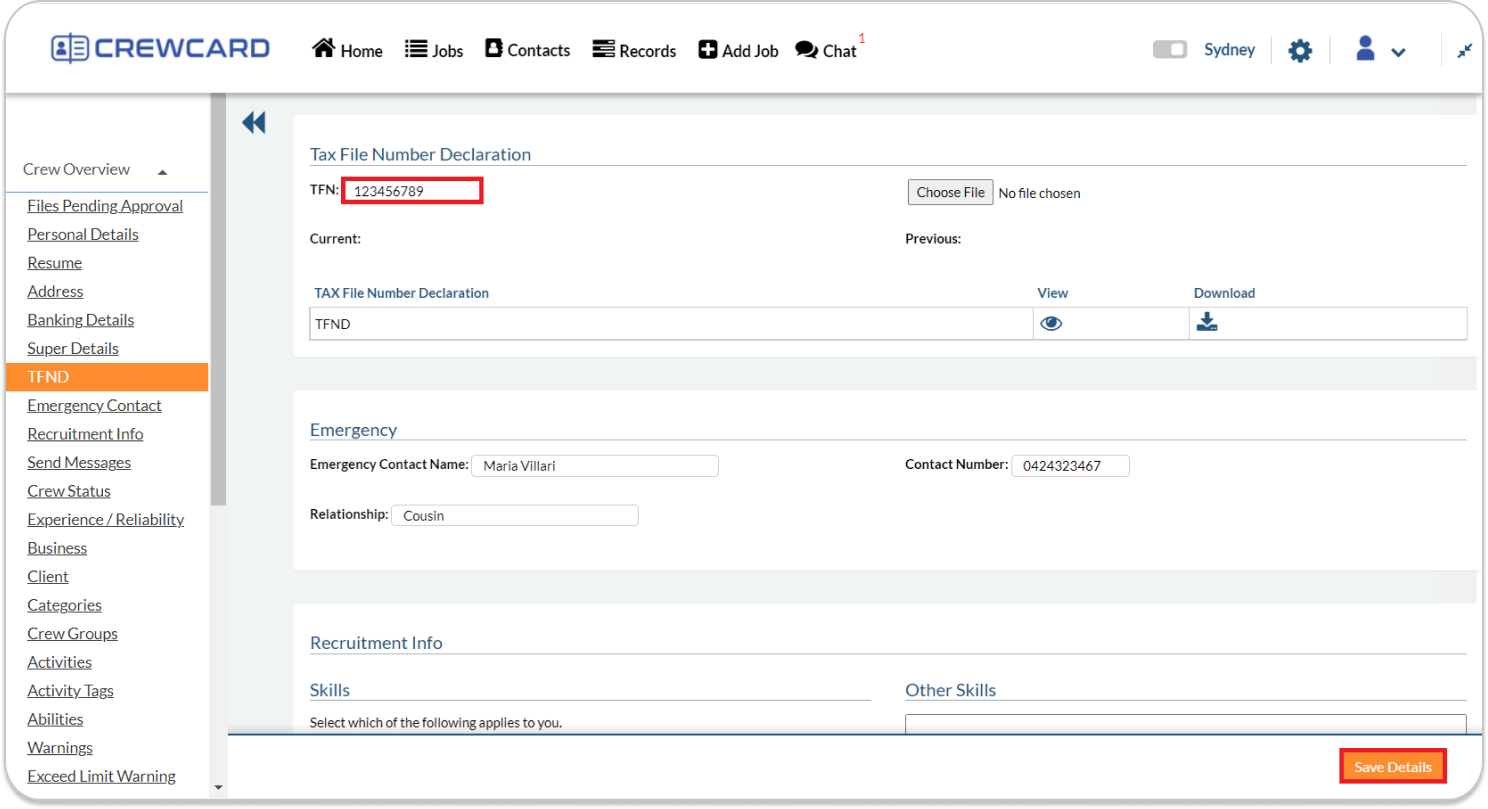
Welcome to the User Guide for CrewCard! In this comprehensive guide, we’ll walk you through the essential steps to efficiently manage your activities, crew, clients, bookings and scheduling. Whether you’re a seasoned professional or just getting started, this breakdown will provide you with the necessary tools and guidance to simplify your workflow and maximise productivity. Let’s dive in and explore how CrewCard can revolutionise the way you manage your personnel and operations.
**NOTE:Sometimes, we may include the navigation journey to help you find the feature quickly. See example below:
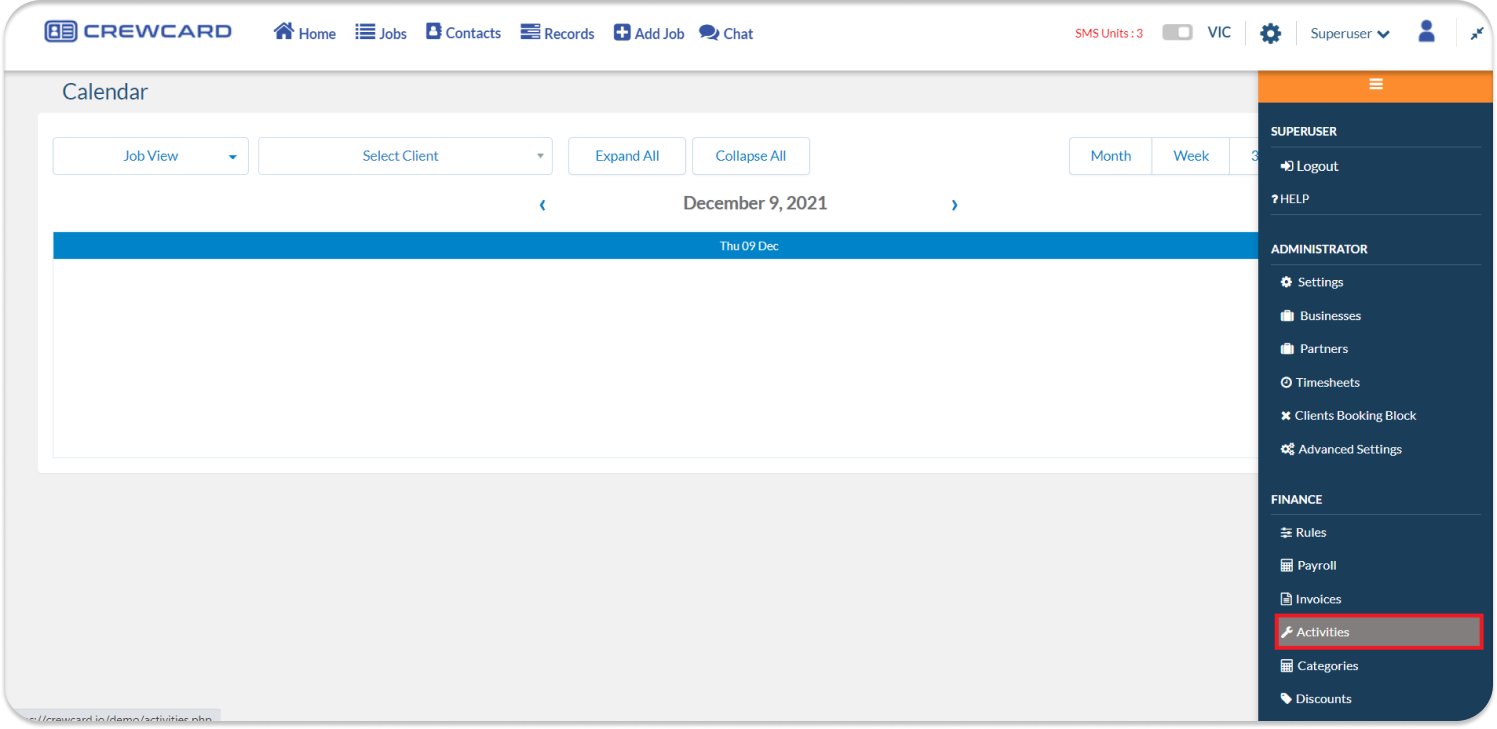
Journey: Admin Menu > Finance > Activities
That means you’ll first need to click on ‘Admin Menu’, then find the button that says ‘Finance’ and finally click on ‘Activities’ to help you navigate to the page you need!
Let’s Get Started!Step 1:Add Activities (roles, skills)
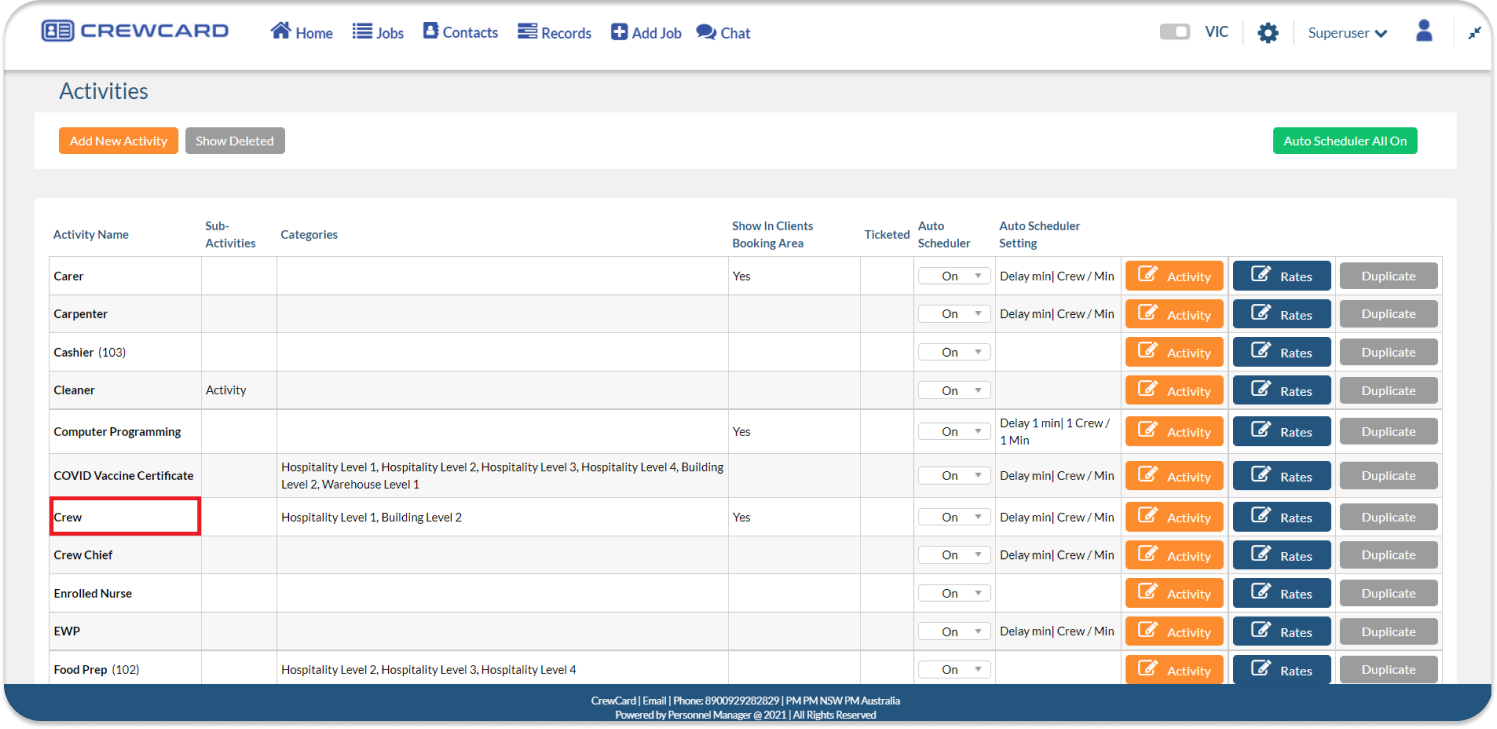
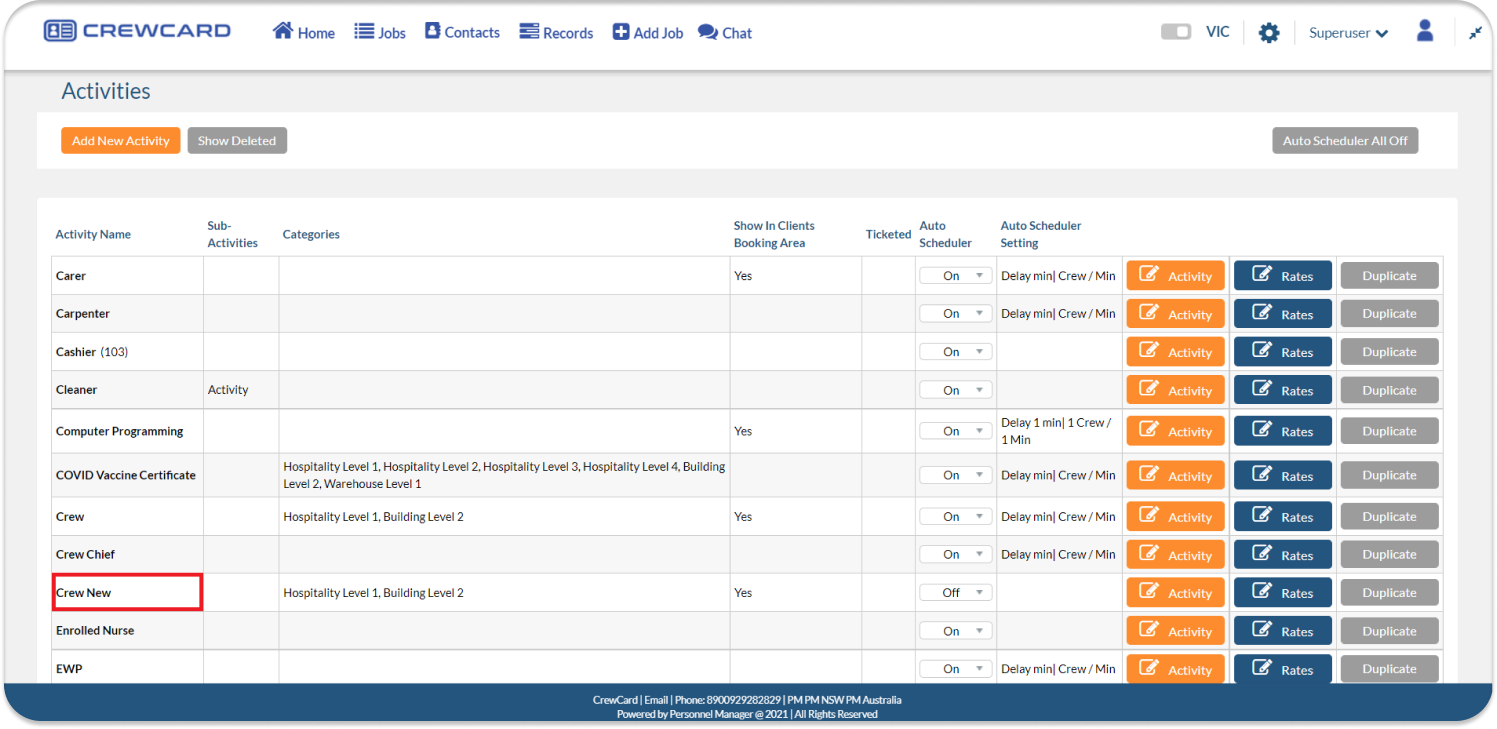
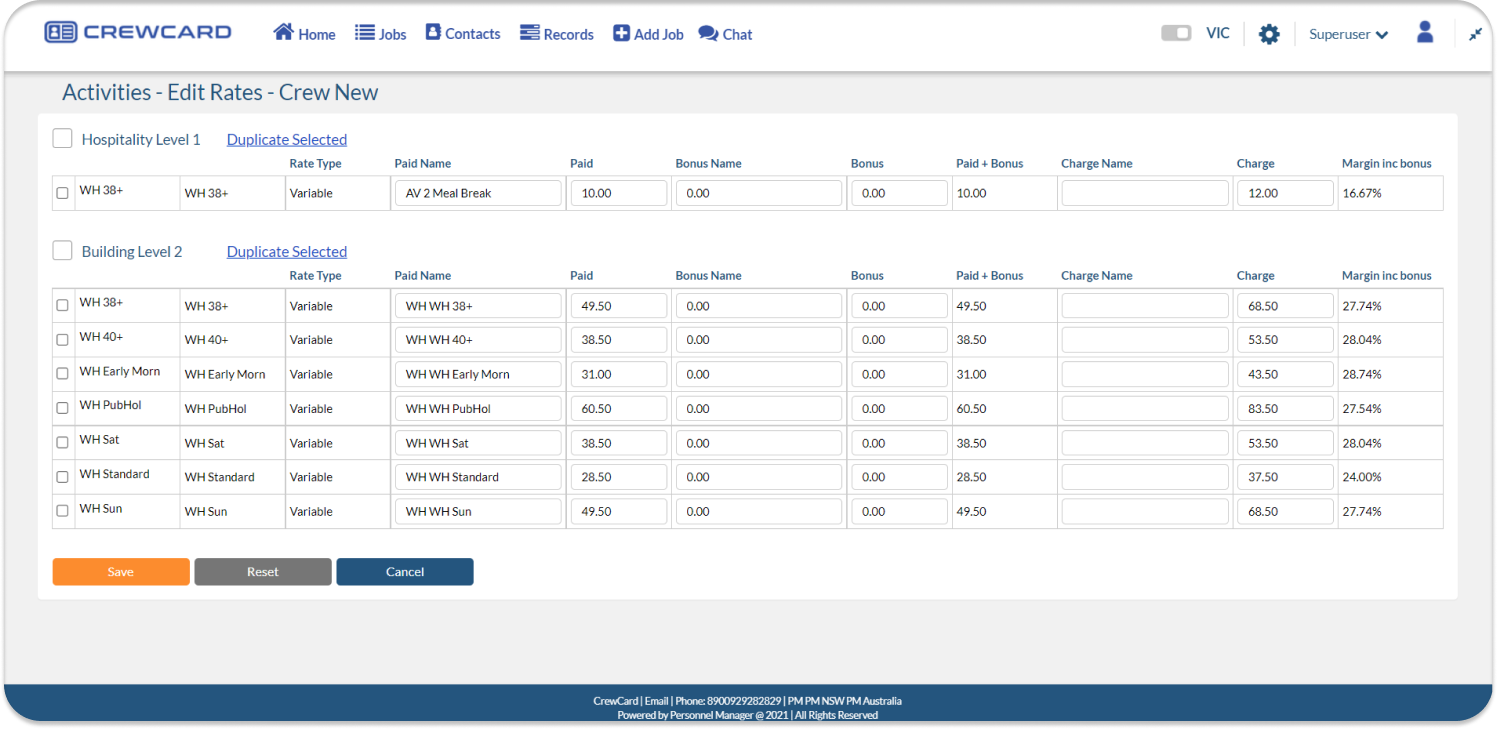
The feature ‘Activity’ standardises a particular skill or role. Admins and Managers can set conditionals, such as rates, inductions, minimum calls, auto-scheduler, etc., to streamline scheduling management.
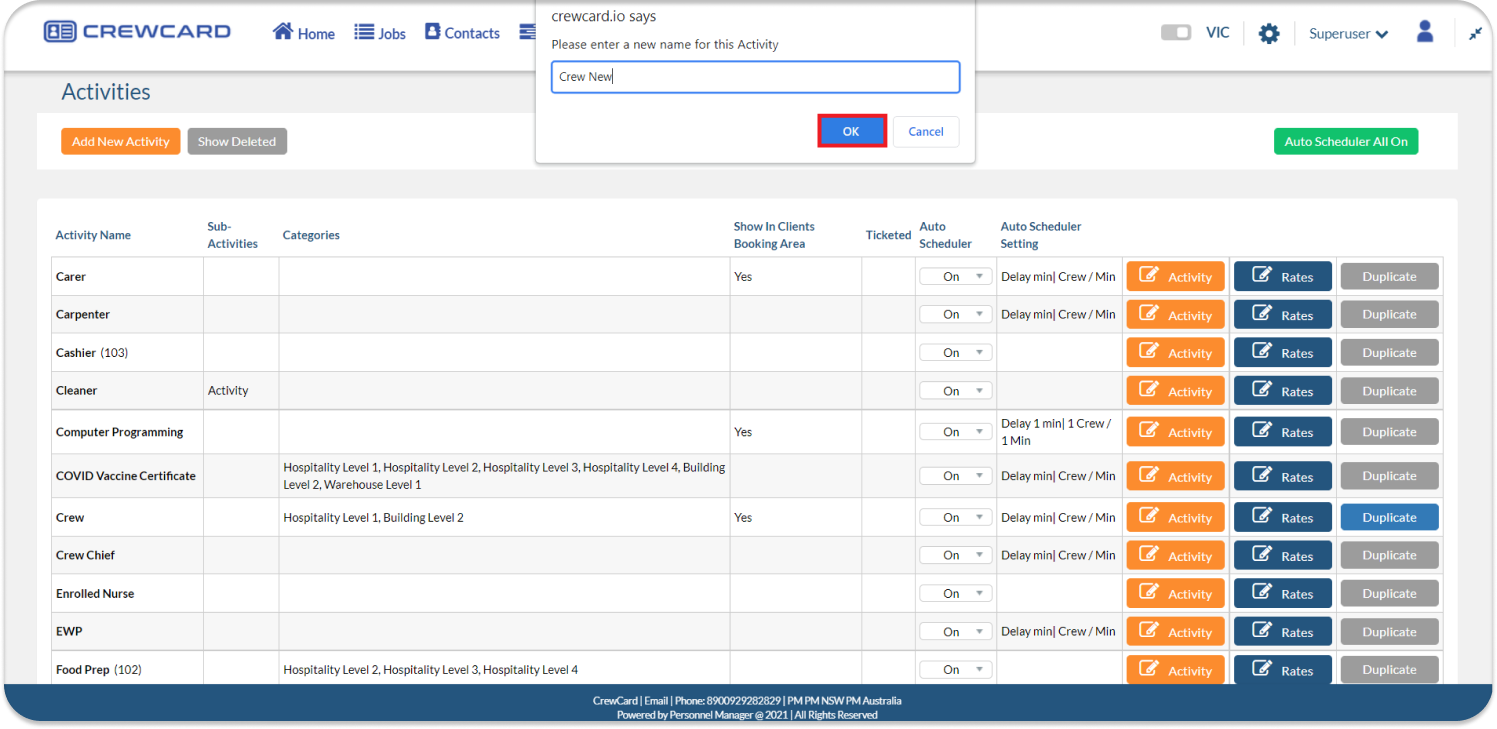
To add a new activity, find the Activity page and click “Add New Activity”.
Journey: Admin Menu > Finance > Activities > Add New Activity
Fill out the form and once completed click “Save” button.
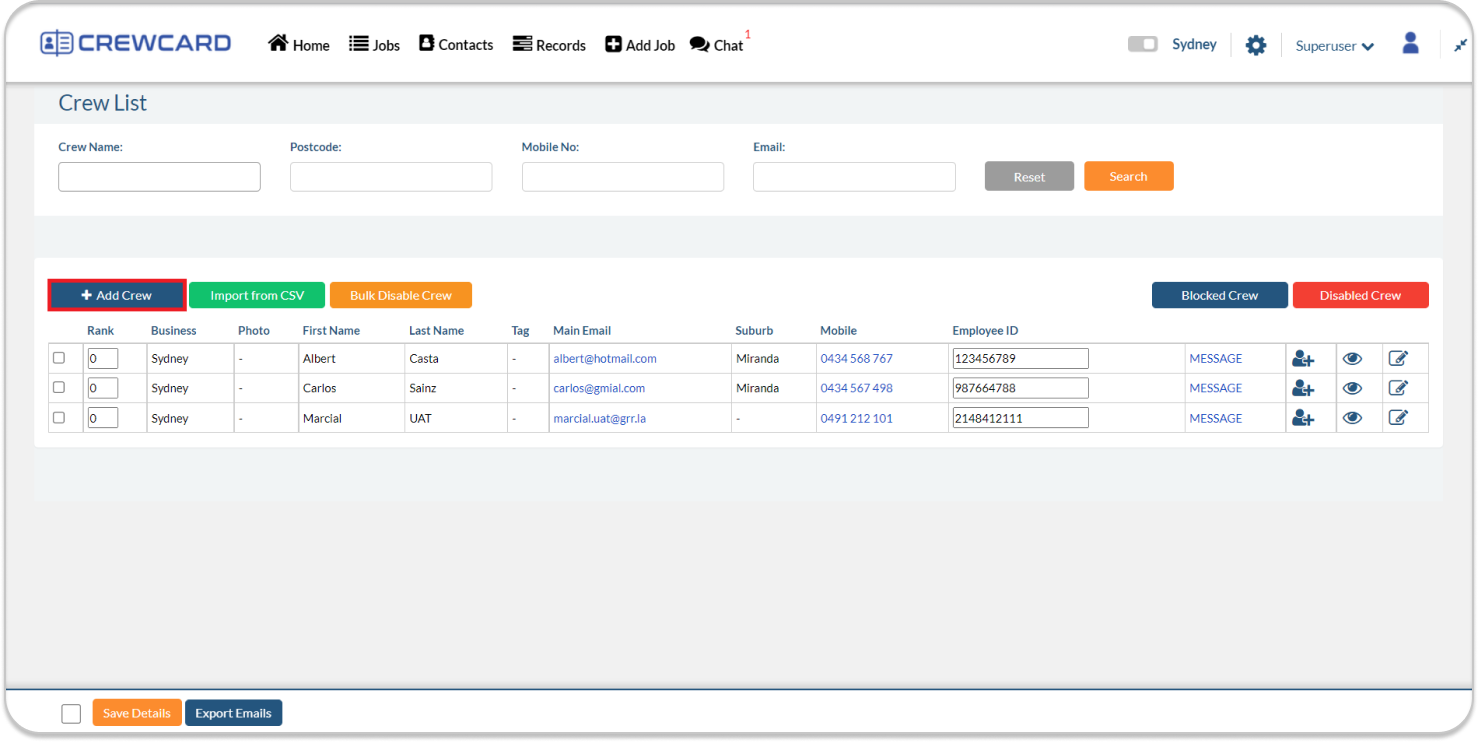
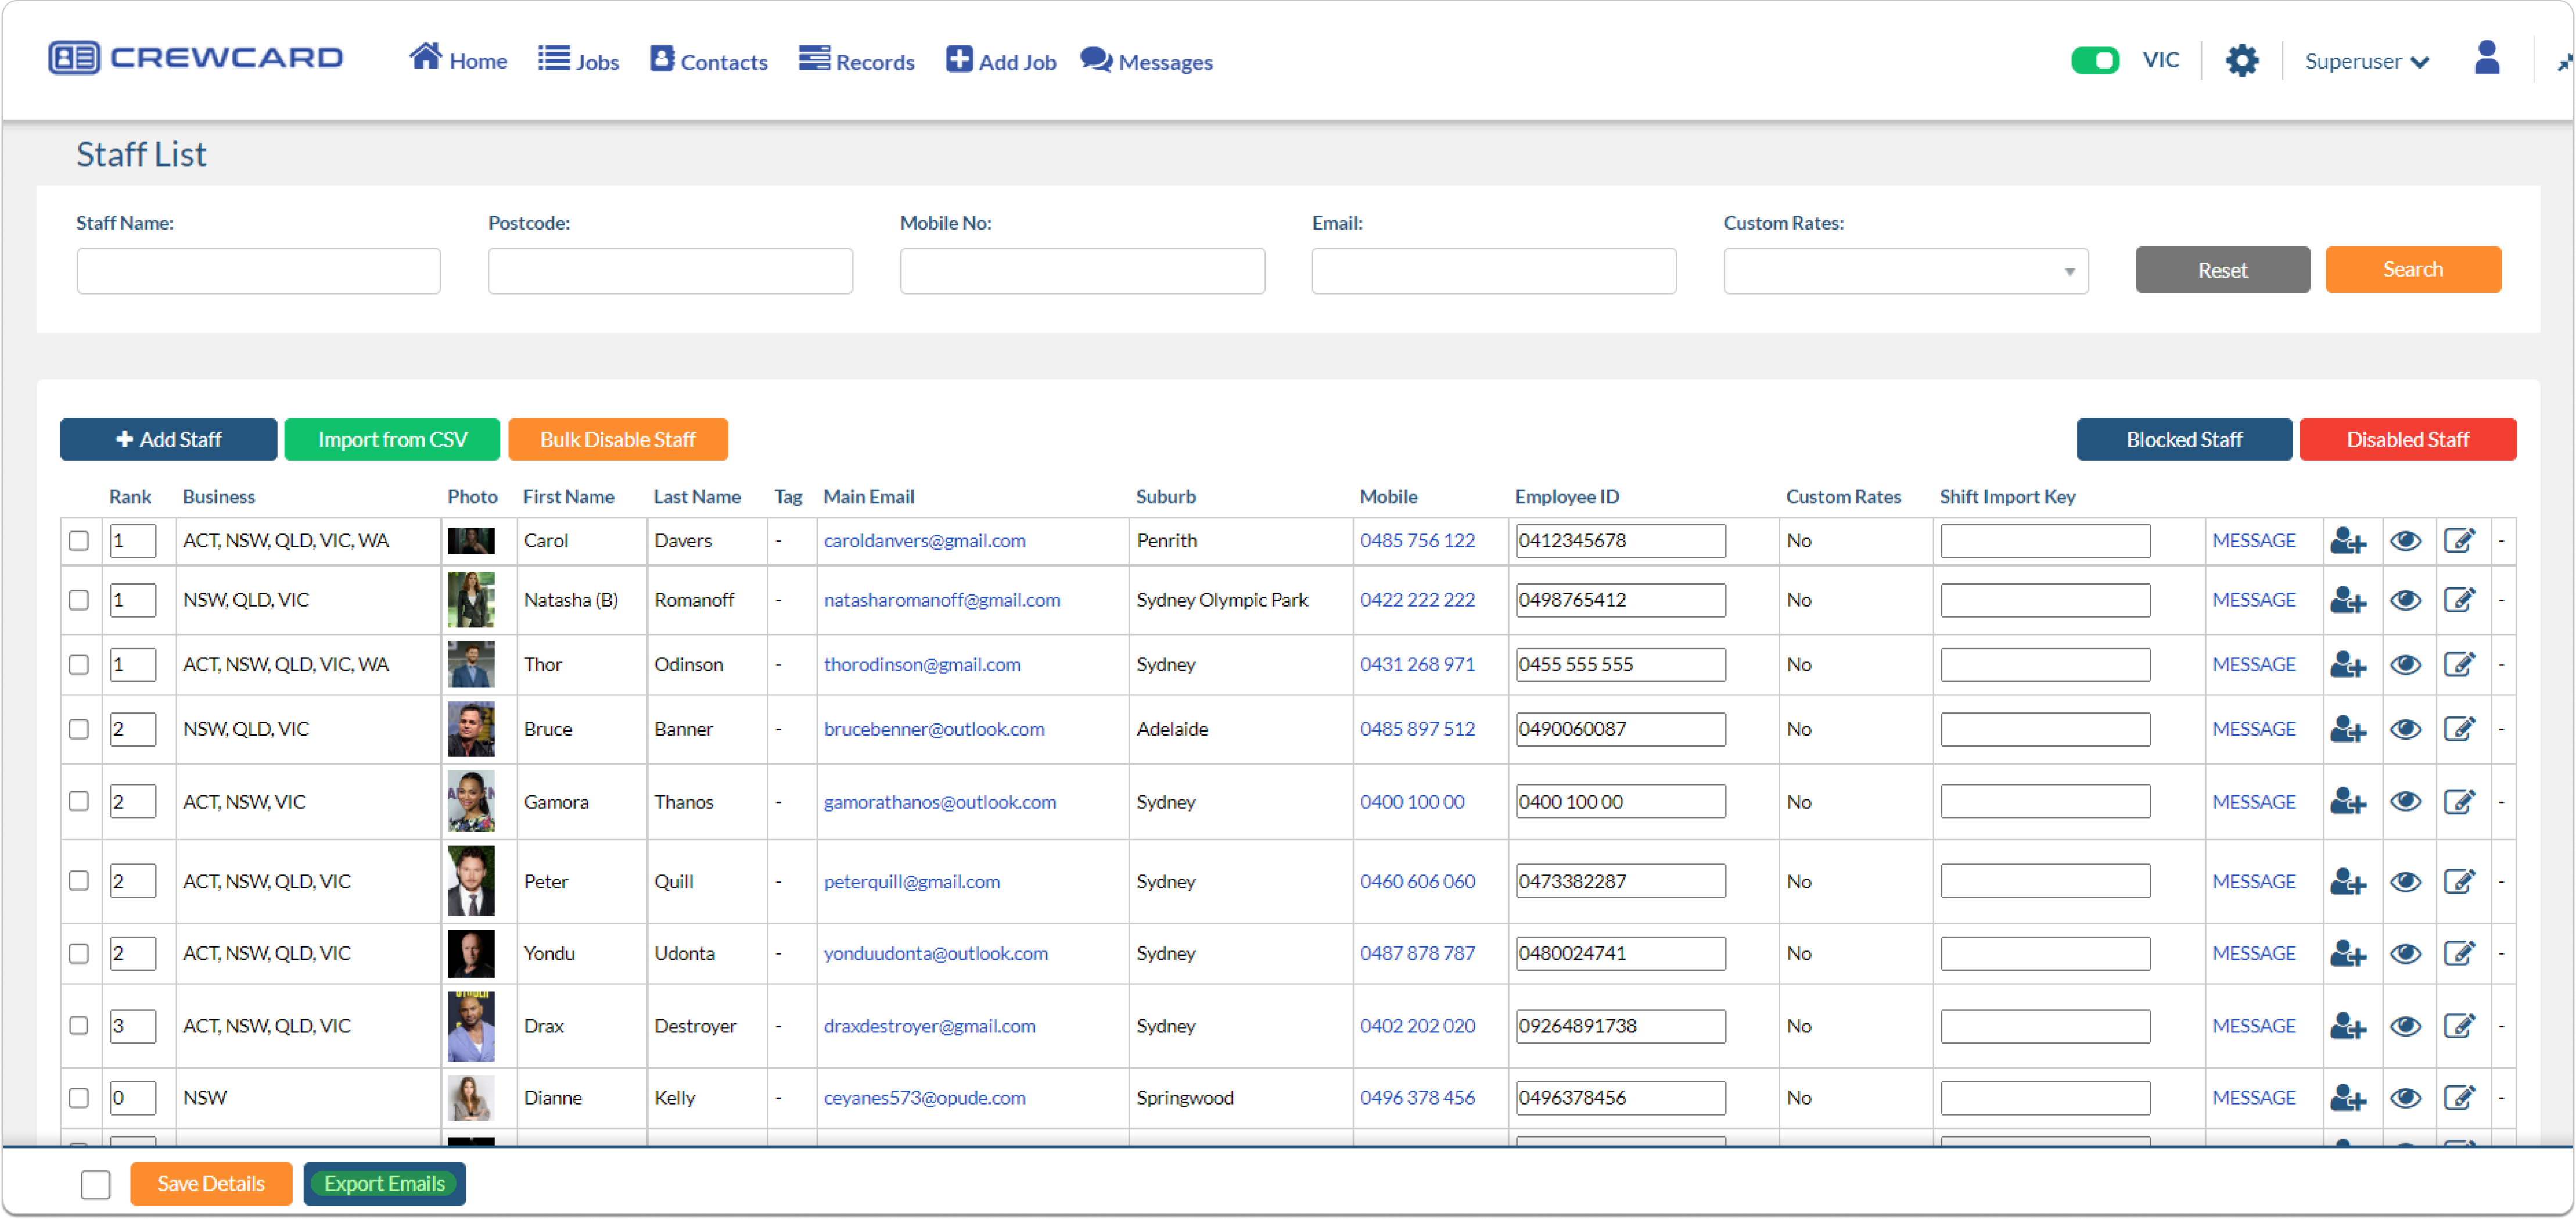
Step 2: Add Crew
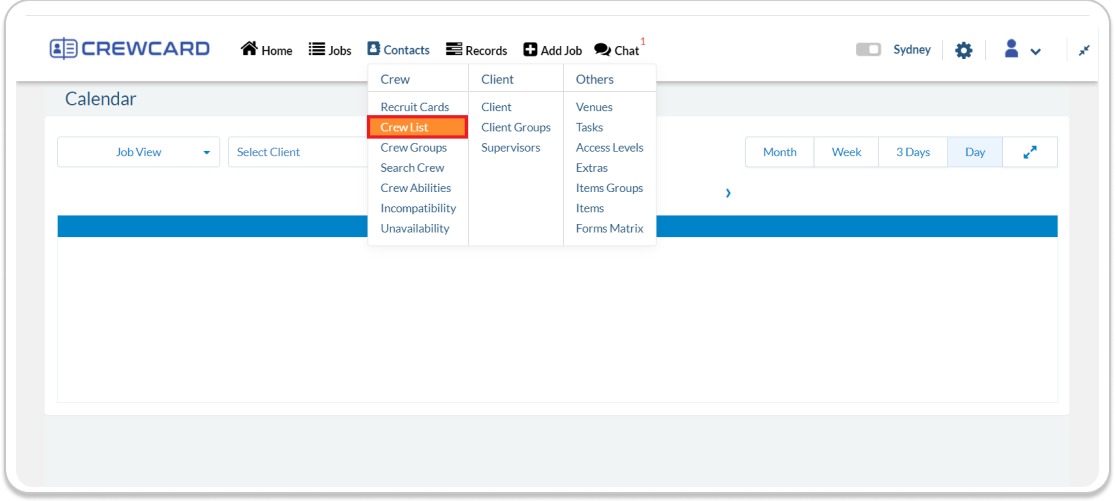
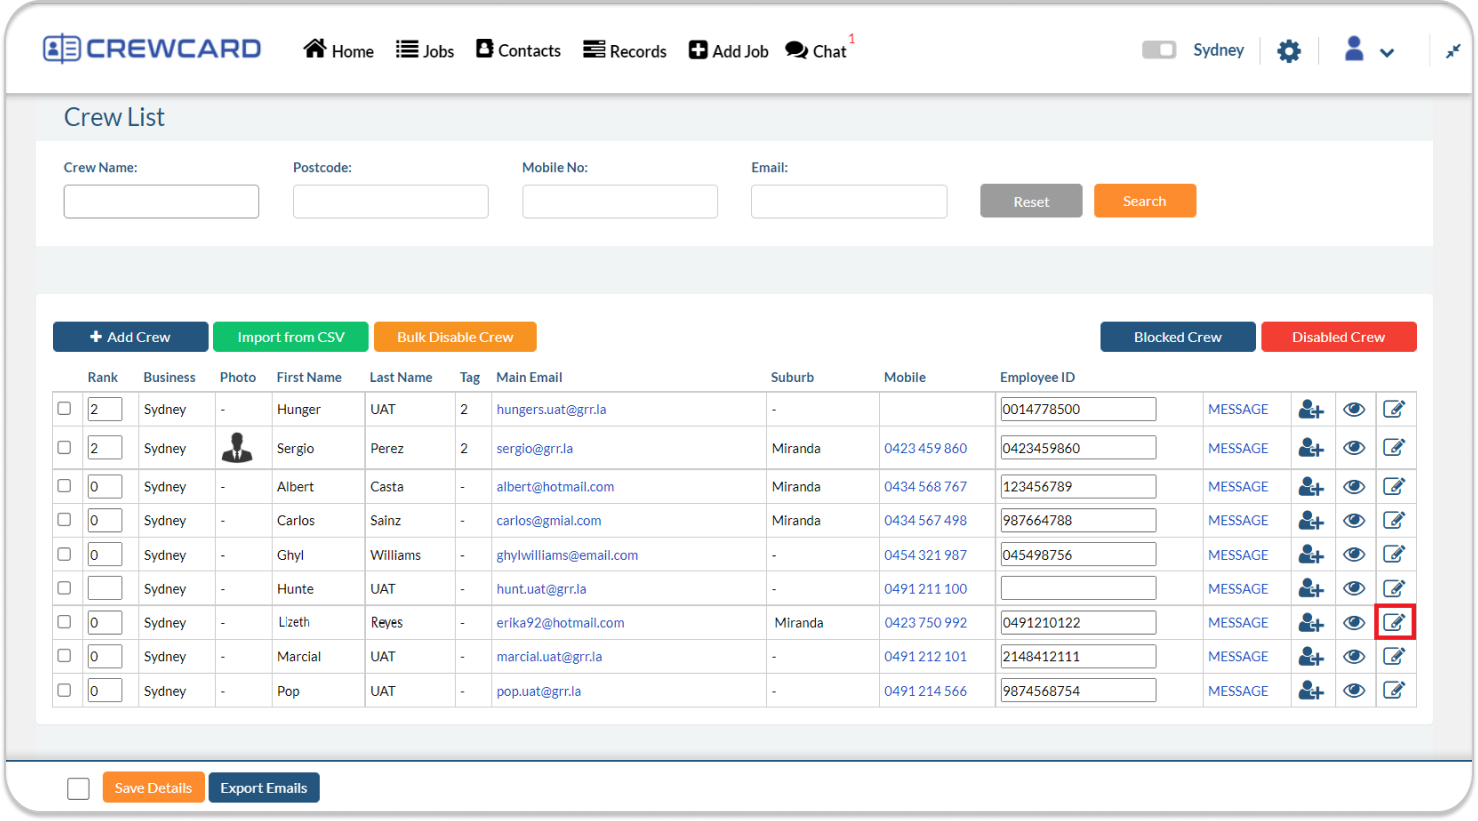
In order to assign jobs to your employees, admins and managers will need to add employees to the ‘Staff/Crew List’.
Hover your cursor over the “+ Add Staff” option in Contacts Menu.
Journey: Contacts > Add Staff/Crew
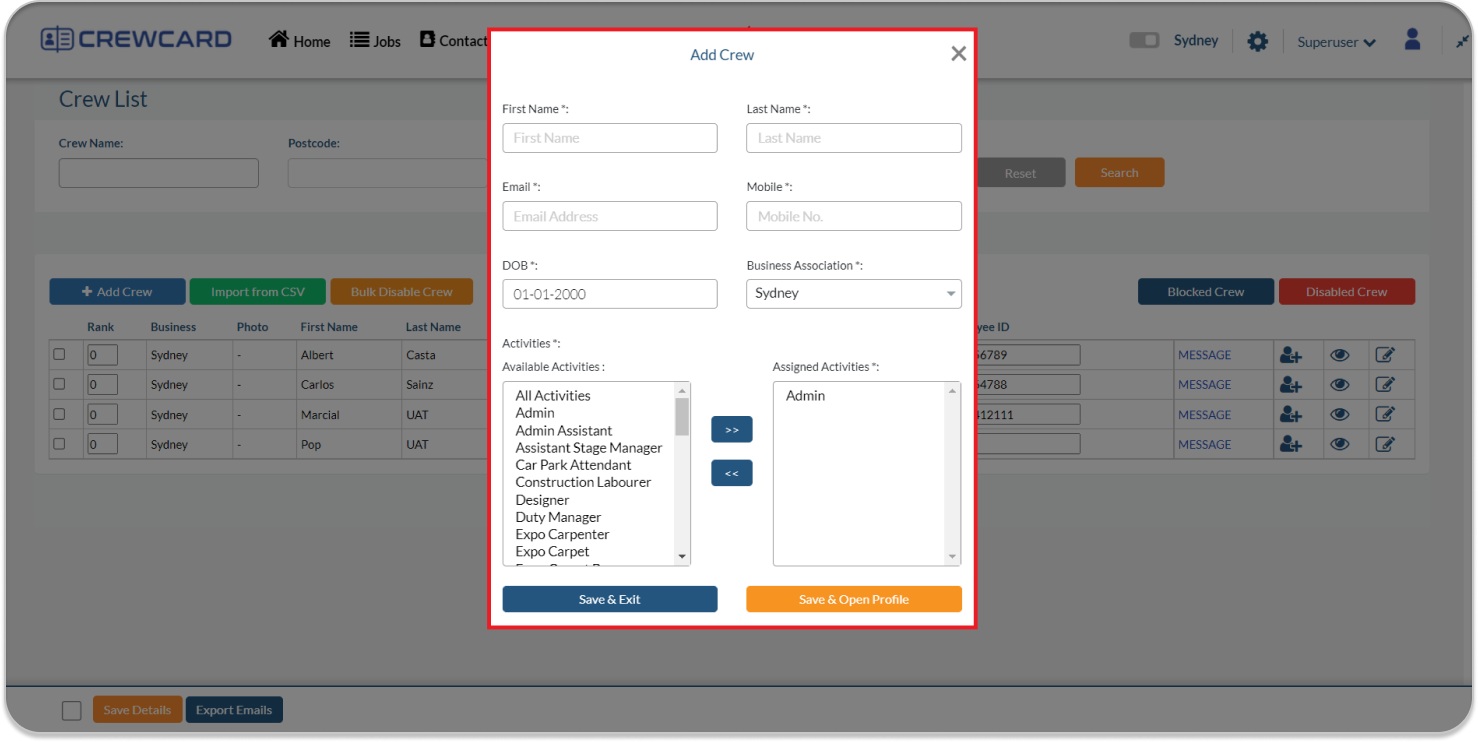
‘Add Staff/Crew’ Window will open.
Enter the staff details and use the arrow buttons to select their activities. The activities available in the list are from the ones uploaded through the settings.
Once you have entered the information, you have the option to select either ‘Save & Exit’ or ‘Save & Open Profile’ to continue setting up the employee’s profile.
Step 3:Add Clients (may be actual clients or internal managers at your company)
Admins and Managers may add clients to the ‘Client List’ for Customer relationship management (CRM). In some cases, this feature may be referred to as ‘Project Manager’ instead of ‘Client’ to suit your organisation’s structure.
Click on the button labeled “Add Client or Add Project Managers“.
Journey: Contacts > Add Client
Fill in the client’s details and generate their login credentials. It is recommended to utilise the client’s number if they haven’t specified a password. Clients have the autonomy to modify their passwords via their personal account.
Map All Crew to this Client – When creating a new client, you can tick the “Map All Crew to This Client” checkbox to automatically assign existing crew to the new client.
Note: If a crew member’s profile is later updated from “All Clients” to a limited list, only the clients selected at the time of mapping will appear. This ensures only intentionally assigned clients are included.
Select ‘Save & Exit’ to go back to the client list, or opt for ‘Save & Open Profile’ to directly access the Client Profile.
Step 4: Add Jobs
The ‘Add Job’ feature enable admin and managers to add multiple shifts for one or more staff members on various dates. The jobs are to be scheduled on specific dates within designated start and end times. This feature is commonly used for rosters.
Hover your cursor over the “Add Job” option on the CNB (Central Navigation Bar) and proceed to click on “Add Job”.
Journey: Add Job > Add Job
A window labeled ‘Add Job’ will appear. Choose the client from the list and click on the ‘Next’ button.
This action will direct you to a new page titled “Add Booking’. Proceed to complete all required fields.
Once all fields are filled, click on the ‘Next’ button.
You’ll then be redirected to the ‘Job Details’ page, where individual shift information is displayed. You have the option to edit any necessary details.
After clicking “Next”, you’ll be directed to an overview of the job.
Click “Next” again to proceed to the “Final Info” page.
Finally, click “Confirm Booking” to create the job.
A confirmation message will appear, including the job reference number for your records.
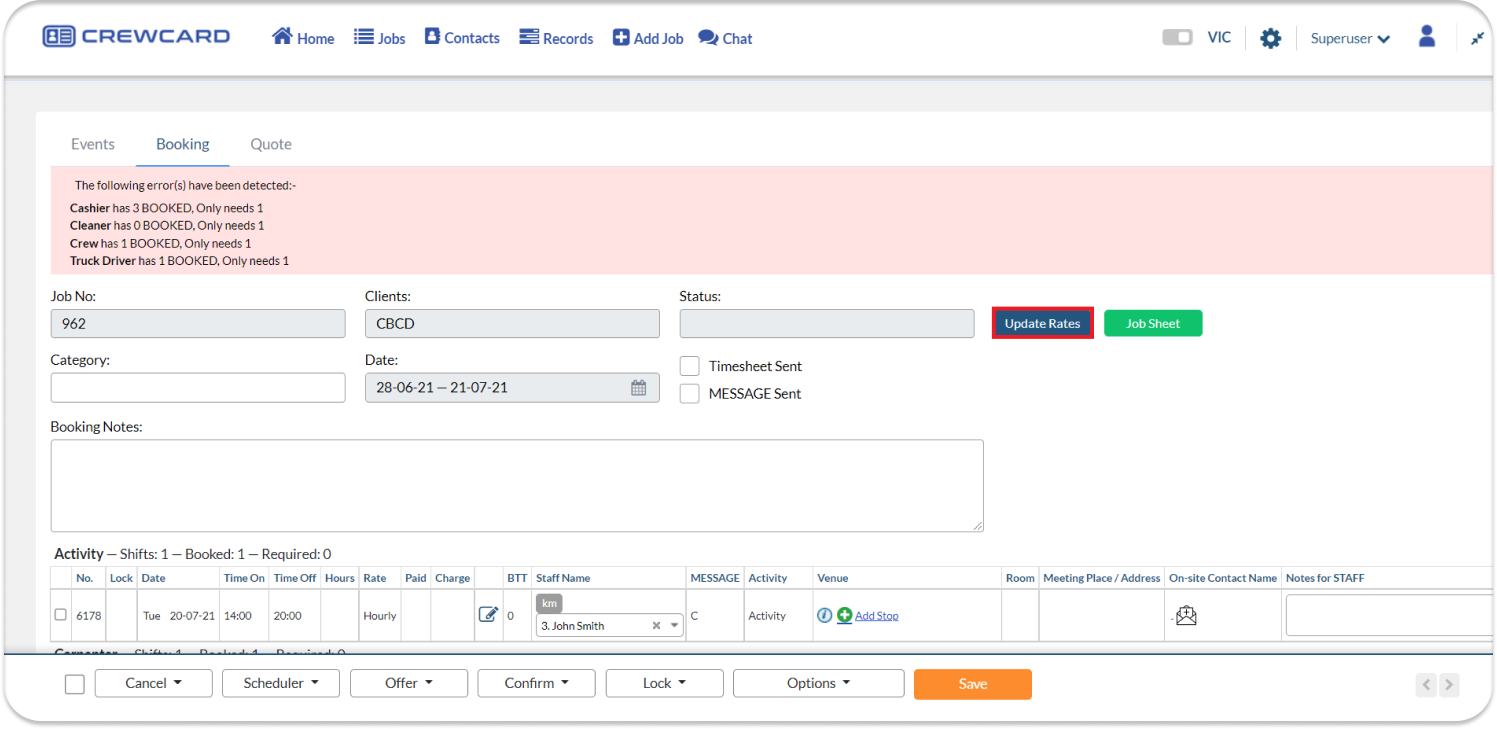
Step 5:Open Job Sheet or Shifts Page to schedule shifts
After successfully creating the booking or job, click the provided link (e.g. AA Enterprise 2299 14-04) to open the JobSheet page.
This will allow you to access and review all the details and information about the newly created booking or job. Choose the shifts you wish to assign and utilise the Scheduler button to manage them effectively.
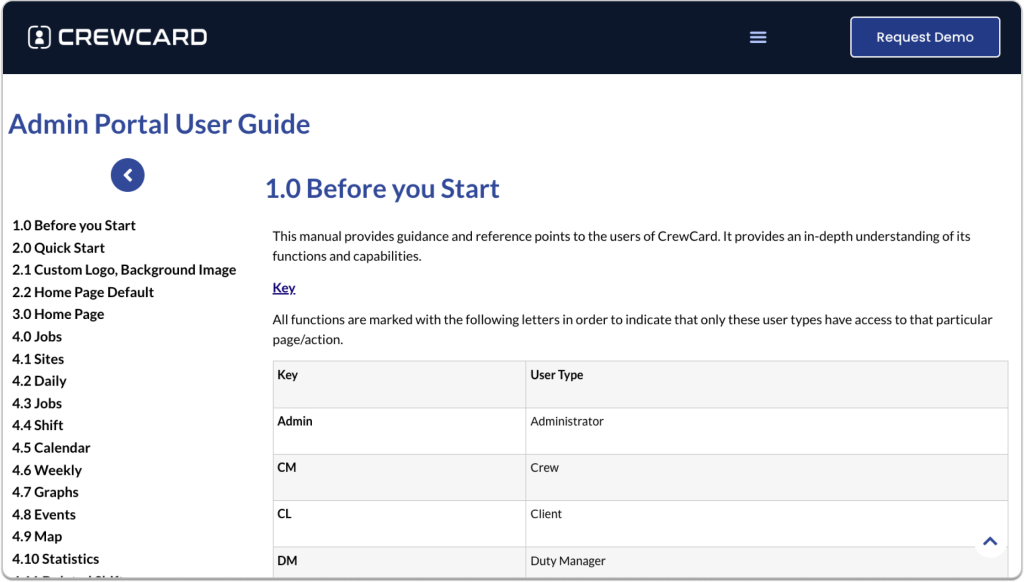
This manual provides guidance and reference points to the users of CrewCard. It provides an in-depth understanding of its functions and capabilities.
Key
All functions are marked with the following letters in order to indicate that only these user types have access to that particular page/action.
Key
User Type
Admin
Administrator
CM
Crew
CL
Client
DM
Duty Manager
TL
Team Leader
CNB – Central Navigation Bar
The Central Navigation Bar is located at the top of the page.
Hover your mouse over the icons to show dropdown menu lists. See sample below:
Drop Down Menu Features: Jobs
Sites
Daily
Jobs
Shifts
Groups
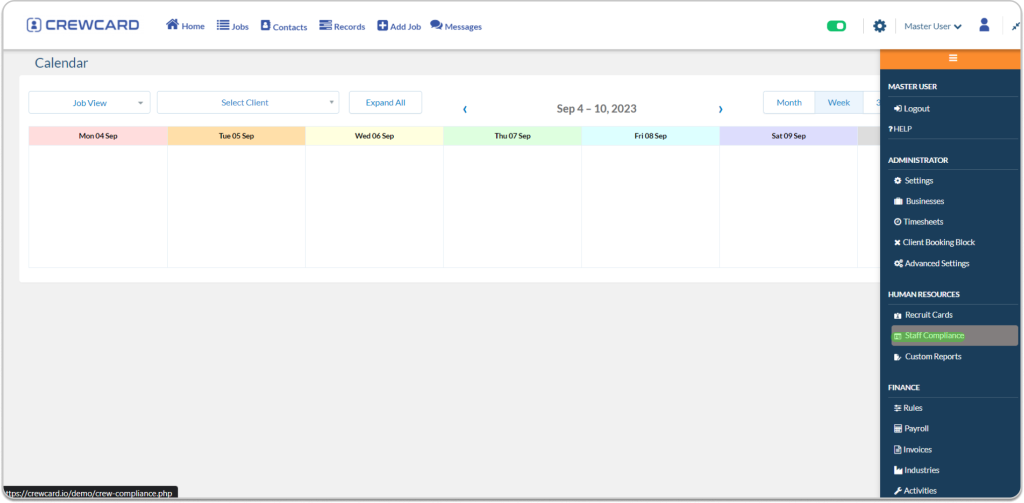
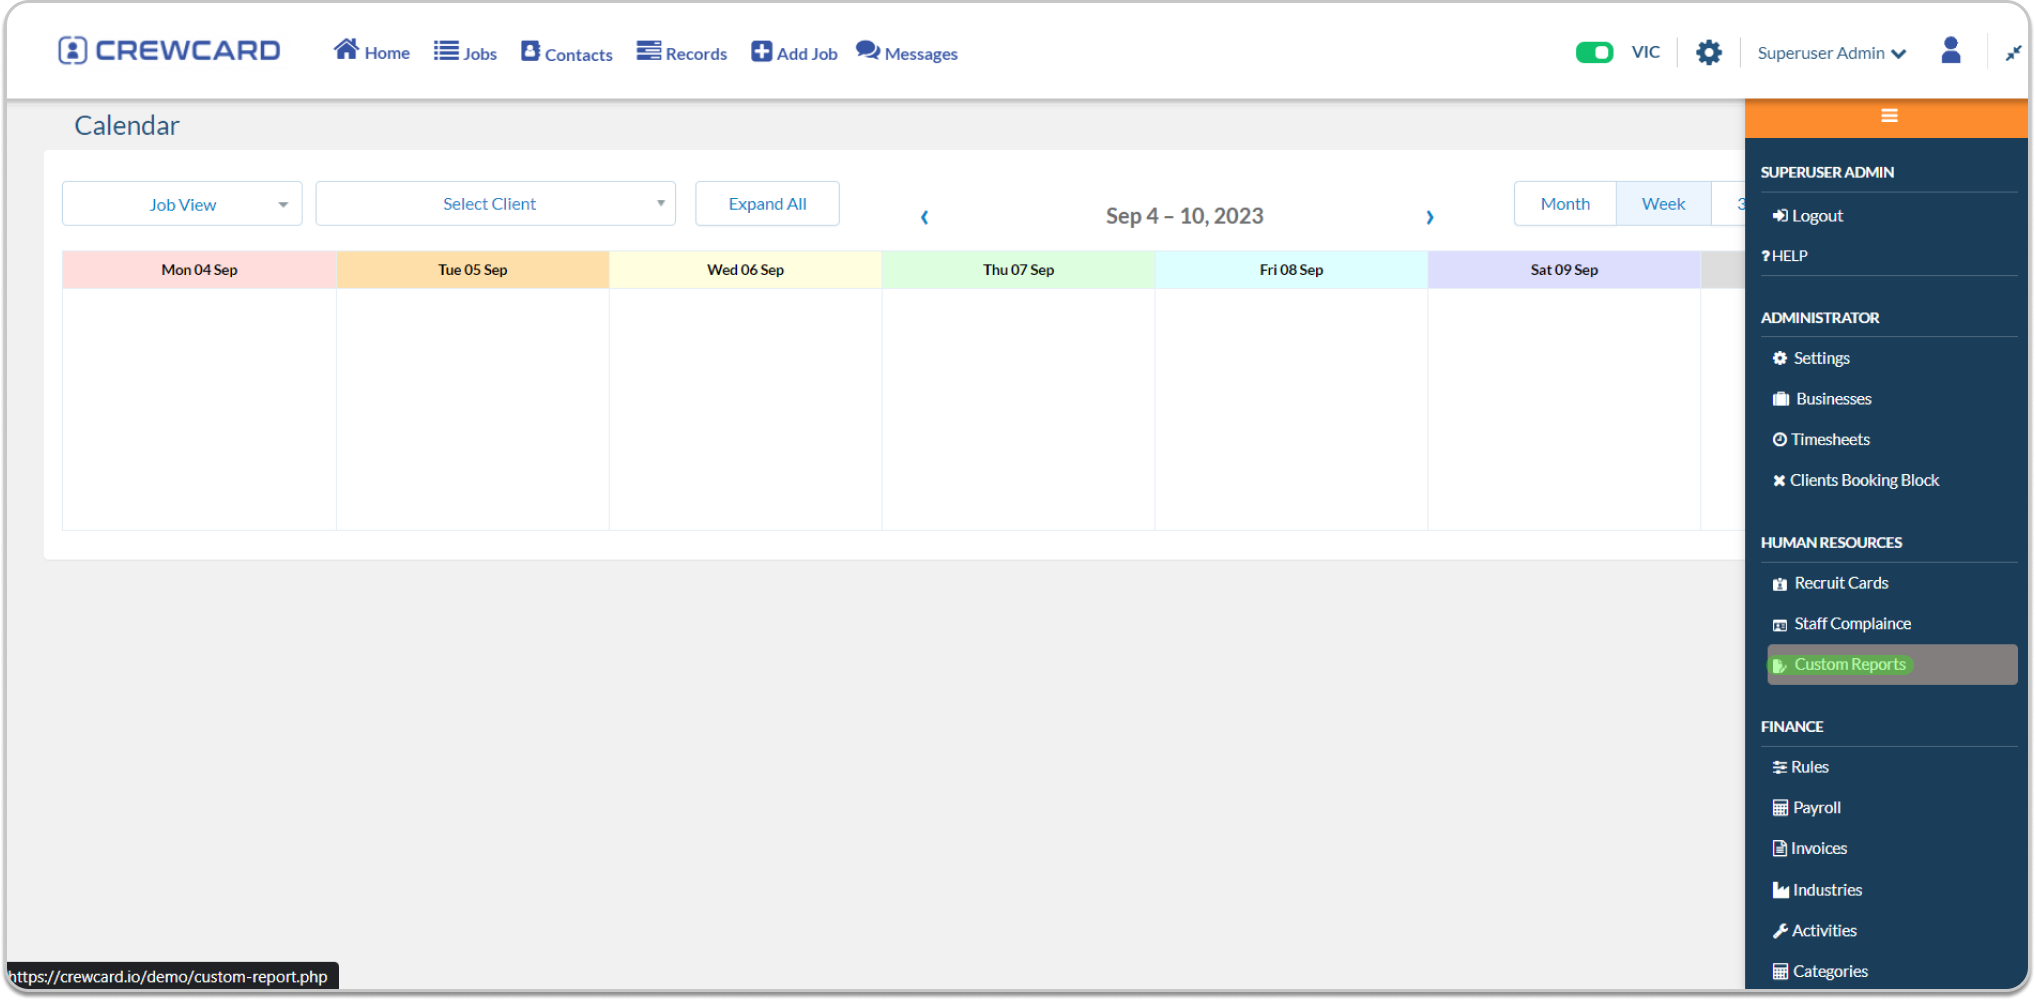
Calendar
Crew
Weekly
Graphs
Events
Maps
Statistics
Roster
Deleted
Contacts
Crew
Client
Add Crew
Add Client
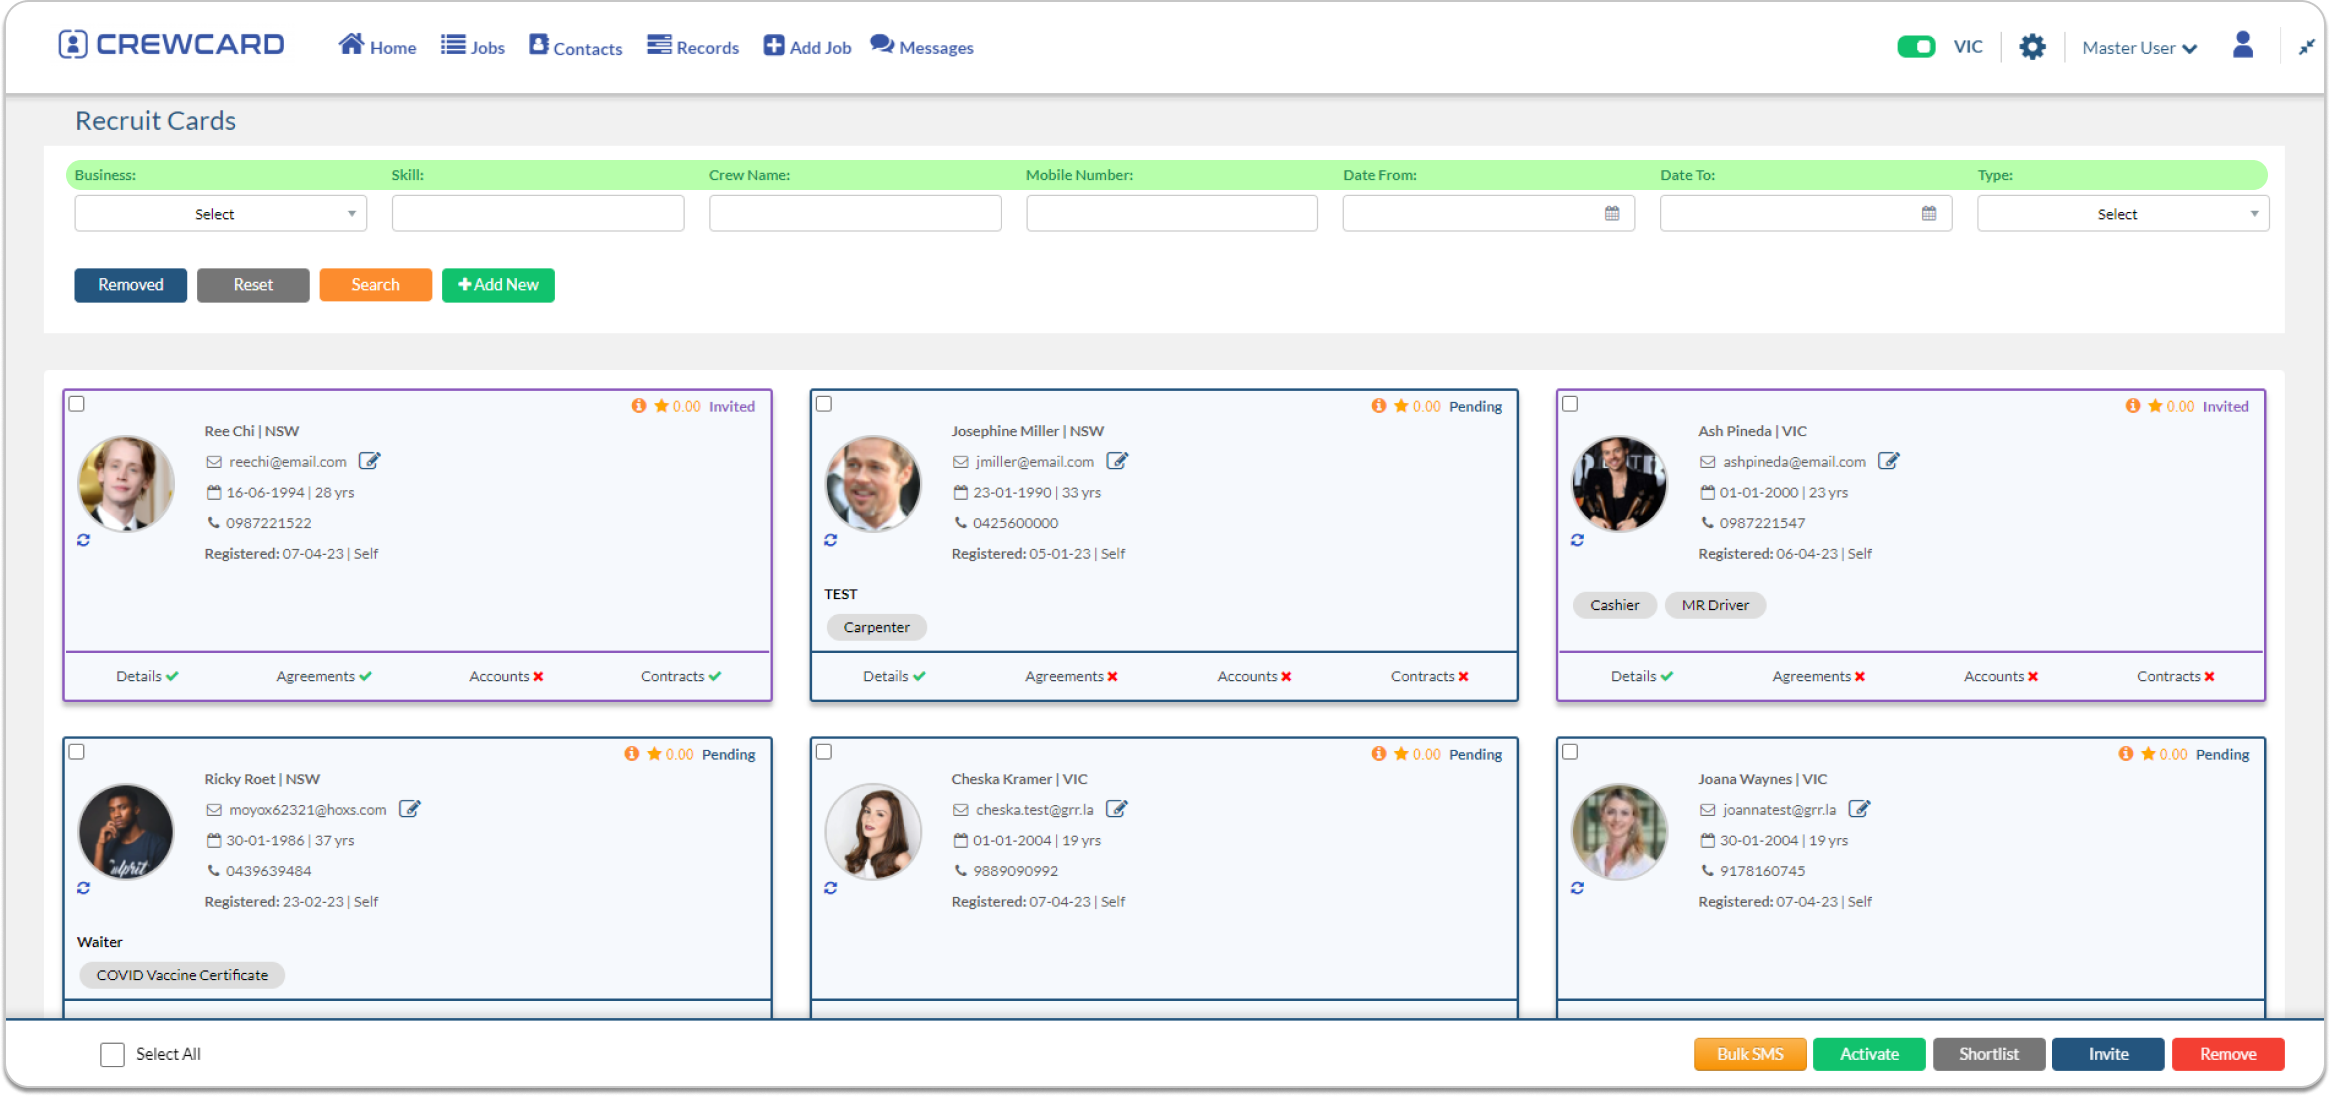
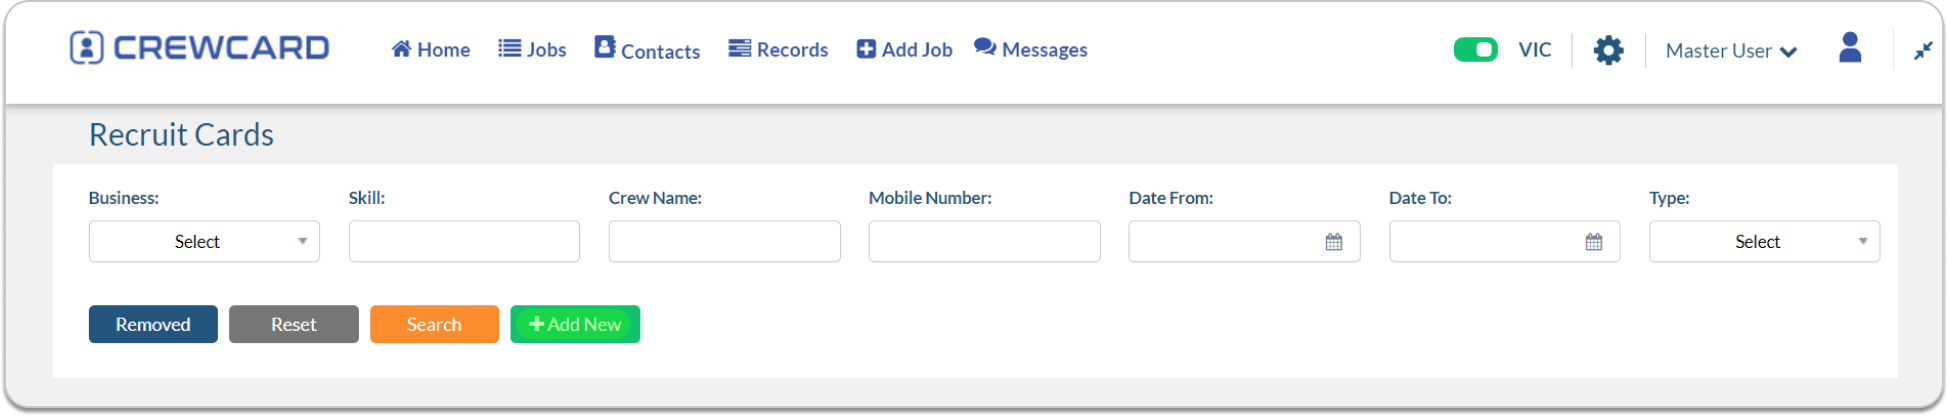
Recruit cards
Client
Crew Compliance
Client Groups
Crew List
Supervisors
Crew Statistics
Preferred Staff
Crew Groups
Search Crew
Crew Abilities
Incompatibility
Unavailability
Records
Messages
Utilities
Others
Logs
Credits
Action Forms
Venues
Shift History
Send SMS/ Notification
Admin Forms
Tasks
Crew Profile Logs
Notification Logs
Processes
Access Levels
App Activity
Message Logs
Inductions
Extras
Bulk Email
Projects
Item Groups
Purchase Credits
Instructions
Items
Send to App Noticeboard
Job Templates
Uniforms
Message Templates
Forms Matrix
Add Job will route you to Add Job screen
Add Job
Add Flexible
Add Shifts
Add Ongoing
Add Group
Add Open
Add Booking
Job Templates
Add Delivery
Add Import
Messages will appear in a corner of the page, allowing you to send messages to various users.
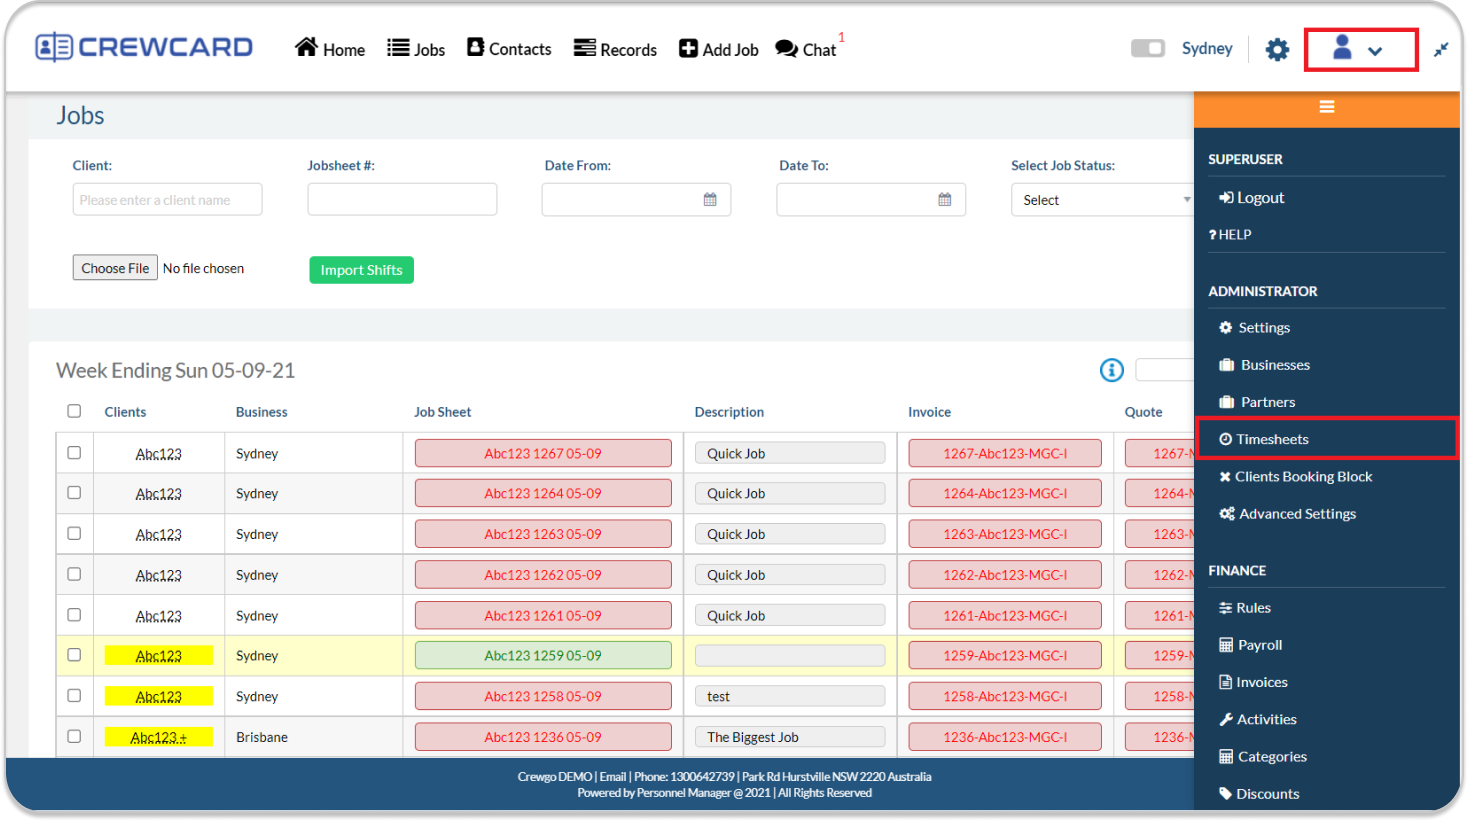
AM – Administration Menu Located on the upper right corner of your screen.
Contains links to the following pages:
SUPERUSER
Administrator
Human Resources
Finance
View All Business
Logout
Settings
Recruit Cards
Billing
On/Off
?Help
Businesses
Crew Compliance
Rules
Partners
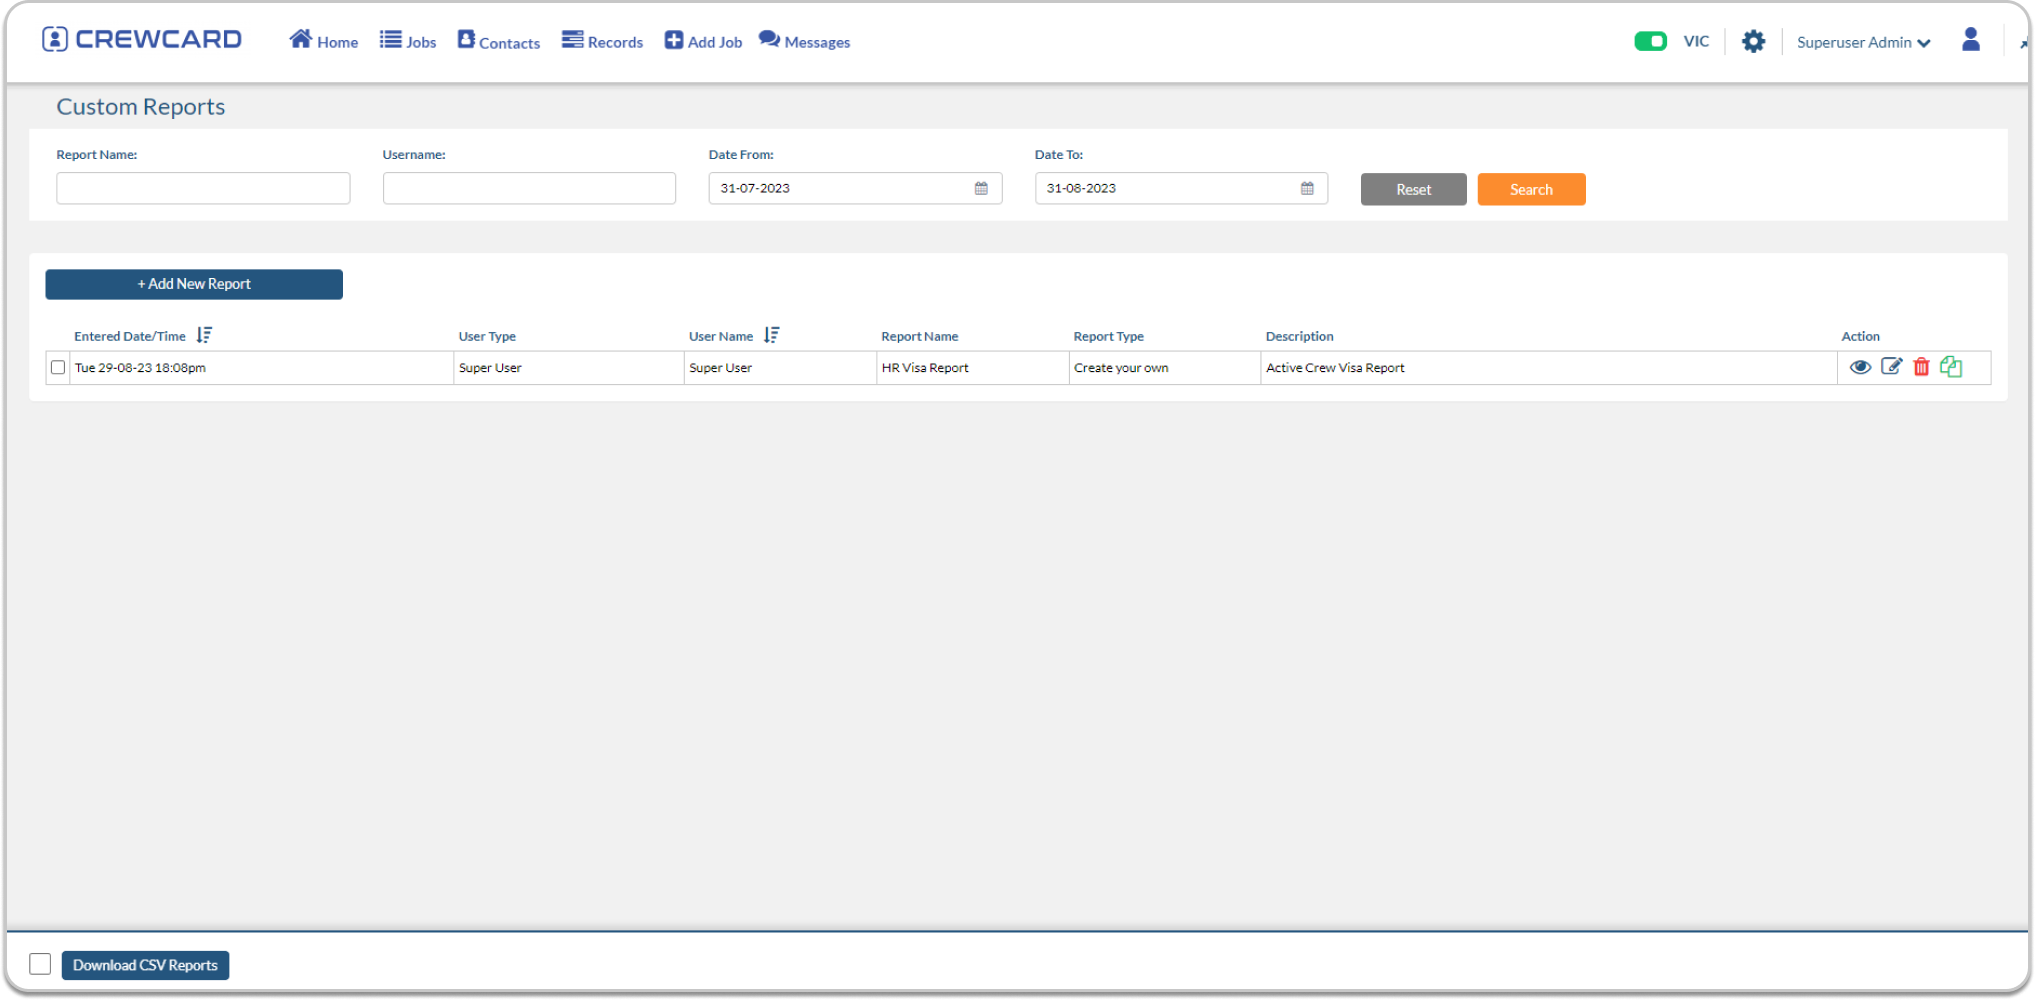
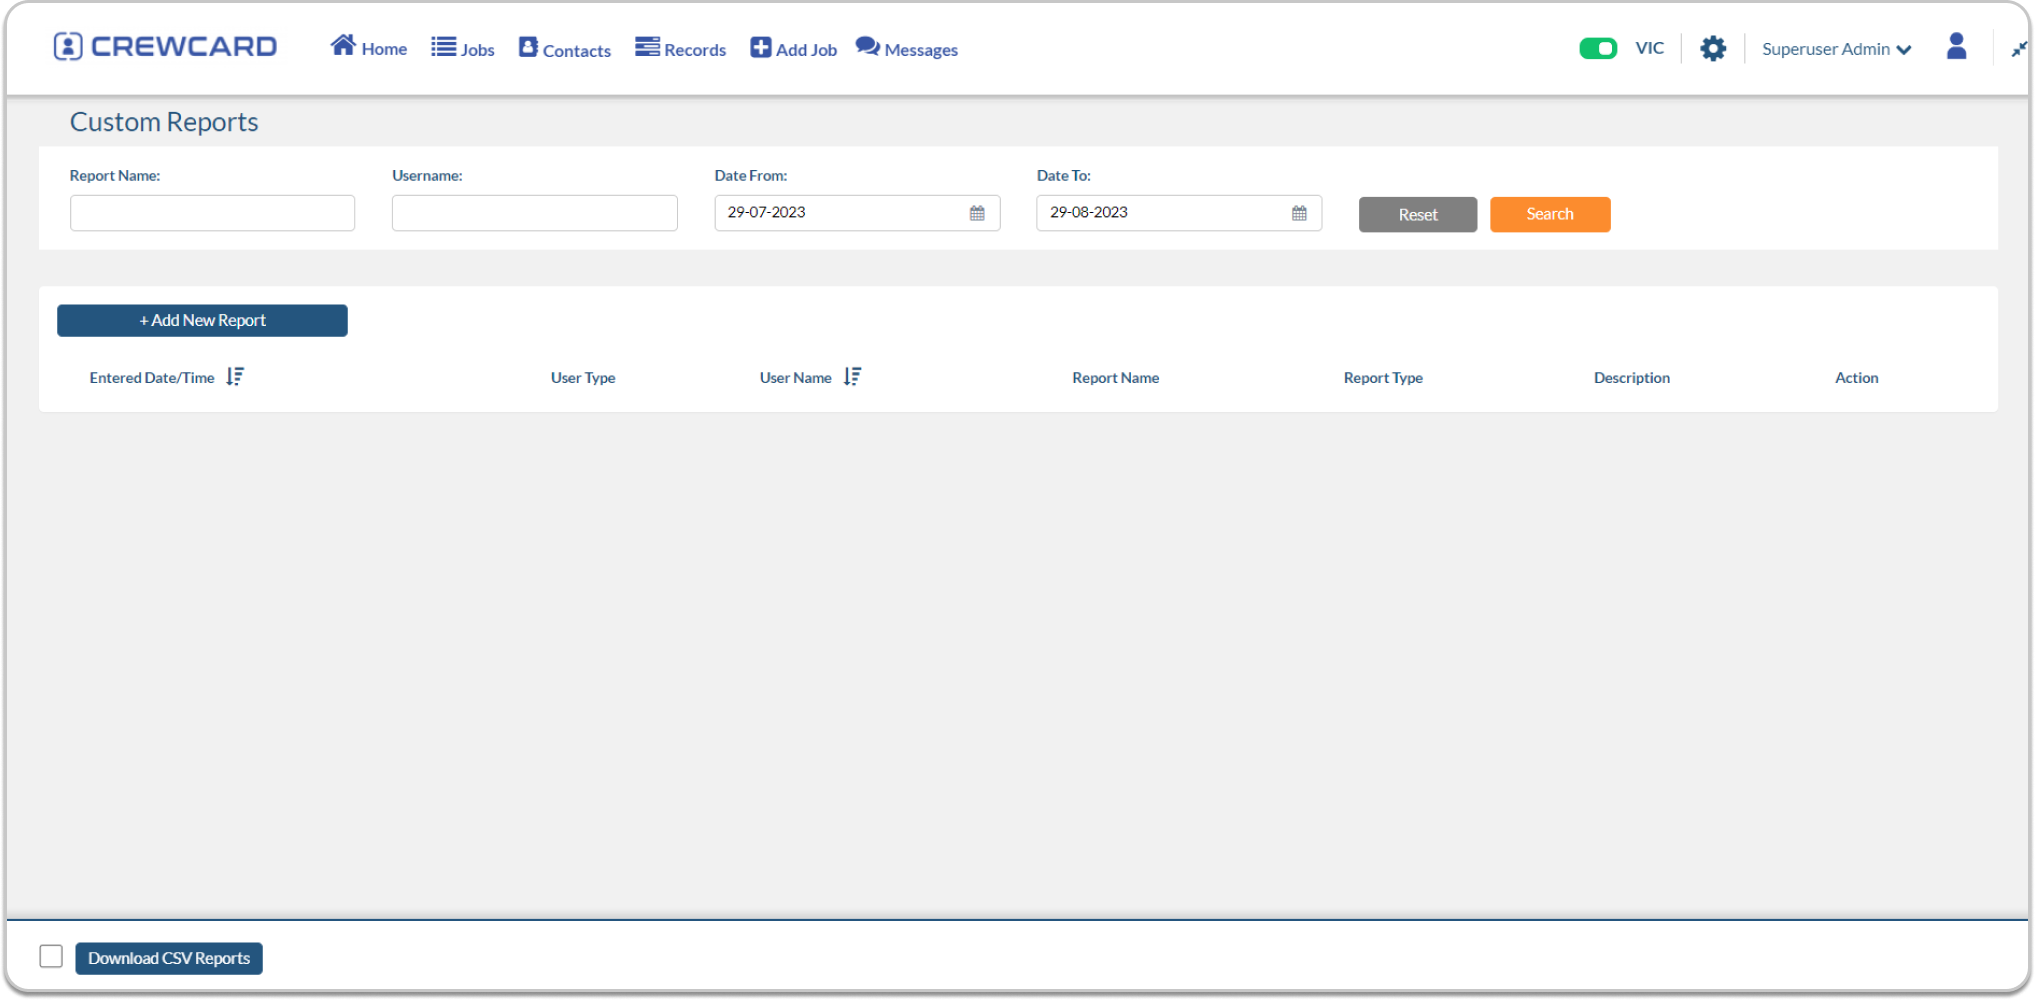
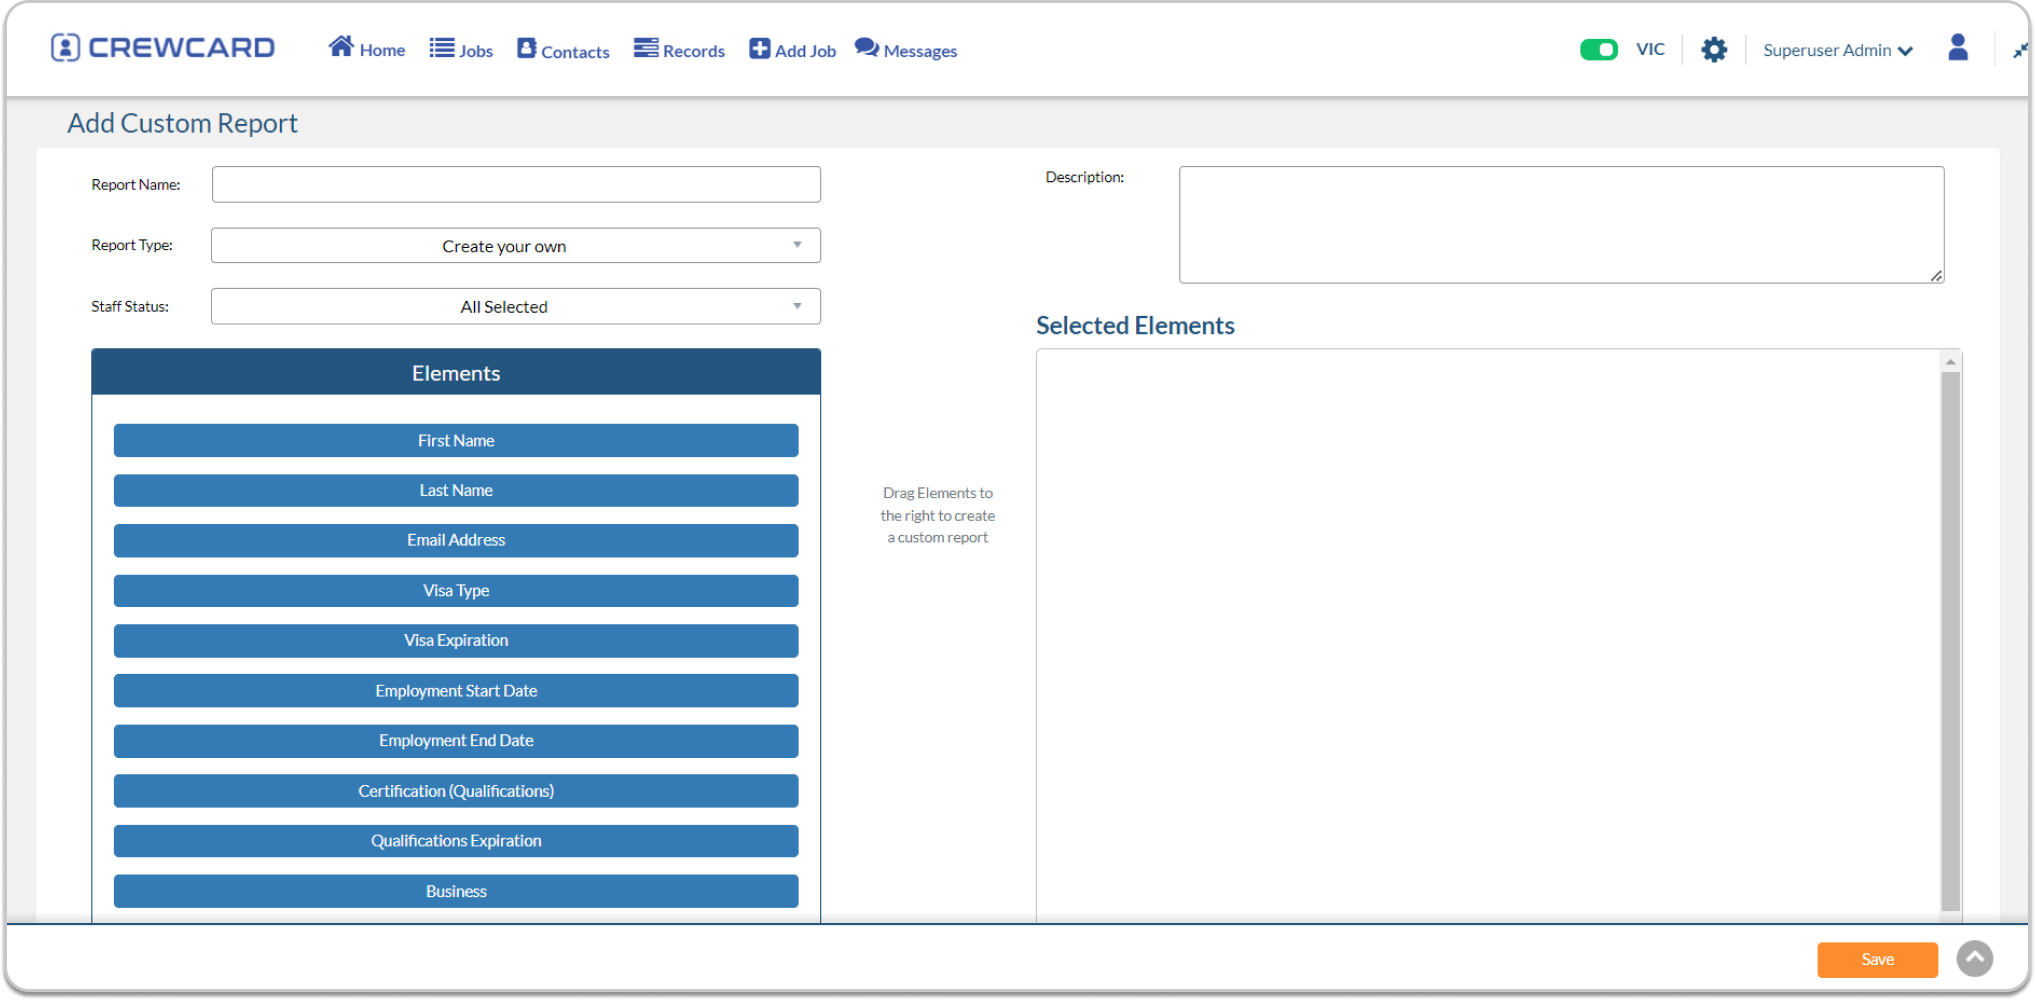
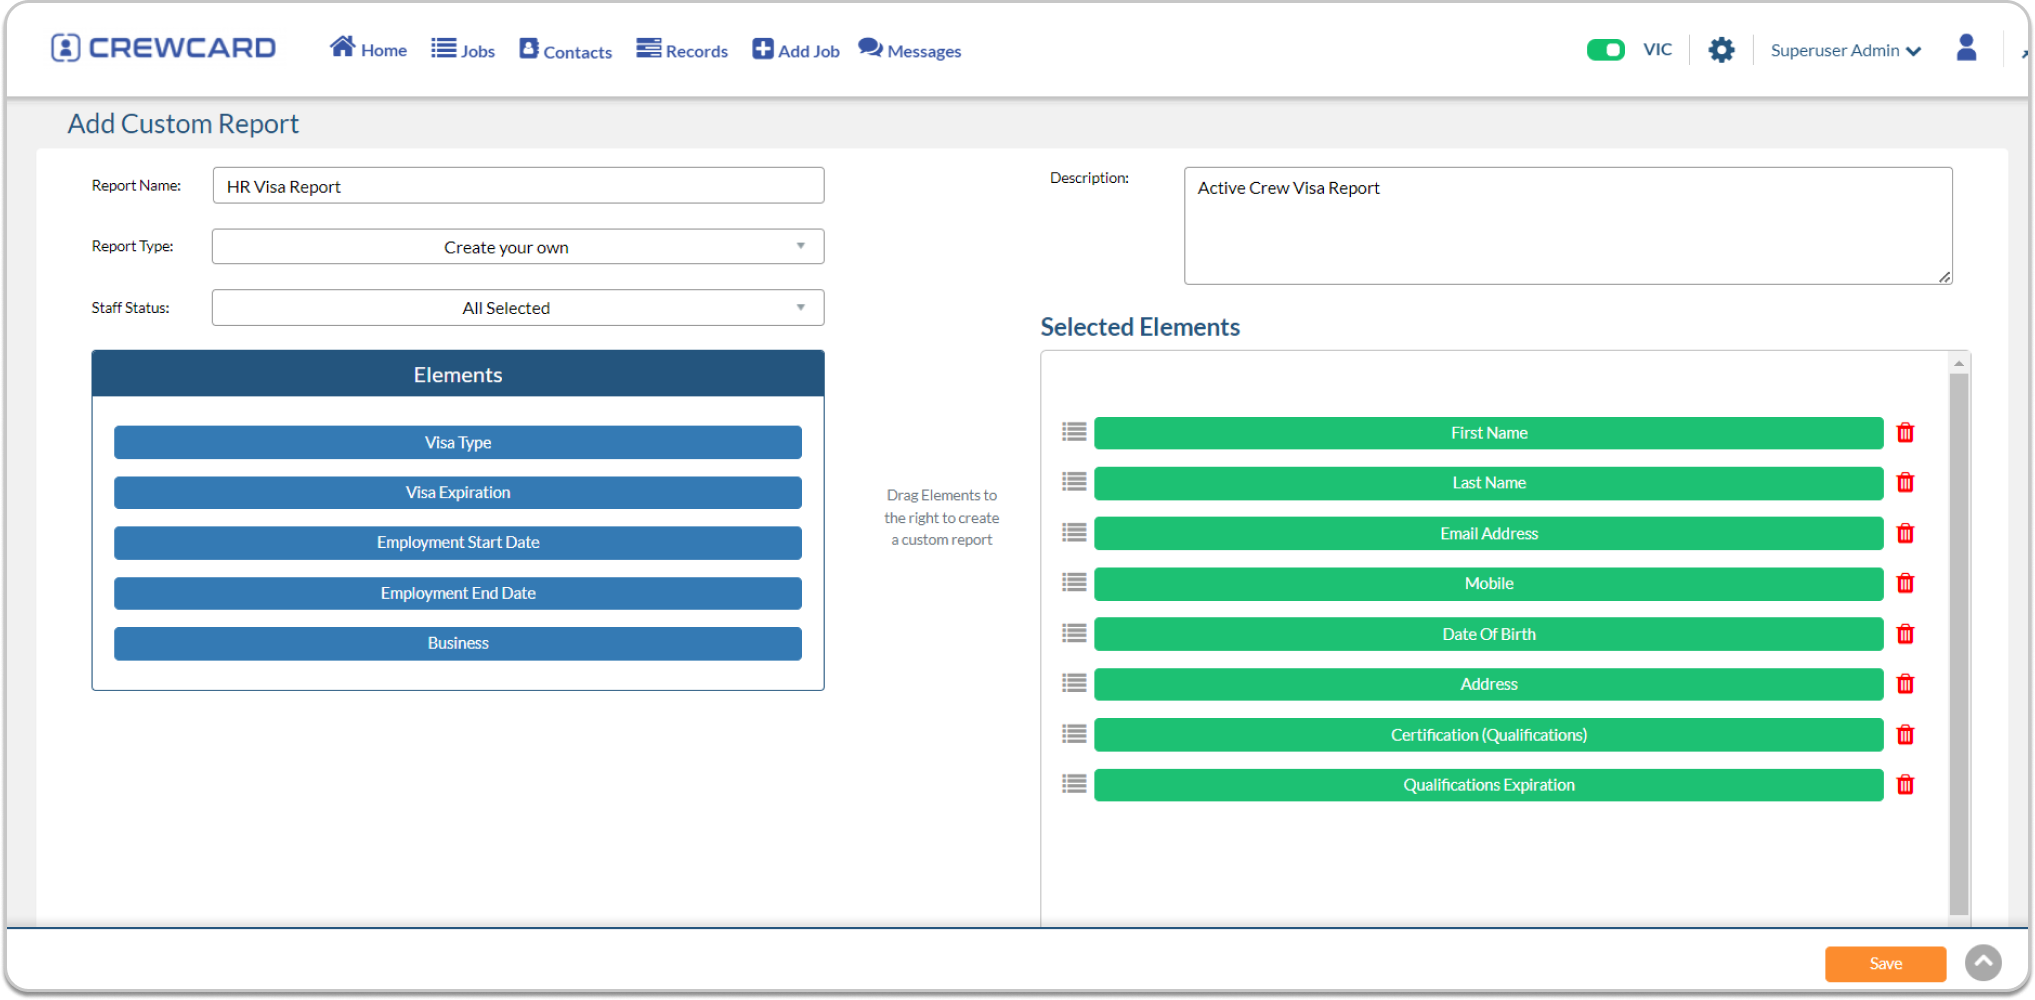
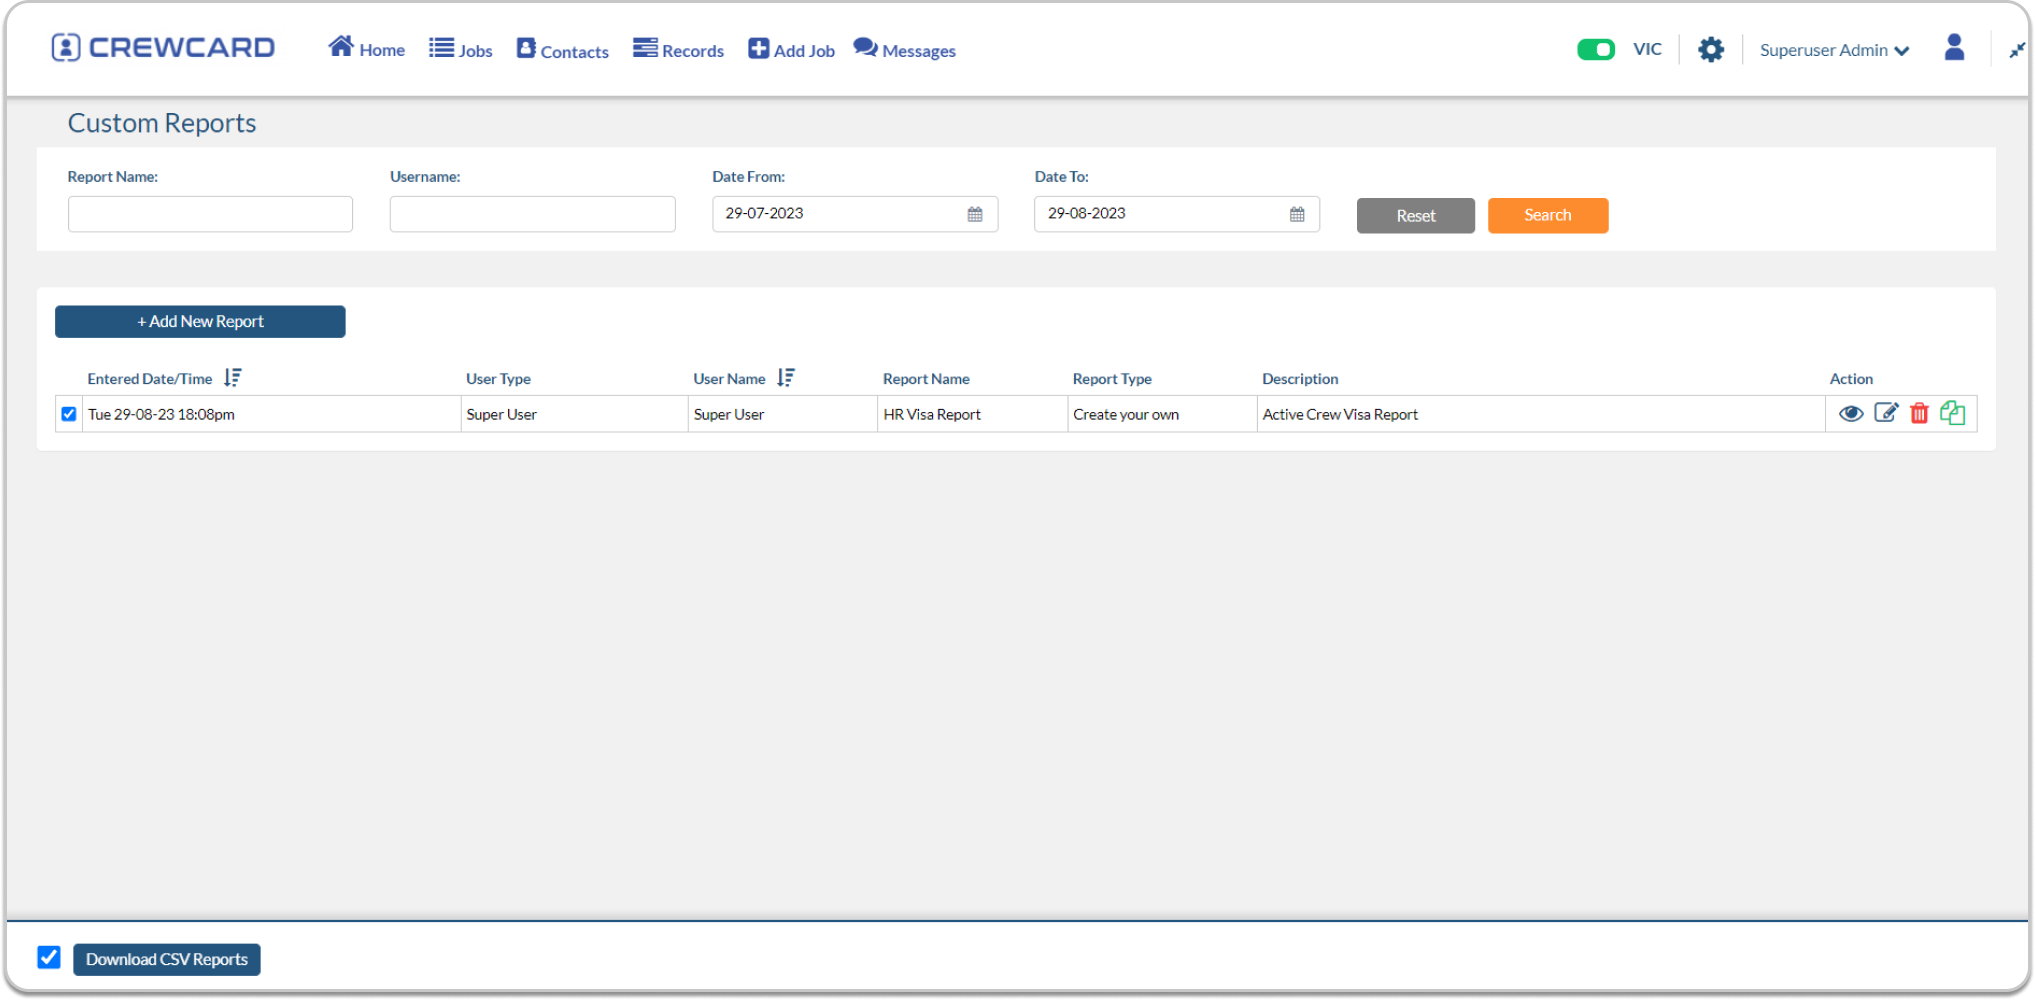
Custom Reports
Payroll
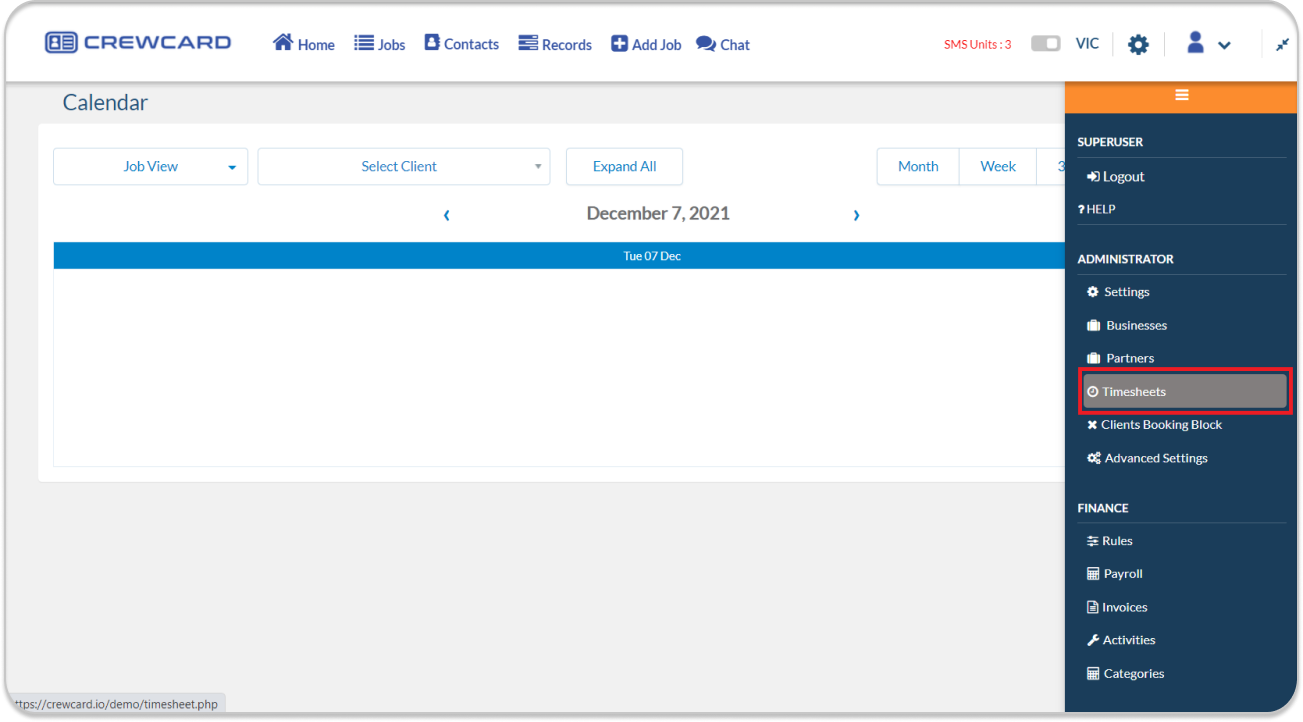
Timesheets
Invoices
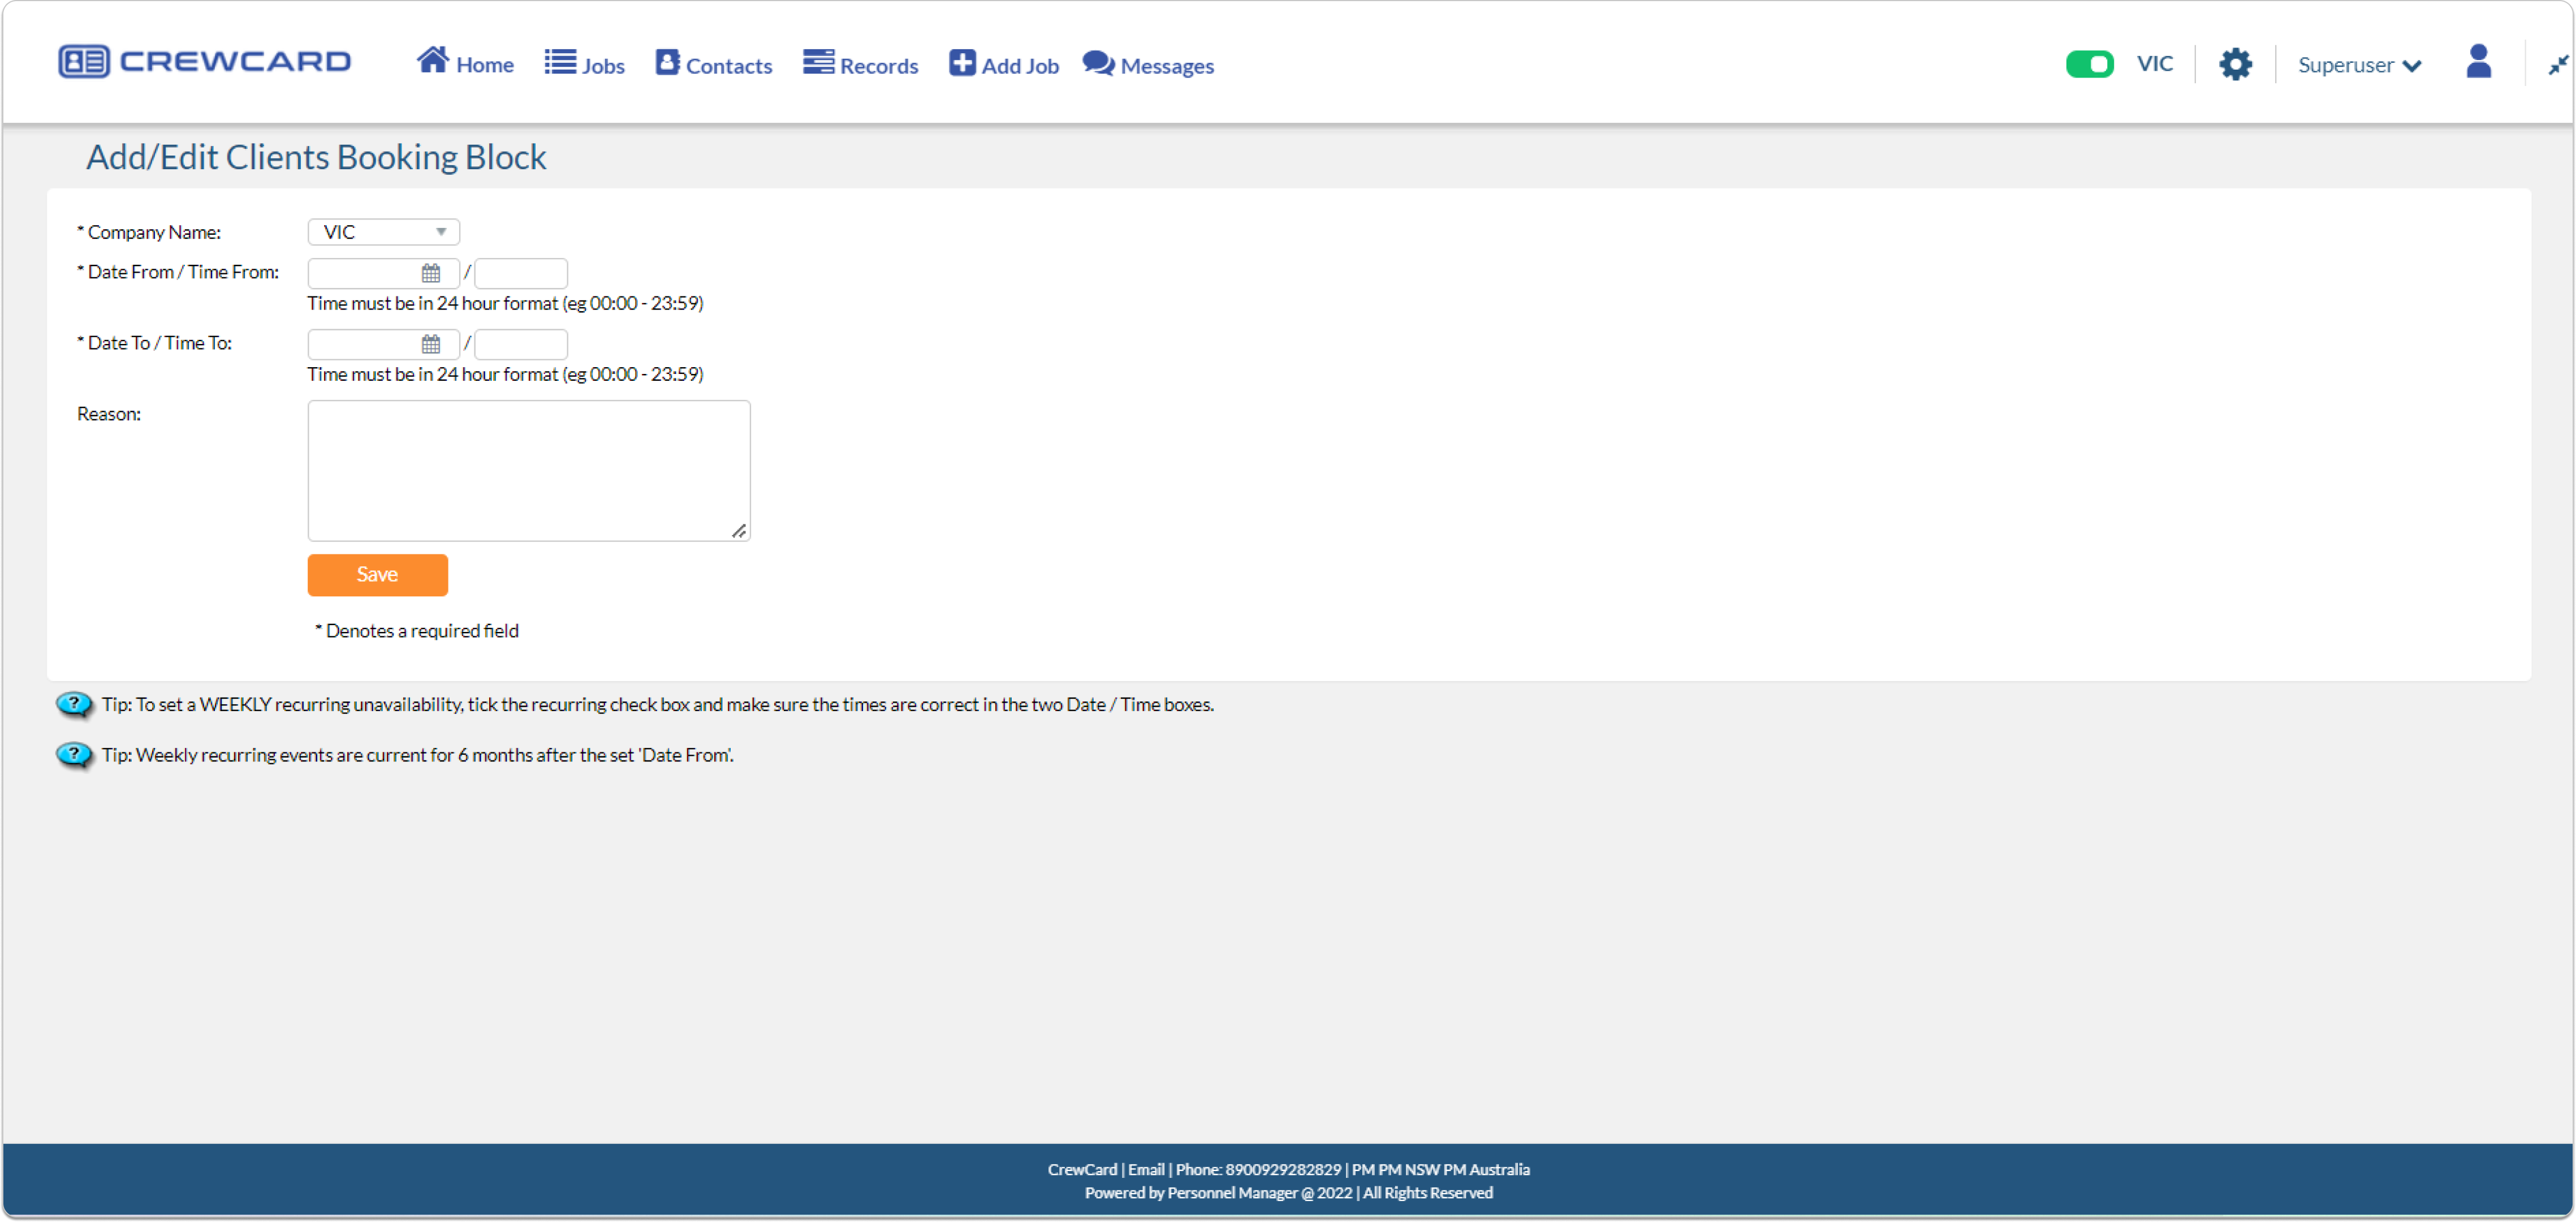
Clients Booking Block
Activities
Payroll Admin
Categories
Discounts
Extras
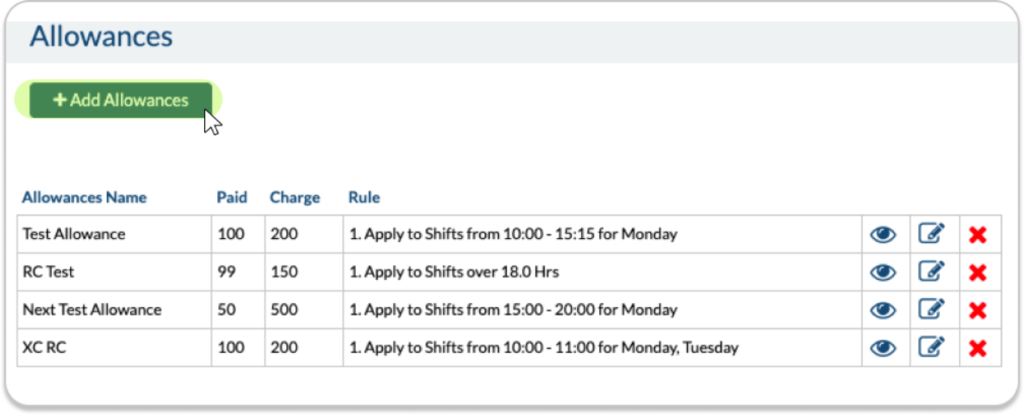
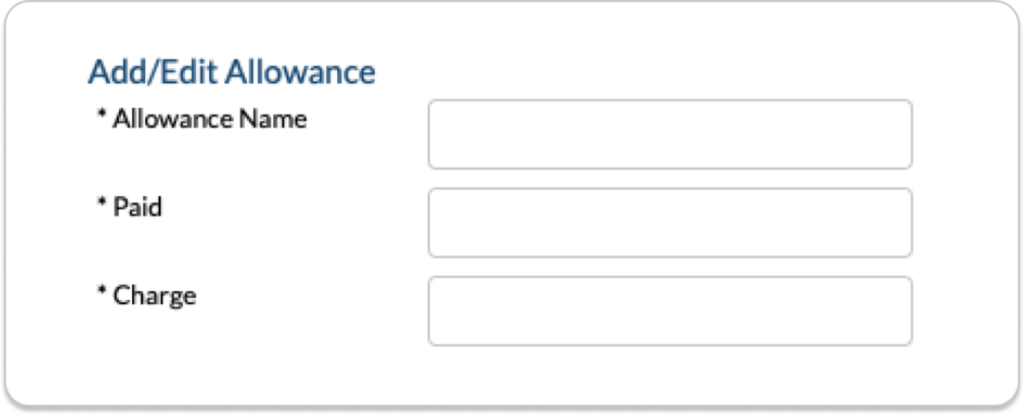
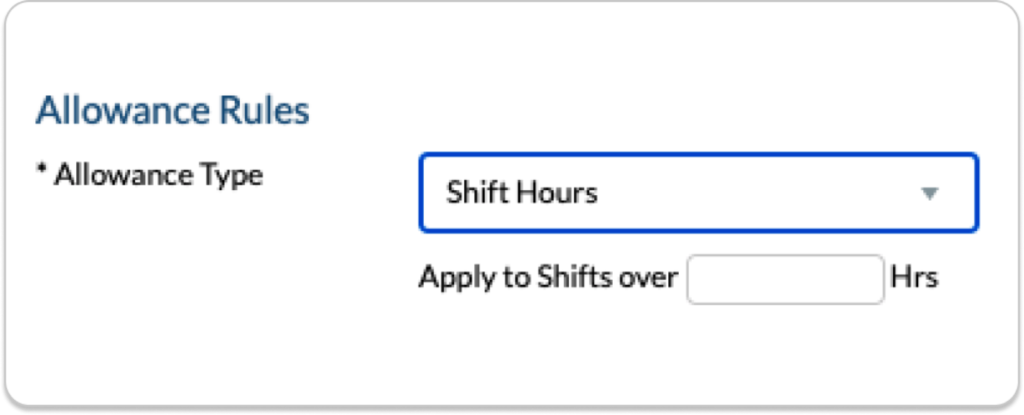
Allowances
Bonuses
Leave
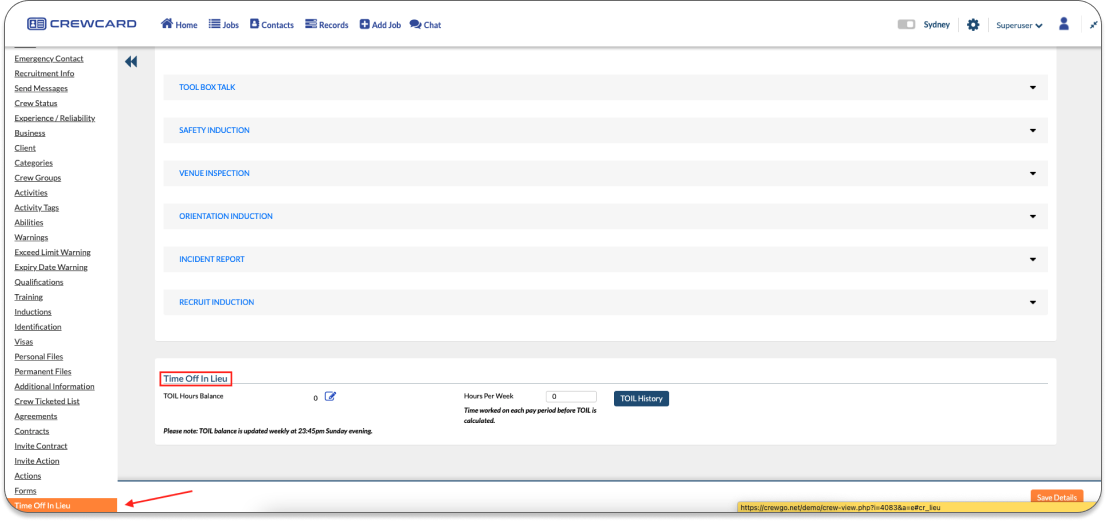
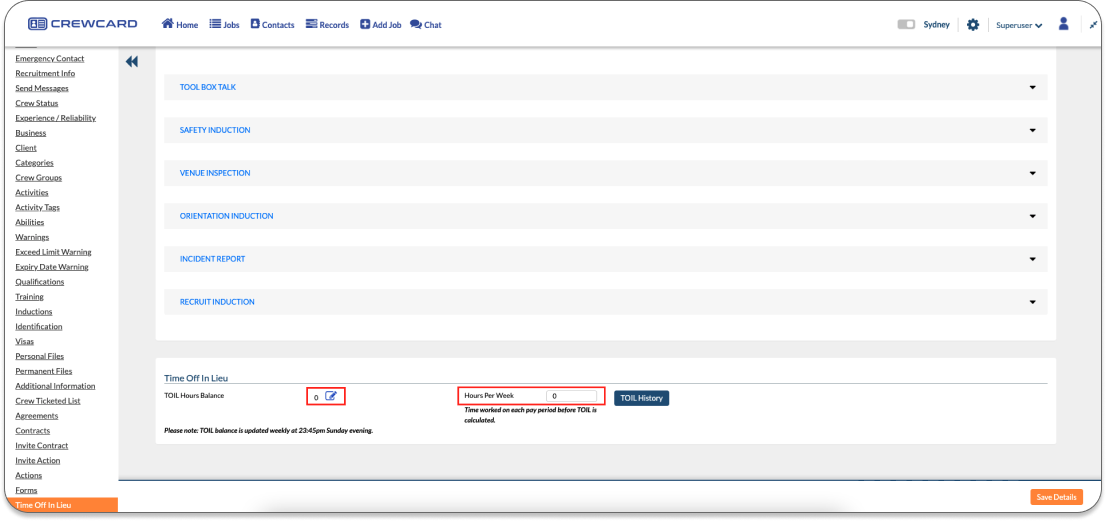
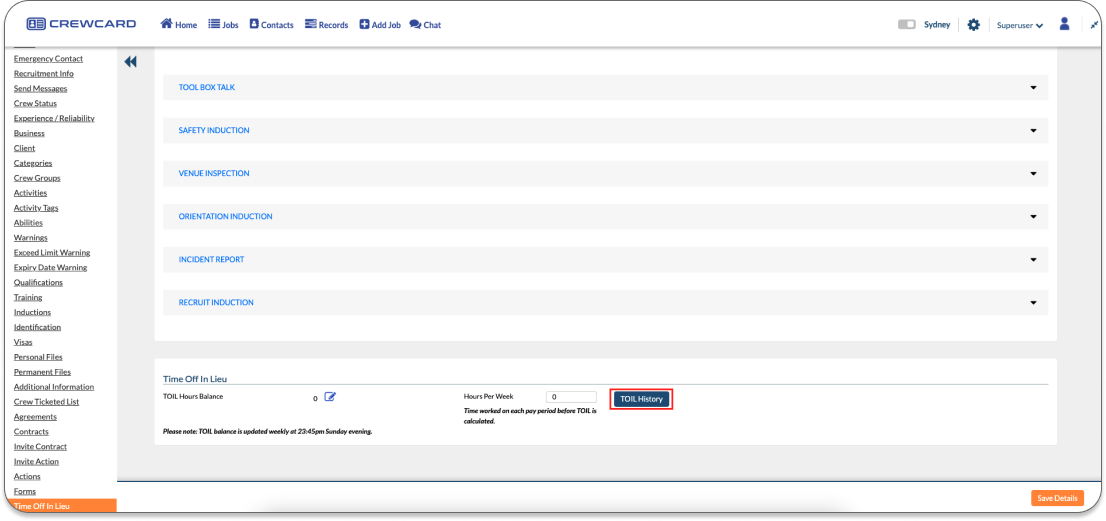
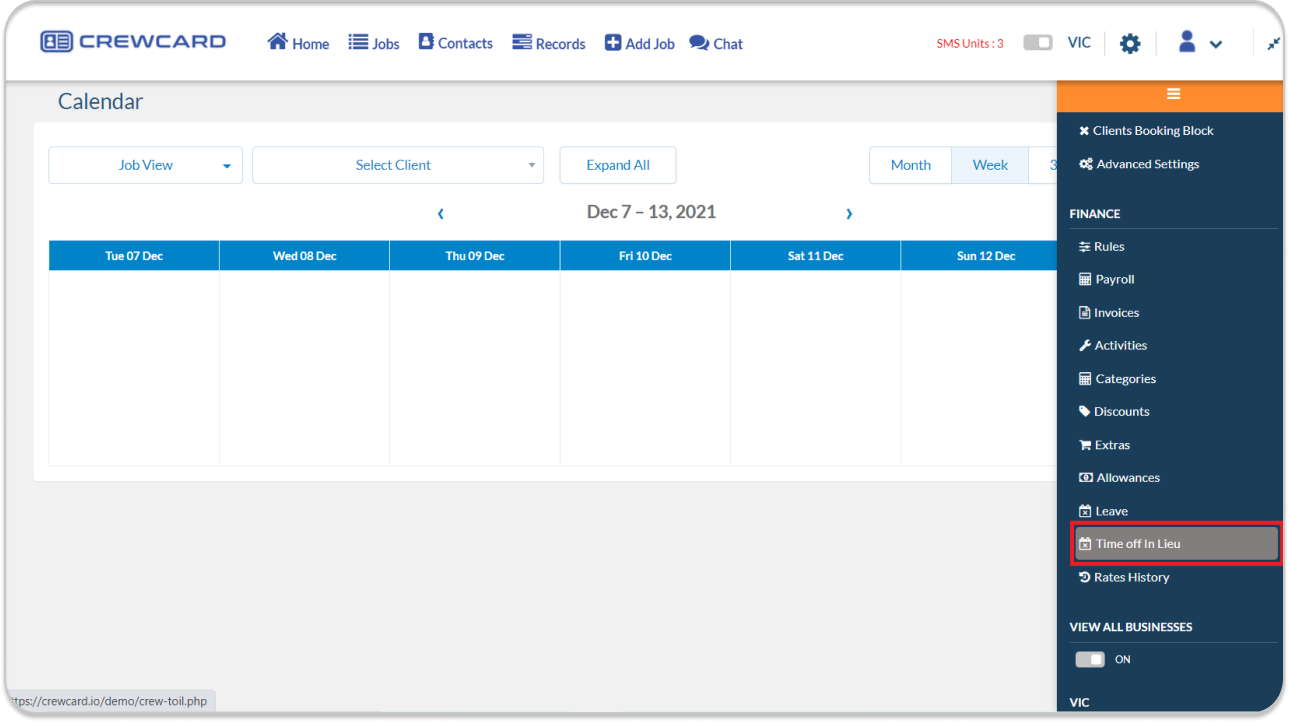
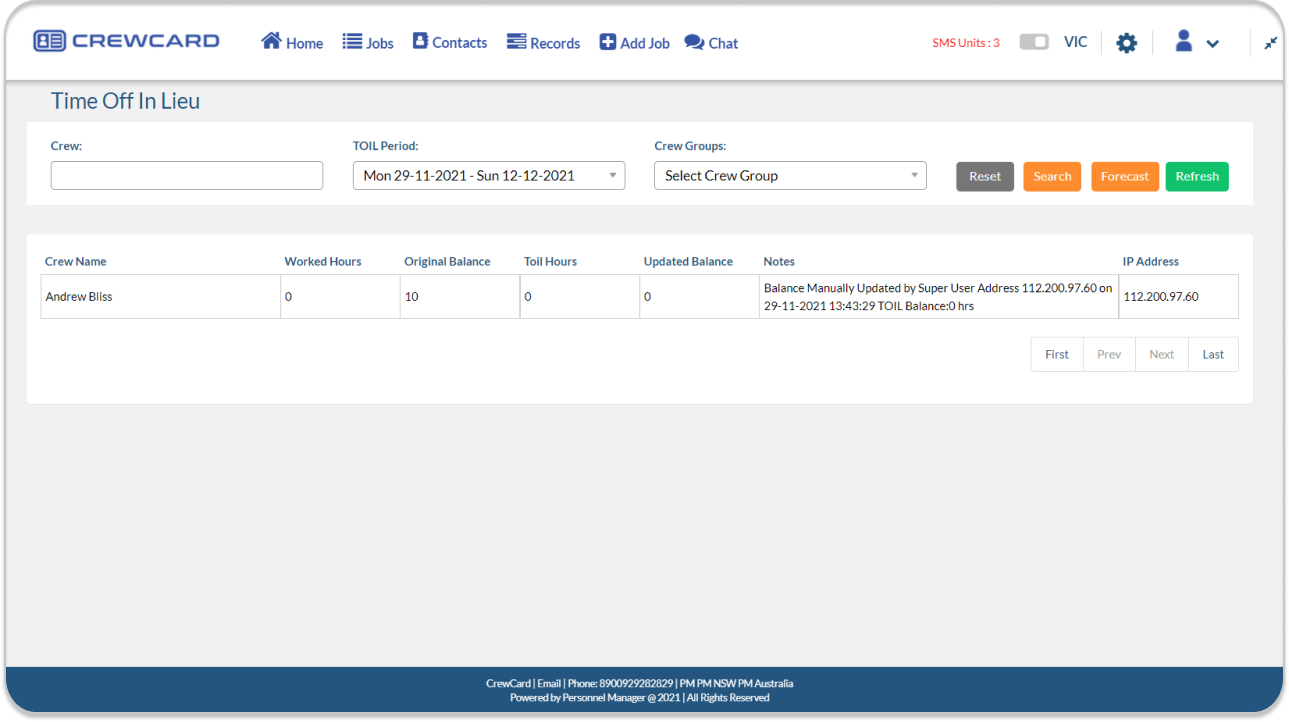
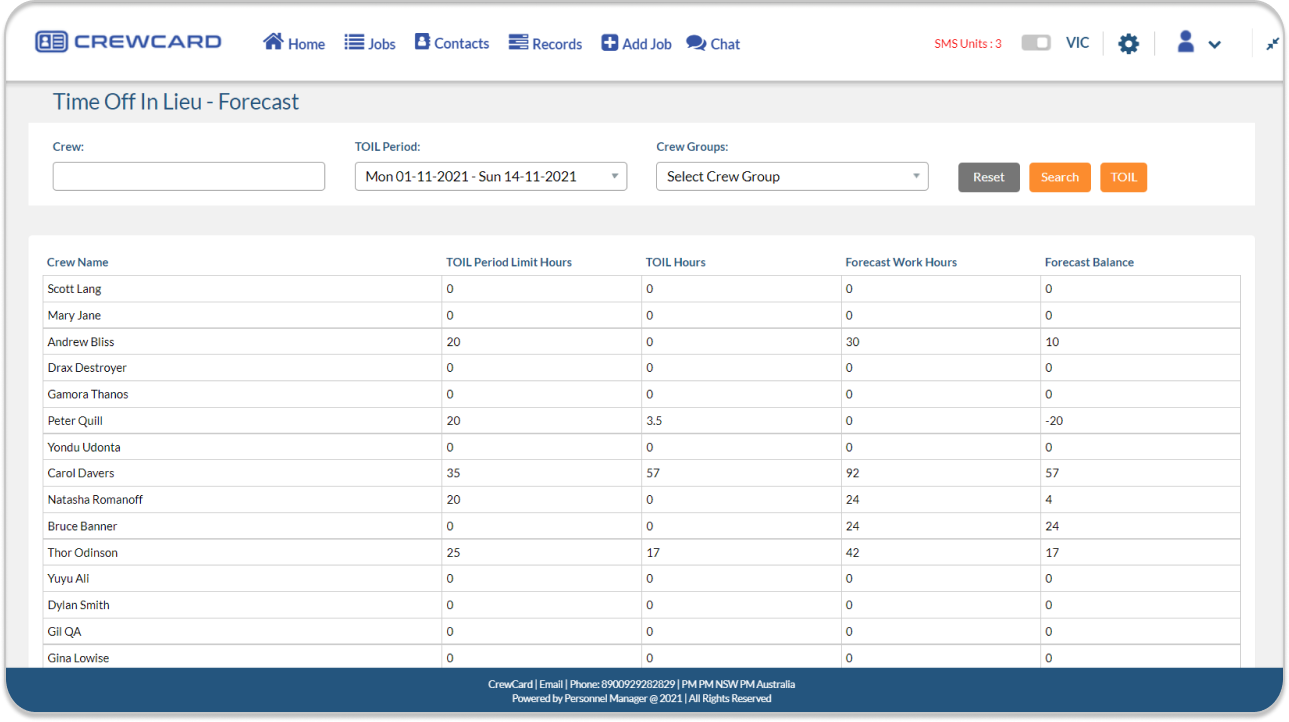
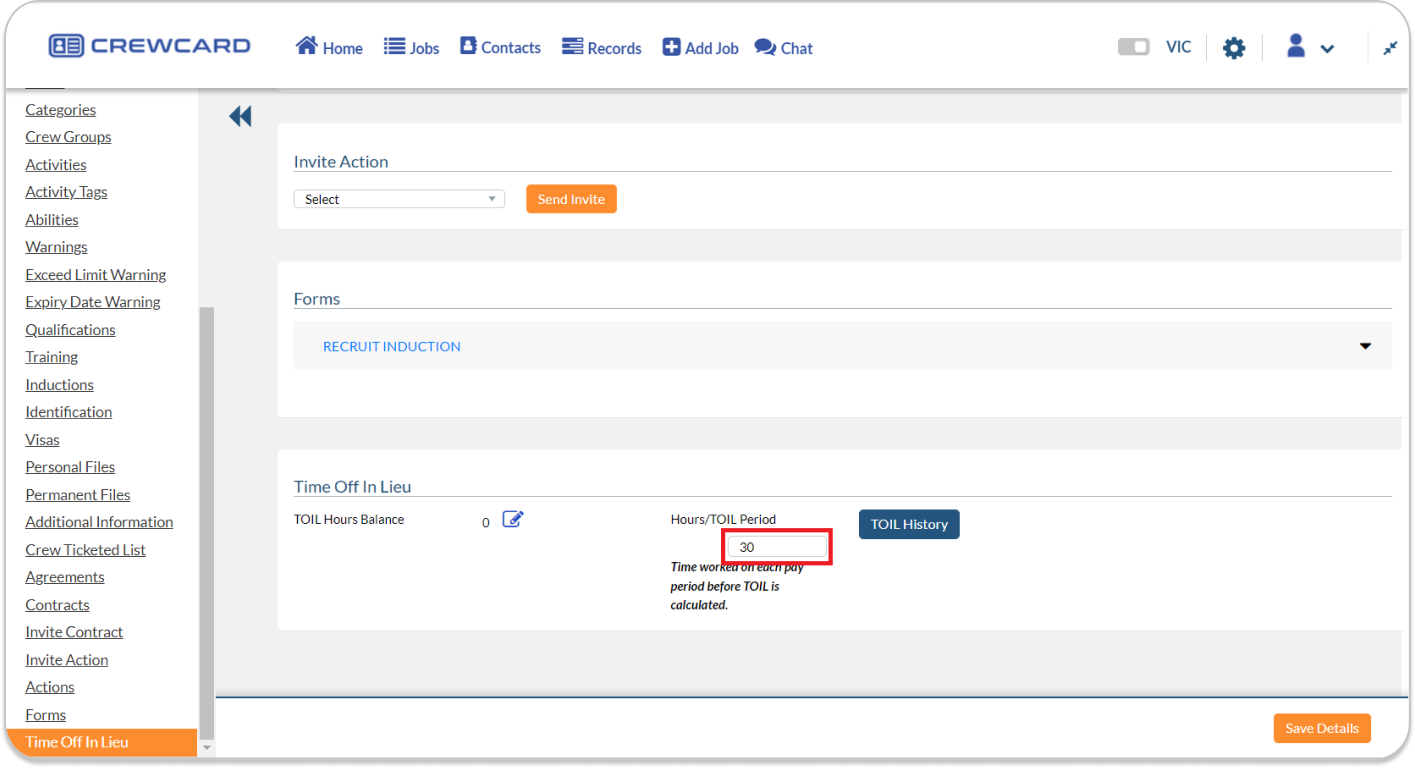
Time Off In Lieu
2.0 Quick Start
To access CrewCard, you must have an active account. Your login credentials will be provided to you by CrewCard’s technical support team.
Alternatively, if you wish to explore the demo version, please reach out to support@personnelmanager.com.au.
Once you have received your login details, if you want to enable two-factor authentication, please contact support@personnelmanager.com.au.
With two-factor authentication activated, when you log in to the CrewCard software, a pop-up window will appear, requesting an authentication code. This code will be sent to both the email address and mobile number registered to your account.
A unique 6-digit code will be sent, and you must input it into the provided textbox to gain access to your account. This code changes each time you log in to your account for added security.
This security mechanism provides robust protection against unauthorised access to your accounts, significantly reducing the risk of fraud or the compromise of sensitive information.
Moreover, users can enhance their security by reaching out to support@personnelmanager.com.au to activate an additional layer of protection during the login process. Once enabled, users will have four attempts to log in. If incorrect login credentials are entered on the fifth attempt, the system will automatically block the user for a duration of 15 minutes before allowing them to attempt to log in again. This security measure has been put in place to thwart brute force attacks and persistent password guessing attempts aimed at gaining unauthorised access to accounts that do not belong to CrewCard users.
2.1 Custom Logo, Background Image
Key: A / DM / M
CrewCard allows users to create personal branding for the website. Admins can customise the default logo image, login background image, and profile icon to suit their organisation. The account admin can access and control these changes through the settings icon at the top right-hand corner of the website page.
Journey: Admin Menu > Settings > Admin Settings > Company Details
Once in Settings, select Admin Settings followed by Company Details.
To change the Logo:
1. Navigate to Admin Settings
2. Select Company Details
3. Click ‘Choose file’ in 53. Logo and upload your image file from your computer.
Tip: For best results – please use image format JPEG/GIF/PNG/TIFF/EPS to upload.
This will replace the default image. See below:
To change the Background Image on the Login/Sign Up page:
1. Navigate to Admin Settings
2. Select Company Details
3. Click ‘Choose file’ in 54. Background Image and upload your image file from your computer.
Tip: For best results – image dimension should be 4000×1400. Upload image formats JPEG/GIF/PNG/TIFF/EPS.
This will change the background image on the login and sign-up:
To change the Profile Icon:
1. Navigate to Admin Settings
2. Select Company Details
3. Click ‘Choose file’ in 55. Profile Icon and upload your image file from your computer.
Tip: For best results – Upload image formats JPEG/GIF/PNG/TIFF/EPS.
This will change the following icon:
2.2 Home Page Default
Key: A / DM / M
By default, the landing page on CrewCard was set to be the Dashboard. However, admin has the flexibilty to change it to either the Calendar, Jobs, Sites or Events.
To change the landing page, navigate to 75. Home Page under the Admin Settings.
Journey: Admin Menu > Settings > Admin Settings > 75. Home Page
When using CrewCard, you can filter and display your jobs based on their location or business, depending on your company’s setup. To do this, access the Central Navigation Bar (CNB) and click on the text adjacent to the switch. In the provided example, it’s labelled ‘Vic.’ Clicking on it will reveal a dropdown list of business or location groups. You can filter the display by selecting the options that you want to focus on.
Once you’ve made your selection, click the switch again. This will now display only the jobs assigned to the chosen location. To revert to the default view, simply click the switch again to turn off this filter.
3.0 Home Page
As mentioned previously, the Dashboard is set as the homepage by default. If you wish to change the default page, please visit 2.2 Home Page Default.
**Tips: Forgot what the feature meant? Use these tools to help you:
Tool
Description
Info Icon
You may find this icon next to a button. Clicking on it will provide you with an explanation of the feature
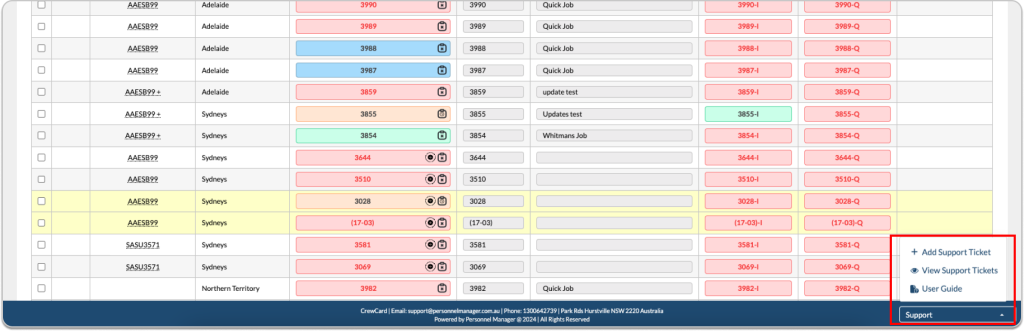
User Guide
Toggle the dropdown labelled ‘Support’(located in the footer). This will allow you to quickly access the User Guide.
Alternatively, user guides are also available on CrewCard website
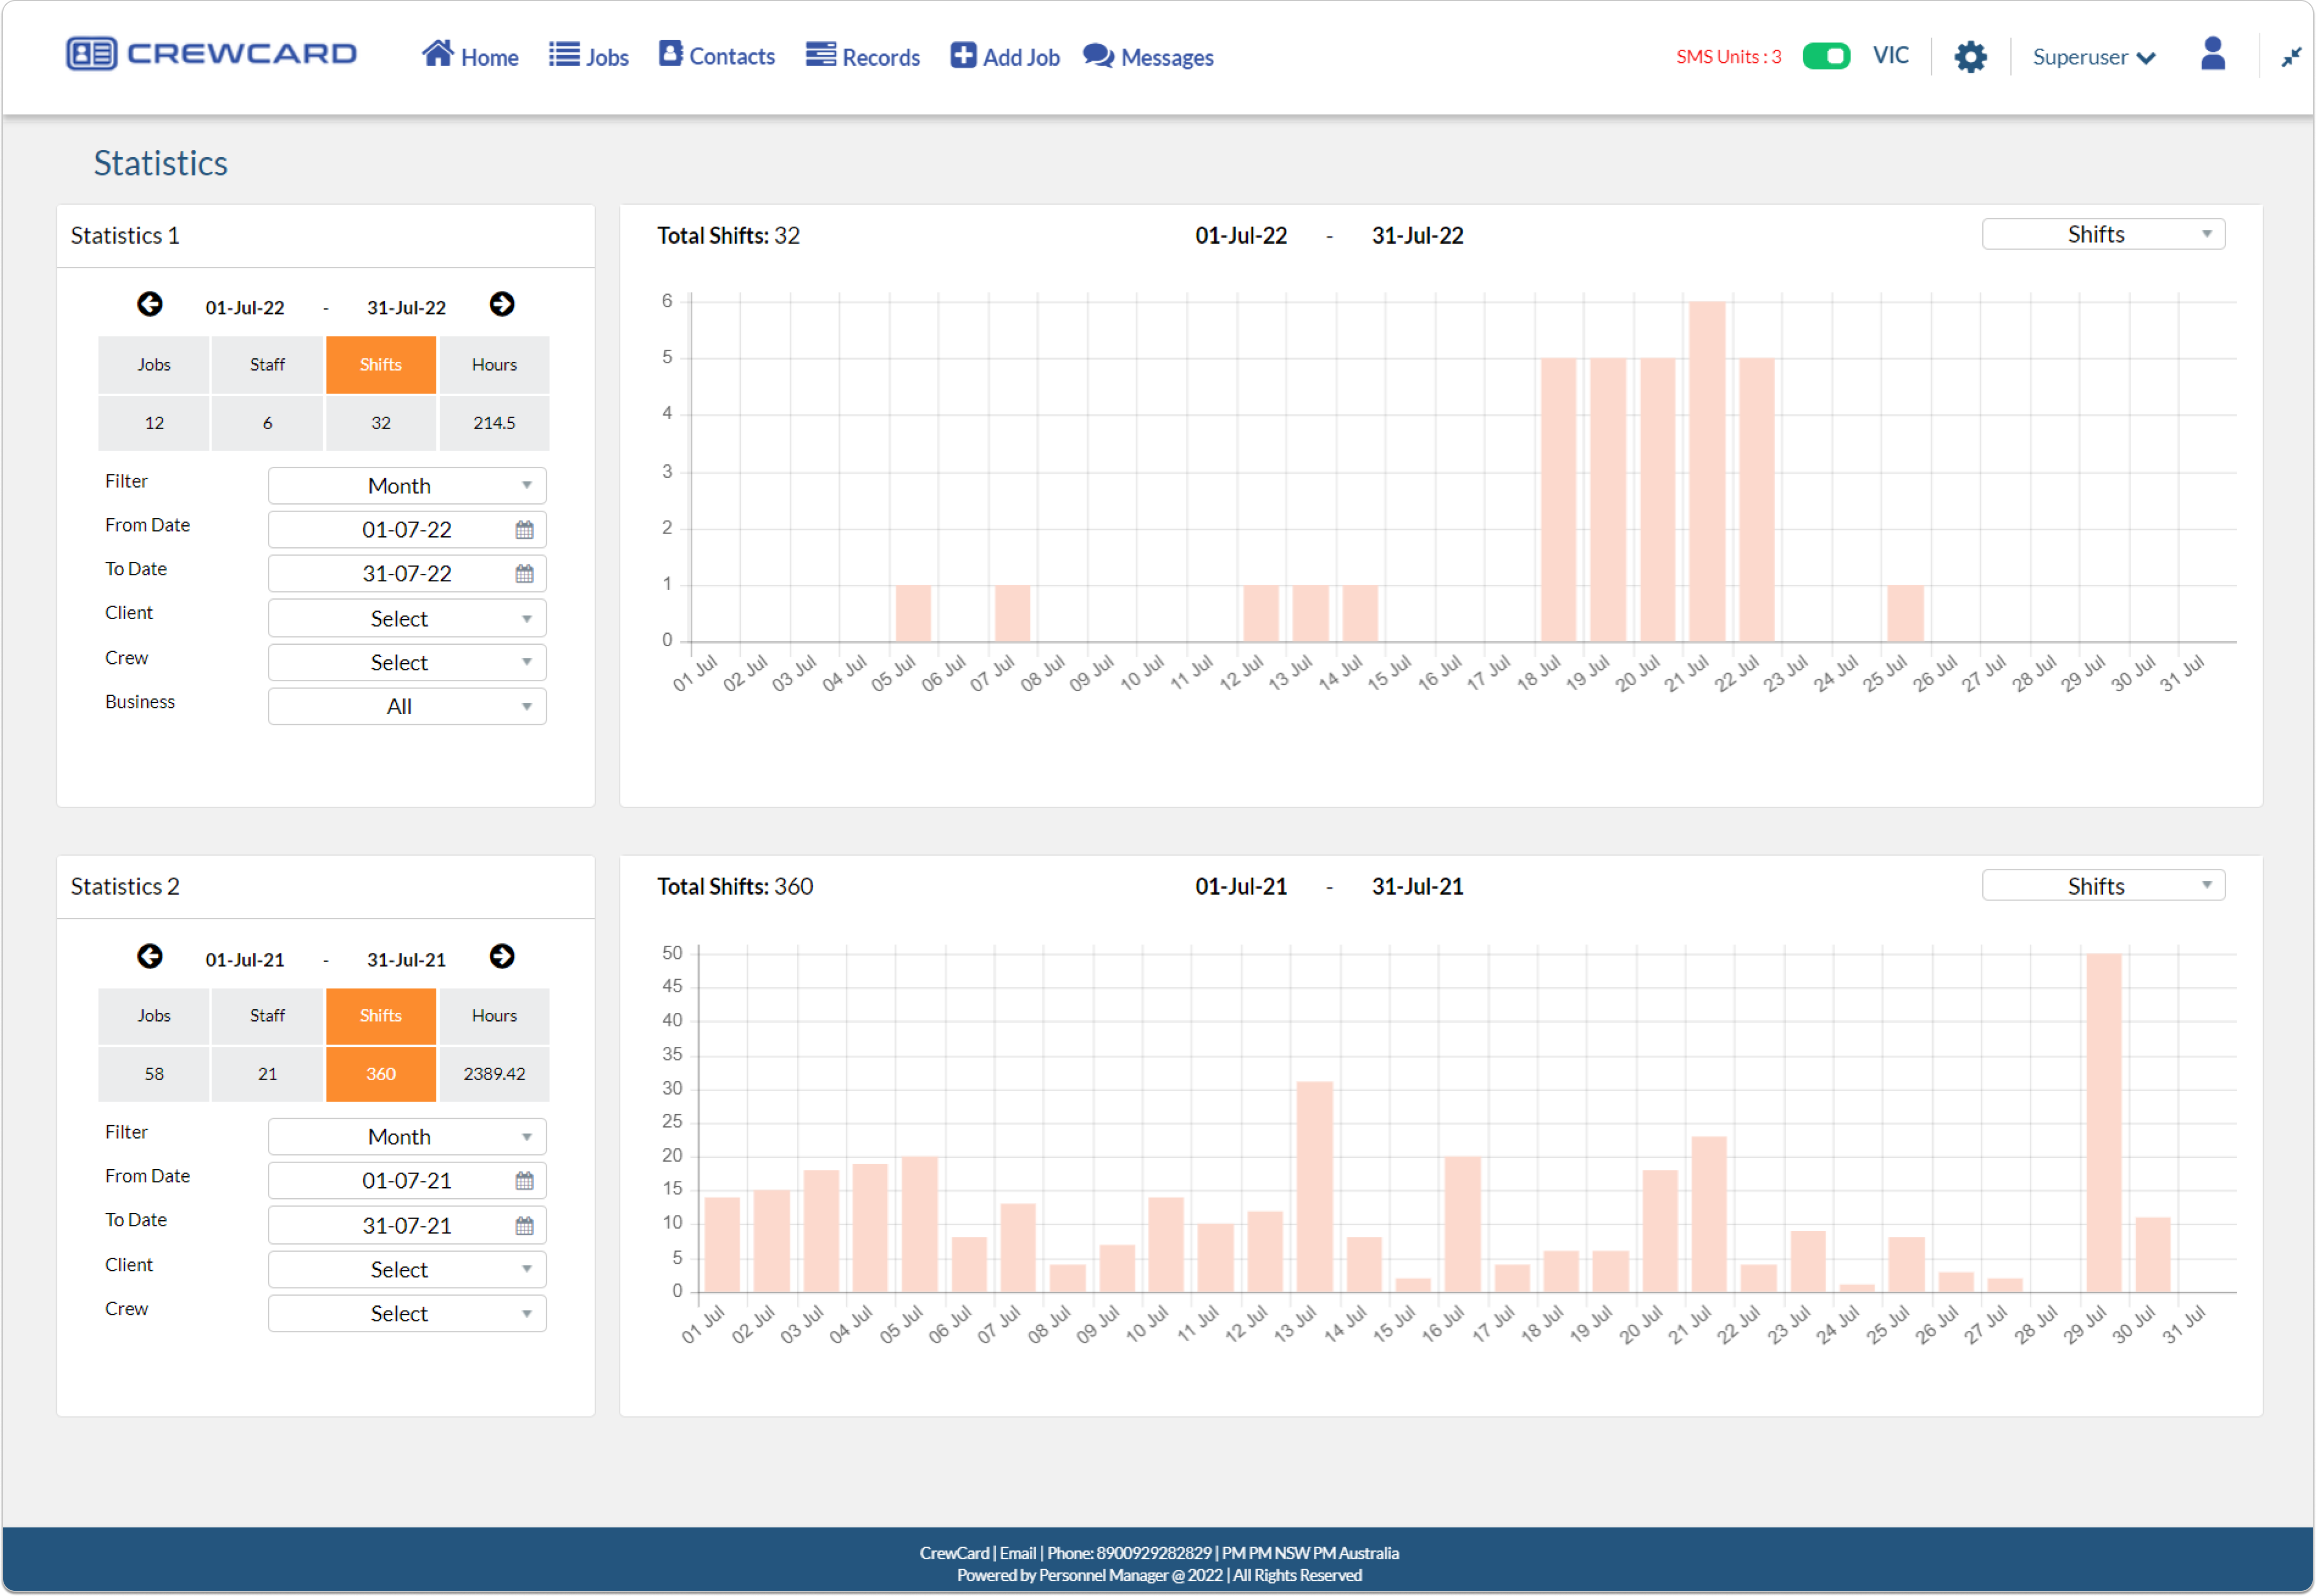
Dashboard
The Dashboard depicts various statistics based on crew and their shifts. This overview provides valuable insights into shifts and workforce trends, spanning daily summaries to annual evaluations.
Filter Dates
Users can filter the statistics by daily, weekly, monthly, or yearly. There is also an option to choose a date range. Upon clicking a date range, a pop-up window labelled ‘Select a Date Range’ will appear. Select the to and from date and click save to search from those days.
Statistic vs Shift View
The Dashboard has two views; Statistics and Shifts.
The Statistics View display an overview of all the shifts and crew information.
The Shifts View allows you to view statistics for specific activities. Through settings, Admin can limit the number of shifts displayed and hide activities from the shifts page.
To alter the Shifts View, access ‘Shifts Page Configuration’ located in the Admin Settings. Admin can now select which activities to hide from the Shifts view and control the number of shifts to display.
Select from the drop down menu in 79. Default Shifts to Show and click save located at the bottom of the page. This will control the amount of shifts to be displayed in the Shifts view
You can also hide activities from Shifts Page via 80. Activities Hidden from Shifts Page. Simply select the activity in the box labelled ‘Activities’ and use the arrow keys to switch it to the box labelled ‘Activities Hidden from Shifts Page.’
After the settings have been saved the statistics on the Shift View on Dashboard will now exclude those specific activities.
Statistics
Let’s look at the statistics in the dashboard! Above the dashboard, we have a data-driven summary within a selected date range.
Statistics
Function
Assigned Crew
Lists crew members confirmed or pencilled in for shifts within the date range.
Activated Recruits
Amount of recruits activated within the selected date range. Activated Recruits means recruits that became staff/crew and were moved from the Recruit Cards page to the Crew/Staff List page
Confirmed Shifts
Displays shifts with confirmed crew within the selected date range.
Unconfirmed Shifts
Displays shifts with no confirmed crew within the selected date range, including blank shifts and shifts with pencilled-in crew.
Total Shifts
Total number of shifts, including unconfirmed and unconfirmed
Total Hours
Total number of hours used within the date range
Total Jobs
Indicates the total number of Job Sheets
The middle of the dashboard provides a graphical representation of the shifts and employment analytics. Users can hover their mouse over the graph to check the statistics.
Statistics
Function
Shift Analytics
Graphical representation of confirmed vs unconfirmed shifts.
Users can filter this graph weekly, monthly or yearly.
Recruits
Depicts New Recruits versus Activated Recruits.
User can click on the three dots in the corner to be directed to the Recruits page.
Active Crew Visa
Displays the overview of employee visa status.
Valid: Indicates active visas. Please refer to the Crew Compliance Page for Vevo check details.
Expiring Soon: Displays visas set to expire within the upcoming month from the current date.
Expired: Includes visas that have expired as of yesterday or an earlier date.
Click on the three dots in the corner to be directed to the Crew Compliance page.
Shifts Offered
Displays all accepted, rejected, or unavailable shifts. This offers users insight into their shift scheduling and the status of their shift offers.
Users can filter by SMS, Email, App or All in the top right.
Users can also use the five buttons located at the bottom of the dashboard as shortcuts to their respective pages: Jobs, Calendar, Statistics, Events, and Shifts.
4.0 Jobs
Key: CNB (Central Navigation Bar)
The ‘Jobs’ tab has everything you need to view and manage scheduled jobs. This section will explore the different pages under the tab ‘Jobs’.
Let’s get started!
To access Jobs page, hover your mouse over to ‘Jobs’ in CNB to open the drop-down menu and select ‘Jobs’.
Journey: Jobs > Jobs
This page provides a weekly summary of your clients’ job sheets, invoices, and quotes. By default, the week is set to be Monday to Sunday. If you wish to alter this, please email support@personnelmanager.com
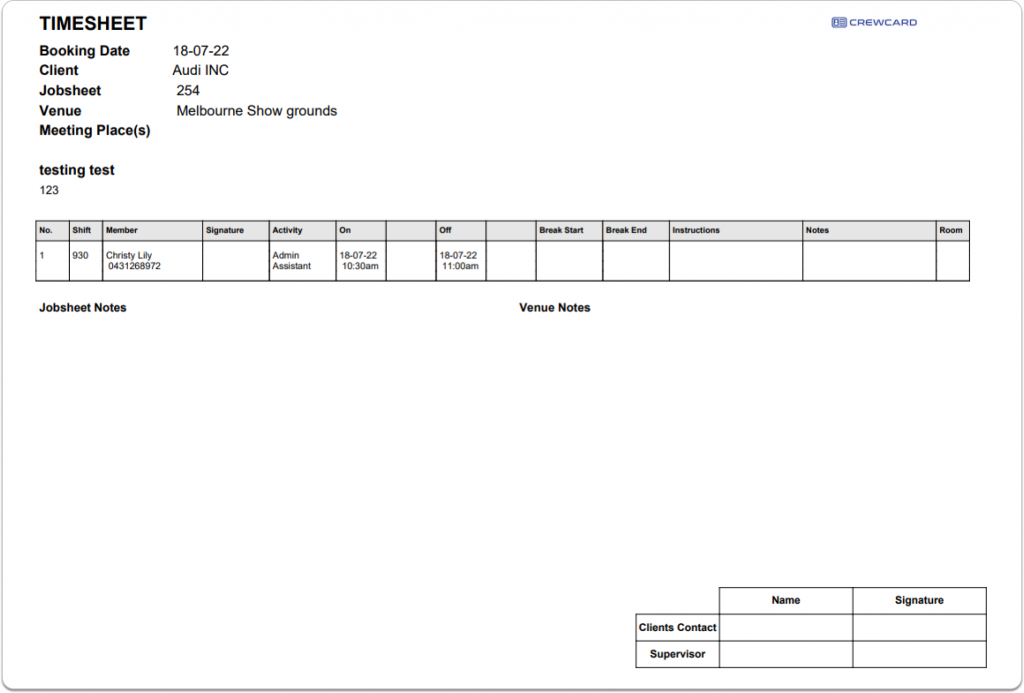
On the Jobs page, the ‘Timesheet Approved’ filter displays all entries with fully approved timesheets when selected. A check icon indicates that the timesheets have been approved and accepted.
Categories
Let’s start by looking at the categories!
Each job includes various categories and information designed to support the timesheet. See below for more information:
Category
Description
Partners
Name of the partner for the corresponding job.
Client
The name of the client for whom the job is booked for.
Business
Name of the business for the corresponding job.
Job Sheet
Click on the box to be redirected to the corresponding job sheet to view and edit. For more info, please read guide 7.1 Jobs Sheets.
Job No.
The unique job number given for the timesheet. Job no. can be edited via admin settings. Please read guide 10.1.6 Ops HomeConfiguration.
Description
The description of the job. Can be edited easily by clicking the box.
Invoice
Click on the box to be redirected to the corresponding invoice to view and edit. For more info, please read guide 12.2.7 Updating Invoices
Quote
Click on the box to be redirected to the corresponding quote to view and edit.
Tag
Display all the selected tags for the Job Sheets
The system automatically assigns a Job Number to each of the Job Sheets. Upon adding a Job Sheet, the corresponding Quote and Invoice will be automatically generated with the same Job Number.
Colour Codes
Colour Code description is explained on the info icon next to the left of Actions tab, which is located on the right of your screen.
Colour Codes for Invoices/ Quotes:
Colour
Description
Red
Invoice or Quote that has NOT been sent to the Client.
Green
Invoice or Quote that has been sent to the Clients.
Grey
Quote that has been approved by the Client.
Colour Codes for Job Sheets:
Colour
Description
Red
No Shifts have been confirmed.
Blue
All Shifts confirmed.
Orange
Some Shifts has been confirmed.
Green
Some shifts are locked but there are still unlocked shifts in the job.
Grey
All shifts have been locked.
Blue Background Highlight
The Job sheet is admin locked.
Yellow Background Highlight
The shifts within the job sheet have been highlighted.
Client Name Orange Shading
The job is booked via the client portal.
Status of Job Sheets:
Next to the Job Sheet numbers, there’s icons representing the state of approval for a timesheet. See below for more information:
Icon
Description
Timesheet is partially confirmed.
Timesheet approval required.
Timesheet are fully accepted.
Ongoing job– weekly, fortnight, monthly
Sending Invoices
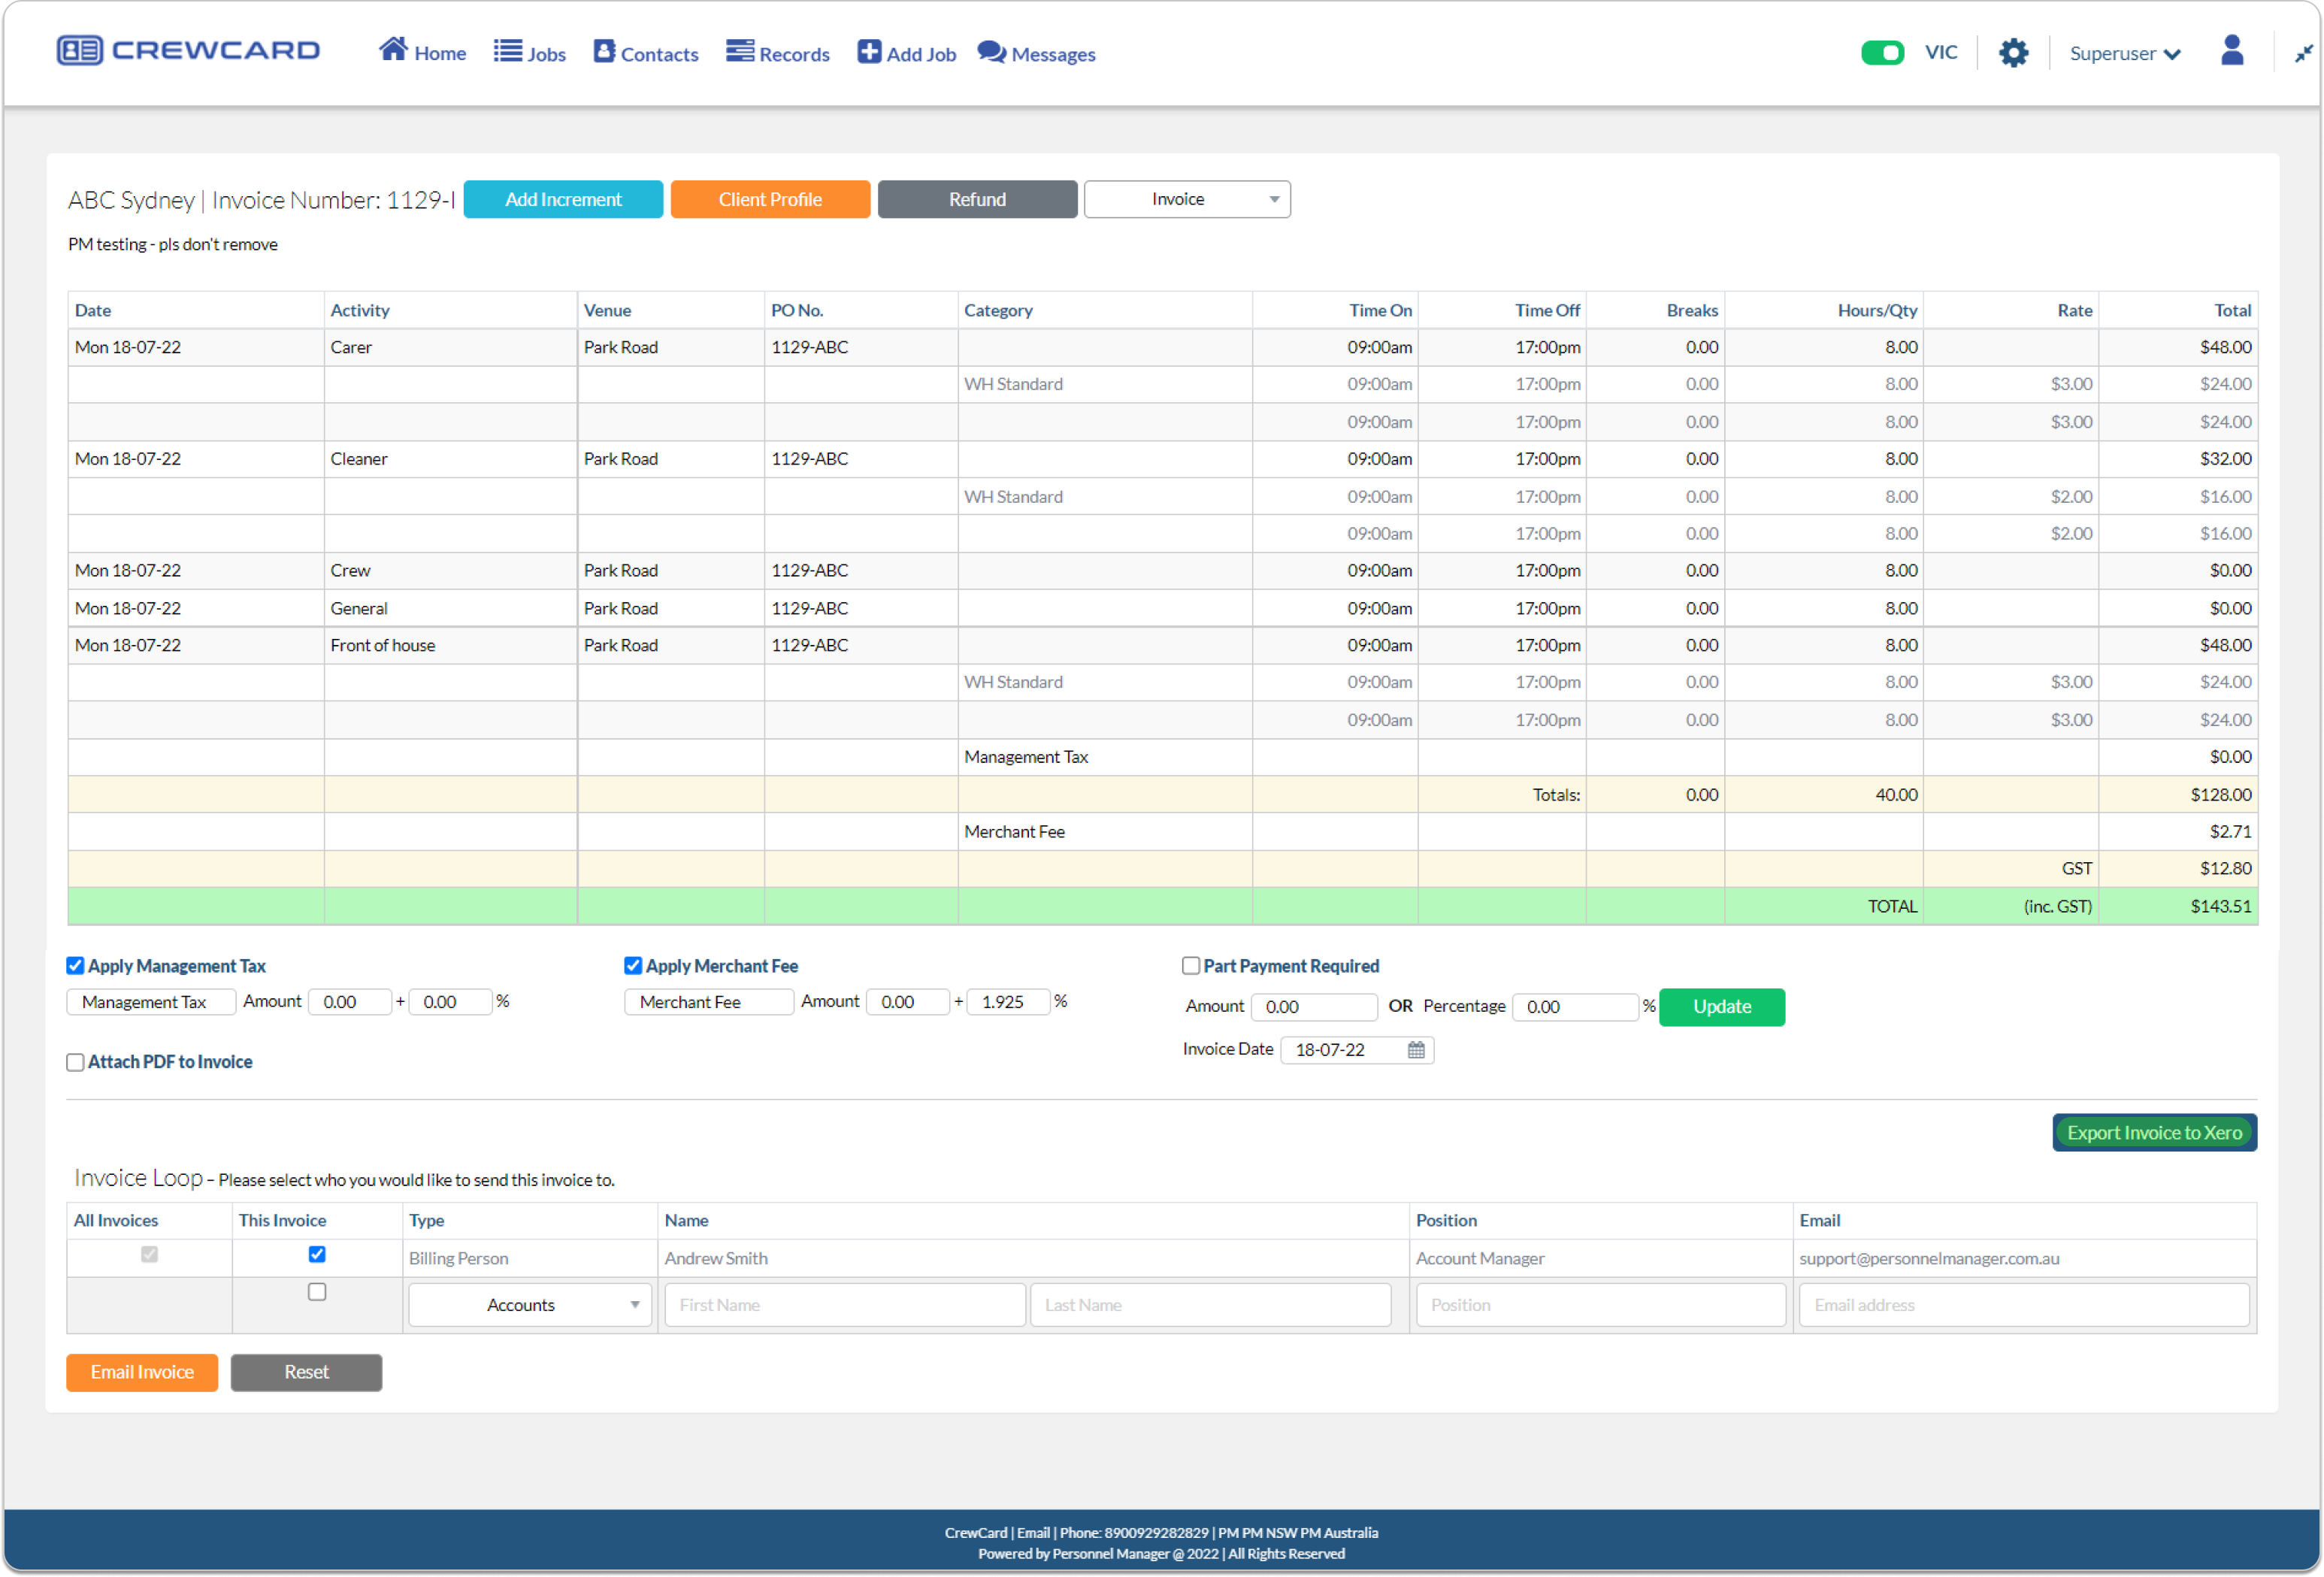
Now that we have learned the basics on the Job page, let’s examine how to send invoices to our clients!
First, click on the ‘Invoice’ box related to the job.
You will now be directed to the Invoice page. If you wish to attach a PDF copy of the invoice, simply tick the ‘Attach PDF to Invoice’ checkbox.
This will attach a PDF copy of the invoice when admin emails the invoice to the client.
To send the invoice, click on ‘Email Invoice’ located at the bottom of the page.
Applying Discounts and Fees to Invoices
To apply discounts, admin must first select the checkbox labelled “Apply Admin Discount”.
By default, the discounts are called ‘Admin Discount’. You can rename it by editing the field.
Make sure to enter the discount amount in the box labelled ‘Amount’. To do this, enter the discount amount with a minus symbol ( – ) at the beginning, e.g., “-50%” or “-50.”
After you’ve applied the discount, click on the green button labelled ‘Update Invoice’, and the information should appear on the invoices, as shown below.
Remember to click ‘Update Invoice’ after you make an adjustment!
**Note: To apply any other fees or deductions, follow the same steps as for admin discounts above: tick the appropriate box and enter the amount with a negative (-) sign for deductions. If you need further instruction, see 4.1.1 Invoices
Invoice History
Invoice history refers to a record or log of all past invoices issued by a business or individual. It includes details such as invoice numbers, dates, amounts, payment status, and any related transactions. The invoice history provides a comprehensive overview of the invoicing activities and serves as a reference for tracking payments and managing financial records.
To view the invoice history, simply click on the “Invoice history” button.
Upon clicking the “Invoice history” button, you will be directed to the invoice history page. There, you can view an overview of the invoice history for a specific invoice.
Here’s what each of the categories means:
Category
Description
User Type
The category or classification of the user responsible for the changes made to the invoice
Name
The username or actual name of the user who made modifications to the invoice. It indicates the specific individual who was responsible for the changes made to the invoice.
IP Address
The unique numerical ID that identifies the device or network connection used to modify the invoice, pinpointing the exact location or device of the changes.
Date
the date and time when the modifications were made to the invoice by the user
Notes
Specify the invoice recipient(s) and note if any attachments were included. This section also covers any related remarks or details about the individuals or organisations receiving the invoice.
Actions Download Icon
Allows for easy access and retrieval of the modified invoice in a downloadable format, which can then be saved or printed as needed.
To return to the Invoice page, simply click on the “Invoice” button. This will navigate you back to the main Invoice page where you can access and manage your invoices.
Sending Quotes
Before sending a quote, please read 10.2.16 Quote Template Settingsto set up a customised quote experience on CrewCard.
To send a quote, click on the ‘Quote’ box related to the job.
This will direct you to the Quote page to the corresponding job.
On the quote page you are presented with a view of all costs for a review before sending.
By default, it will display staff/crew name on the quotes. You can remove it through Admin Settings, which allow you to hide the crew/staff from the quote.
Journey: Admin Menu > Settings > Admin Settings > Ops Home Configuration > 72. Show Crew per shift on Quotes and Invoices
Once you hide the staff from quotes, the ‘Staff/Crew’ column will disappear from the Quote page, as shown below;
Applying notes and deductions in Quotes
Similar to the Invoice page, admins can apply special discounts and notes.
To do this, tick the box for the adjustment, enter a name or description, input the amount (including the % sign), and click ‘Update Quote’ to apply the changes.
Additionally, ‘Part Payment Required’ allows admin to charge the client to a maximum of 3 separate times by using this feature. Tick the box next to Part Payment Required, enter the payment amount or percentage, and click “Update.” see 4.1.1 Invoices for more information
TIP: To add or deduct an amount (excluding GST), tick “Apply Management Tax,” enter the name (e.g., “Tool Hire”), and specify the amount without the % sign. Use a negative sign before the amount for deductions or discounts.
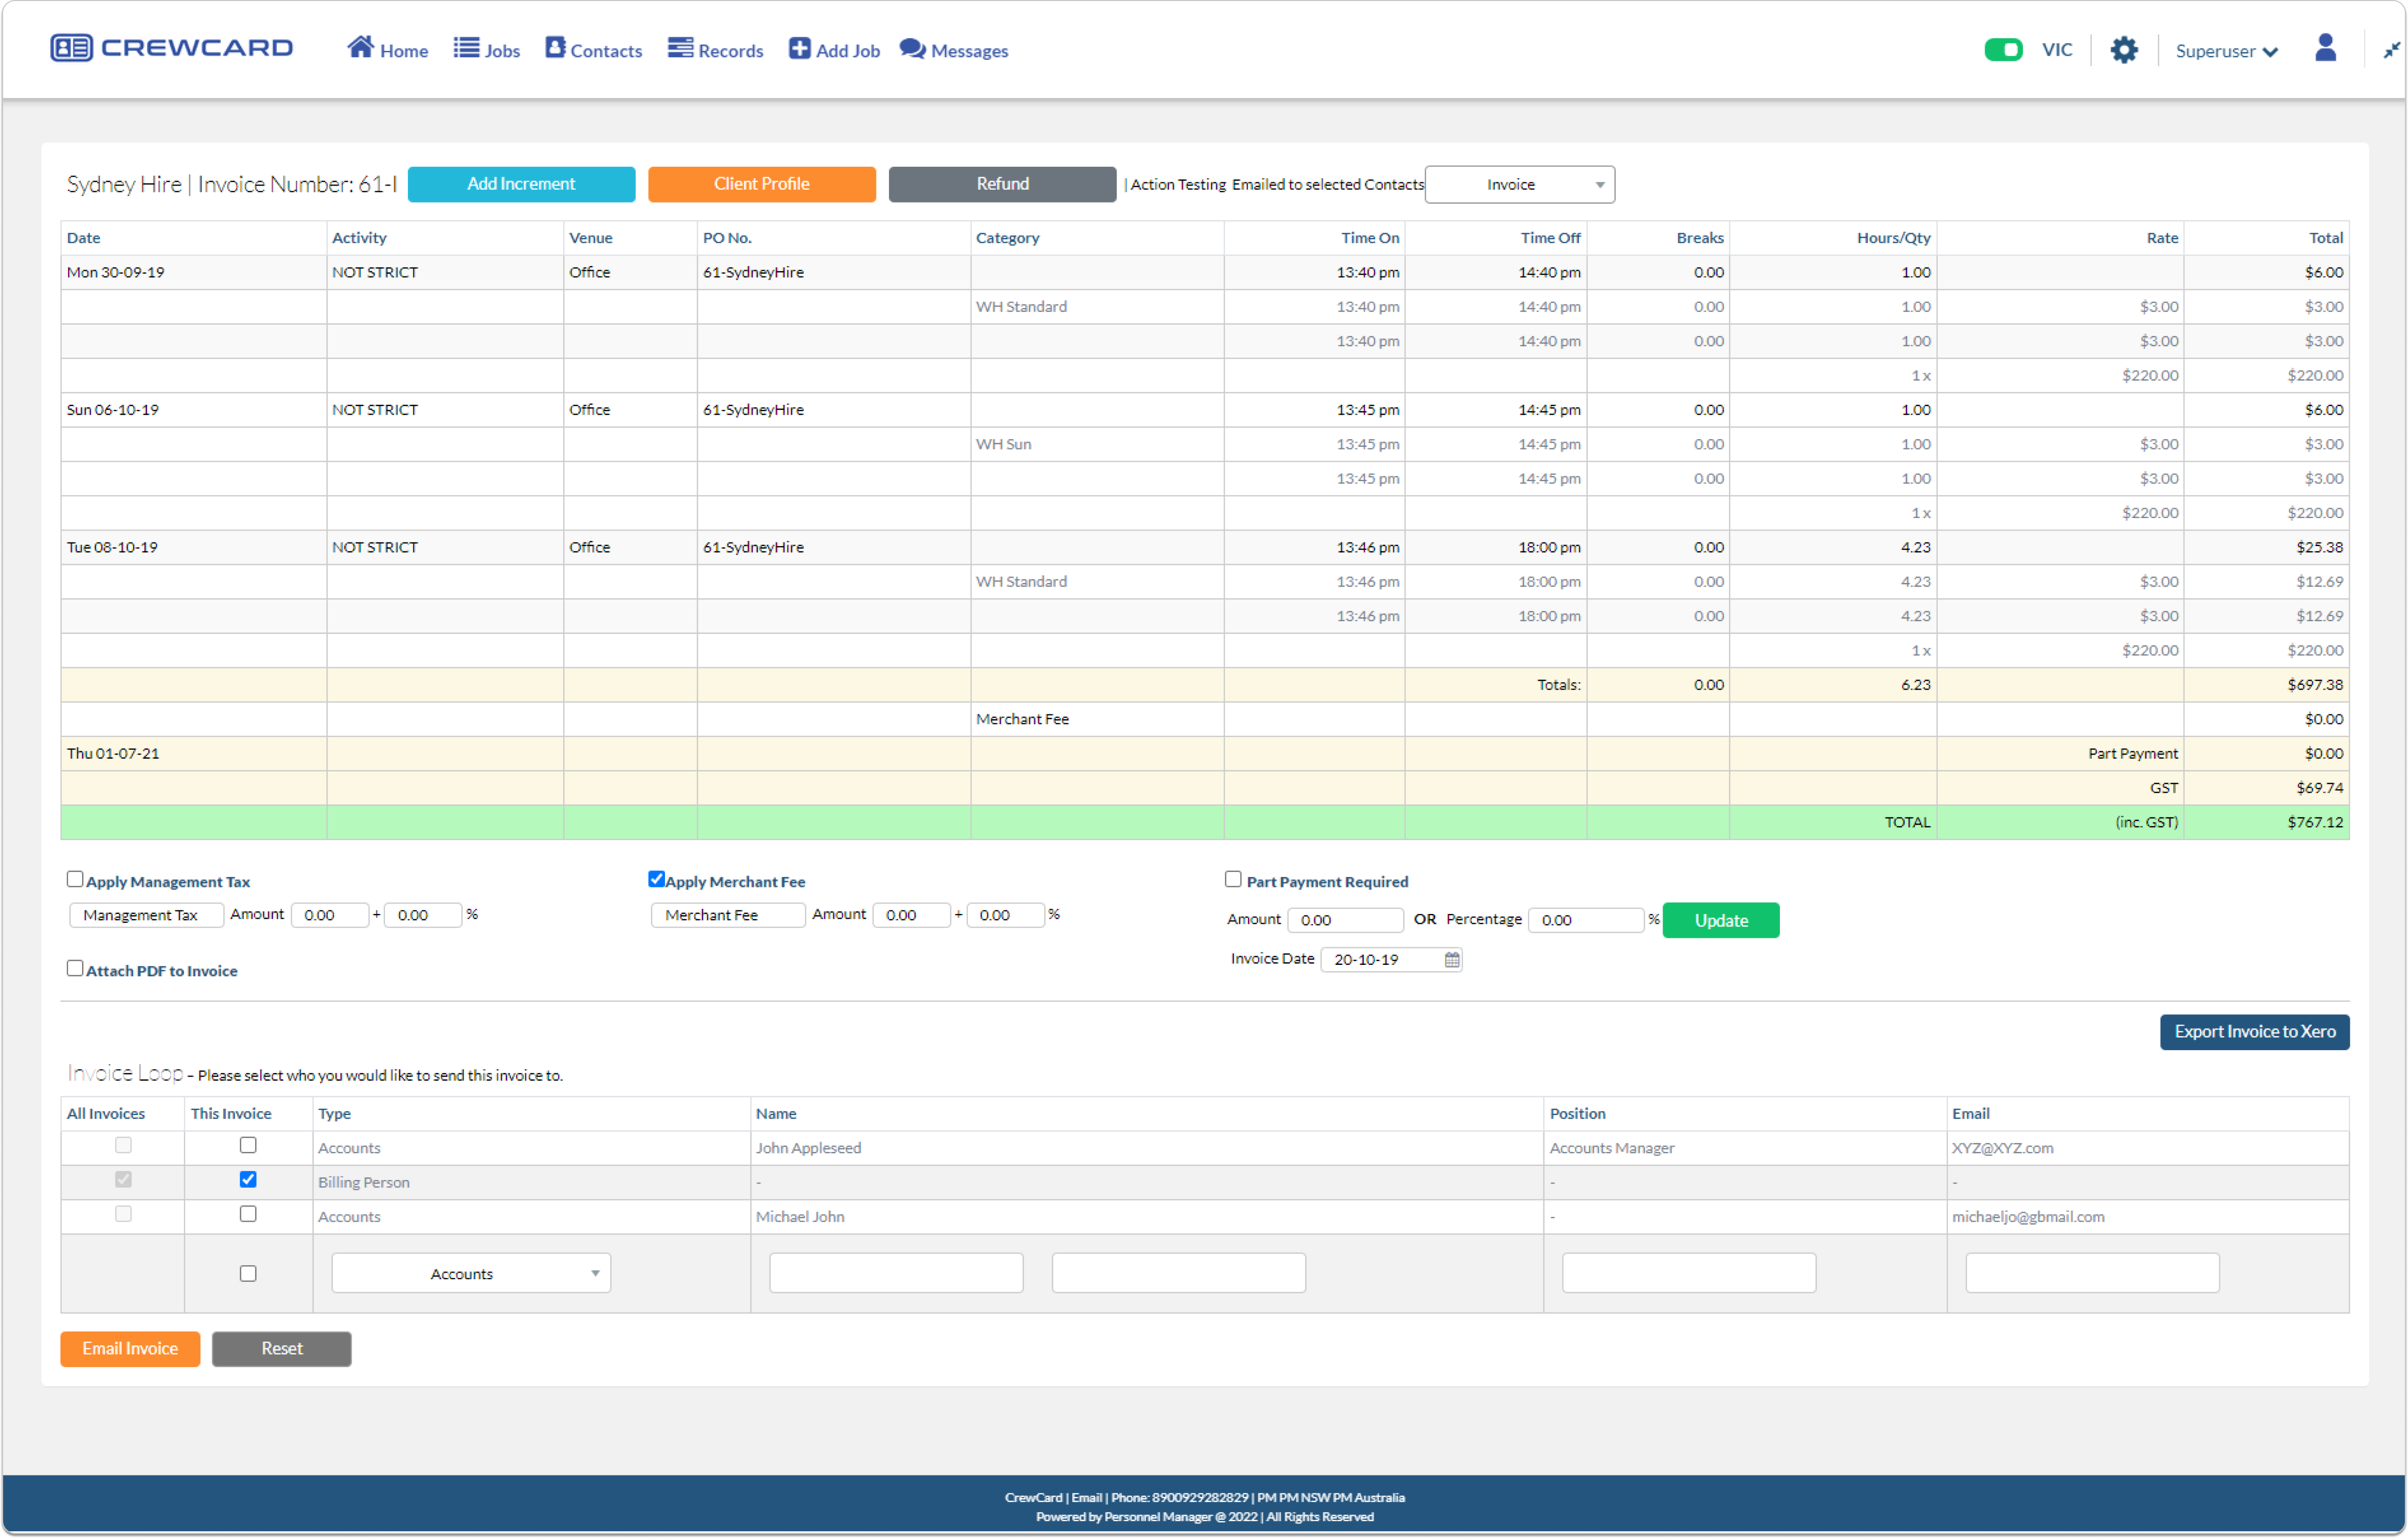
After reviewing the quote, scroll down to the email quote section. All recipients linked to the client’s profile will be displayed. To learn how to add recipients, refer to Guide 9.2 Client Profile. Tick the box next to the names of the recipients you want to include. If you need to send the quote to someone not in the system, use the bottom line to add their information:
To add a contact, fill in the contact type, name, position, and email address before sending the quote. Check the boxes next to their names to send the quote to multiple recipients. deselect or click the ‘Reset’ button to clear the fields. Once the quote was sent, any new contacts will automatically be added to the contact list and the invoice loop. You can view, delete, or edit these entries in each client’s ‘Client Profile.’
When you’re ready to send the quote, choose either the CrewCard default quote template or your customised one from settings, then click “Email Quote.”
Invoice Notes Templates
The select Template dropdown allows users to insert pre-saved note templates into the invoice’s Note Field.
Users can create and manage thier own invoice note templates in Settings > General Settings > Invoice Notes Templates
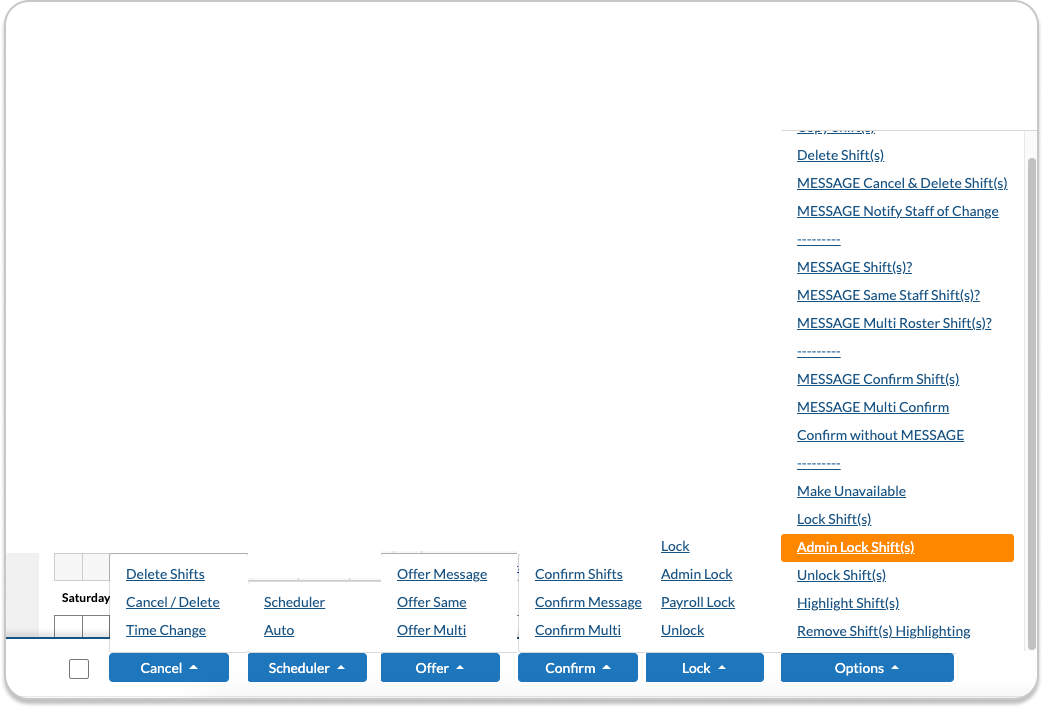
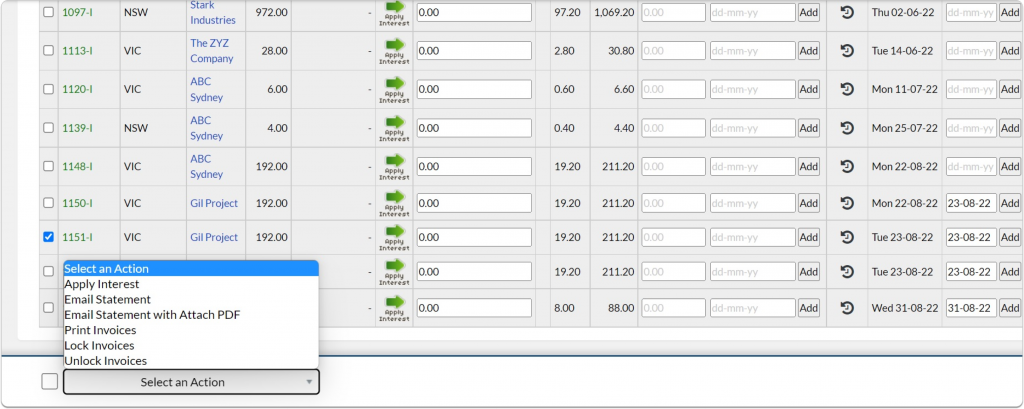
Actions
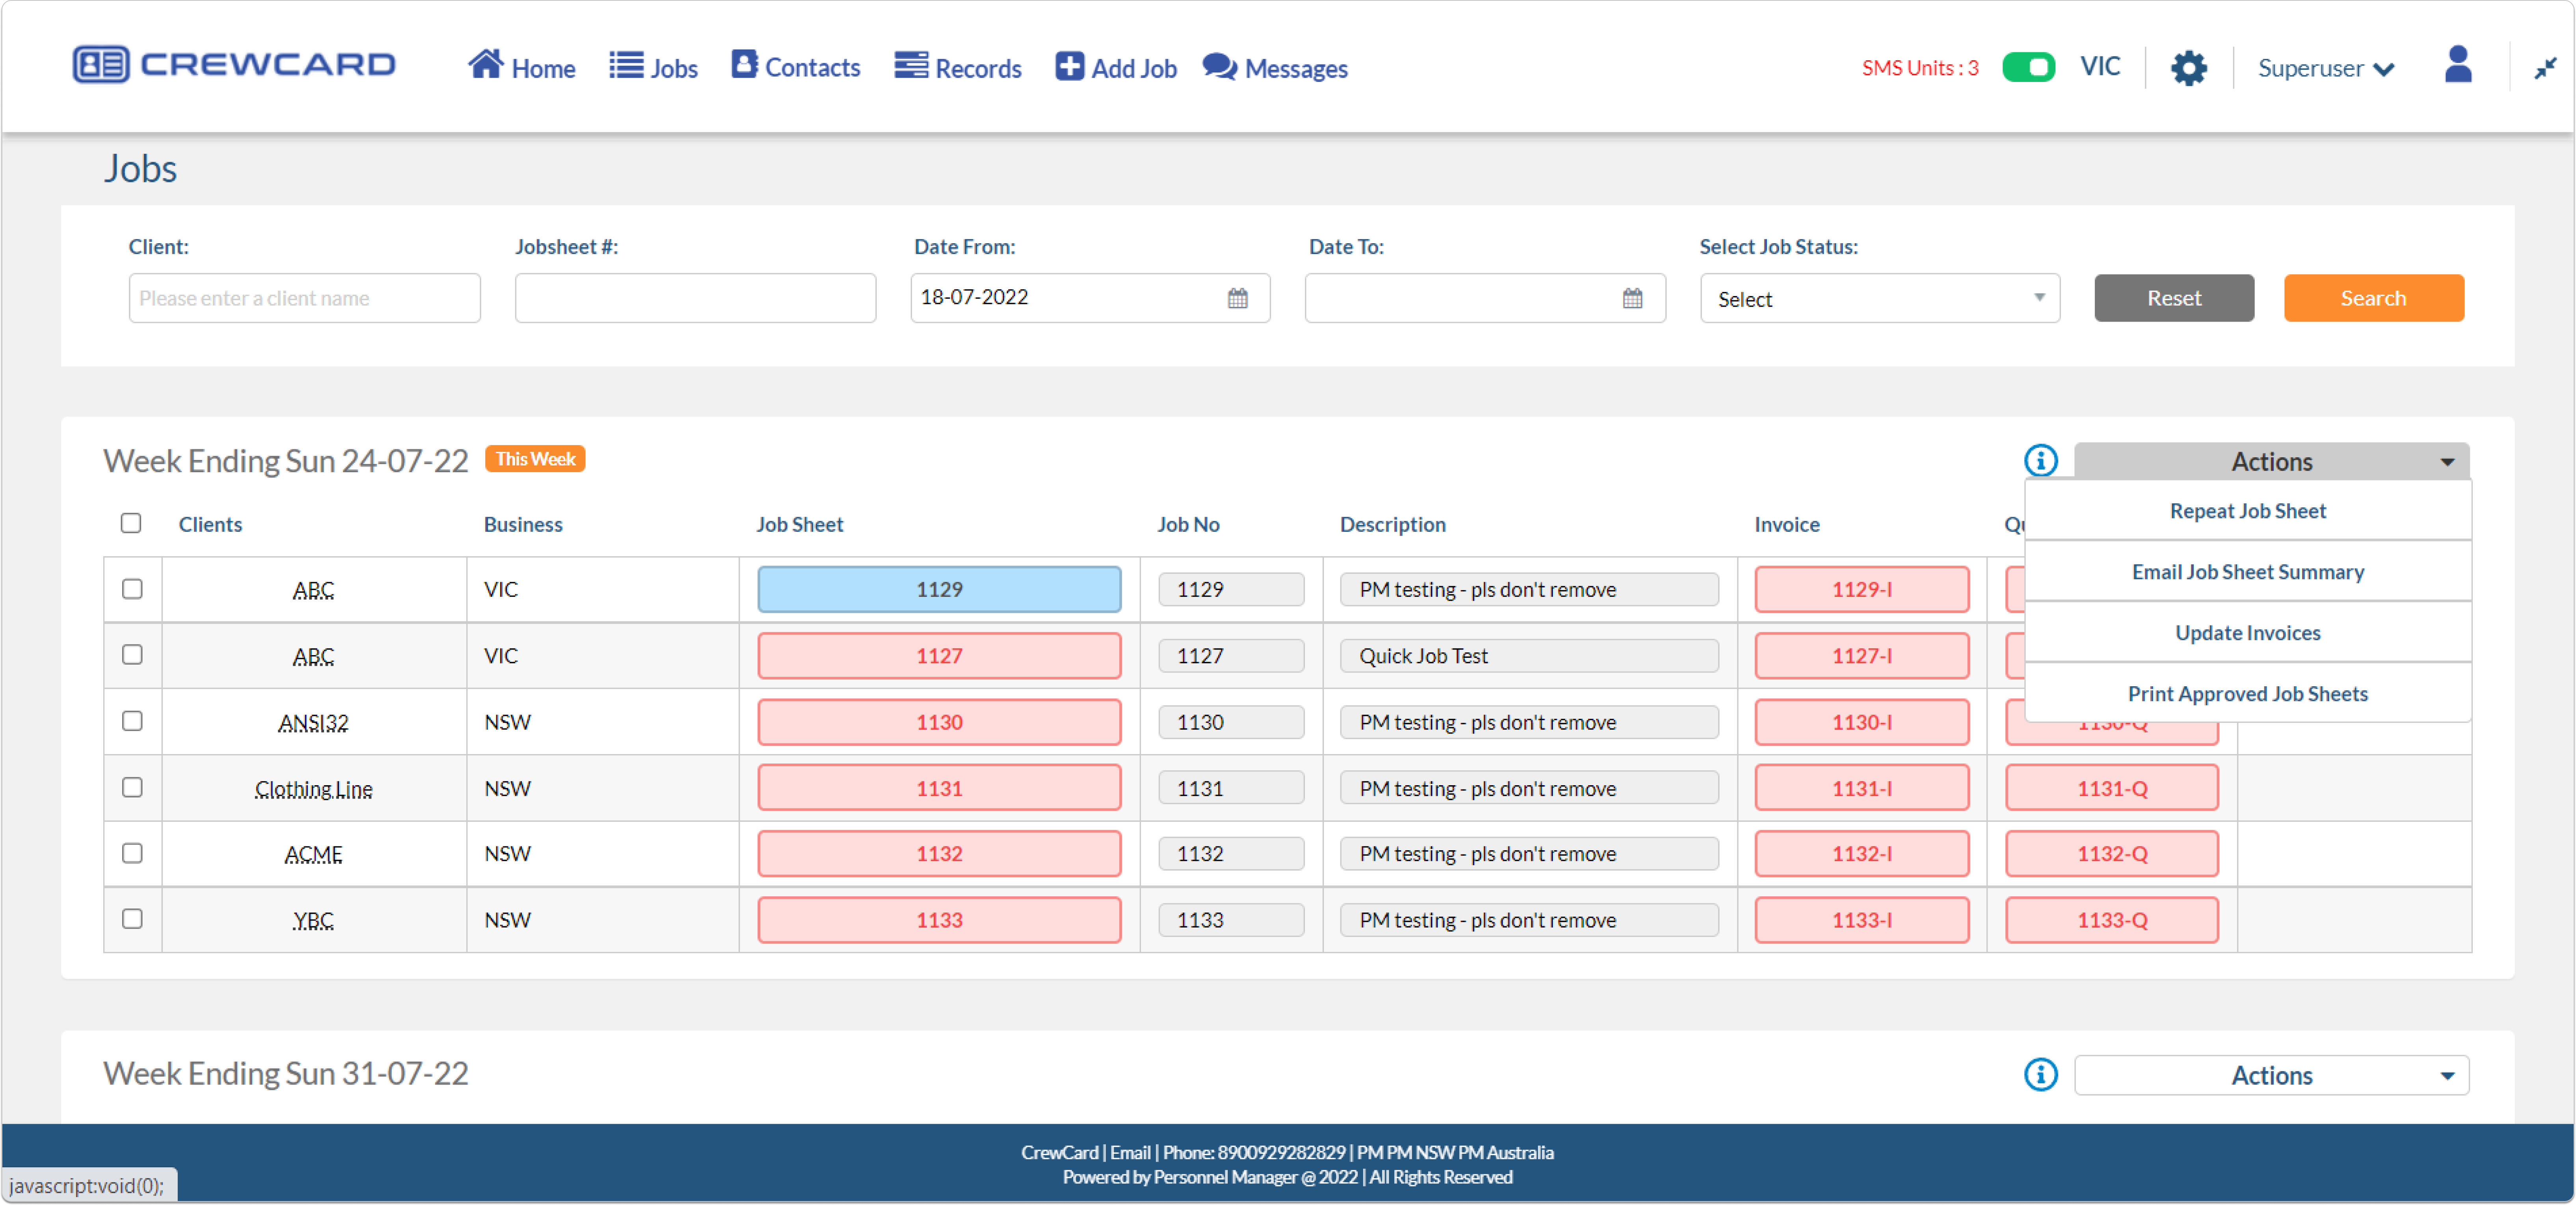
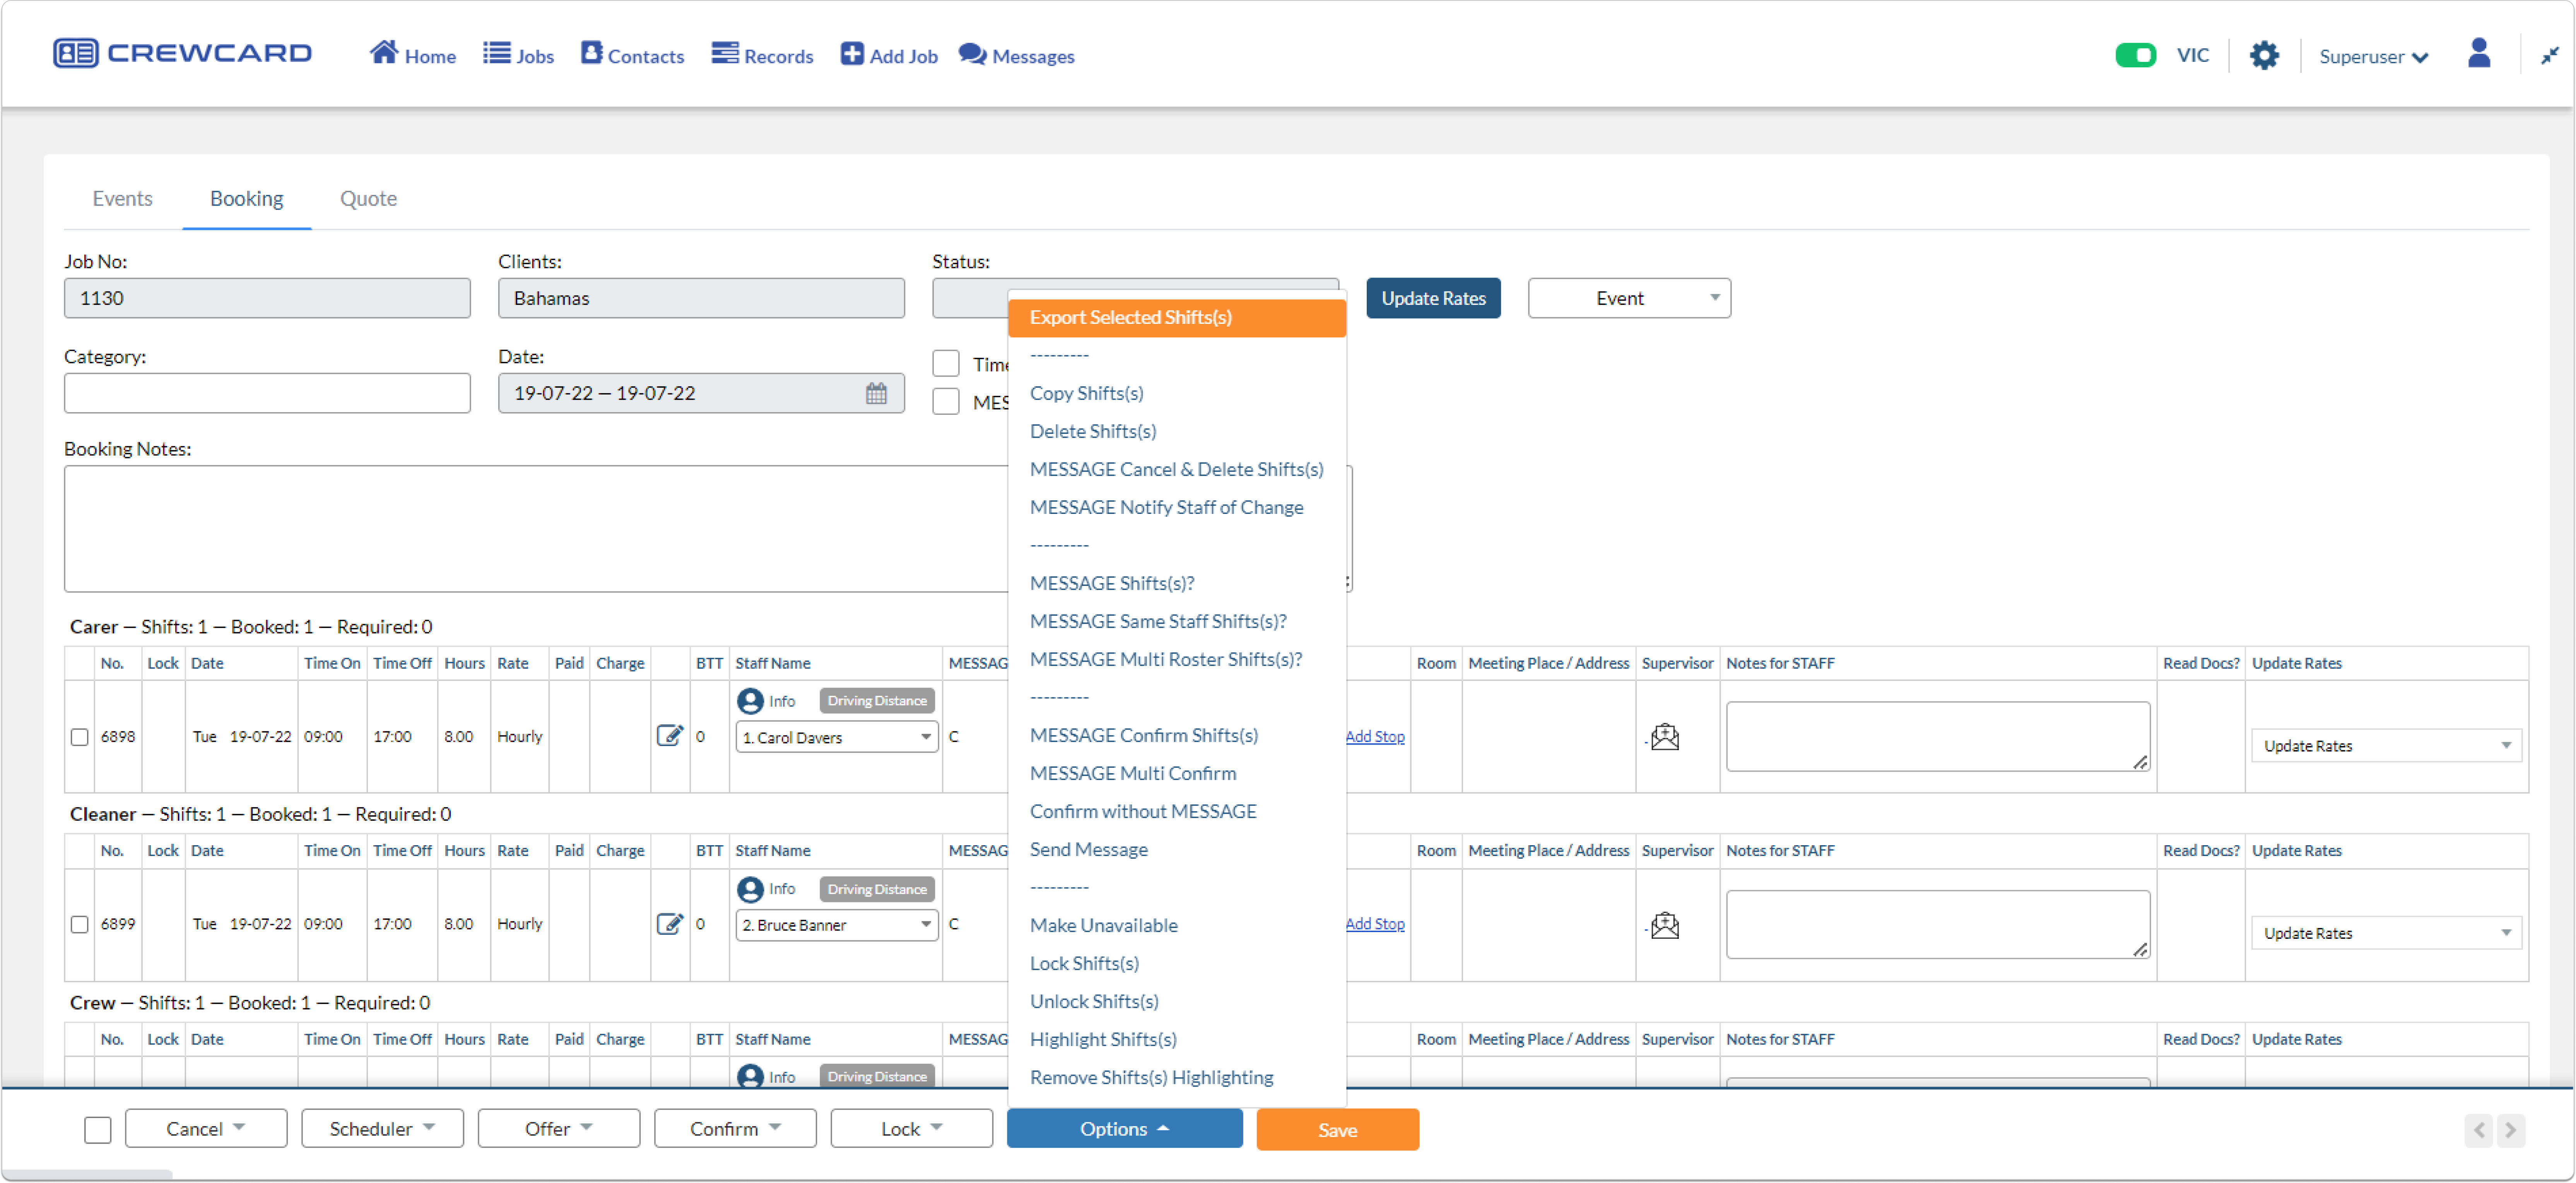
Now, let’s go back to the job page and take a look at what the Action drop-down menu.
Action is located in the right corner of every jobs. Click on the box to toggle the drop down.
Journey: Job > Job > Action
A drop-down menu will appear which contains a list of actions that can be performed on this page.
To apply ‘Action’ to specific jobs, check the box next to the job/s you wish to perform an action on, then click the action from the list.
Let’s dive deeper into what each of the actions does!
Action: Repeat Job Sheet Weekly
Admins and managers can create weekly recurring shifts to avoid the hassle of manually duplicating shifts.
To do this, check the job that you wish to copy and click on ‘Repeat Job Sheet’. A pop-up window will appear on the page:
Fill out all fields and make sure to check the box next to ‘Repeat’. Enter the number of times you want the job to recur each week. Once done, click the button labelled ‘Repeat’ to apply it across the system.
Action: Email Job Sheet Summary
This feature help you quickly send one or multiple jobs to it’s corresponding clients.
Note: Default email template will be used! You can customise the layout of the email that is to be sent via general settings. See guide 10.2.5 Client Email Job Sheet Summary to find out how.
Important: In order to use this feature, the following should be met:
Only ‘Locked’ shifts will be included in the summary email.
Only recipients with the contact type ‘Accounts’ will receive the email. To add or edit the contact type, visit Accounts located in the client’s profile.
Journey: Contacts (located in CNB) > Client List > Select the Client > edit (pencil & paper icon) > Accounts > edit (pencil & paper icon) or ‘Add New Account’
Action: Update Invoices
Sometimes, multiple managers or admins may review job sheets. To streamline this process, we’ve implemented a feature called ‘Update Invoices.’
This feature enables organisations to confirm invoices that have been edited, paid, or partially paid, ensuring better control and structure in timesheet management.
When an invoice is edited, the box in the Invoice section will turn red. After the shift is confirmed, the box will turn green to indicate that it has been reviewed and updated.
For example, if a manager recently edited an invoice, the box under ‘Invoice’ will turn red, alerting their boss to review and confirm the changes. Once the boss reviews and confirms the invoice, the box will turn green, indicating in the system that the invoice has been reviewed.
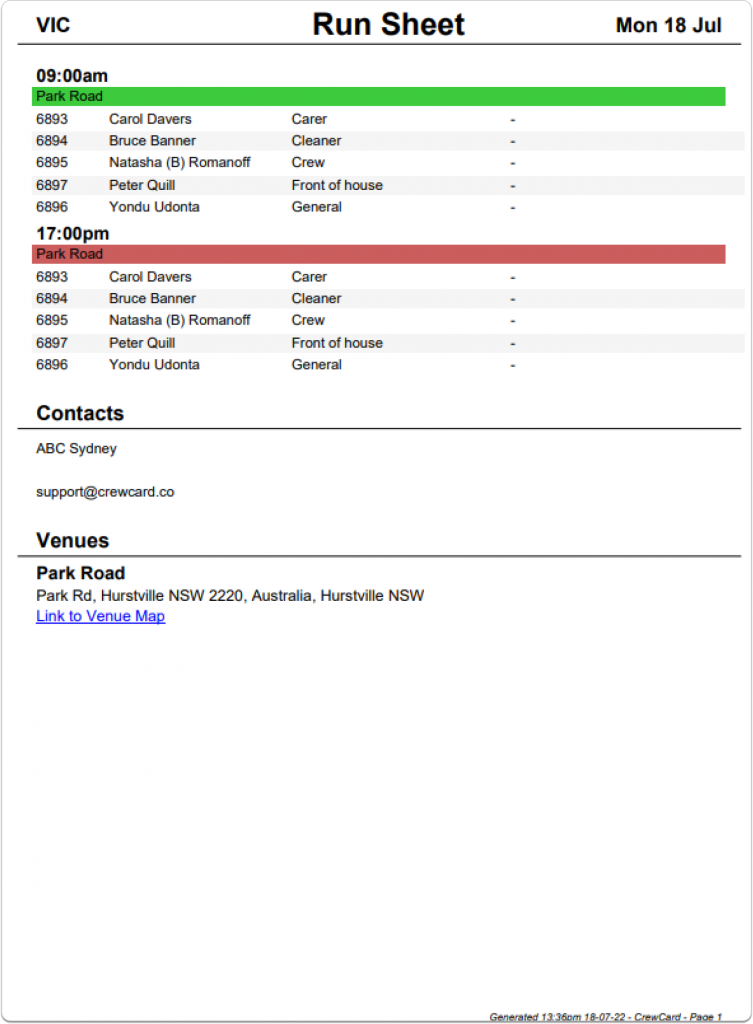
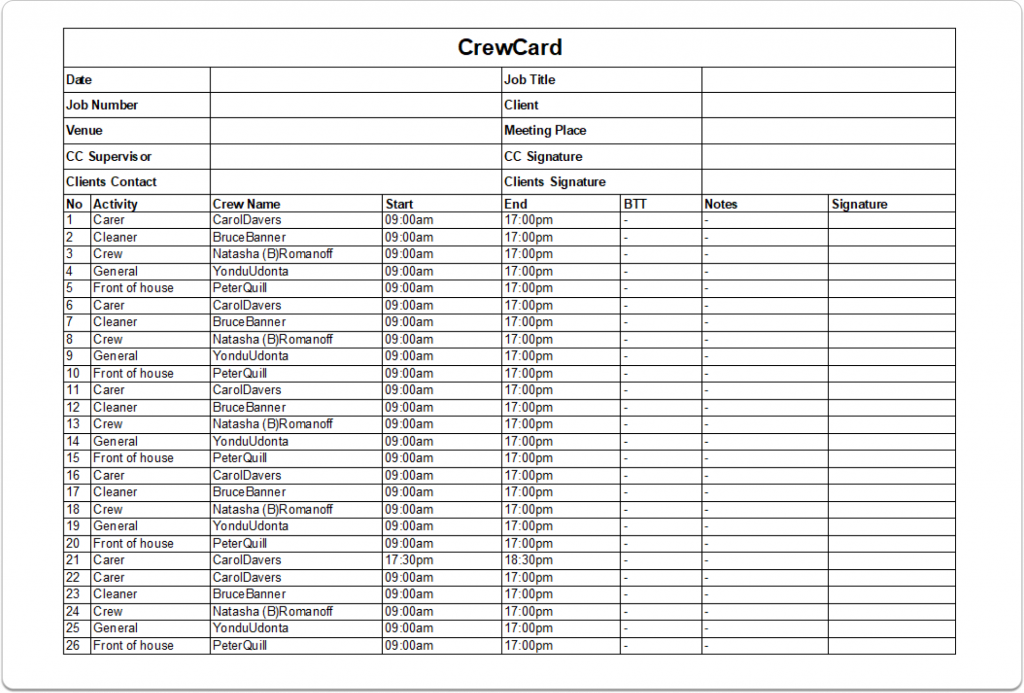
Action: Print Approved Job Sheets
Select the job and click on ‘Print Approved Job Sheet’. This feature automatically generates a job sheet in a new window.
From there, you can either print the job sheet or download it as a PDF.
Action: Send Timesheet Approval Email
On the Jobs page, select the desired job and click the actions button, click on “Send Timesheet Approval Email.”
Timesheet Approval Logic
Access to Timesheet approval is limited to specific user roles: Client, Project Manager, Supervisor, and Admin.
Within the app, the following designations apply:
A: Admin (Schedule Time) CM: Crew Member (Actual Time) S: Supervisor CL: ClientFor example, when a client logs into the app, they have the ability to view both the scheduled time and actual time entries submitted by the crew. However, they can only make edits to the time entries that they themselves have entered. In this scenario, an additional editable time field is provided for the Client (CL).
Select the users to whom you wish to send the timesheet approval email, or check the “Select All” option and click the send button.
Review all the shift informations and click on ‘Send Email’.
Select the members you wish to send the timesheet approval email to, or choose “Select All” for all members. Once done, click “Send.”
The selected members will receive the timesheet approval email and can review and respond to it by rejecting or approving the timesheet.
Once the timesheet is approved, it will be marked as “Timesheet Approved.”
Admins can check the status of timesheet approval on the Job Sheet page (Job > Job Sheet). Simply hover your mouse over the icon above the shift number, and a tooltip will appear, indicating whether the timesheet still requires approval or if it has been fully accepted.
An alternative method to send the timesheet approval is by navigating to the desired Job Sheet page where you intend to send the timesheet approval.
Choose the specific shift or select all shifts, click on the options button, and then select “Send Timesheet Approval Email.”
Select the users to whom you wish to send the timesheet approval email, or check the “Select All” option and click the send button.
The selected members will receive the timesheet approval email and can review and respond to it by rejecting or approving the timesheet.
After approving the timesheet, it will be displayed as “Timesheet Approved.”
In an event the timesheet is rejected, the user will be redirected to the daysheet page, where they can review the shifts before submitting the timesheet again.
The timesheet approval hierarchy will adhere to the sequence of Crew, Supervisor, Client, and Admin.
In the provided example, the supervisor has already approved the timesheet. As I am currently logged in as an admin, I retain the ability to review the timesheet once more. This enables me to either grant approval or reject the submission, particularly if any irregularities are identified in the hours entered by the crew.
The Timesheet Approval Email will be sent to the client automatically, in accordance with the designated time set within the settings. Emails will be dispatched to the client continuously until they have granted approval for the timesheet.
Furthermore, you have the option to activate the feature that shows the timesheet approver in the invoice email by enabling “Display Timesheet Approval at Invoice Email.”
Action: Send Bulk Invoice
The Jobs page allows you to manage and send bulk invoices efficiently. Follow the steps below to complete the process:
Once you select a jobsheet, a dropdown menu will appear with various actions. On the upper right side, click Send Bulk Invoices.
After clicking, a pop-up will appear displaying the Client Name, Invoice Number, and Job Description.
Once the invoices have been successfully sent, a confirmation pop-up will appear in the upper right corner of the screen.
Action: Xero Bulk Send
The “Xero Bulk Send” feature enables bulk export of invoices to Xero from the Jobs page. This function allows users to send multiple selected jobs/invoices to Xero in a single action.
Navigate to the Jobs Page. Select Jobs for Export, Tick the checkboxes next to the jobs you wish to export.
Choose the “Xero Bulk Send” Action. Click on the “Select Actions” dropdown and Select “Xero Bulk Send” from the list.
The Xero login page will appear.Enter your Xero user credentials to proceed.
Select the organization from the list. Click the “Continue with Organization” button located at the footer of the page.
A pop-up notification will confirm the export process. Message: “Invoices exported to Xero.”
Each exported invoice will have a log entry, similar to the existing individual invoice export logs and Each invoice will display a “Last Exported” timestamp below the “Export Invoice to Xero” button after a successful export.
If an export fails, a pop-up notification will display the reason. Example messages:
Title: “Invoice Failed to Export”
Invoice 001 did not have the correct Xero category number assigned to activity X.
Missing TFN Number from Shang Chi. Please update the details here.
A marker will be displayed next to each invoice number to indicate the export status:
Green marker – Successfully exported to Xero.
Red marker – Export failed.
These markers function similarly to the ongoing and timesheet markers.
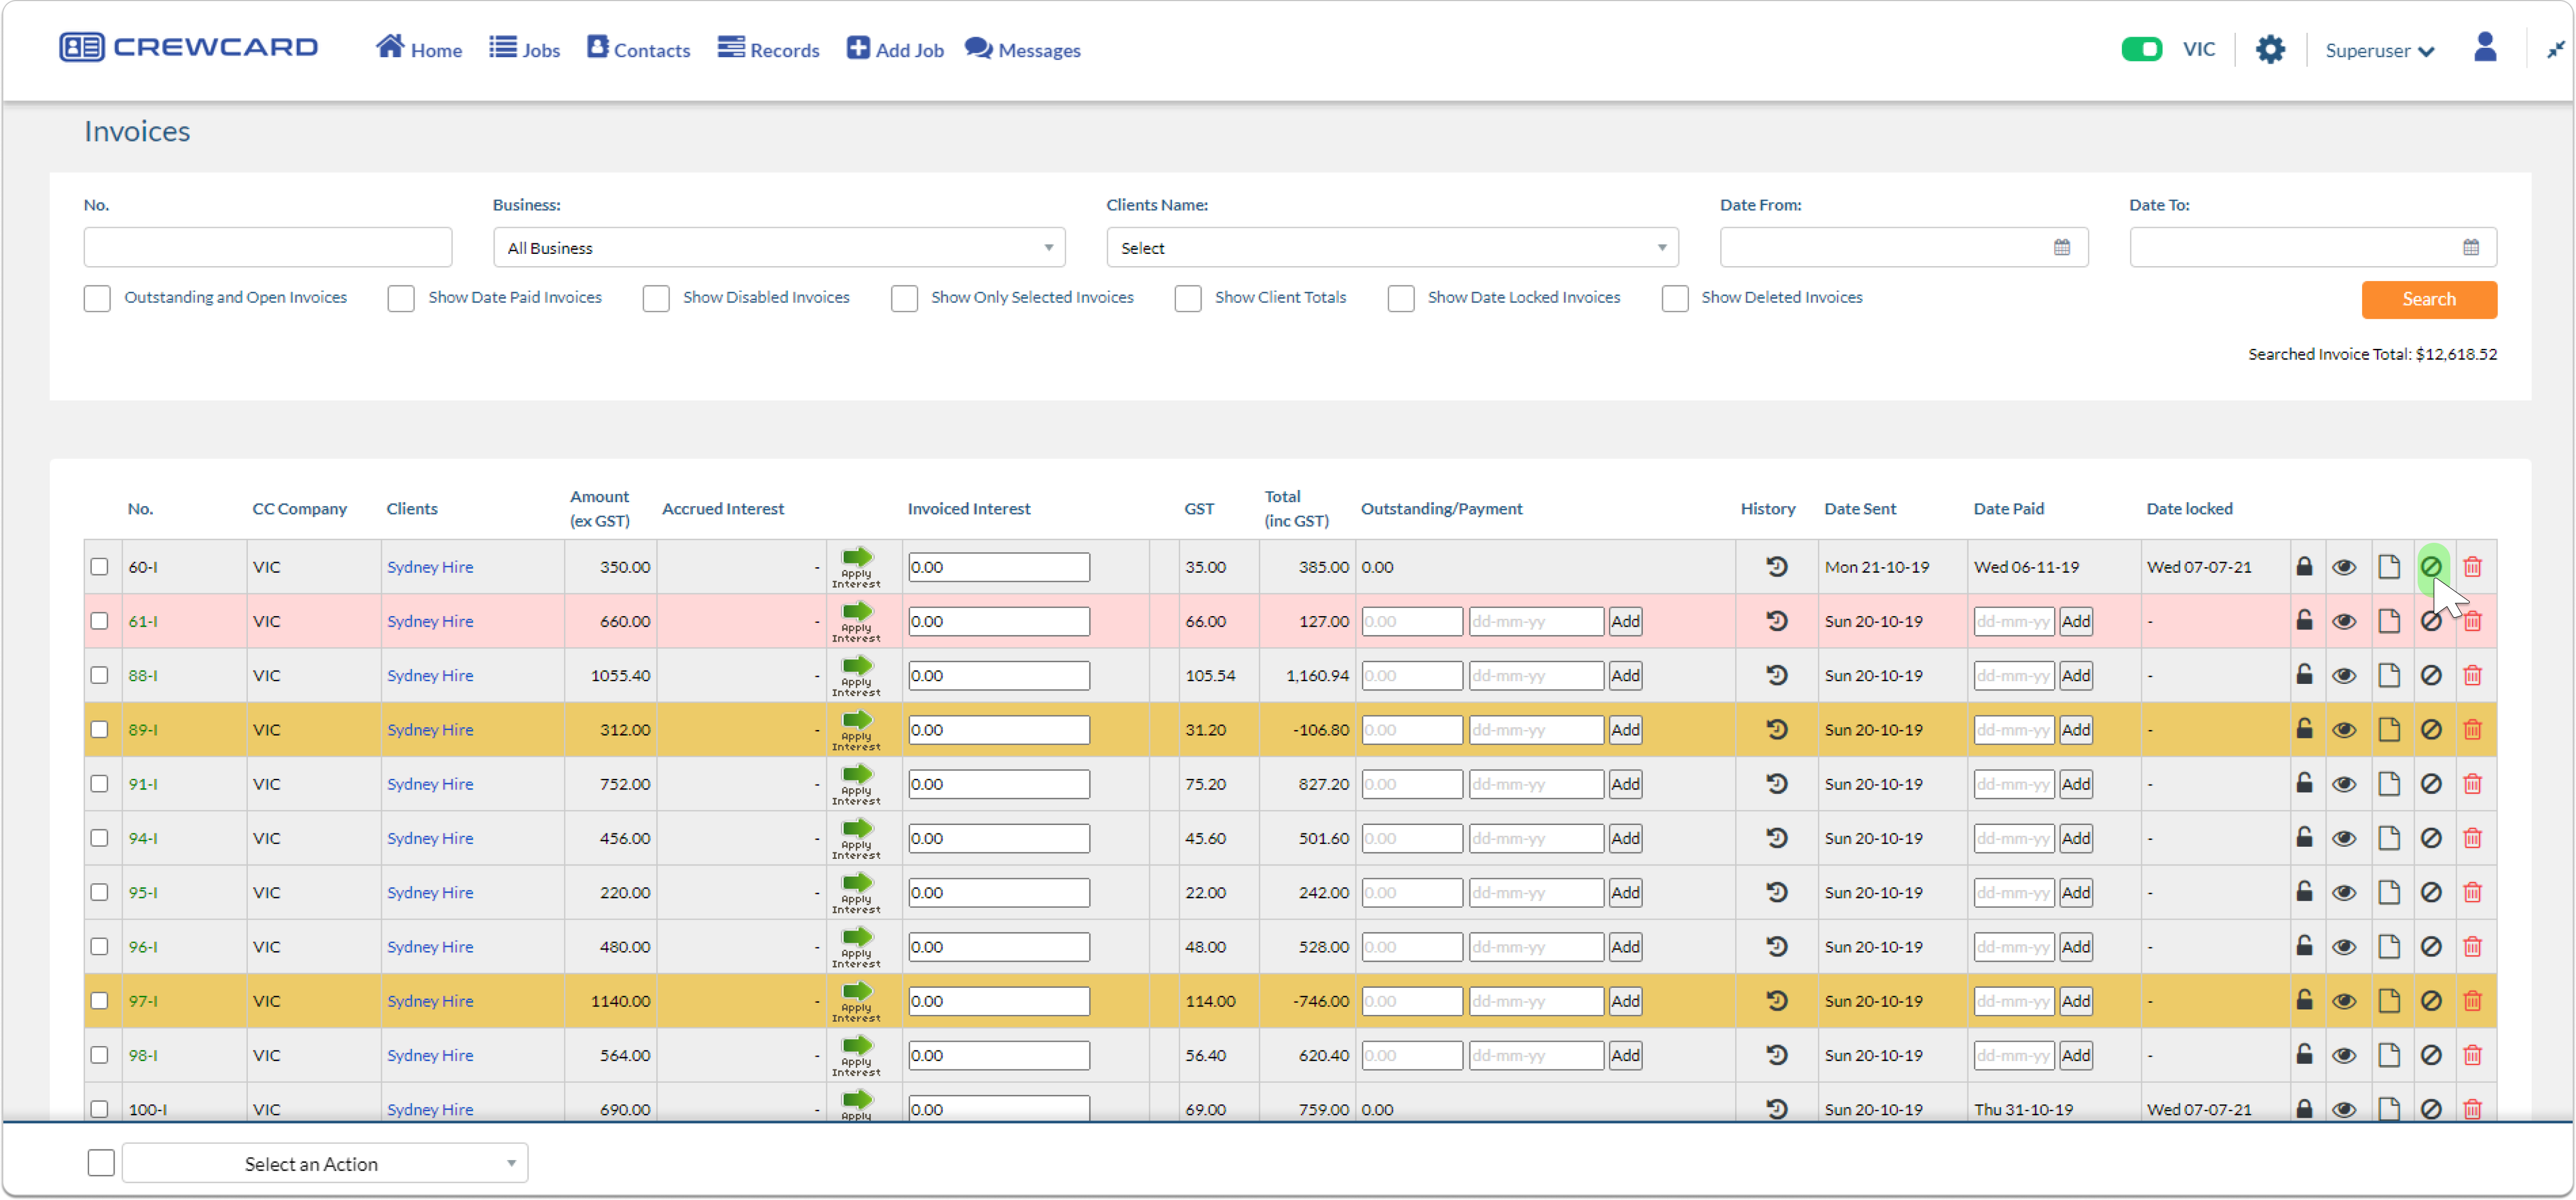
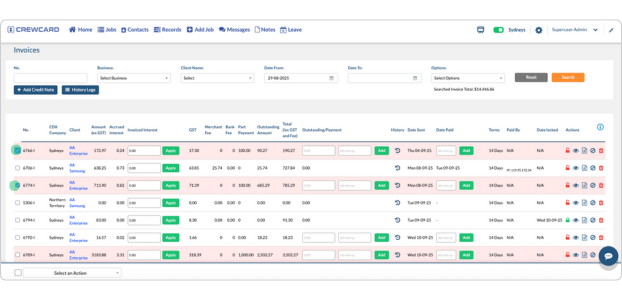
4.1.1 Invoices
To access the Invoice page, visit ‘Invoices’ in the Admin Menu.
Journey: Admin Menu > Finance > Invoices
This will direct you to the Invoices page where you can review and edit your invoices.
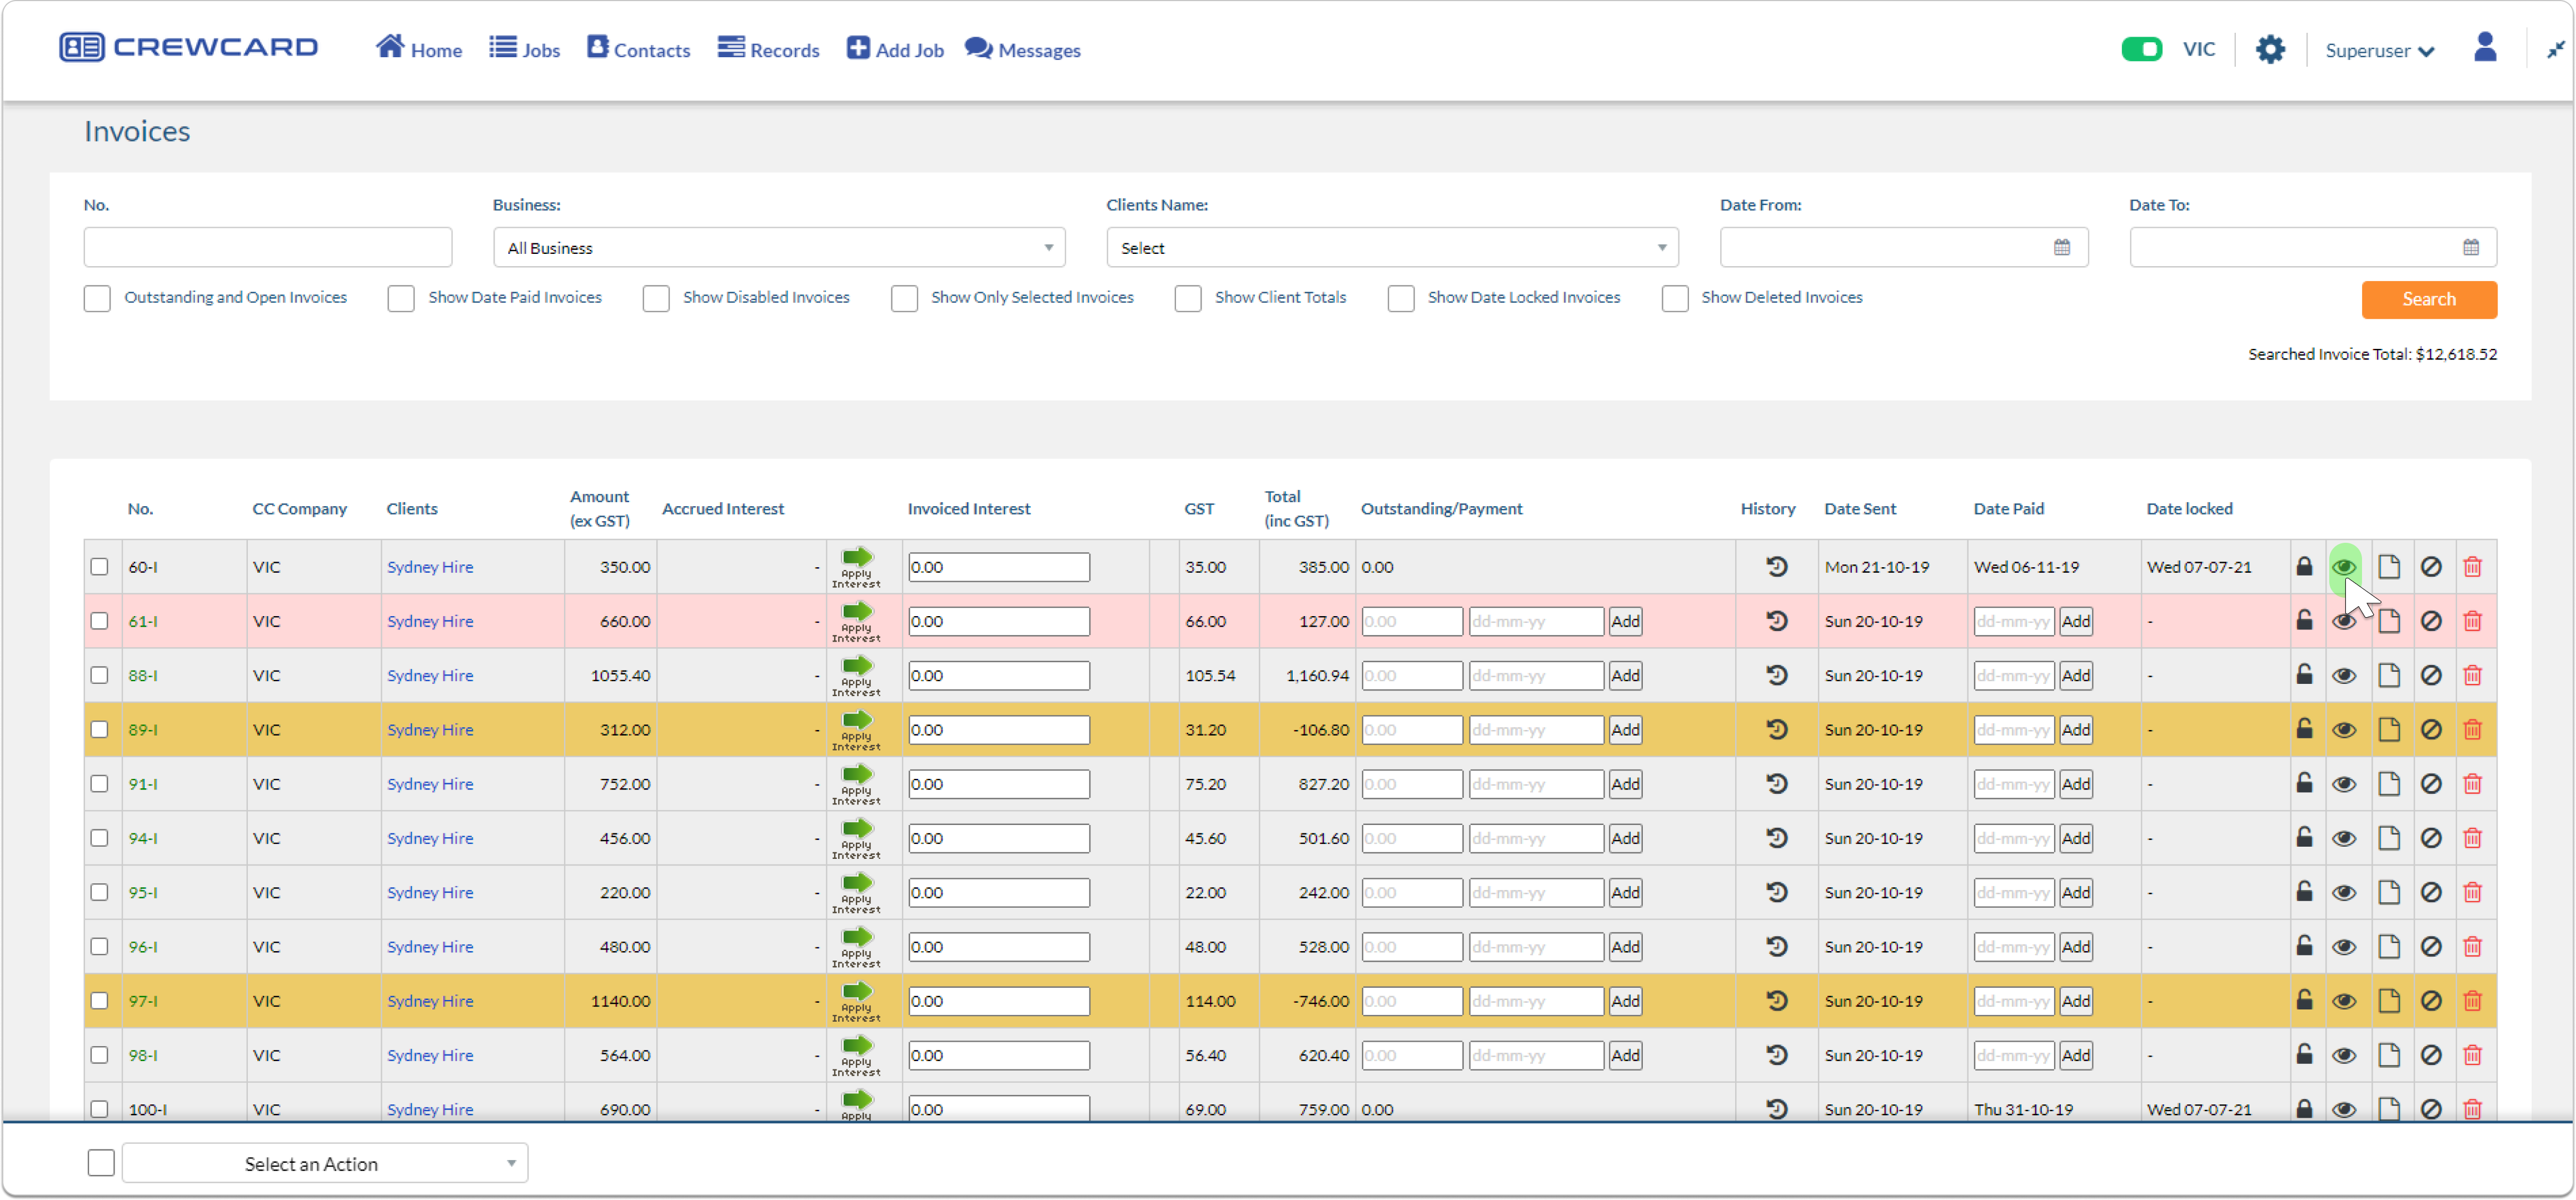
Highlighted rows show differences between payments and the invoice total. Hover over the info icon on the right of the table header to see more details.Find the invoice that you wish to edit on (for example, invoice no.4678-1) and click on the eye icon.
This will direct you to the Invoice page tailored to the chosen client.
Now, let’s take a look at the features at the top of the Invoice Page.
Feature
Description
Add Increment
Enable admin to update the Invoice number.
Client Profile
Directs user to the Client Profile page.
Refund
Used to reverse or refund a payment for the specific invoice.
Invoice History
Records or logs of all past invoices that have been sent.
Dropdown (Currently on ‘Invoice’)
Quick navigation to various job pages.
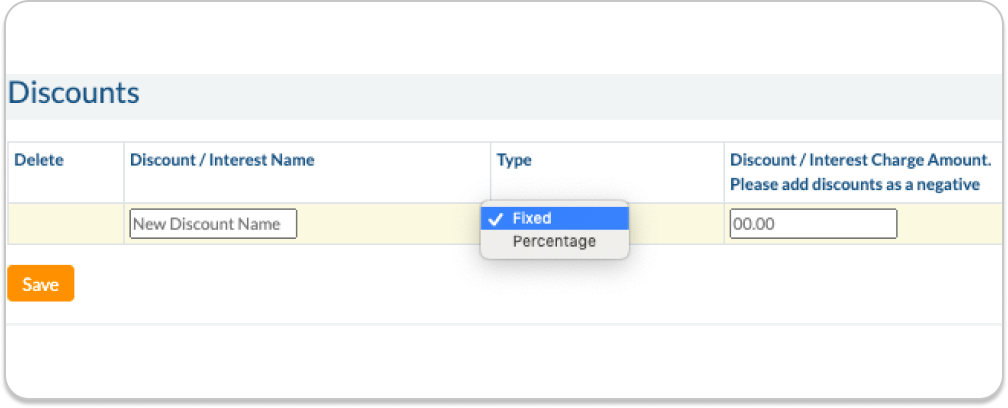
Add New Discount
It’s important to add discounts first before applying them via the Client Profile.
To add a new discount, go to the Discounts page under the Admin Menu.
Journey: Admin Menu > Finance > Discounts
Click the ‘+Add New Discount’ button to create new discount options.
Alternatively, you can edit existing discounts if any are available.
Once it has been created, Go to the Client Profile > Client Discount to select the Discount.
Apply Admin Discount
On the Invoice page (located under the admin menu), admins can add a discount in two ways:
Method 1: Apply via Client’s profile
Click on the client name to open up the Client Profile. Click on ‘Edit’
Select ‘Client Discount.’ under ‘Client overview’. Choose the discount options that will be applied to future invoices for the selected client.
Method 2: Apply through edit
Find the invoice that you wish to edit on and click on the eye icon.
Tick ‘Apply Admin Discount’ and set the discount amount or percentage.
Once completed, save your changes by clicking ‘Update Invoice.’
Merchant Fee and Bank Account Fee
Bank Account Fee: when the Bank Account Fee is ticked on the invoice page, it indicates that bank account payment is the client’s preferred payment method, as set in the Client’s Portal > Billing Details page.
Within the invoice page, this fee can be applied by ticking and entering an amount or percentage (including the % sign). Make sure to save any changes by clicking ‘Update Invoices’
Merchant Fee Amount: when the Merchant Account Fee is ticked on the invoice page, it indicates that card payment is the client’s preferred payment method, as set in the Client’s Portal > Billing Details page.
Within the invoice page, this fee can be applied by ticking and entering an amount or percentage (including the % sign). Make sure to save any changes by clicking ‘Update Invoices’
**Note: admin can opt to remove these fees by unticking the selected preferred method in the Invoice page.
Part Payment Required
Admins can charge the client up to three times using this feature. To begin, tick the ‘Part Payment Required’ box and enter the part payment amount or percentage of the total amount (including GST).
After applying the part payments, the payment amount (highlighted in blue) will be reflected on the invoice. See below:
**Note: Admins must wait until the first payment is completed before proceeding to add additional part payments.
Once part payment has been applied, admins have 3 options to charge clients:
Option 1: Direct Debit
Click ‘Charge Payment’ to directly debit the part payment amount from the client’s bank account or credit card.
Option 2: Email Invoices
Alternatively, admins can send the part payment email by ticking ‘Attach PDF to Invoice.’ Select the recipients or add new account details for those who should receive the invoice, then click ‘Email Invoice.’ This will send a copy of the invoice with (PDF attachment) to the selected users in the Invoice Loop.
Option 3: Email Using Action
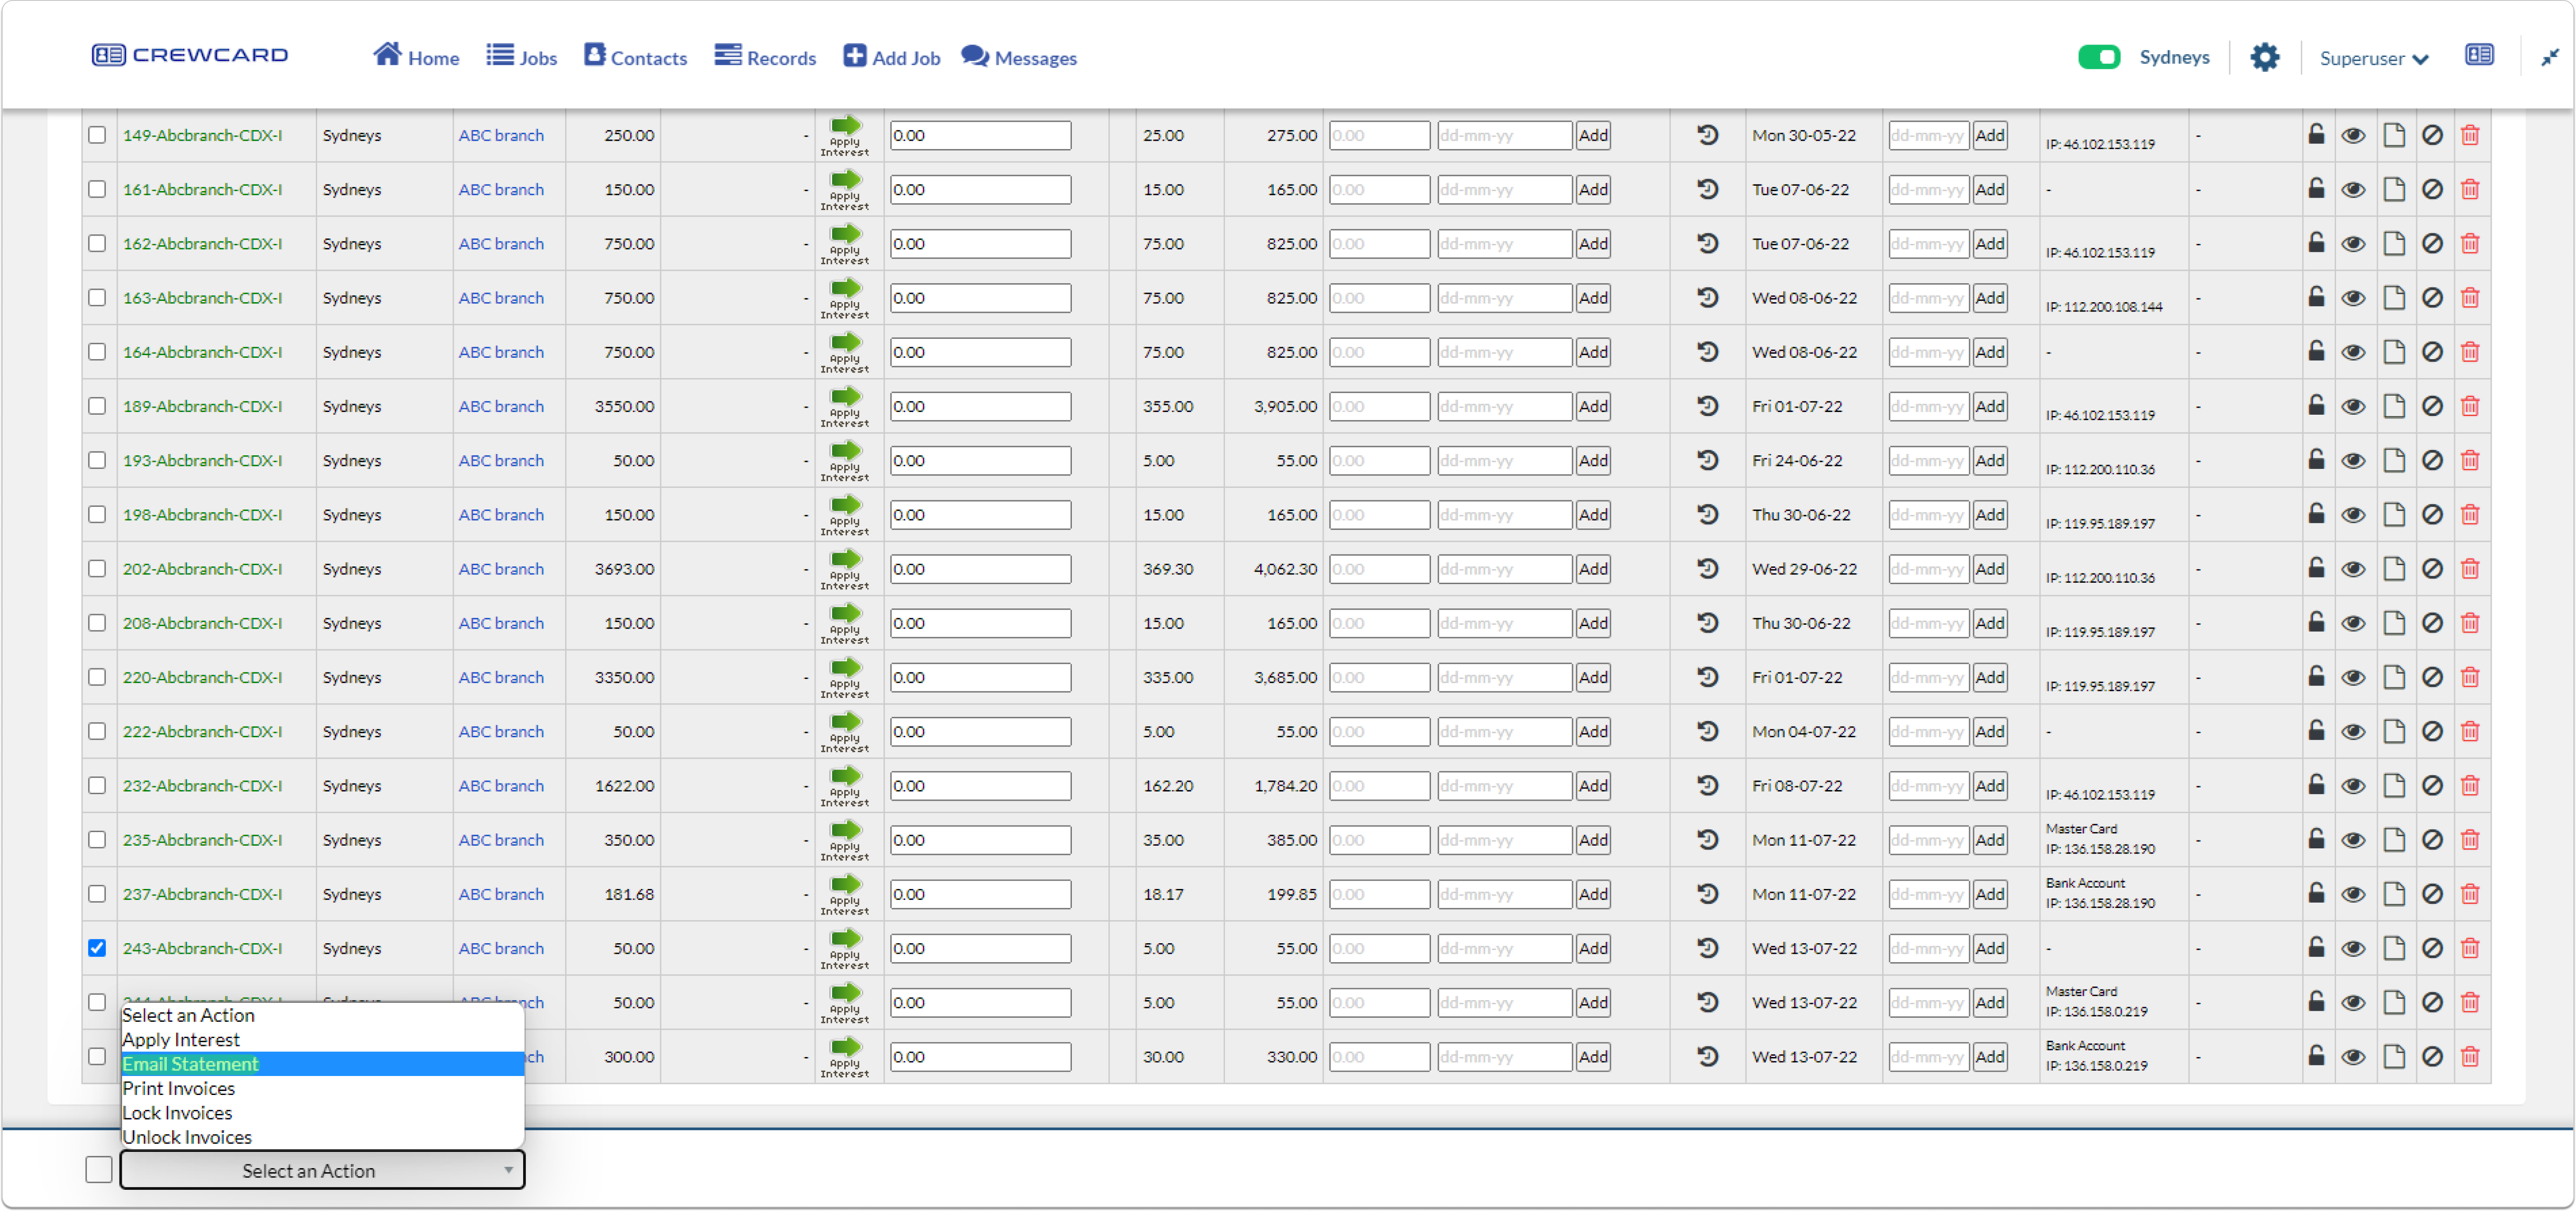
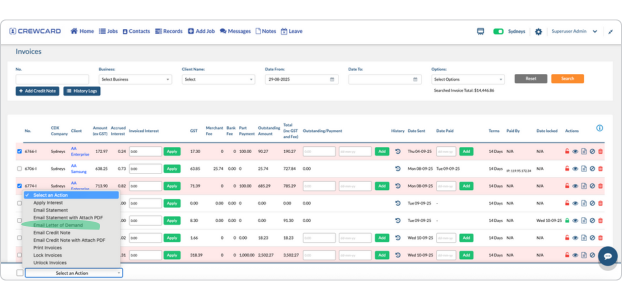
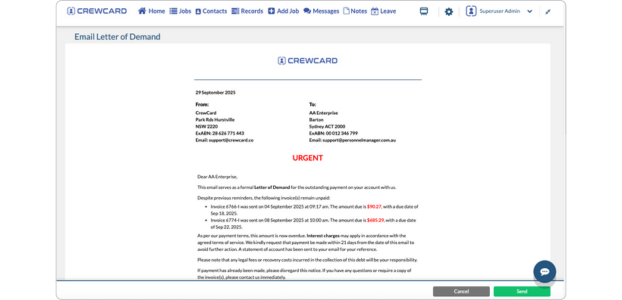
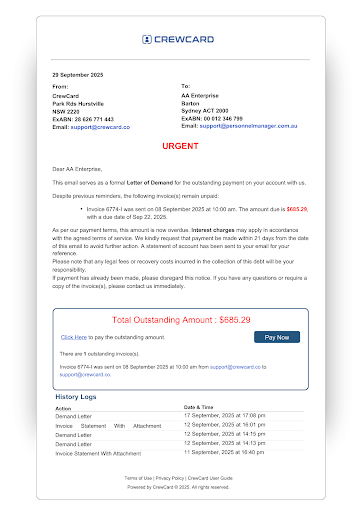
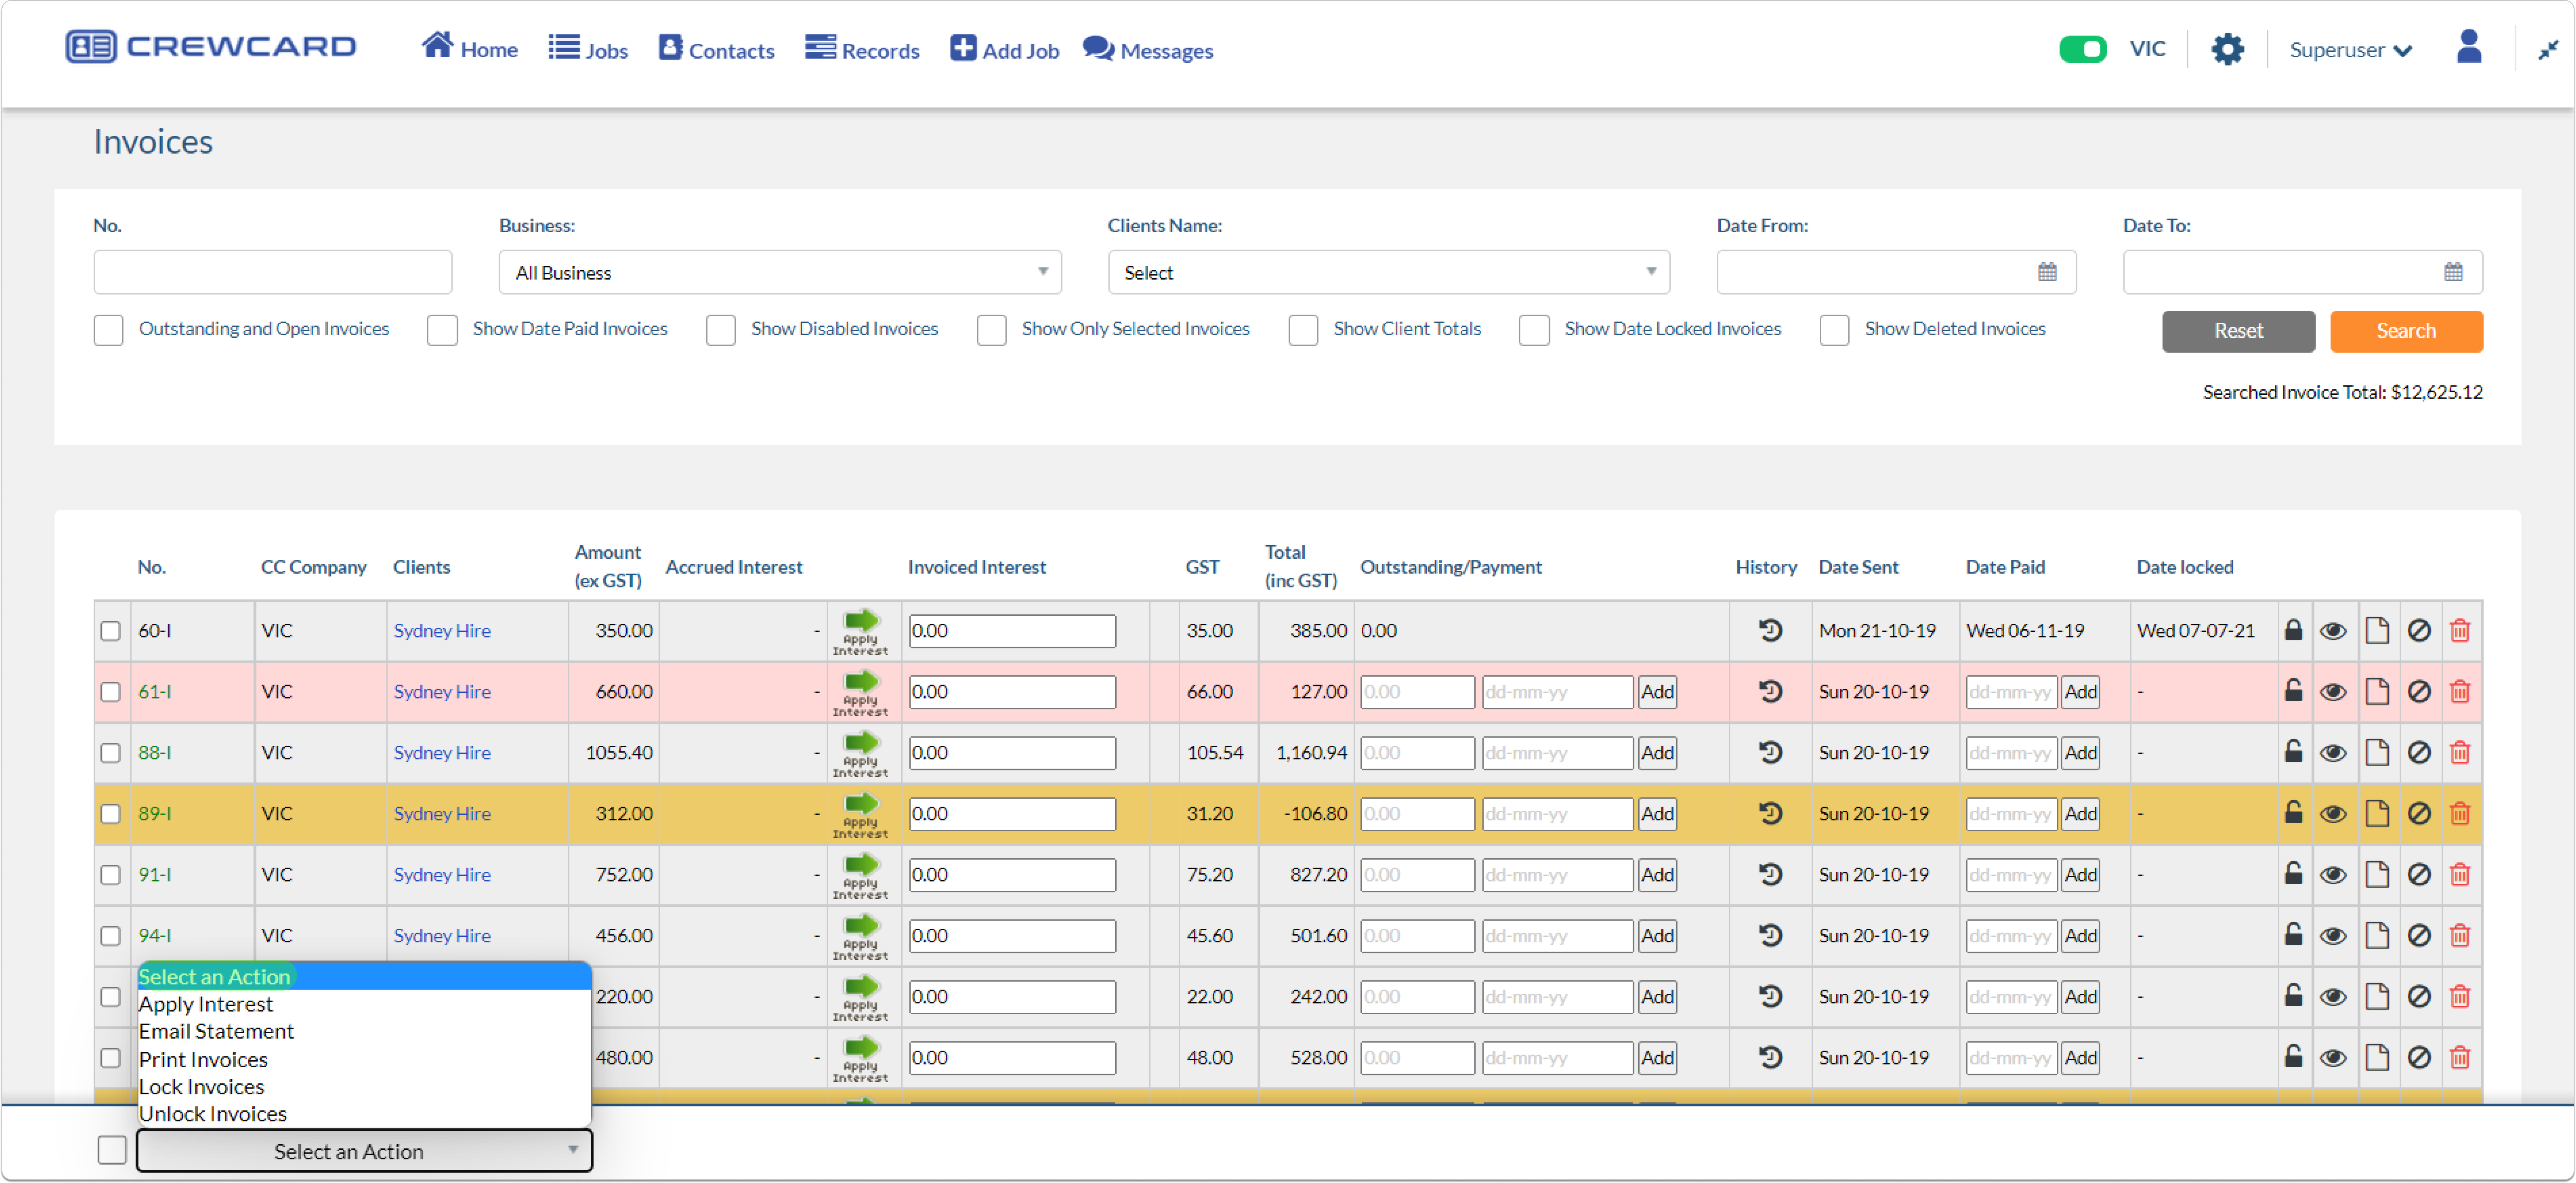
Another way to email an invoice is through the “Action” menu on the Invoice page.
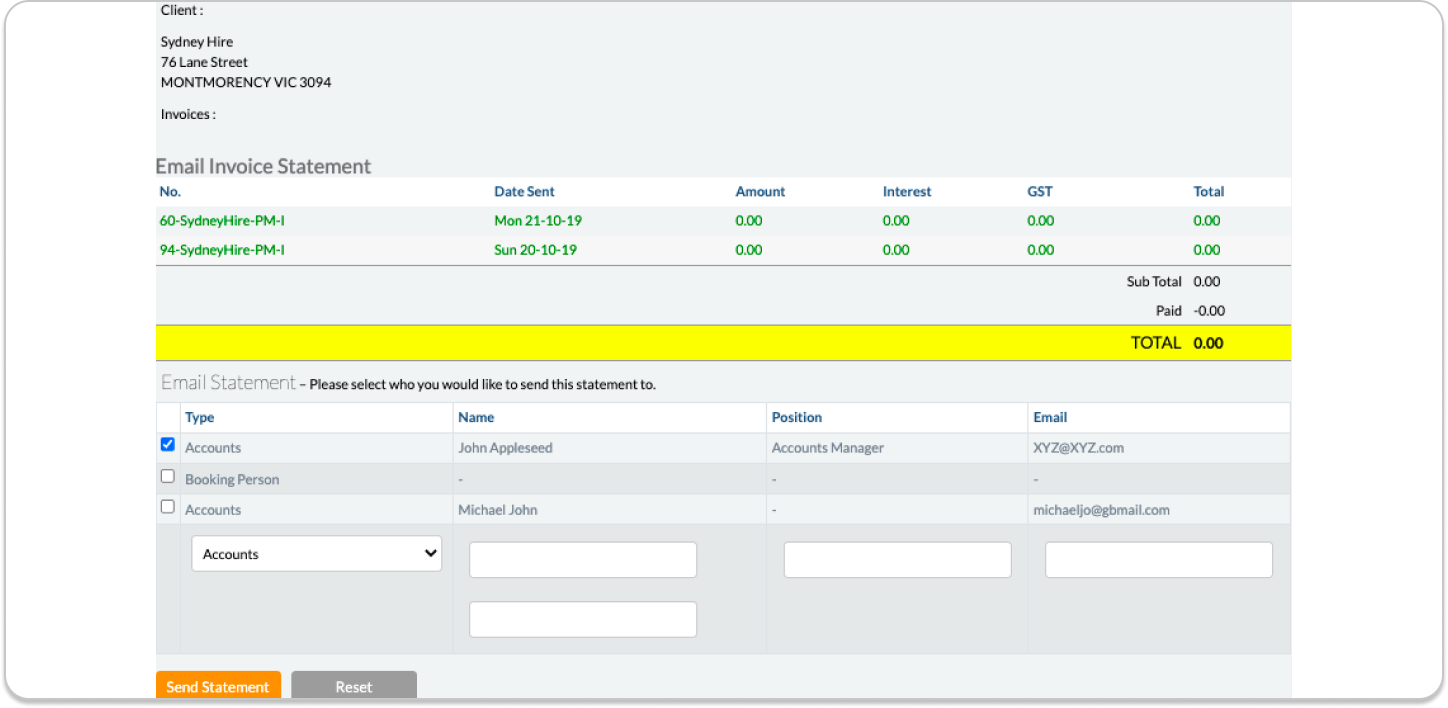
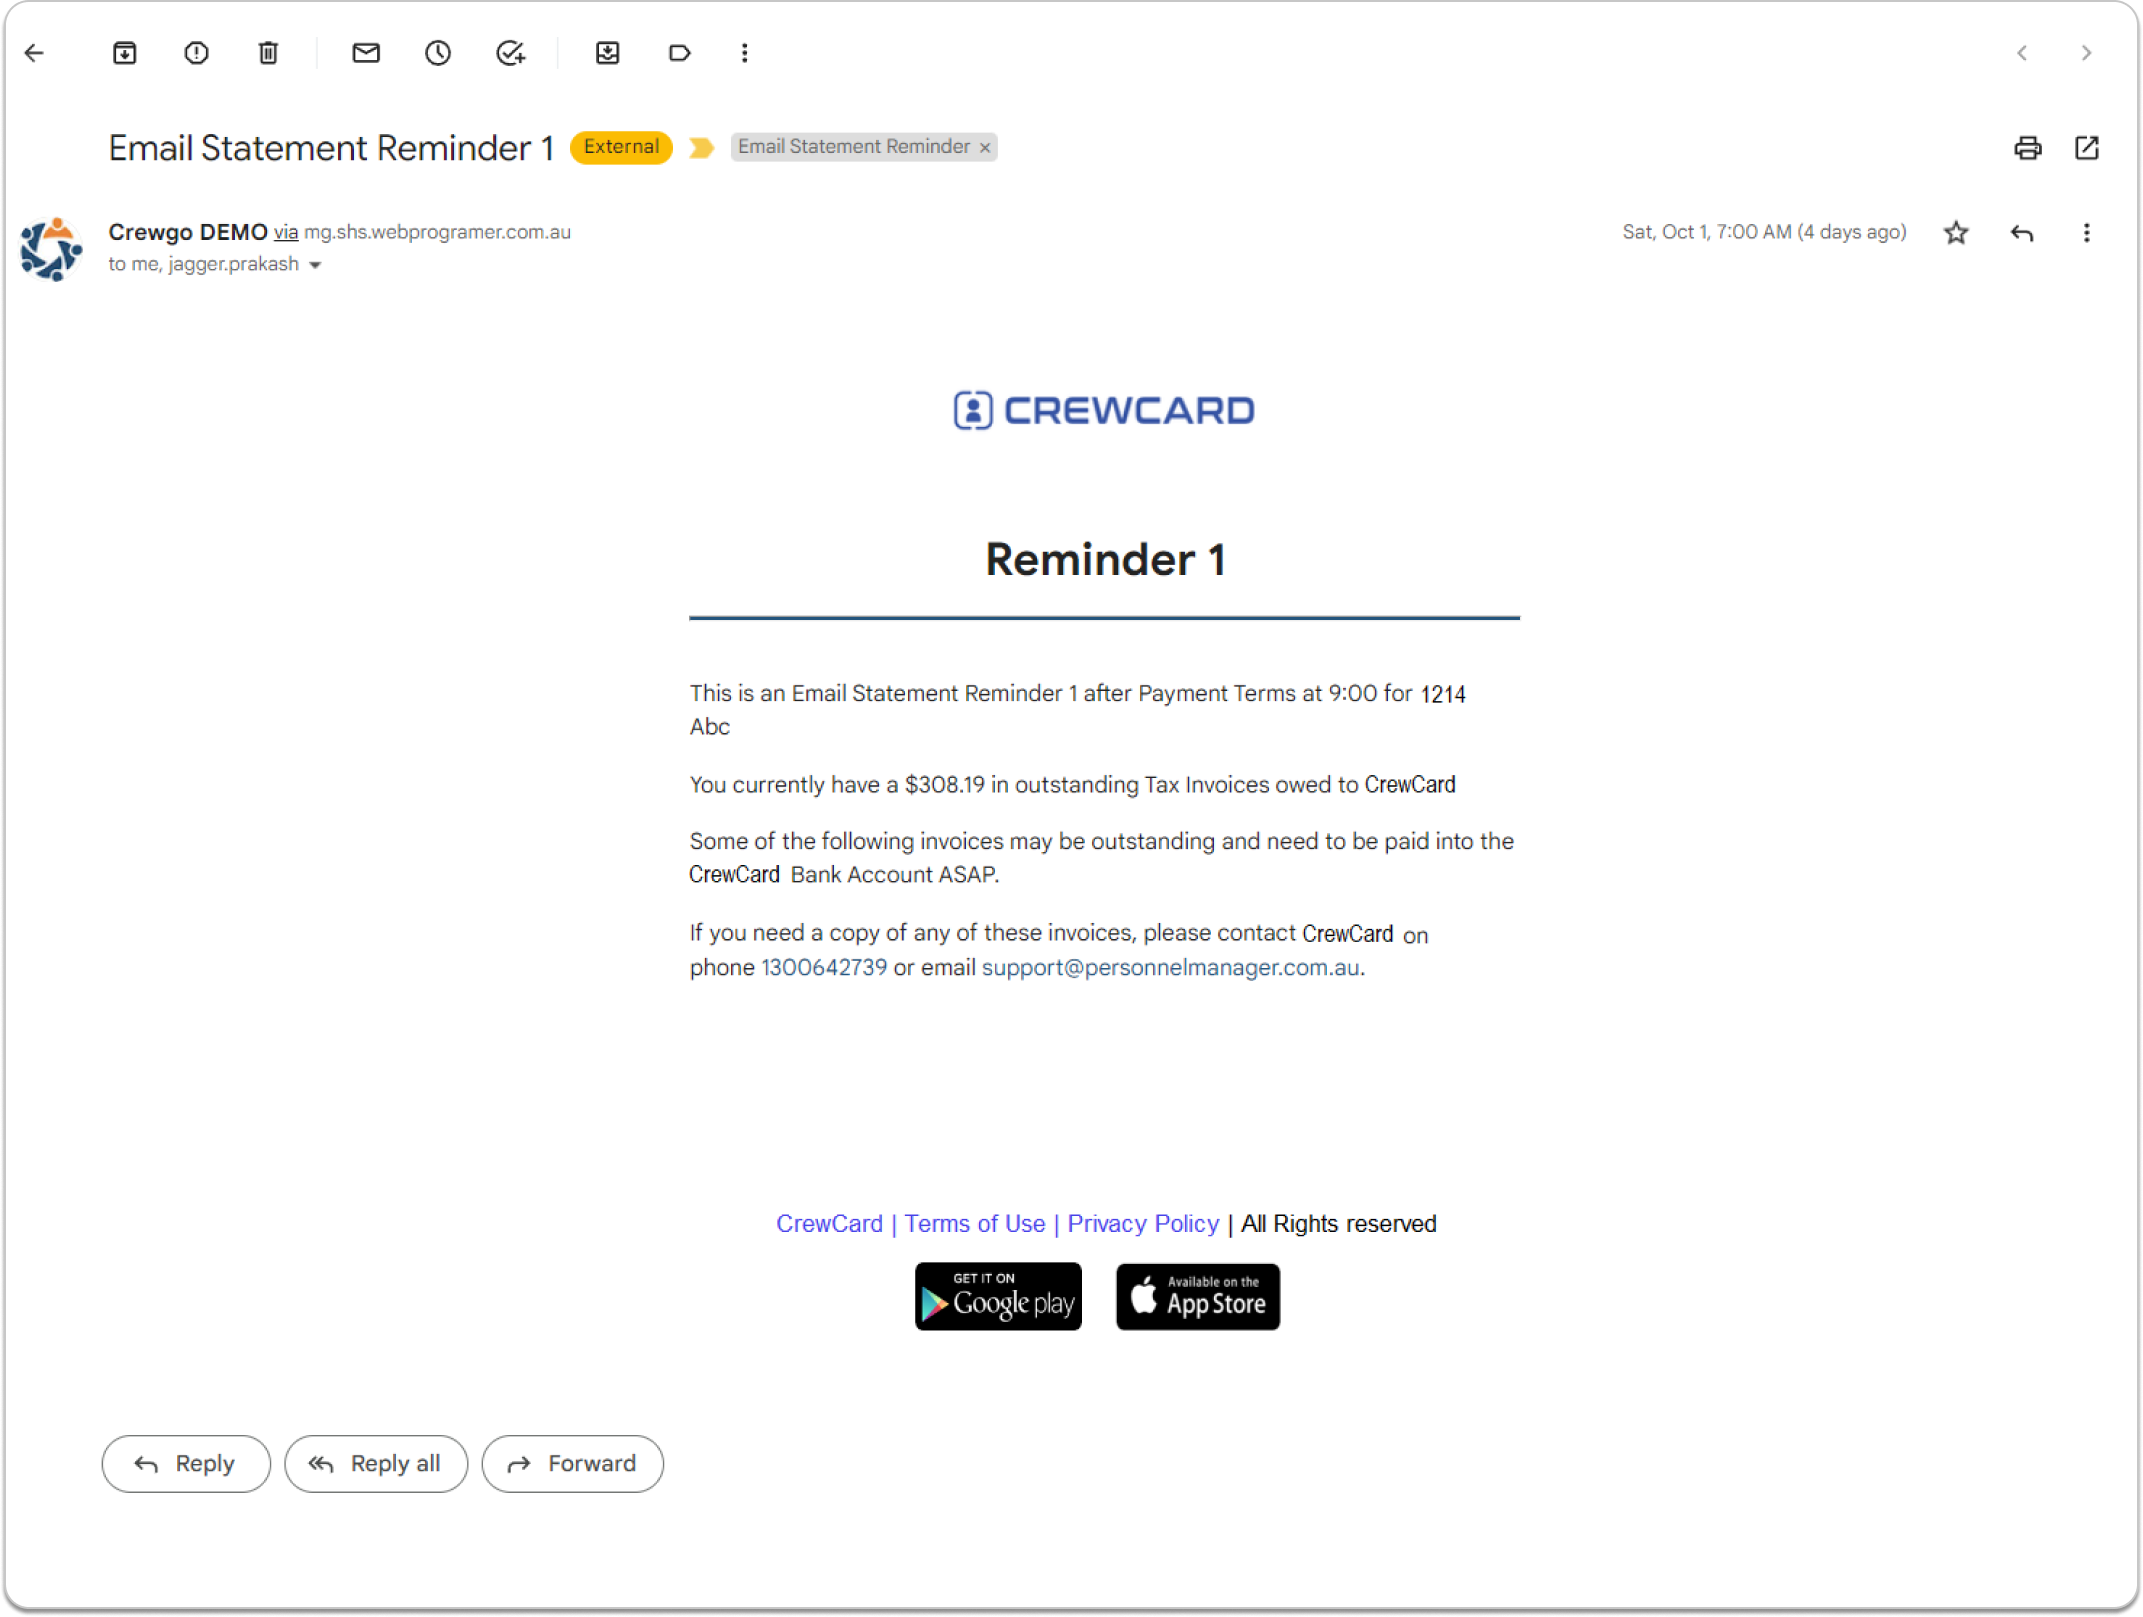
Select the invoice, then click “Select an Action.” Admins can choose either “Email Statement” or “Email Statement with Attach PDF.”
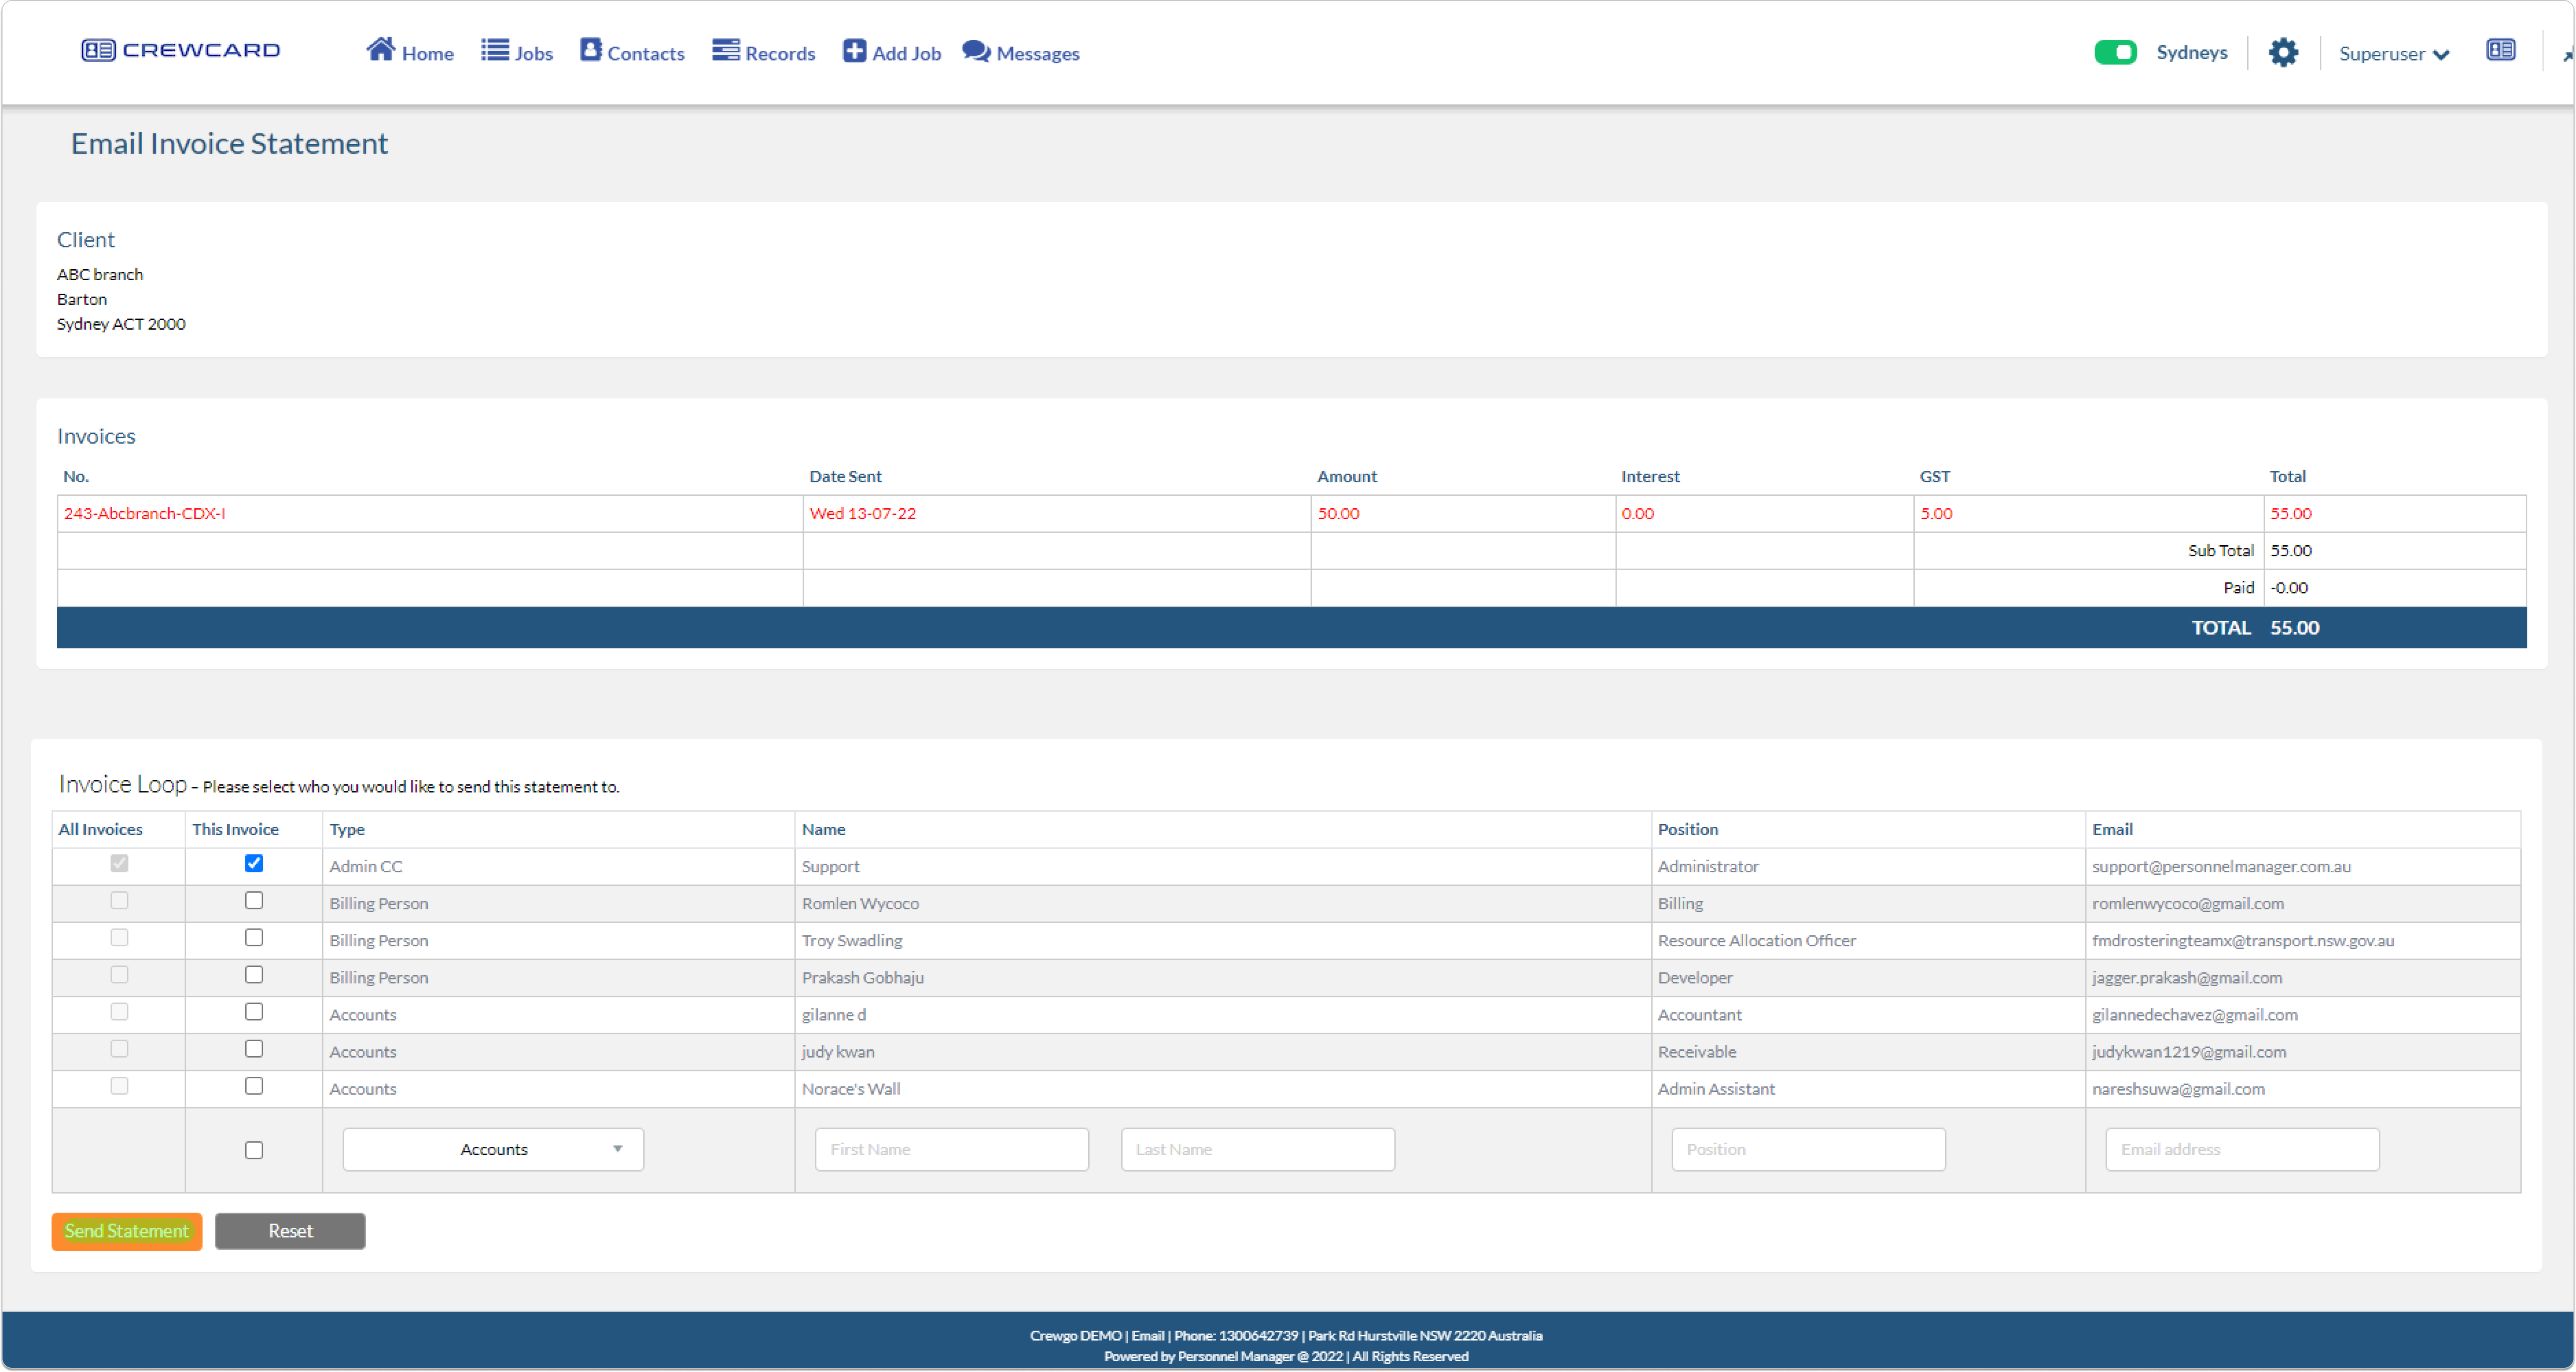
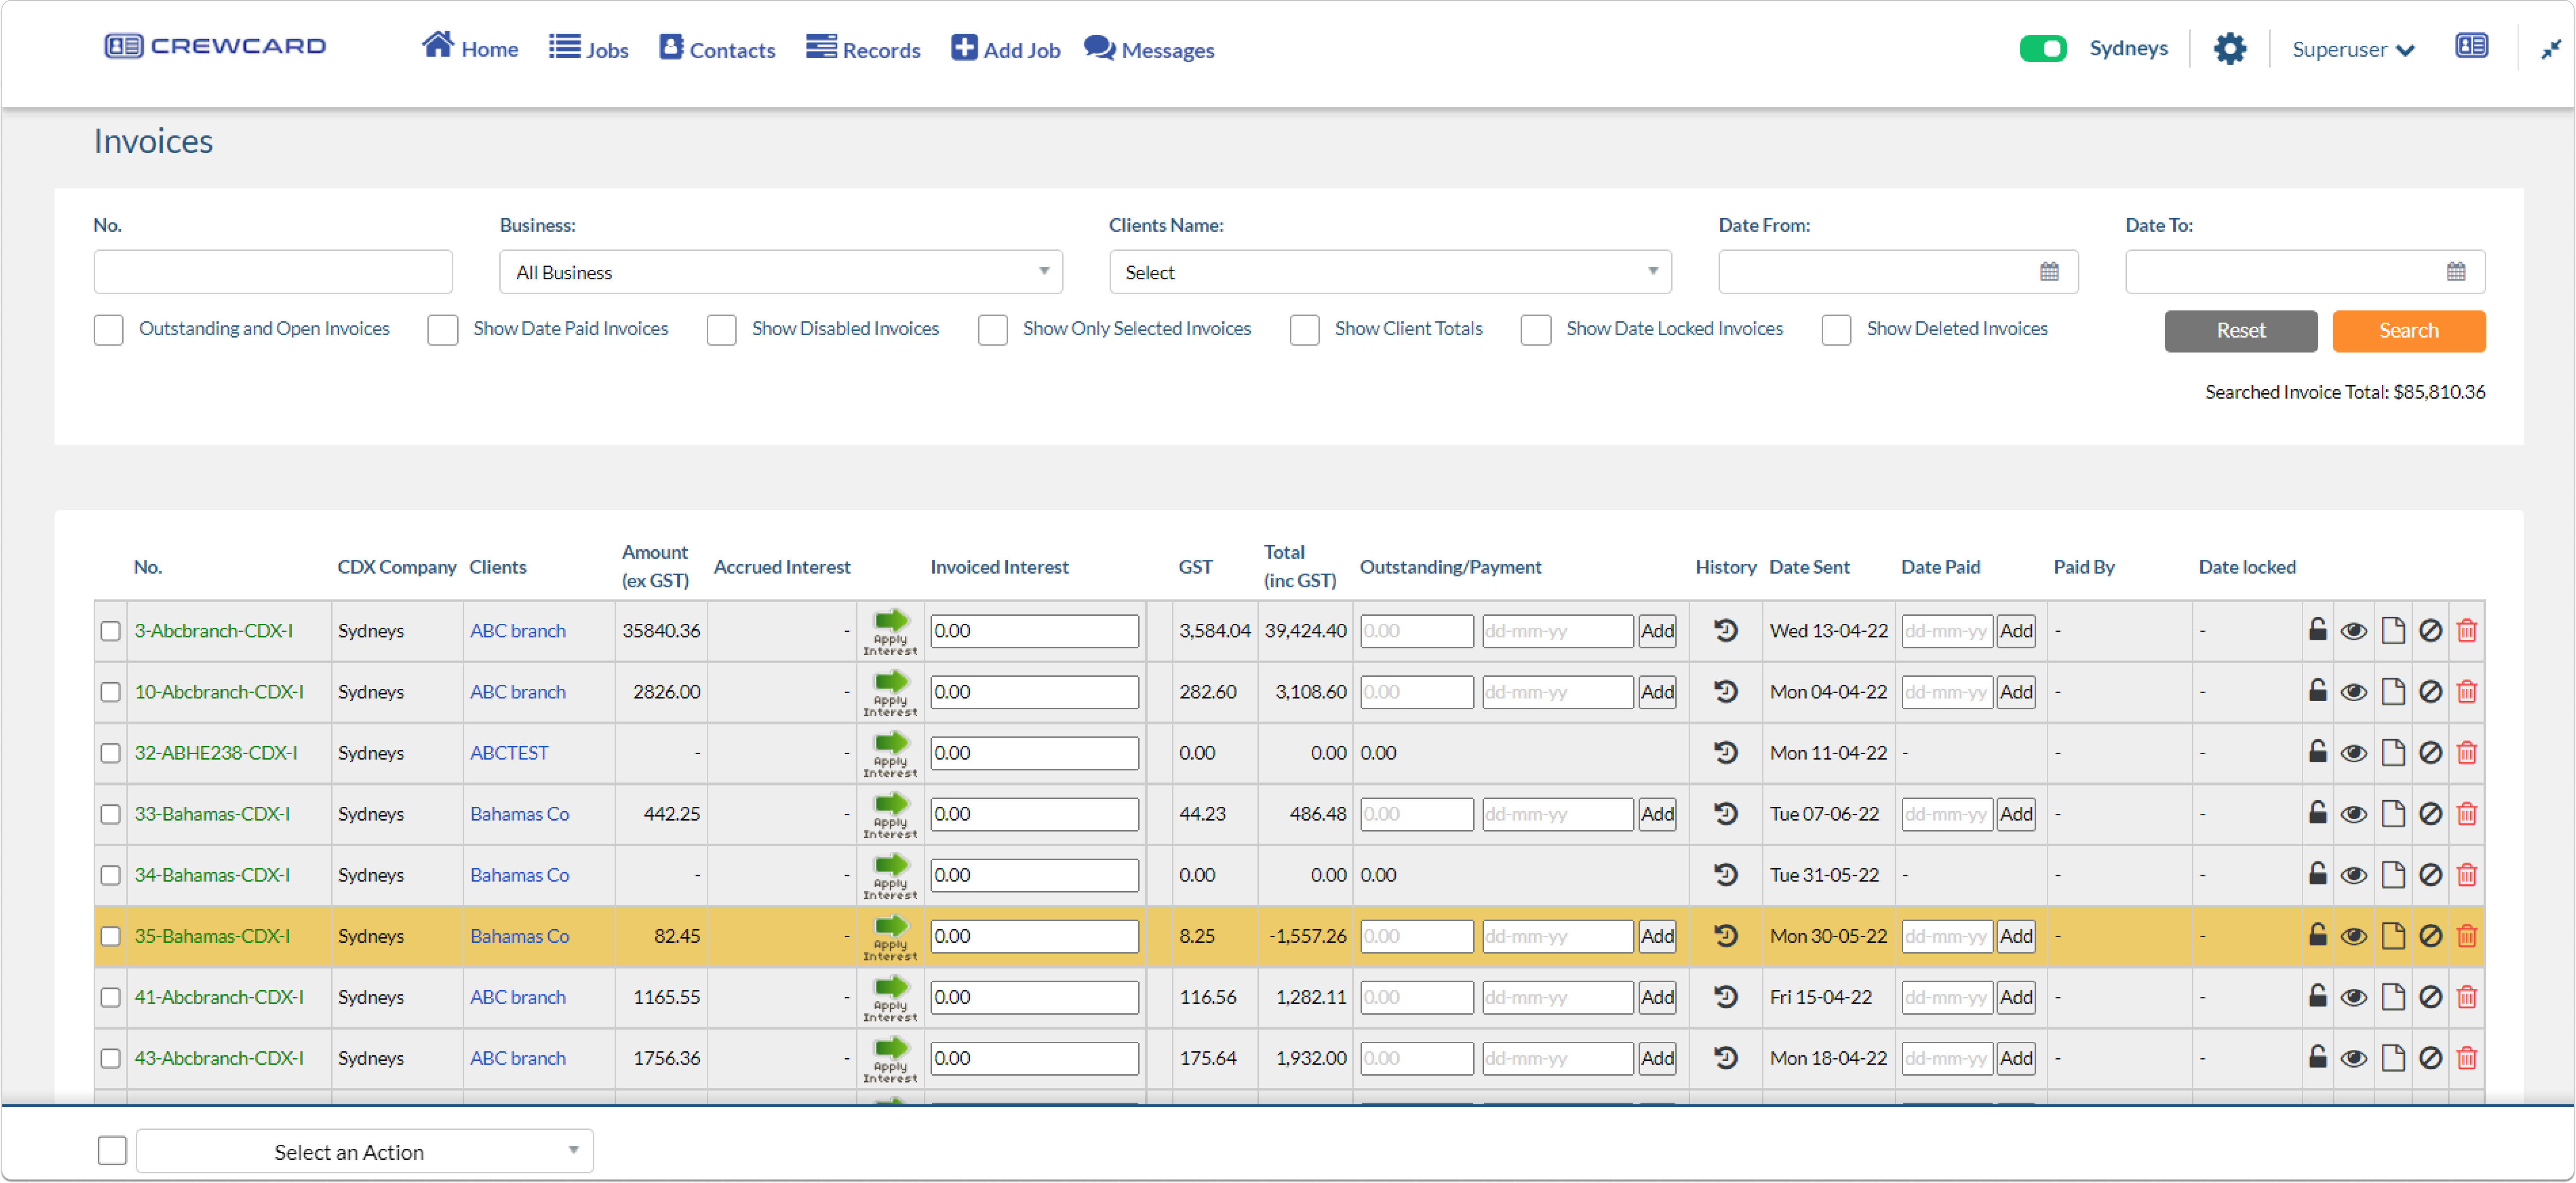
This will take you to the Email Invoice Statement page, where you can view invoice details such as the Invoice Number, Date Sent, Amount, Interest, GST, and Total. If the first part payment has been made, you’ll also see the paid amount and the outstanding balance.
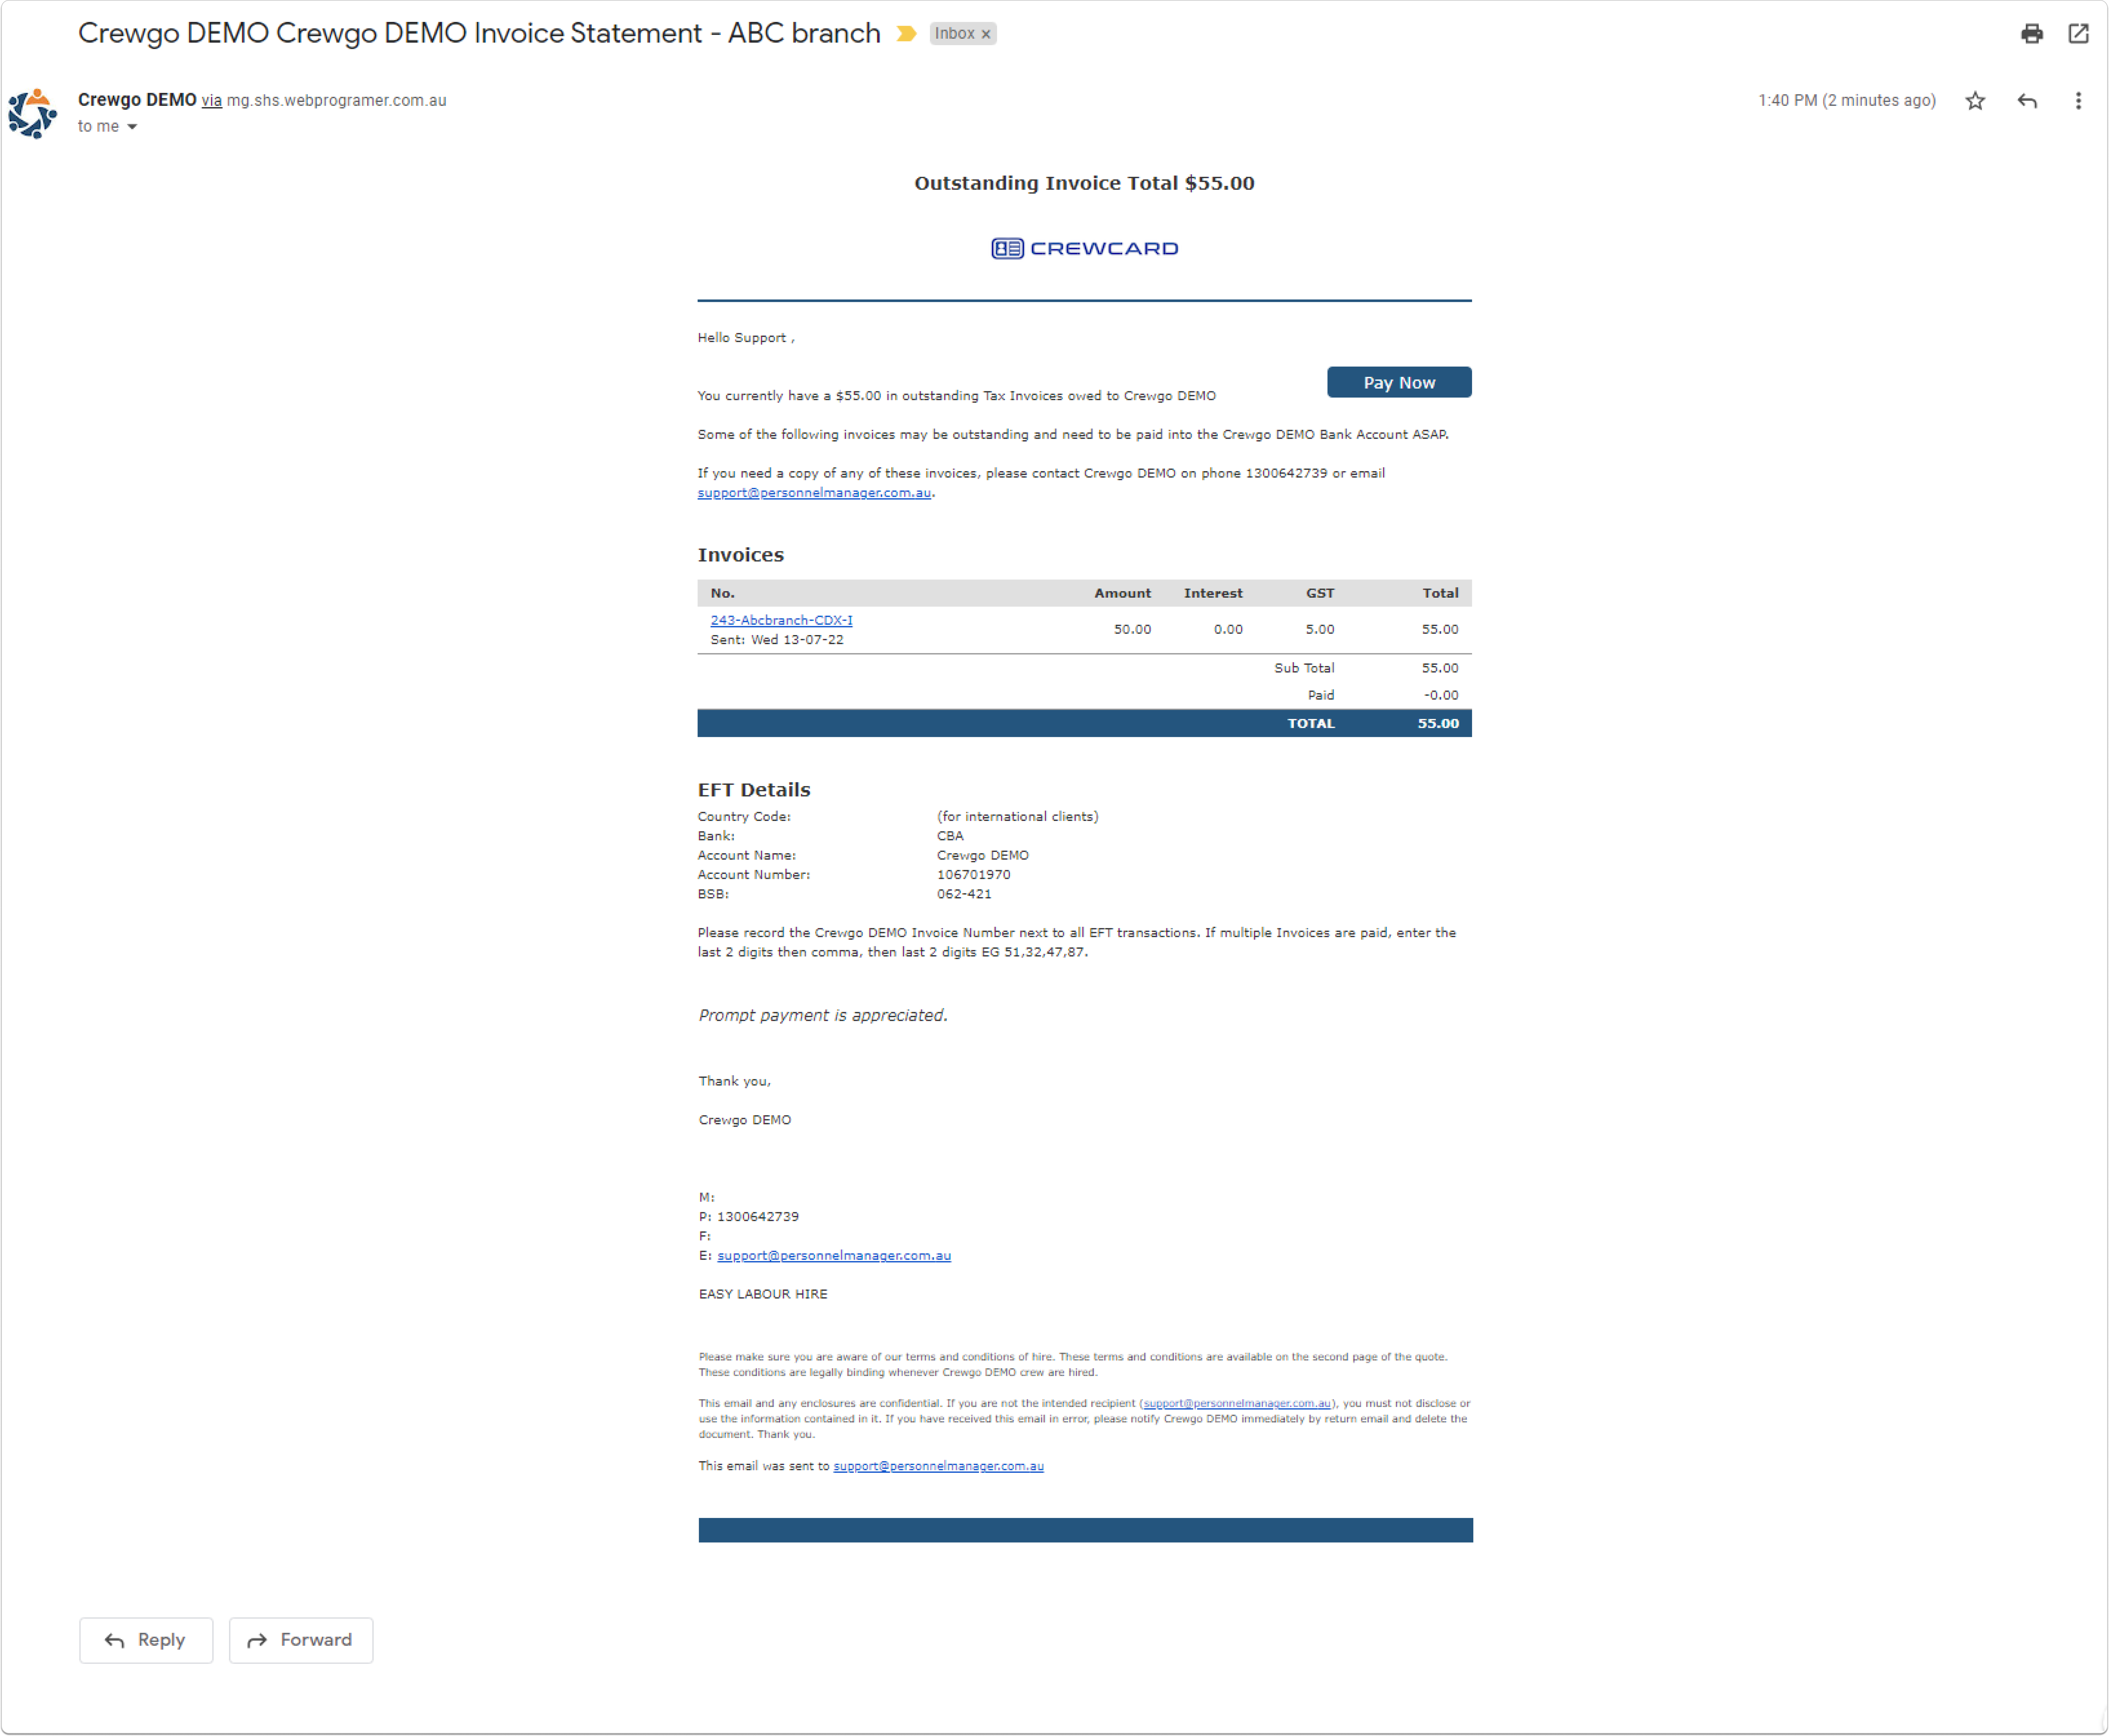
Once the Email Invoice Statement has been sent, both the Admin and Client will receive an Invoice Statement Email showing the outstanding amount that needs to be settled by the Client. For more details about the Invoices Page, please visit CrewCard User Guide>> 13.3 Invoices.
**Note: Admins should use the Email Invoice Statement option when sending the outstanding balance to the client.
When a Part Payment has been charged by the Admin, an email will be sent to both the Admin and the Client. This email will include a thank you message, along with the Total Invoice Amount, the Paid Part Payment, and the remaining Balance.
Admins will also receive an email notification for the New Customer Payment whenever they make a Charge Payment or when the Client makes a payment.
Payment will be reflected in the Invoices page under the Admin Drop Down.
In the Invoices Page, it will reflect the outstanding amounts to help Admins keep track of their invoice status.
Furthermore, whenever an invoice is sent to the client, the invoice will also appear in the Client’s Portal under the Invoices page.
On the Invoices page, the “Payment Type” column will display “Part Payment Required,” indicating the type of payment charged. This serves as an additional way for the client to recognise the payment type applied to their account.
Add Notes in the Invoice
Admins can also attach additional notes to the invoice.
To do this, simply add your notes in the “Invoice Notes” section of the invoice
After adding the notes, Tick the “Attach PDF to Invoice” and Click “Email Invoice.”
Once sent, Client who are selected under the Invoice Loop will receive the Invoice email with the attached PDF.
Open the attached PDF and you will find the Invoice Notes.
Removing GST
To remove the GST from the Invoice Page, Simply go to the Clients Profile you wish to remove the GST or Click the Client Profile button on the the top of the Invoice page. This will direct you to the Clients Profile Page
In the Clients Profile Page, Click the Client Discount on the side menu.
Untick the “Apply GST” and click Save Details
Go back to the Invoice page and refresh it; the GST should disappear from the invoice page for the selected client.
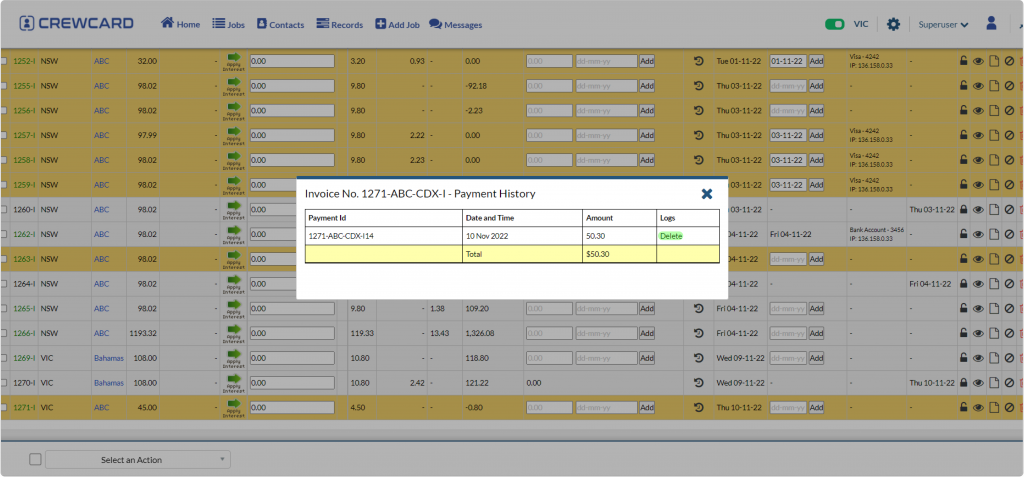
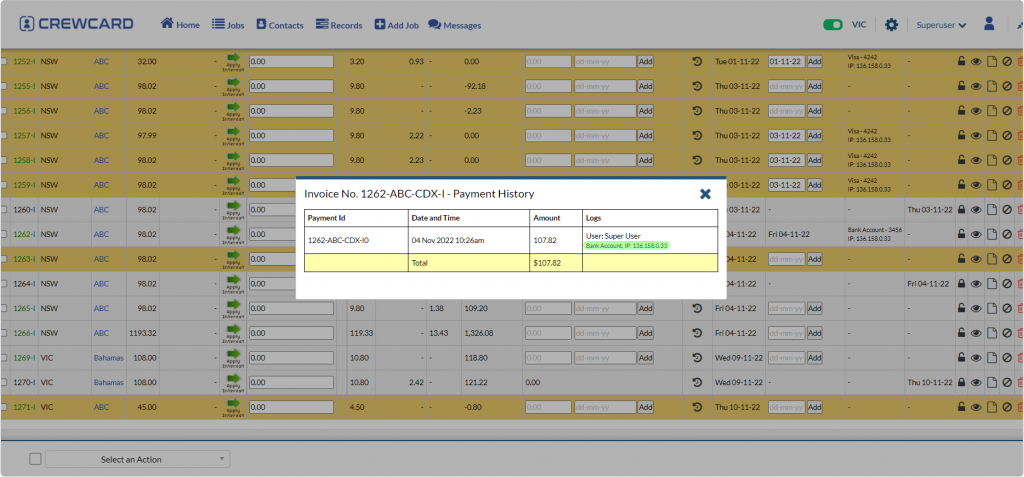
Refund
You can also reverse the payment or refund an amount via ‘Refund’.
To begin, on the Invoice page, click the ‘Refund’ button.
The Refund Payment window will appear. Select the previous transaction from the Select a Part Transaction drop down list.
Enter the refund amount and the reason for the refund, then click the ‘Refund’ button.
Once the refund has been completed, it will appear under the Payment History section.
The client will receive a Refund Completed email with the amount refunded.
The refunded amount and date can be found on the Invoices page within the Client’s Portal.
Updated Invoice Layout:
We have improved the organisation of details in the new Invoice Layout.
These details will be sourced from the Business Page under Account Details. When “Use Separate Account Details” is ticked, all information, including the business name, state, suburb, postcode, telephone number, fax, and ABN number from the Business Page, will appear on the invoice page.
You can edit these details by unchecking “Use Separate Account Details” and then modifying the fields as needed.
4.1 Sites
The Sites page displays the location of workers and the current jobs they are working on.
To access the Sites page, hover your mouse over ‘Jobs’ in the central navigation bar. Select Sites from the drop-down list.
Journey: CNB > Jobs > Sites
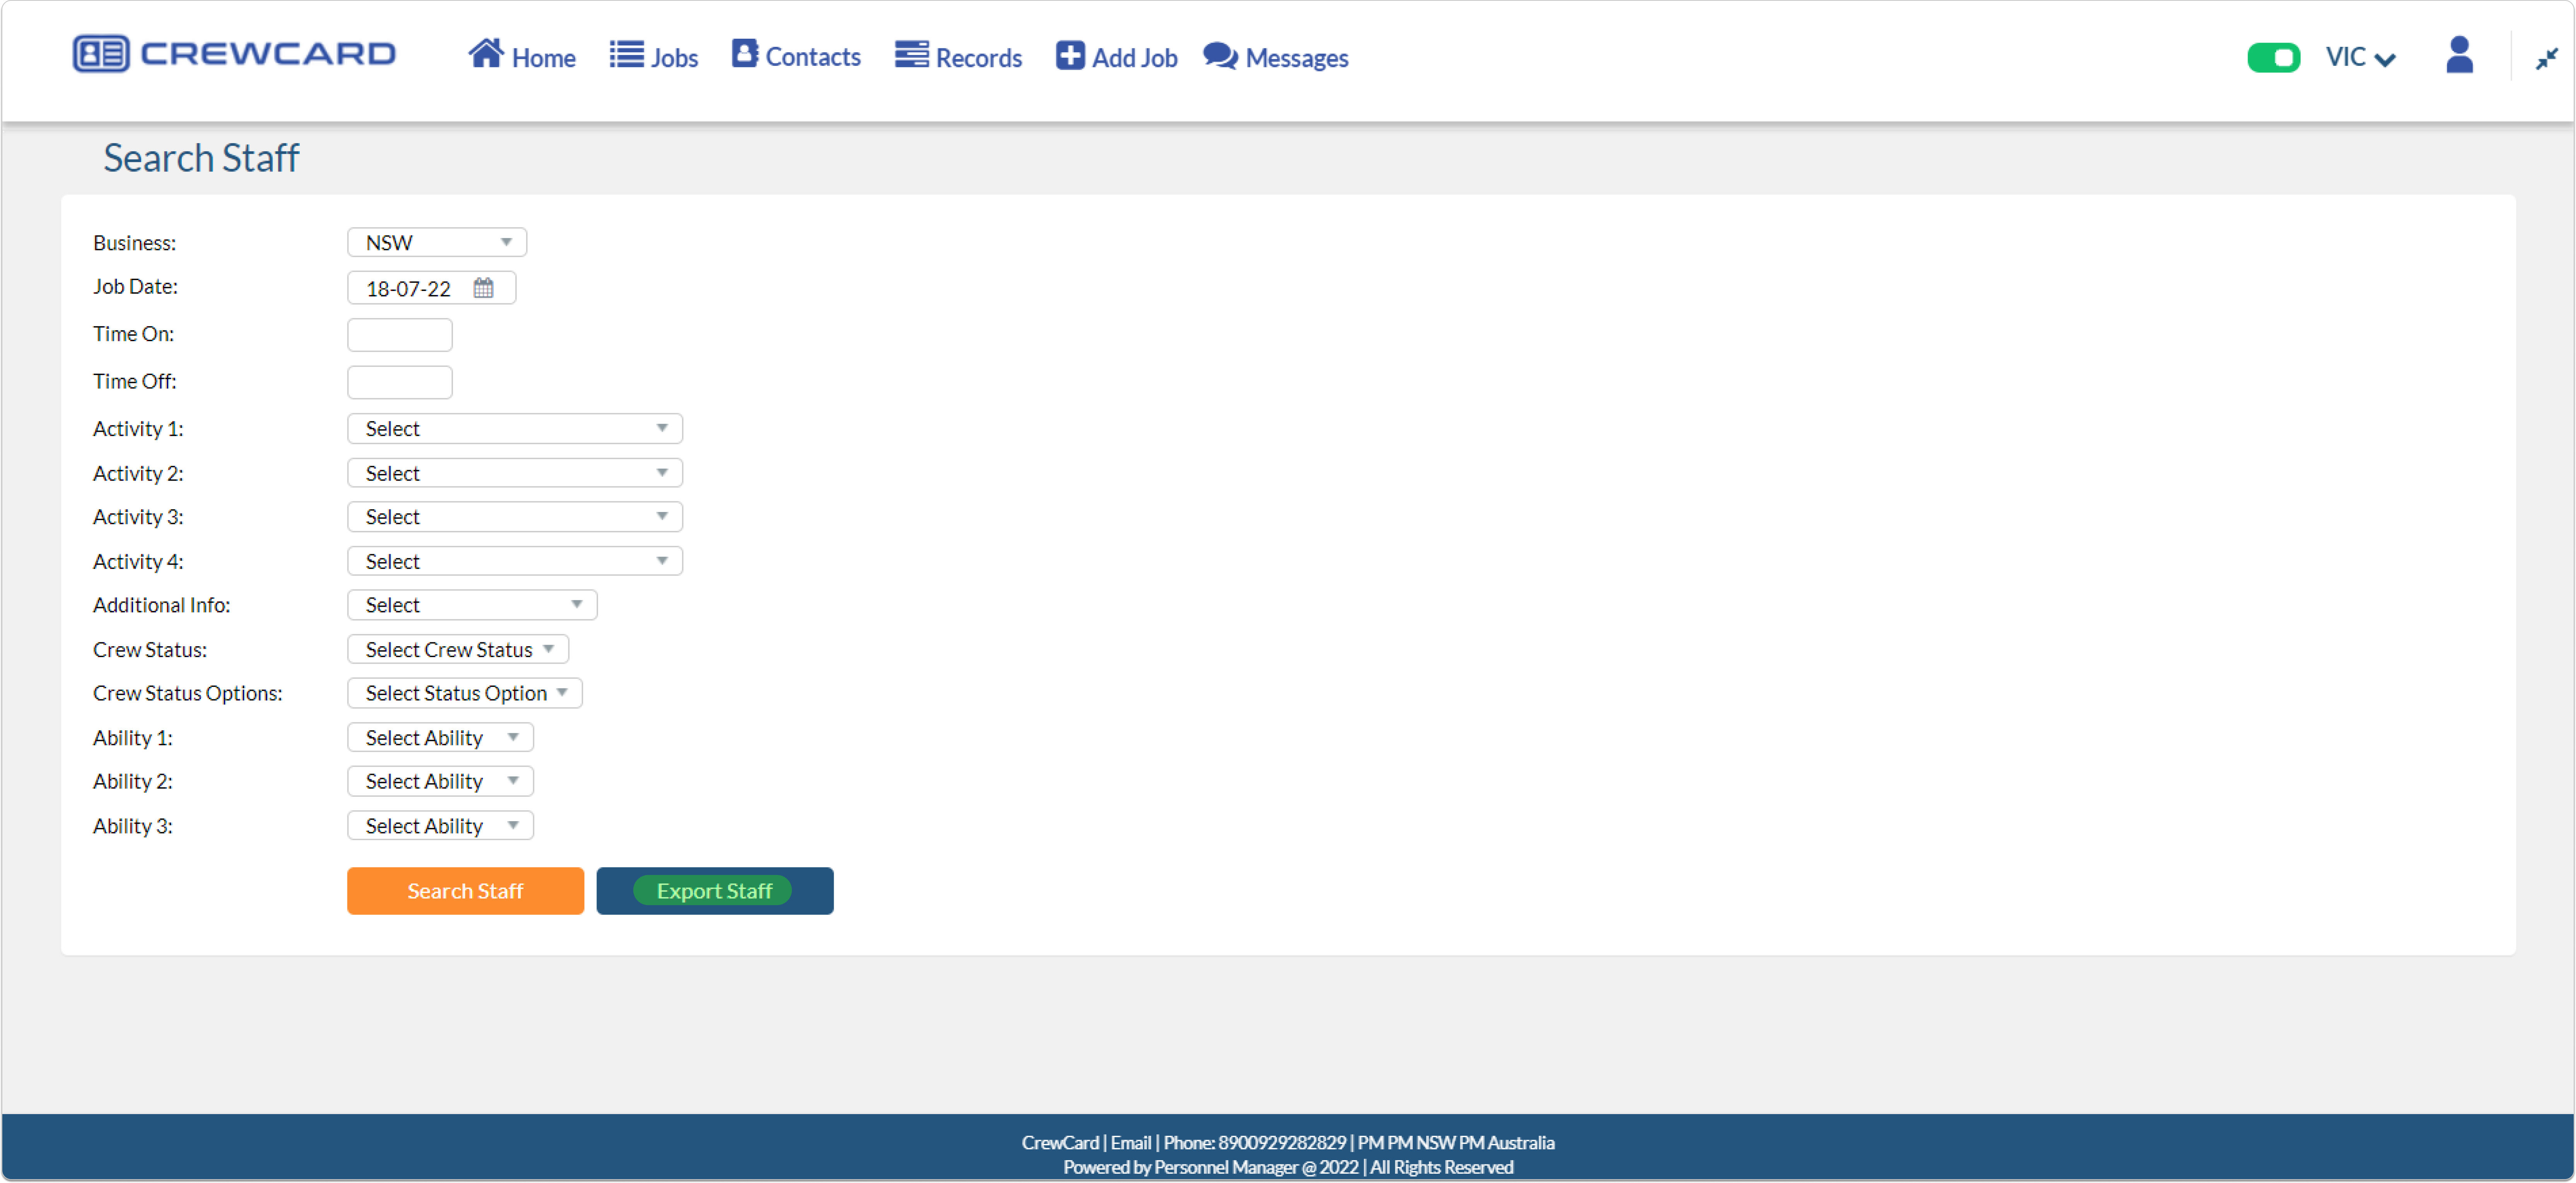
You can filter or search for a specific job using the filters at the top of the page. The available parameters for refining your search include:
Businesses
Job Number
Clients
Crew
Date
The Info icon allows you to view the Job Card Colour Legend.
Map (located on the left)
The following functions allow users to easily search the map:
Live View: You may choose from the options All, Sites, Crew to cater to your needs.
Suburb/Postcode: You may enter a specific value code to narrow down your search.
Date: You may navigate to a certain date according to your needs.
Calendar (Located on the right)
There are two kinds of cards you may select; Job Cards and Crew Cards. These cards show the following information: Schedule, Timesheet, Logs, Notes, Rating, and Crew Pass. You may also initiate a Call and Chat with the specific worker.
Data shown in the cards include:
Venue
Meeting Place
Total Crew
Total Hours
Position
Click on the arrow key within the job card. This will direct you to the Jobsite that contains Day Cards
There may be cases where a job is unassigned. To assign a crew, please click on “Unassigned”. It will provide a list where you can select a crew members name to be assigned to the task.
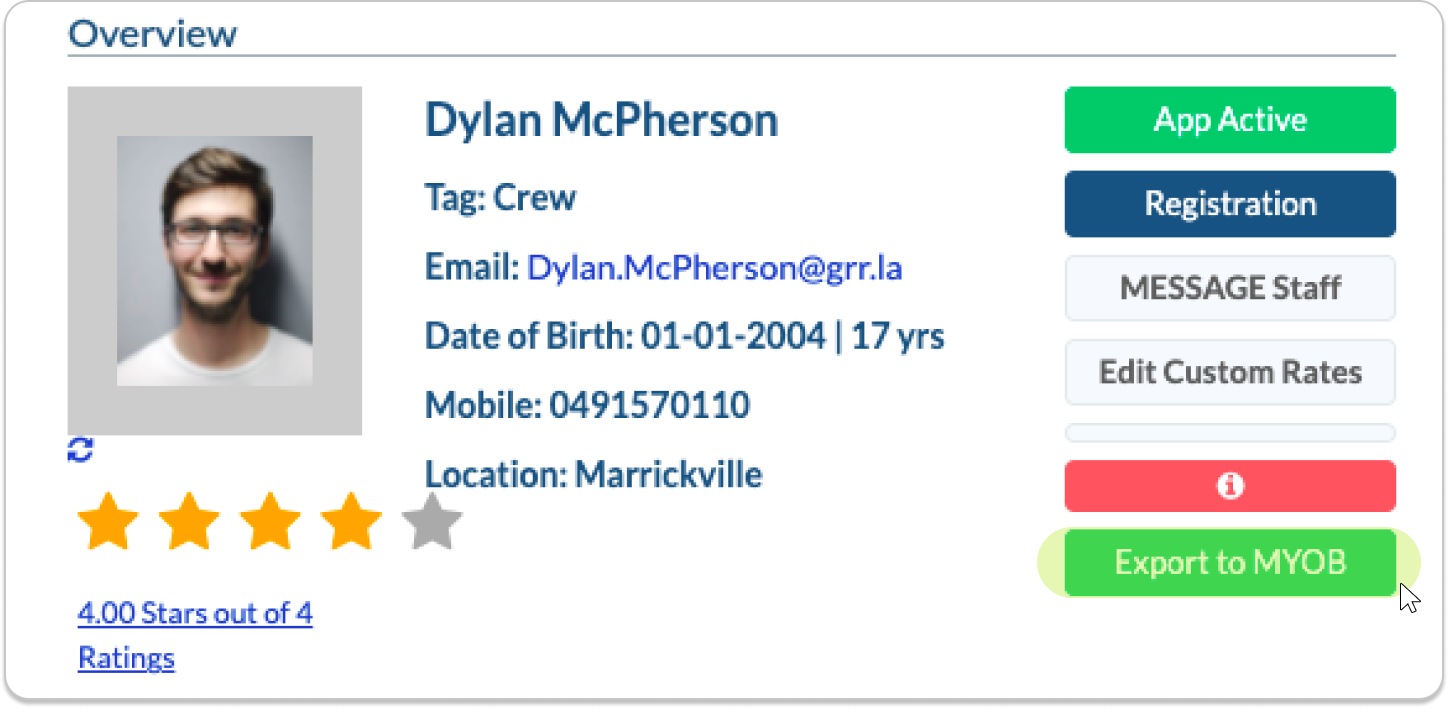
The cards also offer the option to view a crew member’s profile by clicking on their picture, located between the checkbox and their name.
In this profile window, you can find information such as their Date of Birth, Age, On Call/Off Call status, Address, Email, Phone Number, Total Shifts, Acceptance Rate, and Registration Date. You can also view their Activities and Abilities, leave a note, rate their performance, and choose to send an ‘Invite Contract’ or ‘Invite Action.’
Please refer below for further explanations regarding the different types of cards and their function.
Crew Cards
These show the specific crew on a site.
Job Cards
These show the group of crew members in a particular site/location.
Card Functions
Timesheet: You may view and approve the selected worker’s timesheet, as well as edit time. The data included in the window are: Crew Name, Reported Time, Admin, and Records.
Logs: You may view the selected worker’s log, should there be instances of Auto-Scheduling
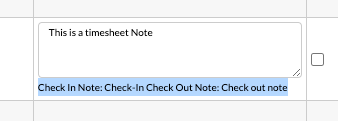
Notes: You may leave notes for the crew in this window, with control of who can see the notes.
Rate: You may submit a rating for the crew by selecting a star from 1-5. The system will automatically equate it with corresponding condition. There is also an option to leave a comment. Please refer to 9.1.2 Performance of Crew Calculation for the detailed computation of ratings.
Crew Pass: Please refer to 4.1 Daily regarding the information and status of Crew Pass.
Page Footer
Located at the bottom part of the page is the Page Footer. This consists of Auto, Scheduler, Edit, Quick Edit, as well as an option to select all crew with Unconfirmed shifts or Unlocked shifts.
Auto: Once a shift is selected, you are able to schedule and set the following:
Schedule By
Merge Shifts
Rank
Oncall
Proximity
Option to set a distance
Select Abilities
Select Abilities
Staff Every
Minutes
From Rank
To Rank
There is also an option to check on the following: SMS, Email, App, Enable Client Shift Confirmation, Open Scheduler Page, Return to the previous page.
Scheduler: allows users to send offers via SMS, Email, and the CrewCard mobile application.
You may also select crew members based on the following:
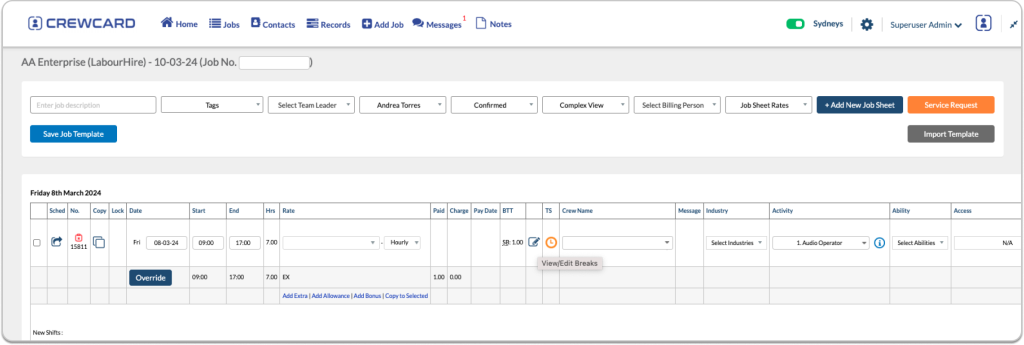
Edit: provides you with a comprehensive view of the crew’s information and details regarding the specific job he/she working on. Also allows you to set the following:
Date
Start and End
Rate
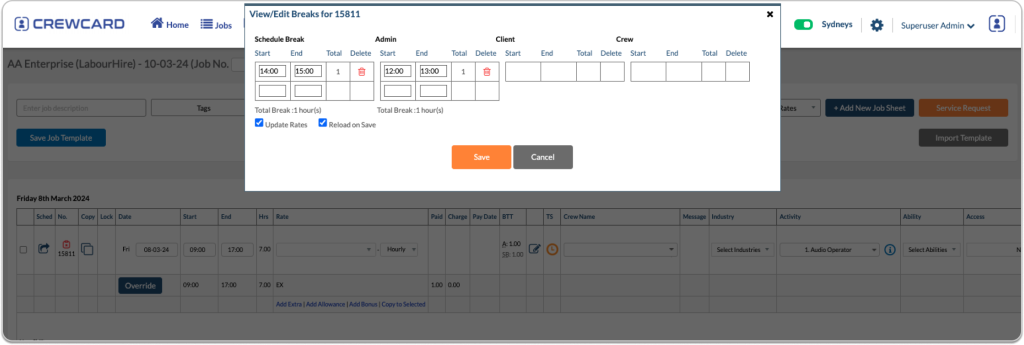
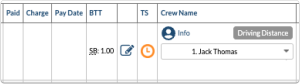
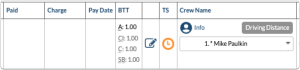
View/Edit Breaks
TimeSheet
Crew Name
Activity
Ability
Access
Task
Venue, Room, and Meeting Place/ Address
On-site Contact Name
PO No or Name of Event
Notes for Crew (Clients editable and Ops Section)
Update Rates
Update Breaks
Business
Quick Edit: provides a summarised version of the form in Edit, which allows you to set the following:
Task
Date
Time On and Off
Break Start and End
Jobsite
To check the job-site, please select the arrow on the Job Card.
Once on the Jobsite, you may now access more details and information regarding the job, such as:
Site
Job No
Dates
Supervisor
Notes
Venue
Address
Meeting Place
Room
Day Cards (Please refer to Card Functions for detailed information regarding the functions)
Timesheet
Message
Call
Chat
Notes
Rate
Crew Pass
Map – You may check the pinned locations of the Venue.
To add you may also do the following on the jobsite:
Inductions – For a more detailed guide and information please refer to 6.2.2 Inductions
Add Induction
Induction Name (required)
Induction URL
Crew Required to upload file Yes/No (required)
Client Association
Venue Association
Job Sheet Association
Reminder Email when assigned to job
Email to Admin
Email to Crew
Notes
Select – Select from the current inductions
Remove – Remove currently assigned inductions
Actions – For a more detailed guide and information please refer to 9.4 Actions Forms
Select – Select from the current Actions
Remove – Remove currently assigned Actions
Operations Notes (not visible to crew) – add special instructions/notes/information that regards the booking.
Instructions – For a more detailed guide and information please refer to 6.2.4 Instructions
Add Instruction
Title
Task Name
Upload Instruction File
Select – Select from the current instructions
Remove – Remove currently assigned instructions
4.2 Daily
The daily page displays all confirmed jobs by day.
To access the Daily Page, hover to the Jobs in the Central Navigation bar and select ‘Daily’
Journey: CNB > Jobs > Daily
This will open the Daily Jobs page, displaying all the jobs scheduled for the current day.
Search & Filter Jobs
If you wish to view a past or future day, simply click on the date you wish to view. If you cannot see it, use the left arrow to go into the past and the right arrow to move into the future.
Search and filter jobs by entering one of the following fields at the top of the page: Job NO, Shift No, Client, Activity, Staff or Date. To start a new search, click reset.
Quick Add In the same section as the advance search, you can also Quick Add.
The following pop-out window will appear when selected:
Fill out the required details to save the Job.
**NOTE: You can only use the Quick Add function if the information for the client & venue is already in the system.
Another key function that the Daily Page provides, is access to the job sheet. Here, you can edit any information in regards to the job. For the individual, shift-click the Edit icon. To see all of the job sheets related to the client, click the blue arrow under the ‘Open’ column.
The Scheduler icon will take you to the scheduler page. View guide 4.4 Shift to learn about the scheduler.
The Quick Edit icon will pop-out Quick Edit window, the window will display limited edits that can be changed in relation to the shift.
Fill out any information you wish you edit about the shift, and click Save & Close.
CrewPass
To create a new Access Level in the Admin Portal, please refer to Easy Assign Crew Pass. Once the Access Level is created and assigned to a crew member, simply click the crew pass icon in the Daily Jobs page.
Green crew pass means induction is completed.
Orange crew pass means induction is not required
Red crew pass means that the induction is required or not yet completed. In an event that Induction is required or not yet completed, please refer to 6.2.2 Inductions
Once the card icon on the right of the screen has been clicked, it will open the CrewPass. Here you can view the Access Level, Job details, and any other relevant qualifications or inductions that the Crew Member will require for that Job. The Crew Pass will automatically display all qualifications of the Crew Members associated with the Activity of that shift.
When selected, the attached files will appear in a pop up window.
4.3 Jobs
Key: CNB (Central Navigation Bar)
The ‘Jobs’ tab has everything you need to view and manage scheduled jobs. This section will explore the different pages under the tab ‘Jobs’.
Let’s get started!
To access Jobs page, hover your mouse over to ‘Jobs’ in CNB to open the drop-down menu and select ‘Jobs’.
Journey: Jobs > Jobs
This page provides a weekly summary of your clients’ job sheets, invoices, and quotes. By default, the week is set to be Monday to Sunday. If you wish to alter this, please email support@personnelmanager.com
On the Jobs page, the ‘Timesheet Approved’ filter displays all entries with fully approved timesheets when selected. A check icon indicates that the timesheets have been approved and accepted.
Categories
Let’s start by looking at the categories!
Each job includes various categories and information designed to support the timesheet. See below for more information:
Category
Description
Partners
Name of the partner for the corresponding job.
Client
The name of the client for whom the job is booked for.
Business
Name of the business for the corresponding job.
Job Sheet
Click on the box to be redirected to the corresponding job sheet to view and edit. For more info, please read guide 7.1 Jobs Sheets.
Job No.
The unique job number given for the timesheet. Job no. can be edited via admin settings. Please read guide 10.1.6 Ops HomeConfiguration.
Description
The description of the job. Can be edited easily by clicking the box.
Invoice
Click on the box to be redirected to the corresponding invoice to view and edit. For more info, please read guide 12.2.7 Updating Invoices
Quote
Click on the box to be redirected to the corresponding quote to view and edit.
Tag
Display all the selected tags for the Job Sheets
The system automatically assigns a Job Number to each of the Job Sheets. Upon adding a Job Sheet, the corresponding Quote and Invoice will be automatically generated with the same Job Number.
Colour Codes
Colour Code description is explained on the info icon next to the left of Actions tab, which is located on the right of your screen.
Colour Codes for Invoices/ Quotes:
Colour
Description
Red
Invoice or Quote that has NOT been sent to the Client.
Green
Invoice or Quote that has been sent to the Clients.
Grey
Quote that has been approved by the Client.
Colour Codes for Job Sheets:
Colour
Description
Red
No Shifts have been confirmed.
Blue
All Shifts confirmed.
Orange
Some Shifts has been confirmed.
Green
Some shifts are locked but there are still unlocked shifts in the job.
Grey
All shifts have been locked.
Blue Background Highlight
The Job sheet is admin locked.
Yellow Background Highlight
The shifts within the job sheet have been highlighted.
Client Name Orange Shading
The job is booked via the client portal.
Status of Job Sheets:
Next to the Job Sheet numbers, there’s icons representing the state of approval for a timesheet. See below for more information:
Icon
Description
Timesheet is partially confirmed.
Timesheet approval required.
Timesheet are fully accepted.
Ongoing job– weekly, fortnight, monthly
Sending Invoices
Now that we have learned the basics on the Job page, let’s examine how to send invoices to our clients!
First, click on the ‘Invoice’ box related to the job.
You will now be directed to the Invoice page. If you wish to attach a PDF copy of the invoice, simply tick the ‘Attach PDF to Invoice’ checkbox.
This will attach a PDF copy of the invoice when admin emails the invoice to the client.
To send the invoice, click on ‘Email Invoice’ located at the bottom of the page.
Applying Discounts and Fees to Invoices
To apply discounts, admin must first select the checkbox labelled “Apply Admin Discount”.
By default, the discounts are called ‘Admin Discount’. You can rename it by editing the field.
Make sure to enter the discount amount in the box labelled ‘Amount’. To do this, enter the discount amount with a minus symbol ( – ) at the beginning, e.g., “-50%” or “-50.”
After you’ve applied the discount, click on the green button labelled ‘Update Invoice’, and the information should appear on the invoices, as shown below.
Remember to click ‘Update Invoice’ after you make an adjustment!
**Note: To apply any other fees or deductions, follow the same steps as for admin discounts above: tick the appropriate box and enter the amount with a negative (-) sign for deductions. If you need further instruction, see 4.1.1 Invoices
Invoice History
Invoice history refers to a record or log of all past invoices issued by a business or individual. It includes details such as invoice numbers, dates, amounts, payment status, and any related transactions. The invoice history provides a comprehensive overview of the invoicing activities and serves as a reference for tracking payments and managing financial records.
To view the invoice history, simply click on the “Invoice history” button.
Upon clicking the “Invoice history” button, you will be directed to the invoice history page. There, you can view an overview of the invoice history for a specific invoice.
Here’s what each of the categories means:
Category
Description
User Type
The category or classification of the user responsible for the changes made to the invoice
Name
The username or actual name of the user who made modifications to the invoice. It indicates the specific individual who was responsible for the changes made to the invoice.
IP Address
The unique numerical ID that identifies the device or network connection used to modify the invoice, pinpointing the exact location or device of the changes.
Date
the date and time when the modifications were made to the invoice by the user
Notes
Specify the invoice recipient(s) and note if any attachments were included. This section also covers any related remarks or details about the individuals or organisations receiving the invoice.
Actions Download Icon
Allows for easy access and retrieval of the modified invoice in a downloadable format, which can then be saved or printed as needed.
To return to the Invoice page, simply click on the “Invoice” button. This will navigate you back to the main Invoice page where you can access and manage your invoices.
Sending Quotes
Before sending a quote, please read 10.2.16 Quote Template Settingsto set up a customised quote experience on CrewCard.
To send a quote, click on the ‘Quote’ box related to the job.
This will direct you to the Quote page to the corresponding job.
On the quote page you are presented with a view of all costs for a review before sending.
By default, it will display staff/crew name on the quotes. You can remove it through Admin Settings, which allow you to hide the crew/staff from the quote.
Journey: Admin Menu > Settings > Admin Settings > Ops Home Configuration > 72. Show Crew per shift on Quotes and Invoices
Once you hide the staff from quotes, the ‘Staff/Crew’ column will disappear from the Quote page, as shown below;
Applying notes and deductions in Quotes
Similar to the Invoice page, admins can apply special discounts and notes.
To do this, tick the box for the adjustment, enter a name or description, input the amount (including the % sign), and click ‘Update Quote’ to apply the changes.
Additionally, ‘Part Payment Required’ allows admin to charge the client to a maximum of 3 separate times by using this feature. Tick the box next to Part Payment Required, enter the payment amount or percentage, and click “Update.” see 4.1.1 Invoices for more information
TIP: To add or deduct an amount (excluding GST), tick “Apply Management Tax,” enter the name (e.g., “Tool Hire”), and specify the amount without the % sign. Use a negative sign before the amount for deductions or discounts.
After reviewing the quote, scroll down to the email quote section. All recipients linked to the client’s profile will be displayed. To learn how to add recipients, refer to Guide 9.2 Client Profile. Tick the box next to the names of the recipients you want to include. If you need to send the quote to someone not in the system, use the bottom line to add their information:
To add a contact, fill in the contact type, name, position, and email address before sending the quote. Check the boxes next to their names to send the quote to multiple recipients. deselect or click the ‘Reset’ button to clear the fields. Once the quote was sent, any new contacts will automatically be added to the contact list and the invoice loop. You can view, delete, or edit these entries in each client’s ‘Client Profile.’
When you’re ready to send the quote, choose either the CrewCard default quote template or your customised one from settings, then click “Email Quote.”
Invoice Notes Templates
The select Template dropdown allows users to insert pre-saved note templates into the invoice’s Note Field.
Users can create and manage thier own invoice note templates in Settings > General Settings > Invoice Notes Templates
Actions
Now, let’s go back to the job page and take a look at what the Action drop-down menu.
Action is located in the right corner of every jobs. Click on the box to toggle the drop down.
Journey: Job > Job > Action
A drop-down menu will appear which contains a list of actions that can be performed on this page.
To apply ‘Action’ to specific jobs, check the box next to the job/s you wish to perform an action on, then click the action from the list.
Let’s dive deeper into what each of the actions does!
Action: Repeat Job Sheet Weekly
Admins and managers can create weekly recurring shifts to avoid the hassle of manually duplicating shifts.
To do this, check the job that you wish to copy and click on ‘Repeat Job Sheet’. A pop-up window will appear on the page:
Fill out all fields and make sure to check the box next to ‘Repeat’. Enter the number of times you want the job to recur each week. Once done, click the button labelled ‘Repeat’ to apply it across the system.
Action: Email Job Sheet Summary
This feature help you quickly send one or multiple jobs to it’s corresponding clients.
Note: Default email template will be used! You can customise the layout of the email that is to be sent via general settings. See guide 10.2.5 Client Email Job Sheet Summary to find out how.
Important: In order to use this feature, the following should be met:
Only ‘Locked’ shifts will be included in the summary email.
Only recipients with the contact type ‘Accounts’ will receive the email. To add or edit the contact type, visit Accounts located in the client’s profile.
Journey: Contacts (located in CNB) > Client List > Select the Client > edit (pencil & paper icon) > Accounts > edit (pencil & paper icon) or ‘Add New Account’
Action: Update Invoices
Sometimes, multiple managers or admins may review job sheets. To streamline this process, we’ve implemented a feature called ‘Update Invoices.’
This feature enables organisations to confirm invoices that have been edited, paid, or partially paid, ensuring better control and structure in timesheet management.
When an invoice is edited, the box in the Invoice section will turn red. After the shift is confirmed, the box will turn green to indicate that it has been reviewed and updated.
For example, if a manager recently edited an invoice, the box under ‘Invoice’ will turn red, alerting their boss to review and confirm the changes. Once the boss reviews and confirms the invoice, the box will turn green, indicating in the system that the invoice has been reviewed.
Action: Print Approved Job Sheets
Select the job and click on ‘Print Approved Job Sheet’. This feature automatically generates a job sheet in a new window.
From there, you can either print the job sheet or download it as a PDF.
Action: Send Timesheet Approval Email
On the Jobs page, select the desired job and click the actions button, click on “Send Timesheet Approval Email.”
Timesheet Approval Logic
Access to Timesheet approval is limited to specific user roles: Client, Project Manager, Supervisor, and Admin.
Within the app, the following designations apply:
A: Admin (Schedule Time) CM: Crew Member (Actual Time) S: Supervisor CL: ClientFor example, when a client logs into the app, they have the ability to view both the scheduled time and actual time entries submitted by the crew. However, they can only make edits to the time entries that they themselves have entered. In this scenario, an additional editable time field is provided for the Client (CL).
Select the users to whom you wish to send the timesheet approval email, or check the “Select All” option and click the send button.
Review all the shift informations and click on ‘Send Email’.
Select the members you wish to send the timesheet approval email to, or choose “Select All” for all members. Once done, click “Send.”
The selected members will receive the timesheet approval email and can review and respond to it by rejecting or approving the timesheet.
Once the timesheet is approved, it will be marked as “Timesheet Approved.”
Admins can check the status of timesheet approval on the Job Sheet page (Job > Job Sheet). Simply hover your mouse over the icon above the shift number, and a tooltip will appear, indicating whether the timesheet still requires approval or if it has been fully accepted.
An alternative method to send the timesheet approval is by navigating to the desired Job Sheet page where you intend to send the timesheet approval.
Choose the specific shift or select all shifts, click on the options button, and then select “Send Timesheet Approval Email.”
Select the users to whom you wish to send the timesheet approval email, or check the “Select All” option and click the send button.
The selected members will receive the timesheet approval email and can review and respond to it by rejecting or approving the timesheet.
After approving the timesheet, it will be displayed as “Timesheet Approved.”
In an event the timesheet is rejected, the user will be redirected to the daysheet page, where they can review the shifts before submitting the timesheet again.
The timesheet approval hierarchy will adhere to the sequence of Crew, Supervisor, Client, and Admin.
In the provided example, the supervisor has already approved the timesheet. As I am currently logged in as an admin, I retain the ability to review the timesheet once more. This enables me to either grant approval or reject the submission, particularly if any irregularities are identified in the hours entered by the crew.
The Timesheet Approval Email will be sent to the client automatically, in accordance with the designated time set within the settings. Emails will be dispatched to the client continuously until they have granted approval for the timesheet.
Furthermore, you have the option to activate the feature that shows the timesheet approver in the invoice email by enabling “Display Timesheet Approval at Invoice Email.”
Action: Send Bulk Invoice
The Jobs page allows you to manage and send bulk invoices efficiently. Follow the steps below to complete the process:
Once you select a jobsheet, a dropdown menu will appear with various actions. On the upper right side, click Send Bulk Invoices.
After clicking, a pop-up will appear displaying the Client Name, Invoice Number, and Job Description.
Once the invoices have been successfully sent, a confirmation pop-up will appear in the upper right corner of the screen.
Action: Xero Bulk Send
The “Xero Bulk Send” feature enables bulk export of invoices to Xero from the Jobs page. This function allows users to send multiple selected jobs/invoices to Xero in a single action.
Navigate to the Jobs Page. Select Jobs for Export, Tick the checkboxes next to the jobs you wish to export.
Choose the “Xero Bulk Send” Action. Click on the “Select Actions” dropdown and Select “Xero Bulk Send” from the list.
The Xero login page will appear.Enter your Xero user credentials to proceed.
Select the organization from the list. Click the “Continue with Organization” button located at the footer of the page.
A pop-up notification will confirm the export process. Message: “Invoices exported to Xero.”
Each exported invoice will have a log entry, similar to the existing individual invoice export logs and Each invoice will display a “Last Exported” timestamp below the “Export Invoice to Xero” button after a successful export.
If an export fails, a pop-up notification will display the reason. Example messages:
Title: “Invoice Failed to Export”
Invoice 001 did not have the correct Xero category number assigned to activity X.
Missing TFN Number from Shang Chi. Please update the details here.
A marker will be displayed next to each invoice number to indicate the export status:
Green marker – Successfully exported to Xero.
Red marker – Export failed.
These markers function similarly to the ongoing and timesheet markers.
4.1.1 Invoices
To access the Invoice page, visit ‘Invoices’ in the Admin Menu.
Journey: Admin Menu > Finance > Invoices
This will direct you to the Invoices page where you can review and edit your invoices.
Highlighted rows show differences between payments and the invoice total. Hover over the info icon on the right of the table header to see more details.Find the invoice that you wish to edit on (for example, invoice no.4678-1) and click on the eye icon.
This will direct you to the Invoice page tailored to the chosen client.
Now, let’s take a look at the features at the top of the Invoice Page.
Feature
Description
Add Increment
Enable admin to update the Invoice number.
Client Profile
Directs user to the Client Profile page.
Refund
Used to reverse or refund a payment for the specific invoice.
Invoice History
Records or logs of all past invoices that have been sent.
Dropdown (Currently on ‘Invoice’)
Quick navigation to various job pages.
Add New Discount
It’s important to add discounts first before applying them via the Client Profile.
To add a new discount, go to the Discounts page under the Admin Menu.
Journey: Admin Menu > Finance > Discounts
Click the ‘+Add New Discount’ button to create new discount options.
Alternatively, you can edit existing discounts if any are available.
Once it has been created, Go to the Client Profile > Client Discount to select the Discount.
Apply Admin Discount
On the Invoice page (located under the admin menu), admins can add a discount in two ways:
Method 1: Apply via Client’s profile
Click on the client name to open up the Client Profile. Click on ‘Edit’
Select ‘Client Discount.’ under ‘Client overview’. Choose the discount options that will be applied to future invoices for the selected client.
Method 2: Apply through edit
Find the invoice that you wish to edit on and click on the eye icon.
Tick ‘Apply Admin Discount’ and set the discount amount or percentage.
Once completed, save your changes by clicking ‘Update Invoice.’
Merchant Fee and Bank Account Fee
Bank Account Fee: when the Bank Account Fee is ticked on the invoice page, it indicates that bank account payment is the client’s preferred payment method, as set in the Client’s Portal > Billing Details page.
Within the invoice page, this fee can be applied by ticking and entering an amount or percentage (including the % sign). Make sure to save any changes by clicking ‘Update Invoices’
Merchant Fee Amount: when the Merchant Account Fee is ticked on the invoice page, it indicates that card payment is the client’s preferred payment method, as set in the Client’s Portal > Billing Details page.
Within the invoice page, this fee can be applied by ticking and entering an amount or percentage (including the % sign). Make sure to save any changes by clicking ‘Update Invoices’
**Note: admin can opt to remove these fees by unticking the selected preferred method in the Invoice page.
Part Payment Required
Admins can charge the client up to three times using this feature. To begin, tick the ‘Part Payment Required’ box and enter the part payment amount or percentage of the total amount (including GST).
After applying the part payments, the payment amount (highlighted in blue) will be reflected on the invoice. See below:
**Note: Admins must wait until the first payment is completed before proceeding to add additional part payments.
Once part payment has been applied, admins have 3 options to charge clients:
Option 1: Direct Debit
Click ‘Charge Payment’ to directly debit the part payment amount from the client’s bank account or credit card.
Option 2: Email Invoices
Alternatively, admins can send the part payment email by ticking ‘Attach PDF to Invoice.’ Select the recipients or add new account details for those who should receive the invoice, then click ‘Email Invoice.’ This will send a copy of the invoice with (PDF attachment) to the selected users in the Invoice Loop.
Option 3: Email Using Action
Another way to email an invoice is through the “Action” menu on the Invoice page.
Select the invoice, then click “Select an Action.” Admins can choose either “Email Statement” or “Email Statement with Attach PDF.”
This will take you to the Email Invoice Statement page, where you can view invoice details such as the Invoice Number, Date Sent, Amount, Interest, GST, and Total. If the first part payment has been made, you’ll also see the paid amount and the outstanding balance.
Once the Email Invoice Statement has been sent, both the Admin and Client will receive an Invoice Statement Email showing the outstanding amount that needs to be settled by the Client. For more details about the Invoices Page, please visit CrewCard User Guide>> 13.3 Invoices.
**Note: Admins should use the Email Invoice Statement option when sending the outstanding balance to the client.
When a Part Payment has been charged by the Admin, an email will be sent to both the Admin and the Client. This email will include a thank you message, along with the Total Invoice Amount, the Paid Part Payment, and the remaining Balance.
Admins will also receive an email notification for the New Customer Payment whenever they make a Charge Payment or when the Client makes a payment.
Payment will be reflected in the Invoices page under the Admin Drop Down.
In the Invoices Page, it will reflect the outstanding amounts to help Admins keep track of their invoice status.
Furthermore, whenever an invoice is sent to the client, the invoice will also appear in the Client’s Portal under the Invoices page.
On the Invoices page, the “Payment Type” column will display “Part Payment Required,” indicating the type of payment charged. This serves as an additional way for the client to recognise the payment type applied to their account.
Add Notes in the Invoice
Admins can also attach additional notes to the invoice.
To do this, simply add your notes in the “Invoice Notes” section of the invoice
After adding the notes, Tick the “Attach PDF to Invoice” and Click “Email Invoice.”
Once sent, Client who are selected under the Invoice Loop will receive the Invoice email with the attached PDF.
Open the attached PDF and you will find the Invoice Notes.
Removing GST
To remove the GST from the Invoice Page, Simply go to the Clients Profile you wish to remove the GST or Click the Client Profile button on the the top of the Invoice page. This will direct you to the Clients Profile Page
In the Clients Profile Page, Click the Client Discount on the side menu.
Untick the “Apply GST” and click Save Details
Go back to the Invoice page and refresh it; the GST should disappear from the invoice page for the selected client.
Refund
You can also reverse the payment or refund an amount via ‘Refund’.
To begin, on the Invoice page, click the ‘Refund’ button.
The Refund Payment window will appear. Select the previous transaction from the Select a Part Transaction drop down list.
Enter the refund amount and the reason for the refund, then click the ‘Refund’ button.
Once the refund has been completed, it will appear under the Payment History section.
The client will receive a Refund Completed email with the amount refunded.
The refunded amount and date can be found on the Invoices page within the Client’s Portal.
Updated Invoice Layout:
We have improved the organisation of details in the new Invoice Layout.
These details will be sourced from the Business Page under Account Details. When “Use Separate Account Details” is ticked, all information, including the business name, state, suburb, postcode, telephone number, fax, and ABN number from the Business Page, will appear on the invoice page.
You can edit these details by unchecking “Use Separate Account Details” and then modifying the fields as needed.
4.4 Shift
Key: A / DM / M The shifts page allows you to view, edit and process data regarding all staff shifts that are entered into the system. All information on this page has been collected when a job is booked.
The Shifts page includes a PO Filter that allows users to filter shifts based on the PO number entered during the booking process.
By using this filter, users can easily view only the shifts associated with a specific PO number.
Advanced Shift Search
As the shifts page displays all current shifts in the system, use the advanced search to find the shift and job sheet you are looking for.
Note: Click “Shift No” under No. Column should automatically insert the job number into the search field on the shifts page. It will display all shifts associated with that job sheet on the shifts page.
To commence a search you can fill out one or more fields of the following information.
No
Shift number to view a specific shift.
PO No.
Enter the PO No to filter a shift(s) based on the PO number entered at the time of booking.
Job Sheet
Job sheet number to view the entire Job Sheet on Shifts Page
Business
When the field is clicked, a Multi-select dropdown list will appear containing all your businesses
Client
When the field is clicked a drop-down list containing all your clients will appear, click the client’s name you wish to view
Partner
When the field is clicked, a Multi-select dropdown list will appear containing all your Partner
Activity
When the field is clicked, a drop-down list containing all your activities will appear, click the one activity. The activities that are listed can be altered through Admin Settings.
Task
When the field is clicked, a multi select drop-down list containing all your task will appear, select the task.
Date From –
Date To
Click the field to open a calendar, select the dates you wish to view shits commencing in
Time From –
Time To
Enter the time in 24 hours. For example, 11:00 am/ 23:00pm
Project Code
Project Code is only for rental point and only can be activate at General Settings #180 Enable Project Code
Staff/ Crew
When the field is clicked a drop-down list containing all your staff will appear, click the staff’s name you wish to view
Day of Week
Tick box one or more day
Venues
When the field is clicked a drop-down list containing all your Venues will appear, click the Venue’s name you wish to view
Options
Use this field to select what form you would like to view your search in a new tab will open up.
Graph: this will open up the graph guide 4.6 and display only the searched shifts.
Calendar: this will open the shifts in the weekly guide 4.5 format
Import shift from XML: contact support@personnelmanager.com for help to set this up
Status
apply different shift states to quickly view them.
Unconfirmed- Identify shifts that have a crew pencilled but havent accepted the shift.
Unassigned – Quickly locate shifts that are not filled at all. Please note this view is completely blank where no crew member is assigned or pencilled in.
Unlocked – Shifts that aren’t locked.
confirmed- Shifts that have a crew confirmed for the shift.
Timesheet Approved – Shifts that has been approved.
Timesheet Not Approved- Shifts that has not been approved.
Search
Click to search
Reset
Click reset to clear all search fields
TIP: Combine Job Sheet number with date or time to narrow down the search. Ideal for a massive job sheet.
On the top right corner of the page is an overview of the shifts and hours. See below:
The totals automatically change when a search is done.
Underneath the advanced shift search, warnings will appear in a yellow square.
Warnings: If there is an issue when booking a shift, a warning will appear at the top. See the following screenshot for example. Warnings can appear for a number of reasons such as double booking, SMS failure, crew ticket expiry, and if the crew has exceeded [x] amount of hours in a week (setup in Admin Settings > General Settings > #139 to #142). Click the dropdown list to expand the reason behind the warning, below is an example of how they will appear:
Note: CrewCard will not allow the crew members to mark themselves as unavailable for a shift that you have already booked them for.
Action Keys
Column
Description
Scheduler (S Column)
This will open a new tab that will take you to the scheduler
Quick Edit (Q Column)
Quick edit, a pop-up window will open with limited editing options
Edit (E Column)
This will allow you to edit the whole shift in detail
Shift Number (No. Column): This provides information regarding the Shift number, also it provides a code regarding how the shift was booked. Please refer to the below information as a Guide.
Client Booked (CB)
These are shifts that are booked by the client.
Same Crew Booking (SC)
These are shifts where there is multiple shifts that is created at the same time.
Message
Message (Msg): Indicates the Status of outgoing SMS Messages. For more info regarding sending shifts to the crew, please see “MESSAGE Shifts” under “Shifts Page – Select an Action” and see “Message Logs Page” for more info regarding SMS Codes.
Msg Code
Implications
C – Confirmed
Indicates that a shift has been successfully assigned to a crew member and confirmed. This status confirms that the crew member is expected to attend the shift as scheduled.
D – Declined
Indicates that the shift was sent to a specific crew member, but they have declined the offer. The system records this response, and the shift remains unfilled until reassigned or accepted by another crew member.
M: (Multi SMS)
In the “Offer Shift Message” options for shifts can be sent to crew/s and the last 3 digits of Shift Numbers becomes the Acceptance (or Decline) Code for this shift.
L: (Linked Shifts SMS)
In the “Offer Shift Message” options for multiple shifts of the same kind can be selected (linked) and sent to the crew.
For example, 5x general crew shifts starting and finishing at the same time at the same venue sent to “x” amount of crew. CrewCard assigns the last 3 digits of the shift with the lowest shift number and shows L[xxx] on each shift.
Indicates that 2 or more shifts from different hours/dates/venues etc, have been sent together to the crew aiming to confirm the same person on all of them. All shifts must be selected and “Offer Shift Same Crew” must be clicked.
For example, a 4hr shift on Monday, 3hr shift on Wednesday, and 5hr shift on Saturday can all be sent together in one SMS as a package offer. CrewCard assigns the last 3 digits of the shift with the lowest shift number and shows SC[xxx] on each selected shift.
S: (Single Shift Sent)
When the Crew Member’s name is in blue, it indicates that the crew member has been selected manually, entered, and saved for a shift, but has not been confirmed. Once an “Offer Shift Message” is sent, it changes to green and an “S” appears in the “MESSAGE” column. The “S” will also appear in this column if the “Time Change” SMS has been sent to the crew. (For more info see “Time Change” under “Shifts Page” and “Select an Action”)
T: (Timeout)
Indicates Time Out for an “Offer Shift Message” has been sent and no incoming acceptance messages will be confirmed after this point. Time Out period can be determined in Global Settings.
?
Indicates that an offer multi has been sent to the assigned crew. You may select the ? icon to open up a window showing if SMS, Email, or App offers has been sent to the assigned crew. You may also cancel the Multi SMS by selecting the X icon
Next to some Msg codes, you will see information icons. Clicking on these icons opens the Shift Booking Status popup, which provides a detailed history of the shift offer.
In this popup, you will find:
Booking Type – Indicates the type of shift offer, such as Job Offer (offer message), Scheduler (Auto/Manual) , etc.
Offer Run Status – Displays a table showing:
The time the offer was sent (Offered At)
The offered shift ID
The crew member(s) the offer was sent to
Incoming SMS Accept Shift Interval – The waiting period after a crew member responds to a job offer via SMS, after which the system automatically confirms the shift.
Incoming App Accept Shift Interval – The waiting period after a crew member responds via the CrewCard App, after which the system automatically confirms the shift.
Message Logs Table – Provides a detailed record of:
Who the shift offer was sent to
The date and time of the offer
The delivery method (SMS, App, or Email)
Whether and how the crew member responded
Locked Shifts
Lock Type
Description
Lock Shifts – C/A
Crew Has completed their shift by checking in/out (With or without breaks)
Admin Locked Shifts
When admin locks a shift in the jobsheet page, the locked values are recorde as final regardless of whether the crew checked in/out or the shift was approved.
Clicking on any of the locked Icons will bring open the Timesheet information Popup for that specific shift.
You will find Detailed Explaination of the Timesheet codes below.
Name
The font colour of the Crew Name may vary depending on the status of the job assigned to him/her. Please refer to the info below:
Green – If an offer/request has been sent to Crew but not yet confirmed.
Red – If the crew has received the offer but is denied or unavailable to add to the said shift.
Blue – If the offer received is confirmed by the crew.
You will also see codes displayed under each crew member’s name, indicating their current status in relation to the shift:
En Route (EN) – The time the crew member has marked themselves as En Route (on the way) to their shift.
Check In / Check Out (CI / CO) – The exact times the crew member tapped the Check In or Check Out buttons in the CrewCard App.
Time
This column provides access to the crew member’s timesheet.
Each cell contains a timesheet icon – clicking on this icon opens the Timesheet Approval popup window. From here, you can view the geofence location of the crew, approve timesheets and more.
In the Timesheet Popup you can view both exact times a crew member clicked the check In/Out Button and the time they manually nominated as their start or end using the time picker in the Crew App.
Detailed explanations of these reported times can be accessed by clicking the information icon within the popup.
Click the pin icon and it will show you if the Crew is inside the designated geofence of the job or outside the vicinity of the job.
Crew App – The times that crew have nominated using the time picker in the CrewCard App as the times they started and finished work.
Geolocation (GI/ GO) – The time that crew first cross into the Geofence (set to 500 metres) radius around the job site and the first time they exit the Geofence.
Timesheet Code:
Scheduled Times – The start, finish and break times that were set when the job was entered into the system.
Actual Times – The times shown under Actual Times follow a set hierarchy. When crew members check in and check out via the CrewCard App and enter their break times, this action locks their timesheet and records the hours they worked. If these times are accurate, no further action is required. However, if an Admin edits the shift, the Admin’s changes override the crew-submitted times and these updated values are what will appear in reports and payroll.
Timesheet Hierarchy – Admin > Duty Managers > Managers > Supervisors > Team Leaders > Crew Members
Admin – Code: Admin – The times that the Admin (Superuser) entered using the Admin Portal for the times that crew started and finished work.
Duty Manager – Code: DM – The times that Duty Managers entered using the Admin Portal for the times that crew started and finished work.
Manager – Code: M – The times that the Manager (business) entered using the Admin Portal for the times that crew started and finished work.
Client – Code: CL – The times that the Client entered using the Client Portal or Client access for the CrewCard app for the times that crew started and finished work.
Supervisor – Code: S -The times that the Supervisor (of the Client crew) entered using the Supervisor access of the CrewCard app for the times that crew started and finished work.
Team Leader – Code: TL – The times that the Crew Leader (of the staff crew) entered using the crew access for the CrewCard app or Crew Portal for the times that crew started and finished work.
Crew Member – Code: CM – The times that a Crew Member entered using the crew access for the CrewCard app or Crew Portal for the times that they started and finished work.
SMS
The SMS icon does appear on shifts that aren’t yet either confirmed or denied. It will appear on shifts where an offer has been sent but the crew has not responded.
Once the SMS Icon is clicked it will redirect to the Send Messages page where you may send a message to the crew either by SMS, Email, or App. Please Input your message and select Send Message.
Once the SMS Icon is clicked it will redirect to the Send Messages page where you may send a message to the crew either by SMS, Email, or App. Please Input your message and select Send Message.
Scheduler Settings and Message Logs
Select the scheduler logs below the message code to view the Scheduler Settings and Message Logs.
The window will provide information regarding Scheduler Settings, Offer Run Status, and Message Logs.
You are given an option to Cancel Auto-Schedule and Cancel Multi SMS
Cancel Auto-Schedule – These will apply to the shifts that are scheduled via the Auto feature. Please select the button to cancel.
Cancel Multi-SMS – These will apply to shifts where there is an Offer Multi that was sent to the specific shift. Please select the button to cancel.
Extras
Icon
Description
Map
Hovering over this gives you a dropdown for three options
Staff GPS
Venue Overview
Venue Details
Detailed information about this will be below.
Note
Notes for/from staff and operations.
Instruction
Instructions to the specific shift(s) needed to accomplish the tasks.
Please refer to the colour code for the meaning of the Instruction icon.
Action
Select action as a job may require that crew members are properly inducted about the venue, or before a crew can start a job, they will need information about health and safety.
Please refer to the colour code for the meaning of the Action icon.
Files
Any documents that have been uploaded related to shifting. These files are uploaded via the corresponding job sheet of the shift(please refer to 7.1 Job sheets for more details). Once clicked you are given an option to view the file or delete it.
Crew Pass
Select to be able to view the Crew Pass that can be used by the crew to know their access level on sites. This will also include Job Details, Activity/Role, Documents Uploaded, and Inductions(if required).
For more information on Crew Pass, you may refer to 4.1 Daily.
The colour code will be activated depending on induction at the crew pass.
Colour Code:
Next to “Extras” you will find an information icon, clicking on this opens a popup where you can view the colors of each extras icon which indicates its current status.
How to Add Notes (Visible in the note column):
In the Extras column, click on the Notes icon (located between the drop pin and task icons).
A popup window will appear, showing multiple note fields, each differentiated by note type.
Enter the relevant details in the field labelled “Crew Notes for Shift XXXX (only visible to Admin)”.
Save your entry to ensure the note is attached to that shift.
Venue Overview
When you hover over this column, a tooltip will appear with three options: Staff GPS, Venue Overview, and Venue Details.
By default, clicking on the icon opens the Venue Overview popup. Within this popup, you can perform several actions:
Venue – Clicking the venue hyperlink takes you to the Edit Venues page, where you can update venue details.
Meeting Place – Displayed in a dropdown format, allowing you to select the meeting place for the shift. The dropdown options are pulled directly from the meeting places saved in the Edit Venues / Venues page.
Status – Update the status of the shift according to your processes.
Meeting Place Map – A draggable drop pin appears on the map. By default, it uses the Google Maps drop pin based on the venue address. For larger venues, you can drag the pin to the exact desired location.
Staff GPS
Clicking on this dropdown option opens a popup where you can track the crew’s location throughout the duration of the shift. The map also displays a drop pin marking the exact meeting place.
At the bottom of the map, you will find a draggable timeline with start and end markers. Adjusting these markers allows you to view the crew’s location at different times during the shift.
Venue Details
Clicking on this option opens the Venue Details (Edit Venue) popup, where you can update the venue name and address, add notes, manage meeting places and rooms, attach files and more ; these changes can also be made directly from the Venues page.
Action Footer:
Tick box one or more shifts → Click ‘Select an Action’ to present the following dropbox.
Actions:
Confirm Shift: By selecting shift/s and clicking this option, you simply make Crew member/s confirmed for a shift without sending them a Confirmation Message. Their name will appear black on the Shifts Page with a C next to it (under the SMS field) which indicates they have confirmed.
Edit Shifts: Select the shift/s and then scroll down to the bottom of the Shifts Page, use the Select an Action drop-down box to select Edit Shifts to edit the selected shift/s details.
Update Rates: When editing details of each shift or swapping crew members, along the way whether manually or automatically (confirmation via SMS) some shifts’ rates may not follow the changes properly even after being saved and the shift rate may need to update. This option is to ensure shift rates are updated based on rate/crew to correct payslips.
Copy Shifts: The selected shifts will be copied
Repeat Shifts: The shift will repeat the exact same
Unconfirmed Shifts: If the shift has been confirmed but you wish to change it back to unconfirmed
Highlight Shift: Highlight the shift, this reminds you to make changes to it
Remove Shift: Highlighting: This removes the highlight from the shift.
Deleted Shifts: The selected shifts will be deleted
Auto Scheduler/scheduler: The Auto Scheduler will automatically send offers to qualified crew based on Rank, On Call, Proximity and Merge Shift. Scheduler: manually select the crew you wish to offer the shift to. Learn more about this in guide 4.7.
Message:
All of the following actions will open up a message page where you can edit the message and select if you would like to send the message by Email, App or SMS (SMS uses SMS credit). You can set default messages for each section through the general settings.
Offer Message: The Offer Message feature allows you to send job offers to your staff, making it ideal for single shifts or multiple shifts where it’s acceptable for different staff members to accept the job. This option is flexible and works well when it’s not necessary to have the same staff assigned to all shifts.
Offer Same: This feature enables you to send job offers for two or more separate shifts within a single message. It ensures the same number of staff is booked for all shifts making it perfect when you need a consistent team to work across multiple shifts.
Offer Multi: This feature is designed for scenarios where the same staff members are required to work across multiple dates or venues. This option simplifies scheduling and ensures consistency for extended periods or across different locations.
Confirm Message: This will send a confirmation message to the crew who is booked for the shift
Confirm Multi: Confirm multiple shifts for the same crew (can do in one message)
Send Message: Allows you to send messages and bulk messages via SMS or App.
How to Send Message
Seamlessly connect with your crew members by using the Send Message. This feature allows you to send messages and bulk messages via SMS or App.
In the Shift page, Select a shift and click Select an action, Click Send Message.
Send Message page, allows you to select the Msg template additionally the crew assigned in the selected shift is automatically added to the list of crew who will receive the Msg Template. Users can tick SMS and App from where the crew will receive the message.
Once the Message template has been selected the message will automatically populate in the message field. Click the Send SMS button to send the message.
Users can also send messages by going to the Shift Edit page. In the shift page, click the edit icon.
This will open a new window for the Shift Edit page, Select or tick the checkbox for the shift.
Click the Option button and select Send Message.
Select the Message template and it will automatically populate in the message field. Click the Send SMS button to send the message.
Crew Notes For Shift
Admins can now save notes for each shift. This enhancement allows for better organization and communication, ensuring that important information is easily accessible and documented for every shift.
Navigate to the Shifts page and select the shift number for which you want to update the Crew Notes for Shift.
Click on Select an Action, then choose Crew Notes.
The Add/Edit Crew Notes window will open. You can add or edit the Crew Notes for the shift and click the save button. Alternatively, you can click the cancel button.
Once saved, a notification will confirm that the notes have been successfully saved.
Clicking the Note Icon will display the added or edited notes saved under Crew Notes for the shift.
Time Change: Update the times on the job
Cancel/Delete: Delete/cancel shift and a message will be sent to the crew member to notify them
Export:
Generate Report: This feature generates a comprehensive report or summary based on gathered data. Below are the steps for creating a report based on the tailored data.
How to Open
Firstly, select Shifts under the Jobs menu tab to initiate the report generation process.
Select the shifts you wish to include in the report on the Shifts page. Then, click the “Select an Action” button in the footer and choose “Generate Report” from the options in the Export column.
Generate Report’s pop-up will appear, allowing you to select a preferred template from the template dropdown.
To delete the saved template, click the edit icon, and then remove any saved templates by clicking the bin icon.
Within the “Generate Report” pop-up, select the specific fields to include in the report by choosing from the available fields and moving them to the Excel column alignment section using the right arrow button.
Moreover, you may also drag and drop by selecting one or more data on available fields, holding it, and dragging it to the right column.
Tick the “Save as Template” option to create and save the selected fields. Once all necessary selections are assigned, click the “Export” button.
A dialogue will prompt you to enter the template name. After providing the name, click the “Save & Export” button to finalise the process.
A confirmation pop-up will appear, showing the ‘X’ icon and the Back and Export buttons. Click Back to return to the previous step, use the ‘X’ button to cancel, and click ‘Export’ to proceed.
Upon completion of the download process, the file will be automatically saved in your designated Downloads folder.
Export Run sheets: Exports a detailed Run Sheet for selected shifts into PDF format. Useful for viewing staff’s start/finish times, venue and other details.
Export Excel: This feature enables you to export the selected shifts from the Shifts Page to an Excel spreadsheet. Once the scheduling has been done this feature makes it easy for importing the roster into other packages. You can save an Excel sheet into CSV files or tab_delimiter files.
Export Excel Sign off: The system will create a sign off sheet and download it into an Excel file
Export Summary: Export into Excel that displays a breakdown of the selected shifts which shows the following breakdown:
Date
Business
Activity
Job Sheet Number
Total hours
Total Paid $
Total Bonus $
Total Charge $
Profit
Margin
Site sheet PDF Download: The job sheet will download into a PDF
Site Sheet PDF Email: The software will create a PDF off the job sheet and send it to the allocated email
Export Staff Emails: The emails from staff on shifts will download all together into an Excel
When a shift is locked, no one is able to make changes to the details of the shift
Admin Lock Shifts
This is different from the normal lock as only the admin can unlock the job
Payroll Lock Shifts
In the Shift page a lock icon will be visible once payroll lock has been triggered while a lock with letter “P” will be visible in the shift edit page. Additionally, if Payroll locked is selected you can select or choose which week Pay Period you want the shift/s to be added to.
The Email Client for Job Confirmation feature sends a formal confirmation to the client regarding a scheduled job. It ensures clear communication by providing key job details, such as date, time, location, assigned crew, and specific instructions. This helps prevent misunderstandings, keeps the client informed and serves as a record of job confirmation.
Navigate to the Shifts Page and find the shift for which you need to send an email confirmation to the client. Open the ‘Select an Action’ dropdown menu and, under the ‘Message’ column, choose ‘Email Client Confirmation.’
After selecting ‘Email Client Confirmation,’ a pop-up window displaying the email confirmation template will appear. Click the ‘Send’ button to proceed. The system will then process and send the email to the client.
Once sent, a small confirmation pop-up will appear with the message: “Success! Email Client Confirmation successfully sent to (Client Name) <client email address>.” Click ‘OK’ to confirm.
Notes:
Ensure that client email details are correctly stored in the system to avoid delivery issues.
The email confirmation template can be customised in the settings if necessary. General Settings >> Email Templates>>Email Client Confirmation.
Use this feature to efficiently notify clients about shift confirmations and other relevant details.
For any further assistance, contact support@crewcard.co.
Custom Highlight Colour on Shifts Page
The Highlight Shifts feature allows users to assign custom colours to shifts for better visibility and organisation.
Navigate to the Shifts Page.
Click on the Highlight Shifts button.
A pop-up window will appear.
From the pop-up, select your preferred colour to highlight shifts based on your criteria.
Save or apply the changes.
On the Shifts page, there is a Highlight Shifts feature accessible via the Select an Action button located in the footer. Click Highlight Shifts to begin.
This feature allows you to customise selected shifts by applying a highlight colour of your choice.
Once selected, the chosen shift(s) will be visually highlighted with the selected colour.
To remove a highlight, select the shift(s) you want to clear, then choose Remove Shift Highlighting.
The shift(s) will revert to the default appearance with no highlight colour applied.
4.5 Groups
Shift Groups is a dynamic feature integrated into CrewCard’s platform, offering admins and managers the ability to organise shifts into groups. Shift Groups provide unparalleled flexibility in structuring and visualising the workforce schedule.
How It Works
Go to ‘Add Group’ under ‘Add Job’.
Click on ‘Add Group’ to open up the ‘Add Group’ window. Here you will fill the client, venue, start/end date, time on/off, no. of shifts per day and activity. Once filled click save.
NOTE: You can add another group with similar details later. This new group will be added underneath the previous one, given that the details are similar or identical.
Go to ‘Groups’ under ‘Jobs’. Click ‘Groups’ to be taken to the Shift Groups page. You can search for your shifts using the advanced search bar at the top of the page. The group shifts are present with this information; start/end date, group name, no. of shifts, business, shift no., job sheet, lock, on, off, client, venue, activity, name, phone, message and timesheet.
NOTE: “Multiple” Display Labels – When a shift group contains varying shift numbers, crew members, or phone numbers, it will be labeled as ‘Multiple.’ However, if multiple shifts within the group are assigned to the same crew member, their name will be displayed instead. Lock and Message Icons – An inconsistent icon will appear under lock and message if only some shifts have been locked and confirmed. Nested Rows Grouping –Grouped shifts are displayed in an accordion-style format, with an expandable icon replacing the checkbox. Clicking this icon will expand the nested rows, allowing users to view detailed information about each shift within the group.
Scheduler (Merge Group)
This feature allows you to take two or more group shifts and schedule them out together. In the scheduler, they will be listed together rather than as separate jobs. This means you can schedule out numerous jobs, even jobs with different clients, all at once.
First select the shifts you want to schedule out. Then click on the ‘Select an Action’ button in the footer. Click on ‘Scheduler (Merge Group)’ under ‘Actions’.
NOTE: You can merge any group shifts regardless if they do not have similar job details. These shift can only be scheduled if there are no crew pencilled into the shifts prior to this action.
You will be taken to the ‘Scheduler’ page where you can now assign crew to the shifts.
Group Shifts
Group Shifts allows you to select shifts that have been previously made and group them together.
First go to the ‘Shifts’ page and select the shifts. Then click on the ‘Select an Action’ button in the footer and click ‘Group Shifts’ under ‘Actions’.
NOTE: The shifts you select to group together do not have to have similar job details. They can be any job from any client.
Enter a group name and click ‘Group Shifts’. The shift group should now appear in the ‘Shift Groups’ page.
Ungroup Shifts
Ungroup Shift allows you to ungroup a shift group. Go to the ‘Groups’ page and select the shift group you want to ungroup. Then click on the ‘Select an Action’ button in the footer and click ‘Ungroup Shifts’ under ‘Actions’.
Click ‘Ungroup Shifts’ to confirm the action. The shifts will now appear under the ‘Shifts’ page as individual shifts.
4.6 Calendar
The calendar page displays all jobs for the week at one glance. You can set this up as the home page; however, you can also access the calendar page through the Jobs tab. You can edit the display information and the starting day of the week through General Settings. Thisis explained in guide 10.2.
To access the Calendar page, hover to Jobs in the Central Navigation Bar and click Calendar
Journey:CNB> Jobs > Calendar
Shifts within the calendar are colour coded to reflect the shift status.
Colour Codes for Calendar:
Colour
Description
Red
No Shifts have been confirmed.
Blue
Some or All Shifts confirmed.
Orange
Some shifts are confirmed but there are still unlocked shifts in the job.
Green
Some shifts are locked but there are still unlocked shifts in the job.
Grey
All shifts have been locked.
On the top right-hand side, you can click each button to view your jobs by month, 2 weeks, week, 3 days or today.
Edit Job in Calendar
To make changes to a job or to view more details, you must expand the job.
There are two ways you can do this:
Method 1: click ‘expand all’ at the top of the calendar
Method 2: click the arrow on the job cards to drop down the details.
Let’s first take a look at the three buttons located at the bottom of the expanded job card:
Schedule: If there are no confirmed staff for your shift, use the Scheduler (guide 4.12) function to send job offers to the available crew.
Quick Edit: Shows limited editing options for the shift.
Edit: This will take you to the job sheet pages which enables you to make changes to the shift for the job.
Let’s now look at our Options Menu
Click on options to expand more buttons:
Shifts:Tick the box of one or more crew members and press the shift button. This will open up the shifts page so you can edit a shift.
Jobs:Tick the box of one or more crew members and press the jobs button. This will open up the job sheet just for the selected crew.
Day Sheet: After a job has been completed, the Day Sheet button will appear. Clicking the button will direct you to the Day Sheet page. The Day Sheet allows you to enter times directly into the system and to report on the performance of a crew (applicable for Team Leaders, Client and Duty Managers).
Under the options is the job details:
Venue
Click the venue icon to quick edit the venue for the job.
A pop-out window will open. In this window, you can edit the details of the Venue by clicking the pencil icon. It will redirect you to the venue’s page, where you can edit the details of the Venue. Additionally, you can set the Meeting Place by selecting from the dropdown menu. Expand the map of the Meeting Place by clicking the plus icon.
Crew Profile
To open up the crew profile, click the name of the crew. This will redirect you to the crew profile.
Crew Rating
Once the job is completed, you can expand to see all of the crews that were on the job. Click on the star icon to provide feedback and a rating.
4.4.1 Day Sheet
The Day Sheet allows you to enter times directly into the system, and to report the performance of a crew (applicable for Team Leaders, Client and Duty Managers).
To access the Day Sheet, go to the calendar and find the job that you want to view the Day Sheet of. Click Options then select the Day Sheet.
Journey: Jobs (CNB) > Calendar > Select Job > Options > Day Sheet
You will be redirected to the Day Sheet, where you can edit shift times and provide staff feedback. This is what the Day Sheet will look like for Admin, Duty Managers, Team Leader and Supervisors.
Let’s take a look at what Day Sheet page include:
Job Details
This section will display the details of the job, including: job number, date of the job, venue of the job, its meeting place and the activities. The details of the Venue can be edited by clicking the house icon (applicable for Admin and Duty managers only). You can also click on the direction arrow of the Meeting Place, opening a new tab to display the Meeting Place on a map, and the directions on how to get there.
Supervisor Details
If there is a Supervisor assigned to the job, it will be displayed here. Otherwise, the fields will be blank and information will need to be entered before submitting the Day Sheet.
Meeting Place
Click the box to open up information about the venue, address and meeting place.
Staff GPS
Clicking the box will redirect you to a new page displaying the staff member’s real-time location.
Safety Induction
When the Induction Button is clicked, a new window tab will open for Induction. Depending on your login credentials, the Induction can be for Client Induction, Team Leader Induction or General Activity. The Induction Button is not available on the Day Sheet of the crew. Further, the Induction function is for Team Leaders and Supervisors only. Though the button will appear for Clients and Admin, the function will not work for them.
You will be redirected to the Induction page, where you are to completely fill out the Induction Form. The contents of the induction will depend on the settings of your system.
Let’s now look at the tabs within Safety Induction
Job Details
Click on the Job Details to open its content and select the job from the dropdown list.
Tool Box Talk
Click on the Tool Box Talk to open its content and select the job from the dropdown list.
Policies and Procedures
Click on Policies and Procedures to open its contents. It will list down all available policies and procedures. You can click on the policies and procedures to view its entire content.
Signature
Once you are done with the Induction, you can now affix your signature and submit it.
Inspection
When the Inspection Button is clicked, a new window tab will open. The venue inspection function is for Team Leaders and Supervisors only. Though the button will appear for Clients and Admin, the function will not work for them.
Select the job from the dropdown menu where the venue inspection will take place. Then, follow all necessary inspection steps as outlined in the window. When you select a job from the dropdown menu, it will display the venue and the client for that job.
**NOTE: The content of these sections will vary and will depend on the settings configured in the Safety Forms.
Take 5 – Before You Start
This section will provide users with some tips on how to effectively inspect a venue. Follow these guidelines to ensure your venue inspection is effective.
Open All – when you click on this button, all accordions will be opened.
Close All – accordions will be minimised.
Photo – can take a photo or Upload image of the venue
Venue Information
Based on your observation and inspection, you can now fill out the information needed in the Venue Information. Provide info for Staff Entry Location, Security Location, First Aid Location, Emergency Meeting Point, Restroom Points and Other info.
Staff Entry Location – this is the entrance dedicated for the crew members.
Security Location – the location of security personnel.
First Aid Location – the location where first aid is kept.
Emergency Meeting Point – this is the assembly meeting point if there is an emergency.
Restroom Locations – the location of the restrooms.
Other Info – other relevant and important information about the venue.
Work Areas Inspected
Tick the box of all the areas you’ve inspected. If you inspected other areas, you can enter it in the info box provided at the bottom of this section. You can also enter your notes in this field.
Existing Safety Measures
Tick the boxes of the applicable safety measures in effect at the venue.
Signature Block
If you have previously signed a form, your signature will appear here. You can always click Clear if you want to re-affix your signature. You can click Submit once you have completed all of the sections under the Venue Inspection Form.
After you submit the form, a pop-up will appear asking if there are any safety issues you want to report. Click No if there are no safety issues and click yes if there are safety issues you want to report.
Photo
The next section in the Day Sheet page is the photo. You can attach a picture in the day sheet by clicking the photo button. If you are using a mobile phone to access a day sheet, it prompts you to use your camera or to browse for photos. If you are using a web browser, when you click on the photo button, it will ask you to search the photo in your files so you can attach it in the day sheet.
Timesheet
The timesheet can be accessed within the Day Sheet by clicking the link provided. When clicked, the timesheet information will pop-up.
It displays the time entered by the Crew, Supervisor, Client, Team Leader and Admin.
Star Icon
The star icon is for crew rating. When you click on this icon, you will be able to send ratings and feedback for the crew. Go to 4.4Calendar >> Crew Rating for more details.
Handshake Icon
The handshake icon is used to acknowledge and confirm that the staff member understands the induction and inspection policies required by the company.
The green handshake icon signifies that crew has fully understood the content of the Induction, Toolbox Talk and SWMS. It shows that the crew member will abide by all policies and has confirmed all details in the Day Sheet are correct.
Day Sheet Indicators
There are numerous indicators on the Day Sheet that signify various things. For example, the green text and time on the Day Sheet with code “CM” on the below screenshot signify that crew has entered his/her check in and check out time.
Timesheet Hierarchy – Admin >Duty Managers > Managers > Supervisors > Team Leaders > Crew Members
These are the codes to indicate the user who entered the time on the Day Sheet:
Code
Indicator
Admin
The times that the Admin (Superuser) entered using the Admin Portal for the times that crew started and finished work.
DM
(Duty Manager)
The times that Duty Managers entered using the Admin Portal for the times that crew started and finished work.
M
(Manager)
The times that the Manager (business) entered using the Admin Portal for the times that crew started and finished work.
CL
(Client)
The times that the Client entered using the Client Portal or Client access for the CrewCard app for the times that crew started and finished work.
S
(Supervisor)
The times that the Supervisor (of the Client crew) entered using the Supervisor access of the CrewCard app for the times that crew started and finished work.
TL
(Team Leader)
The times that the Crew Leader (of the staff crew) entered using the crew access for the CrewCard app or Crew Portal for the times that crew started and finished work.
CM
(Crew Member)
The times that a Crew Member entered using the crew access for the CrewCard app or Crew Portal for the times that they started and finished work.
Footer Buttons
The footer buttons are used for entering and submitting time related to the shift.
Check In Button –Use the Check In button to record the crew’s start time.
Check Out Button – Use the Check Out button to note the crew’s end time or indicate their absence.
Breaks – Manage crew breaks by using the Breaks option.
Submit – Finalise and submit the recorded time by selecting Submit.
To enter the check in time, select the crew by ticking the box of their names, then click the check-in button. A window will pop-up to select time for check in. Select the time from the dropdown menu and click ok.
The page will refresh and the check-in time will be reflected with a green text, followed by the code of the person who entered the time.
Follow the same steps when entering check out time. Select the crew by ticking the box of their names, then click the check-out button.
A window will pop-up to select time for check out or you can mark the crew member as Absent.
The page will refresh and the check-out time will be reflected with a green text, followed by the code of the person who entered the time.
Follow the same steps when entering the break time. Tick the box of the crew then click the Breaks button.
Click the plus icon to add break time. Then, click the down arrow to select break start and break end. After, click the Save button to add the break time.
Client Sign Off
Affix your signature in the box and click the submit button if you are ready to submit the Day Sheet.
Submit Day sheet
A pop-up window will appear to confirm the submission of the Day Sheet. Click YES if you are ready to submit the day sheet, otherwise click CANCEL.
Once a Day Sheet has been submitted successfully, this pop-up window will appear.
The check in and check out times will now have a lock icon beside them.
4.7 Weekly
The WeeklyPage provides an overview of jobs organised in a weekly view. To access the Weekly page, hover over “Jobs” in the Central Navigation Bar and select “Weekly.”
Journey: CNB > Jobs > Weekly
When clicked, a distinct calendar format will open in a new tab, displaying the current week. You can navigate through different weeks using the ‘Previous Week’ and ‘Next Week’ buttons.
4.8 Graphs
The “Graphs Page” typically refers to a section or feature where graphical representations or charts of data are presented. The “Graphs Page” is where users can view graphical representations of crew and job data, allowing for a visual analysis of scheduling and workforce-related information. Such pages are often used to provide users with a visual overview of data trends, making it easier to interpret and analyze complex information.
When you select “Graphs” from the “Job” dropdown, you will be taken to a new page where a graphical representation of crew and job data will be displayed.
Data Display:
Group By: You can choose to group crew by either the job name, showing all crew with shifts, or by specific crew groups.
Filter by Business: This option allows you to view jobs based on the associated business.
Job No: Displays the unique job number allocated to each job.
Crew Group: Shows members within a specific crew group.
Date From/To: You can specify date ranges to display jobs between those dates. The default view is one week. Scroll: Use arrows to navigate through job days.
Graph Layout:
Height: Adjust the height of the graph using the arrows. This affects the number of job rows displayed.
Zoom: Zoom in or out of the graph using the ‘-‘ and ‘+’ buttons. This alters the visibility of days.
Display by options : Located on the left panel, users can select multiple crew groups using the dropdown menu. This feature allows you to filter and view relevant shift data more effectively. You can also enable the following viewing options:
Show Unassigned Jobs – Lists activities with shifts that have no confirmed crew, with matching bars shown on the right side of the graph.
Show Unassigned Crew – Lists crew members without a shift in the selected date range and crew groups.
Show Unavailable Crew – Lists crew who are marked as unavailable for the selected date range.
Shift Management:
Shifts can be easily managed directly from the Graphs page. You can:
Transfer shifts between crew members by dragging the shift to a new crew member.
Adjust shift times by stretching or repositioning the shift bar.
Hover over a shift to display a flyover menu with an Edit button.
Upon making changes, a confirmation window will appear, displaying both the previous and updated shift details.
Click Save to confirm changes, or click Notify Crew to open the messaging page and alert the assigned crew about the update.
Edit Shift Bar Popup
Hover over a shift, and a flyover will appear.
Click on the Edit button to open the Edit Shift Bar popup, where you can view and update shift details.
Within this popup, you can view and edit the following details:
Crew Member Name
Shift Status
Shift Number
Description
Activity
Task
Supervisor Name
Supervisor Contact Number
Date
Time
Duration
Client
Venue Address
Instructions
Assigning or Replacing Crew Members within the edit shift bar
Drag and Drop: Drag a crew member from the right-hand list into the Name field (top left of the popup).
Double Click: Double-click a crew member’s name from the list to assign them to the shift
Click Save to confirm changes. Alternatively, click Message to be redirected to the messaging page where you can notify crew of the shift update.
A pop-up notification will confirm the successful shift update.
This process allows for efficient management and adjustment of shifts among crew members.
Info Icon: Crew Statistics
Each crew member on the graph now features a subtle info icon beside their name. Click or hover over it to view:
Total Hours Worked
Total Shifts Assigned
Consecutive Days Worked
About Consecutive Days
This stat follows the Per Pay Week Method set in your Settings. It doesn’t rely on the selected graph range but instead uses the current pay period (weekly or fortnightly) to calculate the maximum number of consecutive days worked.
Example Scenarios:
Weekly Pay (Mon–Sun): Crew worked Mon, Tue, Fri, Sat, Sun → Max consecutive = 3 (Fri–Sun)
Fortnightly Pay: Crew worked Fri–Sun in week 1, Mon–Tue in week 2 → Max consecutive = 5
Colour Customisation
You can now customise the colours of Unassigned Shifts and Unassigned Crew using hex codes in General Settings.
Simply scroll to “Unassigned Shifts Colour (Hexadecimal)”, enter a hex code or use the colour picker, and tick “Use Colour from Setting 20. Graph Colour Grouping” to apply the changes to your Graph Page.
4.9 Events
The “Events Page” is designed to display and manage events, typically organised by date and day. Users can view and manage events, bookings or job sheets. This page can be set as the default home page.
On the “Events Page,” events are usually presented in a calendar-like format, allowing users to see events for different days and dates. This page often includes features for creating, editing and managing events, assigning staff, specifying event details and more.
Bookings or job sheets here are known as “Events”. All bookings are displayed by event on the main Events Page, rather than by each shift (staff) on the Shifts Page.
Creating job sheets (events) on this page also gives you quick access to two additional components: “Equipment” and “Consumables”, which can be added or edited on the go. Using the Events Page would be most efficient if each event is entered by your office staff (as opposed to Clients making bookings online every day) and, if your invoices include a combination of an hourly rate for staff, consumable items and equipment hire.
There are three pages within this page: Events, Booking and Quote.
The events are colour coded by day and the columns are categorised by key:
Business: The name of the business/location that the job is booked for.
From/Until: Click the field to display a calendar and select the time frame in which you would like to view the events.
Notes: Anything that’s entered in the “Booking Notes” text box, in either Booking or Quote tab, appears here.
Using the search bar, events can be narrowed down by client, date or job number. A combination of multiple search filters can also be used by entering the data and clicking the “Search” button. Click the “Reset” button to reset the advanced search bar entries and bring the events to view back to today.
Creating A New Event:
Click “Add Event” or “Booking” which will open a small window.
Fill out the fields and click create.
This will create a new booking/event. This will then take you to the quoting page.
‘Job No.’ is automatically assigned by CrewCard. This can be edited with numbers or text.
Booking Notes: Any notes related to the event can be entered here.
Qty: Total number of shifts.
Booked: Number of shifts that have been confirmed.
Required: Number of shifts that are needed or necessary.
More staff can be added by clicking “Add Staff”.
Equipment: Click “Add Equipment” then enter a quantity, which will multiply the amount that’s entered under “Charge”.
Consumables: Add a description of the charge, date (optional), quantity and the charge, which will be multiplied by the quantity.
The numbers entered are able to be in whole or decimal form for both equipment and consumables.
Make sure to click “Save Information” after making any changes.
To perform an advanced search, use the client bar, date or job number, which narrows down the jobs displayed. Click reset to return to view all.
Booking
When the event has been created, double click the event to be taken to the booking page. Here, you can allocate staff, select a venue, write notes for staff and update their rates.
Whenever an Activity or Category is edited or remapped, it is recommended to update the rates in the Job Sheet, Shift Edit Page or Events Booking Page.
Assigning or editing a supervisor may also be possible by selecting the On-site Contact Name.
A window will pop up where you may input the supervisor’s name. An option to send an Email and SMS invite can also be done. To save the changes, please select Send App Invite.
Footer
Tick box one or more shifts. Use the footer options to perform the following actions:
Offer Message: A message will be sent to the crew about the shift
Offer Same: If you have more than one shift with different details and you put those shifts in one offer, that is Offer Same
Offer Multi: Multiple shifts will be sent to the same crew
Confirm Shift: If you know the crew has already confirmed the shift, this will not send a message to them but will confirm that they will be doing the shift
Confirm Message: This will send a confirmation message to the crew who is booked for the shift
Confirm Multi: Confirm multiple shifts the same crew can do
Lock: When a shift is locked, no one is able to make changes to the shifts details
Admin Lock: This is different from the normal lock as only the admin can unlock the job
Payroll Lock: In the Events page>> Booking Tab a lock icon with letter “P” will be visible once payroll lock has been triggered. Additionally, if Payroll locked is selected you can select or choose which week Pay Period you want the shift/s to be added to.
Unlock: Unlock a shift so the shift can be edited.
Export selected Shift (s): The selected shifts will export into an excel sheet.
Copy Shift (s): The selected shifts will be copied.
Deleted Shift (s): The selected shifts will be deleted.
Message Cancel & Delete Shift (s): Delete/cancel shift and a message will be sent to the crew member to notify them.
Message Notify Staff of Change: The change in the selected shift will be sent to the crew.
Make Unavailable: The shift won’t be available.
Admin Lock Shift(s): This is different from the normal lock as only the admin can unlock the shift.
Highlight Shift(s): Highlight the shift. This reminds you to make changes to it.
Remove Shift(s) Highlighting: This removes the highlight from the shift.
4.10 Map
The “Map” feature shows the positions of both staff members and their respective shifts in real-time.
You can also utilise the search function to precisely locate a crew member or venue on the map. Simply enter the initial letters of a crew member’s name, a venue or a meeting point and then select from the provided drop-down list.
Colour Tags:
Green: Indicates the locations where crew members reside.
Red: Represents crew members currently working at a venue.
Clicking on these tags will trigger a pop-up window displaying additional details about the staff and shifts. You can refine your search by specifying a date and time to view the relevant staff and shift information.
Tip: Similar to the functionality on the Google Maps website, you can zoom in and out on the Location Map using the mouse wheel or click and drag to navigate.
4.11 Statistics
The Statistics page allows you to view and compare two time periods at once. Enter and select the information you would like to compare for the two different graphs.
4.12 Roster
Key: A / DM / M
A Roster is a schedule of shifts that assigns crew members to specific jobs over a defined period. The Crew Card app allows you to create, manage, and modify rosters with ease, ensuring you meet operational needs efficiently.
Navigate to the Rosters section from Jobs in the main menu.
Creating a New Roster
Click the + Add Roster button.
Select the Client and Venue.
Set the date and time frame: Choose the start and end dates for the roster. You can also select a predefined period such as a ‘Shutdown’ event.
Choose the Activity required for the job.
Choose the day of the week, either Weekdays only or a Custom Selection.
Enter the Number of Crew required.
Save your roster, and it will be ready for crew assignment.
The job sheet will be generated. To open it, click “Open All Job Sheets” for the full list, or click the specific job sheet number to open it directly.
Assigning Crew to Shifts
Once your roster is created, you can start assigning crew to each shift:
Open the Roster page and find the shifts created.
Choose from the available crew list or search by name.
Drag and drop the crew member’s name into the shifts.
Note: Only active crew members will be listed under Crew Lists.
Note: Each card features a crew icon in different colors, representing the following:
Orange: If there is insufficient crew, the icon will be orange.
Blue: if there are enough crew, the icon will be blue.
If the crew was not pencilled in for the shifts, the reasons would likely be as follows:
Crew does not have the correct activity.
Exceed Hours Limit.
Crew is not mapped to Business.
Crew is only allowed to work with certain clients.
Crew is tagged as incompatible with the Client.
Using Filters in Roster
CrewCard offers various filters to help you quickly find the best-fit crew for each shift. These filters allow you to streamline the process by selecting based on specific criteria.
Shift No.: This is a unique identifier assigned to a particular shift, often used to track and reference it in roster systems.
Crew: List of Crew Members
Client: This is the individual or organization for whom the work is being done. They are usually the party that has requested the services or for whom the crew is performing tasks.
Date From: The start date of a specified period or shift. It marks when the shift or job begins.
Date To: The end date of a specified period or shift. It indicates when the shift or job concludes.
Another way to filter the shifts is by selecting the Client from the Clients column. The calendar will then display the list of shifts for the current week.
Additionally, you can use the < and > buttons to view the shift schedules for the previous and next weeks on the calendar.
In the Clients column, selecting a client will display the list of shifts. When you tick a shift number, it will take you to the shift’s edit page.
To filter the Crew list, click the filter icon. You can select multiple Activities and Abilities and then click “Apply Filter.” Alternatively, you can type the crew member’s name into the text field.
4.13 Deleted Shifts
Key: A / DM / M
This page presents a list of all the shifts that have been deleted.
To restore a deleted shift, navigate to: Jobs → Deleted → Restore Shifts → OK
Note: Delete shift reason is required by default, Settings is required to manually change to have delete shift, reason hidden.
4.14 Scheduler
The scheduler offers an enhanced method for sending job offers to staff, incorporating additional features and capabilities. With the scheduler, users can send offers through SMS, Email and the CrewCard mobile application.
Furthermore, the scheduler enables you to choose crew members based on various criteria such as their On-Call Status, Ranking, Proximity to the Job Location and Abilities. Access to the scheduler is available via the Calendar, Job Sheet and Shift interfaces.
Calendar:
Job Sheet:
Shift:
Two Types of Scheduler
Manual – You have to select the crew from the available list and send the offers to them manually. You can also confirm staff to shifts or pencil them in.
Auto– Sending of job offers is done automatically. Simply enter the number of staff that will be sent offers based on the time you prescribed in the minutes field. You can also specify the ranks of the staff.
Manual Scheduler
To open the manual scheduler click scheduler through the calendar or open it through the job sheet by selecting the shift and click scheduler.
The following page will open. The warning sign appears on the top of this page – Only a maximum of 50 crew should be sent out each time, or else this will overload Scheduler and the page will be very laggy and slow.
The distance (in KM) here next to the crew name, eg: Scarlet Witch 36.2km, describes the POINT TO POINT distance of the crew to the job site, not the DRIVING distance.
A list of crew will appear bellow the shift, click Rank, On Call or Proximity to list the staff in order.
Rank – Crew members in the available list will be displayed in order of their ranking.
On Call – Crew Members who have activated their on-call status through the Crew Access portal/ app will appear at the top of the list.
Proximity – When selected, crew members are arranged in the list based on their distance from their home address to the job location.
Merge Shifts – You can combine shifts into one using the Merge Shifts button. This means a crew member will only receive one SMS, one Email or one App notification when job offers or job confirmation are sent. Select the shifts that you want to merge and click Go.
NOTE: The difference between the Multi Shift Offer and Merged Shift (Method 3) is that the crew will only receive one offer message the number of shifts. If there are 10 shifts, there will only be 1 SMS, 1 Email and 1 App Notification for the message offer. If you use Multi Shift Offer to send the offer, the crew will receive 10 separate SMS, 10 separate Email and 10 separate App notification for the job offer.
Send Message:
Tick box one or more ways to send the offer to the crew
Tick box the staff you wish to send a message to and use the footer to perform sending the message.
Footer
Each shift has three functional buttons that you can use – Pencil, Offer and Confirm.
Pencil – When you pencil in staff to a shift, you are just planning to assign that specific crew to that particular shift. Pencil does not mean confirmation. No message is sent to the crew when they are penciled in to a shift.
Offer – Shift is being offer to the crew. Shift offers are sent via SMS, Email or App.
Confirm – Crew is confirmed to a shift and a confirmation message is sent to the crew. Also when the crew is ticked box and you click confirm it will confirm their shift.
Confirm Message: This will send a confirmation message to the crew who is booked for the shift.
Cancel: This will delete the shift.
NOTE: When the crew accepted an offer, he/she will be automatically confirmed to the shift.
When offering a shift depending on what way is ticked a message box will appear. A default message will appear that is set in settings please see guide 10.2 General Setting.
App (Single Shift) – First Come First Serve
It means you are only offering one shift to multiple crew. Whoever accepted the offer first will be confirmed to the shift.
App (Multiple Shifts) and SMS
It will follow the accept interval time where it will collect all acceptances and will confirm crew with the highest rank amongst all who accepted the offer.
Multiple shifts means, you are offering 2 or more shifts to crew members.
Example:
Shift A 09:00-18:00 Shift B 09-00-18:00
You send Shift A and Shift B to Crew 1, Crew 2, Crew 3, Crew 4, so on and so forth.
The accept interval time in your system is 3 minutes. It means the system will check the highest ranking member 3 minutes after first acceptance.
If crew members have the same rank, it will confirm the crew based on Database ID meaning the crew who was saved and added to the system first.
4.15 Auto Scheduler
The Auto Scheduler will automatically send offers to the qualified crew. Similar to the Manual Scheduler, you can also use Rank, On Call, Proximity and Merge Shift. Tick box the shift/ shifts on the job sheet, then click auto-scheduler:
When clicked the Auto Scheduler will open. Fill out the fields to commence sending out job offers.
Click one of the following to be the base of the job offering:
Rank – the offers will be sent according to their rank.
On Call – job offers are sent to crews who are on call
Proximity – job offers are first sent to crew who are nearer to the job location
Merge Shifts – shifts are merged and offers are sent using Rank
Select Abilities: Only crew members with the Ability will receive the offer
Staff Every: The values entered here will determine the volume of offers sent to the crew and how long between the job offers will be sent out
From Rank to Rank: Enter the rank number you wish crew with that ranking will only be offered
Finally, click how you wish to send out the offers, once clicked press go and the shift will be sent out.
Note: You can select the Open Schedule page and a new window will open to display it. Offers will be sent to the crew as indicated by the logs. In Auto Scheduler, offers are sent to qualified crews and, if they accept the offer, they will be confirmed instantly, except for Auto Scheduler – Merge Shift.
For Auto Scheduler – Merge Shift, if 3 crew members accepted a shift, there will be an interval before someone gets confirmed. The system will select the best crew member among the three, then auto-confirmation is sent to the crew.
4.16 Quick Edit
Quick Edit can be found in Scheduler Page, Shifts Page and Calendar Page. it will allow you to edit shift(s) such as the activity, date, time and break schedule.
Scheduler Page:
Shift Page:
Calendar Page:
5.0 Contacts
Contacts gives you access to view/edit your staff, clients and job details.
The Recruit Cards is highlighted in the above images as this is a setting that needs to be switched on, please see guide 10.4 Recruitment Settings.
5.1 Staff
5.1.1 Crew (Staff) List Key: A / DM / M
Click the ‘Crew List’ function under the Contacts dropdown to display a list of all crews in your system. You are able to advance search, block, disable, edit existing crew and add new staff through this page.
Advance search crew by Name, Postcode and Mobile no.
Employee ID: Click the text box and enter a customised employee key for each crew member.
Rank: The CrewCard staff rostering system allows you to rank your crew numerically for the purposes of prioritising them in order of preference. Simply open the Crew Page (Admin/Manager Login), and enter a number in the text box to the left of each Crew Member’s line. It is possible to assign the same ranking to multiple staff. The MultiSMS system will use the ranking when sending an SMS. If rankings are not saved, (shown as ‘0’), the MultiSMS sequence will display crew in alphabetical order. The administration account has the ability to lock the ranking so it cannot be changed. No one can see this lock.
Business: Determines which “Business” this Crew works under. All shifts are entered under one “Business” and crew names DO NOT appear if they are not saved under that “Business”. Please note that any crew can be saved under multiple businesses.
Score Info: To view the score information, turn off the business option and the score info column will appear in the crew list. Click on the score info. To edit the details in the score info, go to General Settings and update the 187. Score Info Popup Text.
MESSAGE
Click the message next to a crew member’s name.
This will open the SMS message page where you can send a message to one or multiple crew members.
Add Existing Staff
To add an existing Crew in CrewCard, simply hover your mouse over contacts and select Add Crew under the Crew Column. ‘Add Crew’ will allow you to add existing crew in your company while adding a new crew through recruitment process. Please refer to 5.4 Recruitment .
Enter the details of the crew, then click Save & Exit or Save & Open Profile.
Add New Staff
If you wish to add staff that are not in the system or have not signed up, click the add staff button.
The following window will open:
Enter the crew details and use the arrow buttons to select their activities. The activities available in the list are from the activities uploaded through settings.
After entering the information, you are given the option to save and exit, or to open the crew profile and finish uploading their information. Please see guide 9.1 Crew Profile for more information.
Disable Staff
Disabling staff is a setting that allows you to temporarily disable crew from being booked for jobs.
Tick box the crew or crews you wish to disable, then click the Bulk Disable Staff.
A pop-out box will open up. Enter a reason for disabling the crew member and click submit.
Before disabling the crew, a pop-out will appear, making sure you want to proceed. If yes, click okay.
You can now find the crew member on the disabled staff list. If you wish to enable crew members back into the crew, click the red icon next to the crew.
Enter the reason why you wish to enable the staff back into the system.
The crew will be back in the system and made available for bookings.
If you wish to permanently delete crew from the system, you can do it on this page.
On the disabled crew page, you can view all deleted staff. Click the deleted staff button.
This will take you to a list of all deleted crew, where you can view or edit their profile.
The Deleted Crew Page contains the deleted crew members details, which enable Admin access for editing/viewing. The purpose behind the Deleted Crew Page is to have the option of updating the deleted crew members details, in order for them to be rehired into the system. The CrewCard system does not allow a crew to be added with the same mobile number even when a crew member has been deleted.
To add deleted crew as New Crew, go to the Deleted Crew Page, then change the crew’s mobile number and Save. Once the mobile number is changed, Admin is able to add the person as a new crew again.
On the Disabled Crew List page, there is an option for bulk deletion that allows you to select multiple crew members at once and remove them from the list. There are also two important features:
Total Disabled Crew: This indicates the total number of crew members who are currently disabled.
Memory Used Indicator: This shows the amount of memory used, helping you keep track of system resources. These features, along with the bulk deletion function, are essential for managing your crew efficiently.
Export Emails:
Through the staff list page, you can export all crew names and emails from the system. Click the export email button.
This will download the list of crew names and emails into excel.
Employment Type
The Employment Type column enables administrators to view and manage crew employment statuses directly from the Crew List page.
To update the employment type for a crew member, follow these steps:
Go to the Crew List page. Select the crew member whose employment type you wish to update, then click the edit icon.
In the Crew Profile under the Personal Details section, locate the Employment Type field. Choose the appropriate employment type (e.g., Contractor or Employee).
Click Save Details to apply the changes.
The updated employment type will now be visible in the Employment Type column on the Crew List page.
5.1.2 Crew (Staff) Compliance
To get started, hover your cursor over the “Contacts” in the central navigation bar. Then, choose the “Staff Compliance” option from the drop-down menu.
Upon selection, you will be redirected to the Staff Compliance page, where you will find a comprehensive graphical representation of various compliance areas. This visual presentation depicts aspects such as onboarding, employee skill certification, employment verification documents and HR documentation review.
On the Crew Compliance page, you have the option to select the view by “All,” “Active Crew” or “Recruits.” This allows you to filter and display the compliance information based on the desired category.
One of the interesting features in Crew Compliance is the ability to select the graph legend that corresponds to each graph. This function allows you to choose and focus on specific areas of compliance represented by the graphs.
When you select the graph legend, you will notice that it becomes excluded or marked as removed, along with the corresponding graph being displayed.
To further enhance the reporting capabilities of the Staff Compliance feature, all pages within the compliance module provide the option to download CSV reports. This feature allows you to generate comprehensive reports for further analysis or sharing with relevant stakeholders.
By selecting the checkbox next to “Download CSV Reports,” you gain the ability to download all the selected reports simultaneously. Additionally, you can individually select the checkboxes for each module, enabling you to download specific reports for that particular module.
Within each compliance page, you have the ability to apply filters to refine your search based on the specific category you desire. This feature allows you to narrow down and focus on the information or data that is most relevant to your needs.
Business: To view specific crew members based on location or business, you can apply filters or search criteria. This will enable you to narrow down the crew list and access the desired information related to their respective locations or business affiliations.
Crew Name: By entering the first few letters of the crew name, the system will generate crew name suggestions for you to choose from. This feature assists in selecting the correct crew name more easily and accurately.
Document: This feature enables you to select or apply filters based on specific documents. You can easily navigate and sort through the available documents to access the desired information.
Status: Choose the status of the document. This option allows you to select and filter documents based on their current status, helping you to manage and organize them more effectively.
Furthermore, you can filter the view by utilizing the sort icon situated next to each column, including Rank, First Name, Last Name and Document. When you click on the sort icon, the data will be arranged either in ascending or descending order, based on your preference. This functionality provides a convenient way to organise and prioritise the displayed information according to the selected column.
Each page includes logs and an action column, which provide convenient access to additional information. These features enhance the usability of the pages by allowing you to track activity logs and quickly perform actions related to the displayed data.
Logs: The logs feature enables you to view records of reminder logs, including information such as the sender, date/time of the reminder, and the IP address from which the reminder was sent. This provides you with a comprehensive overview of the reminder activity and helps you track the relevant details associated with each reminder.
View Icon: By clicking on the view icon, you can access and view the uploaded documents associated with a specific crew member. This feature enables you to review and examine the documents uploaded by the crew for further reference or verification purposes.
Download Icon: Utilising the download icon, you can conveniently download the relevant uploaded document of a crew member. This feature enables you to retrieve and save the documents to your local device for offline access or further usage as needed.
Reminder Icon: By utilising the reminder icon, you can send an email reminder to your crew members and recruits, prompting them to submit their documents. This feature streamlines the process of collecting necessary paperwork and ensures timely compliance.
Staff Profile Icon: Clicking on the profile icon within this column provides quick and effortless navigation to the relevant details based on the staff member’s status. This functionality allows you to access comprehensive information about the staff member, including their qualifications, certifications and other pertinent details.
Please note that each page within the compliance module may have different actions and columns specific to its purpose and functionality. These variations are designed to cater to the specific requirements and tasks associated with each compliance aspect.
Onboarding documentation – This section pertains to the collection of necessary papers and forms essential for effectively introducing new employees to the company. This encompasses legal and administrative documents like employment agreements, tax forms, confidentiality pacts, direct deposit permissions and emergency contact particulars.
As an organisation, you will allocate a wide array of documents to your staff, ranging from employee agreements to letters signifying the conclusion of probationary periods. These documents advance through multiple phases, involving creation, employee validation, and finalisation. As a result, using a centralized system to supervise this process can significantly curtail the administrative effort invested in this responsibility.
The functionality of the Onboarding Documentation feature allows you to create a report that streamlines the evaluation of the status of HR documents within your establishment. This report aids in pinpointing individuals necessitating reminders to complete document endorsements.
View Onboarding Documentation Report
Select the Onboarding Documentation Chart – Depending on the color scheme, you can filter the report using the following criteria:
Accepted
Overdue
Completed
You can activate or deactivate the criteria by clicking on the pink colour or the “overdue” option as displayed in the screenshot above.
Clicking on the “Completed Onboarding Documentation” will lead you to a page where you can view all the documents that have been successfully finalised during the onboarding process.
On this page, you have the option to refine your searches using the following filters:
Business
Crew Name
Document – Agreement, Policy, etc.
Status – Accepted, Overdue and Completed
After you have narrowed down your searches, you can choose the desired search result and then click on “Download CSV Reports.”
Staff/ Crew Certifications – This section offers the ability to confirm and record the qualifications, abilities and official certifications possessed by team members. This process involves the management and monitoring of certifications and training credentials to ensure alignment with industry norms, regulations, and the organisation’s mandates.
Certifications serve as tangible evidence of accomplishment and provide insight into the training, licenses, qualifications and assessments that an employee has obtained. Furthermore, certifications might be a prerequisite for specific positions, such as a security guard requiring a valid security license or a childcare worker needing a Certificate IV in childcare.
The Certifications Reporting functionality enables you to observe the progress of your employees regarding their designated certifications, identify overdue certifications and track the approval status from their managers.
View Crew Certifications Report
Select the Crew Certifications Chart – Depending on the color scheme, you can filter the report using the following criteria:
Outstanding
Approved
Pending
You can activate or deactivate the criteria by clicking on the yellow colour or the “pending” option as displayed in the screenshot above.
By selecting “Outstanding Crew Certifications,” you’ll be directed to a page where you can access a list of documents containing crew members who have not yet submitted the required certification.
On this page, you have the option to refine your searches using the following filters:
Business
Crew Name
Cert Type – Qualification (RSA, Working with Children Certificate, etc.)
Status – Outstanding, Approved and Pending
Expiry Date Form
After you have narrowed down your searches, you can choose the desired search result and then click on “Download CSV Reports.”
Contracts Review – Contracts Review – This component centers around the assessment of contractual agreements and documentation concerning crew members. Its purpose is to guarantee adherence to legal mandates, industry stipulations and organisational guidelines. This is accomplished by scrutinizing and validating the terms, conditions and responsibilities outlined in contracts.
The contract is a legally binding agreement between an employer and an employee that outlines the terms and conditions of their working relationship. It typically includes details such as job responsibilities, compensation, benefits, working hours, probationary periods, termination conditions and any other terms relevant to the employment arrangement. Employment contracts serve to establish clear expectations and rights for both parties and help protect their interests by defining the scope of the employment relationship.
The Certifications Reporting functionality assists in verifying that employees have indeed signed agreements with the organization.
View Contracts Review Report
Select the Crew Certifications Chart – Depending on the color scheme, you can filter the report using the following criteria:
Signed
Waiting for recipient Signature
You can activate or deactivate the criteria by clicking on the yellow Green colour or “Signed” option as displayed in the screenshot above.
By selecting “Contracts Review,” you’ll be directed to a page where you can access a list of Contracts containing crew members who have not yet signed the Contracts.
On this page, you have the option to refine your searches using the following filters:
Business
Crew Name
Document – Employment Agreement
Manager Name
After you have narrowed down your searches, you can choose the desired search result and then click on “Download CSV Reports.”
Citizenship Documents and Visa Status – Involve the validation and oversight of crew members’ legal positions in relation to citizenship and visa prerequisites. This compliance facet guarantees that crew members possess the essential documentation required to lawfully work in the country where they are engaged.
If, during the employee’s onboarding process, they indicate that they are neither an Australian citizen nor a permanent resident, you can verify their work eligibility and Visa status using the Visa Entitlement Verification Online (VEVO) Check. This verification method is valuable for assessing the work eligibility of employees, particularly for businesses frequently employing individuals on work visas.
The Work Eligibility Reporting functionality permits you to examine the work eligibility of your employees, whether individually or in groups.
View Citizenship Documents and Visa Status Report
Select the Crew Certifications Chart – Depending on the color scheme, you can filter the report using the following criteria:
Expired Visa
Visa Expiring Soon
Valid Visa (Note Verified)
Valid Visa (Verified)
You can activate or deactivate the criteria by clicking on the Grey colour or “Valid Visa (Not Verified)” option as displayed in the screenshot above.
Choosing the “Expired Visa” option will guide you to a page where you can view a list of crew members whose visas have already expired.
On this page, you have the option to refine your searches using the following filters:
Business
Crew Name
Visa Type – Working Holiday Visa, Student Visa, Australian Citizen, etc.
Start Date From
Expiry Date From
After you have narrowed down your searches, you can choose the desired search result and then click on “Download CSV Reports.”
5.1.3 Crew (Staff) Statistics
To access Crew Statistics, hover your mouse over the Jobs tab, and select Crew Statistics. The Crew Statistic page offers statistics of each individual crew member based on a range of factors. This includes their:
Rank
Business
Star rating
Total hours worked
Average hours worked per week
Shifts they have been removed from
Shifts they did not show up to but were rostered on for
Requests from clients and crew to not work with them
Short notice cancellations
Complaints from clients.
A ‘reasons’ text box is also provided for explanation behind the above scores. You may filter your search by business, staff name, date from and date to.
If a client would like to activate the statics of Remove, No Show, Client Request, Crew Request, Short Notice and Complaint Client, please contact support@personnelmanager.com.au
By contacting support, you may also adjust the title of each column presented as statistics, therefore being able to adjust the list of reasons for being removed from a shift.
These statistics are derived from various functions within the system.
For example, the statistics found in columns of Remove, No Show, Client Request, Crew Request, Short Notice and Complaint Client, of each crew member, are sourced when they are removed from a shift via the job sheet. By clicking the ‘x’ next to their name below, there are functions to provide information behind the action.
5.1.4 Preferred Crew (Staff)
Begin by moving your cursor to the “Contacts” section located in the central navigation bar.
Within the “Staff/Crew” column, select “Preferred Staff/Crew.”
Upon selecting “Preferred Staff/Crew,” you will be directed to the preferred staff page. Here, you can assign preferred crew members to clients as per your requirements.
To designate a preferred crew member for a client, click the “Add Preferred Crew” button.
A pop-up window will appear, asking you to choose the client and select the desired crew member.
Once you have selected the preferred crew, click the Save button.
The visibility of preferred crew members is subject to certain conditions:
If the crew isn’t assigned to a specific client, they will be visible in the preferred crew list, regardless of the client.
If the crew is assigned to a particular client, they will only be displayed if that client is chosen in the preferred crew section.
Incompatible crew members with the selected client will not be shown.
After successfully assigning a preferred crew member to a specific client, you will notice the changes reflected in Client and Crew Profiles. This can be verified in both the client and crew profiles.
Client Profile: Navigate to the client’s profile and select “Preferred Crew” from the sidebar menu.
Crew Profile: Go to the crew member’s profile and choose “Preferred Client” from the sidebar menu.
In addition to the above, a new feature has been integrated into the scheduler page. This enhancement enables administrators to filter staff status by preferred staff, ensuring a streamlined scheduling process.
When you choose “Preferred Staff” in the staff status and click the “Save Search” button, it will enable you to view all preferred crew members associated with the specific client.
5.1.5 Crew (Staff) Group Key: A / DM / M
This page allows you to create different groups for different types of clients and staff. When booking a shift, crew names who are selected in this group will appear in blue. If the staff is associated with the client they will appear green, meaning they are preferred. Crew names that are not associated with this client will appear in black as this is the default colour. Also, crew who have made themselves unavailable will appear in red. For more information, see “Unavailability”.
For Example: A labor-hire company may have staff for two different sets of Clients. One set of Clients maybe very corporate and another set of Clients may not be. It may be that certain types of Crew Members would not be suitable for these Clients. On the Crew groups Page, you would be able to create two groups, Corporate and Non-Corporate and assign the correct Crew Members and Clients to these groups.
Scroll to the bottom of the page and click “Add New Group”. Once the page is refreshed, the new default group will appear.
Enter the name and no. of the group, using the arrow keys to group the crew and client together. Click ‘save’ at the bottom of the page.
Deleting or Undeleting a Group
Tick the box “Tick to delete this group”
Press “Save Changes”
To recall deleted records, press “Show Deleted”. Crew groups can then be undeleted.
The buttons “Order by Name” and “Order by Rank” sorts all crew in all lists on this page, either alphabetically or by their rank.
5.1.6 Search Crew (Staff) Key: A / DM / M
In this window, you can search all of the Crew Members in your system by business, date, time, four activities, status and three abilities. So, if you need a certain crew with a certain skill (activity) for a certain time slot, you can enter the time and date you require the person for, and then select up to four different Activities.Additional info is based on what is set in general settings for the crew profile.
5.1.7 Crew Abilities
Crew Abilities are specific abilities that a crew can perform. One example is a crew that speaks a language fluently. This will be added to the list and applied to that particular crew in their profile. With the use of crew abilities, you can further filter your crews when clients request a specific group of people with specific abilities. For example, when a client needs a crew with bartending skills who also know how to speak French.
Click Add Ability and enter the Ability Name and Ability Description.
Ability Name: Name the ability Ability Description: Description of the ability Click save and this will then be added to the ability list in the system.
At any time, you can return to the list to edit and delete abilities using the action keys. Click the pencil to edit the ability or, click the bin to delete the ability from the system.
When edit icon is clicked, we can edit the ability and assign Qualifications.This is done through selecting a qualification and assigning it to the Ability. It is only possible to add one Qualification per Ability
5.1.8 Incompatibility
On this webpage, you have the ability to create situations where specific Crew Members cannot work with particular Clients. This action will result in their names being excluded from the roster of available crew members when assigning shifts for a specific client.
To achieve this, input the name of the client and crew member, provide a reason (if desired), and then proceed by clicking the “Add” button.
To remove the incompatibility, just click on the trash icon.
5.1.9 Unavailability
Key: A / DM / M
The Unavailability Page in Admin/Manager Login allows you to enter the Unavailability of Crew Members for certain time slots. This then places a hash symbol (#) next to their name in the Crew List for jobs that are due to occur in that time slot.
If a Crew Member is booked for a shift in a time period that conflicts with their Unavailability, a warning will display on the Shifts Page. If a Crew Member becomes unavailable for a shift that’s been confirmed, it is possible to take the crew’s name off the shift and make it unavailable. This is done in one go by pressing the “Make Unavailable” button in the Shifts Edit Page or Job Sheet Page. The entry in the “Unavailabilities Page” will say “Made unavailable by admin – time/date of entry”.
When Admin has selected to allow the crew to enter their unavailability in Crew Area, Crew Members can enter their own Unavailability in Crew Login. Crew must not be booked on any shifts within that time period to be able to enter unavailability.
The Unavailability page features a log accessible by clicking the Log History icon. This allows users to view the changes made by a specific user.
Once clicked, it will display the log details, including when the update was made and where the user updated their unavailability, such as through the app or portal.
Unavailability Search: Enter crew name and/or date to make a search for unavailabilities. Any unavailability can be edited or deleted in this page by clicking on the “edit” or “delete” icons next to each entry.
Add Unavailability: Select crew name, then start date/time and finish date/time. Optional if it is repeated.
Crew Unavailability Reason is required
Request Status is to be selected as Approved/Pending/Denied. Once completed, click “Submit Unavailability”. Note: If Request Status left blank the entered unavailability will not be active.
Only Admin is able to edit and delete an unavailability that is registered as Approved or Denied. When editing the unavailability by pressing the edit icon, a new page is presented, where you are able to edit, deem as bending, approved or denied, and add feedback as described above.
Crew members are able to add unavailability also, but can only edit unavailability that has the status of ‘pending’.
The crew view is as follows:
Please see the General Setting guide 10.2 to alter the unavailability system in CrewCard.
This includes feature such as:
Admin will confirm Crew Unavailability: This option in AM allows for the option of unavailabilities to be approved by admin or not.
If “No”, crew can simply go on to their crew pages and enter the unavailability in the system.
If “Yes”, then each unavailability “request” must be viewed and approved by admin. This is executed by selecting “approved” in the “Request Status” of the Unavailability Page, then saved.
If any feedback needs to be sent to crew regarding their request, it can be entered in the “Admin Status Feedback” → “Submit” → “Email Feedback to Crew” is selected “Yes”.
5.2 Clients
Key A / DM / M
All the work being conducted is on behalf of CA Client. In Ops Home, a Client must be selected in order to create a job sheet. For Labour Hire companies, the clients of the company can be listed here or some businesses may prefer to enter their account managers or supervisors as clients.
Client records can be searched by entering the first few letters of the name then selecting from the list that appears. Once selected click “Search” to bring up the records. Search by “Postcode” can also be performed on this page.
The Bulk Client Email Invite feature allows you to send email invitations to multiple clients simultaneously.
To use this feature, go to the client list and click the Email Invite button located at the bottom-left corner. You can choose to invite all clients by clicking Select All or manually select specific clients. Once your selection is made, click Email Invite to proceed.
A pop-up window will appear, displaying a preview of the email invitation. Review the content to ensure everything is correct. When ready, click Send to deliver the invitations.
After sending, a confirmation pop-up will appear, confirming that the emails were successfully sent.
Client Files
To enable the Client File in the Jobsheet Page, navigate to the client profile and go to the Client Files section and fill out the File Name and choose a file you wish to upload then click the save details.
Once the checkbox is checked in the client profile, the option will be visible on the client’s job sheet. The client will automatically be added to associated job sheets whenever the checkbox is selected.
Adding Existing Client
To add an existing Client in Crewcard, Simply hover your mouse to contacts and select Add Client under Clients Column. Add Client will allow you to add your existing clients.
Enter the Client details and Click Save & Exit or Save & Open profile.
Adding a new client
Press ‘Add Client’
Enter the client’s details and create their login. We suggest using the client’s number if they have not requested a certain password. They can change their password through their own account.
Click Save & Exit to return to the client list or click Save & Open Profile which will redirect you to the Client Profile. See guide 9.2.
Adding a Sub Clients
To add a sub client, start by hovering your mouse over the ‘Contacts’ tab and then select ‘Client List’ from the dropdown menu.
Once you have accessed the ‘Client’ page, you can proceed to select ‘Add a Sub Client’.
After selecting this option, a pop-up window will appear, allowing you to enter the details of the Sub Client. If you need to cancel, simply click the ‘X’ button. To save the details and exit, click ‘Save & Exit’. If you want to save and immediately view the newly created sub client, then click ‘Save & Open Profile’.
Import from CSV
Start by hovering your mouse over the ‘Contacts’ tab in the navigation menu. From the dropdown menu that appears, select ‘Client List’.
Once you’re on the Client page, look for and click on the ‘Import from CSV’ button to import your desired data.
After clicking the button, you must scroll down to the bottom of the page to access further options. At the bottom of the page, you can upload a CSV file or download the CSV template. You can select the appropriate option to continue importing or exporting data depending on your needs.
First, download the CSV template and complete it. When you’re ready to submit, click ‘Choose File’ to select the completed file, then click ‘Upload CSV’.
Press the Import button to confirm the upload of the CSV file.
Once done, you’ll see a prompt indicating that the client has been imported.
5.2.1 Client Groups
You can create client groups and allocate certain activities to them. Use the arrows to shift clients and activities to the right box to activate.
Navigate to the Crew Groups Page.
Scroll at the end of the page and click add new group.
Name the group, use the arrows to move the clients and activities to group them.
The group will save into the system. If you wish to delete a group, use the tick box under the name which will delete the group from the system.
5.2.2 Supervisors Key: A / DM / M
The Supervisor is the person that crew will report to and contact onsite. They are added once the name and mobile number are stored in the system for future reference. They are also listed in the Client Access.
App Access: Tick box to allow supervisor to have app access Message: Message client Edit: Edit the supervisor Delete: Quick delete supervisor contact card
Supervisors
The Supervisor is the person that staff will report to from the client company. When a Supervisor is entered, the name and mobile number are stored in the system for future reference in the Supervisor Page and in the individual Client entries.
They are also listed in the Client Access.
If Dual Text Activity is selected in the Activities/Rates page when adding or editing an Activity, then both the Crew Member AND the Onsite Contact will receive reminder SMS messages (if they have been activated). Deleted on-site contacts cannot be restored.
Navigate to the Supervisor page.
Click add supervisor button.
A pop out window will open fill out the fields.
Client: Select the client from the dropdown menu list.
First Name: Enter the first name of the Supervisor in this field
Last Name: Enter the last name of the Supervisor in this field
Contact Phone: Enter the contact number of the Supervisor in this field
Extension No.: If the Supervisor has an extension number, enter in this field
E-mail: Provide the email address of the Supervisor in this field.
Password: Nominate a password for the access of the new Supervisor in this field.
Supervisor App Access: Tick the box if you want the new Supervisor to have access to the Supervisor App.
SMS and Email Invite: Tick the checkbox for SMS and Email Invite.
Click Save after you have entered all the information for the new Supervisor.
A confirmation message will appear after you have added the new Supervisor
The following actions can be performed on this page:
App Access: Tick box to allow the supervisor to have access to the app
Message: Click to be redirected to the message page where you can send a message to the supervisor or bulk message
Edit: This will open a pop-out window that will allow you to edit the supervisor’s information.
Trash: Clicking this button will remove the supervisor from the system, resulting in automatic removal of the supervisor’s record from the list.
How to send SMS and Email Invite to Supervisor
In the Supervisor page, Click + Add Supervisor
Fill out the Add Supervisor form.
Once the form has been filled out, Click the Save button and a pop up will appear that “ Supervisor has been added Successfully”.
The newly created Supervisor will be added in the Supervisor list.
This is a sample email that the Supervisor will receive.
Furthermore, Supervisors can also be assigned through the Events page > Booking Tab and Job Sheets. you may refer to 4.8 Events and 7.1 Job Sheets for more details.
5.2.3 How to activate client to have the Add Job function on their portal
Go to Contacts in the Central Navigation Bar and select clients
Select a Client and click edit icon
In Clients Page, click Accounts in the side menu
Click Add New Account button.
Fill out the Add Accounts Details
Contact Type: Select the Contact type
Types of Contact:
Accounts: Enter the email of the person responsible for the accounts in your company.
Billing Person: person who is responsible for collecting and sending invoice
Admin CC: Company Admin email address
Position: Enter the Position
First Name: Enter First Name
Last Name: Enter Last Name
Email Address: Enter the Email Address
Phone Number: Enter the Phone Number
Tick the checkbox if “Include this person in the Invoice Loop”
Once it’s completed, Click Save.
Next is to Select Associated in the side menu of Client’s Page
Select Booking Persons and Click Add Booking.
Fill out the Add Booking Person
First Name: Enter First Name
Last Name: Enter Last Name
Email: Enter Email Address
Phone: Enter Phone Number
Position: Enter the Position. This field is optional
Once it’s completed, Click Save.
5.2.4 Invite Email Client Card Details
Go to Client’s profile and Select Accounts.
Please click the “Invite Email” button. Registered email address of the client will receive the Invite Email.
Client will receive a Client Add Payment Details Email. Advise the client to click the “Click Here” button.
Clients are required to input either their credit card details or bank account information based on the selected tab, and then proceed to click the “Submit” button.
Once submitted, It will prompt the “Billing Details Added Successfully”.
Admin can check if the billing details have been added, by going to the Client’s profile and selecting Accounts. Under the billing details section, the credit card details of the client will be added.
5.2.5 Disabling and Re-enabling Clients
Once you have clicked into the client page, you will notice the 4 symbols next to each client on the far right hand side of the screen. The first symbol represents the enablement/disabling of the client.
When in the list of active clients, pressing the blue person icon with a plus symbol will disable the client. You will be presented with a pop out window to ensure that you are certain of the decision being made.
Once Disable has been pressed, the blue icon will then turn red with an x next to it, indicated disabled client.
To reenable, select the red icon.
When selecting to enable clients in the Deleted Clients list, this will re activate their status to active, and move them out of the Deleted Clients list. You can now disable and re-enable them in this list, however, you must press the bin icon to delete them.
Disabling clients that are in the Deleted Clients list will just disable them while they stay within that page.
5.2.6 Bulk Delete Clients
Navigate to the Clients list page. To delete specific clients, use the checkboxes next to each client to select the ones you want to delete.
Alternatively, you can tick the “Select all” checkbox at the bottom of the page to select all clients on the list.
Click the “Delete” button.
Confirm that you want to delete the selected clients.
Remember, deleting clients cannot be undone, and any associated data will also be deleted. Therefore, make sure you double-check before proceeding with the deletion.To enable the Client File in the Jobsheet Page, navigate to the client profile and go to the Client Files section and fill out the File Name and choose a file you wish to upload then click the save details.
5.2.5 Auto Approve New Sign Up Client
The Auto-Approve Newly Signed-Up Clients setting allows admins to control whether new client registrations are automatically approved or require manual review. This feature provides flexibility in managing new client onboarding by ensuring only verified clients can access the CrewCard.
On: Automatically approves new client registrations upon sign-up. When On, clients who sign up will be immediately added to the Client List without further approval.
Off (Default): Every new client must undergo a manual review and approval process by an admin or designated team member before gaining access to the CrewCard. When Off, new client registrations will be placed in the Pending Clients section for manual review. An administrator must approve them before they appear in the Client List.
The default setting is Off, meaning new client registrations require manual approval. To activate this feature, please contact support@crewcard.co
Active Clients
If the settings allow automatic approval, the newly signed-up client’s account will be enabled. You can confirm this by checking the Actions column in the client list; the Disable Client button will be displayed in Blue.
Pending Client Review
If client approval is required before activation, newly signed-up clients will remain in a pending review state. In the Client List, the Disable Client button will be displayed in red. This signifies that the client registration is still awaiting approval.
For admins: If a client’s registration is pending review, an admin must manually review and approve the registration to activate the account.
For clients: If your account remains pending, please wait for admins approval before you can fully access the system.
5.4 Recruitment
Recruit Cards Page – Admin Access
To view recruit lists, select “Business”, “Skill”, “Crew Name”, ”Mobile Number”, “Date From”, “Date To” and “Types”.
Definitions: Recruiter – Administrator or Duty Manager User accessing the Admin Portal, utilising the Recruit Cards page in order to perform the tasks necessary to assist recruits in completing the recruitment process.
Recruit – Crew User accessing the Crew Portal to complete the recruitment process.
Applicant – Crew User accessing the Sign-Up page to register themselves as potential recruits.
Contacts (Header) > Recruit Cards
CrewCard’s Recruitment Module allows you to onboard new staff members directly into your CrewCard platform. Recruits can access their Crew Portal Profile to complete the onboarding process once they have been invited by a recruiter (Admin or Duty Manager User), or when Recruitment Settings are configured to allow for automatic invitations – Auto Invite.
Add Recruit
There are two methods to initiate the recruitment process and create a Recruit Card in the Admin Portal: Enrolment and Registration.
Enrolment: A recruit is enrolled into the system by an Admin or Duty Manager User by pressing the Add New on the Recruit Cards page.
Registration: A recruit registers themselves into the system on the Sign-Up Page.
During the onboarding process, a recruit completes a series of stages for recruitment until they are Activated by a recruiter (Admin / Duty Manager User). This moves them into the active Crew List at Contacts > Crew List.
Stages of recruitment are Enrolled / Registered, Shortlisted, Invited, Pending, Completed, Hidden and Active, which can be searched in the search header of the Recruit Cards page.
Enrolment
To enroll crew into your system, click the +Add New Recruit button.
A pop-out window will open. Please fill out the fields.
After you have clicked Save, you will be redirected to the individual’s recruits page and the recruit will receive an email of enrolment. Once enrolled, the status on the card will be tagged as Enrolled.
Auto – Invite: Invitations are not required after registration. There are two options for applicants to progress to the onboarding process from the Sign-Up page. Once applicants have either registered themselves from the Sign-Up page, or have been enrolled by a recruiter, they can be invited by the recruiter via an email. This email will contain a once-only access token to open their Recruit Details page and continue the process of onboarding themselves as recruits. The Auto Invite option allows you to bypass the step of Recruiters manually inviting recruits to set their password, fill in their personal details, qualifications, experience, medical history, agreements, contract, induction and accounts. This exists so that once an applicant has registered on the Sign-Up page, they can progress to the next steps without needing an email invitation.
Registration
To register, simply click the the Sign up button in the login page.
Select Job Seeker Sign up or scan the QR Code.
And fill out the forms until you’ve finished the registration process.
Recruitment Page Tabs
Recruits (staff) can access their Crew Profile to self-register as recruits, which can also be viewed in the Recruit Cards page through the Admin Portal (admin access).
Admin Users and Duty Manager Users can view the same recruitment details as the recruits. This is done by clicking on a Recruit Card on the Recruit Cards Page at Contacts > Recruit Cards.
The Crew Portal Profile page contains several pages for recruits to navigate in order to complete their onboarding process. Admin and Duty Manager Users can access the Recruit Cards to view the Bio, Overview, Interview, Details, Agreements, Induction, Contracts, Accounts, Approval and Activate tabs. Recruits are unable to view the Bio, Interview, Approval or Activate pages as these are for the use of Admin and Duty Manager Users only. To hide any of the Interview, Details, Agreements, Inductions, Contracts, Accounts pages from recruits, please untick any of the below settings.
Bio: in the context of recruit cards it refers to a brief biography or summary of the individual being recruited. It typically includes key information about the recruit, such as their name, background, skills, qualifications, and perhaps a brief description of their experience or accomplishments. This information helps recruiters or hiring managers get a quick overview of a candidate’s suitability for a position.
Interview: Admin or Duty Manager Users performing the function of Recruiters can add Admin notes, set interview questions, send predefined SMS messages to recruits (perhaps to inform them to expect a call from a certain phone number to discuss their recruitment) and view the CV of recruits.
Customise the questions that you may need to ask the recruit during a phone or in-person interview.
Agreements: Recruiters (Admin and Duty Manager) Users can assign company policies and other documents from the Resources Module in Settings. They can also create disclaimer questions for recruits to view, sign and submit here. The Agreements Invite button at the bottom of the page sends an email to the recruit. containing a button that links directly to the Agreements page of their Crew Portal Profile. This invites them to agree to the company policies and agreements and to accept the disclaimers, sign their signature and submit. At this point, the Recruit has accepted your company’s legal requirements for employment, and the Profile Completed email is automatically sent to both the recruit and Administrator. This email includes two PDF attachments and a record of the agreements that have been accepted, plus a copy of the captured signature. The PDF attachments can be uploaded in the Recruitment Settings page, and can be chosen by the Administrator. An example is PDF 1 may contain ‘Welcome Information’ outlining your expectations to new staff members, and PDF 2 may contain ‘Safety Handbook’. The agreements information and captured signature is also permanently stored within the Crew Profile.
Inductions: Recruits can complete a multiple-choice quiz to demonstrate their knowledge of your company’s work health and safety system. This can include questions such as how to submit an incident report. Customise induction questions in Settings > Forms > Recruit Induction. To remove the induction tab for recruits, please hide the tab.
Customise induction questions by going through Settings>Forms>Recruit Induction. To remove the induction tab for recruits, please hide the tab.
Contracts: To add new contracts, see Settings > Contract Settings. Once you have set up a new contract template and signature block, you can assign an employment contract for new recruits to sign and submit as part of their recruitment onboarding. Admin and Duty Manager Users can also invite Recruits to sign the contract by clicking the Invite Contract button in the Contract tab of the Recruit Card at Contacts > Recruit Card > Contracts tab. When recruits sign and submit the contract, it will be attached as a PDF to an email sent automatically to both the Recruit and Admin. Additionally, the contract will be stored permanently in their Crew Profile.
Accounts: To collect info in preparation for payroll, you can present this tab for recruits to fill in their Bank, Super and TFND (tax file number declaration) details.
Display Recruits Sign Up on Login Page: This will show the Sign-Up option on the System Login Page that directs recruits to the Sign-Up page.
The following is what the recruits will see when signing up.
Enable Recruits Page Menu: This will enable the Recruit Cards page via Contacts > Recruit Cards.
Hide business selection on sign up page: If you are using the Businesses as Location, such as when you are operating in Sydney, Melbourne and Brisbane, you would enable this selection for your recruits to sign up under the correct location.
Business Label: You can relabel your Businesses drop down menu to a custom label, such as Location or Branch, to make more sense to applicants when they choose which Business to select upon registration in the Sign-Up page.
This also relates to the button at the top of the systems page.
Display employment history section on Recruits Sign up: Enable this setting if you require applicants to fill in their employment history on the Sign-Up page. You can then add customised questions for that Sign-Up page.
The crew will see this:
Allow UK mobile number: The system defaults to accept 10 digits for Australian mobile numbers. Enable this setting to accept 11 digits for UK mobile numbers.
Resume: This setting allows you to choose one of two methods that applicants can provide their resume or CV details by; TextEditor or Attachment.
TextEditor: This will allow the applicant to copy and paste their resume upon registration in the Sign-Up page.
Attachment: This will allow the applicant to attach their resume as a PDF or Word file when they register on the Sign-Up page.
Tips: To make profile photos upload optional, please see General Setting 48. Profile photo upload required.
To Edit Gender Selections, please see General Setting 47. Gender Text
Shirt size fields are useful to record uniform sizes for staff and are enabled by default as a required question on the Details page. However, this question is optional and can be disabled in General Setting 46. Shirt Size Field
SMS Templates: Create and add multiple default SMS message templates for Admin and Duty manager Users to send to applicants in order to improve the chances of them answering calls from your recruiters. Example 1: Title – Initial SMS. Message – Hi This is [Insert Company Name]. We have received your application and will give you a call shortly to discuss in detail. The call is coming from 1800 000 000. Thank You. Example 1: Title – Request for Call Back. Message – Hi This is [Insert Company Name]. We have received your application and tried to get in contact with you. Please contact recruitment at 1800 000 000. Thank you.
Info Box: Explainer text can be customised above the text field below the medical disclaimer checkboxes to prompt the recruit of which medical details they should provide. Example: List all previous physical or psychological injuries that may affect your work performance (answer not compulsory).
Setting:
Enable Medical Conditions: When the medical conditions setting is enabled, recruits are required to fill in any medical related details that may be required. This comes as part of the employment details on the Medical page of their Crew Portal Profile.
Medical Disclaimer Check boxes: Add any additional custom questions under the medical conditions section for your recruits to check and acknowledge.
Recruit View:
Sign-Up Page Questions: Create and add custom questions on the Sign-Up page to record answers for applicants. For example, you may wish to include a question asking an applicant to explain why they want to work for your company or what pertinent industry experience do they have?
Setting:
Crew View:
Qualifications: When qualifications are required for selected Activities (skills/roles) in order for them to be uploaded into the system, the Qualifications page is added into the recruitment process. In this page, recruits will select the qualifications they possess and upload them.
To add and update qualifications, see Settings > Compliance settings > Qualifications Expiry Date Warning.
To update any Activity and qualification mapping, see Activities Page > Edit Activity
Enable Activities for applicants to select upon sign up: Tick to enable applicants to select different Activities (skills, roles) in the system. Once selected, the Activities will be assigned to staff in their Admin Portal Crew Profiles. Any Activities that require Qualifications will then need to be completed by recruits in the Qualifications section of the onboarding process.
Setting:
Crew View:
Default Activity – Settings > Recruit Settings
Each Crew User is required to have at least one Activity assigned to their profile. This setting allows you to select which Activity will be assigned as the default Activity for Crew Users.
Default Category – Settings > Recruit Settings
Each Crew User is required to have at least one Category assigned to their profile. This setting allows you to select which Activity will be assigned as the default Category for Crew Users.
Recruiters can add extra Activities to the Crew Profile of recruits during the interview process. For example, the default Activity assigned to all recruits might be General Labourer. Using the Assigned Activities function in the Interview tab of the Recruit Card page, a recruiter may add a second Activity of ForkLift Driver, if the recruit has that skill.
The Default Activity will be already assigned, as will any Activities that the applicant selected on the Sign-Up Page.
The Default Category selected in the Recruit Settings will be already assigned in the Recruit Card for each recruit. Because each new Activity assigned will require a category mapped to it in order to trigger a Paid Rate, the Recruiter may need to select additional Categories to match any additional Activities assigned. This is to ensure the Activity Details displays correctly (see Activity Details).
Activity Details
Activity Details displays a table with a combination of Activity, Minimum Rate and Description for each Activity assigned to the recruit.
By displaying the Activity Details on the Agreements page, recruits are accepting the initial pay rates as part of accepting their employment obligations.
The Activity Details can also be inserted into their employment contract. This is displayed on the Contract page of their Crew Portal Profile, or indeed any contract, by inserting the placeholder [ACTIVITY_DETAILS] into the text of the contract when you create or edit a contract (Settings > Contracts > Add Contract). The contract will automatically contain the Activities, pay rates and job description in the employment contract. This works for recruits to agree without the need for any member of staff to manually insert such details.
Activity name and description are pulled from the Activities section of the system. See Administrator Menu > Finance – Activities > Add New Activity or Edit Activity.
Activity name corresponds to the *Name field and description information is pulled from the Job Description field under Activities.
The Min Rate is Paid rate, which can be accessed and set under Administrator Menu > Finance – Activities > Edit Rates or Administrator Menu > Finance – Categories > Edit Rates, under the Paid column. In order for the Paid amount to register, a category needs to be assigned to both the Activity and a Crew Member (recruit) first.
Invite: Invitations are required to be manually sent by pressing the Invite button in the footer after applicants are ‘enrolled’ by recruiters (admin or Duty Manager Users. This is done by pressing the + Add New button in the Recruits Card page and completing the pop up details. Invitations are emailed with a once only access token, and a button that links them to the Set Password page in their Crew Portal Profile .
Once enrolled, recruits appear on the Recruits Cards page, and may be invited individually by selecting one Recruit Card, or in bulk by selecting multiple Recruit Cards and pressing the Invite button. Recruits who have registered themselves via the Sign-Up page may be manually invited by pressing the Invite button, unless the Auto Invite feature is selected. In this scenario, applicants can progress to the Set Password page and may continue with the onboarding process without the need to be invited by Recruiters in the Recruit Cards page.
Details Page: The details page allows recruits to complete their details within their Crew Portal Profile, such as their name and contact details, next of kin / emergency contacts and address. They are also able to upload up to three profile images, pressing the Next button when complete. Recruiters can also assist recruits in real time or complete these details on behalf of recruits by completing the Details tab in their Recruit Card and pressing the Save button at the bottom of the screen.
Agreements: During the onboarding process for new staff, recruits are guided to the Agreements page where they will accept your legal agreements such as contracts, company policies and disclaimers.
The Agreements page can be set up at Settings > Recruitment > Agreements.
Agreements can also be manually emailed by Admin and Duty Manager Users for staff to accept, either during the recruitment process or once activated into the Crew List as active crew with Crew Profiles.
Invite Agreements for Active Crew:
Go to the Contacts menu in the header and select Crew List. Search or find the crew member you would like to invite to accept your company agreements, and click the edit icon on the far right of the screen.
Inside the Crew Portal of the desired crew member, in the Overview section near the top, click the Registration button to open the same registration pages that recruits access during their onboarding process with your company. Click on the Agreements page, then scroll to the bottom of the page to press the Invite Agreements button. This will send the email to the crew member, containing a link to their Agreements page in their Crew Portal, where they can accept your policies and agreements. Once set up, your staff can be sent and accept their agreements quickly and easily on their mobile device.
Crew Portal:
Invite Agreements for Recruits:
Go to the Contacts menu in the header and select Recruit Cards. Search or find the recruit you would like to invite to accept your company agreements and click their Recruit Card to open it.
Once inside their Recruit Card, click on the Agreements page, then scroll to the bottom of the page to press the Invite Agreements button. This will send the email to the crew member, containing a link to their Agreements page in their Crew Portal, where they can accept your policies and agreements. Once set up, your staff can be sent and accept their agreements quickly and easily on their mobile device.
The Agreements Invite button at the bottom of the Agreements page in the Admin Portal, sends an email to the recruit with a button that links directly to the Agreements page of their Crew Portal Profile. This link invites them to agree to the company policies and agreements, and to accept the disclaimers, sign their signature and submit. At this point, the Recruit has accepted your company’s legal requirements for employment, and the Profile Completed email is automatically sent to both the recruit and Administrator. The email consists of two PDF attachments and a record of the agreements that have been accepted, plus a copy of the captured signature. The PDF attachments can be uploaded in the Recruitment Settings page and can be chosen by the Administrator. An example is PDF 1 may contain ‘Welcome Information’ outlining your expectations to new staff members and PDF 2 may contain ‘Safety Handbook’. The agreements information and captured signature is also permanently stored within the Crew Profile.
Account Log:
The accounts log allows you to see the logs of when crew made alterations in their accounts. Crew must make changes to their account in order for Admin to receive an Account details email and view the changes in the accounts tab>> Accounts log section.
Crew must login to their Crew Portal.
Click the dropdown arrow beside your name and select Accounts.
They will be directed to the Profile Page >>Account Tab wherein Crew can make modification on their account information.
As an example, I will be adding the Last Name of the Crew in the Name of the Account and click Save button.
A pop up will appear that says “Your Account Details has been updated.” Click close to confirm. Simultaneously, the Admin will receive an email that the account details of the crew have been updated.
This is the sample email that Admin will receive when the crew have updated their account details. Admin must select the Click Here button in the email to be directed to the crew profile.
Once the Admin has been directed to the crew profile, click Registration button.
This will bring you to the Recruit Page. Click the Accounts Tab.
Scroll down at the bottom part of the Accounts tab until you reach the Account Log section. There you will see what alterations have been made by the crew on his/ her account information.
6.0 Records
Records typically refer to the data entries or information related to specific messages, forms, events, history, activity or tasks that are recorded and stored within the system.
These functionalities appear to represent various features and capabilities within the system, each serving a specific purpose related to managing records, communication, forms, workflows, and other aspects of the platform as illustration above.
6.1 Messages
6.1.1 Credits This displays a quick view of the SMS credit balance. An Alert will appear whenever your SMS Credit falls below 500. This warning is important as once your SMS credit runs out, all of your outgoing SMS messages will be put in queue until you replenish your SMS credit.
6.1.2 Send an SMS
This option allows users to send a quick SMS or Push Notification to the crew. When Send SMS/ Notification is clicked under Records in the Message column, it will direct you to the Send SMS/Notification page. Tick SMS or App. Type your message in the text box “SMS Message”, or select the Msg Template. For a Push Notification message, enter the Push Notification title and “App Message”. Double click on the staff name/s or click “>>” to move the names to the right-hand side. Then, click the “Send” button.
To view staff lists, select “Search Disabled Crew”, “Search Active Crew” or “business, ” skills” and “abilities”.
Business: Filter the crew search by Business
Skill One/Skill Two: Filter the crew search by Activity
Abilities: Filter the crew search by Ability
Filter By: apply filters to the available crew list to highlight crew members who meet certain criteria(s)
Available Crew List (Left Selection box)
Quickly find crew members using the search bar located at the top of the available crew list.
As you type into the search field, the list will dynamically filter in real time to match your input.
A clear “X” button appears inside the search box as you type, allowing you to instantly clear your search.
Notification prompt:
SMS only – SMS Queued for Send Successfully
APP only – Push Notification Queued for Send Successfully
SMS & APP- SMS and Push Notification Queued for Send Successfully
For example, if you need to send a common message to all of your drivers, select “Driver” in the skill list. This will bring up the crew list with only “Driver” skill assigned. Select all of the crew in the list and move them to the right by clicking “>>”. Next, send your message. This also applies when selecting abilities.
6.1.3 Send to App Noticeboard
The Noticeboard is a new page within the Crewcard app that is accessible to staff members. Admin users of Crewcard gain the power to create noticeboard posts through their admin portal, which can include both text and images. These posts are then shared on the noticeboard, allowing all crew members to view them easily. Noticeboard messages can be sent via push notification to alert the staff and provide an easy link for opening. Or they can simply be updated within the Noticeboard for staff to see next time they check in with the CrewCard app.
To begin, position your cursor over the “Records” option and then choose “Send to App Noticeboard” from the Message Column.
After clicking, you’ll land on the “Send to App Noticeboard” page, granting you access to create, edit, and delete Noticeboard posts. Furthermore, you’ll have the option to send notices and review Noticeboard logs. These posts are readily accessible to selected crew members via push notifications or the Noticeboard page within the Crew app.
To add a new noticeboard, click on “Add New Noticeboard” and complete the form. Remember, noticeboard posts can include text, video, and images.
Once you’ve finished the Noticeboard post, you can choose to send it by clicking the Send Noticeboard button on the Send to App Noticeboard page. You can then select the Noticeboard from the dropdown menu and apply filters such as Search Active Crew or Search Disabled Crew, Business, Skill One, Skill Two, Abilities, Tag, and Date Range to refine your crew searches. The info icon next to the Date Range field provides a tooltip with the message: “Crew with Confirmed Shifts within selected Date Range.”
Alternatively, you have the option to directly pick crew members in the Send to section and move them to another column. After selecting the crew members, simply click the Send button. Alternatively, you can click the Cancel button.
From the crew’s standpoint, they will receive a push notification. Upon opening the app, the crew will see an increment in the message board count within the Noticeboard menu and notice a new Noticeboard icon on the shifts page. This signifies the presence of a new Noticeboard post or message.
To access the Noticeboard post or message, you can either tap the “Noticeboard” option in the menu or navigate to the shifts page and tap the Noticeboard icon. Then, click on the new post or message. Please be aware that “New Messages” appear green and “Read Messages” appear in grayscale colour.
You can also click on “View All” to access and view all Noticeboard posts or messages.
6.1.4 Notification Logs
By default, the Notification logs play displays all messages, incoming or outgoing, starting from the beginning of the week to the current time. The latest received/sent message are at the top of the page. An “Advanced Notification Search” can be made using the fields provided above the messages.
TIP: All or some of these fields can be combined while making a message search.
No.: Enter a shift number and click “Go” to see the history of all messages sent or received regarding this specific shift.
Client Name: Select a client name to narrow down all messages to one client’s shifts, which are booked under this client only.
Crew Name: Select a crew name to see all incoming/outgoing messages sent or received by this crew.
Mobile Number: Instead of crew name, a search can be made by crew mobile number. Please note that any number of digits can be entered here. For example, a search that only has “89” in all mobile numbers can be made.
Business: Search by Business can be done by selecting a Business in the drop-down list.
Date From & Date To: To narrow down the searches by date.
No.: Indicate the shift number
T: Tags are codes that show the type of that message:
Business: Shows which business crew is assigned under.
Date: Date and time message has been sent/received.
From & To: Indicates where the message is coming from or sent to which number.
Crew Name: Crew name that sent/received the message
Message: The actual message sent/received. Messages are shortened by CrewCard for an easy display. If needed, any message can be viewed fully by clicking [More], or shrunk by clicking [Hide]. You will notice (when clicked [More]) that any incoming message from the crew is displayed with some of the crew details such as date, time, ranking, email address etc, but the actual message sent by crew appears under the text “SMS Message – – – – “.
Status: The status of the message can be “Success”, which means the message has been successfully sent, “Queued” which means it is pending, or “Failed”, which means the server may have problems sending the message.
Total Log Count: Similar to the ‘Total Hrs’ section on the Shifts page, a total log count has been added above the Search button on the Notification Logs page. This count provides an overview of the total number of logs based on the selected tab.
SMS Tab When the SMS tab is selected, you will see the total count of SMS logs. Example: “Total Logs: X SMS Logs
Email Tab When the Email tab is selected, you will see the total count of email logs. Example: “Total Logs: X Email Logs”
App Tab When the App tab is selected, you will see the total count of app logs. Example: “Total Logs: X App Logs”
Sent Via: Indication of whether it’s an SMS or Email.
6.1.5 Message Logs
Message logs display all chat messages. An “Advanced MESSAGE Search” can be made using the fields provided above the messages.
No.: Enter a shift number and click “Go” to see the history of all messages sent or received regarding this specific shift.
Client Name: Select a client name to narrow down all messages to one client’s shifts, which are booked under this client only.
Crew Name: Select a crew name to see all incoming/outgoing messages sent or received by this crew.
Mobile Number: Instead of crew name, a search can be made by crew mobile number. Please note that any number of digits can be entered here. For example, a search that only has “89” in all mobile numbers can be made.
Business: Search by Business can be done by selecting a Business in the drop-down list.
Date From & Date To: To narrow down the searches by date.
No.: (not applicable in Message logs)
T: (not applicable in Message logs)
Business: (not applicable in Message logs)
Date: Date and time message has been sent/received.
From & To: Indicates the Sender and Receiver name
Crew Name: Crew name that received the Chat message
Message: The actual message sent/received.
Sent Via: Indication of whether it’s a Chat
6.1.6 Purchase Credits
Click purchase credit. This will open a pop-out window. Select the amount you wish to purchase from the dropdown from 1000 to 25,000 SMS. Once you click Purchase, you will receive the invoice shortly after. The invoice is sent to the allocated accounts person/ email.
6.2 Utilities
6.2.1 App Forms
A job may require crew members to be properly inducted about the venue. Similarly, before a crew can start a job, they may need information about health and safety.
The App Forms is where you can set up the actions needed for crews to read and understand before they can complete a job.
To add an action, Go to Messages and Select Action Forms under Utilities Column.
Click the +Add New App Form button to open the window for adding an App Form.
The App Forms now include a Multiple Choice Question feature. When users drag this feature to the right side, it will generate a customizable question field where they can define multiple answer choices for selection.
Enter the title of the App Form in the provided field. You can either select a ready made action form, or begin adding elements to create a custom form. This is done by dragging the Elements to the Action preview box. There are different Elements that you can add to an Action Preview.
These are the available elements that you can add to your Action List:
Resource – This can be a policy, procedure or any other important information that the crew can access using the Crew Access or via the app.
Subtitle – this text space can be used for additional information
Text – information in the form of texts
Checkbox – checkboxes that can be set as mandatory or not
Question – a question step that crew members will have to answer
Yes/No Question – a question step answerable by yes/no
SWMS – This will display the venue’s inductions when a crew is on shift.
Toolbox Talk – Providing you with fully fledged and dynamic safety inductions for every occasion.
Required Action
Allows you to select when actions will takes place, such as the following:
First Time App Login
Before Accept Shift
Before Check In
Before Check Out
Frequency
Forms can also be provided to staff at certain programmed times, such as the first time they are confirmed on a shift, or every time they are confirmed, monthly, quarterly, every six months or every year. For example, you may have a Forklift Induction that needs to be sent to a Forklift driver prior to their first shift, or you may require staff to complete a questionnaire every year to prove they are up to date with your latest policies and procedures.
Available Activity
This allows you to select which activity will take action of the App Form assigned to a shift.
Email Admin and Email Crew can be ticked if you want them to receive an email notification for the Action required by the crew.
Once the action has been filled out, Click the Save button.
The newly saved App forms will be added in the App Form List. You may edit, delete or copy the Action Form.
Assign the App form to a job by going to the Jobs Page.
Select the Job Sheet that you would like to assign an Action Form to.
Scroll down to the bottom part of the page.
Select an Action from the drop down list and click save.
Action form is now assigned to a Job.
6.2.2 Admin Forms
To access the “Admin Forms,” hover your cursor over the record and choose the “Admin Forms” option located within the Utilities column.
To create a new admin form, simply click on the “Create Admin Form” button.
To create a customised form, input the title of the admin form and drag elements onto the admin form preview. Enter the required questions within the elements and when finished, click the save button.
If desired, you can also select the checkbox for “Add to Forms Matrix.” When this feature is enabled, the completed form will be automatically added to the form matrix.
After saving the form, you will see a list of the newly added Admin Forms on this page.
On the Admin Forms page, the admin and duty manager have the ability to edit, delete, and copy an Admin Form by selecting the corresponding action located next to each form.
To access the completed forms, simply click on the “Completed Admin Forms” button.
The Completed Admin Forms page enables you to view a comprehensive list of all completed admin forms. From this page, you can perform various actions such as editing, downloading and deleting the forms.
To complete an Admin Form, click on the “Complete an Admin Form” button. A pop-up will appear where you can select the desired Admin Form and click the “Complete” button. You will then be directed to the “Complete an Admin Form” page, where you can fill out the form and save it. Once saved, the completed admin form will be listed in the Completed Admin Forms section.
6.2.3 Processes
Internal documents and office processes can be stored and accessed using the Processes page. This enables your Administrator and Duty Managers to easily search processes in the system. These initiatives have been implemented with a view to reduce the systems required for operations management.
See guide 10.8 Processes Settings
6.2.4 Inductions
Induction is important to a job as it educates the crew on vital information about a job that they may not be aware of. Use this page to store and view all inductions in the system
To access induction, click Records in the Central Navigation bar and select Inductions under the Utilities column.
On this page, you can see lists of inductions that have been made/saved before.
You can Click + Add New button to create a new Induction.
Fill out the form.
Induction Name: Enter the Induction name
Induction URL: Enter the URL of the Induction
Crew Required to Upload File: Select Yes/ No
Client Association: Select a Client associated with this Induction
Venue Association: Select the Venue associated with this Induction
JobSheet Association: Select a Job Sheet associated to this Induction
Reminder Email when assigned to Job: Select Email to Admin/ Email to Crew
Notes: Enter Notes
Click Save once completed.
Once the Induction has been created, you may edit the induction by clicking the edit icon. If you would like to delete the induction, click the delete icon.
Locate “Projects” under “Records” in the “Utilities” column.
Here you can find, create and manage projects.
Click on the + Add Project button. ‘Add Project’ popup will display on screen, fill in the Name and Description of the project. Once complete click ‘add project’.
You can now find the new project in the list below. The projects are listed by the date they were added into the system. Use the search bar to search for Projects.
Search: Search for a project by number or keyword.
From Date: The date the project started.
To Date: The deadline date.
Once text fields are filled click search.
Uploading a video file has a size limit, which can be found when the user clicks “Insert file” and selects “Upload.” The file size should not exceed 10 MB, as shown below:
Project Cards
Project Cards are generated after a new project has been added. On the card you will find the Project Name, Project Description, Date Created and Action buttons.
Click the Edit icon in the top right of the project card to edit the Name and Description of the project. Click the Bin icon in the top right of the project card to delete the project.
Click the Project Card, you will be taken to another page called Project Board. On this board you can start planning out the project.
Project Board
The Project Board allows you to plan out the tasks required of a project. You can create detailed tickets – tickets refer to individual tasks, issues or items that require attention, action or tracking within a project. Manage these tickets to keep on top of the project by marking their progress.
Click + Add Ticket. ‘Add Ticket’ popup will display on screen.
Ticket Name: Name of the ticket
Description: Describe what the ticket is
Owner Name: The creator of the ticket
Owner Email: The creator of the ticket’s email
Assign To: Who the ticket task is assigned to, to complete
Deadline Date: Date the ticket is due
Deadline Time: Time the ticket is due
Reminder Date: Remind the assignee what date the ticket is due
Reminder Time: Remind the assignee what time the ticket is due
Once all text fields have been filled, click Save. The ticket can now be seen listed under one of the columns.
On the ticket card you will find the Ticket Name, Ticket Description, Deadline, Owner, Date Created, Assignee’s and Action Buttons.
You will find the three Action buttons in the top right of the card. The chat icon will show the reviews on the ticket. The edit icon allows you to quick edit the contents of the ticket. The plus icon allows you to add a reminder, add a review or change the status of the ticket.
Add Reminder: Add in another reminder by selecting Date and Time.
Add Review: Add a note to the ticket. You can also click the checkbox labeled ‘Ticket Complete’ to verify that the task is complete.
Change Status: Change the status of the ticket to Not Started, In Progress, Stuck or Done. Once status is changed the color of the ticket will change.
Grey: Not Started
Blue: In Progress
Red: Stuck
Green: Done
Click the ticket, this will take you to another page where you can view all of the Ticket’s details. Here you can edit the ticket or add a review.
The tickets can be sorted into different categories. Using the columns, you can categorise your tickets. Hover over the title in the column, you will see an edit icon and a bin icon. Click on the edit icon to edit the Title name. Click on the bin icon to delete the column.
Click the + Add Column button. Type in a Title name then click save. The new column will now be displayed on the board.
NOTE: Both the administrator and the assignee will receive email notifications when a ticket is generated and created, as well as when a ticket is moved to another column. When someone adds a review in the ticket they will be notified via email.
You can search for Tickets using the search bar:
Search: Search for a ticket by number or keyword.
From Date: The date the Ticket started.
To Date: The deadline date.
Type: The progress of the ticket.
Assignee: Those assigned to the ticket.
Once text fields are filled click search.
Duplicate Tickets
Select the tickets by clicking the checkbox in the top left corner of the ticket card. Once selected click the Duplicate button on the footer. You will be prompted to cancel or duplicate the ticket. Click duplicate. The ticket should now be duplicated.
Closing Tickets
Select the tickets by clicking the checkbox in the top left corner of the ticket card. Once selected click the Close Ticket button on the footer. You will be prompted to cancel or close the ticket. Click close. The ticket should now be closed.
Delete Tickets
Select the tickets by clicking the checkbox in the top left corner of the ticket card. Once selected click the Close Ticket button on the footer. You will be prompted to cancel or delete the ticket. Click delete. The ticket should now be deleted.
View Tickets
Click the View Closed Tickets button in the top right. This will take you to the tickets that have been marked as closed. Click View Ongoing Tickets to go back to all current tickets.
Click the View Deleted Tickets button in the top right. This will take you to the tickets that have been deleted. Click View Ongoing Tickets to go back to all current tickets or click View Closed Tickets to see tickets marked as closed.
Click the View Projects button in the top right. This will take you back to the projects page.
6.2.6 Instructions
To assign an instruction to a job, simply hover your mouse over Jobs in the central navigation bar and select jobs. Select a Job Sheet that you would like to add the instruction to.
In the Job Sheet page, scroll down to the bottom of the page to locate the Instruction section. Click + Add Instruction button to add an instruction.
The instruction window will pop out. Fill out the form. Note that you may add more than 1 task by clicking the + Icon.
Click the Upload button to upload an image or photo. Once the file has been uploaded, you are able to view it by clicking the file below the Upload button.
A notification will appear on your upper right screen that states “Instruction Saved successfully”. You will also notice that the newly created instruction has been added under the assigned instructions header. Additionally, you may select existing or saved instructions in the select drop down menu.
Another way of Adding Instructions is through the Instruction Page. Hover your mouse over Records in the central navigation bar and select Instructions under the Utilities column. This will direct you to the Instruction Page.
Once you are directed in the Instruction Page, click + Add Instruction to add an instruction. You may also select an instruction from this page and click edit icon if modification is required. Alternatively, click the delete icon if instruction needs to be removed.
Once the + Add instruction has been clicked, an Add Instruction window will pop up. Fill out the form. Note that you can add more than 1 task by clicking the + icon. Click the Upload button to upload an Image or photo. If there are additional instructions, enter it in the Notes field. Moreover, you may select a Job wherein you can associate the Instruction.
Once you have completed filling out the Add instruction form, click the Save button.
A notification will appear stating that the “Instruction Saved successfully”. The new added instruction will also be added to the Instructions list on this page.
6.2.7 Job Templates
Job Templates allow you to create as many different types of Jobs (schedules, rosters) as you like and save them within each Job Sheet.
Once your template has been saved in a Job Sheet, you can edit and delete the job templates in the job templates page. It can be opened at any time, and contain a new start date while all other details remain the same as previously. It is even possible to recreate the same template under a new client or business.
To create a Job template, go to the Job Sheet Page page and click the Save Job Template button.
The Save Job Template window will pop up. Enter the Job Template name and click the Save button.
To create a job from the save Job Template, hover your mouse over Add Jobs, then select Job Templates. Enter the Job Template name, and click save.
Create a Job from the Job Template, a window will pop up. You can select the saved Job Templates, fill up all the empty fields, and click open.
Once the open button has been clicked, a notification will pop up on your upper right screen that the ‘Job has been added to the template’.
Additionally the created job from the saved template will be available from the jobs page, as shown on the below screenshot.
6.2.8 Msg Templates
CrewCard has created a solution for the constant flow of communication, by using Message templates to simplify customer communication. This feature allows you to create a set of standard messages that enable you to use previously configured messages to reply, send new messages and send SMS. This means that you do not have to manually type the messages. You can use the Msg Template field to automatically fill in the information of your message. Message templates also allow you to respond faster.
To create a Message Template, simply hover your mouse over Records and select Msg Templates.
In the Msg Template page, Click + Add Message Template button to create a new template.
The Add Message Template window will pop up. Enter the Template Name and the message.
Once the Template name and Message has been entered, click the Save button.
The saved Msg Template will appear below the list of Msg templates list. Alternatively, you can edit or delete the Msg Template.
To send a message using the created message template, you can choose the message template from the Send Message page or Send SMS page.
6.3 Others
6.3.1 Dashboard
The Dashboard is one of three different landing pages that Admins can set for the Home Page. The Dashboard depicts various statistics based on crew and their shifts. This overview aids in providing valuable insights into shifts and workforce trends, spanning from daily summaries to annual evaluations.
The Dashboard has two views; Statistics and Shifts.
The Statistics View will show all shift and crew information.
The Shifts View, however, may yield different results depending on the Admin settings. To alter the Shifts View to see the statistics for specific activities, users will need to access the Admin Settings. Once in admin settings select Shifts Page and locate ‘79. Activities Hidden from Shifts Page’. Users can now select which activities they wish to keep hidden from the Shifts view.
After the settings have been saved the statistics on the Shift View on Dashboard will now exclude those specific activities.
The info icon next to the Dashboard view drop menu explains how each statistic works.
Users can filter the statistics by daily, weekly, monthly or yearly. There is also an additional option to choose the date range. Upon clicking a date range a pop-up window labeled ‘Select a Date Range’ will appear. Select the to and from date and click save to search from those days.
The first row of statistics on the dashboard page works as such:
Assigned Crew: Lists crew members confirmed or pencilled in for shifts within the specified date range.
Activated Recruits: Recruits activated within the selected date range. Once activated, recruits become crew and are moved from the Recruit Cards page to the Crew List page.
Confirmed Shifts: Displays shifts with confirmed crew within the selected date range.
Unconfirmed Shifts: Displays shifts with no confirmed crew within the selected date range, including blank shifts and shifts with pencilled-in crew.
Total Shifts: Represents the current sum of hours, distinguishing from Scheduled Hours which represent the initial entry before any edits.
Total Hours: Reflects the current sum of hours, distinguishing from Scheduled Hours which represent the initial entry to any edits.
Total Jobs: Indicates the total number of Job Sheets.
Shift Analytics provides users with a graphical representation of confirmed versus unconfirmed shifts. Using the filter, users can view statistics weekly, monthly or yearly.
The Recruits pie chart depicts New Recruits versus Activated Recruits. Hover the mouse over the chart to see how many recruits are new or activated. Click on the three dots in the corner to be directed to the recruits page.
The Active Crew Visa pie chart shows Visas that are Valid, Expiring Soon or Expired. Hover the mouse over the chart to see how many Visas are valid, expiring soon or expired.
Valid: Indicates visas that remain current, though VEVO verification status may vary. Please refer to the Crew Compliance Page for Vevo check details.
Expiring Soon: Displays visas set to expire within the upcoming month from the current date.
Expired: Includes visas that have expired as of yesterday or an earlier date.
The info icon will display this message when the user hovers their mouse over it:
Displays crew members possessing valid visas authorising Australian working rights within the designated timeframe, excluding individuals marked as disabled or deleted.
Click on the three dots in the corner to be directed to the Crew Compliance page.
The Shifts Offered pie chart shows all shifts that are accepted, rejected or unavailable. Users can use the filter in the top right to filter by SMS, Email, App or All. This offers the users insight into their shift scheduling and the status of their shift offers.
Users can also use the five buttons below as a shortcut to their respective pages; Jobs, Calendar, Statistics, Events and Shifts.
6.3.2 Venues Key: A / DM / M
A venue is the location that the shift is to take place in. Anytime a venue is entered into the database, it is stored for future reference and can be found in the Venues Page. Staff can view their Shift Meeting Places on a Google Map via their Crew Login Page and, from their internet calendar (such as Outlook Calendar). (See “iCAL under “Crew Login Page” for more info).
Eye Icon: Displays the venue details in a new window. Pencil Icon: Opens the Venue Edit Page. Add Venue: Takes you to a new window to enter venue information Review: A date is set for an inspection. When a job is booked at that venue after the date of the inspection, a warning will appear on the Shifts Page. Show Deleted: View all deleted venues
Add New Venue/ Edit Existing Venue
Click add venue
Name, address and postcode can be entered here, as well as venue phone number, website address etc.
Notes: Important venue notes are saved in this text box, which also appears on SMS Confirmations (or emails) sent to the crew who are booked to work at this venue. For example: “Corporate venue, dress appropriately”.
Private for Client: When selected, this Venue will not appear in the list of possible venues that clients can select from in the Client Booking Page. It is useful for private residences or one-off events. To enter a client name, start typing the first few letters then select it from the drop-down list of clients that appears.
Delete: If ticked and saved, this venue would be deleted from the system.
Meeting Places: A specific meeting place for this venue. Each time these are entered by clicking the “+” icon , they are stored in the system. It is possible for the one venue to have several meeting points. When a venue is selected in a shift or shifts, a list of meeting places that belong to this venue will be displayed under the Meeting Places in the shifts edit page.
For example: ABC Hotel would be saved as a venue with address details like 123 Halifax St, Sydney CBD. The meeting places would be entered as “Meet at the front”, “Loading Dock”, “Call on Arrival”. There is no need to enter the street address in the meeting points as it will already be entered in the venue details.
The Meeting Place of any Venue can have a Google Map attached to it, accessible by staff in their Crew Page and in their Internet Calendar.
Delete: Any meeting point or rooms can be deleted by ticking “Deleted” box and saving the page.
Rooms: Rooms is an alternative location that can be saved under each venue. It does not necessarily have to be a room, it could be for example “Main Foyer”. By default, rooms does not appear in SMS Confirmation messages sent to the crew, but they can be seen by crew in their crew pages.
Files: Any documents related to this venue can be uploaded and stored in each venue’s page.
Simply click Choose File
Drag and Drop the file or Click to Upload the file and click Save button.
Add Venue Notes/ Edit Existing Venue Notes
When selecting and editing a venue, you are able to add Venue Notes. To access the list of Venues saved, hover your mouse over ‘Contacts’ and select ‘Venues’, listed under ‘Others’.
In the example below, it shows the Venue Details of the Sydney Opera House once it has been selected from the list.
Enter the required Venue Notes in the text box given and select Save once completed. Next, when creating a new job, select the same venue that attains the venue notes previously written. One the job has been saved, select the Job Sheet, accessible via the ‘Jobs’ tab.
Admin must select the shift via the checkbox, then select the ‘Confirm’ dropbox. Tap ‘Confirm Message’ to send a confirmation message detailing the shift, including the Venue Notes, via a push notification to crew members.
Below is the template for Confirm Message. Select ‘Send Message’ to send it to the crew.
If the crew is logged in to the CrewCard app, they will receive a push notification to their mobile phone. To expand on the message push notification, press and hold the box and it will show the full message. IOS devices are able to show a maximum of 250 characters.
Note, Venue Notes may not be included in the Confirm Message template. To ensure that it is, access Settings in the top right corner of the page. Under the put out menu on the left side of the screen, select General Settings. Click on ‘SMS’ and scroll to No. 145. SMS Confirm Message. Here, [VENUE NOTES] should be displayed after [VENUE].
6.3.3 Tasks Key: A / DM / M
Add tasks that are related to any activity/shift, enable the task page in settings. See guide 10.2.18 Software Configuration.
Add Task
To Add a task, click the Add Task button. Enter the Task Name, Task Description, select Display on App and click the Save button.
When Display on App is set to yes it will display the task on the Crew App; otherwise, select no to hide the task details.
Alternatively, you can delete and edit a task. To delete the task, click the delete icon, and to edit the task, click the edit icon.
Edit the Task name and description, then click the Save button.
Click yes to display the task on the Crew App; otherwise, select no to hide the task details.
6.3.4 Extras
Extras is a way to add a charge to a job that isn’t a set price. For example, if a crew goes out to a three-hour shift, you can charge the client a call-out fee. In the screen shot below, you can see Paid is what the crew member will receive, and the Charge is how much the client will be invoiced after the job.
6.3.5 Items Groups
To add group, press the ‘Add Item Group’ button.
Fill out the fields and click save.
6.3.6 Items
Follow the above instructions to add individual items.
6.3.7 Form Matrix
The Forms Matrix contains all forms submitted by the crew, supervisors, team leaders and clients. Access the Forms Matrix by selecting ‘Records’ in the central navigation bar, then the last option under ‘Others’. Once on the Forms Matrix page, select the Form Type and User Type from the dropdown menus in the Forms Matrix. If you know the Username, Venue, Date from and Date to, all forms matching the search criteria will be displayed. To edit the form’s full information just, click the edit icon. A pop-up window will then appear with the Edit Form wherein you can modify the Form and view the file uploaded.
Date & Time: Form submission date and time
Form Type: Type of Form
Form Name: User who created the form ( This is only applicable who made the indecent report in the CrewCard App) / User who is the subject of the form
Description: The form’s brief description
User Type: Define which rights are granted to the user. Example: Crew/ Superuser/ Admin/ Manager etc.
Reporter: The source of the report
Details: By selecting the Reupload file button, you can reupload the file that was uploaded or click the view details to open the file uploaded
Review: This is the review date that indicates when the review date expires. When this occurs, the whole field will become red
The sort icon located beside the review column will sort out all the expired reviews to be at the top of the list.
To add a new form, click the Add New Form button and complete the boxes of the pop up window. Once saved, it will be included in the Forms list.
By selecting the edit icon, admin can modify and/or remove the form type by clicking the delete icon. Keep in mind that only Admin will have access to the edit icon.
6.4 Logs
6.3.1 Shift History Key: A / DM / M
This page displays all shifts completed in the system. Any notes of changes in shifts will appear here.
Advance search the shift using shift No., Date From, Date To, Business and Duty Manager.
6.3.2 App Activity
An App Activity page is a recorded log of how time is spent. Within organisations, app activity is typically used to track the activities of crew and clients.
This includes an IP address column, which helps identify whether the crew member logged into the app and tracks the user’s location at the time of login.
6.3.3 Crew Profile Logs
Crew Profile Logs is a new feature in the Records section of the header navigation bar under Logs.
This log records all changes and updates to the crew profile precisely when a new visa is uploaded under the Visa section. Additionally, it should track who uploaded files, unblocked a profile, updated the expiry date, deleted files and when they were approved.
7.0 Add Job
Key: A / DM / M
There are three types of job creations in CrewCard: Add Job, Add Shifts, Add Booking, Job Templates & Add Import. This guide will help guide and create a better understanding of the different types. Hover your mouse over Add Jobs on the CNB:
7.0.1 Add Jobs
the Add Jobs feature takes you through a detailed way of adding jobs into your system. Hover your mouse over the Add Jobs on the CNB and click Add Job:
The following window will pop up. At the top of thedropdown, you’ll seee a search field that lets you quickly locate an client.
Alternatively, you can scroll through the dropdown list and manually select an option.
It will take you to a new page. Fill out all fields.
Booking Person: The person who creates the job or is responsible for the job.
Job Location: Click to open the drop-down menu to display the location of the booking.
PO No: Enter a reference number or job name.
Venue Name: Enter the name of the venue.
Meeting Place/ Address: Click the text box to open a drop-down menu with a list of pre-uploaded locations, or use the plus button to add a venue. This is the address that the crew will go to for the job.
Room: This field helps guide the crew to the right location when they arrive at the venue. Click the field for a drop-down menu of all the meeting marks related to the venue, or use the plus button to add a new one.
Onsite Contact: Click the field to present a list of all onsite contacts that are associated with the client, or use the plus button to add a new onsite contact.
Select date across multiple dates using the date picker No of Crew, Time on/off – (Dropdown option or type the hour in the field), Activity and Ability.
The next page will open displaying the individual shift. Edit any information.
Clicking next brings you to the overview tab of the booking step.
The Overview page brings together all shift information in a consolidated view, making it simple to review and manage bookings. Shifts that share the same details such as role, time, or requirements are automatically grouped under a blue highlighted row called a shift header. These headers are used specifically for bulk editing, which allows you to apply updates across all shifts within the group at once.
If you only need to make a change to a single shift, you can edit that individual row directly without affecting the rest of the group.
Bulk Selection(s)
The Bulk Select option allows you to efficiently manage multiple shifts at once. To select specific shifts, tick the checkboxes located under the Link column beside each row. If you wish to select every shift in the jobsheet, simply click the checkbox in the footer, which automatically selects all rows.
Once your desired shifts are selected, you can perform bulk actions such as deleting or duplicating the rows, and click save.
Proceed to the last step of the booking from where you can add Crew notes, Operational notes and check the checkboxes required to verify and click confirm.
Click Confirm Booking to create the job.
Final Step Disclaimer – Client Portal Booking Form
The Final Step Disclaimer allows you to display important legal or acknowledgment text to Clients before they confirm a booking. This section ensures that Clients are aware of and agree to specific conditions associated with their booking.
The Final Step Disclaimer is used to confirm that the Client acknowledges certain requirements, responsibilities or limitations before completing the booking. It is often applied for situations involving:
Use of client-owned vehicles or equipment
Site safety responsibilities
Insurance or compliance requirements
Special job conditions or restrictions
This helps manage risk, clarify responsibilities and ensure Clients are aware of any important conditions before proceeding.
Example Use Case
For example, when a booking involves the use of a Client’s vehicle, you may wish to include the following disclaimer:
Example Disclaimer Text “By proceeding with this booking, the Client confirms that they have read and understood all terms and conditions associated with this activity.
The Client acknowledges that they are responsible for ensuring all required insurances, permits and safety measures are in place for this booking. The Company accepts no liability for any loss, damage or injury arising from circumstances outside its direct control.
Proceeding with this booking signifies the Client’s agreement to these terms.”
This is a generic example disclaimer provided by CrewCard. It can be edited to suit your organisation’s specific requirements. CrewCard holds no liability for the use or content of this disclaimer.
How to Configure
Navigate to the Activities Page.
Locate the activity you want to apply the disclaimer to, then click the Activity button at the end of the row.
Scroll down the Activity Settings page.
Find the section labelled Final Step Disclaimer — located between “Qualifications” and “Auto-Scheduler Settings.” Enter your desired disclaimer text in the provided field. Click Save to apply your changes.
Note: The disclaimer is triggered based on the selected activity during the Client’s booking process. Each activity can have its own unique disclaimer text, allowing flexibility across different job types or industries.
Where It Appears
Client Portal (During Booking): The disclaimer will appear as a pop-up on the final step of the booking process. The Client must read and accept this disclaimer before the booking can be submitted.
Booking Confirmation Email: Once confirmed, the same disclaimer text will be automatically included at the bottom of the Booking Confirmation Email, serving as a record of the Client’s acknowledgment.
The following message will be displayed, including the job reference number. This is highlighted in green in the below screenshot.
Please see guide 7.1 Jobs Sheets learn how to fill out a job sheet.
Client Shift Confirmation / Client can Select their own Crew
The Client Shift Confirmation function will allow clients to select the crew and confirm to a shift. When offers are sent to the crew, crew will have to apply to the job offer. These job applications will then be forwarded to the CrewCard App where clients can select the crew and confirm them to the shift.
The Enable Shift Confirmation should be enabled.
If you wish to select your own crew members for a job, you can do so by contacting support@personnelmanager.com.au. Once this option is enabled, you will be able to select crew members based on your specific requirements.
Set parameters in the Scheduler of Activity.
Go to Activity Page, Click Edit Activity of the activity where you want to confirm shifts.
Enter data on the following fields:
Auto Scheduler: Tick the box of this field
Enable Scheduler: Enter a number on this field. The number will represent the time when the Scheduler will be triggered after creating a job from the Client Portal.
Proximity: Put a check on this box if you want proximity to be a factor when sending offers to qualified crew.
Proximity KM: The proximity distance where your offer will be sent to crew.
Enter number for Staff Every and Minutes field. This will determine the number of offers to be sent to the number of crew every minute.
Enter number for fields From Rank and To Rank to determine the rank of the crews who will receive the offer.
Tick the box of Enable Client Shift Confirmation for Auto Scheduler.
Client Portal Process
Log in to the Client Portal using your credentials. Click on “Add Job” in the central navigation bar.
It’s important to ensure that the “Allow (Client) to confirm crew” option is checked on the last page of the Job Booking page. This option enables clients to confirm their own crew members for the job based on their specific requirements.
Once the job is created and the client has checked the “Allow (Client) to confirm crew” option, the shifts will be added to the Auto Scheduler. The Auto Scheduler is an automated feature that matches available crew members with job requirements based on their skills, experience, and availability.
The crew members who are matched with the job requirements will receive job offers through the Crewcard app.
To check if the shifts have been offered to the crew members, Click on the shift that you want to check. Look for the scheduler icon in the shift and Click on the scheduler icon to view the status of the shift. If the shift has been offered to crew members, you should see their names listed.
Refer to CrewCard – Client App Access >> 5.0 Jobs >> Client Can Select their own Crew and CrewCard – Crew App Access >>7.0 Job Offers
Generative Text – Client Shift Confirmation
The Client Shift Confirmation – Generative Text feature allows Admins and Coordinators to automatically generate a copy-and-paste booking confirmation message immediately after a job is created.
This message can be quickly sent to clients via SMS, email, or messaging apps, saving time and ensuring booking details are clearly communicated.
This feature is fully configurable in Settings and supports dynamic variables that automatically populate job, client, shift, and crew details.
Where to find the setting
To enable and configure this feature:
Login into the admin portal
Go to: Settings → General Settings → SMS
Inside this section, you will see:
A toggle/checkbox for “Client Shift Confirmation”
A text field labeled “Shift Confirmation” where you can enter your custom message
How this feature works
If the setting is OFF (unticked):
No generative confirmation message pop-up will appear after booking.
The system will continue to function as normal.
Shift statuses will still be automatically updated to “C” (Confirmed) under MSG Column to indicate that the shifts have been successfully confirmed.
Setting is Ticked (Enabled)
If the setting is ON (ticked):
A custom, copyable booking confirmation message will automatically appear immediately after a job is booked
The content displayed will be based on the custom text saved in the Shift Confirmation field This message can then be:
Highlighted
Copied
Pasted directly into SMS, WhatsApp, email, or other client communication channels
Configuring custom messages
Once the setting is enabled:
Scroll to the Shift, Confirmation text box
Type your preferred message. Use dynamic variables to auto-populate booking information
A helpful tooltip (“tip”) appears in this section to show you which variables are available.
7.0.2 Add Ongoing
The Ongoing Job feature is a tool that allows businesses to create and manage jobs or tasks that do not have a set end date. It’s beneficial for recurring or continuous tasks that must be performed indefinitely or until further notice.
Create Ongoing Jobs
First log in to CrewCard. Find Add Ongoing Job in the central navigation bar under Add Job. Create an Ongoing Job will pop up.
Client: Select the Client.
No. of Shifts: Type in the number of shifts then click + Add Shift. The new shifts will appear underneath.
Weekday/Custom: Either select from Weekdays Only or Custom.
Create Shift Group: Tick the checkbox if you want to create a Shift Group.
Once the above is selected, fill in the shift details.
No.: Refers to the shift order, which means no.1 ranks on top.
Start/End Date: Add in the dates individually or click the check box next to each shift and select the date. The selected shifts will all automatically change to the data inputted.
Time On/Off: Type in the times. Similarly, you can add the times individually or multi-fill by selecting which shifts and editing one.
Crew Name: Select which crew you want for the job.
Activity: Select Activity, this is the role they are doing for the job.
Abilities: Select Abilities, these are any additional skills that are needed for the job.
Venue: Type in the Venue. If the venue does not exist you will be prompted to create a new venue.
Meeting Place: Type in the Meeting Place. You can click the map icon next to the text field to see the location on the map.
Supervisor: Select a Supervisor. Click on the plus icon to add a new supervisor. Then click the envelope icon to invite them.
Action: The copy and delete buttons.
Copy icon: The copy icon will copy the selected shift.
Trash icon: The trash icon will delete the shift.
Once all the details are filled out, click Cancel, Update or Next. Next will take you to Edit Ongoing Job. Before you finalise any jobs you can fine-tune any details within the new ongoing jobs. Click Back to go back a step or Next to finalise.
Select the number of times you want the shift to repeat, then select if it’s being repeated weekly, fortnightly or monthly. Then click save.
TIP: When dealing with a date range selected as “Weekly,” the default value is configured as 26. For date ranges marked as “Fortnightly,” the default value is 13. In cases where the date range is exclusively “Monthly,” the default value stands at 6.
The Ongoing Job will be created and the Job Sheets will be generated.
Click on Open All Job Sheets.All the job sheets will open up in your browser.
You can now go in and edit the job sheets if needed or schedule them out.
Ongoing Jobs on Jobs Page
On the Jobs page you can now find the ongoing jobs.
You can differentiate the type of jobs by going to the Job Sheets column. You will find a circle icon next to the clipboard icon, this indicates that the job is an ongoing job. If you hover over it will tell if the job is ongoing weekly, fortnightly or monthly.
You can delete an ongoing job by clicking the circle icon. A pop up will prompt you to enter the date you wish the shifts to be deleted after.
Once selected click Save. If you don’t want to delete the ongoing job click Cancel. If you have clicked Save you will be asked to confirm shifts to be deleted. Click Delete to delete the shifts or Cancel to go back.
If there are no shifts found even if there is a shift on that day, it may indicate that there are no shifts scheduled from that point onwards. In this case the shifts that can be deleted all fall within the already scheduled shifts in the ongoing job.
7.0.3 Add Shifts
Click Add Shifts as another way to create a job.
A pop-out window will show. Fill out all fields and press save.
NOTE: You can only Add Shifts if the information for the client & venue are already in the system.
Once successfully added, a message will appear at the top of the pop-out window, which includes the job number. If you wish to edit the job sheet, you can click the number, which will open a new tab with the job sheet ready to be filled out.
This will open the job sheet. The job description will automatically be entered as Quick Job. Click the text box to overwrite the description.
Please see guide 7.1 Jobs Sheets to learn how to fill out a job sheet.
7.0.4 Add Open
The Add Open Job feature allows you to create a job by setting a date range and time frame, then offering the shift to multiple crew members at once. Once published, the selected crew will see the job in their app and can choose to self-assign. Open Jobs remain available until one or more crew members accept and claim the shift, making it a flexible and efficient way to fill roles quickly.
Note that shifts are given on a first come first serve basis, to enable this feature please contact support@crewcard.co
How to Add an Open Job
Access the feature Hover over Add Jobs in the header and select Add Open Job.
A popup appears where you can enter the job details
Specify the date range and time frame.
Add key details such as job location, venue, PO number, meeting place, supervisor, and other requirements.
Choose crew availability Select the crew members or groups you want to make the shift available to.
Publish the Open Job Once saved, the job will appear in the chosen crew members’ app under Open Shifts / Job Offers
Crew self-assignment Crew can view the shift details and assign themselves to the job. Once claimed, the job is no longer available for other crew unless multiple spots are required.
7.0.5 Add Booking
Click Add Booking to open the job sheets for the selected client.
This will open up a pop-out window. Select the client and date you wish to open a job sheet for, and click go.
This will open the job sheet page. If the client has a job on the date you have selected, the existing job sheets will be displayed with a new job shift underneath it. Please see guide 7.1 Jobs Sheets to learn how to fill out a job sheet.
In the screenshot below, ABC Sydney has an existing job on the day selected. The shift displays under the existing shift. Please note that this shift does not relate to the existing one.
After editing the shift, use the footer to perform an action.
If you wish to open a blank job sheet for a client, click Add Job sheet.
On instances where a booking is added and there aren’t any existing jobs for the week, the job sheet would have added forms such as Inductions, Actions, Operations Notes, Upload Files and Instructions.
Inductions: you may be able to add, select, and delete existing inductions.
Actions: you may be able to select from the existing actions on the list(for more details please check, 9.4 Action Forms.)
Operations Notes: input notes that are not visible to the crew, to provide additional information regarding the task.
Upload Files: upload files that are related to the job.
Instructions: you may be able to add and select instructions that are needed for the job.
7.0.6 Job Templates
Job Templates allow you to create as many different types of Jobs (schedules, rosters) as you like, and save them within each Job Sheet.
Once your template has been saved in a Job Sheet, you can edit and delete the job templates at the job templates page. It can be opened at any time, with a new start date, while all other details remain the same as previously. It is even possible to recreate the same template under a new client or business.
To create a Job template, go to the Job Sheet Page page and click the Save Job Template button.
The ‘Save Job Template’ window will pop up. Enter the Job Template name and click the Save button.
To create a job from the save Job Template, hover your mouse over Add Jobs and select Job Templates. Enter the Job Template name and click Save.
When you create a Job from the Job Template, a window will pop up. You can select the saved Job Templates, fill up all the empty fields, and click open.
Once the open button has been clicked, a notification will pop up on your upper right screen to state that the Job has been added to the template.
Additionally, the created job from the saved template will be available from the jobs page, as shown on the below screenshot.
7.0.7 Add Import
Add Import allows users to create Jobs under Add Jobs, wherein they can customise your download template and upload the excel template in order to create a Job.
Required PM Fields for Add Import
First Name
Crew Profile> Personal Details > First Name of the Crew
Last name
Crew Profile> Personal Details > Last Name of the Crew
Client Short Name
Client Profile> Client profile> Client’s Short Name
Approved Box in Timesheet
Yes/ No
Job Scheduled Start Date
This must be entered in dd-mm-yy format e.g. 28-04-22. Job start date
Job Scheduled Start Time
This must be entered in 24 hour format e.g. 00:00, 14:00. Job start time
Job Scheduled End Date
This must be entered in dd-mm-yy format e.g. 28-04-22. Job end date
Actual Start Date
Actual start date of the job
Job Scheduled End Time
Scheduled end time of the shift
Actual Start Time
Actual start time of the shift
Actual End Date
Actual End date of the shift
Actual End Time
Actual end time of the shift
Break 1 Start
Break 1 Start is the start time of the break per shift
Break 1 End
Break 1 End is the end time of the break per shift
Activity
Activity assigned to Crew
Venue
Details of the location that crew members will meet for the shift to commence.
Optional PM fields for Add import
Break 2 Start
Break 2 Start is the start time of the break per shift
Break 2 End
Break 2 End is the end time of the break per shift
Break 3 Start
Break 3 Start is the start time of the break per shift
Break 3 End
Break 3 End is the end time of the break per shift
Total Working Hours + Break Time
The total working hours including break times
Total Working Hours
The total working hours excluding break times
Ability
Abilities that a crew can perform
To begin with, hover your mouse over +Add Job and select Add Import.
To edit the Add Import Template, simply click Edit Template.
In the Edit Download Template, you can customise templates by dragging and dropping the elements of the Available Fields over to the Excel template.
As an example, below the Total Working Hours to Excel template has been dragged. Once done, click the save button.
To upload the custom template, go back to the Add Import window by clicking the left arrow key.
Click the Download Template button to download the customised excel template. Once downloaded, open the excel file.
Fill out the fields required in the excel template and save the template to your local drive.
Go back to the Add Import window and click Upload Template. Select the excel file to your local drive and click the open button.
Below the Upload Template button, you will notice that the Imported Job has been completed with the Job No.
To view the Job, go to the Jobs Page. Search and open the job.
Here’s the sample Job Sheet created using the Add Import function.
7.1 Jobsheets
Job Sheet contains all shifts within the one job sheet number, where job details can be added and edited. Admin can group shifts on the Job Sheets page by shift, date or activity, which is located in Admin Settings. See guide 10.1.6 Ops Home Configuration for more information. You can open job sheets from the jobs home page and shifts page.
Job Page: click the job sheet number you wish to open.
Some shifts will be Confirmed, some Pending and some Cancelled. This will be indicated within the Job Sheet text box.
Confirmed, pending and cancelled are three options which can be selected from a dropdown function in the job sheet.
When confirmed is selected, the Jobs page will show the shift in its full form with no text beside it. A job should be confirmed when all shifts are filled and confirmed.
When Pending is selected, the Jobs page will show the job text box with ‘Pending’ next to it. This indicates that the job is in the process of being confirmed and awaiting confirmation on things such as crew on shifts, admin locks and time changes etc. When Cancelled is selected, the jobs page will show the job text box with ‘Cancelled’ next to it. In this scenario, the job has been cancelled and will no longer be in operation.
Shift Page: click the no. next to the Job Sheet column if you wish to open the job sheet.
The below image is what a job sheet looks like.
On the Job Sheet, you are able to add tasks to the job. Scroll to the right to find the Task column. Click the drop down function to select an already made task. Otherwise, select the green plus symbol to add a new task, as seen below.
On the job sheet, assigning or editing a supervisor may also be possible by selecting the Supervisor.
Scroll to the right until you can view the Supervisor column. Click the Plus Icon to Add a Supervisor.
Fill out the Add Supervisor form.
Once the form has been filled out, click the Add button.
Select the Supervisor name in the drop down list and click the Supervisor icon.
Check the Email and Phone number of the Supervisor you wish to send the SMS and Email Invite. Tick the SMS and Email Invite checkboxes and Click Send App Invite button.
A pop up will appear stating that the “App Invitation has been Sent” to the Supervisor.
Furthermore, when selecting a supervisor from the drop down list, you will be able to see which supervisors have been invited to the app, and which have not been invited, indicated underneath their name in small green or red text. This is especially relevant when working on sites that provide supervisors not associated with your company as a crew member.
Select Supervisor
To begin with, select a job sheet. At the top of the job sheet click on “Select Supervisor”, a drop menu will appear with the list of all supervisors. Choose a supervisor. That supervisor will now be automatically assigned to each shift within the job sheet.
You can go back and manually assign different supervisors to specific shifts.
Note:If you choose different supervisors for certain shifts, the “Select Supervisor” field will go blank. However, if you manually assign the same supervisor to all of the shifts in the job sheet the “Select Supervisor” field will automatically update with that supervisors name.
Exploring the Job Sheet:
The job sheet has many different functions. This guide will help in breaking down the different functions step by step to ensure you have a better understanding.
Job Description: You may enter the job description you want to describe the job sheet in creation.
Tags: Select from the pre-existing tags that are available, you may also add a new tag. The tag will also be visible in the jobs page.
Select Team Leader: This allows you to select a crew member who is on a team leader level, to be a team leader for the overall job sheet. This will allow them access to view the job sheets.
Status: Select the status of the job sheet from Confirmed, Pending, and Cancelled. The status will be displayed on the Job Sheet column on the Jobs page.
Confirmed:
Pending:
Cancelled:
Confirmed, pending and cancelled are three options which can be selected from a dropdown function in the job sheet.
When confirmed is selected, the Jobs page will show the shift in its full form with no text beside it. A job should be confirmed when all shifts are filled and confirmed.
When Pending is selected, the Jobs page will show the job text box with ‘Pending’ next to it. This indicates that the job is in the process of being confirmed and awaiting confirmation on things such as crew on shifts, admin locks and time changes etc.
When Cancelled is selected, the jobs page will show the job text box with ‘Cancelled’ next to it. In this scenario, the job has been cancelled and will no longer be in operation.
Job Sheet View: Select whether you want a Complex View or a Simple View.
Complex View – The Complex View is the name given to the standard view that you would be familiar with; rates will not be visible when a Complex view is selected. To view the rates, select Job Sheet Rates in the Job Sheet drop down menu.
Simple View – allows you to see just the basic fields needed for day to day operations.
Billing Person: From the list, select who would be billed for the invoice. In the invoice under the Invoice loop section, the name selected from the job sheet page will be selected from the Invoice loop section.
Job Sheet: Select from the list of Job Sheet, Job Sheet Rates, Site, Event, Quote, and Invoice. Once selected, this will open the page with the same job/shifts details.
+ Add New Job Sheet: Click the button to add a new separate job sheet.
If you wish to open a blank job sheet for a client, click Add New Job Sheet. This will open up a blank job sheet for the client.
Qty: Refers to the quantity of shifts. The number in the box will be the amount of times this same shift will be duplicated once you click “Save”.
Example: You have 10 people working on this shift, therefore you type 10 in the box, and the row will be duplicated 10 times.
TIP: Pressing ‘tab’ will advance you to the next field. Pressing ‘shift + tab’ will take you back to the previous one.
Service Request: Click the button to create a service request
Save Job Template: Select to save the job template that was created.
Import Template: Working with TEMPLATES: On any job sheet, it is possible to save a template. This can later be opened to recreate a previously existing job sheet with new dates to save you the effort of entering all the information into a new job sheet each time.
See User Guide 6.2.5 Job Template for creating a Save Job Template.
Import template allows you to import the shifts with a new start date, and while all other details remain the same as the saved Job templates. To import a template, open a job sheet in the jobs page.
In the job Sheet page, click Import Template.
An Import Template pop up will appear. Select the template and the first date.
Once the template and first date has been selected, click the import button.
The shifts from the Save Job Template will be added to the Job Sheet.
For Example: if the saved job sheet had 3 shifts on the 12th of January and if 13th of March has been entered as the “First Day”, then CrewCard creates the new job sheet with full details (Times, venue, activities…) of 3 shifts on the 13th
Tags: Tags are useful when it comes to visually categorising job sheets on the Job page. Click the “Tags” button and a drop-down list appears. Click “Add New Tag”, then Save at the bottom of the job sheet page. Once created, all tags will appear in the drop-down list under “Tags”, where they can be selected or deselected. Selected Tag will appear on the Ops Home page and can help to categorise different job sheets. For example, a tag named “Xmas” can be created and all job sheets related to Christmas can be tagged for an easy view on the jobs page.
Confirmed:
If a shift has been saved with a crew member assigned to it and you press CONFIRM for that particular shift, the SMS page will bring up the ‘confirmed’ message for the selected shift to be sent to the crew member once more.
If numerous shifts have been selected, then all of the SMS’s will be brought up with their respective ‘confirmed’ messages. This message can be modified or completely deleted and a new message can be entered manually.
The message will appear: ‘Confirmed: “Date”, “Time On” (Minus 15 mins) until, “Time Off” approx, at “Venue”, “Meeting Place Address”, “Client”, “Onsite Contact Name”, “Onsite Contact Mobile”, cheers’
For example, the SMS will appear like this: ‘Confirmed: Fri 25-05, 08:15am – 11:30am approx, at Opera House, Stage Door, SHS, Dave Neil, 0412968412, cheers’
Tip: When you can’t find crew or Staff for a shift or job, please make sure to check that:
Activity is assigned
Crew/Staff is assigned to the correct business
Crew/Staff Groups
Incompatibility (This function makes Crew Members incompatible with certain Clients. This will remove their names from the list of the available crew when issuing shifts out for a particular client, making it impossible to send certain staff to certain clients.)
Business Update and Crew Mapping Notification
When you update or change the business information in a CrewCard, you might encounter a warning if the crew is not already mapped to the updated business or if the crew has not yet been paid. This will explain how to ensure that the crew is properly mapped to the correct business.
Go to the Jobs page and select the jobsheet you wish to edit.
Choose a different business from the dropdown menu in the business field. Once you’ve made the selection, click the ‘Save’ button to update the business information.
After saving, a warning message will appear if the crew member is not mapped to the newly selected business. This message is triggered only when the crew member is not associated with the selected business.
Selecting Yes:
The job sheet page will refresh.
In the background, the business will be mapped to the crew’s profile.
After the mapping process is complete, the following pop-up will appear:
After you click OK, a pop-up will display, confirming that the business mapping has been successfully completed. To ensure that the crew has been mapped correctly, you can navigate to the Crew Profile for verification.
Selecting No:
The crew will not be mapped to the updated business.
For more information regarding Inductions, Actions, Operations Notes, and Upload Files. And Instructions you may refer to 7.0.3 Add Booking for more information
Operations Notes: When new bookings are created online, clients have the option to add special instructions/notes/information that regards the booking. See the Operation Notes section at the bottom of the job sheet page.
Show Shift: Alter how many shifts you would like to see per job page.
Upload a new file: Required documents are available to attach in the job sheets, Crew members who have shift/s booked within the job sheets can view the attached documents online from the Crew Pages.
To upload a file, navigate to the Jobsheet page located in the lower left section of the page. They can then click on the Upload button within the Upload file section. Enter the file description name and click choose file, A file selection dialog box will appear on your screen. Browse your computer’s files and folders to locate the file you want to upload. Select the file and click the “Open” button to start the upload. Once done, click the Upload button.
The purpose of uploading a file is to provide important information or documentation related to a specific job or task. By uploading a file, such as a document, image, or PDF, the admin can share relevant data with the crew members. This file may contain instructions, specifications, reference materials, or any other relevant information that assists the crew in performing their tasks effectively. The crew can then access and view the uploaded file through the Crewcard app, ensuring that they have the necessary information readily available on their mobile devices while working on the job.
Add Induction: Select a pre-existing induction in the system, or create your own induction to allocated to this job sheet. The crew will have to read the induction before commencing the job.
Job Sheet Number: When selected in Admin Settings by ticking the box “Use In-house Client Reference Numbers”, CC displays ‘In-house Client Reference Numbers’ instead of ‘Default Reference Numbers’ on Job Sheets, Invoices, and Quotes. Then, any number or name can be given to Job Sheets “manually”.
Double Bookings: In scenarios where a crew is assigned to two different shifts but have conflicting schedules, a warning can be seen on the job sheet, showing the job number of the shift that has conflict.
Job Sheet Columns
Scheduler: This will take you to the scheduler page
No.: A Shift Number for each shift that is automatically assigned by the database.
Copy: “Copy” Icon appears for each shift. Click to open a pop-up dialogue box with the ‘Copies’ Box to enter a number. The number entered in the ‘Copies” Box indicates the amount of times you request to copy this individual shift. Note: “Copy” Icon only works on a single shift, selecting multiple shifts will not copy all shifts at the same time. Make sure to check the shift number on the pop-up dialogue box when copying shifts.
Lock: When shift is locked, a ‘Padlock’ Icon will appear in the Lock column (See “Lock Shifts” under “Dashboard”/“Job Sheets Page” for more info)
Lock Type
Description
Lock Shifts
When a shift is locked, no one is able to make changes to the details of the shift
Admin Lock Shifts
This is different from the normal lock as only the admin can unlock the job
Payroll Lock Shifts
Once payroll lock has been triggered, a lock with the letter “P” will be visible in the shift edit page. Additionally, if Payroll locked is selected you can select or choose which week Pay Period you want the shift/s to be added to.
Unlock Shifts
Unlock a shift so the shift can be edited.
C/A Lock Shifts
When the crew checks out of the shift, the C/A Lock Shifts will appear in the lock column.
Date: Enter the date format as DD-MM-YY.
Shift row date has defaulted to Sunday of the current week.
Note:
Always check for the correct month at the beginning/end of month as the date may default to the previous or following month.
Always check for the correct date after entering either 24:00 or 00:00 to make sure that it has not been changed to the intended day
Once “Save” is clicked, the day of the week will appear to the left of the date.
Time On: This must be entered in 24 hour format e.g. 00:00, 14:00, The “:” (Colon) can be substituted for a “.” (Full stop), so to enter 03:30 you can simply type 3.3
Tip: For 15:00 you can simply type 15 and press Tab. 00:00 refers to midnight at the very start of the day. 24:00 refers to midnight at the very end of the day. If you type 24:00 for a Monday, the database will automatically translate it to 00:00 on Tuesday.
Time Off: Time Off has the same format as Time On.
If a shift commences on one day and finishes on another, you can enter the finish time in either day’s time.
E.g. If a shift commences at 22:00 pm on Mon 02-04-17 and finishes at 02:00 am on Tue 03-04-17, then you can enter either 22 or 2 as finish time and the database will correct the finish time to 02:00 am.
Hrs : The total working hours excluding break times.
Rate, Paid and Charge:
Rates are assigned by adding/editing an activity in the Activities Page. (See “Activities Page” for more info). Pay Rates and Charged Rates can be entered under the “Activities” tab.
“Paid” is the rate pay to the staff hourly for conducting the activity in the scheduled time period.
“Charge” is the rate the client will be invoiced for this particular shift. In the Global Settings page, when “Hide Pay and Charge Columns” is switched to “Yes”, the ‘Paid’ and “Charge” rates will not appear in the job sheet.
Pay Date: The scheduled date to pay
Extra: Add extra charge to the shift. This will not appear on the job sheet
BTT (Break Times Total): Indicates the total amount of break times per shift. To view break times, click on the “Paper-Pencil” Icon next to the BTT column. The pop-up window opens with break details that the crew members entered via SMS whilst locking their shifts. Admin users have the option to edit breaks manually by entering start and end times. Please note that Admin users override crew breaks.
Note: Admin has the ability to delete break times submitted by crew, or any other breaks that have been entered previously.
Click the break edit icon, then click on the red delete icon on the break pop-up window.
TS: Time sheet. Click on the clock to open the timesheet for the crew, where you can edit the time and break, and lock the timesheet.
Crew Name: Crew members are available to be selected from the arrow drop-down list or by entering names to bring up matching results. The drop-down list will be empty when no crew members are added from the “crew” page.
The KM above the upper right side of the staff name field stands for Kilometres. Also, once the distance is clicked it will show the exact distance of the crew from the venue.
Note that venue and crew address should be correct for the feature to work.
Driving Distance calculates the crew’s personalised, real-life distance in km by car, from their home, to the job site.
CrewCard offers directions to the job site through the shortest distance route. If you prefer alternative routes that avoid highways, please get in touch with our support team at support@personnelmanager.com.au.
To illustrate, you can see Scarlet Witch’s Driving Distance is 1km by clicking into “Driving Distance” on the top right hand corner.
When a crew member has been booked on another shift, their name will be in red and an asterisk “*” will appear next to it
When a crew member has made an unavailability for a shift from the crew page, their name will be in red and a hash (#) will appear next to it
When a shift is sent to a crew via SMS, the crew member replies “yes”. A confirmation SMS is sent and the crew name will automatically appear in the crew name box. See “Offering Shifts and Confirming Crew” under “Job Sheet Page/ Edit Page” for more information.
Crew names can be entered manually to send a confirmation SMS. Once a confirmation SMS is sent, the crew name appears in black. It is optional to enter a crew name and save it for the shifts without sending a Confirmation SMS (name will appear in blue). Names can also be entered and sent an “Offer Shift” message (name will appear in green, until the crew replies ‘yes’ to it, then it changes to black).
In the global page, there is a feature called “Permit Crew Member Unavailability to be Viewed by a 3rd Party”. If this feature is switched on, the bookings/unavailability information for crew members will be “shared” by other subscribers to the CrewCard software.
Message: The message column displays the status of Incoming/Outgoing SMS Messages
B = Basic Send which was not associated with a Job
C = Confirmed SMS
M = Multi SMS
S = Single SMS
L = Linked SMS
Co = Connected SMS
I = Incoming SMS
A = After Hours Reminder
N = Next Day Reminder
OA = Onsite Contact After Hours Reminder
ON = Onsite Contact Next Day Reminder
Lo = Loser Multi Shift Message
Activity: Activity must be entered/selected from the drop-down list. The list contains all pre-entered activities from the activities/rates page. The selected activity will automatically be adjusted to the pre-set rate for the shift.
Example: Rate A – (amount a person earns per hour between the hours of 08:00 and 20:00) and Rate B – (amount a person earns between 20:00 and 08:00)
Ability: Select the crew ability from the drop-down list
Access Level: Can be used by the crew to know their access level on sites.
Task: Allows you to add, edit and remove task added in crew shift.
Venue: Includes the details of the location that crew members will meet for the shift to commence. When typing names in the venue text box, the search function will also generate any matching venue names, which will appear in a drop-down list for selection. If the venue name does not appear in the drop-down list, it means it is not in the system. Add the venue by clicking the plus button. A pop-out window will open for you to fill out.
Room: Room is the specific detail of the venue location. You have the option to add/select from the drop-down list, or click on the Green ‘+’ Icon to add. Rooms are also available to be edited/deleted in the venues tab. When room detail is added, the information is sent via outgoing emails to crew, and in job details on crew’s personal pages.
Meeting Place/ Address: Once the location is added in the details in a drop-down list, it will help speed up the process for a similar shift. The meeting details are also sent in the SMS messages to the crew. To add a new meeting place, click on the “map” icon to bring up a pop-up map window, then click on “Add New” and type in the location name/details, then move and drop the pin to the accurate point on the map then press “Add”. (For more info see “venues” tab) Tip: Meeting points can be edited in the venues tab.
Supervisor: Supervisors are available to add by clicking “+” icon next to the drop-down list. Include the area code and omit spaces when typing in the contact numbers of the onsite contact person. Added contacts will be retained in the CrewCard system for future use. The list will be available to select when editing the job sheet, and all contacts are available to view/edit/delete on Client Profile Pages. (For more info, see “Clients” tab)
PO No.: PO number is optional to add for reference which also appears on the invoice.
Notes for Staff (Client editable): Admin or clients can add notes in this box. Notes are included in SMS messages sent to crew and available to view on crew pages.
Example: “Outdoor job, bring water”
Note for Staff (Ops Section): Admin can add notes in this box and be hidden from clients. Notes are included in SMS messages sent to crew and available to view on crew pages.
Update Rates: The rates may not be updated if crew members have different rates and swapped shifts. Prior to processing payroll/timesheets, the rate is available to change in “Update Rates” feature in the shifts page.
Update Breaks: Similar to the “Update Rates” feature, breaks are available to edit prior to processing payroll.
Add Extra and Add Allowance, for additional rates in the timesheet for a particular shift.
Once Add Extra and Add Allowance are selected, you may input quantity, rate, paid, charge, pay date, and an option to delete.
Once done, please select Save to keep the changes.
Crew Profile: This will provide more information regarding the crew. Please select the profile icon in the Staff Name column.
A window will appear providing more detailed information regarding the assigned crew for the shift.
Information: Select the information icon on the Activity column to provide additional information regarding the shift.
A window will show the Activity Name, Categories Assigned, and Rules Assigned.
Footer
Tick the box next to one or more shifts, then use the action bar in the footer to perform the following actions:
Deleted Shifts: The selected shifts will be deleted without a message sent to crew.
Cancel / Remove:
In the jobs page, select a Job sheet where you want a Crew Member to be cancelled from a shift without deleting it.
In the job sheet page, tick a checkbox or select a shift that you wish to cancel a Crew Member from. At the bottom left part of the page, click the cancel button.
Select Cancel or Remove and you will be directed to the cancel message template page.
Scroll down at the bottom part of the page. Automatically, the app checkbox is already ticked. To notify the crew by SMS, tick SMS checkbox. To notify via email, tick email checkbox. Click Send Message, Cancel & Remove Shifts(s) to notify the Crew Member of their shift cancellation by SMS, email and in-app notification in their CrewCard App.
Alternately, select the Cancel / Delete option which simultaneously notifies the Crew Member of the cancellation and deletes the shift.
Time Change: This feature is available when time or date has changed. When shift time/date has updated, click on the “Time Change Button” to open a new window with an SMS message. This will be sent to affected crew members to advise changed information, and requests crew to reply and confirm/accept the changes. The status of the changes displays as followings:
Crew Name appears as green on the Shift Page, ‘S’ (sent) in ‘message’ column also indicates a message has been sent.
Crew Name appears as black when crew member/s has confirmed and accepted.
Crew Name appears as red to indicate crew has denied the changes and ‘D’ (Denied) also appears in the message column.
These features will work like a normal Cancel/ Delete, Cancel/ Remove and Time Change; however this will auto send the message without opening the send message page.
Auto Cancel/ Delete
Auto Cancel/ Remove
Auto Time Change
Scheduler/Auto: Please see guide 4.3
Offer Message:
This option is used when sending out ‘shift offer messages’ to staff members. Click and a page called ‘MultiSMS’ opens up, which allows you to offer shift/s to multiple staff members. The default SMS appears in the text box (editable and customisable in global settings) with another box with the list of crews that are assigned to the activity.
In this list, crew members have an asterisk (*) next to their name indicates that they are booked at that time, or a hash symbol (#) next to their name which indicates they entered their unavailability. Any other crew members are available for shifts.
Offer Same: The ‘same crew’ SMS feature works in two ways.
You can book multiple people on several shifts, with a view to keep consistent staff booked on those shifts, provided you select an equal number of shifts on each occasion.
For example, on the shifts page, you had four shifts for four people, starting at 8am to 12pm. You need the same four people to return on four subsequent shifts, being that evening from 8pm to 11pm.
You would have to select all eight shifts (it has to be an even number of both to work, four morning shifts and four evening shifts) and choose “Message Same Crew Shifts” in the “Select an Action” drop down list. Alternatively, you could press the edit (pencil icon) to enter the Shift Edit Page, then leave the Crew Member name blank, and press “Offer Shift Same Crew”. This will bring up the default SMS (customisable and editable) and a crew list of available crew for that activity. Once again, crew that are already booked in all time slots will have an asterisk * next to their name and those that have entered their own unavailability will have a hash # next to their name.
In this same crew SMS mode, if a Crew Member is already booked for one, but not all of the shifts, a *+ will appear next their name. If they have made themselves unavailable for one but not all of the shifts, a #+ will appear next to their name. The message will create one shift number for both (or all shifts), but will offer crew both shifts in the same message. Depending on how you have set the default settings for the same crew SMS message in global settings, the message you’ve sent may look like this:
[715] Can you do 2 shifts, Sun 05-07, 07:45am – 12:00pm & Sun 05-07, 20:00pm – 23:00pm approx., at Cronulla Beach ? Client – X Productions. Reply 715Y for YES, 715N for NO. Await Confirmation.
The crew members are accepting both shifts by replying with 715Y. With this function, it would be possible to select all eight shifts (four in the morning and four in the evening) and send this message to eight or ten or twelve crew members (however many you think necessary to get the job filled).
Once again, the system will wait the predetermined length of time that you have programmed into it; the first four of the highest ranking to reply in the affirmative will be awarded the job and will receive the confirmation messages. Those who missed out will receive the declined message to inform them that they will not be needed and to standby for more shifts.
Once again, on the shifts page, it will be possible to see which shifts have been sent out using the ‘Offer Shifts Same Crew’ feature. In the shifts, under the SMS field, it will show SC “?” and the shift number created by the system for these shifts, which is, in this example, SC (715). There will be “?” next to the SC (715) of the first of these ‘linked’ shifts. When the “?” icon is clicked, a list will open of all the crew you sent the ‘same crew SMS message’ to, including the time the message was sent. As you refresh the page, you will see Y and N appear after the names of the Crew Members that have responded yes or no to the shifts and the times they responded.
The second way that the “Message Same Crew Shifts” can work is offering multiple shifts (under different clients and job sheets) to one crew member.
For example, for an entire week or fortnight’s work, you need to select all the shifts that you wish to offer to the one crew member, and press the edit (pencil icon) to open the shift edit page. Press the “Offer Shift Same Crew” button, select the crew member you wish to offer the shifts to from the crew list and press “Send SMS”. The content of the SMS will say how many shifts are being offered along with dates, times and locations.
Offer Multi: The ‘Multi Roster Message’ option works the same way as the Message Same Crew Shifts.
Message Multi Roster Shifts allows you to offer several shifts in one SMS/Email to a staff member/s. If they accept the shifts offered, they receive a confirmation SMS with the details of all their shifts in one SMS/Email.
On the shifts Page, at the bottom of the screen under “Select an Action”, and in the shift edit page and the job sheets pages, there is the option “Message Multi Roster Shifts”. This feature allows you to offer multiple shifts to a crew member or several crew members in a single message (SMS/Email) per crew member. The crew member/s only need to reply with a single SMS accept to be confirmed for all shifts.
For example: You could create an entire roster for the following week, select all the shifts you want in the shifts page, scroll down the bottom of the page, under “Select an Action”, select the “Message Multi Roster Shifts”. All shifts will be presented in SMS/format to the staff to accept the shifts in one go. When the crew members accept the shifts, they will automatically be sent confirm multi messages (after the predetermined length of time that is customisable in global settings under “SMS Incoming Configuration”, after “Incoming SMS Accept Shifts Interval”).
Confirm Shift: By selecting shift/s and clicking this option, you simply make a crew member/s confirmed for a shift without sending them a Confirmation Message. Their name will appear black on the shifts Page with a C next to it (under the SMS field) which indicates they have confirmed.
Confirm Message: This will send a confirmation message to the crew who is booked for the shift
Confirm Multi: Confirm multiple shift with the same crew
Lock: Shifts must be locked with the correct times in order to be processed by payroll. Once the start/finish/break times are correct, shifts can be locked using this option from the drop down menu. Once locked, a padlock icon will appear next to the locked shift.
Admin Lock: Shifts must be locked with the correct times in order to be processed by payroll. Once the start/finish/break times are ensured correct, shifts can be locked using this option from the drop-down menu. Once locked, a padlock icon with the word ‘ADMIN’ under it will appear next to each shift/s. Admin locked shifts can only be unlocked by ‘ADMIN’ users.
Payroll Lock: The job is locked for payroll the time sheet will be sent to be paid
Unlock: This option reverses the locked or admin locked actions.
Copy Shift (s): The selected shifts will be copied
Deleted Shift (s): The selected shifts will be deleted
Message Cancel & Delete Shift (s): Delete/cancel shift and a message will be sent to the crew member to notify them
Message Notify Staff of Change: The change in the selected shift will be sent to the crew
Highlight Shift(s): Highlight the shift, this reminds you to make changes to it
Reasons for Job Sheet Highlight:
Copied Shift
RP update – Any copied imported jobs or shifts will also be highlighted in red, as the newly created copies do not exist in Rentman/Rental Point.
Highlight option
Copied shift that has been locked (Lock, Admin Lock and Payroll Lock)
Remove Shift(s) Highlighting: This removes the highlight from the shift.
Add Reason When Removing Crew from a Confirmed Shift
There are several reasons why a crew may need to be removed from a shift.
Some common reasons include customer complaints, blow up, or if the crew members are not performing their duties adequately.
In these situations, it may be necessary to remove the crew from the shift in order to maintain safety and productivity.
Additionally, if a crew member is not able to fulfill their duties due to personal reasons, it may be necessary to remove them from the shift and find a replacement.
CrewCard makes it easy for Admin to enter a reason when removing a crew from a confirmed shift.
NOTE: This feature needs to be activated before it can be used. You can contact CrewCard / Personnel Manager to activate this feature for you.
Click the x icon beside the name of the crew that is confirmed to the shift.
Once you clicked the x icon, the Remove Reason window will appear.
Enter the details of the reason why you are removing the crew in the Reason to remove crew field as this is a mandatory field.
Then under the reason field are the Types of Reasons:
Remove
No Show
Client Request
Crew Request
Short Notice
Complaint
You need to click one Reason Type and click OK.
After clicking OK, the crew will be removed from the shift.
Repeat Shifts
The repeat shift function is a convenient feature that enables users to quickly and effortlessly duplicate a previously assigned shift for multiple dates. This function saves time and effort by eliminating the need to manually input the same shift details repeatedly. By utilising this feature, users can efficiently manage their work schedules and ensure that they are consistently meeting their commitments without any unnecessary hassle.
First choose a Job Sheet. Once in the job sheet you must select at least one shift. Then in the footer menu click “Options”, then “Repeat Shift(s)”.
After clicking “Repeat Shift(s)”, a pop-up window will appear asking the user to fill out the fields. Enter in how many times you want the selected shift/s to repeat, then select how you want them to repeat from daily, weekly, fortnightly or monthly.
Users can click ‘X’ to exit the pop up. Clicking ‘Reset’ to clear the fields. Once all fields are filled out click ‘Go’ to proceed. A message saying ‘Shifts repeated successfully’ will appear.
Drag and Drop File Upload
Drag and Drop: Simply drag and drop the file into the designated area.
Click to Upload: Alternatively, click the drag-and-drop area to open the file dialog box. Select the file you wish to upload.
Enter File Name: After selecting the file, enter a name for it in the provided field.
Save: Once you’ve entered the file name, click the “Save” button to complete the upload process.
7.2 Sending Job offers
Toggle between Old and New User Interface on Offers Page
To improve user flexibility and accommodate different preferences, a UI toggle feature has been introduced on the Offer Message page. This allows users to switch between the Old User Interface (1) and the New User Interface (2) view.
When you open the Offer Message page, the Old User Interface (1) (as shown in the image below) will be displayed by default.
The Old User Interface contains the traditional layout for SMS, Email, App message composition, and staff selection criteria.
To switch between the Old User Interface (1) and the New User Interface (2), simply locate the User Interface Toggle Switch on the Offer Message page and click it. Your chosen interface will be immediately updated, while all functions and data remain the same.
The New User Interface displays the updated interface with enhanced layout and spacing for modern usability (as shown in image above). Any user with access to the Offer Message page can switch between interfaces.
Note: The system will always load the Old UI (1) by default.
Understanding the New Interface of the Offer Pages and their Types
Offer Message
The Offer Message feature is designed for sending job offers to staff. It is best used for:
Single shifts – one staff member per job.
Multiple shifts – where different staff members can accept the job.
At the top of the page, a set of checkboxes determines the communication method. Options include:
Email
SMS
App (push notification)
Checking a box applies the chosen communication method globally across all listed shift(s).
Page Layout
Left Panel (Shift Accordions) – The left panel displays a list of shifts in a dynamic accordion format.
When you expand a shift in the left panel, the right panel automatically updates to show the details and editable fields for that specific shift.
Each expanded accordion represents its own corresponding right panel view.
Within an expanded accordion you will find:
Date
Start/Finish times
Crew Member (if assigned)
Client
Activity
Venue
Message (if added)
Shift-level communication preference (Email, App, SMS)
This design ensures that when managing multiple shifts, you can switch between them easily: expanding a different accordion on the left will update the right panel to display the message and crew selection tools for that shift only.
Right Panel – Message Editor
The right panel displays and manages message content. Fields include:
Character count – tracks total characters in the message.
SMS units – displays how many SMS segments are required.
App message – editable text for push notifications.
SMS message – editable content for SMS (if enabled).
Offer Same: This feature enables you to send job offers for two or more separate shifts within a single message. It ensures the same number of staff is booked for all shifts making it perfect when you need a consistent team to work across multiple shifts.
Left Panel – Combined Shift Accordion
In this layout, all shifts are expanded by default, displaying each shift’s details together.
You can collapse or expand individual shifts; however, doing so does not affect the right panel, since all shifts are combined into one shared message.
This unified layout allows you to manage multiple shifts within a single message efficiently.
Each shift accordion displays essential information, including:
Date
Start/Finish times
Crew Member (if assigned)
Client
Activity
Venue
Message (if added)
Note: Unlike the standard Offer Message page where each shift has its own message editor, in Offer Same all selected shifts share one message panel.
Right Panel – Message Editor
The right panel manages the job offer message content that will be sent for all selected shifts simultaneously. Since all shifts are collated under one message, edits made here apply globally to all included shifts.
Key elements include:
Character Count – Tracks total message length.
SMS Units – Displays the number of SMS message segments required (if applicable).
App Message – Editable text for in-app push notifications.
Email Content – Editable subject and body fields (if enabled).
SMS Message – Editable content for SMS delivery (if enabled).
Offer Multi: This feature is designed for scenarios where the same staff members are required to work across multiple dates or venues. This option simplifies scheduling and ensures consistency for extended periods or across different locations.
Left Panel – Combined Shift Accordion
All shifts are expanded by default and displayed together in the left panel.
You can collapse or expand individual shift accordions; however, this action does not affect the right panel, since all shifts share one message view.
Each accordion displays the following details:
Date
Start/Finish Times
Crew Member (if assigned)
Client
Activity
Venue
Message (If added)
The right panel manages the job offer message content that will be sent for all selected shifts simultaneously. Since all shifts are collated under one message, edits made here apply globally to all included shifts.
Key elements include:
Character Count – Tracks total message length.
SMS Units – Displays the number of SMS message segments required (if applicable).
App Message – Editable text for in-app push notifications.
Email Content – Editable subject and body fields (if enabled).
SMS Message – Editable content for SMS delivery (if enabled).
Staff Selection Criteria
This section allows users to control which crew receives the offer message. The interface is divided into two boxes
Left: Available crew list
Right: Selected crew for the offer
Sorting Options
You can reorder the available staff list by three key criteria:
Rank – Staff are ordered by their ranking from the Crew List page. Higher-ranked staff appear at the top.
Acceptance – Staff are prioritised by their recent activity and responsiveness to previous job offers.
Proximity – Staff are ordered based on their distance from the job venue.
Once the sort by options are selected, you can automatically assign the number of crew entered in the text box and click go .
Alternatively, you can click on apply all available to add it onto the selected crew list box to the right.
Additional controls
Filters – Custom filters can be applied for more targeted crew selection, selecting an option filters the available crew option.
Apply All Available – This button automatically moves all crew listed under the available crew box (Left Side) into the selected crew box( Right side).
Exclude By – The exclude by filter helps refine the available Crew List by removing crew members who meet specific exclusion criteria.
It supports mult-select filtering, allowing you to apply multiple exclusion conditions at the same time.
Available options include:
Crew Already Offered (Past 6 Days) – Excludes crew who have been offered any shifts within the last six days, not limited to this specific shift.
Crew Already Offered (Today) – Excludes crew who have been offered any shifts today, regardless of the job or client. Crew Already Offered (Last 3 Days) – Excludes crew who have been offered any shifts within the past three days. Booked Crew – Excludes crew who are already booked for other shifts during the same time period as the current job.
Unavailable Crew – Excludes crew who have marked themselves as unavailable in their CrewCard app or profile.
Important note when sending job offers
Please note that when sending job offers, the system does not accept certain special characters (such as ‘).
If your message contains an invalid character, an error pop-up will appear. The system will highlight the invalid text so you can easily identify and correct it before resending the message.
💡Tip: Using the Exclude By filter before sending offers ensures that you only message crew members who are available and not recently offered or booked elsewhere.
8.0 Messages
Messages is a live online communication platform that allows you to communicate with managers, crew and clients. Click the Messages tab at the top of the page.
This will open the live messages (Chat).
8.1 Create Group
Creating a Group allows you to send messages to your team members added in the Group Messages.
To create a Group, Simply click group message icon on the upper right of the live messages. Enter a name for the new Message Group and assign members to the group. You may also use the search box to search for the Clients, Duty Managers and Crews. Once done selecting the members in the group, click the Create button.
9.0 Crew & Client Profile
Crew and Client Profiles is where their information is stored. It can be edited at anytime.
9.1 Crew Profile
The Crew profile has the following fields.
Overview – Crew Notes – Files Pending Approval – Personal Details – Resume/ CV – Address – Banking Details – Super Fund Details – TFND – Emergency – Recruitment Info – Send Messages – Crew Status – Experience / Reliability – Business Association – Client Association – Categories – Crew Groups – Available Activities – Activities Tags – Warnings – Citizenship Status – Expiry Date Warning – Exceed Weekly – Exceed Shift – Qualifications – Training – Inductions – Visas – Personal File – Permanent Files – Additional Information – Crew Ticketed List – Agreements – Contracts Invite Contracts – Actions –Invite action – Forms
9.1.2 Crew Profile Overview
In order to access a Crew Profile Overview, select Crew List from the Contacts tab, located in the Central Navigation Bar.
Once you have access to the Crew List, select the edit icon, located on the far right column of any crew profile row. Once selected, you will be taken to the Crew Overview Page, click the Edit icon beside it.
The Crew Overview sub headings are located to the left of the screen. The green eye icon that appears next to each heading indicates that the section will be displayed on the Crew Profile Overview once the editing function has been exited and the Profile is in viewing mode.
The Info icon in a crew profile provides details about a specific crew member. This icon, often represented by a small “i” in a circle, can be found on the crew profile page. When you click on it, a pop-up or side panel appears, displaying information.
Start Date: This marks the date when a crew was initially confirmed for a shift.
Last Updated: Indicates the date when the Crew Profile information was last updated.
Last Logged in: Records the date of the crew’s last login to the app.
Last Worked Date: Displays the date of the crew’s most recent confirmed shift.
Activated: Shows the date when the crew was activated from the Recruitment process.
Added: Displays the date when the crew was manually added to the Crew page without going through the Recruitment process.
To hide a sub heading from the menu in viewing mode, select the eye icon and it will turn grey with a line through it. Once you select ‘Save’, the heading/s and the information respective to it will no longer be visible when viewing the Crew Profile Overview.
Updating or changing the business field on the crew profile will trigger a warning if the crew has shifts penciled/confirmed to a business, has not yet been paid, or has a future shift with that business.
Crew members are not allowed to add quotation marks in their banking details, specifically in the Account Name field and in the TFND Name field. If users include a quotation mark, a warning pop-up will indicate that this action is not allowed. Since this is not allowed, the quotation marks will not be saved either.
9.1.3 Last Work Date of Crew
Click on Crew List in Contacts under Crew to go to the Crew List page.
Choose a crew and click on the Edit icon located under Actions to be redirected to the Crew Profile page.
Users can conveniently retrieve their “Last Work Date” details on this page, accessible within the ‘Profile Info‘ section. The shift associated with the “Last Work Date” is a shift that has already passed, it does not account for future shifts that have been confirmed.
9.1.4 Performance of Crew Calculation
The overall performance rating of a crew member is a measurement by the performance of the crew in terms of experience, crew rating/feedbacks, and reliability. Each crew member is awarded a score out of 100 that is derived from a combination of their star rating (out of 5), experience level (out of 5), reliability level (out of 5) and recent activity level (out of 5) with the formula weighted most heavily on their recent activity level rating.
Star Rating: Star ratings default to a rating of 2DF for crew members not yet rated (DF = Default). Once they are rated in the calendar or app, they will earn an average star rating.
Shift Acceptance Rate: The shift acceptance rate displays the average acceptance from crew. It shows acceptance rate within 30 days, 90 days, and 14 days.
Experience: In the dropdown menu for experience, select 1, 2, 3, 4, 5. If you select default for the experience, the rating will be calculated automatically.
Experience Levels are 1 – 5 from least experienced to most experienced. This is defaulted to the total hours crew have worked in the system and are calculated as follows: Level 0 – 0 Hrs Level 1 < 100 Hrs Level 2 100 – 200 Hrs Level 3 200 – 500 Hrs Level 4 500 – 1000 Hrs Level 5 > 1000 Hrs
Once the default setting has been replaced, the experience level will no longer display DF for default.
Example: if a crew member with a lot of industry experience came to work for Show Support, then a level of 1 would not be appropriate and would adversely affect their score. In these cases, we can assign a higher level, such as 4 or 5. The DF will no longer appear after the number to display that the experience level has been manually updated.
Reliability: Reliability rating from the dropdown menu. Reliability levels are 1 (least) – 5 (most) reliable. Reliability levels default to 5 for all crew. Reliability levels MUST be updated manually (under experience/reliability in their crew profiles) as follows: Level 5 – No blow outs, no lateness, perfectly reliable. Level 4 – 1 Blow Out and/or 2 Times Late in the last 12 months Level 3 – 2 Blow Outs and/or 4 Times Late in the last 12 months Level 2 – 3 Blow Outs and/or 6 Times Late in the last 12 months Level 1 – 4 Blow Outs and/or 8 Times Late in the last 12 months
Bias: Aside from experience and reliability, you can also enter bias in the crew profile page. Only admin has access to this feature. If you are using a different login credential, this option will not appear. Enter the value of bias in the provided field.
Recent Activity:
Recent Activity Levels are 0 (least) – 5 (most) active. Recent activity is based on the number of hours a Crew member has worked in the last 60 days. Level 0 – 0 Hrs Level 1 – 0 – 75 Hrs Level 2 – 75 – 150 Hrs Level 3 – 150 – 250 Hrs Level 4 – 250 – 340 Hrs Level 5 – 340 Hrs
Ranking Using Crew Score:
You can order ranks by hours, score or inactive.
Score
Bias
Hrs – Total Working Hours of the Crew
Hrs 7 – Total Working Hours of the Crew within a week
EXP – the experience rating
REL – the reliability rating
REC – the recent activity rating.
9.1.5 Blocked Crew
CrewCard automatically blocks crew members based on compliance and eligibility criteria. When a crew member is blocked, they cannot be assigned to new shifts until the issue is resolved. Automatic Blocking Triggers
crew member may be automatically blocked if:
Qualifications have expired (e.g., licences, trade certifications, tickets).
Mandatory documentation is missing or expired (e.g., WHS induction, contracts, insurances).
Visa or work rights have expired or have not been uploaded/verified.
Required fields are incomplete in their profile (e.g., ID details not provided).
Impact of Blocking
Blocked crew cannot be assigned to shifts.
Crew remain visible in the system but show as Blocked until compliance is restored.
Once the missing or expired item is updated and verified, the block is automatically lifted.
Note that you can also manually block crew by clicking on the active button.
A Popup will appear where you would have to fill in the details of the blocked crew.
Handling Blocked Crew Shift Offer Responses
The Blocked Crew Shift Offer Responses setting controls how blocked crew members can interact with shift offers they received before being blocked.
How It Works
When Enabled; Blocked crew members cannot reply to any previous shift offers (via email or SMS).
When Disabled; Blocked crew members may still reply to shift offers they received before being blocked. However, they will still not receive any new shift offers.
In All Cases
Blocked crew members do not receive portal messages.
Blocked crew members do not receive new shift offers once they are blocked.
How to Use This Setting
This option is managed at the system level. If you would like this setting enabled or adjusted, please contact support@crewcard.cofor assistance.
9.1.6 Address
Address Type: Crew can select between the options of Residential Address or PO Box
9.1.7 Activities Tags
Activities tag is an additional field in the Crew Profile page. Administrators, Duty Managers, Managers can access this page, but not within Client/Crew access. Crew tags are identification marks so that you can easily recognise a crew.
9.1.8 Warning Message
Warning Dev allows you to send announcements or warning messages to your crew members separately via email or push notifications.
To begin, navigate to Settings and select the warning option.
Simply click the Add Warning Template button to add a Warning Template. A new window will appear.
If you want your crew to receive the Warning message via email, select Email; otherwise, select APP to receive it via push notification. You can also select both checkboxes if you want your team to receive it via email and push notification.
Warning Title: Enter the title of the warning message
Messages: Enter the content of the warning message
Save button: To save the changes, click Save.
X button: To close or cancel, click the X button.
After you save the warning message, it will appear in the warning template lists, as shown in the screenshot below.
It will also allow you to edit or delete the warning you have created on the Warning Page. Click the Edit icon to modify the warning template. Alternatively, you may click the delete icon to delete the warning template.
Once the Warning templates have been created, navigate to the Crew List Page. Click the edit icon to select the crew of which you want to send the warning message to.
Select warning from the crew profile page to go to the warning section.
Select the Warning message from the dropdown list to see the warning template you created in the warning settings.
If you want to create a new warning message, click the Send Warning Message button. Fill out the form and click the send button.
Once the warning message has been sent, a pop-up will appear in the upper right corner of the screen stating “Warning sent successfully,” and the record will appear in the warning logs.
Crew will receive the warning message when they log in to their crewcard app. If the admin sends multiple warning messages, crew will receive consecutive warning messages when they log in to the app.
9.1.9 Encryption of Banking and Super Details
CrewCard has instilled encryption at rest for the banking and super details of crew members in order to add an extra layer of security. Encryption at rest is designed to protect data that is stored on a disk or backup media. Only Duty Managers are able to see the details provided. For users other than the Duty Manager and the Crew member themself, the information presented in the crew profile is hidden.
9.1.10 Crew Profile Photo
To add a Crew Profile Photo, first navigate to the Crew Profile section and click on “Personal Details” in the side menu.
Then, locate the “Upload headshot” section below the “App Invite” and upload up to three images.
If needed, an Admin can delete the Profile Photo by clicking the “x” button.
A pop-up confirmation will appear, asking for confirmation to delete the Crew Profile Photo. Click the “Delete” button to confirm the deletion. Alternatively, you can select the “Cancel” button to abort the removal of the Crew Profile Photo.
Please keep in mind that Admins can only upload up to three Crew Profile Photos. If the Admin attempts to upload more than three, a pop-up message will appear stating, “Maximum number of headshot image limit reached. Please delete an image before uploading a new one.”
9.1.11 Export Crew Notes
To export crew notes into a PDF format, first access the Crew Profile.
Then, navigate to the Crew section and click “Export to PDF”
After the system generates the PDF file, open it with a PDF viewer to access the crew notes.
9.1.12 Business (Auto-Mapping Crew to Business) The Auto-Map Crew to Business feature ensures that when a crew member accepts a shift for a Business (client/company) they are not yet mapped to, the system will automatically link them to that Business. This saves time and avoids manual mapping.
How It Works A shift is reassigned to a different Business > The crew member accepts the shift.
If the crew is not already mapped to that Business, the system will automatically add the mapping.
Auto-mapping is triggered no matter how the crew accepts the shift:
✅ Email acceptance – by clicking the acceptance link in the email notification.
✅ App acceptance – by confirming the shift directly through the Crew App.
✅ SMS acceptance – by replying with the acceptance code.
Important Notes
If the crew is already mapped to the Business, no new mapping is created. The feature runs automatically in the background—no extra steps are required from admins or crew.
9.1.13 Restricted Notes and Files
The purpose of this feature is to provide exclusive access for Admins and Duty Managers to discrete and confidential information about a Crew Member in the form of Notes and Files that is best kept hidden from ordinary office staff that have access to CrewCard / PM as Duty Managers or Admin.
As a Duty Manager or Admin, you can log in and access the crew profile to gain access to restricted notes and files. However, it’s important to note that permission to view these fields will only be granted to individuals who have been specifically authorised to do so.
To access the restricted notes and files, follow these steps:
Open the crew list and locate the “Edit” button.
Once you are on the crew overview page, scroll down until you find the “Restricted” tab.
Alternatively, you can close the crew overview dropdown to reveal the “Restricted” tab.
If you have been granted access to the restricted notes and files, you will be able to view both pages as depicted in the provided screenshot.
Restricted Notes
To add a restricted note, follow these steps:
Click on “Add Notes” and enter the title of the note.
Provide the specific information intended for the crew in the note.
Once done, click “Save” to save the note.
The created notes will include a history indicating who created them and when they were created. If someone else updates the notes, a history icon will appear, and a pop-up will display the updated notes’ history. It will list the relevant information about the modifications made.
To delete a note, follow these steps:
Tick the checkbox next to the note you wish to delete. (Please note that only the user who adds the notes can delete it; other users cannot delete the notes created by someone else.)
Click on “Delete” to remove the selected note.
To access the deleted notes, follow these steps:
Click on “Deleted Notes.”
The page will display all the deleted notes for your reference.
Restricted Files
To add a restricted file, follow these steps:
Add a description for your file.
Upload the file to the designated area.
The uploaded file will be displayed at the bottom along with the upload history, including information about who uploaded the file and when.
To delete a file, follow these steps:
Simply click on the bin icon next to the file.
(Please note that only the user who uploaded the file can delete it; other users cannot delete files uploaded by someone else.)
Alternatively, to delete multiple files:
Tick the checkboxes next to the files you wish to delete.
Click on the “Delete” button to remove the selected files.
To access the deleted files, follow these steps:
Click on “Deleted Files.”
All the deleted files will be displayed for your reference.
To Grant Access
To grant Restricted Notes and Documents access to your Duty Manager, follow these steps in the Admin Settings (Only available for Super User/ Admin login):
Open the Admin Settings and navigate to the Duty Manager tab.
Locate settings number 67A to grant access to Restricted Notes.
Proceed to settings number 67B to grant access to Restricted Files.
Depending on your preference, you can assign a specific Duty Manager to access both features or assign separate Duty Managers for each feature7.
9.1.14 Display in Timesheet where Crew Member was removed
This functionality allows users to view details of shifts from which a crew member was removed. The information is displayed in the Timesheet page under the “Approved Total” section when enabled.
The Timesheet page will display a section titled “Shift where crew members were removed” below the Approved Total section.
The details displayed are sourced from the system logs where crew removal is recorded.
Navigate Go to the Jobsheet or Events Page>>select the Booking Tab. To remove a crew member from a shift, click the X icon.
A pop-up will appear asking for the reason to remove the crew member from the shift. Enter the reason in the provided field.
Choose the reason for removing the crew member and select the notification channel (SMS, EMAIL, or APP) through which the crew will be informed of the removal. Once you’re finished, click the OK button.
Navigate to the Timesheet page, and below the Approved Total section, you will see the details of the shifts and the reason for the crew’s removal.
Note: The payroll processing in the system is handled on a weekly basis. As a result, the date range for payroll calculations is structured in a weekly format, for example:
Jan 06 to Jan 12 – It’s important to note that the actual date of removal for records in the system should align within the selected date range on the Timesheet page. For instance:
If the selected date range on the Timesheet page is Jan 06 to Jan 12 any removal or adjustments should be effective within these dates.
9.2 Client Profile
A client profile has the following fields.
Client Details: Enter client’s details
App Access: Create a login for the client and press ‘Invite’ to email their details
Address: Office address
Billing Address: Enter address if different to office address
Account Details: The contact for anything accounts-related
Primary Booking: The contact who manages booking
Online Booking: Tick box on/off to allow client to make their own booking
Email Templates: Edit clients own email template based of CrewCard template
Invite Contracts: Invite client to sign a contract
Crew Groups: If need to assign crew
Preferred Crew: Shows which Crew clients prefer to work with
Business Association: If need to assign the client to business/es
Additional Information: Please go to settings to edit, see guide 4.7.7
Clients Discounts: Please see guide 6.5
Client Venues: Venues for the clients
Activities: Activities for the client
Press ‘Save Details’ at the bottom of the page.
9.2.1 Default PO No./ Name of Event
This feature allows users to pre-fill the PO No./Name Event field for jobs based on values saved in the Client Profile, automating job creation and improving consistency. Please contact our support team at support@crewcard.co if you would like this setting to be enabled.
Go to Client Details where you find the field labeled “ “Default PO No./Name of Event:” where you can enter the desired value into the text box
Once done, click save.
Once the Default PO No./Name of Event setting is enabled and a value is entered in the client’s profile:
Auto-filled Field During Job Creation: When a job is created for the client (either by admin or by the client via the portal), the PO No./Name of Event field will automatically display the default value saved in their profile.
Editable at Job Level: The pre-filled value can still be manually edited during job creation if a different PO or event name is needed for a specific booking.
Client-Specific Entries: Each client can have a unique default PO No./Event Name stored—this helps standardize job records and improve invoicing accuracy.
9.2.2 ABN Check
ABN can be set to be a mandatory or optional field in the client profile. Please email support@personnelmanager.com.au. Once activated, the check ABN button will be activated and can be used to check the ABN details of a company. Enter the ABN on the provided field and click ABN Check. If the ABN is invalid, a warning message will appear.
The name of the company will appear. You can select accept or cancel
9.2.3 App Update
If the client’s login details have been changed or the client is unable to log into the app, the details will need to be updated. On the client profile overview, press update app, and this will refresh their login details.
When adding clients and/or supervisors to the system, if you attempt to register a client or supervisor that shares the same number as one that already exists, an alert will pop up on the screen. You will not be able to register the client and/or supervisor.
Adding sub-clients to main clients
The new Sub-Client feature allows the Main Client to log in to multiple accounts using the same email and password. When creating sub-clients, the system automatically pre-fills the email, password, and mobile number from the main client for added convenience. However, sub-clients also have the flexibility to use their own email and password if they prefer, allowing them to maintain individual login credentials.
The main client will have access to view all jobs assigned to its sub-clients. This ensures comprehensive oversight of all activities managed under the master account.
After filling out all necessary fields, click Save & Open Profile to be redirected to the newly created sub-client page. On this page, you can make additional updates to the sub-client’s details as needed. Once all updates are completed, click Save to confirm the changes.
Viewing Sub-clients: Sub-clients are displayed under their respective MainClient in a dropdown menu. Expand the dropdown by clicking the arrow beside the Main Client’s name to view associated sub-clients.
Sub-Clients cannot access jobs assigned to other Sub-Clients, ensuring confidentiality and restricted access. Main Clients are the only users with oversight of all jobs across sub-clients.
Sub-clients should use their short name along with their password to log in to the portal.
9.2.4 Client Discount
Associated Discount
Select Associated Discount if you want specific client to have a default discount. Discount can be created in discount page.
Apply GST
To apply GST to an Invoice for a specific Client, Tick Apply GST checkbox.
Default Attach PDF on Invoice
To simplify the process of attaching a PDF file to an invoice, CrewCard provides an option to set a default PDF attachment for certain clients. To do this, go to the client’s profile and select the “Attach PDF to Invoice” checkbox.
This setting will make the attached PDF the default attachment for all future invoices sent to that client. By enabling this option, the admin will no longer need to manually select the PDF attachment each time they create an invoice for that particular client.
9.2.5 Client Qualifications
Qualification Mapping to Clients in the CrewCard
When a qualification is mapped to a client in the Crew Card app, it acts as an additional filter to ensure that only crew members with the required qualifications for that client are displayed during the job booking process. This functionality helps streamline recruitment by matching qualified crew with client-specific requirements.
To map a qualification to a client profile, navigate to the client’s profile and select Client Qualifications. This will take you to the qualifications section, where you can select any qualifications under the Available Qualifications column and move them to Qualifications Under This Client using the right arrow key. Click Save to associate the selected qualifications with the client profile.
Conditions for qualification mapping:
The qualification must have an approved status. This ensures that only verified and valid qualifications are considered for the mapping.
The qualification must not be expired based on the shift’s end date/time, not the current date/today (only if the expiry is not ticked in the settings, as shown in screenshot ).
9.2.6 External Instructions and Directions integrated to Job Booking using Additional Information in Client Profile
This feature allows users to store External Instructions and Directions within the CrewCard system. When the system detects a custom field labeled as External Instructions and Directions, it automatically displays this information during job bookings. This functionality streamlines the booking process by ensuring critical instructions and directions are easily accessible and seamlessly integrated into job details.
Navigate to the General Settings section on the main dashboard.
Select the Custom Fields option, where you can create fields that will appear under Client Profile >> Additional Information.
Enter the External Instructions and Directions into the custom field and save the changes.
Conditions:
If the label is only “instructions” without “external,” it won’t auto-fill in the job booking. It should be labeled as “External Instructions” and “Directions,” as shown in the screenshot above.
If multiple fields share the same label (e.g., two fields labeled “Directions”), the system will auto-fill the booking with values from all such fields.
Custom fields will appear under Client Profile >> Additional Information, allowing you to store specific instructions and directions for each client.
When an Admin or Client creates a job booking, the information will display on the Job Booking Page >> Final Info under Notes for Crew (visible to crew).
It will also reflect in the Jobsheet Page >> Crew App Notes (editable by the client).
Crew members can access these External Instructions and Directions in the CrewCard App >> Job Details Page below notes section.
This ensures crew members always have the necessary details at their fingertips.
9.2.7 Admin Access to Update Client XERO ID
When this setting is enabled:
The Xero Client ID field in the Client Profile becomes editable for users with Admin access.
When the setting is disabled, Admin accounts will still be able to view the Client XERO ID section, but the field will be greyed out and not editable.
Please contact us at email us at support@crewcard.co to provide admin users to update the Xero Client ID field in a client’s profile.
9.3 Contracts
Crew members are sent an email invitation to accept contracts. They simply open the contract from a link in the email, review and sign it with their finger and then press submit. The final copy is emailed to the staff member and to Admin as a PDF attachment and is permanently stored in the CrewCard system.
The process of creating contracts in CrewCard is very easy. Each contract can be added in under one minute or as long as it takes to enter the contract name, copy and paste the content, select a signature block and press save. Assigning signature blocks to your contracts means they are ‘pre-signed’ by the authorised representative from your organisation, so only the recipient needs to sign and submit. Different contracts can be saved with different signature blocks.
For example, a manager’s name, position and signature can be preloaded into the contract as a signature block so they will not need to sign each time the contract is executed.
How to Add Contracts
To create contracts, go to Settings and select Contracts in the side left menu.
Create a Signature
You will need at least one Signature to be able to create a contract.
To add a signature, click + Add Signature in the top left of the page. Complete the three required fields: Signature Block Name, Manager Name and Job Role. Signature Block Name refers to the name of the Signature that will be added to the contract as the signatory from your organisation. Manager Name refers to the name of the person signing – e.g. John Smith – and Job Role refers to the position of the manager signing – e.g. General Manager. The last field is the signature itself where the manager must sign using their mouse or touch screen to get the closest result possible to a hand-drawn signature.
You may save several signatures in your Contract settings for different managers to be added to different contracts, but you can only add one signature to a contract. For example, you might have two contracts, one to be signed by the General Manager and another to be signed by the Managing Director, with the signatures for the correct manager applied to each contract.
Once a signature has been created and saved, it will appear in the Signature list below the Add Signature section from where it can be edited or deleted.
Create a Contract
To add a contract, click the + Add Contract button below the Signature List.
Simply fill in the Title with the name of the contract and copy and paste the main content of the contract into the text editor below. Then, select a Signature from the drop down and press Save.
For employment contracts, you can insert the Activity Details by inserting the placeholder [ACTIVITY_DETAILS] at the desired place inside the contract. This will automatically pull in the Activity, Activity Description and Minimum Rate of the various Activities that have been assigned to crew members or recruits. Note, you will need to ensure the correct Categories and Activities have been assigned for this feature to function correctly. See Activity Descriptions in the User Guide for more information.
Once a contract has been created and saved it will appear in the Contract list below the Add Contract section from where it can be edited or deleted.
How Contracts are signed
There are three methods for getting contracts signed and saved in CrewCard.
Recruit Contracts
Employment contracts that may be required to be accepted by new staff members as part of their onboarding process can be included via the Recruitment module. Go to Settings > Recruitment in the left side menu then scroll down to the Contract section. Select the desired contract from the Choose Contract drop down and then press Save Contract. Once contracts have been saved, they appear in the Contract form list and can be deleted if required.
Recruits are onboarded in their Crew Portal Profile where there is a Contracts page that is optional for inclusion by the Administrator as some users may prefer to include the contract in the Agreements page.
A recruit may locate, read and sign the contract during their onboarding process by following the steps from registration through to entering their accounts details. Recruits may also be invited to sign a contract by clicking the Invite Contract button at the bottom of the Contracts tab inside their Recruit Card in the Admin Portal.
Invite Contract will send a Contract Invitation email to the recruit with a link to the contract page of their Crew Portal Profile indicated by the Click Here button in the email. Once inside the Contracts page, the Recruit selects the contract to open, review and sign on their mobile device (or use their pre-saved signature) and press the Submit button at the bottom.
Once the contract has been signed by the recruit, the physical contract is generated as a PDF attachment to an email sent both to the recruit and to Admin. The PDF displays the name, details and address of the staff member and the signature blocks of both the staff member and the manager. Additionally, the contract PDF is permanently saved to the Crew Profile of the recruit to be accessed at any time.
2. Invite Contract for Crew Members
Crew members can be invited to accept contracts from within their Crew Profile in the Admin Portal. Go to Contacts > Crew List > Edit Crew Profile (right of screen) > Invite Contracts (side left menu). Select the desired contract from the drop down menu and press Send Invite.
Invite Contract will send a Contract Invitation email to the crew member with a link to the contract page of their Crew Portal Profile indicated by the Click Here button in the email. Once inside the Contracts page, the crew member selects the contract to open, review and sign on their mobile device (or use their pre-saved signature) and press the Submit button at the bottom.
Once the contract has been signed by the crew member, the physical contract is generated as a PDF attachment to an email sent both to the recruit and to Admin. The PDF displays the name, details and address of the crew member and the signature blocks of both the crew member and the manager. Additionally, the contract PDF is permanently saved to their Crew Profile to be accessed at any time.
3. Invite Contract for Clients
Clients can be invited to accept contracts from within their Client Profile in the Admin Portal. Go to Contacts > Clients > Edit Client Profile (right of screen) > Invite Contracts (side left menu). Select the desired contract from the drop down menu and press Send Invite.
Invite Contract will send a Contract Invitation email to the client contact with a link to the contract page of their Client Portal Profile indicated by the Click Here button in the email. Once inside the Contracts page, the client contact selects the contract to open, review and sign on their mobile device (or use their pre-saved signature) and press the Submit button at the bottom.
Once the contract has been signed by the client contact, the physical contract is generated as a PDF attachment to an email sent both to the recruit and to Admin. The PDF displays the name, details and address of the client contact and the signature blocks of both the client contact and the manager. Additionally, the contract PDF is permanently saved to their Client Profile to be accessed at any time.
9.4 Actions Forms
Actions Forms are custom online forms for your staff to complete.
CrewCard offers as many online forms as you need, to help you manage your business.
For example, you may need pre-start safety checklists, or office inductions, workplace inspections, or equipment sign-out forms. CrewCard can tailor such forms with checkboxes, text fields, images, links, checkboxes and yes or no questions for your staff to complete, sign and submit using their mobile device. In addition, any of your company policies, documents, SWMS and Toolbox Talks can also be included in these forms, providing you with fully fledged and dynamic safety inductions for every occasion.
The possibilities for potential Action forms that can be added to your CrewCard system are as endless as your imagination. Furthermore, these forms are linked to your scheduling system for staff to complete when required. They are all conveniently saved in your CrewCard Admin Portal once completed as proof of acceptance and a helpful Admin email to let you know. CrewCard’s Actions forms automate your workflow by saving you from having to remember and follow up all the various agreements staff have to complete during the course of their work.
Actions are responsive web pages that can be accessed by your staff in their Actions page, emailed either manually or automatically with a link contained in the body of the email, prompting the recipient to open the page and complete the form. The link is authenticated to log the crew user directly into their Crew Portal to complete, sign and submit the form. Once the form has been completed, an email is sent to Admin with proof of the agreement and the completed form is saved inside the Crew Profile in your Admin Portal, along with the staff’s signature. The forms can also be accessed from the Forms Matrix, so that any agreements made by staff will be saved permanently in your CrewCard system.
Actions forms can be emailed manually at any time from within the Crew Profile in the Admin Portal and located using the side menu Invite Action option. Simply select the Action from the drop down list and then click Send Invite to manually trigger the email to be sent to your crew member.
Skills Automated Actions emails can be programmed to be sent to crew members according to their skills, such as labourer or delivery driver. One or several skills (activities) may be selected, or if all skills in the event the form applies to everyone in your organisation.
Frequency Forms can also be provided to staff at certain programmed times, such as the first time they are confirmed on a shift, or every time they are confirmed, monthly, quarterly, every six months or every year. For example, you may have a Forklift Induction that needs to be sent to a Forklift driver prior to their first shift, or you may require staff to complete a questionnaire every year to prove they are up to date with your latest policies and procedures. The best thing about using CrewCard for your forms is that it is connected to your rostering and scheduling solution, so Actions are only sent to staff as and when required, when they are booked. What is the point of emailing an induction reminder every 12 months to a staff member that no longer works for you?
Simply contact the CrewCard team with your requests for custom paperless forms and we will have them integrated into your platform ASAP. Simple forms can be produced on the same day, complex forms may take a bit longer.
See more examples of Actions forms below:
Onsite Registration Forms
Paperless Check In Forms
Safety Inductions
Office Inductions
Request Forms
Feedback Forms
Handover Forms
Medical History Form
Course Registration
Skills Training
Competency Assessment
Safe Work Method Statements – SWMS
Toolbox Talks
Incident Report Forms
Quizzes and Questionnaires
Jobsite Safety Inspections
Sign Up Sheets
10.0 Settings
10.1 Admin Settings
Key: A
The following settings enable the user to customise CrewCard to meet their unique needs. Admin settings is only accessible for the admin of the account, as they have the ability to make set changes. To access, click Superuser in the top right-hand corner.
A drop-down menu will appear. Click Settings.
This will take you to all settings. View the menu bar on the left and click Admin Settings.
NOTE: When making updates to a setting, press ‘save’ which is located at the bottom of the page.
10.1.1 Accounts Details (for Invoices)
Below is an example invoice using the following settings to set up the company’s account details.
1. Payment Terms: X amount of days can be set for invoices which will appear as “Payment Terms: 7 days from date of invoice.”
2.Payment Grace Period: “X” amount of days after sent date before the interest is charged.
3. Percentage Interest: Interest rate can be set here (per annum).
4. Management Tax: Select to apply management tax by default.
There are 2 options for adding a Management Tax (or any extra charge) to tax invoices as either a percentage (%) or a flat amount, even if you do not select a Management tax amount in global settings. When you open a Tax Invoice (Ops Home > [any Invoice number]) at the bottom right-hand side of the invoice, click the “Apply Management Tax” checkbox (it will be whatever name you enter in the global settings page) and enter the amount % or flat rate to add to the invoice.
For Example: If you wish to add a Credit Card Surcharge to your Tax Invoices, you could change the Management Tax Name to Credit Card Surcharge in global settings. Even if the checkbox in global settings for management tax is not selected, when you open the Tax Invoice you can tick the checkbox at the bottom right-hand side, enter the amount of the surcharge and Send Invoice.
5. Management Tax Name: Name of Management Tax can be assigned here, i.e: Credit Card Surcharge
6. Management Tax Amount: Enter the amount you wish to charge extra on all tax invoices. If you add a % after the amount, the amount charged will be a percentage. If you do not include the % then the amount charged will be a flat rate. Include a negative sign “-” before the amount and it will deduct this amount from the invoice.
7. Merchant Fee: Select to apply merchant fee by default
8. Merchant Fee Name: Name of fee to be used throughout software
9. Merchant Fee Amount: Amount of fee to be applied (include % sign to use a percentage of invoice total)
10. Bank Account Fee: Select to apply bank account fee by default
11. Bank Account Fee Name: Name of fee to be used throughout software
12. Bank Account Fee Amount: Amount of fee to be applied (include % sign to use a percentage of invoice total)
13. Untick merchant and bank fee by default: Select Yes or No
14. Extra GST: Default (10%)
15. Accounts Email Address: Enter the email of the person responsible for the accounts in your company.
16. Bank Name: Enter company’s bank name
17.Business Account Name: Enter company’s account name
18. Business Account Number: Enter company’s account number
19. BSB: Enter company’s BSB number
20. Bank Country Code: This code is for international transfers, enter the code if relevant
21. Add Bank Details to Invoice: Tick box to show bank details on invoice
22. Transaction Description Code: To export ABA files
23. Bank Abbreviation: If your bank has a shortened name, enter it here
24. APCA Number: Enter your number for Direct Debit payments
25. Invoice Code: a significant code can be given to appear in every single invoice
26. From Address: “From Email Address” for quotes and invoices
27. Reply Address: “Reply Email Address” for quotes and invoices
28. Email Address for Crew Update in Account Details:
10.1.2 Administrator User Login Details
Admin username and password can be edited here:
10.1.3 Company Details
Use this section to enter your company details for the website. This will replace the default text in the software.
31. Company Name: Enter your company’s name
32. Company ABN: Enter your company’s ABN
33. Street: Enter the office street
34. Suburb: Enter the office suburb
35. State: Enter the state the office is located in
36. Postcode: Enter the office postcode
37. Email Address: Enter the company’s main email address
38. CC Email Address: Enter an email address to be CC’d on all emails
39. Phone: Enter the contact number for the company
40. Fax: Enter the company’s fax number
41. Mobile: Enter the company’s mobile number
42. Contact Person: Enter the point of contact within the company
43. Contact No.: Enter the contact person’s number
44. Contact Email: Enter the contact’s person’s email
The following settings will be display at the bottom of the page.
45. Footer Email Address: Enter a contact email address
46. Footer Website Address: Enter your company’s website
47. Term of Use Url: Link here your Terms of Use policy
48. Privacy Policy Url: Link here your policy
49. To change the logo: 1. Go to settings
2. Navigate to Admin Settings
3. Select Company Details
Tip: For best results – please use image format JPEG/GIF/PNG/TIFF/EPS to upload.
This will change the following image in the software:
50. To change the Background Image on the Login/Sign Up page: 1. Navigate to Admin Settings
2. Select Company Details
3. Click Choose File in 46. Profile Icon and upload your image file from your computer Tip: For best results – Upload a JPEG/GIF/PNG image.
This will change the background image on the login and sign-up:
51. To change the Profile Icon: 1. Navigate to Admin Settings
2. Select Company Details
3. Click Choose File in 45. Background Image and upload your image file from your computer
Tip: For best results – Upload image formats JPEG/GIF/PNG/TIFF/EPS.
This will change the following image in the software:
52. Help Text: Write the text for the pop-out windows users will see when they click the question mark. Please below the example.
53. Header Colour Code: Enter known colour code, it will change header colour
54. Footer Colour Code: Enter known colour code, it will change footer colour
55. Footer Site Name: Name of the company
56. Website Tagline: A brief catchy slogan for your company.
57. Email Tagline: The slogan that goes out on every email.
Important Note: In settings page “Site Name” punctuation is NOT to be used, as this will cause error for crews when receiving emails.
FAQ: Why I am not receiving emails after locked-off shift, even when I setup different emails for crew online lock off email alerts?
Please check the following:
Sent the businesses a “crew online lock off” email
The crew name is not in the section “Crew that CANNOT accept Shifts in their “Crew Area””
‘Site Name’ punctuation is not used
Make sure to ‘Save Configuration’ before exit
10.1.4 Superuser
57. Superuser: A Superuser in CrewCard is an individual or team with elevated privileges and responsibilities. Superusers are entrusted with managing various aspects of the CrewCard platform to optimise workforce scheduling, job assignments, and user access.
Select the crew members you would like to grant Superuser access or privileges.
To assign Superuser status to a crew, click on the crew member’s name and then click the right arrow (>) to transfer their name from the unassigned list to the “Assigned Superuser” list. This action designates them as Superusers.
10.1.5 Managers
Admin has the ability to assign crew/staff as duty managers with access to different parts of the system. There are 3 different groups you are able to create with different access levels.
Tip: The crew/manager login will only access to the selected function from the Duty Manager Access list.
Note: Group 1 has the ability to access global settings.
Once the crew is selected to have duty manager access, their login details is the same as their crew login. When crew need to login as duty manager, select “Duty Manager” user type on the login page. When crew need to access as a crew member, crew need to logout and login again as ‘crew’ user type. When admin makes changes to the duty manager access, it displays in shift history:
Note: There are some functions only accessible by admin.
In the Admin Settings, an informational text is displayed under the Duty Managers section to clarify access permissions.
59, 61, 63. Assign Duty Managers: Select from the list of crew you wish to assign as duty manager(s)
60, 62, 64. Manager Access: Check/Uncheck the access you want the duty managers are allowed to use.
Select the Allowances check box in order to allow for Duty Managers to access Allowances. Select Save to confirm your changes. Now, the Allowances title will appear and be available for selection in the side menu within the Duty Managers profile.
Select the Billings check box in order to allow for Duty Managers to access Allowances. Select Save to confirm your changes. Now, the Billings title will appear and be available for selection in the side menu within the Duty Managers profile.
Below: Duty Manager profile.
Tick the check box named Client Edit in order for the Duty Managers selected to have access in editing client details. When unticked, the duty manager will be taken to a page that states they do not have access to the client edit. The page informs them to contact the admin for more information.
This feature allows Duty Managers (levels 1, 2 and 3) to view and access the Rank of crew members across various parts of the system. Visibility of this field depends on whether the “Rank” tickbox is enabled in the Duty Manager Settings.
To enable this feature, navigate to Admin Settings > Duty Manager Setting Access. Under the section for Duty Manager 1, 2 or 3, locate the ‘Rank’ tickbox. Tick this box to allow the selected Duty Manager level to view crew ranks across the system. Once done, make sure to save your changes to apply the new access setting.
The ‘Rank’ will then be visible on pages where crew details are displayed or selected, such as the Scheduler page, Offer Message, Jobsheet crew dropdown, Crew Profile, Crew List, and other pages related to crew compliance and ongoing jobs. If the tick box is unticked, the Rank field will not appear on these pages and will remain hidden from view for the assigned Duty Manager level.
Just like in other manager access settings, users are only allowed to assign each crew member to one Duty Manager Group at a time. If you attempt to assign the same crew member to multiple groups, an error message will appear stating: “Error: Crew can only assign in one Duty Manager Group. Please try again.”
This ensures that crew permissions remain consistent and avoids conflicts across different duty manager levels.
Sensitive Information Feature
The ‘Sensitive Information’ feature is a new access control setting added to both Duty Manager sections under Admin Settings. It allows administrators to manage which Duty Manager groups have access to private and confidential data-related information.
To access sensitive information or restrict access, Navigate to the sidebar menu and click on Admin Settings. Select the Duty Manager tab. Each group listed under this tab now includes a new checkbox labelled ‘Sensitive Information’. Next to the checkbox, you’ll see an Edit icon.
Ticking the checkbox allows users in the selected group to view sensitive data.
Unticking it restricts their access to such information.
Clicking the Edit icon next to the ‘Sensitive Information’ checkbox opens a detailed view.
This view displays a list of all items classified as sensitive.
Choose the sensitive information you want the Duty Manager to have access to, then click Save.
When the Duty Manager logs into the portal, this ensures that each Duty Manager sees only the data they are authorised to view—nothing more.
These fields are considered highly confidential and are typically related to payroll, taxation, and recruitment records.
If you have any inquiries or problems, please reach out to support at support@crewcard.co.
10.1.6 Ops Home Configuration
65. Enable Quotes: If ticked, the quotes column will appear on the jobs page. If not, the quote column on the jobs page will be removed.
66. Enable Invoices: Invoices can be viewed or taken out.
67. Show Staff per shift on Quotes and Invoices: This will show the crew who worked on the job on the invoice and the quote that is sent to the client.
68. Show In-house Client Reference Numbers: Shows client numbers assigned by CrewCard.
69. Use In-house Client Reference Numbers: Job Sheet, Invoice and Quote have default numbers. Tick to display ‘In-house Client Reference Numbers’ instead of ‘Default Reference Numbers’. Short names for clients (entered in Client Profile page) followed by automatically assigned job sheet/invoice number for each job sheet created.
70. Home Page: Custom home view. Please see guide 2.2
71. Group Shifts on Job Sheet, Shift Edit, and Staff View: On CrewCard there are three pages Job Sheets, Shift Edit and Staff View. You can group shifts on these pages by shift, date or activity.
10.1.7 Payroll Configuration
72. Order Payroll by: All crew in payroll page can be organised by their first name first or last name first. 73. Display and Export Payroll according to: Either exports according to shift date or payroll approved dates.
10.1.8 Shifts Page Configuration
74. Default Shifts to Show: Use the drop down function to select the default number of shifts that you wish to be shown on a jobs page. Once Save is selected, this will remain the default number. You still have the option to change this number from shift to shift on each particular job sheet.
75. Activities Hidden from Shifts Page: Group activities you would like to hide from shifts page. You can still book these activities on jobs page. Use the ‘>>’ arrows to move the activity from each group.
10.1.9 Terms and Conditions
Client Terms, Crew Terms, Manager Terms, Admin Terms and Duty Manager are custom files that allows you to add your company terms for each of the user types. This will come up for users who are the logging into the system for the first time, which they are required to accept.
Through the admin settings, click Terms & Conditions and use the text box to enter your own Terms and Conditions.
There are two tick boxes that can be turned on and off below the text box.
76. Client Terms: Insert or Update your Client Terms here through the text editor box.
77. Crew Terms: Insert or Update your Crew Terms here through the text editor box.
78. Manager Terms: Insert or Update your Manager Terms here through the text editor box.
79. Admin Terms: Insert or Update your Admin Terms here through the text editor box.
80. Manager Terms: Insert or Update your Duty Manager Terms here through the text editor box.
81. Clients Delivery Terms: Insert or Update your Client Delivery Terms here through the text editor box.
82. Reset Term Accepted(Crew): Check or uncheck if you want to reset term accepted for crew.
83. Reset Term Accepted(Client): Check or uncheck if you want to reset term accepted for client.
Reset Terms Accepted: When the box is ticked, client/crew must reaccept the terms and conditions before entering. When you update your terms and conditions, it is important to click this so that crew and clients will be informed about it.
CrewCard App Look: Depending of what is entered in the text box, it will come up on the app like the following screen shot.
10.1.10 Privacy Policy
Staff, Manager, Admin, Duty Manager Privacy policy can be edited here.
84. Crew Privacy Policy: Insert or Update your crew privacy policy here through the text editor box.
85. Manager Privacy Policy: Insert or Update your manager privacy policy here through the text editor box.
86. Admin Privacy Policy: Insert or Update your admin privacy policy here through the text editor box.
87. Manager Privacy Policy: Insert or Update your duty manager privacy policy here through the text editor box.
10.1.11 User Action Reporting
The following can be switched on and off by a tick box:
88. Hide Reason on Shift Delete: Check or uncheck if you want to hide reason on shift delete.
89. Hide Reason on Rank Change: Check or uncheck if you want to hide reason on shift delete.
90. Show Staff Notes in Client Access: Check or uncheck if you want to hide reason on shift delete.
91. Hide Export Admin Summary from Managers: Check or uncheck if you want to hide export admin summary from managers.
92. Send email to admin when crew rank is updated: Check or uncheck if you want to send email to admin when crew rank is updated.
93. Admin email address for crew rank, disabled/enabled crew and deleted shifts: This email will receive notification mails regarding the following: Crew Rank Update, Disable/Enable Crew, Delete Shifts
10.1.12 Two -Step Authentication
If you wish to have a two-step authentication, please email support@personnelmanager.com.au
10.2 General Settings
Click the gear icon found on the upper right-hand corner and click ‘General Settings’ from the side menu.
10.2.1 Alternative Text
1. Alternate text for ‘Crew’: The word ‘crew’ can be replaced with any other preferred word across the CrewCard software.
2. Alternate text for ‘Client’: The word ‘client’ can be replaced with any other preferred word across the CrewCard software.
3. Alternate text for ‘Sub Client’: The word ‘Sub Client’ can be replaced with any other preferred word across the CrewCard software.
4. Alternate text for ‘Shift’: The word ‘shift’ can be replaced with any other preferred word across the CrewCard software.
5. Alternate text for ‘Business’: The word ‘Business’ can be replaced with any other preferred word across the CrewCard software.
6. Alternate text for ‘Sub Business’: The word ‘Sub Business’ can be replaced with any other preferred word across the CrewCard software.
10.2.2 Calendar
7. Show Start Time on Calendar: Shows start times on Calendar View.
8. Show End Time on Calendar: Shows end times on Calendar View.
9. Show Crew Name on Calendar: Shows crew names on Calendar View.
10. Show Crew Mobile on Calendar: Shows crew mobiles on Calendar View.
11. Show Crew Shift Number on Calendar: Shows shift numbers on calendar.
12. Show Unavailability Alerts: Unavailability alerts are shown on the shifts page when any crew is booked on a shift which is clashing with their unavailability.
13. View Calendar by Client/Site: Calendar can be sorted and grouped by client.
14. Show Job Description on Calendar: A description text can be entered on each job sheet, this feature will show that “description” on Calendar View.
15. Graph Colour Grouping: This feature allows the users to see the shifts coloured by activities or job sheets.
16. Calendar View Number of Weeks: How many weeks the user will like to see.
17. View Shift as Calendar Starting day of the week: Select what day to start the calendar on.
10.2.3 Clients
18. Clients can view Crew Details: Crew names and mobile numbers.
19. Clients can view shifts: Clients to view shifts in their “Client Pages”
20. Clients can edit/approve timesheets: Tick to allow all clients to edit timesheets shifts.
21. Display Confirmed Shifts Only on Shifts Page: Check the box to display confirmed shifts on the Shifts Page
22. Clients that are allowed to enter time off in shifts: These selected clients can manually enter the finish times of the crew. Use the ‘>>’ button to move the clients into the correct group.
23. Clients can request a quote: Enable this feature to make the “Request a quote?” option available in all online booking forms.
24. Hide same Crew For bookings
25. Crew abilities at Client booking form: Enable Crew Abilities in Client’s Booking Form.
26 – 37. Codes: (SMS or Email texts for codes 1-4): Names for Codes 1-4 can be assigned here which will appear in SMS messages, which are sent to crew depending on job requirements. Email text or email version of the code available.
38. Hide Crew first name from Clients: Check the box to hide first names of Crew from Clients. Uncheck the box to reveal first names to clients
39. Clients can enter a PO number: Check to allow clients to enter a PO number. Uncheck to disable.
40. PO number text: input PO number text.
10.2.4 Client Booking Settings
41-42. Primary and Secondary Booking Skill: Default activities that appear on the client online booking page.
43. Clients to have Booking Edit/Delete permissions: Some (or all) clients can be assigned to edit their bookings. This option will allow the selected clients to see full crew list and copy/repeat shifts send SMS’s to crew. This option can be used if CrewCard is set up as an internal rostering system and “clients” are set up as supervisors/managers within the company rather than actual clients.
44. Clients to be able to view Payroll: Some (or all) clients can be assigned to view payroll details. This option can be used if CrewCard is set as an internal rostering system and “clients” are set up as supervisors/managers within the company rather than actual clients.
10.2.5 Client Email Job Sheet Summary
Through the Jobs Page, there is a send button that emails the client a job sheet summary for a selected job. In this setting, we will be editing and creating a default of what the client will be emailed when sent the job sheet summary. Only ‘locked’ shifts will be included in the summary email.
45. Text Before JobSheet Summary: Enter a default message to the client, this will appear before the Job Sheet. ‘[ACCOUNT_NAME]’ will enter automatically enter the clients name in the message.
46. Fields that are visible in the Summary: Select the fields visible in the summary using ‘>>’ button. You are able to change the order visible using the up and down buttons.
47. Text After JobSheet Summary: Enter a sign-off message.
48. Email Summary from Address: Enter the email of the company/individual’s email you wish the job sheet will come from.
Help Text: Any tips or notes you will like to commonly share with your clients about the job sheets can be entered here which will appear in the email.
10.2.6 Crew Profile
49. Display Job Description on the CrewCard (Crew) App: Option or setting within the CrewCard (Crew) App that controls whether the Job Description should be visible or not. By enabling this setting, the Job Description will be displayed to the users, and if disabled, the Job Description will remain hidden and not visible to the users on the Crew app.
50. Allow Change Activities in Crew Profile: This settings affect the Crew Portal only and for those crew who are ACTIVATED. Recruits who are not yet activated are not affected by this setting.
51. Shirt Size Field: Drop down box hidden/visible
52.Gender Text: Enter as many genders you prefer (Press enter key after you add gender text)
53. Gender Required: Select yes or no for the requirement of gender selection.
54. Emergency Contact Required: Select yes or no for the requirement of an emergency contact
55. Profile photo upload required: Tick box on/off. If turned on, crew will be required to upload 3 images to their profile through their account.
56. In Staff login area, tasks are: Drop down box hidden/visible
57. Staff Available Across ALL Businesses: Tick to enable staff to be available across all businesses. (If not ticked, then the staff will need to be assigned to businesses individually)
58. Default Category: Used for quotes/invoices when Staff member has no assigned categories
59. Crew can enter finish time and lock shifts function: When enabled, all crew can lock off their shifts online by logging in to their crew page.
60. Show [x] days of past shifts in the Crew login area: How many days staff can see their past shift on the login page.
61. Crew can lock off shifts with a Start Time falling: “Before the current time”, “6-48 hrs in advance of current time” and “Any time” are the options for this feature, which allows crew to lock off their shifts “Any time”; “Before the current time”, which means shift start time must have passed to be able to lock, or 6-48 hours in advance of shift start time.
62. Individual Crew that can change shift times: Move Crew by using the ‘>>’ buttons
63. Show double booking warnings in crew login area: Sometimes crew may be booked on two clashing shifts by choice and not by mistake. If it’s preferred that the crew is not to be bothered with a warning, this option can be turned off otherwise crew will see a double-booking warning in crew login area.
64. Unlock double booking shifts in crew login area: This option will give crew the freedom to unlock double bookings in crew login page.
65. Email Admin about a “Crew online lock off”: CrewCard to send an email to admin every time a shift is being locked off by crew. Choose from drop down:
Upon Lock off: If you wish to receive an email as soon as any shift is locked off online by any crew.
Upon Start Time Change: If you wish to receive email ONLY when a start time is changed during lock off.
Upon Any Time Change: If you wish to receive email only when a time change is made before locking off.
66. Send Client a “Crew online lock off” email: CrewCard can be set to send emails to the clients, whom the crew has worked for. Choose from drop down:
Never: If you do NOT wish your clients to receive any emails about online lock offs.
Upon Lock off: If you wish your client to receive an email as soon as any shift is locked off online by the crew, who has worked for this client.
Upon Start Time Change: If you wish your client to receive email ONLY when a start time is changed during lock off.
Upon Any Time Change: If you wish your client to receive email only when a time change is made before locking off.
67. Send the Businesses a “Crew online lock off” email: If businesses need to be notified about crew online lock offs or not, Choose from drop down:
Never: If you do NOT wish the corresponding business to receive any emails about online lock offs.
Upon Lock off: If you wish the corresponding business to receive an email as soon as any shift is locked off online by any crew.
Upon Start Time Change: If you wish the corresponding business to receive email ONLY when a start time is changed during lock off.
Upon Any Time Change: If you wish the corresponding business to receive email only when a time change is made before locking off.
68. Crew can Accept Shifts: Tick to allow crew to accept shifts in “Crew Area”
69. Crew that CANNOT accept online: All crew can be allowed to accept shifts online, which are already offered to them via SMS. Any crew member who is chosen not to be allowed to use this option can easily be selected from the crew list. Use ‘>>’ to more crew from each list.
70-71. “Allow Crew to see other Crew” and “Crew that can see ALL Crew on the same jobs”: Tick to allow staff see each other’s details if they are on the same shift in “Staff Area”. You can group who and who cannot. Use ‘>>’ to move crew from each list.
72. Allow Crew privacy: This option would allow crew to hide their details from other crew in “Crew Area”.
73. Allow Crew unavailability: Tick to allow staff to enter their unavailability in “Staff Area”.
74. Crew that have privacy: If any crew chooses not to share his/her details with other crew, which appears on the crew page under upcoming jobs, he/she can make a request to be put on this list. Use ‘>>’ to more crew from each list
75. Show Crew unavailability on graph: Turn on crew unavailability on graph
76-77. Unavailable Graph Colour (Hexadecimal) and Leave Graph Colour (Hexadecimal): Select the colour for the leave and unavailable blocks, use the available colours or enter colour code.
78. Group graph by: Graphic view can also group by “Businesses” (set under CrewCard) or “Crew Groups”.
79. Show only Active Crew on graph: Tick or untick to show only Active Crew on graph or select an option to display only the crew members who are currently active on the graph.
80. Crew that can view ALL SHIFTS in graph: Some crew (usually high ranking crew) can be granted privileges to view all shifts if their names are put in this list. Use ‘>>’ to move crew from each list
81. Crew that can view ALL shifts with their name (not just the ‘C’ and ‘S’ shifts): In their crew support page, staff can normally see only confirmed shifts. With this option selected, staff can see shifts assigned (saved in the shift manually) to them even if not yet confirmed. Use ‘>>’ to move crew from each list
82. Crew can Update Personal Details: Tick to allow crew to update their personal details in their individual “Crew Area”.
83. Crew can Upload Files: Tick to allow crew to upload files in their individual “Crew Area”.
84. Crew can View Pay Details: Tick to allow crew to view their pay details in their individual “Crew Area”.
85. Upload Notification Email Address: Notify whenever a crew updates their profile by email
83. Crew Shifts Buffer Warning: [X] (Minutes) This will show a warning if an individual Crew members shifts do not have more than the set number of minutes between them. Set to zero to disable.
87. Double Booking Warnings: [X] (Minutes) allowing Crew to see other Crew starting or finishing within the allocated time frame
88 A. Show Warning if Crew Member has completed more than [X] [hrs/shifts] in [X] [time]: If a warning needs to be triggered when any crew works more than certain amount of hours per period it can be entered here.
88 B. Show Warning if Crew Member has completed more than or equal to: If a warning needs to be triggered when any crew works more than certain amount of hours per period it can be entered here.
89. Staff message title: Edit greeting title, which appears on first page of the crew profile
90. Staff message: A body of message can be entered here, which will always appear on the first page of each crew’s profile page.
91. Admin will confirm Crew Unavailability: If “No” is selected, then crew’s unavailability requests will be approved immediately. If “Yes” is selected, all unavailability requests need to be approved by office staff/operators.
92. Obey Crew Groups functionality: If clicked “yes” then only names of crew which are associated with each client on “Crew Groups” will appear on job sheet/edit page when sending out “shift offer” messages. Option “no” will show all crew but still highlight the crew names (in blue) that are associated with corresponding client on job sheet/edit page. (For more info see “Crew Groups”)
93. Remove Crew – Client Association violations from Crew name lists: Option “yes” removes staff completely from crew lists for certain clients. Option “No” shows the names but flags them as unavailable.
94. Enable birthday warning in Crew Profile: By enabling this feature, the system will generate email birthday greeting to the crew’s email address to ensure that Crew Members’ birthdays are not overlooked and can be appropriately acknowledged and celebrated.
95. Enable Crew Birthday email: This feature should automatically send email greetings to Crew Members on their respective birthdays. By activating this setting, the system will ensure that birthday wishes are delivered to the Crew Members via email, adding a personalized touch to their special day. The Birthday email template can be edited in the Email Template Section >> “ Birthday Email” template name.
96. Enable Export Crew Changes in crew list: Enable Export Crew changes in crew list page.
97. Hide Activity Name to Crew Members: Hiding the activity name to crew members.
10.2.7Crew App
98. Pre- Start Acceptance Page
The Pre-Start Quiz feature allows you to assign safety or compliance quizzes to crew members before they begin their shifts. This ensures that all crew are briefed on important safety or compliance requirements before starting work.
You can manage two types of quizzes at the same time:
Temporary Quiz – one-off quizzes that end once completed by all mapped crew.
Permanent Quiz – ongoing quizzes that stay active until manually disabled.
Creating a Quiz
To create a quiz, click “+ Create Quiz”. A quiz introduction table will appear, allowing you to:
Enter a quiz title and introductory text.
Add or delete question rows.
Add multiple answer options for each question.
Mark the correct answer for each question.
When finished, click “Save Quiz” to apply your changes.
The Newly created Quiz will appear in the Pre-start Quiz list just below the Select permanent Quiz option.
You will find three icons where you can perform actions such as
Edit the Quiz
Delete the Quiz
Duplicate the Quiz
99. Select Safety Form: Select which safety form to appear in PSA.
100. Disclaimer text: Add a text for the Disclaimer.
101. Display Supervisor Mobile To team Leader:
If the setting set to YES No Team Leader Selected: Supervisor number will show to all crew.
Team Leader Selected: Supervisor number will only show only to Team leader.
If the setting set to No Crew and team leader can see the Supervisor number.
Supervisor number will NOT display to Crew Members, only to Team
10.2.8Online Shifts Acceptance Configuration
102. Crew Portal Rank Required: Rank required to be able to accept available Shifts online (0 to disable)
103. Crew App Rank Required: Rank required to be able to accept available Shifts online (0 to disable)
104. Show Shifts when unavailable: Tick to allow Crew to be able to see Shifts even when they are unavailable to them.
105. Show View Job as Graph on Shift Page
106. Select all Shifts on JobSheet Page by Default
107. Online Acceptance in Portal:
Pencil – When crew accepts the shift crew will be automatically pencilled to a shift
Confirmed – When crew accepts the shift crew will be automatically confirmed to a shift.
10.2.9 Crew Weekly Unavailability Setting
108. Set Weekly Unavailability option
Custom Fields
10.2.10Client additional information fields
109. Show Warnings for required fields
This feature enables you to customise the client details page by adding fields of your own choice. Fields can be added as a text box, a text area box, check box or drop-down box. Once these fields are created, they will appear on each client’s profile page, which can be switched on or off by ticking boxes.
10.2.11 Crew additional information fields
This feature enables you to customise the crew members details page by adding fields of your own choice. To add, click on Add Field then fill in the caption, type, default, extra, and tick display on reports.
Tip: It is recommended to check the selection in the crew detail page to ensure the new field is added and in the right selection.
When ‘Show Warnings’ for required field is available to edit/add/select/delete’ tick box is selected those fields are available in 3 exports:
▪Shifts Page → Select an Action → Export to Excel
▪Shifts Page → Select an Action → Export Summary (Admin)
▪Timesheets Page → Export All Records
110. Show Warnings for required fields
10.2.12 Crew Status
List can be put specific text; mark as required to show warning message when not complete; for dropdown type: please put the options separated by “|” in List field
111. Show Warnings for required field
10.2.13 Emails
Create emails templates for the following actions by filling out the text box. If you would like to go back to the existing messages, press ‘Back to Default’.
112. Auto-Booking email cancellation warning: Please input the message you want to send when an auto-booking is cancelled (The variable [BOOKING_EMAIL] is available to use within the cancellation warning text. Please remember to enclose the merge fields using square brackets [].)
113. Email Request Message: Please input the message you want to send when requesting/asking a crew if they are able to attend to a shift.
114. Email Request Message (2 connected shifts): Please input the message you want to send when requesting/asking a crew if they are able to attend to 2 connected shifts.
115. Email Request Message (more than 2 connected shifts): Please input the message you want to send when requesting/asking a crew if they are able to attend on more than 2 connected shifts.
116. Email Notify Staff of Change Message: Please input the message you want to send when requesting/asking a crew if they are able to attend on a shift with the changed date or time.
117. Email Cancellation Message: Please input the message you want to send when a shift has been cancelled.
118.Email Confirm Message: Please input the message you want to send when a shift has been confirmed.
119. Email Multi Confirm Message: Please input the message you want to send when a multi-shift has been confirmed.
120. Email Decline Message: Please input the message you want to send when a shift has already been filled.
121. Email Crew Reminder (16:00): Please input the message you want to send to remind a Crew regarding a confirmed shift before the start time.
122. Email Supervisor Reminder (16:00): Please input the message you want to send to remind the Onsite Contact regarding a confirmed shift before the start time.
123. Email Crew Reminder (After Hours): Please input the message you want to send to remind a Crew regarding a confirmed shift after working hours.
124. Email Supervisor Reminder (After Hours) : Please input the message you want to send to remind the Onsite Contact regarding a confirmed shift after working hours.
TIP: Variables are available to use within the SMS text. For example, “This job starts at [TIME_ON]”. The available Variables are [JOBSHEET], [JOB_REFERENCE], [NO_OF_SHIFTS], [TIME_ON], [TIME_OFF], [TIME_ON_LAST], [TIME_OFF_LAST], [TIMES_MULTIPLE], [TIMES_MULTIPLE_AND_SUBURB], [TIMES_MULTIPLE_AND_VENUE], [TIMES_MULTIPLE_VENUE_ACTIVITY_INSTRUCTIONS], [TIMES_MULTIPLE_VENUE_ACTIVITYNAME_TASK_INSTRUCTIONS], [TIMES_MULTIPLE_VENUE_TASKNAME], [SKILL], [VENUE], [VENUE_NOTES], [MEETING_PLACE], [CLIENT_NAME], [SHORT_NAME], [ONSITE_NAME], [ONSITE_NUMBER], [YES_RESPONSE], [NO_RESPONSE], [LETTER_CODES], [INSTRUCTIONS], [ACTIVITY], [SUBURB], [ADDRESS], [POSTCODE].
Please remember to enclose the merge fields using square brackets [].
10.2.14 Invoices and Quotes
Email Message
This page is where you can personalise your email messages to send out invoices. The text boxes on the right side of each section are available for you to type out exactly what your email will show when sending out invoices.
Sections you can edit:
125. Invoice Email Content: Email content template can be added here in this text box, each time an Invoice Statements can be sent out
126. Part Payment Invoice Email: Part payment invoice can be sent out alongside this Email content template, each time a part invoice can be sent out with this content. Checkbox to include PDF as Attachment
127. Complete Payment invoice: Input content in this text box to appear in the Complete Payment Email.
128. Refund: Input content in this text box to appear when sending a Refund.
129. Invoice Email Footer: Invoice Email footer can be added here, footer content usually includes declaring that the receiver is aware of the terms and conditions, or confidentiality
130. PDF Invoice Text: This content will be visible in the attached PDF invoice
131. Invoice Page – Email Statement Content: Please input the message format on sending an Invoice Statements that are not yet settled.
TIP: Variables are available to use within the email text. For example, “This invoice total was [SUB_TOTAL]”. The available Variables are [BUSINESS_NAME], [BUSINESS_PHONE], [BUSINESS_EMAIL], [CONTACT_NAME], [CONTACT_EMAIL], [SUB_TOTAL], [PAID], [TOTAL]
Please remember to enclose the merge fields using square brackets [].
Reminder 1 (Day) Days after Payment Terms at (time)
Reminder 2 (Day) Days after Payment Terms at (time)
Reminder 3 (Day) Days after Payment Terms at (time)
Enter the days after the invoice was sent to the Client and set the time on when they will receive the Email Statement Reminder.
Customising the Invoice Appearance
CrewCard’s Invoice Appearance feature lets you customise your invoices, including the layout and other details.
How to Open
Begin by navigating to the General Settings and selecting “Invoices and Quotes”. From there, click on “Invoice Appearance” to access the customisation page, where you can tailor the appearance of your invoices to your liking.
On the Invoice Appearance page, you can customise various elements of your invoice, which are detailed below:
Invoice Header Section (Top left) This section allows you to customise the heading and essential details such as the invoice title (e.g., TAX INVOICE), invoice date, and invoice number.
Client Information Section (Below the header) This area includes details about the client, such as client name, address, email, customer number and PDF invoice text for custom messages.
Business Information Section (Top right) This section contains your business information, including business name, address, telephone, email and ABN.
Invoice Table Section (Middle) This primary section allows you to customise the items or services you are billing. The table includes columns such as activity, venue, PO number or event name, crew name, category, time on/off, hours/quantity, rate and total.
Invoice Notes Section (Bottom left) You can add notes or important information about the invoice in this section.
Payment Details Section (Bottom right) This section allows you to include electronic payment information, including EFT details, business bank name, account name, account number and BSB.
Custom Elements
Add headings, labels, or text that aren’t part of the default invoice layout. Useful for adding extra information, disclaimers, or custom fields.
Invoice Details Includes essential invoice information such as invoice number, invoice date, due date, and PDF invoice text (custom text to be included in the PDF version of the invoice).
Client Details Add or modify client-related fields such as client names, addresses and customer numbers.
Business Details Customise the information related to your business, including email, phone number, address and tax identification.
Logo Size
Set the width of your business logo. The height will automatically adjust to keep the correct proportions. Maximum width allowed: 140mm (531px).
Custom Font Colour & Size
Choose a Font size (In pt) and colour that reflects your branding.
Saving and Previewing Your Changes
After customising your invoice, click the Save button to apply your changes. Preview the updated invoice to ensure all field positions and details appear as desired.
Tip: Always preview before sending invoices to clients to ensure your branding and details appear correctly.
10.2.15 Invoice Notes templates
Add Invoice Notes Template : To Add a invoice template simply click Add Invoice Notes Template button.
10.2.16 Quote Template Settings
NOTE: Ensure “Set Customised Template as Default Option” is ticked for any of the below settings to be applied.
You are able to create your own quote template that includes a custom logo, default text before and after the quote section, custom footer, whether the quote prints in summary or detail form and whether the quote prints in landscape or portrait format.
The following configuration items are available via the ‘General Settings’.
133. Logo: A logo that will appear on all quotes.
Click on “Choose File” to select file from computer and upload template.
TIP: JPEG/GIF/PNG/TIFF/EPS formats are the recommended template format to upload.
134. Quote Email Content: Enter content of the template can be added here in this text boc, each time a Quote Email can be sent out.
135: Quote Label: Title of the quote when the quote is email to the client.
136. Text Before Quote: Any text that will appear before the quotation.
137. Text After Quote: Any text that will appear after the quotation.
138. Quote Footer Text: Any desired quote footer text can be entered here.
139. PDF Quote Text:
PDF Quote Text feature allows clients to customise the content of the Quote invoice email effortlessly. Here you can input any personalised text that you would like to appear on the Quote invoice email.
Go into the General settings and locate ‘135. PDF Quote Text’ under ‘Invoices & Quotes’. Type in the text field the message you wish to appear in the quote.
By default, the invoice email will display the previously set text. However, the custom view will show the updated text that you have entered.
Default view:
Customised View:
TIP: Variables are available to use within the quote text. For example, ” Date Prepared [DATE_PREPARED]”.
The available variables are [DATE_PREPARED], [TO],[JOB_REFERENCE],[CLIENT_CODE],[EVENT_DATE],[JOB_DESCRIPTION],[VENUE]. Please remember to enclose the merge fields using square brackets [].
140. Quote Summary/Detail:
The information within the body of the quote can be displayed in summary or detail.
This is drop-down box. To select, click on the drop-down selection of “Summarised” and “Detailed”. When “Summarised” is selected, shifts with multiple crew are shown in one line. If “Detailed” is selected all individual shifts are shown in the quote as one line. So if a quote has 10x general staff doing the same job quote would have 10 lines, (1 for each staff booked).
141. Set Customised Template as Default Option:
When ticked the above templet becomes default settings for all Quotes.
To override the default template for individual quotes, click on the option ‘Choose Quote Template’ in the dropdown.
142. Quote Page Layout: Landscape or Horizontal
10.2.17 Invoice Settings
143. Invoice Summary/Detail: Select Detailed or Summarised
10.2.18 Site Sheet Configuration
144. Site Sheet Configuration
Site sheet relates to the time sheet that can be printed off or email to crew. Below is the Site sheet configuration which you can edit.
Titles: of each column on the timesheet. Content: the information that will relate to the title. Width: how large the column is (recommend to increase size based on how much information is required). Hide/ Delete: Hide the column from the sheet or completely delete it.
Please see below the timesheet based on the above settings.
10.2.19 SMS
145. SMS Shift Time Buffer: (Minutes) The actual shift start time minus the set amount of minutes. For example if this time is set to 15 minutes, staff will be told to turn up at 08:45. for a 09:00am shift.
146. SMS Number
10.2.20 SMS Configuration
147. Crew that receive SMS reminders: Group who will receive using the ‘>>’ button. By default, all staff will receive a SMS.
148. Staff that receive After Hours SMS: Group who will receive using the ‘>>’ button. By default, all staff will receive a SMS.
149. Automatically Add Used SMS to Clients Invoices: Adds costs of SMS messages to be sent to crew in order to fill the shifts within that job sheet.
150. Charge per SMS: Cost of each SMS to be added to invoices x 0.2, client will be charge double
Create SMS templates for the following actions by filling out the text box. If you would like to go back to the existing messages, press ‘Back to Default’.
151. SMS Request Message
152. SMS Request Message (2 connected shifts)
153. SMS Request Message (more than 2 connected shifts)
154. SMS Notify Staff of Change Message
155. SMS Cancellation Message
156. SMS Confirm Message
157. SMS Confirmation: Tick to NOT send SMS confirmation messages. When accepted by crew, shifts get confirmed but a “Confirmation message” will not be sent.
158. SMS Multi Confirm Message
159. SMS Decline Message
SMS Decline: Tick to NOT send SMS Decline Message.
160. SMS Staff Reminder (16:00)
161. SMS Supervisor Reminder (16:00)
162. SMS Staff Reminder (After Hours)
163. SMS Supervisor Reminder (After Hours)
164. SMS Supervisor App Invitation:
TIP: Variables are available to use within the SMS text. For example, “This job starts at [TIME_ON]”. The available Variables are [JOBSHEET], [JOB_REFERENCE], [NO_OF_SHIFTS], [TIME_ON], [TIME_OFF], [TIME_ON_LAST], [TIME_OFF_LAST], [TIMES_MULTIPLE], [TIMES_MULTIPLE_AND_SUBURB], [TIMES_MULTIPLE_AND_VENUE], [TIMES_MULTIPLE_VENUE_ACTIVITY_INSTRUCTIONS], [TIMES_MULTIPLE_VENUE_ACTIVITYNAME_TASK_INSTRUCTIONS], [TIMES_MULTIPLE_VENUE_TASKNAME], [SKILL], [VENUE], [VENUE_NOTES], [MEETING_PLACE], [CLIENT_NAME], [SHORT_NAME], [ONSITE_NAME], [ONSITE_NUMBER], [YES_RESPONSE], [NO_RESPONSE], [LETTER_CODES], [INSTRUCTIONS], [ACTIVITY], [TASKNAME], [SUBURB], [ADDRESS], [POSTCODE], [SUBURB_TO_SUBURB], [STOP1_SUBURB], [EARNINGS]. Please remember to enclose the merge fields using square brackets [].
10.2.21 Software Configuration
165. Group Shift Search Admin Summary by Client: Excel Export Admin Summary in Shifts Page > Select an Action in the drop-down list regrouped by this option.
166. Enable Tasks: When enabled, a dropdown menu appears on each shift labelled “Tasks”, which can be edited in “Tasks” page
167. Enable Change of Business: CrewCard may be set to organise many different businesses. This option allows users to easily move shifts from one business to another.
168. Default Business:
Active Business: creates new shifts under the currently selected business.
Job sheet Business: creates new shifts under the job sheet business
169. Automatically insert a [x] minute break every[x] hours for Shifts exceeding[x] hours in length [x] Extend time off to allow for breaks: This useful feature allows CrewCard to automatically enter breaks,
170. If admin break is not set, add a zero admin break and override the incoming Crew SMS breaks: If any job does not have any breaks while being created by users and is not meant to have any breaks regardless of what crew texts in, this feature can be ticked and enabled.
171. Long Shifts: [X] (Hours) Over this amount of hours is considered a Long Shift. Set to zero (0) to disable.
172. Long Shift Break: [X] (Hours). A warning will be shown if the above number of hours is NOT given between an individual’s Long Shift and the next Shift.
173. After Hours Start Hour: Select in 24-hour clock out of hours start time
174. After Hours End Hour: Select in 24-hour clock out of hours end time
175. Allow Shift Map Checking: This feature allows the duty managers to drop a pin on a building, street or location to set it as a meeting point, crew log in to their profile page to view their upcoming jobs, they can see a satellite picture of the meeting point of each job.
176. Allow Shift and Job Sheet Note Checking: When job sheets are created, there may be some notes entered, which are vital for the job. If these notes must be checked (by clicking a check box), then select the “yes” option, that way unchecked notes will appear in red, and checked notes will appear in green. If “no” is selected, then there would be no colour indication in the background of the “notes” icon.
177. Show Scheduled times in excel export: When selected, this option will allow the excel export feature to show.
178. Order by rank in “Job SMS” area: All crew are saved in the system with a ranking number. Users can keep the crew in a ranking order in “job sending page”, or only in alphabetical order starting with their first name.
179. Order by rank in “Message” area: All crew are saved in the system with a ranking number. Users can keep the crew in a ranking order in “send SMS page”, or only in alphabetical order starting with their first name.
180. Rank Explanation: Ranking level: 1 – 5, 5 = offered job first – 1 = offer job last
182. Reliability Explanation: Reliability Levels are 1 – 5, 5 is very reliable – 1 is very unreliable
183. Score Info Pop-up Text: Each crew member is accorded a score out of 100 that is derived from a combination of their star rating (out of 5), experience level (out of 5), reliability level (out of 5) and recent activity level (out of 5) with the formula weighted towards their recent activity level.
184. Show Job Number in top right Job Sheet corner: Shows job number in top right corner of job sheet page. On/off option.
10.2.22 Minimum Call (Hours)
185. Default Minimum Call: Set a default minimum call hour on the general settings page for any activity unless the activity’s minimum call is specified which will be under “activities”.
Furthermore, minimum call hours can be adjusted based on which day of the week the call is on. For example, minimum call hour can be set to 4 hours on the weekends, and 3 hours on weekdays.
186. Holiday Default Minimum Call: Use to set the minimum call for different Holiday.
187. Day of Week: Use the days listed to set the minimum call for different days of the week. Leave blank to refer to a default
Timesheets
These time sheets can be reviewed and signed by the client/supervisor onsite once completed.
Tick box: Tick this box if you need default Settings on Timesheets Export
188. Output timesheet in this format: Output of the time sheet page can be set as “portrait” or “landscape”
189. Show “Supervisor” in header area: Select Yes or No
190. Show “Supervisor Contact No.” in header area: Select Yes or No
191. Group timesheet by: Crew on time sheets can be grouped by either “time” or “activity”
192. Timesheet header area Warning: A default message which will be located at the top of each time sheet.
193. Timesheet header area Warning line 2: A default message which will be located at the top of each time sheet.
194. Show Timesheet Footer: A default message which will go on the footer on timesheet.
195. Timesheet Job and Venue Notes: Leave blank to show signature box
196. Show Timesheet Job and Venue Notes: Create note or leave blank to show signature box.
197. Show Tasks on Timesheet exports: Yes/ No
198. Venue lock: Enable or Disable
199. Team Leader Activity: Select an activity from the drop down function. Please note that only one activity is allowed to be selected as a Team Leader Activity.
200. Hide Crew Mobile No. from other crew on the same job: Tick the check box if desired
201. Select All Shifts on Timesheet Page by Default: Select Yes or No.
10.2.23 Day Sheet
Settings for the day sheet which is accessibility through crew access Calendar
202. Hide Induction in the Day sheet: Tick Box On/ Off
203. Hide Inspection in the Day sheet: Tick Box On/ Off
204. Day Sheet Time: The minutes before shift to send the job sheet.
205. Day Sheet Email: Who the day sheet is emailed to. Tick box client, supervisor, team leader or project manager
206. Timesheet Approval Email: (Day) Days after the job at (time).
207. Display Timesheet Approval at Invoice Email: To display the timesheet approval at the bottom page of the invoice.
10.2.24 Events Quote
208. Always select Instruction in Events Quotes: If tick box, the checkbox below the instruction will be ticked “Apply to all shifts on this booking”
10.2.25Project Code
209. Enable Project Code: Enable in the Jobs page
210. Enable Project Code for Timesheets Page: Enable in Timesheet page
211. Enable Project Code for Shifts Page: Enable in the Project code in the search filter section
212. Enable Crew Status for Timesheets Page: Enable the crew status in Timesheet page
Rental Point integration settings.
10.2.26 Email Templates
CrewCard provides users with email templates that can be readily used. These templates are customisable to fit the needs and requirements of the user. Use the drop-down list or create your own template. When the option is selected, a pop-up window will appear so you will be able to edit it.
After creating the email template, click client templates – Client APP Invitation, and select the template you wish to use.
10.3 Compliance settings
This setting is for various compliance standards for qualifications, work hour limitations, visas and other documentation, which allows you to monitor them all in one place. The system automatically blocks crew members whose compliance has expired. Additionally, if an Activity requires a qualification and a crew does not meet the requirements, they will be blocked from accepting the shift.
10.3.1 Exceed Hrs/Week Warning
Exceed Hrs/Week Warning is the compliance setting for limiting the working hours of a crew.
Tick box how you would like the warning to be alerted.
Show Warnings for required fields: Check this box to have a warning appear under Shift Warnings under Job shift page – for both the Crew and Admin
Email Warning to Admin: An email is sent to the admin informing them that crew have exceeded the working hours.
Email Warning to Crew: An email is sent to the crew informing them that they have exceeded the working hours.
Fill the following Fields
Caption: Enter the caption of the field. This caption will appear on the crew profile page.
Input: Enter the value of input here.
Select: Select from the dropdown menu list if you want your Input Type to be in Hrs/Week, Hrs/2 Weeks or Hrs/4 Weeks.
Block Crew: The crew will have a text “BLOCKED” appended to it and will not be able to be assigned to a shift.
Required: The field is tagged as a required field on the crew profile page.
Warn: When the checkbox is selected and the hours are exceeded, a warning message will display on the Shifts page.
Apply to All: The field is applicable to all crews.
Daily Email: An email is sent to the admin on a daily basis with updates.
ADDING A FIELD FOR EXCEED HOURS / WEEK WARNING:
Click ‘Add Field’ to add a new exceed hours/week warning.
FIELDS ON THE CREW PROFILE PAGE
The fields will appear on the Crew Profile. Fields will be available for the crew to select from.
BLOCKING CREW USING EXCEED HOURS/WEEK WARNING
If a crew has exceeded their max working hours, they will be blocked to accept any shift offer for that duration of time until a new time frame. This means that if a crew has exceeded 15 hours in 2 weeks, they will not be able to accept any more jobs within the two weeks time frame. A warning message will pop-up if you try to book the blocked crew.
10.3.2 Exceed Limit Warning
This is similar to the Exceed Hrs/Week Warning, but it is based off of the hours and shift the crew works in a week.
Caption: Enter the caption of the field. This caption will appear on the crew profile page.
Input: Total hours or total shifts available
Select: if total hours select ‘Total hrs’ or ‘Shift/Day’
10.3.3 Expiry Date Warning
The Expiry Date Warning works the same as the Exceed Hours Warning, but rather the control is related to the expiry dates of a crew’s licenses/visas. The expiry date warning will appear in the crew profile page.
This displays in the crew profile and the crew will be able to upload their information. Crew View:
10.3.4 Training Expiry Date Warning
All the types of training added in the settings will become available on the crew profile page. A comment and expiry date of the training and supporting document for the crew are needed. If a crew has an expired training, you will not be able to book them on any job.
Crew View:
10.3.5 Induction Expiry Date Warning
In the Compliance Settings, go to Induction Expiry Date Warning. Put a check mark on ‘Block Crew’ if you want to block crew once the training has expired for the crew member. You can also put a check mark on ‘Required’ which will tag the field to be required in the crew profile page. Additionally, when you put a check mark on ‘Warn’, a warning message will appear on the crew profile page and shifts page about the expired induction records.
You can also add the URL of the induction in the provided fields. There are also fields for the provider name, email and comments.
All the induction that you created in the compliance settings will now appear in the crew profile page.
Crew View:
When you select an induction from the dropdown menu, a new field will appear where you’ll need to add comment and expiry date for the induction and upload supporting document for the crew.
10.3.6 Identification Expiry Date Warning
Just like the above, title the type of identification you require from crew and select how you would like to be warned about the expiry date.
Crew View:
10.3.8 Visa Expiry Date Warning
Just like the other expiry date warnings, edit the setting for the Visa you would like the crew to be able to select from to upload their documents.
Crew View:
10.3.9 Visa Hour Limitation Exceeded
The Visa functionality is a feature that allows admin to place a restriction on the hours that a crew member can work, following the guide of their Visa.
This function can be set up in settings. To access this, select the settings icon at the top right of the screen. Under the settings menu on the left hand side of the page, select ‘Compliance’. Under ‘Exceed Hrs/Week Warning’, No. 1., select Add Field in order to add your selected limitation of hours per week, fortnight or 4-week span. See example below.
For the function to be able to work, each Visa Type must be mapped in accordance to the Hrs/Week desired. For the mapping of the Visa Expiry Date Warning, please contact support@personnelmanger.com.au.
To add a Visa type, select Crew Profile, and using the menu on the left hand side, scroll down and select Visas. In the example below, ‘Other Visa Type’ has been mapped to a 15 hours per week limitation. Once ‘Other Visa Type’ is selected, the ’15 Hrs/week’ value for the column ‘Hours Limit’ will appear. Visa Warning Settings must mapped, and there will be a field no of hrs/week that it is greyed out.
When hours have been exceeded
If a crew member breaches the limitation of hrs/week, an email will be sent to Admin informing them of this.
Furthermore, the crew members Crew Profile Page will display a Warning above Overview, titled ‘Crew Warning’. Select the dropdown, and it will display a warning stating that the Week / Hrs Warning for the crew members confirmed hours has exceeded the limitation placed on them.
Once this has been established, when an admin attempts to confirm the crew member for a shift, a warning pop up will appear on the job page that states the crew member has been blocked and removed from the shift. The admin will have the option to select a different crew member, or update the current crew members hour limitations.
10.4 Recruitment Settings
Recruit staff for your job bookings. You can setup requirements, inductions, and other pre-requisites for recruitment before accepting a crew.
The recruitment settings are divided into:
10.4.1 Recruit General Settings
1. Enable Recruits Page Menu: This will enable the Recruit Cards page via Contacts > Recruit Cards.
2. Display Recruits Sign Up on Login Page:This will show the Sign-Up option on the System Login Page that directs recruits to the Sign-Up page.
3. Recruit Access: From the dropdown menu, pick either Manual or Auto invite
Manual Invite – Applicant can either registered themselves from the Sign-Up page or been enrolled by a recruiter, once they have done that, they will be invited by the recruiter via an email with a once-only access token to open their Recruit Details page and continue the process of onboarding themselves as recruits.
Auto Invite – The Auto Invite option bypasses the step of Recruiters manually inviting recruits to set their password, fill in their personal details, qualifications, experience, medical history, agreements, contract, induction and accounts so that once an applicant has registered on the Sign-Up page, they can progress to the next steps without the need for an email invitation
4. Interview:
Enable Interview
This will enable the Interview Tab for both Admin and Duty Manager.
5. Recruit Activation Email Send to Crew
When admin activated a recruit via Recruit Cards or Activation tab, the recruit will receive an email notification (Recruit Activation Email)
10.4.2: Crew Portal Profile Page
Tick box the following tabs that will be shown on the recruitment header.
This will also mean the recruits will need to fill out the information.
6. Details: Enable Details Page
7. Qualifications: Enable Qualifications Page
8. Experience: Enable Experience Page
9. Medical: Enable Medical Page
10. Citizenship: Enable Citizenship Page
11. Agreements: Enable Agreements Page
12. Contracts: Enable Contracts Page
13. Inductions: Enable Induction Page
14. Accounts: Enable Accounts Page
10.4.3 Sign up page
15. Hide business selection on sign up page: When user signs up, they do have to select what business. (This is helpful if there is only one business). Enable Business in the Sign up>> Job Seeker Sign up>> Business Location
16. Business Label: Relabel Business in the Sign up>> Job Seeker Sign up>> Business Location
17. Display employment history section on sign up: Sign up>> Job Seeker Sign up>> Employment History
18. Allow UK mobile number: The system defaults to accept 10 digits for Australian mobile numbers. Enable this setting to accept 11 digits for UK mobile numbers.
19. Resume: Select how you would like recruits to upload (upload it in a textbox or as an attachment).
Resume Textbox style:
Resume Attachment style:
20. Sign Up Questions: Create and add custom questions on the Sign-Up page to record answers for applicants.
Same as interview but when a recruit first signs up, you can add questions that they can fill in themselves.
What applicants will see:
21. Enable Skills/Activities for applicant to select upon sign up : Enable applicants to select different Activities(Skills and roles) in the Sign up>> Job Seeker Sign up>> Skills (Activities).
22. Enable Abilities for applicant to select upon sign up: Enable applicants to select different abilities.in the Sign up>> Job Seeker Sign up>> Please check the abilities below. Any skills you add in the settings will be displayed back to the recruitment tab of your potential crew member. The potential crew member will then be able to select the skills that matches their qualifications.
10.4.4 Interview Page
23. SMS Template to message new recruit before phone interview: Any contents entered on this field will be displayed on the SMS section under Interview tab.
Fill the following SMS:
Initial SMS
Request for Call Back
Request to Submit Document
You can add more titles if needed.
This is what Admin will see:
24. Interview Questions
Customise the questions that you may need to ask the recruit during a phone or in-person interview.
Admin’s View:
10.4.5. Details Page
25. Add any additional custom questions under the details page section for your recruits to check and acknowledge.
Admin’s View:
10.4.6 Medical Page
26. Medical Conditions: Enable medical condition, Recruits are required to fill in any medical related details that may be required as part of the employment details on the Medical page of their Crew Portal Profile. Explainer text can be customised for Medical Conditions.
When tick box ‘Enable Medical Conditions’, the ‘Info Box’ will be visible for the crew. You can also add a label for the info box. In the screenshot below, the label of the info box is “List all previous physical or psychological injuries that may affect your work performance (answer not compulsory)”.
27. Medical Disclaimer Check boxes: Add any additional custom questions under the medical conditions section for your recruits to check and acknowledge.
Click the Add button to a medical disclaimer check boxes. You can also make the medical disclaimer check boxes as mandatory and required by ticking the box ‘Required’.
Crew’s view:
10.4.7 Agreements Page
28. Resources: These Resources can be a policy, procedure or any other important information that the crew can access using the Crew Access or via the app. There is no need for an additional software to view the online content. Resources can be easily used in other sections of the CrewCard system such as Recruitment, Actions and Forms. When a resource is edited, it will be displayed automatically across the software. Resources can be added in the Resources Settings.
From the dropdown menu, select the resource that you want to add, then click Save Resources. Resources are configured under the resources settings. Before a resource can be made available in the recruitment, it needs to be created.
29. Agreement Disclaimer Checkboxes : Disclaimer check boxes will be added under the Agreements Tab in Agreements Section for the recruit tab of the potential crew member. To add a disclaimer check box, simply click the Add Agreement Disclaimer and enter the text in the provided field. If you want to make the disclaimer box as a mandatory field, tick the box ‘Required’. Click ‘Save Agreement Disclaimer’ once you are finished adding disclaimer boxes.
30. New Recruitment Enrolled Email: This settings allows you to set from where the email came from and who will be copied in the new recruitment enrolled email.
Admin Email Address: Enter the email address, this will be the email address that will be used during the course of the recruitment process.
Admin CC Email Address: Enter the email address, that address will be copied for the Recruitment Enrolled Email.
This is what the Recruit will received:
31. Profile Completed Email:
Admin Email Address: this will be the email address that will be used during the course of the recruitment process.
Admin CC Email Address: that address will be copied with the same email during the course of the recruitment process.
Accounts CC Email Address: that address will be copied with the same email during the course of the recruitment process.
Profile completion Email Attachment: When a potential crew member has completed their profile, they will receive an email confirming that profile has been completed. In that e-mail, files that needs to be completed will be included.
32. Assign Activity: The selected activity will be the one displayed during the recruitment process.
33. Assign Category: The selected category will be the one displayed during the recruitment process.
34. Insert Activity Details: The details of the activity will be displayed.
10.4.8 Contract Page
35. Contracts: From the dropdown menu, select the contract that you want to add, then click Save Contract. Before a contract can be made available in the recruitment, it needs to be created first in the contracts settings.
10.4.9 Induction Page
36. Induction title: Allows you to setup requirements, inductions, and other pre-requisites for recruitment before accepting a crew. Enter the Induction title
Subtitle: Enter the Subtitle of the Induction
Sub Title Description: Enter the Sub Title Description of the Induction
10.4.10 Accounts Page
37. Default Super Fund
Default Super Fund is set as: Australian Super Fund (change using text box) This will be the fund that will be displayed by default during the recruitment process
38. Default Super ABN: Enter Default Super ABN
39. Default Super SPIN/USI : Enter default Super SPIN/USI
40. TFND: Enable TFND Section in Accounts Tab.
10.4.11 Activation Page
41. Activation Check list: This can be found in the activation tab in Recruit Card
42. Crew Tag: Enable crew tag
43. Crew Rank: Enable crew rank
On the Crew List page, there is a Rank field where users can add or update a crew member’s rank.
A log will now be created whenever a crew member’s rank is added or updated. Any changes made to the rank will generate a log, which can be viewed on the crew profile page. In this example, the crew member’s rank is changed from Rank 1 to Rank 7, a note is added, and then the changes are saved.
The updated rank will now be reflected in the Crew List page. To view the logs, go to the Crew Profile page. Click the Edit icon.
On the Crew Profile page, click the Profile Change Logs.
Clicking Profile Change Logs will display all logs related to changes made to that crew member. As shown below, one of the logs is the rank update. Click View to see the log details.
The log details will show when the change was made, who made the update, the IP address, the old value (Rank 1), the new value (Rank 7), and other information related to the crew profile changes.
10.5 Contract Settings
10.5 Contract Settings
The Contract Settings allows user to create contracts that can be used in recruitment. Additionally, signatures can also be created which can be affixed automatically to any available contract. The contracts function in CrewCard eliminates the need for hardcopies of any contracts because everything can now be done inside the system.
10.5.1 Adding Signature
Different contracts require different signatures. In this section, you can create a signature depending on your requirement. Clicking the wheel icon in the upper right corner will direct you to the Settings page.
Click ‘Signature’ on the Settings page under the ‘Contracts’ section.
After clicking on ‘Add Signature,’ you have two options: draw a signature or upload a pre-existing one.
To draw a signature, fill out the fields and select ‘Draw Signature’. Use the cursor of your mouse as the tip of your pen, affix your signature as if you are affixing your signature on a piece of paper.
To upload a signature, fill out the fields, select ‘upload image’ and click ‘Choose File’.
A pop-up will appear, allowing the user to select the signature file to upload. Once selected, the user will click ‘Open,’ and the system will upload the file.
To see the suggested size for the signature image file, click the info icon.
The user can then click ‘Save’ to save the Signature.
Clicking ‘Signature List’ under Contracts will direct you to the Signature page. To make changes, click the ‘Edit’ button, scroll up a bit, and you can edit the Signature.
If you want to redo your signature, simply click the Edit button. If you are satisfied with the appearance of your signature, you can now click Save. The newly created signature will then be added in the Signature List.
In the Signature List, there are Actions icons: Edit and Delete. If you want to edit the signature, click on the Edit icon and then you will be able to edit the signature. If ‘Delete Signature’ is clicked, there will be pop-up a warning asking if you really want to delete the signature.
10.5.2 Adding Contracts
Click Add Contract, enter the title of the contract, now enter the details of the contract in the next info box. You can use various formatting tools to make the appearance of your contract more formal and presentable. You can make the text bold, italic, insert photos, videos, and more, by using the editor.
After you added the content of the contract, you can now select the signature to be used for the contract from the dropdown menu, then click save.
This will then be added to the contracts list. If you want to edit the contract, click on the pencil icon and then you will be able to edit the contract. If ‘Delete Contract’ is clicked, a pop-up warning will appear
10.5.3 Bulk Contracts
Start by navigating to the Home page and then clicking on the Settings icon. This will redirect you to the Settings page.
Once there, locate and select ‘Contract Settings’ under the ‘Contracts’ section, and then proceed to click on the ‘Send Contract’ option.
Upon clicking ‘Send Contract,’ a pop-up window will appear, prompting you to fill out the required fields and specify the recipients for sending bulk contracts.
In case you need to abort the process, you can click on either the ‘X’ or ‘Cancel’ buttons. To save any changes made, simply click on the ‘Save’ button.
For viewing contract logs, locate and click on the ‘Contract Logs’ button.
Upon landing on this page, you will notice a default date within the ‘From Date’ filter search. To find specific records of contracts sent, you can input relevant information into the provided filter search fields.
x`
10.6 Qualification Settings
There are Activities and Abilities which require a Qualification before a crew can be assigned to a shift. As such, Activity and Abilities can be mapped to a Qualification. Depending on the Qualification settings, a crew may be blocked from being assigned to a shift.
All the qualifications you have added in this setting will become available in the activity page where you can map the qualifications.
The setting warns you if a crew member has an incomplete qualification or if the qualification has expired, you will not be able to book them for any shift. The word “BLOCKED” will be added alongside the name of the crew member.
To add a new field for Qualification, click Add Field then enter the Caption, Input and you can tick the boxes of Block Crew, Required, Warn, Apply to All, and Daily Email. You also can delete the qualification using the delete icon.
All the qualifications you have added in this setting will become available on the Activity and Abilities page where you can map the qualifications.
In Edit Activity page the qualification added here can be mapped to activities, scroll down to qualification section and to add a qualification click add qualification. Enter the the qualification name, tick Block Crew, required and warn if required then click save button. Automatically the new qualification added in this page will also be visible in Qualification settings.
To access the activities, start by clicking the Settings dropdown menu and selecting the Activities option.
On this page, click ‘Edit Activity’ to see the newly added checkboxes we have implemented.
The checkboxes aim to designate specific activities as ‘Allowance’, giving us control over the calculation of Tax and Super. It will visually indicate whether an activity is licensed (ticketed) and be displayed prominently within the booking area.
This functionality integrates into the PM branch and seamlessly connects to the payroll branch, ensuring a cohesive operational process. Furthermore, marking an activity as an Allowance signifies that no PAYG or Super will be paid for that particular Activity.
Activity Locking and Logic Update
We have enhanced the Activity locking feature to provide you with more control. When an activity is locked, the system will prevent users from deleting it. The updated logic for the locking feature is now triggered when any of the checkboxes are ticked, making the feature more intuitive and user-friendly.
Activities Treated as an Allowance Setting and Checkbox Functionality
The system has a setting that facilitates the selection of multiple activities. Consequently, the selected activities will have the Payroll Settings accessible on the Activities page, enabling administrative users to view and adjust this setting per their requirements. If you wish to activate or deactivate this feature, please contact support@crewcard.co..
On the Activities page, we have added some checkboxes that declare an Activity as an Allowance where we can control if Tax and Super will be calculated. The checkboxes will show the skill in the booking area and indicate if this is a licensed (ticketed) activity.
10.7 Action Settings
Sometimes a job may require that crew members are properly inducted about the venue, or before a crew can start a job, they will need information about health and safety.
The Action List is a new setting where you can set up actions that a crew needs to read and understand before they can complete a job.
If you do not see the Action Settings in your system, contact support@personnelmanager.com.au. to activate this feature in your system.
Click the Add Action button to open the window for adding Action List. Enter the title of the Action List in the provided field and start adding steps to the Action List. There are different steps that you can add to an Action List.
Type the title of the action.
Add a step from the drop-down list that the crew will have to do after reading.
These are the available steps that you can add to your Action List:
Subtitle – this is a text which can be used as an additional information
Text – information in the form of texts
Checkbox – checkboxes which you can set as mandatory or not
Question – a question step where crew members will have to answer
Yes/No Question – a question step answerable by yes/no
Forms that have been uploaded in the forms page will appear in the drop-down menu, select a form that relates to the action.
Click ‘save’ at the bottom right-hand side of the page.
Click the edit button next to the action.
Use the arrows to group the crew ability who are required to read the action.
Click ‘save’ at the bottom right-hand side of the page and a message will pop up.
10.8 Resources Settings
10.8 Resources Settings
These Resources can be a policy, procedure or any other important information that the crew can access using the Crew Access or via the app. There is no need for an additional software to view the online content. Resources can be easily used in other sections of the CrewCard system such as Recruitment, Actions and Forms. When a resource is edited, it will be displayed automatically across the software.
10.8.1 Adding a Resource
Add Resource
Click the Add Resource button, this will open a new window where you can add the contents for the resource. You can edit the text, and insert links, photos, tables and videos.
Furthermore, you can insert a resource by clicking on “Insert Resource”.
Afterward, select the resource you wish to add.
Once you are done adding content for the resource, click the Save button. The newly created resource will then be added on the resource list. You can edit with the pencil icon or delete with the bin icon.
Upload Resource
Upload Resource allows users to upload and save files instead of manually adding in text.
To upload a resource click the ‘Upload Resource’ button next to ‘Add Resource’.
A window will pop up asking you to enter the ‘Resource Name’. Once done click ‘Upload File’ and then click ‘Save’. Once the file is saved, a success message will appear at the top right corner, saying “Success! Resource has been saved.”
NOTE: The file can be opened by clicking on the File Name or File Type, which will then open the file in a new browser tab.
To re-upload the file, simply click the Edit icon on the file that needs to be edited. Then, click ‘Reupload File’, choose the file and click ‘Save’.
10.8.2 Mapping a Resource to an Activity A resource can be mapped to an activity. After adding to the resource list, you can edit it to allocate it to an activity. In the below screenshot, the resource that we created Test Resource for Crew is now mapped to Activity Cashier.
10.8.3 Crew Portal Resources
The crew needs to have the resource activity under their profile. Click the Add Heading button in the Crew Portal Resources and enter a name for the header. After entering the name of the header, click Save Heading. The header will now appear in the list of headers.
Click the button + Resource, and a new field will appear where you can select a Resource from the dropdown menu which will be added to the header. Click Save Resources after selecting the resource from the dropdown menu. Based on the above settings that we configured, this is how will the resource will look in the Crew Access of a crew member:
10.8.4 Resources in Recruitment
Resources can be added into the recruitment process. When you want your recruits to read and understand your company policies and procedures, you can do so by configuring the recruitment settings and choosing the resources. In the Recruitment Settings, select the resource that you want to add from the dropdown menu then click Save Resources. Go to 10.4 Recruitment Setting to view the complete procedure for recruitment.
10.8.5 Resource in Forms
Resources can be added in the Safety Induction in Forms Settings. You can put a check on the box ‘Policies and Procedures’.
10.9 Processes settings
Improve the efficiency of your workplace by adding all of your company processes into CrewCard as responsible web pages, where they are easily accessible to your office team members.
CrewCard includes a complete internal documentation module to record and provide access for admin and duty manager users. All of your internal user guides, training and company processes are in an easy to navigate, user-friendly interface stored within the secure environment of your CrewCard Admin Portal.
It makes sense for the instructions for your office workers to be on the same platform as the one that they use to roster and manage staff, reducing time and financial costs to the organisation of maintaining many separate systems for the same workflow. Some of the advantages for clearly documenting your processes for staff include:
Processes help employees complete their work tasks as expected
Employees learn responsibilities autonomously without needing to over consult with supervisors
Scripts can be accessed via the processes for telephone workers to recite
Online processes minimise errors and reduce the chance of employees not following company processes correctly
Employees can access processes at anytime and from any location
Reduce training and internal emails / communications
To access the processes page, click Records in the header and select Processes under the Logs column. A list of processes will appear, divided into sections under their relevant headings. Process titles and keywords within the processes will result from the search terms used, allowing the admin, duty manager user or the crew user to quickly access the required information to perform their work.
The processes module works much in the same way as the resources module.
To create and add a new process, go to settings and then scroll down to the Processes tab in the left-hand side menu. Click the + Add Process button on the top left-hand side to create a new process. Add the title and the body of the process in the text editor below it. It is possible to attach images and links to web pages and videos to make your processes as informative as possible. Once the content has been added, click Save in the bottom right-hand side of the process.
Once you have created processes, you can assign them to the Admin Portal for admin and duty manager users and the Crew Portal for crew users. Within these portals, the processes can be organised under headings by clicking + Heading on the bottom left, and then pressing the Save Heading button next to it.
Once the heading is saved, a table will appear with the heading title in grey and the buttons + Process and Save Process to the right of it. Once the + Process button is clicked, a drop down menu will appear. Simply select the desired process from here and then press Save Process above. Repeat this process until the list of processes is added under the heading. Continue to add headings and processes as required in the Admin Portal and/or Crew Portal sections of the processes settings.
10.10 Forms Settings
Access Policies Online
CrewCard allows you to add your company policies as responsive web pages, or you are able to upload attachments for your crew members to access within their Crew Portal. In fact, any documentation can be added via the Resources module.
We have generic policies available to be integrated into your CrewCard system, and can offer 3 complimentary policies from the list below for our existing customers:
Anti Discrimination Policy
Social Media Policy
Use of Company Resources
Drug and Alcohol Policy
Privacy Policy
Sexual Harassment Policy
Covid-Safe Plan
Company policies and other documentation can be created and stored in the Resources settings of the Admin Portal. Resources can be used for any type of documentation you require, company policies being only one example.
To add company policies, go to Settings then click Resources in the side left menu. Click the + Add Resource button top left to create a new Resource. Add the Title and the content of the Resource in the text editor below. It is possible to attach images and links to web pages and videos to make your resources as informative as possible. Once the content has been added, click Save in the bottom right of the Resource.
Once your resources have been created, they can be added to the Crew Portal and the Recruitment module for staff to accept during the onboarding process of your company.
Within the Crew Portal, the resources can be organised under Headings by clicking + Heading on the bottom left and then pressing the Save Heading button next to it.
Once the heading is saved a table will appear with the heading title in grey and the buttons + Resource and Save Resource to the right of it. Once the + Resource button is clicked, a drop down menu will appear. Select the desired resource from here, then press Save Resource above. Repeat this process until the list of resources is added under the heading. Continue to add Headings and Resources as required in the Crew Portal section of the Resources Setting.
Company policies and other documents (resources) can be assigned into the Agreements page of the Crew Portal Profile for recruits to view, sign and submit. Go to Settings and select Recruitment from the side menu. Scroll down to the Resources section and select the desired Resources from the Choose Resource drop down menu and then press Save Resource. The order the resources will appear in the Agreements page for recruits and can be altered by dragging the resources up and down on the left of the table using the drag icon buttons.
10.11 SWMS Settings
CrewCard has an in built SWMS feature that is customisable based on the jobs of your company. SWMS will display the venues inductions when a crew is on shift.
11.0 Utility Board
The Utility Board allows users to personalise their portal for faster access to key features. It combines ease of navigation with advanced customisation, giving you control over your workspace layout.
The Utility Board icon is displayed on the header bar, next to the All Business switch icon.
Hovering over the icon displays the message: “Click ‘Utility Board’ to personalise your portal for faster access.”
To enable this feature, go to Admin Settings and select Utility Board. To Activate the feature simply select “Yes” and tick which sub menus you want to enable too.
The Utility Board is tied to the activation status of main headings such as:
Recruitment Booking Jobs Timesheets
Note: If a heading is not set to ON in settings, you won’t be able to select its sub-menus (e.g., Recruit Card, Add Job, Sites, or Payroll).
Key Features and Functions:
Default Positioning
Initial State: The Utility Board opens in the centre of your screen.
Draggable and Resizable: Drag: Click and hold anywhere on the board to move it. Resize: Click, hold, and pull any corner to adjust its size.
Pop-Up Controls The pop-up window includes three icons at the top-right corner for enhanced control:
Minimise: Shrinks the pop-up to a small icon at the bottom of the screen. To restore, click the Utility Board icon again.
Full Screen: Expands the pop-up to cover the entire screen. Click the icon again to return to its default size.
Close: Completely removes the pop-up from view. To reopen, click the Utility Board icon in the header.
12.0 Administrator
12.1 Businesses
Key: A
The CrewCard System allows you to operate unlimited businesses under one platform. Some users operate several businesses; others use it to break their staff up into regions, states or cities. The system also allows you to break up the different departments within a company. If there is a problem adding a new business, please email support@personnelmanager.com.au as an additional fee may be required. On the business page, you are able to edit each business by using the pencil icon to edit or the x icon to delete.
Custom Rates: Assigned to each business once they are created. (See “Rates” for more info)
11.1.1 Add a New Business
Click Add a New Business Record → Add your business details into the fields provided
TIP: You can add as many different businesses as you like
Sort Number: Sort Number 1 means it can be seen by Clients in their Login. Sort Number 0 will not visible to your clients.
Company Name: Name of Company
Client Display Name: A display name can also be added, this is a different name that will be displayed to clients in their client login when making online bookings.
Manager Name: A manager can be selected for this business
11.1.2 Add a Business Manager
Create crew contact (Guide 2.7) → return to business page → use pencil icon to edit business → select manager from drop-down box → Save
Manager Login: Manager login has the ability to only view and edit the roster in their allocated business. They have no ability to see what happens in other businesses.
Can Manager Create Job Sheet: With “yes” selected in this option, the assigned Business Manager will be able to create job sheets.
Email Address: Outgoing emails will also appear in the invoices (for this business). Also, this email address receives the “Online Auto-Booking Forms”.
2nd Email Address: An alternative email address to send/receive copies.
Phone, Fax, Mobile: Contact details for the business.
Incoming SMS: Tick box Use incoming SMS as company mobile number, which is set in Global Settings should be used as company’s mobile number. See “Your Incoming SMS to Web Number” for more info. See guide 4.7.17.
Street, Suburb, State, Postcode: Address of Business (optional).
Time Zone: Select the time zone that the business operates in.
Manager Bonus Rate: It is possible to assign a bonus rate for “Business Manager” payable as a commission of a certain amount of $ per hr of labor worked in that business.
Import Key: Allows up to 5 businesses to connect to thumbprint software PeopleKey integration. (If you would like to add more please contact support@personnelmanager.com.au)
Account Details: In the global settings page, you can enter your default accounts details. These will appear on the Tax Invoices you send to clients. If any business you have created needs to use different account details than the default one, then leave “Use Separate Accounts Details” unticked. Otherwise, enter each business account detail in this section.
Tip: Crew can be assigned as managers to multiple businesses and can view all assigned businesses or each business individually
Adding Sub Business
On the Business page, there is a feature where you can add a Sub Business. Once you click “Add a Sub Business,” you will be taken to a new screen specifically for adding sub-business details. The main business details at the bottom of the screen will be automatically input and will not be editable from this page.
Users can fill in the necessary information for the sub-business and save the changes.
After filling in the information and clicking save, it will be shown under the selected business as shown below:
Viewing and Managing Sub-Businesses: The newly created Sub-Business will automatically appear in the list under the selected main business. From this list, you can access and manage all associated Sub-Businesses as needed.
Assigning Managers: Managers can be assigned to both the Main Business and Sub-Business. Ensure that the crew is mapped to the respective businesses for proper management access.
Logging in for Managers Assigned to Sub-Businesses
At the upper-right corner of the interface, managers will see the businesses assigned to them. For example, a Manager can select the Sub-Business Shrew Enterprise from the available options.
When using the Add Job feature, sub-businesses will be indented in the dropdown menu for easy identification.
After a job is created, the Business field will reflect the sub-business selected by the Manager.
Deletion of a Sub-Business
Deleting a Sub-Business will permanently remove all associated records, including any accounts mapped to it.
12.2 Partners
The CrewCard System enables you to manage as many partners as you want from a single platform. The two parties could be individuals who agree to collaborate to manage a business. Partners is similar to admin, but partner is a smaller admin or client.
If you are having trouble adding a new partner, please contact support@personnelmanager.com.au as an additional fee may be required.
You can edit each partner on the partners page by clicking the pencil icon to edit or the trashicon to delete it.
Simply click the Admin Dropdown and Select Partners.
This takes you to the Partners Page. Click the Add Partner button to add a partner.
TIP: You can add as many different businesses as you like
Fill out the form and press the save button.
Partner Name: Name of the Partner
Code: Partner Name Code
Can Manager Create Job Sheets: With “yes” selected in this option, the assigned Business Manager will be able to create job sheets.
Email Address:Partner Login has the ability to only view and edit the allocated partners. They have no ability to see what happens in other partners.
Password: Partner password for the Partner Portal
2nd Email Address: An alternative email address to send/receive copies.
Phone: Phone Contact details for the business.
Mobile: Mobile Contact details for the business.
Incoming SMS: Tick box Use incoming SMS as company mobile number, which is set in Global Settings should be used as company’s mobile number. See “Your Incoming SMS to Web Number” for more info
Street: Street Address of Business
Suburb: Suburb Address of Business
State: State of Business
Postcode: Postcode of business
Timezone: Select a time zone that the business will operate
Manager Bonus Rate: It is possible to assign a bonus rate for “Business Manager” payable as a commission of a certain amount of $ per hr of labor worked in that business.
Import Key:Allows up to 5 businesses to connect to thumbprint software PeopleKey integration. (If you would like to add more please contact support@personnelmanager.com.au)
Default Customer: Select the default customer
Default Venue: Select the default Venue
12.3 Timesheets
The Timesheets page displays the shifts that crews have completed and the times they worked. This page helps view the total amount the crew has made in a set period of time.
How to use Time Sheets:
Use the following fields to search through the timesheets.
Member: Enter the crew’s name you wish to view
Date from/until: The date you wish the timesheets between
Job No.: Enter the job number so that all job sheets related to this job will display
Crew Status: Click the box to drop down a list of options from gender and the work status.
Lock Status: Select drop down a list of options from the following lock statuses: Locked, Unlocked, C/A Lock, Admin Lock and Payroll Lock.
Time Conflict: Select to drop down a list of options from All to Time Conflicts. If there is a time conflict, the Clock icon in the TS column will turn red.
Export Options: Click the text box and a list of export options will be displayed
Click what you wish to export and it will download into an excel sheet.
Exploring a timesheet:
The crew’s name is located on the top left-hand side before the timesheet. Next to it is the time period of the timesheets that are listed below it.
Click the crew’s name to open up the crew profile.
Below the crew’s name, there are two buttons
Export Record: This download all shifts under the crew into an Excel sheet
Export as Approved Timesheet: This downloads only the approved shifts for the crew
Schedule: Shows you what was originally booked
Actual: You can enter the time of when it actually happened. This will send be copied in the grey section of the timesheet.
Breaks: Click the break icon and a pop-out window will appear.
TS: Timesheet column allows you to change the time as well. Click the clock and the timesheet pop-out will display
Pay Category: Select how the crew will be paid for the shift, either a total of the day or by individual hours. This is reflected on the invoice.
There are two ways to total the payment of the crew, hourly: this will display the quantity of hours the crew worked, or day: this will sum the hours up and produce an overall total. See below.
Extras allow you to upload additional costs that can be charged to your client. For example, call-out fee and travel fees. You can delete any extras that have been created while using the app through the settings.
In the last section of the timesheets, crew can write comments about the shift and it will appear here. A tick box is the timesheet approved and at the end of the timesheet is any rates have been updated in the system. Click the drop-down box to allow the timesheet to automatically update with the new rates, or choose not to allow the timesheet to update with the new rates.
In an event where the timesheet is still editable but the shifts are locked, this indicates that the timesheet has not yet approved. Ensure the checkbox approved is ticked to make the shifts uneditable.
Note that in the Timesheet page, a time buffer setting exists for the crew. If the user can’t fulfil the time buffer, the Time On and Time Off will turn to a Red font colour. Make sure that the crew don’t have an overlapping shift to avoid this from occurring.
Timesheet Notes
The Timesheet Notes section allows you to view notes recorded during a shift. The information displayed depends on how your system is set up.
The field label will vary depending on your configuration:
Timesheet Notes(Crew App Shift Notes & Crew Note) – when the system captures both Crew App and Crew Portal entries.
Notes – when only Crew Portal entries are included.
Understanding the Notes When Timesheet Notes includes Crew App entries.
You will see three types of notes: Check In Note – Entered by the crew at the time of check-in via the Crew App.
Check Out Note – Entered by the crew at the time of check-out via the Crew App.
Crew Note – Added by the crew through the Crew Portal.
When Timesheet Notes includes only Crew Notes The section will be labelled Notes and will display:
Crew Note – Added by the crew through the Crew Portal (on the Crew Job page).
Note: If you would this setting enabled, Please contact support@crewcard.co.
Footer:
Tick box next to one or more shifts, then use the action bar in the footer to perform the following actions.
Deleted Shifts: The selected shifts will be deleted without a message sent to crew
Cancel/Delete: When shift/s is canceled/deleted a Cancellation SMS is sent to notify crew.
Time Change: This feature is available when the time or date has changed. When the shift time/date has updated, click on the “Time Change Button” to open a new window with an SMS message ready to send to affected crew members to advise the change. Also request crew to reply confirm/accept the changes. The status of the changes displays as followings:
Crew name appears as green on the shift Page, ‘S’ (sent) in message column also indicates a message has been sent.
Crew name appears as black when crew member/s has confirmed and accepted.
Crew Name appears as red to indicate crew has denied the changes and ‘D’ (Denied) also appear in message column.
Scheduler/ auto: Please see guide 4.3.
Offer Message:
This option is used when sending out shift offer messages to staff members. Click, and a page called ‘MultiSMS’ will open up, allowing you to offer shift/s to multiple staff members. The default SMS appears in the text box (editable and customisable in Global Settings) with another box with the list of Crews that are assigned to the activity.
In this list, crew members have an asterisk next to their name to indicate that they are booked at that time, or a hash symbol (#) next to their name which indicates they entered their unavailability. Any other crew members are available for shifts.
Offer Same: The Same Crew SMS features works in two ways.
1. You can book multiple people on several shifts, with a view to keep consistent staff booked on those shifts, provided you select an equal number of shifts on each occasion.
For example, if on the shifts page, you had four shifts for four people from 8am to 12pm and you needed the same four people to return on four subsequent shifts, perhaps that evening from 8pm to 11pm, you would have to select all eight shifts (it has to be an even number of both to work, four morning shifts and four evening shifts) and choose “Message Same Crew Shifts” in the “Select an Action drop down list or press the edit (pencil icon) to enter the Shift Edit Page. Then, leaving the Crew Member name blank, press “Offer Shift Same Crew”. This will bring up the default SMS (customisable, editable) and a crew list of available crew for that Activity. Once again crew that are already booked in all time slots will have an asterisk * next to their name and those that have entered their own unavailability will have a hash symbol # next to their name. In this same crew SMS mode, if a crew member is already booked for one but not all of the shifts, a *+ will appear next their name and if they have made themselves unavailable for one but not all of the shifts a #+ will appear next to their name. The message will create one shift number for both (or all shifts) but will offer crew both shifts in the same message. Depending upon how you have set the default settings for the same crew SMS message in global settings, the message you’ve sent may look like this:
[715] Can you do 2 shifts, Sun 05-07, 07:45am – 12:00pm & Sun 05-07, 20:00pm – 23:00pm approx., at Cronulla Beach ? Client – X Productions. Reply 715Y for YES, 715N for NO. Await Confirmation.
The crew members are accepting both shifts by replying 715Y. With this function, it would be possible to select all eight shifts (four in the morning and four in the evening) and send this message to eight or ten or twelve crew members (however many you think necessary to get the job filled). Once again, the system will wait the predetermined length of time that you have programmed into it; the first four of the highest ranking to reply in the affirmative will be awarded the job and will receive the confirmation messages. Those who missed out will receive the declined message to inform them that they will not be needed and to stand by for more shifts. Once again, on the shifts page, it will be possible to see which shifts have been sent out using the offer shifts same crew feature because in the shifts, under the SMS field, it will show SC “?” and the shift number created by the system for these shifts, in this example SC (715). There will be the “?” next to the SC (715) of the first of these ‘linked’ shifts. If you pressed this “?” icon, a list will open showing all the crew you sent the Same Crew SMS message to, including the time the message was sent. As you refresh the page you will see Y and N appear after the names of the crew members that have responded yes or no to the shifts and the times they responded.
2. The second way that the “Message Same Crew Shifts” can work is by offering multiple shifts (under different clients and job sheets) to one crew member, for example an entire week or fortnight’s work. In the shifts page, you need to select all the shifts that you wish to offer to the one crew member and press the edit (pencil icon) to open the shift edit page. Press the “Offer Shift Same Crew” button, select the crew member you wish to offer the shifts to from the crew list and press ‘Send SMS’. The content of the SMS will say how many shifts are being offered with dates, times and locations.
Offer Multi: Multi Roster Message option works the same way as the Message Same Crew Shifts. Message Multi Roster Shifts allows you to offer several shifts in one SMS/Email to a Staff Member/s. If they accept the shifts offered, they receive a Confirmation SMS with the details of all their shifts in one SMS/Email. On the shifts Page, at the bottom of the screen under ‘Select an Action’, and in the shift edit page and the job sheets pages, there is the option ‘Message Multi Roster Shifts’. This feature allows you to offer multiple shifts to a Crew Member or several Crew Members in a single Message (SMS/Email) per crew member. The crew member/s only need to reply with a single SMS accept to be confirmed for all shifts.
For example: You could create an entire roster for the following week, select all the shifts you want in the Shifts Page, scroll down the bottom of the page, under “Select an Action” select the “Message Multi Roster Shifts”. All shifts will be presented in SMS/format to the staff to accept the shifts in one go. When the crew members accept the shifts, they will automatically be sent Confirm Multi Messages (after the predetermined length of time that is customisable in Global Settings under SMS Incoming Configuration, after Incoming SMS Accept Shifts Interval).
Confirm Shift: By selecting shift/s and clicking this option you simply make a Crew member/s confirmed for a shift without sending them a Confirmation Message. Their name will appear black on the shifts page with a C next to it (under the SMS field) indicates they have confirmed.
Confirm Message: This will send a confirmation message to the crew who is booked for the shift
Confirm Multi: Confirm multiple shift with the same crew
Lock: Shifts must be locked with the correct times in order to be processed by payroll. Once the start/finish/break times are ensured correct, shifts can be locked using this option from the drop down menu. Once locked a padlock icon will appear next to the locked shift.
Admin Lock: Shifts must be locked with the correct times in order to be processed by payroll. Once the start/finish/break times are ensured correct, shifts can be locked using this option from the drop-down menu. Once locked, a padlock icon with the word ADMIN under it will appear next to each shift/s. Admin locked shifts can only be unlocked by ADMIN users.
Payroll Lock: The job is locked for payroll the time sheet will be sent to be paid
Unlock: This option reverses the locked or admin locked actions.
Copy Shift (s): The selected shifts will be copied
Deleted Shift (s): The selected shifts will be deleted
Message Cancel & Delete Shift (s): Delete/ cancel shift and a message will be sent to the crew member to notify them
Message Notify Staff of Change: The change in the selected shift will be sent to the crew
Message Notify Staff of Change: The change in the selected shift will be sent to the crew
Highlight Shift(s): Highlight the shift, this reminds you to make changes to it
Remove Shift(s) Highlighting: This removes the highlight from the shift.
To edit the timesheet layout, please view guide 10.2.21 Timesheets.
12.4 Client Booking Block
4.3 Client Booking Block Key: A
This feature allows you to put a block on clients from making “Auto Bookings”. To add clients to this list, click “Add Client Booking Block”.
Select the Company Name that you want to create the booking block for, then fill out the date and time for the period and add a reason (optional), then click “Save”.
13.0 Human Resources
Key: A
Access the Human Resources menu by hovering your mouse over the user dropdown at the right corner of the screen.
There are three sections under the Human Resources menu. Recruit Cards, Staff Compliance, and Custom Reports.
Recruit Cards:
Explore talent acquisition in the Recruit Cards section. Discover recruits on digital cards with key info like qualifications and experience. Easily evaluate and manage your recruits from this hub.
Staff Compliance:
Stay compliant effortlessly in the Staff Compliance section. Track and manage tasks like certifications and training. Ensure staff follows company policies and industry standards.
Custom Reports:
Simplify data-driven decisions with Custom Reports. Create tailored HR reports, explore analytics, and gain insights into your workforce. Use this feature for strategic planning and informed choices.
13.1 Recruit Cards
Key: A
Recruit Cards Page – Admin Access
To view recruit lists, select “Business”, “Skill”, “Crew Name”, ”Mobile Number”, “Cate From”, “Date To” and “Types”.
Definitions: Recruiter – Administrator or Duty Manager User accessing the Admin Portal, utilising the Recruit Cards page in order to perform the tasks necessary to assist recruits in completing the recruitment process.
Recruit – Crew User accessing the Crew Portal to complete the recruitment process.
Applicant – Crew User accessing the Sign-Up page to register themselves as potential recruits.
Contacts (Header) > Recruit Cards
CrewCard’s Recruitment Module allows you to onboard new staff members directly into your CrewCard platform. Recruits can access their Crew Portal Profile to complete the onboarding process once they have been invited by a recruiter (Admin or Duty Manager User), or when Recruitment Settings are configured to allow for automatic invitations – Auto Invite.
Add Recruit
There are two methods to initiate the recruitment process and create a Recruit Card in the Admin Portal: Enrolment and Registration.
Enrolment: A recruit is enrolled into the system by an Admin or Duty Manager User by pressing the Add New on the Recruit Cards page.
Registration: A recruit registers themselves into the system on the Sign-Up Page.
During the onboarding process, a recruit completes a series of stages for recruitment until they are Activated by a recruiter (Admin / Duty Manager User). This moves them into the active Crew List at Contacts > Crew List.
Stages of recruitment are Enrolled / Registered, Shortlisted, Invited, Pending, Completed, Hidden and Active, which can be searched in the search header of the Recruit Cards page.
Enrolment
To enroll crew into your system, click the Add New button.
A pop-out window will open. Please fill out the fields.
After you have clicked Save, you will be redirected to the individual’s recruits page and the recruit will receive an email of enrolment. Once enrolled, the status on the card will be tagged as Enrolled.
Auto – Invite: Invitations are not required after registration. There are two options for applicants to progress to the onboarding process from the Sign-Up page. Once applicants have either registered themselves from the Sign-Up page, or have been enrolled by a recruiter, they can be invited by the recruiter via an email. This email will contain a once-only access token to open their Recruit Details page and continue the process of onboarding themselves as recruits. The Auto Invite option allows you to bypass the step of Recruiters manually inviting recruits to set their password, fill in their personal details, qualifications, experience, medical history, agreements, contract, induction and accounts. This exists so that once an applicant has registered on the Sign-Up page, they can progress to the next steps without needing an email invitation.
Recruitment Page Tabs
Crew Profile > Crew Access
Recruits (staff) can access their Crew Profile to self-register as recruits, which can also be viewed in the Recruit Cards page through the Admin Portal (admin access).
Admin Users and Duty Manager Users can view the same recruitment details as the recruits. This is done by clicking on a Recruit Card on the Recruit Cards Page at Contacts > Recruit Cards.
The Crew Portal Profile page contains several pages for recruits to navigate in order to complete their onboarding process. Admin and Duty Manager Users can access the Recruit Cards to view the Bio, Overview, Interview, Details, Agreements, Induction, Contracts, Accounts, Approval and Activate tabs. Recruits are unable to view the Bio, Interview, Approval or Activate pages as these are for the use of Admin and Duty Manager Users only. To hide any of the Interview, Details, Agreements, Inductions, Contracts, Accounts pages from recruits, please untick any of the below settings.
Interview: Admin or Duty Manager Users performing the function of Recruiters can add Admin notes, set interview questions, send predefined SMS messages to recruits (perhaps to inform them to expect a call from a certain phone number to discuss their recruitment) and view the CV of recruits.
Customise the questions that you may need to ask the recruit during a phone or in-person interview.
Agreements: Recruiters (Admin and Duty Manager) Users can assign company policies and other documents from the Resources Module in Settings. They can also create disclaimer questions for recruits to view, sign and submit here. The Agreements Invite button at the bottom of the page sends an email to the recruit. containing a button that links directly to the Agreements page of their Crew Portal Profile. This invites them to agree to the company policies and agreements and to accept the disclaimers, sign their signature and submit. At this point, the Recruit has accepted your company’s legal requirements for employment, and the Profile Completed email is automatically sent to both the recruit and Administrator. This email includes two PDF attachments and a record of the agreements that have been accepted, plus a copy of the captured signature. The PDF attachments can be uploaded in the Recruitment Settings page, and can be chosen by the Administrator. An example is PDF 1 may contain ‘Welcome Information’ outlining your expectations to new staff members, and PDF 2 may contain ‘Safety Handbook’. The agreements information and captured signature is also permanently stored within the Crew Profile.
Inductions: Recruits can complete a multiple-choice quiz to demonstrate their knowledge of your company’s work health and safety system. This can include questions such as how to submit an incident report. Customise induction questions in Settings > Forms > Recruit Induction. To remove the induction tab for recruits, please hide the tab.
Customise induction questions by going through Settings>Forms>Recruit Induction. To remove the induction tab for recruits, please hide the tab.
Contracts: To add new contracts, see Settings > Contract Settings. Once you have set up a new contract template and signature block, you can assign an employment contract for new recruits to sign and submit as part of their recruitment onboarding. Admin and Duty Manager Users can also invite Recruits to sign the contract by clicking the Invite Contract button in the Contract tab of the Recruit Card at Contacts > Recruit Card > Contracts tab. When recruits sign and submit the contract, it will be attached as a PDF to an email sent automatically to both the Recruit and Admin. Additionally, the contract will be stored permanently in their Crew Profile.
Accounts: To collect info in preparation for payroll, you can present this tab for recruits to fill in their Bank, Super and TFND (tax file number declaration) details.
Display Recruits Sign Up on Login Page: This will show the Sign-Up option on the System Login Page that directs recruits to the Sign-Up page.
The following is what the recruits will see when signing up.
Enable Recruits Page Menu: This will enable the Recruit Cards page via Contacts > Recruit Cards.
Hide business selection on sign up page: If you are using the Businesses as Location, such as when you are operating in Sydney, Melbourne and Brisbane, you would enable this selection for your recruits to sign up under the correct location.
Business Label: You can relabel your Businesses drop down menu to a custom label, such as Location or Branch, to make more sense to applicants when they choose which Business to select upon registration in the Sign-Up page.
This also relates to the button at the top of the systems page.
Display employment history section on Recruits Sign up: Enable this setting if you require applicants to fill in their employment history on the Sign-Up page. You can then add customised questions for that Sign-Up page.
The crew will see this:
Allow UK mobile number: The system defaults to accept 10 digits for Australian mobile numbers. Enable this setting to accept 11 digits for UK mobile numbers.
Resume: This setting allows you to choose one of two methods that applicants can provide their resume or CV details by; TextEditor or Attachment.
TextEditor: This will allow the applicant to copy and paste their resume upon registration in the Sign-Up page.
Attachment: This will allow the applicant to attach their resume as a PDF or Word file when they register on the Sign-Up page.
Tips: To make profile photos upload optional, please see General Setting 48. Profile photo upload required.
To Edit Gender Selections, please see General Setting 47. Gender Text
Shirt size fields are useful to record uniform sizes for staff and are enabled by default as a required question on the Details page. However, this question is optional and can be disabled in General Setting 46. Shirt Size Field
SMS Templates: Create and add multiple default SMS message templates for Admin and Duty manager Users to send to applicants in order to improve the chances of them answering calls from your recruiters. Example 1: Title – Initial SMS. Message – Hi This is [Insert Company Name]. We have received your application and will give you a call shortly to discuss in detail. The call is coming from 1800 000 000. Thank You. Example 1: Title – Request for Call Back. Message – Hi This is [Insert Company Name]. We have received your application and tried to get in contact with you. Please contact recruitment at 1800 000 000. Thank you.
Info Box: Explainer text can be customised above the text field below the medical disclaimer checkboxes to prompt the recruit of which medical details they should provide. Example: List all previous physical or psychological injuries that may affect your work performance (answer not compulsory).
Setting:
Enable Medical Conditions: When the medical conditions setting is enabled, recruits are required to fill in any medical related details that may be required. This comes as part of the employment details on the Medical page of their Crew Portal Profile.
Medical Disclaimer Check boxes: Add any additional custom questions under the medical conditions section for your recruits to check and acknowledge.
Recruit View:
Sign-Up Page Questions: Create and add custom questions on the Sign-Up page to record answers for applicants. For example, you may wish to include a question asking an applicant to explain why they want to work for your company or what pertinent industry experience do they have?
Setting:
Crew View:
Qualifications: When qualifications are required for selected Activities (skills/roles) in order for them to be uploaded into the system, the Qualifications page is added into the recruitment process. In this page, recruits will select the qualifications they possess and upload them.
To add and update qualifications, see Settings > Compliance settings > Qualifications Expiry Date Warning.
To update any Activity and qualification mapping, see Activities Page > Edit Activity
Enable Activities for applicants to select upon sign up: Tick to enable applicants to select different Activities (skills, roles) in the system. Once selected, the Activities will be assigned to staff in their Admin Portal Crew Profiles. Any Activities that require Qualifications will then need to be completed by recruits in the Qualifications section of the onboarding process.
Setting:
Crew View:
Default Activity – Settings > Recruit Settings
Each Crew User is required to have at least one Activity assigned to their profile. This setting allows you to select which Activity will be assigned as the default Activity for Crew Users.
Default Category – Settings > Recruit Settings
Each Crew User is required to have at least one Category assigned to their profile. This setting allows you to select which Activity will be assigned as the default Category for Crew Users.
Recruiters can add extra Activities to the Crew Profile of recruits during the interview process. For example, the default Activity assigned to all recruits might be General Labourer. Using the Assigned Activities function in the Interview tab of the Recruit Card page, a recruiter may add a second Activity of ForkLift Driver, if the recruit has that skill.
The Default Activity will be already assigned, as will any Activities that the applicant selected on the Sign-Up Page.
The Default Category selected in the Recruit Settings will be already assigned in the Recruit Card for each recruit. Because each new Activity assigned will require a category mapped to it in order to trigger a Paid Rate, the Recruiter may need to select additional Categories to match any additional Activities assigned. This is to ensure the Activity Details displays correctly (see Activity Details).
Activity Details
Activity Details displays a table with a combination of Activity, Minimum Rate and Description for each Activity assigned to the recruit.
By displaying the Activity Details on the Agreements page, recruits are accepting the initial pay rates as part of accepting their employment obligations.
The Activity Details can also be inserted into their employment contract. This is displayed on the Contract page of their Crew Portal Profile, or indeed any contract, by inserting the placeholder [ACTIVITY_DETAILS] into the text of the contract when you create or edit a contract (Settings > Contracts > Add Contract). The contract will automatically contain the Activities, pay rates and job description in the employment contract. This works for recruits to agree without the need for any member of staff to manually insert such details.
Activity name and description are pulled from the Activities section of the system. See Administrator Menu > Finance – Activities > Add New Activity or Edit Activity.
Activity name corresponds to the *Name field and description information is pulled from the Job Description field under Activities.
The Min Rate is Paid rate, which can be accessed and set under Administrator Menu > Finance – Activities > Edit Rates or Administrator Menu > Finance – Categories > Edit Rates, under the Paid column. In order for the Paid amount to register, a category needs to be assigned to both the Activity and a Crew Member (recruit) first.
Invite: Invitations are required to be manually sent by pressing the Invite button in the footer after applicants are ‘enrolled’ by recruiters (admin or Duty Manager Users. This is done by pressing the + Add New button in the Recruits Card page and completing the pop up details. Invitations are emailed with a once only access token, and a button that links them to the Set Password page in their Crew Portal Profile .
Once enrolled, recruits appear on the Recruits Cards page, and may be invited individually by selecting one Recruit Card, or in bulk by selecting multiple Recruit Cards and pressing the Invite button. Recruits who have registered themselves via the Sign-Up page may be manually invited by pressing the Invite button, unless the Auto Invite feature is selected. In this scenario, applicants can progress to the Set Password page and may continue with the onboarding process without the need to be invited by Recruiters in the Recruit Cards page.
Details Page: The details page allows recruits to complete their details within their Crew Portal Profile, such as their name and contact details, next of kin / emergency contacts and address. They are also able to upload up to three profile images, pressing the Next button when complete. Recruiters can also assist recruits in real time or complete these details on behalf of recruits by completing the Details tab in their Recruit Card and pressing the Save button at the bottom of the screen.
Agreements: During the onboarding process for new staff, recruits are guided to the Agreements page where they will accept your legal agreements such as contracts, company policies and disclaimers.
The Agreements page can be set up at Settings > Recruitment > Agreements.
Agreements can also be manually emailed by Admin and Duty Manager Users for staff to accept, either during the recruitment process or once activated into the Crew List as active crew with Crew Profiles.
Invite Agreements for Active Crew:
Go to the Contacts menu in the header and select Crew List. Search or find the crew member you would like to invite to accept your company agreements, and click the edit icon on the far right of the screen.
Inside the Crew Portal of the desired crew member, in the Overview section near the top, click the Registration button to open the same registration pages that recruits access during their onboarding process with your company. Click on the Agreements page, then scroll to the bottom of the page to press the Invite Agreements button. This will send the email to the crew member, containing a link to their Agreements page in their Crew Portal, where they can accept your policies and agreements. Once set up, your staff can be sent and accept their agreements quickly and easily on their mobile device.
Crew Portal:
Invite Agreements for Recruits:
Go to the Contacts menu in the header and select Recruit Cards. Search or find the recruit you would like to invite to accept your company agreements and click their Recruit Card to open it.
Once inside their Recruit Card, click on the Agreements page, then scroll to the bottom of the page to press the Invite Agreements button. This will send the email to the crew member, containing a link to their Agreements page in their Crew Portal, where they can accept your policies and agreements. Once set up, your staff can be sent and accept their agreements quickly and easily on their mobile device.
The Agreements Invite button at the bottom of the Agreements page in the Admin Portal, sends an email to the recruit with a button that links directly to the Agreements page of their Crew Portal Profile. This link invites them to agree to the company policies and agreements, and to accept the disclaimers, sign their signature and submit. At this point, the Recruit has accepted your company’s legal requirements for employment, and the Profile Completed email is automatically sent to both the recruit and Administrator. The email consists of two PDF attachments and a record of the agreements that have been accepted, plus a copy of the captured signature. The PDF attachments can be uploaded in the Recruitment Settings page and can be chosen by the Administrator. An example is PDF 1 may contain ‘Welcome Information’ outlining your expectations to new staff members and PDF 2 may contain ‘Safety Handbook’. The agreements information and captured signature is also permanently stored within the Crew Profile.
Account Log:
The accounts log allows you to see the logs of when crew made alterations in their accounts. Crew must make changes to their account in order for Admin to receive an Account details email and view the changes in the accounts tab>> Accounts log section.
Crew must login to their Crew Portal.
Click the dropdown arrow beside your name and select Accounts.
They will be directed to the Profile Page >>Account Tab wherein Crew can make modification on their account information.
As an example, I will be adding the Last Name of the Crew in the Name of the Account and click Save button.
A pop up will appear that says “Your Account Details has been updated.” Click close to confirm. Simultaneously, the Admin will receive an email that the account details of the crew have been updated.
This is the sample email that Admin will receive when the crew have updated their account details. Admin must select the Click Here button in the email to be directed to the crew profile.
Once the Admin has been directed to the crew profile, click Registration button.
This will bring you to the Recruit Page. Click the Accounts Tab.
Scroll down at the bottom part of the Accounts tab until you reach the Account Log section. There you will see what alterations have been made by the crew on his/ her account information.
13.2 Staff Compliance
Key: A
To get started, navigate to the admin dropdown menu and choose “Staff Compliance” within the Human Resources section.
Alternatively, hover your cursor over the “Contacts” in the central navigation bar. Then, choose the “Staff Compliance” option from the drop-down menu.
Upon selection, you will be redirected to the Staff Compliance page, where you will find a comprehensive graphical representation of various compliance areas. This visual presentation depicts aspects such as onboarding, employee skill certification, employment verification documents, and HR documentation review.
On the Crew Compliance page, you have the option to select the view by “All,” “Active Crew,” or “Recruits.” This allows you to filter and display the compliance information based on the desired category.
One of the interesting features in Crew Compliance is the ability to select the graph legend that corresponds to each graph. This functionality allows you to choose and focus on specific areas of compliance represented by the graphs.
When you select the graph legend, you will notice that it becomes excluded or marked as removed, along with the corresponding graph being displayed.
To further enhance the reporting capabilities of the Staff Compliance feature, all pages within the compliance module provide the option to download CSV reports. This feature allows you to generate comprehensive reports for further analysis or sharing with relevant stakeholders.
By selecting the checkbox next to “Download CSV Reports,” you gain the ability to download all the selected reports simultaneously. Additionally, you can individually select the checkboxes for each module, enabling you to download specific reports for that particular module.
Within each compliance page, you have the ability to apply filters to refine your search based on the specific category you desire. This feature allows you to narrow down and focus on the information or data that is most relevant to your needs.
Business: To view specific crew members based on location or business, you can apply filters or search criteria. This will enable you to narrow down the crew list and access the desired information related to their respective locations or business affiliations.
Crew Name: By entering the first few letters of the crew name, the system will generate crew name suggestions for you to choose from. This feature assists in selecting the correct crew name more easily and accurately.
Document: This feature enables you to select or apply filters based on specific documents. You can easily navigate and sort through the available documents to access the desired information.
Status: Choose the status of the document. This option allows you to select and filter documents based on their current status, helping you to manage and organize them more effectively.
Furthermore, you can filter the view by utilizing the sort icon situated next to each column, including Rank, First Name, Last Name, and Document. When you click on the sort icon, the data will be arranged either in ascending or descending order, based on your preference. This functionality provides a convenient way to organize and prioritize the displayed information according to the selected column.
Each page includes logs and an action column, which provide convenient access to additional information. These features enhance the usability of the pages by allowing you to track activity logs and quickly perform actions related to the displayed data.
Logs: The logs feature enables you to view records of reminder logs, including information such as the sender, date/time of the reminder, and the IP address from which the reminder was sent. This provides you with a comprehensive overview of the reminder activity and helps you track the relevant details associated with each reminder.
View Icon: By clicking on the view icon, you can access and view the uploaded documents associated with a specific crew member. This feature enables you to review and examine the documents uploaded by the crew for further reference or verification purposes.
Download Icon: Utilizing the download icon, you can conveniently download the relevant uploaded document of a crew member. This feature enables you to retrieve and save the documents to your local device for offline access or further usage as needed.
Reminder Icon: By utilizing the reminder icon, you can send an email reminder to your crew members and recruits, prompting them to submit their documents. This feature streamlines the process of collecting necessary paperwork and ensures timely compliance.
Staff Profile Icon: Clicking on the profile icon within this column provides quick and effortless navigation to the relevant details based on the staff member’s status. This functionality allows you to access comprehensive information about the staff member, including their qualifications, certifications, and other pertinent details.
Please note that each page within the compliance module may have different actions and columns specific to its purpose and functionality. These variations are designed to cater to the specific requirements and tasks associated with each compliance aspect.
Onboarding documentation – This section pertains to the collection of necessary papers and forms essential for effectively introducing new employees to the company. This encompasses legal and administrative documents like employment agreements, tax forms, confidentiality pacts, direct deposit permissions, and emergency contact particulars.
As an organization, you will allocate a wide array of documents to your staff, ranging from employee agreements to letters signifying the conclusion of probationary periods. These documents advance through multiple phases, involving creation, employee validation, and finalization. As a result, using a centralized system to supervise this process can significantly curtail the administrative effort invested in this responsibility.
The functionality of the Onboarding Documentation feature allows you to create a report that streamlines the evaluation of the status of HR documents within your establishment. This report aids in pinpointing individuals necessitating reminders to complete document endorsements.
View Onboarding Documentation Report
Select the Onboarding Documentation Chart – Depending on the color scheme, you can filter the report using the following criteria:
Accepted
Overdue
Completed
You can activate or deactivate the criteria by clicking on the pink colour or the “overdue” option as displayed in the screenshot above.
Clicking on the “Completed Onboarding Documentation” will lead you to a page where you can view all the documents that have been successfully finalized during the onboarding process.
On this page, you have the option to refine your searches using the following filters:
Business
Crew Name
Document – Agreement, Policy, etc.
Status – Accepted, Overdue and Completed
After you have narrowed down your searches, you can choose the desired search result and then click on “Download CSV Reports.”
Staff/ Crew Certifications – This section offers the ability to confirm and record the qualifications, abilities, and official certifications possessed by team members. This process involves the management and monitoring of certifications and training credentials to ensure alignment with industry norms, regulations, and the organization’s mandates.
Certifications serve as tangible evidence of accomplishment and provide insight into the training, licenses, qualifications, and assessments that an employee has obtained. Furthermore, certifications might be a prerequisite for specific positions, such as a security guard requiring a valid security license or a childcare worker needing a Certificate IV in childcare.
The Certifications Reporting functionality enables you to observe the progress of your employees regarding their designated certifications, identify overdue certifications, and track the approval status from their managers.
View Crew Certifications Report
Select the Crew Certifications Chart – Depending on the color scheme, you can filter the report using the following criteria:
Outstanding
Approved
Pending
You can activate or deactivate the criteria by clicking on the yellow colour or the “pending” option as displayed in the screenshot above.
By selecting “Outstanding Crew Certifications,” you’ll be directed to a page where you can access a list of documents containing crew members who have not yet submitted the required certification.
On this page, you have the option to refine your searches using the following filters:
Business
Crew Name
Cert Type – Qualification (RSA, Working with Children Certificate, etc.)
Status – Outstanding, Approved and Pending
Expiry Date Form
After you have narrowed down your searches, you can choose the desired search result and then click on “Download CSV Reports.”
Contracts Review – Contracts Review – This component centers around the assessment of contractual agreements and documentation concerning crew members. Its purpose is to guarantee adherence to legal mandates, industry stipulations, and organizational guidelines. This is accomplished by scrutinizing and validating the terms, conditions, and responsibilities outlined in contracts.
The contract is a legally binding agreement between an employer and an employee that outlines the terms and conditions of their working relationship. It typically includes details such as job responsibilities, compensation, benefits, working hours, probationary periods, termination conditions, and any other terms relevant to the employment arrangement. Employment contracts serve to establish clear expectations and rights for both parties and help protect their interests by defining the scope of the employment relationship.
The Certifications Reporting functionality assists in verifying that employees have indeed signed agreements with the organization.
View Contracts Review Report
Select the Crew Certifications Chart – Depending on the color scheme, you can filter the report using the following criteria:
Signed
Waiting for recipient Signature
You can activate or deactivate the criteria by clicking on the yellow Green colour or “Signed” option as displayed in the screenshot above.
By selecting “Contracts Review,” you’ll be directed to a page where you can access a list of Contracts containing crew members who have not yet signed the Contracts.
On this page, you have the option to refine your searches using the following filters:
Business
Crew Name
Document – Employment Agreement
Manager Name
After you have narrowed down your searches, you can choose the desired search result and then click on “Download CSV Reports.”
Citizenship Documents and Visa Status – Involve the validation and oversight of crew members’ legal positions in relation to citizenship and visa prerequisites. This compliance facet guarantees that crew members possess the essential documentation required to lawfully work in the country where they are engaged.
If, during the employee’s onboarding process, they indicate that they are neither an Australian citizen nor a permanent resident, you can verify their work eligibility and Visa status using the Visa Entitlement Verification Online (VEVO) Check. This verification method is valuable for assessing the work eligibility of employees, particularly for businesses frequently employing individuals on work visas.
The Work Eligibility Reporting functionality permits you to examine the work eligibility of your employees, whether individually or in groups.
View Citizenship Documents and Visa Status Report
Select the Crew Certifications Chart – Depending on the color scheme, you can filter the report using the following criteria:
Expired Visa
Visa Expiring Soon
Valid Visa (Note Verified)
Valid Visa (Verified)
You can activate or deactivate the criteria by clicking on the Grey colour or “Valid Visa (Not Verified)” option as displayed in the screenshot above.
Choosing the “Expired Visa” option will guide you to a page where you can view a list of crew members whose visas have already expired.
On this page, you have the option to refine your searches using the following filters:
Business
Crew Name
Visa Type – Working Holiday Visa, Student Visa, Australian Citizen, etc.
Start Date From
Expiry Date From
After you have narrowed down your searches, you can choose the desired search result and then click on “Download CSV Reports.”
13.3 Custom Resports
Key: A
Begin by opening the Administrative Dropdown Menu.
Within the Human Resources section, select “Custom Reports.”
Upon selection, you will be directed to the custom reports page.
Here, you can customize your report based on the data, ensuring it aligns precisely with your needs.
On this page, you have the capability to view all generated custom reports.
This functionality allows you to Add, View, Edit, or Delete custom reports.
You can also duplicate your crafted reports by clicking the copy icon under the action column.
To add a new custom report, click the “Add New Report” button.
This action will redirect you to the “Add Custom Report” section, where you can personalize your report to match your preferences.
Report Attributes:
Report Name: An identifier that distinguishes your report, aiding in easy recognition.
Report Type: A classification that groups reports, such as Headcount, Visa, or Certifications, and the option to create a custom type.
Headcount Report – a document that provides an overview of the total number of employees within an organisation at a specific point in time. This report typically includes information such as the total headcount, the number of employees in various departments or teams, and any changes in employee status (e.g., new hires, terminations). The headcount report helps organisations monitor their workforce size and composition, which is essential for workforce planning, budgeting, and decision-making.
Visa Report – a document that outlines the visa status of employees or individuals within an organisation. This report provides information about the type of visa held by each individual, including details such as the visa expiration date, visa category, and any related conditions or restrictions. Visa reports are commonly used by companies to ensure compliance with immigration regulations, track visa expirations, and manage the legal status of their foreign employees. This helps organisations ensure that their workforce is in alignment with legal requirements and facilitates timely visa renewals or applications when needed.
Certifications Report – a record that compiles information about the certifications held by employees or individuals within an organisation. This report includes details about the certifications obtained by each person, such as the certification name, issuing authority, date of issuance, and expiration date if applicable. Certifications can cover a wide range of areas, from industry-specific skills to safety training and professional development. The certifications report helps organisations track the qualifications of their employees, ensure compliance with regulatory requirements, and manage training and skill development initiatives effectively.
Staff Status: Describes an employee’s state, indicating if they are active, blocked, or a recruit.
Description: Provides detailed context or explanation about the custom report.
After completing the form, drag elements to the selected elements column.
Choose the required fields that you need for your custom report.
Additional Fields
Emergency Contacts – Displays the crew member’s emergency contact details including name, number and relationships to the crew member.
Superannuation Elements – Displays the crew member’s superannuation information
Crew Status – Displays the crew member’s status based on the predefined values set in General Settings. These statuses are selected and managed within the Crew Profile and are automatically reflected in generated reports.
Once your report is ready, press the “Save” button.
You can access your custom report in the list of customer reports.
For CSV downloads, select the custom report and click the “Download CSV Reports” button.
14.0 Finance
Key: A
The payroll page displays a calculation of all the pay rates for your staff. The payroll page defaults to the previous pay week and will display all the staff that have worked for a certain business in that pay week. It shows the amount of hours they have worked in each different activity, with a calculation of the total pay for the week. The total hours for the business and the amount of commission the business manager has earned is also shown for the week
Search payroll week select the week then press “Show Payroll Week”.
Search individual payrolls for crew by selecting the crew name and enter a date. Then, press “Show Pay Records”.
12.1.1 MYOB Export
Import/Export Instructions
Part A: Crew Member MYOB Card ID
Please ensure that CrewCard has the correct MYOB Card ID for each crew member. You can view or edit the MYOB Card ID on their Crew Profile. Contact support@personnelmanager.com for help to set up.
14.1 Payroll
Key: A
The payroll page displays a calculation of all the pay rates for your staff. The payroll page defaults to the previous pay week and will display all the staff that have worked for a certain business in that pay week. It shows the amount of hours they have worked in each different activity, with a calculation of the total pay for the week. The total hours for the business and the amount of commission the business manager has earned is also shown for the week
Search payroll week select the week then press “Show Payroll Week”.
Search individual payrolls for crew by selecting the crew name and enter a date. Then, press “Show Pay Records”.
12.1.1 MYOB Export
Import/Export Instructions
Part A: Crew Member MYOB Card ID
Please ensure that CrewCard has the correct MYOB Card ID for each crew member. You can view or edit the MYOB Card ID on their Crew Profile. Contact support@personnelmanager.com for help to set up.
14.2 Industries
Industries are services provided by companies that are classified into groups.
To begin, navigate to the Admin Dropdown and select Finances. Choose Industries.
To Add a new industry, Click the Add New Industry button.
This will direct you to Industries – Add Industry page.
Enter the Industry Name, Select the Activities and Select the Abilities which are part of the new Industry.
Once done, Click Save button.
The newly added Industry has already been added to the list of Industries on the Industries page.
At any time you can return to the Industries list, edit and delete Industries using the action keys. Click the Edit icon to edit the ability or click the Trash icon to delete the Industry from the system.
14.3 Invoices
Key: A
CrewCard can send invoices to clients, when an invoice is create for a client it will then appear on the invoice page.
Invoice Page – Filter Bar Overview no. – Enter the invoice number to search for a specific record. Business – Dropdown menu to select the business entity linked to the invoice or credit note. Client Name – Dropdown menu containing all clients in the system. You can scroll through the list or start typing in the field to automatically filter and populate matching client names. Date From/Date To – Select a date range to display only invoices or credit notes issued within that period. Options – Dropdown Menu with additional filtering choices
When an invoice has been paid by the client, then the invoice can be “Locked”. You can search by locked & unlocked invoices every time a search is done the total amount of invoices will be shown on the bottom right of the search box.
On the Invoices page, you can lock your desired invoices by selecting the invoice and clicking on the “Lock Invoices” option under the “Select an Option” button located in the bottom left corner.
A pop-up will appear, allowing you to select a date and specify the desired pay date for the invoice.
Once the invoice is locked, another pop-up will confirm that the invoice has been successfully locked.
In the list view, a locked icon will appear along with the dates the invoices were locked. Please note that the locked date reflects the actual date when the invoice was locked.
14.3.1 Advanced Invoice Search
Advanced search can be done by the search bar. The totals of invoiced amount is shown on the right hand side of this bar where it says “Search Invoice Total“.
No.: Search by invoice number
Client Name: Search by client name
Date From, Date To: Search by date
Outstanding and Open Invoices: When selected any search you make will only come up with outstanding and open invoices
Deleted Invoices: Will only show deleted invoices
Show Only Selected Invoices: Search only tick box invoices
Show Client Totals: Group by client
Show Date Paid Invoices: Show paid invoices
Show Date Locked Invoices: Show locked invoices
Show Disabled Invoices: Show disabled invoices
14.3.2 Invoice Column List
No.: Invoice Number
Company: Jobs based on location or business.
Client: Client Name
Amount (ex GST): Total Amount excluding GST fee
Invoices Interest: Accrued interest to the Invoice
GST: 10% tax on total amount
Edit GST: In the case of international business, such as operations in the USA, CrewCard has the option to edit the GST to a number other than the fixed Australian rate. This can be done when accessing an invoice, where a tick box can be selected to either an entered amount, OR percentage. If the tick box is not selected, the default 10% will be applied.
Merchant Fee: Transaction fees applied to the total amount including GST fee whenever customer uses a credit card purchase from the system.
Bank Fee: Transaction fees applied to the total amount including GST fee whenever customer uses the debit card/ account when purchase from the system.
Total (inc GST and Fee):Total amount including the GST fee, merchant fee or bank fee.
Outstanding/Payment: Entered Amount paid via EFT and date of payment
History: Payment history
When payment history icon is clicked you would be able to view the Payment History:
History for EFT Payment, Admin can delete this record when the delete link is clicked.
History for Stripe Payment, This will allow to view the payment details such as what preferred method and IP address used to make the payment.
Date Sent: Date invoice was sent
Date Paid: Payment date
Paid By: It will show the record of the last digits of the card number and the IP address of the user who paid the invoice
Date Locked: Date when the invoice is locked
14.2.3 “Select an Action” drop down list
To apply interest, please see guide 10.1.1.
Apply Interest: To apply interest to any outstanding invoices, tick the box for one more invoices, click action and select “Apply Interest” from the list. This will add accrued interest to the selected invoice(s). They can now be sent to clients. Or, simply click “apply interest” in the middle section of each invoice line.
Email Statement: This can be done for one or more this will email the invoice to the account contact for that client. However, you can select another contact
Email Statement with Attached PDF: This can be done for one or more this will email the invoice to the account contact for that client with attach Email Invoice Statement.
Print Invoices: Print one or more invoices depending how many are selected.
Lock Invoices: When locking invoices mean no changes will be done. Lock invoices usually mean it has been paid.
Unlock Invoices: The invoice is still outstanding.
14.3.4 Part Payment towards Invoice
If part payment is received via Electronic Fund Transfer enter the amount and date in the ‘outstanding / payment’ column. To view history, click on ‘History’ Icon will provide a history of payments. This will be updated on the invoice, statement and clients notes.
To customize your own template for Email invoice for part payment to clients:— please see 10.2.14 Invoice and Quotes
14.3.5 Add Invoice Payment Date
You can add a date when an invoice was paid via Electronic Fund Transfer, enter date in the date paid column, click Add.
14.3.6 Disable Invoice
You can disable an invoice by clicking the disable invoice button, confirm action:
A window will appear to confirm ” Click OK to disable the Invoice” Click Ok to disable else click Cancel button.
14.3.7 Updating Invoices
There are two ways to access the invoice update page. One is through the jobs page discussed earlier in guide 3.0 Home Page, and the invoices page using the eye icon.
The following page will open:
On this page, you can add a Management Tax & Merchant Fee to the invoice. Before updating the invoice, the user has the ability to change the date on the invoice if needed, if they do not wish to edit the date the field will have the original date in it.
To create a Management Tax and Merchant Fee, please read guide 10.1.1 Accounts Details (for Invoices).
To customise your own template for Email invoices to clients:— please see 10.2.14 Invoice and Quotes
14.2.8 Unpaid Invoices
We recommend using the Email Statement when sending Unpaid Invoices only. In the Invoice Page, Select the Unpaid Invoice(s).
Click the Select an Action and Select Email Statement.
This will direct you to Email Invoice Statement page. Select who you want to receive the Email Statement and click Send Statement.
The client will receive an email with the outstanding amount or unpaid invoice/s that needs to be settled.
14.3.9 Email Statement Reminder
Email Statement Reminder allows you to keep users up to date and give them a heads up so they don’t miss the next invoice payment date.
To begin, go to General Settings, then select Invoices & Quotes, and finally go to Settings 109. Email Statement Reminder – Invoice Page.
Enter the day following the Payment Terms and the time the client should receive the Email Statement Reminder. When finished, click the save button.
This is an example of how the Email Statement Reminder will appear to the client.
Keep in mind that when the settings are set to Reminder 3, the client will receive up to three Email Statement Reminders.
14.3.10 Credit Note
The Credit Note feature allows you to manage overcharges by automatically deducting the overpaid amount from the next invoice. This feature also supports exporting to Xero.
Navigate to the Invoice Page To add a credit note, go to the Invoice Page where you manage client billing.
Click “Add Credit Note”: When you click on Add Credit Note, you will be directed to the credit note page.
The form includes fields such as Client, Description, Price, GST, and Comments. Select the Client in “Select a Client” dropdown.
To add a description, click “Add Line Item”, which allows you to input entries.
Once a price is entered, the GST and Total are automatically calculated.
After completing the form, clicking “Save” updates all the details.
Customising the credit note footer content
You can customise the footer of your credit notes to include important information such as disclaimers, payment terms or company-specific messages.
To up date the credit note footer content, go to Settings > General Settings to locate the credit note footer content field.
Enter the text you’d like to appear in the footer of all credit notes and save your changes.
Notes:
Identify Overcharges: If a client has paid more than the required amount for a specific invoice, a new row will appear on the invoice page, highlighted in yellow, indicating an overpayment.
Adjust Invoice Amount: In the row where the overcharge is detected, you will see the “No” marked with -I (Invoice). Once you apply the credit note, it will change to -CN (Credit Note), representing the adjustment.
How the Searched Invoice Total is Calculated:
The Searched Invoice Total is determined using different formulas depending on the type of search performed.
For Outstanding and Open Invoices:
The total is calculated as: Total = Sum of all outstanding invoices – Credit Notes
For Example:
288.00 + 1000 + 1065 -22 =2,331
For a Normal Search (Without Filters):
The total is calculated as: Total = Sum of all Total (inc GST and Fee) – Credit Notes These calculations ensure that the correct total is displayed based on the selected search criteria.
To send the Credit Note to the Client, Choose the invoice, then click on “Select an Action” and select the dropdown option labeled “Email Credit Note.” This will redirect you to the Invoice Credit Note Page, where you can either edit or send the credit note.
14.3.11 Letter of Demand
The letter of demand feature allows you to send a formal notice to clients regarding outstanding payments. This letter is issued when invoices remain unpaid despite previous reminders. To enable this feature, please contact support@crewcard.co.
How to Access the Letter of Demand
Navigate to the Invoice Page and select the checkbox for the invoice you wish to send the Letter of Demand to.
Note: You can only send a letter of demands to one client at a time.
In the footer, open the Select an Action dropdown menu and choose Email Letter of Demand.
You will be redirected to a Preview Page, where you can review the email content before sending.
Letter of Demand Template
All Letters of Demand follow a standard template, which includes:
Current date
From: YourCompany name, Address, State, ABN and email
To: The client company and representative’s contact information, Address, State, ABN
Content Body:
A detailed record of previous reminders (including invoice numbers, reminder dates, original due dates, and amounts)
Total Outstanding Amount – clearly displayed, with an option for the client to pay directly by clicking the payment button in the email
History Logs – Records only the actions directly associated with the Letter of Demand, including the sending of invoice statements, generation of PDFs, and other relevant communications. These entries provide a clear record demonstrating the company’s active efforts to recover the outstanding payment.
14.4 Activities
12.3 Activities Key: A
12.3.1 Adding a New Activity
To add a new activity, click “Add New Activity”:
Name: Enter a name
Code: These codes can then appear in the SMS messages for staff, both request and confirmation messages, this can be custom in settings. The activity codes will also appear in the Crew Support pages along with an explanation of the activity. Example: G is shortened for General Labour
Graph Colour: Select colour this will appear on the “View Shifts as Graph” (this is on the shift page)
Show Skill in Clients Booking Area: If ticked the activity will display in the Client Access (Login) as an activity that they can select when making a booking.
Tick to indicate that this is a licensed (ticketed activity): If a person is booked on a shift for a ‘Ticketed Activity’, a warning will display on the shifts page if the ticket number and/or ticket expiry date have not been entered or expired. It is not possible to accidentally book a person for a job that they are not qualified for.
Tick to indicate that this is a dual text activity: Crew and onsite contact will receive a message the day before booking.
Tick to Delete: Will delete the activity and store it in ‘Show Deleted’
Job Description: Describe the job for the staff to view
Sub Activities: When an activity has more than one task to do
Grouping activity: Use the arrows to select
Categories: Categories the Activity falls under.
Staff: If known staff members can be selected to have this activity on their profile. TIP:This action can also be done individually in the crew profile page.
Qualification: Select related qualification
Auto Scheduler Settings: Enables shift default when shift offering
Minimum Call (Hours): A default minimum call hours can be entered here for the activity
12.3.2 Activities Main Page
All activities & Sub-activities displayed on one page.
Edit Activity: To edit activity
Edit Rates: Edit rates related to this activity. Please note that activities must be assigned to a category first.
Duplicate: To duplicate activity
12.3.3 Creating a new Activity with Duplicate Rates and Activities
For Creating a New Activity with Duplicate rates from another activity. In Homepage, click the admin drop down menu and select Activities.
In the Activities page, Select an activity that you want to copy the rates.
Click Duplicate Button.
A pop up will appear that allows you to enter the new Activity name. Enter the Activity name in the given field. Note that by default the Activity Name will be the activity that you have copied.
Once the Activity Name has been entered, click the Ok button.
The new Activity has been created and rates have been duplicated. Note that the Activity will also be copied too. Click the Duplicate button to see whether the rate has been copied.
Whenever an Activity or Category is edited or remapped, updating rates in the Job Sheet, Shift Edit Page or Events Bookings Page is recommended.
12.3.4 Hide/Unhide feature on Activities Page
Hide/ Unhide Feature on Activities PageThe new ‘Hide/Unhide Activity’ feature enables you to manage the visibility of activities on your Activities Page. This guide walks you through using the new functionality.
Navigate to the Activities Page and Click the ‘Hide/Unhide Activity’ button.
A pop-up window will appear displaying the list of all activities.
To close the pop-up window, click the ‘x’ icon in the top-right corner of the pop-up.
Find the activity you want to hide in the list.
Click the green eye icon next to the activity.
The icon will change to gray, indicating the activity is now hidden.
Once you’ve made your changes, click the ‘Update’ button in the pop-up window.
This will apply your changes, and the selected activities will be hidden or unhidden across all activities lists.
Notes:
Changes made using the ‘Hide/Unhide Activity’ button will take effect immediately after clicking ‘Update’.
The visibility settings for activities are system-wide and apply to all users with access to the Activities Page.
To revert your changes, simply repeat the steps to toggle the eye icon back to its original state.
14.5 Discounts
Discounts can be added to client profiles which will apply to their invoices each time. Save the discount in the system using the discount setting.
Name the discount & select the type of discount.
Fixed: The amount entered will be taken off the total of the bill.
Percentage: The percentage entered will be taken off the total of the bill. Enter the amount in the next field.
Note: you must put a ‘-‘ sign before the number. Example: ‘-10.00’
Client Profile: On the client profile go to client discounts, press the arrow for the drop down menu which will present you with all the uploaded discounts. Select the discount you wish to use and press ‘Save Details’.
14.6 Extras
Extras allow you to upload additional costs that can be charged to your client. For example, call out fee and travel fees. You can delete any extras that have created while using the app through the settings.
14.7 Allowance
Create allowances to add to shifts on the job sheet. Example off allowances are meal and travel allowance. Add allowances to be saved into the system. Example: A cashier who conducts a shift for 10 hours between the time of 4pm to 2am they will receive a $20 meal allowance.
Allowance Name: Name off allowance which will be used to select in job Paid: How much the crew will receive Charge: How much the client will be charged
Allowance rules can be setup in two ways:
Shift Hours: The allowance will only be available for shifts over a certain length.
Day/Time: Allowances can only be added to shifts that fall between a certain time of a particular day. Allowances can also be grouped under activities that are in system. Use the arrows to assign the activities to the allowance. This is the same for rules.
14.8 Leave
The leave page allows you to easily keep track of crew leave. The page gives the user the ability to edit existing leave or add leave. Click add leave.
This will take you to a new page:
Enter the business the employee works under → Name of crew → Activity they do → Their Rate → Date of leave → Type of leave the crew is taking
14.9 Rates History Search
This page allows you to perform an advanced search on any past rates that have been uploaded in the system.
15.0 Export Crew to Astute
Required PM Fields for PM to Astute Crew Export
Employee ID
The Unique Identifier located in the Crew List Page Tip: can use mobile number
Gender
Settings > General Settings > 45. Gender Text
First Name
Crew Profile> Personal Details > First Name of the Crew
Last Name
Crew Profile> Personal Details > Last Name of the Crew
Date of Birth
Crew Profile> Personal Details > Date of Birth of the Crew
Mobile
Mobile Phone Number
Email
Email address (also Username for CrewCard App)
Phone
Can be Mobile Phone Number or landline
Address
Street Name
Suburb
Crew Profile > Address > Suburb
State
Crew Profile > Address > State
Post Code
Crew Profile > Address > Post Code
Account Name
Bank Account Name of the Employee (not name of the financial institution)
Super Company Name
Name of the Super Company financial institution EG Australian Super
SPIN/USI
Super Fund USI
Super ABN
Super Fund ABN
Super Product Name
Is the name of the Product under the specific super fund. It is identified by the USI
Super Membership Number
Employee Super Membership Number
Super Account Name
Employee Super Account Name
TFN
Employee Tax File Number
Optional PM Fields for PM to Astute Crew Export
Bank Name
Bank Name of the Crew
Account Name
Account Name of the Crew
Account Number
Bank Account Number of the Crew
BSB
6 Digits number used to identify the individual branch of an Australian Bank
Residency
Crew Profile> Address> Residency
Passport Country
Crew Profile> Citizenship Status> Country
Visa Type & Expiry
Crew Profile> Citizenship Status> Through Vevo Check “Passport ID is required to do this”
Add New Crew
In the Crew List Page, Simply Click + Add Crew for Creating Crew in PM.
The following window will open:
Enter the crew details and use the arrow buttons to select their activities, these activities that are available in the list are from the activities uploaded through the settings.
After entering the information you have the option to save and exit or open the crew profile to finish uploading their information.
In the Crew List section, there is an overview of crew personal details. Employee ID column, To update the Employee ID click on the Employee ID field and provide an unique identifier to the employee.
Click Save Details.
Edit Crew Profile
Click on Contacts in Central Navigation Bar and Select Crew List.
When Crew List is clicked from the menu, it will display all active crew members. To enter a Crew Member’s Profile click the Edit icon to the right of the page.
To add the Employee End date (Crew who got Terminated or Resign) and reason, Enter the End Date and Reason in the Overview Section.
Start Date – The date when the crew member is first confirmed to a shift.
Added: Super Admin -Employment Start Date when the crew is first activated or added to the system.
Employment End Date – The date of the employee’s last shift.
Please note: In the event Crew Members have been added to the system and have not yet been confirmed on their first shift, the value Added will be substituted for Start Date so the export to Astute will succeed. None of these fields need to be added by the Admin User, they are handled automatically by the system.
Select Personal Details in the side menu of Crew Profile page and update information accordingly.
First Name, Last Name and Date of Birth
E-mail address / Username for CrewCard app.
Mobile Number and Phone
Provide ABN if required
To add or modify gender options, go to the Settings. Click on General Settings and select Crew. Refer to “45. Gender Text “ to add or modify the type of gender as preference. Click Save Details.
Select Address in the Crew profile and select the Residency. Once done, Click Save Details.
In Crew profile, Select Banking details in the side menu and update the following:
Bank Name
Account Name
BSB
Account Number
Click Save Details.
Select Super Details in the side menu and Enter first few letters of the Super Company Name. Suggestions will available for the selection.
When user selects the Super Company Name, the following are automatically populated:
SPIN/USI
Super ABN
Super Product Name
Click Save Details.
Select TFND in the side menu and Provide the details of the Employee Tax File Number ( A digit of 9 numbers ). Click Save Details.
Go to Citizenship Status section in Crew Profile, enter the passport ID and select the country. Click Check Vevo, it will prompt for the Visa Type and Visa Expiry.
Export Crew to Astute
Once Personal details has been updated, Crew is ready to be exported to Astute. Click on Export to Astute inside the Crew Profile.
Note: Crew members who are already in the system prior to the Astute Dev will need to be confirmed to a shift. The date will be used as the Employment Start Date which is a mandatory field in exporting crew to Astute.
An automatic message will confirm “Inserted User ID”.
The crew member has been added to the Astute portal. Select User Tab and Employees Tab.
15.1 Export Timesheet to Astute
Click Admin Menu drop down menu at Central Navigation Bar and select Timesheets to get access to the Timesheets.
In the Timesheet Page, Click on Export Options dropdown menu and select Export Astute Report.
The document will be download as .xls file. Open the Timesheet file, Click File, Select Save As and Select Text (Tab delimited) (*.txt).
Convert the file to one of the formats accepted by Astute, which are: JPEG, PNG, BMP, TIF, GIF and PDF. Tip: Export to PDF will convert the file to an acceptable format.
After converting the file to a supported format, Compress the file using ZIP. Right click the PDF file, Select Send To and Select Compressed (zipped) Folder.
Timesheet file is ready for import into Astute. Login to Astute Portal and Click Payroll Tab.
Select Import Timesheet and Click Choose File to upload.
Once the zip file has been uploaded, Click Import.
16.0 Time Off In Lieu
Time Off In Lieu can be managed within the CrewCard Platform.
In the Crew Profile, select Time Off In Lieu from the side menu to navigate to the Time Off In Lieu (TOIL) section. Note that Full Time and Part time staff can fully utilise this function.
Here you can set the TOIL hours balance and TOIL period. You may Contact CrewCard support to let us know the pay period options and which day of the week the pay period should commence.
TOIL Period refers to the amount of hours that staff are able to work before the time off in lieu is recorded. It can be 1 week, 2 weeks, 3 weeks or 4 weeks. For example, a staff member might have an agreed weekly working hours of 38 hours per week. Any work performed over and above 38 hours (minus breaks) will be added into the TOIL calculation. If the staff member had a balance of 0 hours and worked 45 hours in week 1 and then 48 hours in week 2, they will have an updated TOIL balance of 17 hours at the end of week 2. This means they can take 17 hours off work and still receive pay for these hours.
Please note that the CrewCard TOIL calculations work both ways. If we use the example above and the staff member in week 3 only worked 10 hours, 28 hours would be deducted from the balance of 17 hours and the TOIL balance would be reduced back to 0.
Click on TOIL history to see a breakdown of the TOIL balance for the staff member and the events that changed the balance, such as manual updates of the TOIL balance and system generated updates calculated each pay period according to the programmed logic.
There is a Time Off In Lieu page in the Admin menu that enables you to see the TOIL history for multiple staff and to search the TOIL history of staff.
In this page, you can filter the crew member, crew group and the TOIL period based on the date. TOIL balance is updated weekly depending on the confirmed shift by the admin to the crew. You can Update the TOIL figures for shifts which are already existing in the system or allow users to manually update the TOIL Balance of all staff using the Refresh Button.
From this page, you can click the Forecast button to view the predictions of the TOIL balance in upcoming TOIL periods by looking at the Forecast Working Hours and Forecast Balance. In this page, you also can use the same filter as in the previous page.
You also can check the TOIL details of each crew in the Timesheet. In the timesheet page the TOIL balance is available including the following details: Toil Period, Previous Start, Previous End, Previous Balance, Current Start, Current End and Current Balance
In the event when the hrs./TOIL period was modified in the Crew Profile.
For example: week 1, the set Hours/TOIL Period is 20 and in week 2, the Hours/TOIL Period was changed to 30. The first week will work based on 20 limits while the second week will work based on 30 limits however if you edit the shift for the first week then the calculation will update with new Hours/TOIL Period which is the 30 limits.
17.0 Reporting
In this section, you will find different reporting available in the CrewCard System.
15.0.1 Export in Jobs Page
Email Job Sheet Summary: This will be sent to the client, it is important to customise these through General Settings > Client, you can customise the layout of the email that is sent, which is located in guide 10.2.5 Client Email Job Sheet Summary.
Print Approved Job Sheet: CrewCard will let you print the approved Job Sheet or download it into a PDF.
15.0.2 Export in Shifts Page
Export Run Sheets: Exports a detailed Run Sheet for selected shifts into PDF format. Useful for viewing staff’s start/finish times, venue and other details.
Sample Export Run Sheets
Export Excel: This feature enables you to export the selected shifts from the Shifts Page to an Excel spreadsheet. Once the scheduling has been done this feature makes it easy for importing the roster into other packages. You can save an Excel sheet into CSV files or tab_delimiter files.
Export Excel Sign Off: The system will create a sign off sheet and download it into an Excel file
Sample Export Excel Sign Off
Export Brief: Export into Excel that displays the following fields: Date, First Name, Last Name, Phone and Email Address of the crew.
Export Summary: Export into Excel that displays a breakdown of the selected shifts which shows the following breakdown.
Date
Business
Activity
Job Sheet Number
Total hours
Total Paid $
Total Bonus $
Total Charge $
Profit
Margin
Site Sheet PDF Download: The job sheet will download into a PDF.
Sample Site Sheet PDF Download
Site Sheet PDF Email: The software will create a PDF off the job sheet and send it to the allocated email.
When Site Sheet PDF Email is selected it will direct you to Email Timesheet page wherein you need to enter the email address who will receive the Timesheet and click send button.
They will receive this Timesheet as show on below figure.
Export Staff Emails: The emails from staff on shifts will download all together into an Excel.
Export Select Shifts: This will download all selected shifts in Events Page>> Booking Tab
15.0.4 Report in Statistics Page
The statistics page allows you to view and compare two time periods at once. Enter and select the information you would like to compare for the two different graphs.
15.0.5 Export in Invoice Page
Export Invoice to Xero: This will export the invoice fields to the Xero.
15.0.6 Export in Staff List Page
Export Emails: Export the email address of the selected Crew Member.
15.0.7 Export in Search Staff Page
Export Staff: This will export staff details depending on the filter selected.
15.0.8 Reports in Invoices Page
In the Invoices page, it allows you to view different reports depending on the filter selection:
Advanced search can be done by the search bar. The totals of invoiced amount is shown on the right hand side of this bar where it says “Search Invoice Total“.
No.: Search by invoice number.
Client Name: Search by client name.
Date From, Date To: Search by date.
Outstanding and Open Invoices: When selected any search it will only come up with outstanding and open invoices.
Show Date Paid Invoices: Show paid invoices.
Deleted Invoices: Will only show deleted invoices.
Show Only Selected Invoices: Search only tick box invoices.
Show Disabled Invoices: Show disabled invoices.
Show Only Selected Invoices: Display selected invoices
Show Client Total: Display Invoice total group by client.
Show Date Locked Invoices: Show locked invoices.
Show Deleted Invoices: Display deleted Invoices.
Apply Interest: To apply interest to any outstanding invoices, tick the box for one more invoices, click action and select “Apply Interest” from the list. This will add accrued interest to the selected invoice(s). They can now be sent to clients. Or, simply click “apply interest” in the middle section of each invoice line.
Email Statement: This will email the invoice to the selected type of person in the invoice loop. Note that we recommend to use the email statement for unpaid invoices only.
Print Invoices: Print one or more invoices depending how many are selected.
Lock Invoices: When locking invoices mean no changes will be done. Lock invoices usually mean it has been paid.
Unlock Invoices: The invoice is still outstanding.
15.0.9 Export in Timesheet Page
Export All Records: This download all shifts under the crew into an Excel sheet.
Export All APPROVED Records: This download all approved shifts under the crew into an Excel sheet.
Export KeyPay Records: This download all shifts with the following fields:
Employee External ID
Employee Name
Start Date Time
End Date Time
Break Start Date Time
Break End Date Time
Total Break Time
Location External ID
Work Type External ID
Comments
Venue
Activity
Activity External ID
Task
Notes
Hours
Export KeyPay APPROVED Records: This download all Approved shifts with the same fields as Export KeyPay Records.
Export KeyPay Report: This download all shifts with the following fields:
Employee External ID
Client Name
Employee Name
Order Owner
Start Date Time
End Date Time
Week Ending Date
Break Start Date Time
Break End Date Time
Total Break Time
Location External ID
Work Type External ID
Comments
Venue
State
Activity
Activity External ID
Task
Notes
Hours
Base Pay Rate
Charge
Export Astute Report: This download all shifts in the timesheet for import required in Astute with the following fields.
Job UIN
Run Ref
Run Date
Country
Location
Hiring Manager
First Name
Family Name
Temp Type
Skillstream ID
Billing Cost Centre
Type
Item Detail
Rate Name
Pay Rate
Agency Rate
Pay Unit
Temp Status
Month
W/E Date
Units
Number of days worked
Net
Input GST
Agency Name
Export Astute APPROVED Report: This download all approved shifts in the timesheet for import required in Astute with the same fields as Export Astute Report.
Scheduled Breaks means that your crew know exactly when they are expected to go on break during their shift. Scheduled breaks can be both done automatically and manually.
18.0.1 Auto Break
To set up an automatic break head to the settings. Click on Software Configuration in the General Settings and locate ‘No. 165’. This setting should look like this.
You have the ability to set how long of a break and how frequent the break is, for shifts exceeding how many hours you desire. You also have the option to select whether or not you would like to ‘extend time off to allow for breaks’.
Open up a Job Sheet. You will see in the BTT column that a break has been scheduled. In this case the settings are 60 minute breaks for every 5 hrs. This shift starts at 9:00 and ends at 17:00 which means the system has automatically inserted a 1 hour break.
Click on the edit icon. A window labeled View/Edit Breaks forshift no. should appear. Here you will see under Scheduled Break that the system has created an 1 hour break from 14:00 to 15:00.
18.0.2 Manual Breaks
Select a Job Sheet. Choose the shift you wish to enter a manual break into and click on the edit icon next to the BTT column.
A window labeled View/Edit Breaks forshift no. should appear. Here you can manually add in the start and end times for breaks. There should be a column for Admin, Client and Crew. Breaks under these headings indicate who has added in the times for the scheduled break.
Once saved the break length will appear in the BTT column. It will appear next to who entered the break.
A – Admin
Cl – Client
C – Crew
If the Auto Break settings is turned on, the scheduled break will appear in the Scheduled Break column on the View/Edit Breaks window. It will also appear in the BTT column under ‘SB’. Once a break is manually added, the Scheduled Break will turn grey while the ones added by Admin, Client or Crew will remain in bold black text.
The Scheduled Break is overridden by the breaks entered by Crew, Supervisor, Clients and Admin.
19.0 Support Ticket
As a user, you may need to raise a support ticket in the Admin Portal to get assistance with an issue you are facing.
In the footer of the website there is a Support drop menu. When the user clicks on the drop menu they are given three options which are ‘Add Support Ticket’, ‘View Support Ticket’ and ‘User Guide’.
Add Support Ticket: enables you to create a new support ticket.
View Support Ticket: allows you to view, update and close your existing support tickets.
User Guide: provides a guide for users.
19.0.1 Add Support Ticket
To add a support ticket, click on the ‘Support’ drop menu located in the footer. Then, select ‘Add Support Tickets’.
A window will pop up called ‘Add support ticket’. Fill out the required fields in the form.This form requires you to insert images, videos and links in the ‘description’ text field.
Note: If a user logs in as a duty manager, the user’s details will be automatically filled out during the ‘Add Support Ticket’ process.
Note: You must clearly outline the bug or issue. Be sure to include the url of the page you are encountering the issue on, the click path that led you there and the screenshots of the issue in order to assist our team to resolve your matter as efficiently as possible.
Once you have entered all the necessary details, click on ‘Submit’.
You will then be redirected to the ‘Support Ticket’ page where you can view your newly created ticket.
NOTE: Whenever a ticket is created or updated, an email notification will be sent to you.
19.0.2 View Support Tickets
To view your pending tickets, click on the ‘Support’ drop menu located in the footer. Then, select ‘View Support Tickets’. You will be taken to the ‘Support Ticket’ page. Here you can view all support tickets. Click between the list or grid button to toggle between List View and Grid View.
Click the ‘View Pending Tickets’ button to see tickets that have pending responses. Click the ‘View Closed Tickets’ to see tickets that have been resolved. Or, Click ‘View Ongoing Tickets’ to be redirected to the ‘View Support Tickets’ page.
You can search for support tickets by using the advanced search bar at the top of the page. Fill in the tick number, from/to date and status then click search.
Ticket Number: The number that was assigned to the support ticket
User Type: Choose between the user type that submitted the ticket; super user, master user and duty manager.
Date To/From: The dates which the ticket was submitted.
Status: The current status of the ticket; pending customer or pending support.
Update Ticket
To update a ticket, select the ticket that you want to update. You will have the option to ‘Update Ticket’ or ‘Close Ticket’. Click the ‘Update Ticket’ button. A text field will appear where you can now add a comment to the ticket.
Close Ticket
To close a ticket, choose the ticket that you want to close and click on the ‘Close Ticket button’.
A window will pop up asking for the user to confirm the action. Close ‘close’ or ‘x’ to cancel action or click ‘close ticket’ to approve the action. A message will appear confirming that the ticket has been closed. Once a ticket is closed, it will no longer be ‘Pending’.
19.0.3 User Guide
To open the user guide, click on the ‘Support’ drop menu located in the footer. Then, select ‘User Guide’. The user will then be directed to the ‘Admin Portal User Guide’ page.

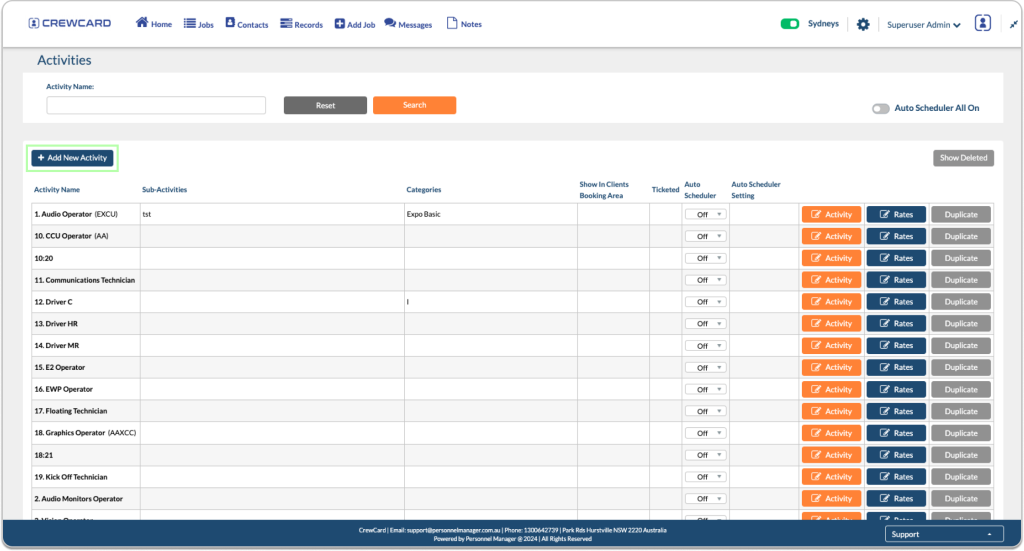 Fill out the form and once completed click “Save” button.
Step 2: Add Crew
In order to assign jobs to your employees, admins and managers will need to add employees to the ‘Staff/Crew List’.
Hover your cursor over the “
Fill out the form and once completed click “Save” button.
Step 2: Add Crew
In order to assign jobs to your employees, admins and managers will need to add employees to the ‘Staff/Crew List’.
Hover your cursor over the “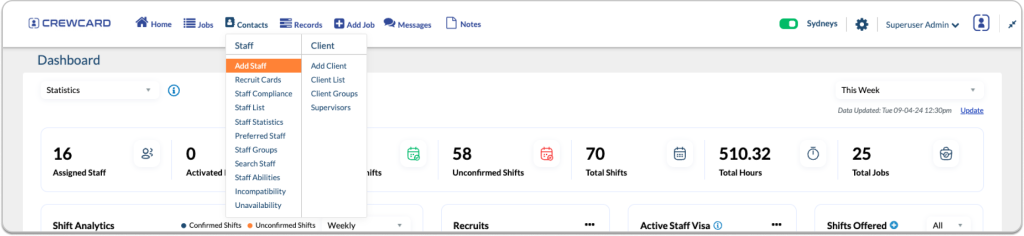 ‘Add Staff/Crew’ Window will open.
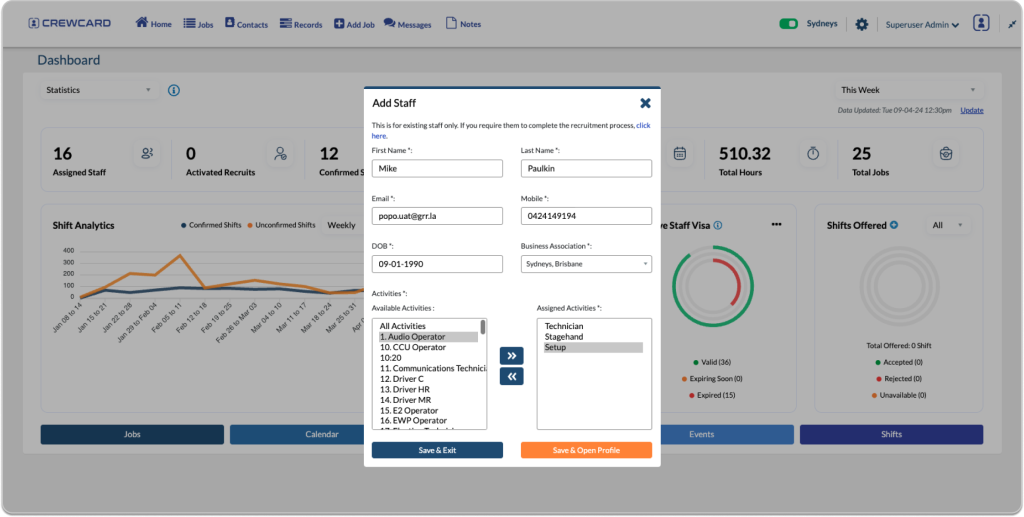 Enter the staff details and use the arrow buttons to select their activities. The activities available in the list are from the ones uploaded through the settings.
Once you have entered the information, you have the option to select either ‘Save & Exit’ or ‘Save & Open Profile’ to continue setting up the employee’s profile.
Step 3: Add Clients (may be actual clients or internal managers at your company)
Admins and Managers may add clients to the ‘Client List’ for Customer relationship management (CRM). In some cases, this feature may be referred to as ‘Project Manager’ instead of ‘Client’ to suit your organisation’s structure.
Click on the button labeled “
Enter the staff details and use the arrow buttons to select their activities. The activities available in the list are from the ones uploaded through the settings.
Once you have entered the information, you have the option to select either ‘Save & Exit’ or ‘Save & Open Profile’ to continue setting up the employee’s profile.
Step 3: Add Clients (may be actual clients or internal managers at your company)
Admins and Managers may add clients to the ‘Client List’ for Customer relationship management (CRM). In some cases, this feature may be referred to as ‘Project Manager’ instead of ‘Client’ to suit your organisation’s structure.
Click on the button labeled “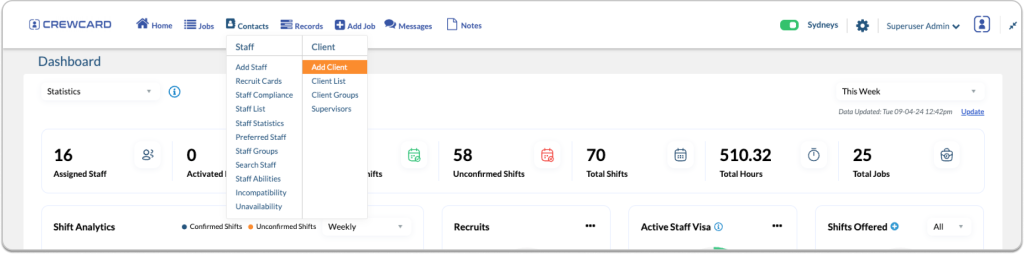 Fill in the client’s details and generate their login credentials. It is recommended to utilise the client’s number if they haven’t specified a password. Clients have the autonomy to modify their passwords via their personal account.
 Map All Crew to this Client – When creating a new client, you can tick the “Map All Crew to This Client” checkbox to automatically assign existing crew to the new client.
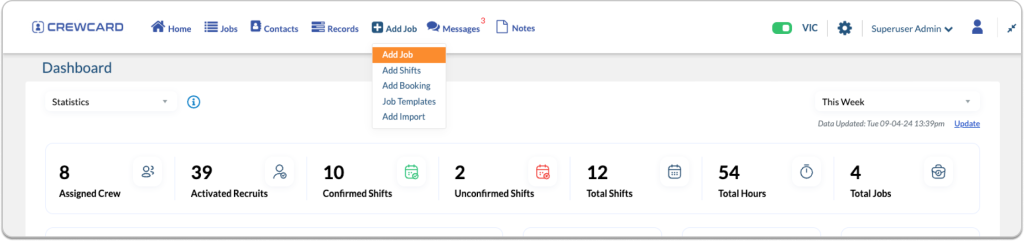 A window labeled ‘Add Job’ will appear. Choose the client from the list and click on the ‘Next’ button.
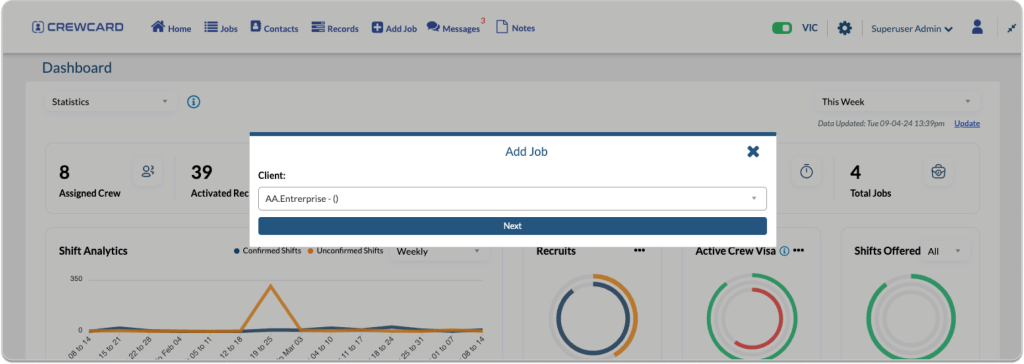 This action will direct you to a new page titled “Add Booking’. Proceed to complete all required fields.
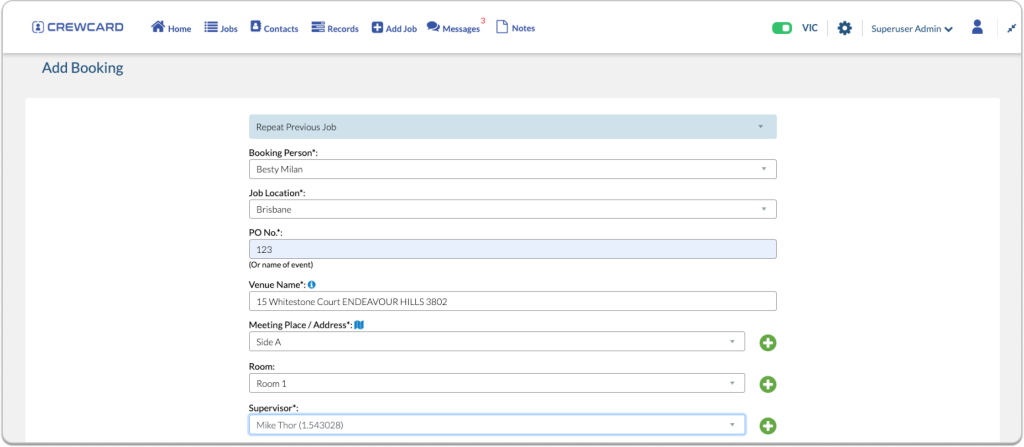
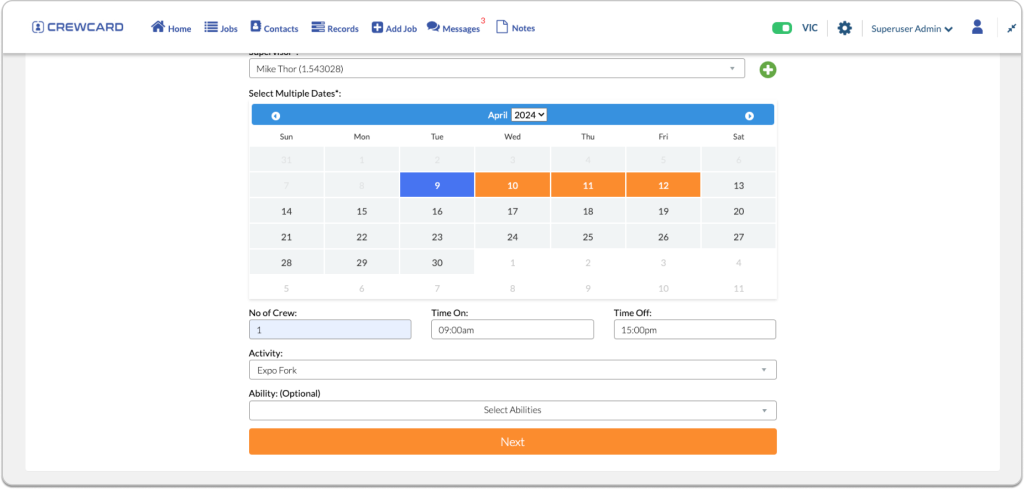 Once all fields are filled, click on the ‘Next’ button.
You’ll then be redirected to the ‘Job Details’ page, where individual shift information is displayed. You have the option to edit any necessary details.
Once all fields are filled, click on the ‘Next’ button.
You’ll then be redirected to the ‘Job Details’ page, where individual shift information is displayed. You have the option to edit any necessary details.
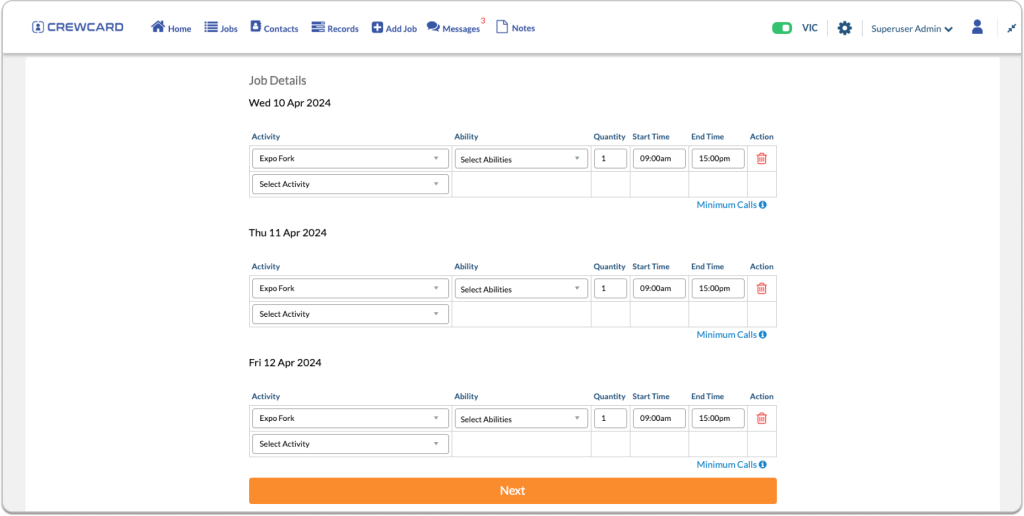 After clicking “Next”, you’ll be directed to an overview of the job.
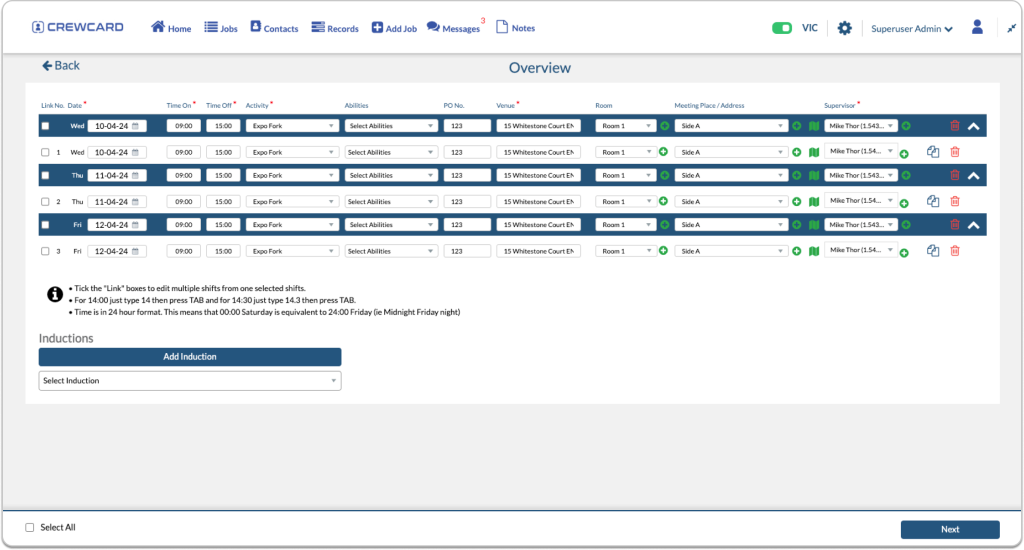 Click “Next” again to proceed to the “Final Info” page.
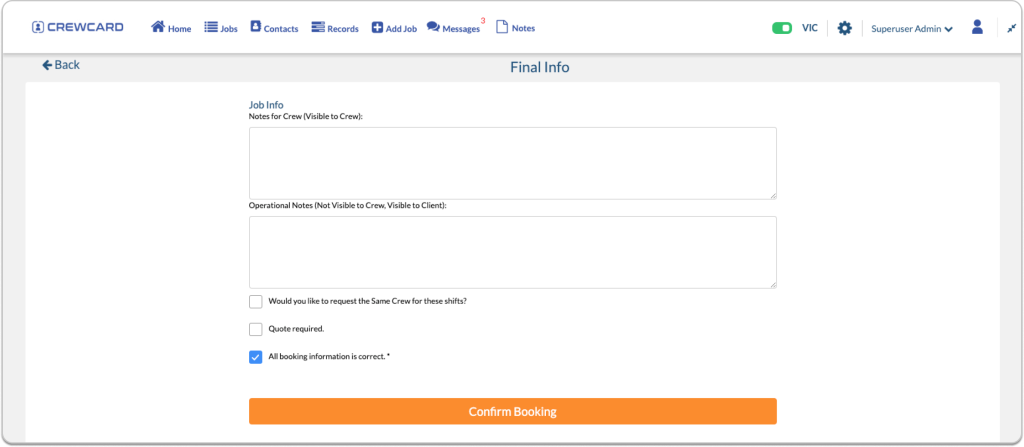 Finally, click “Confirm Booking” to create the job.
 A confirmation message will appear, including the job reference number for your records.
Step 5: Open Job Sheet or Shifts Page to schedule shifts
After successfully creating the booking or job, click the provided link
A confirmation message will appear, including the job reference number for your records.
Step 5: Open Job Sheet or Shifts Page to schedule shifts
After successfully creating the booking or job, click the provided link 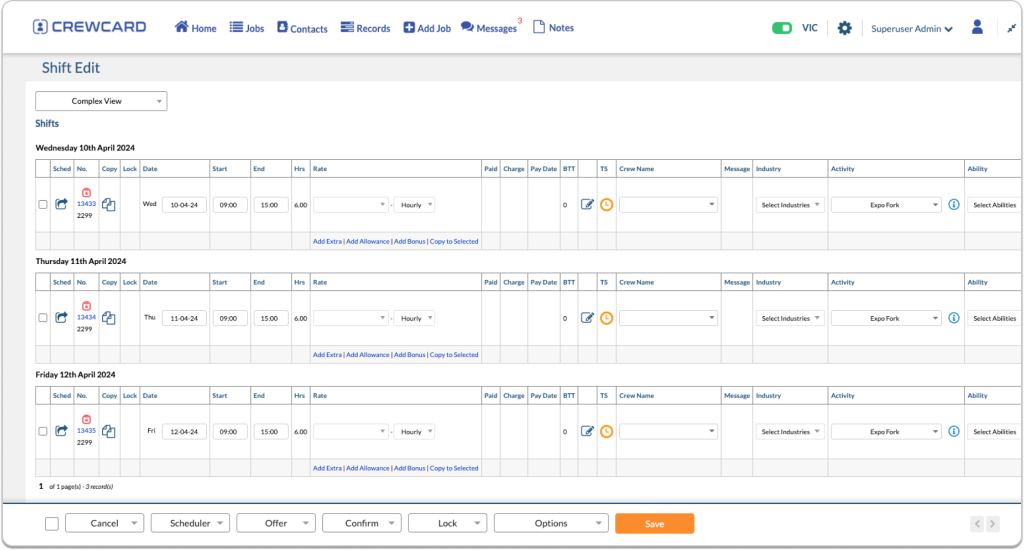 This will allow you to access and review all the details and information about the newly created booking or job. Choose the shifts you wish to assign and utilise the
 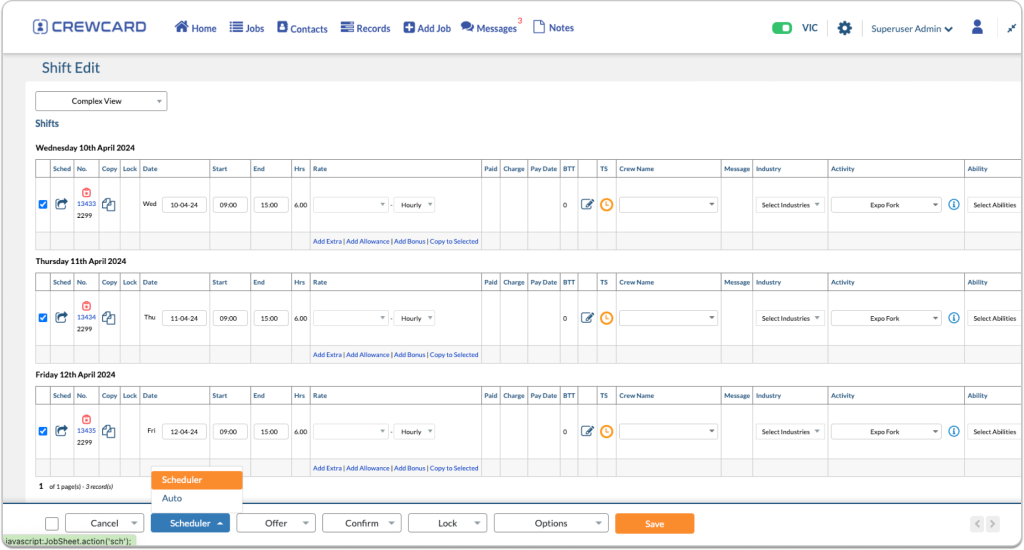 This manual provides guidance and reference points to the users of CrewCard. It provides an in-depth understanding of its functions and capabilities.
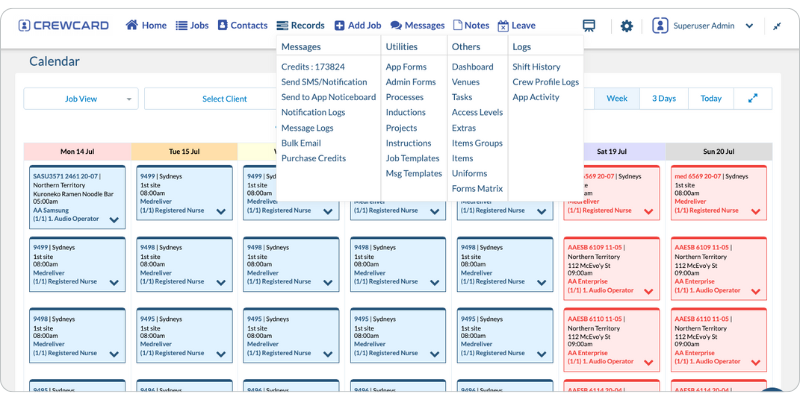 Drop Down Menu Features:
Jobs
Drop Down Menu Features:
Jobs
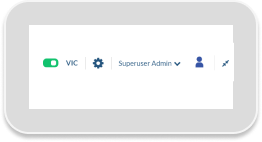

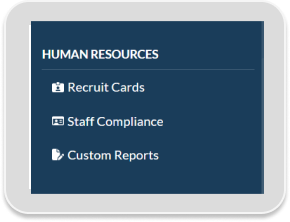
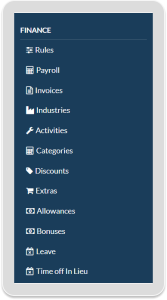

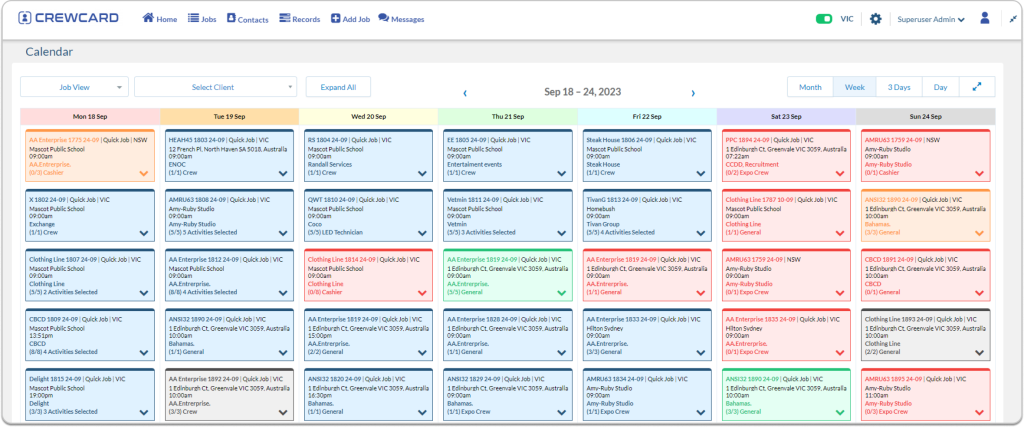


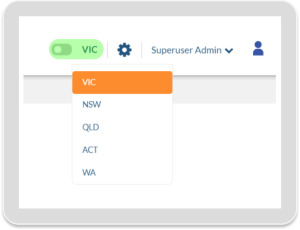

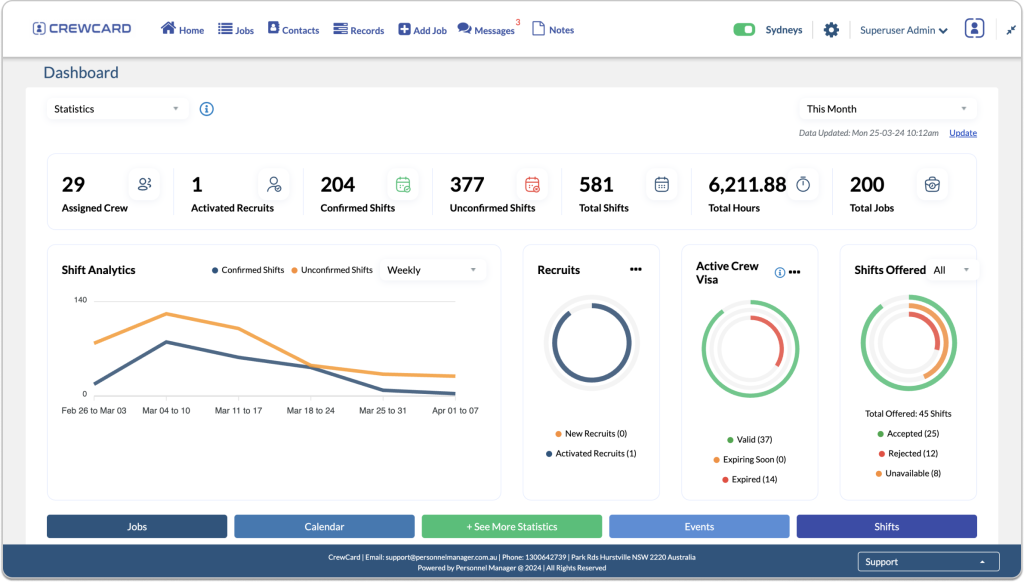
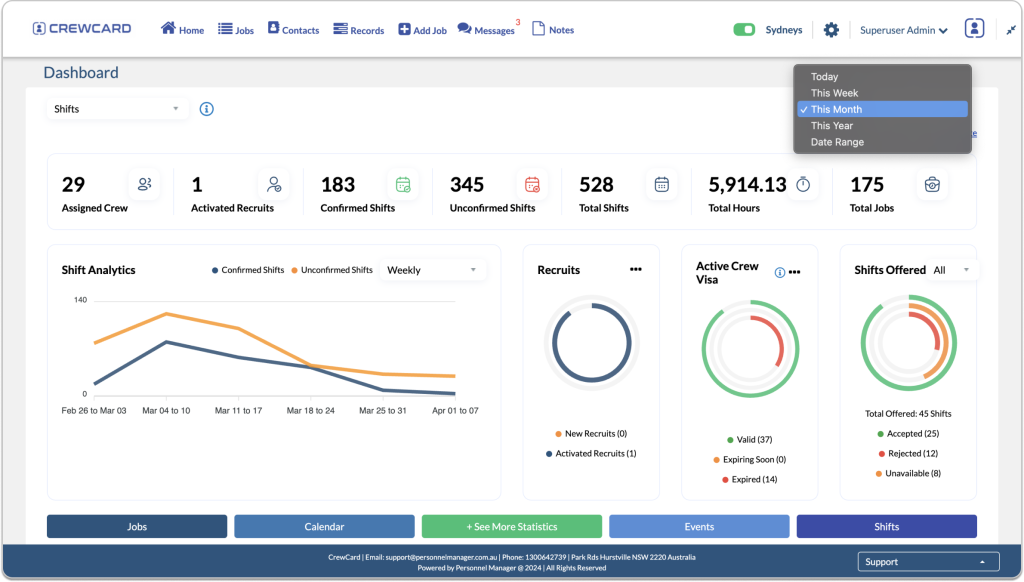
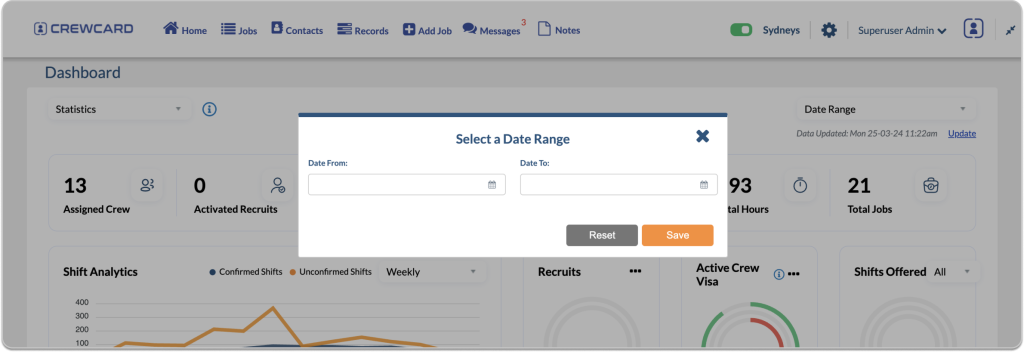
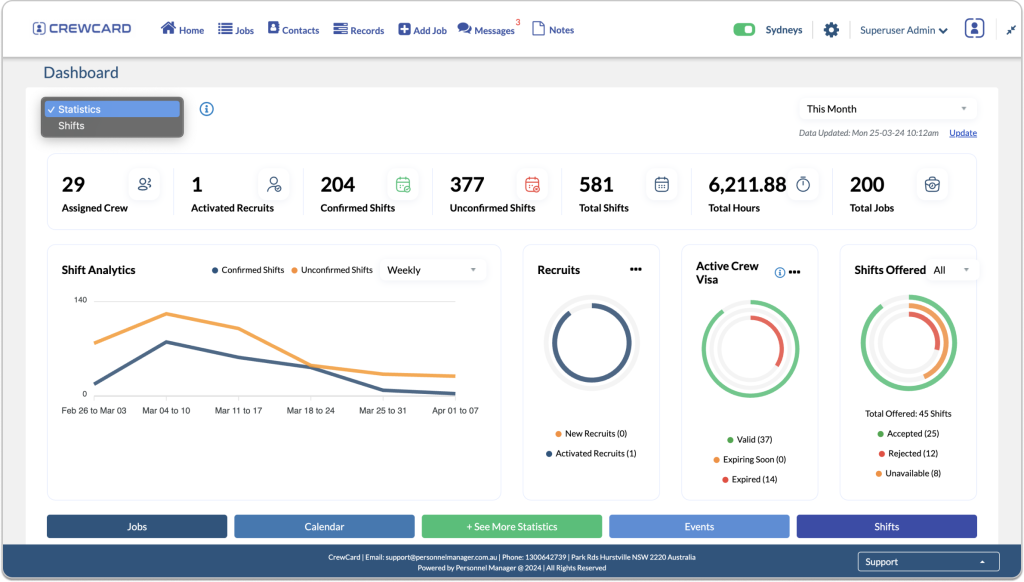


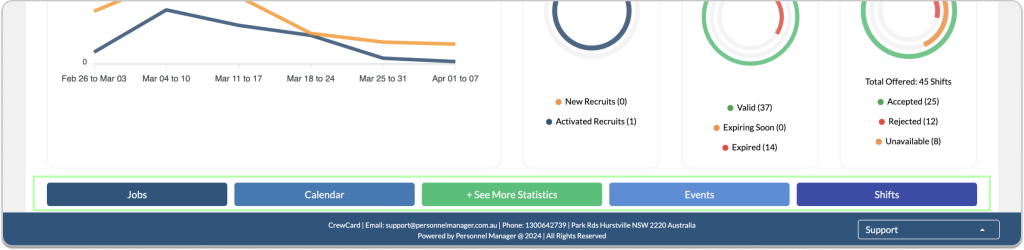
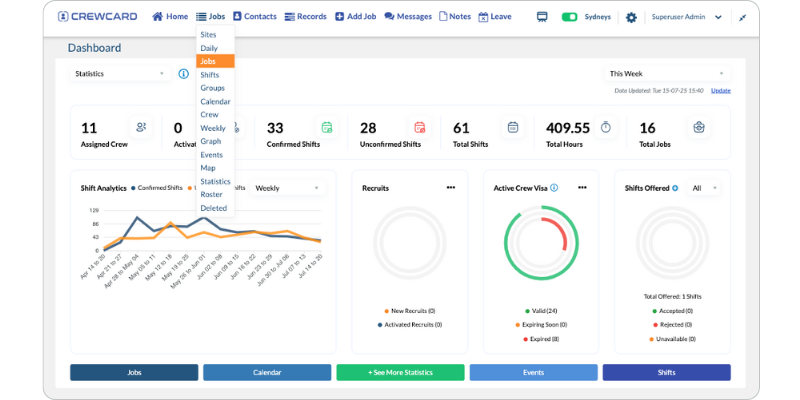


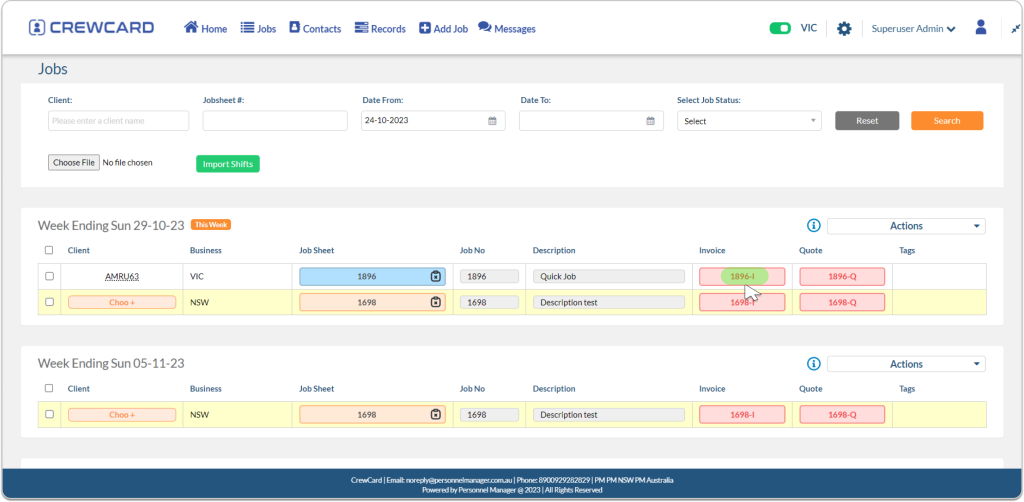
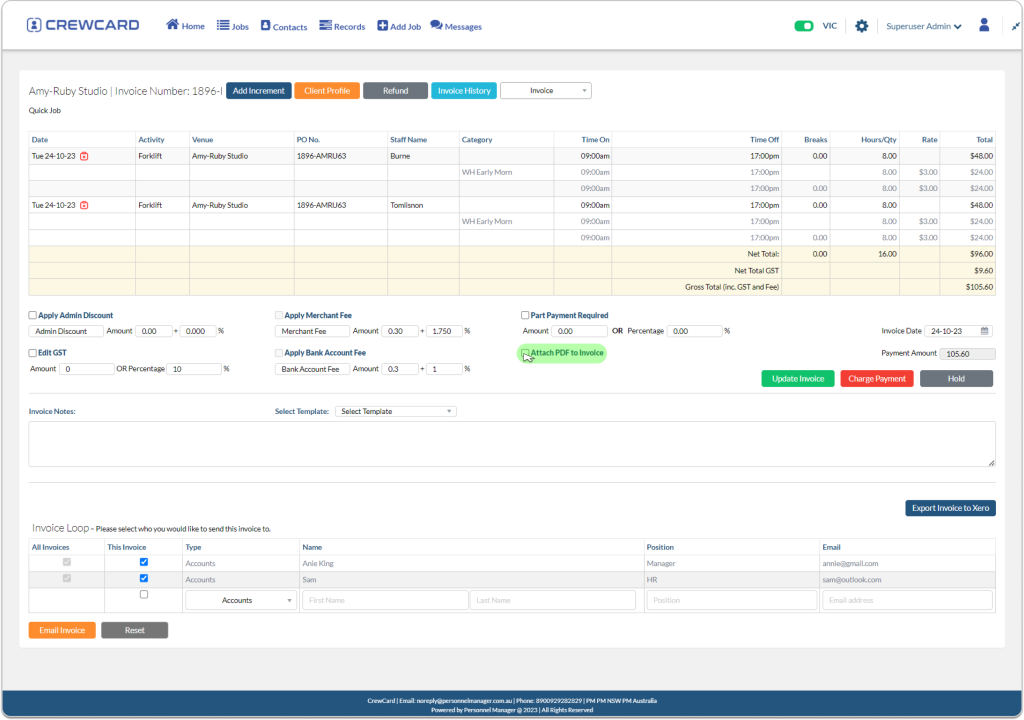


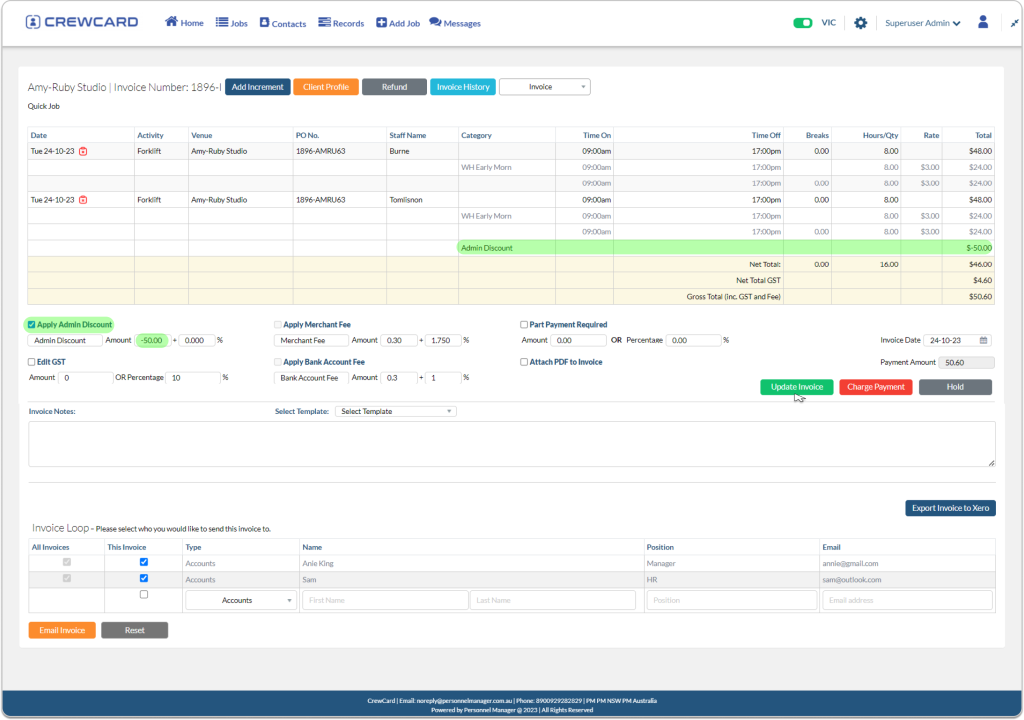


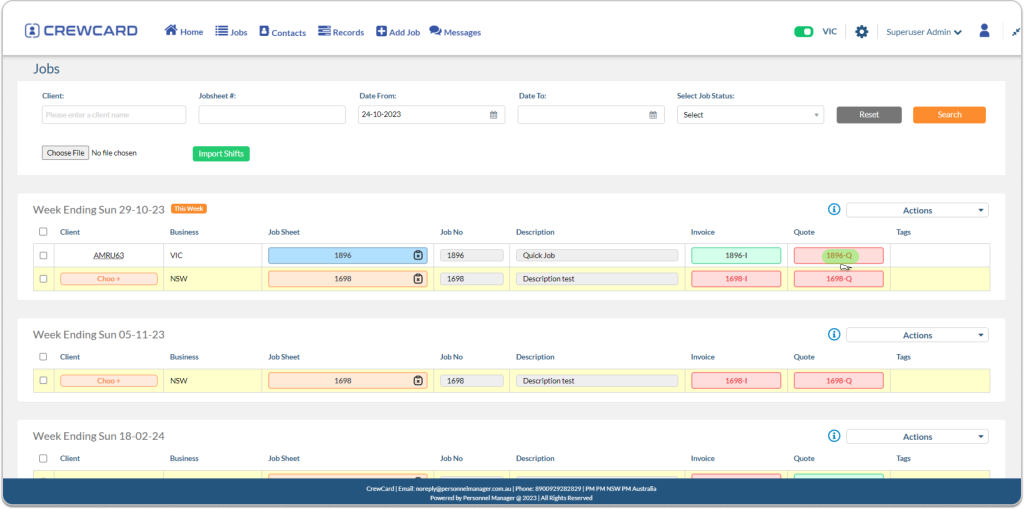
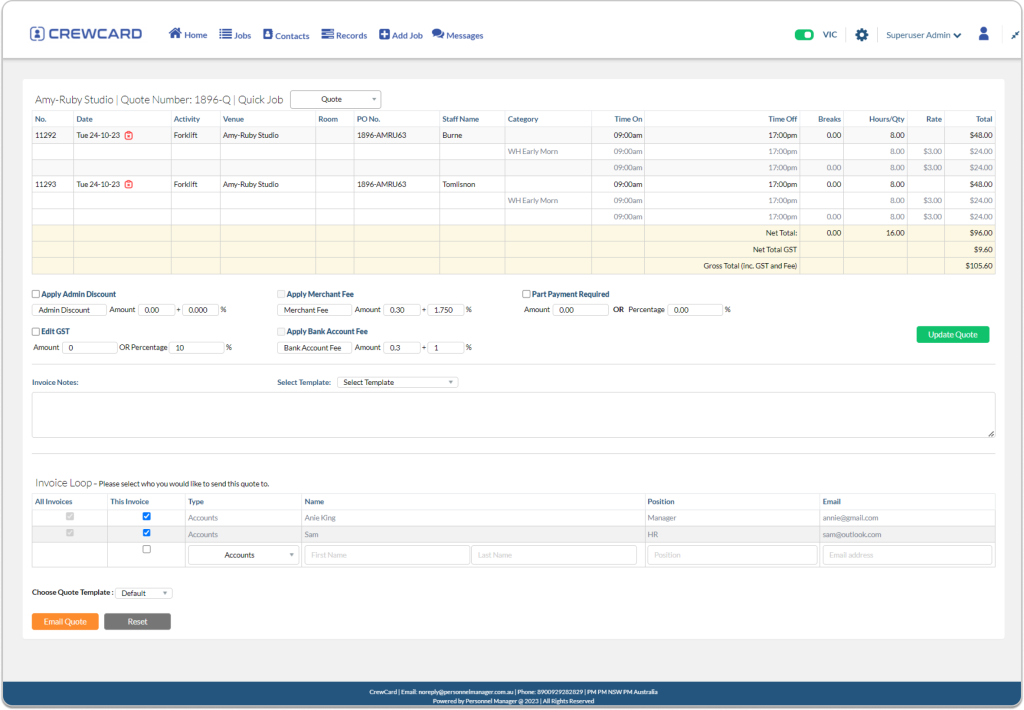

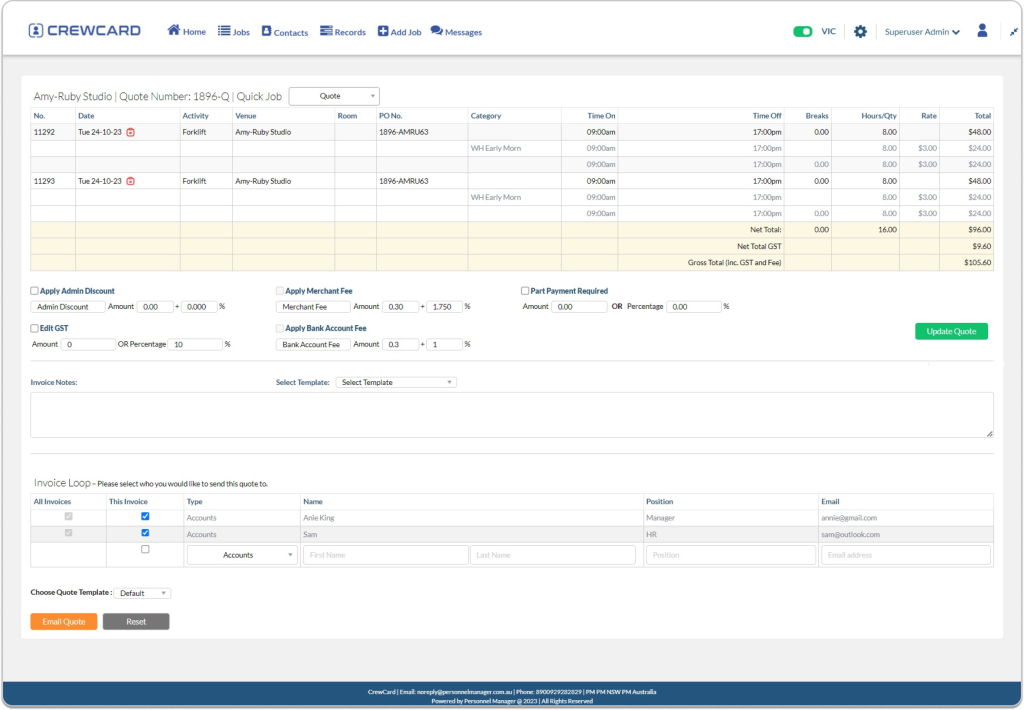


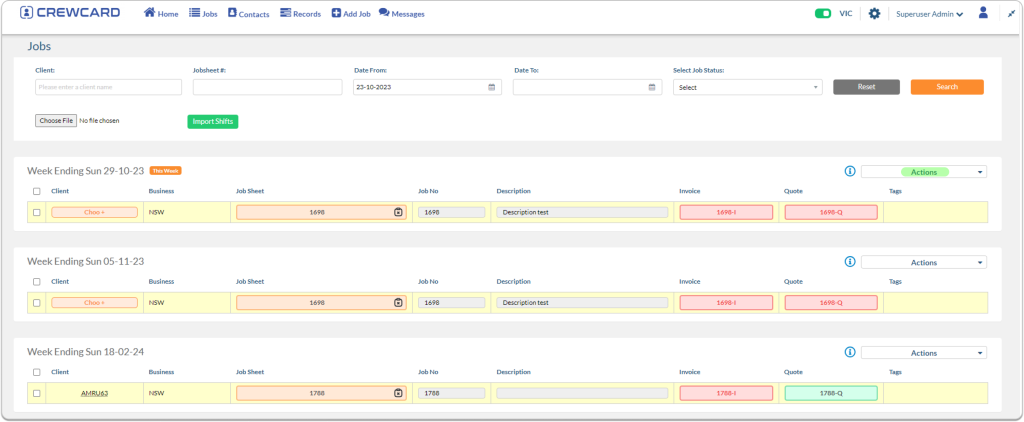


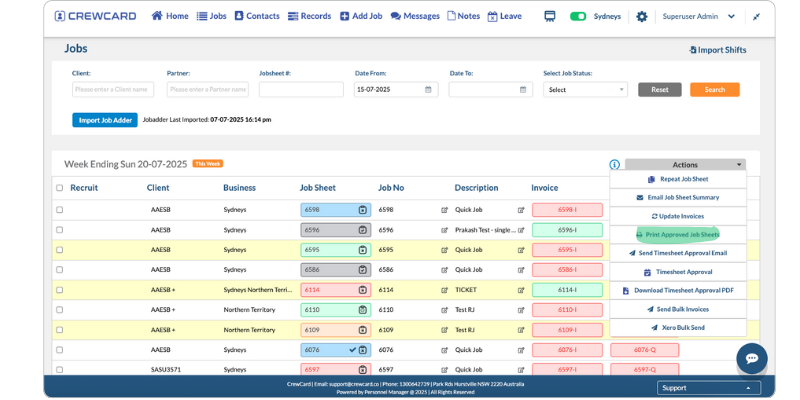
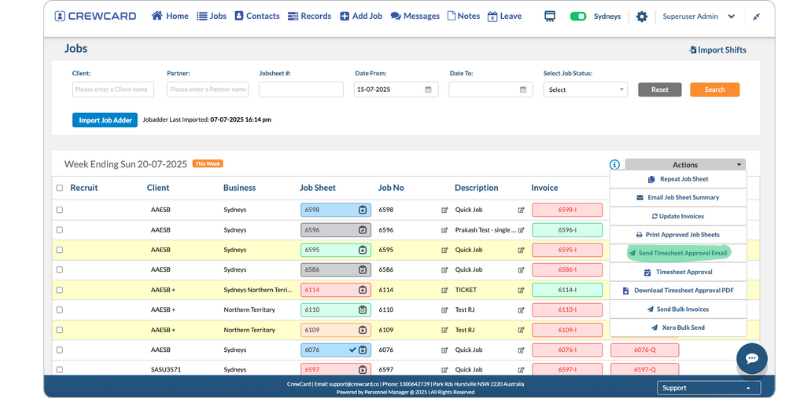


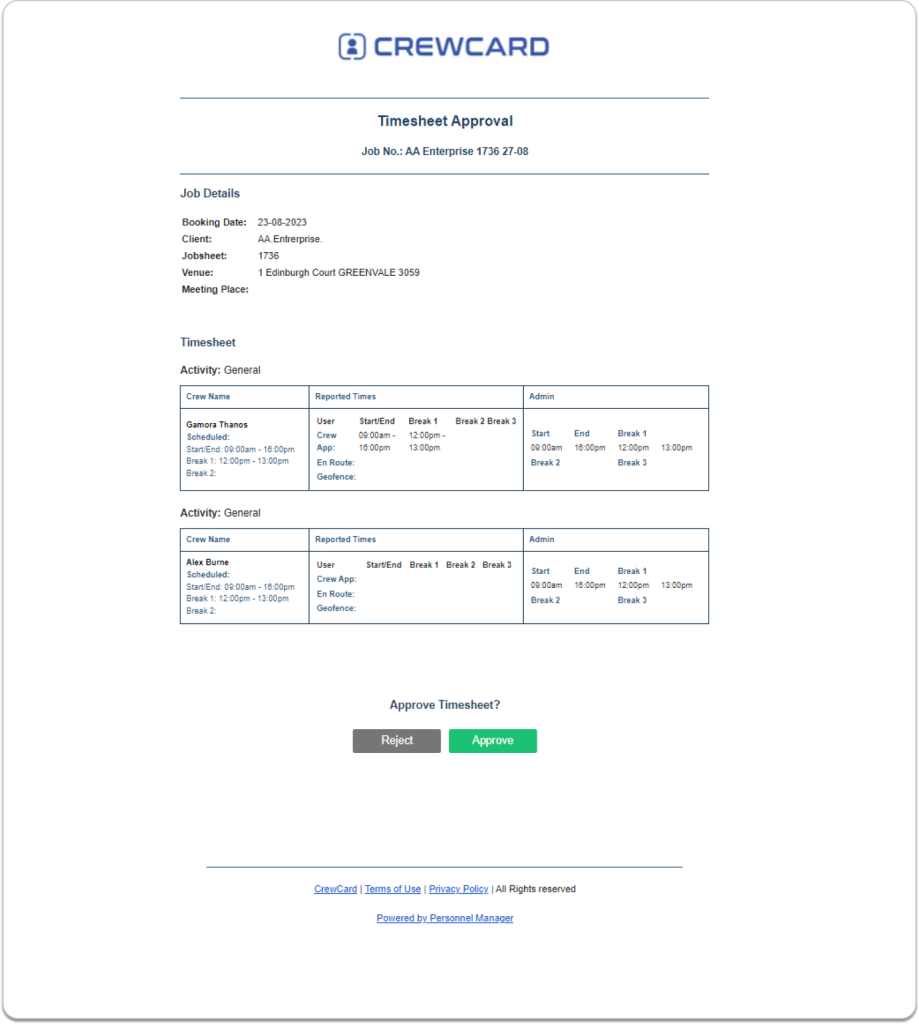

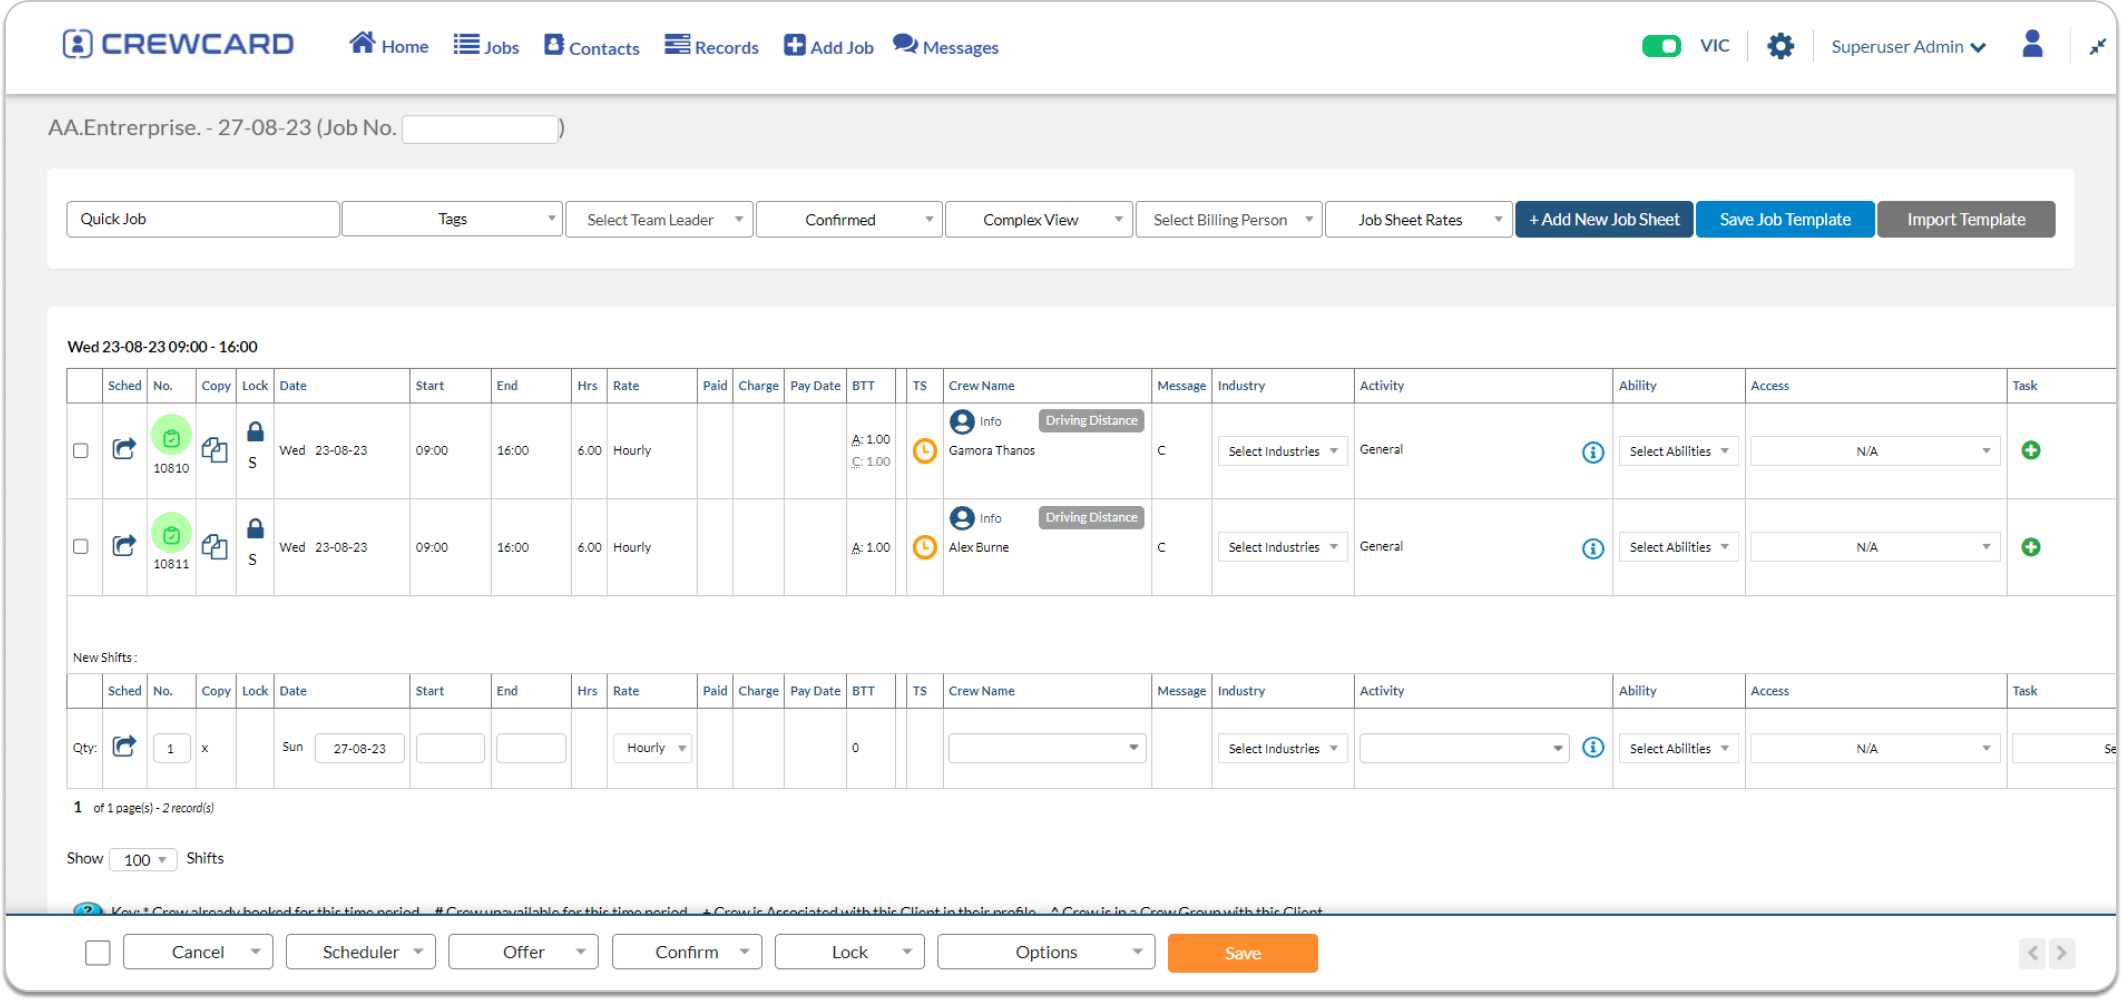
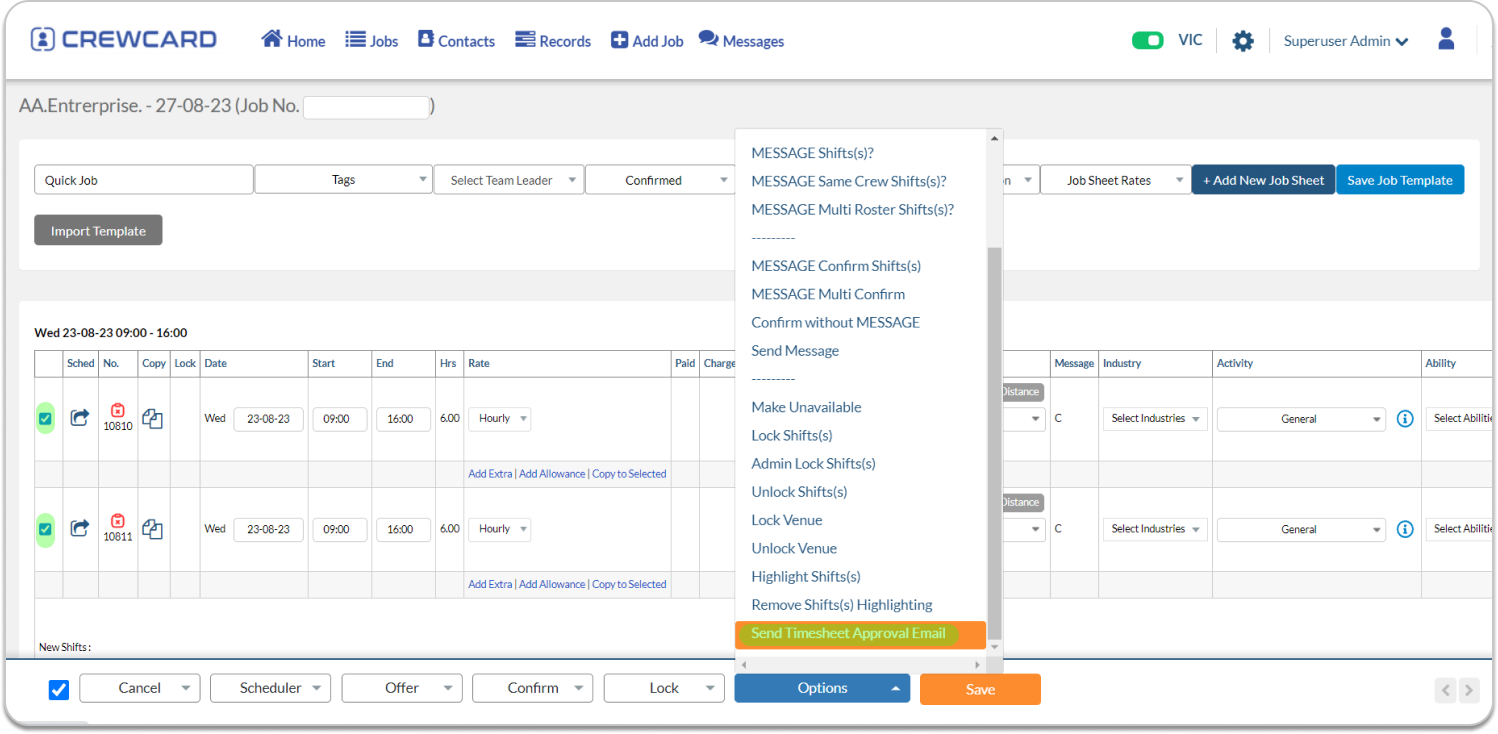
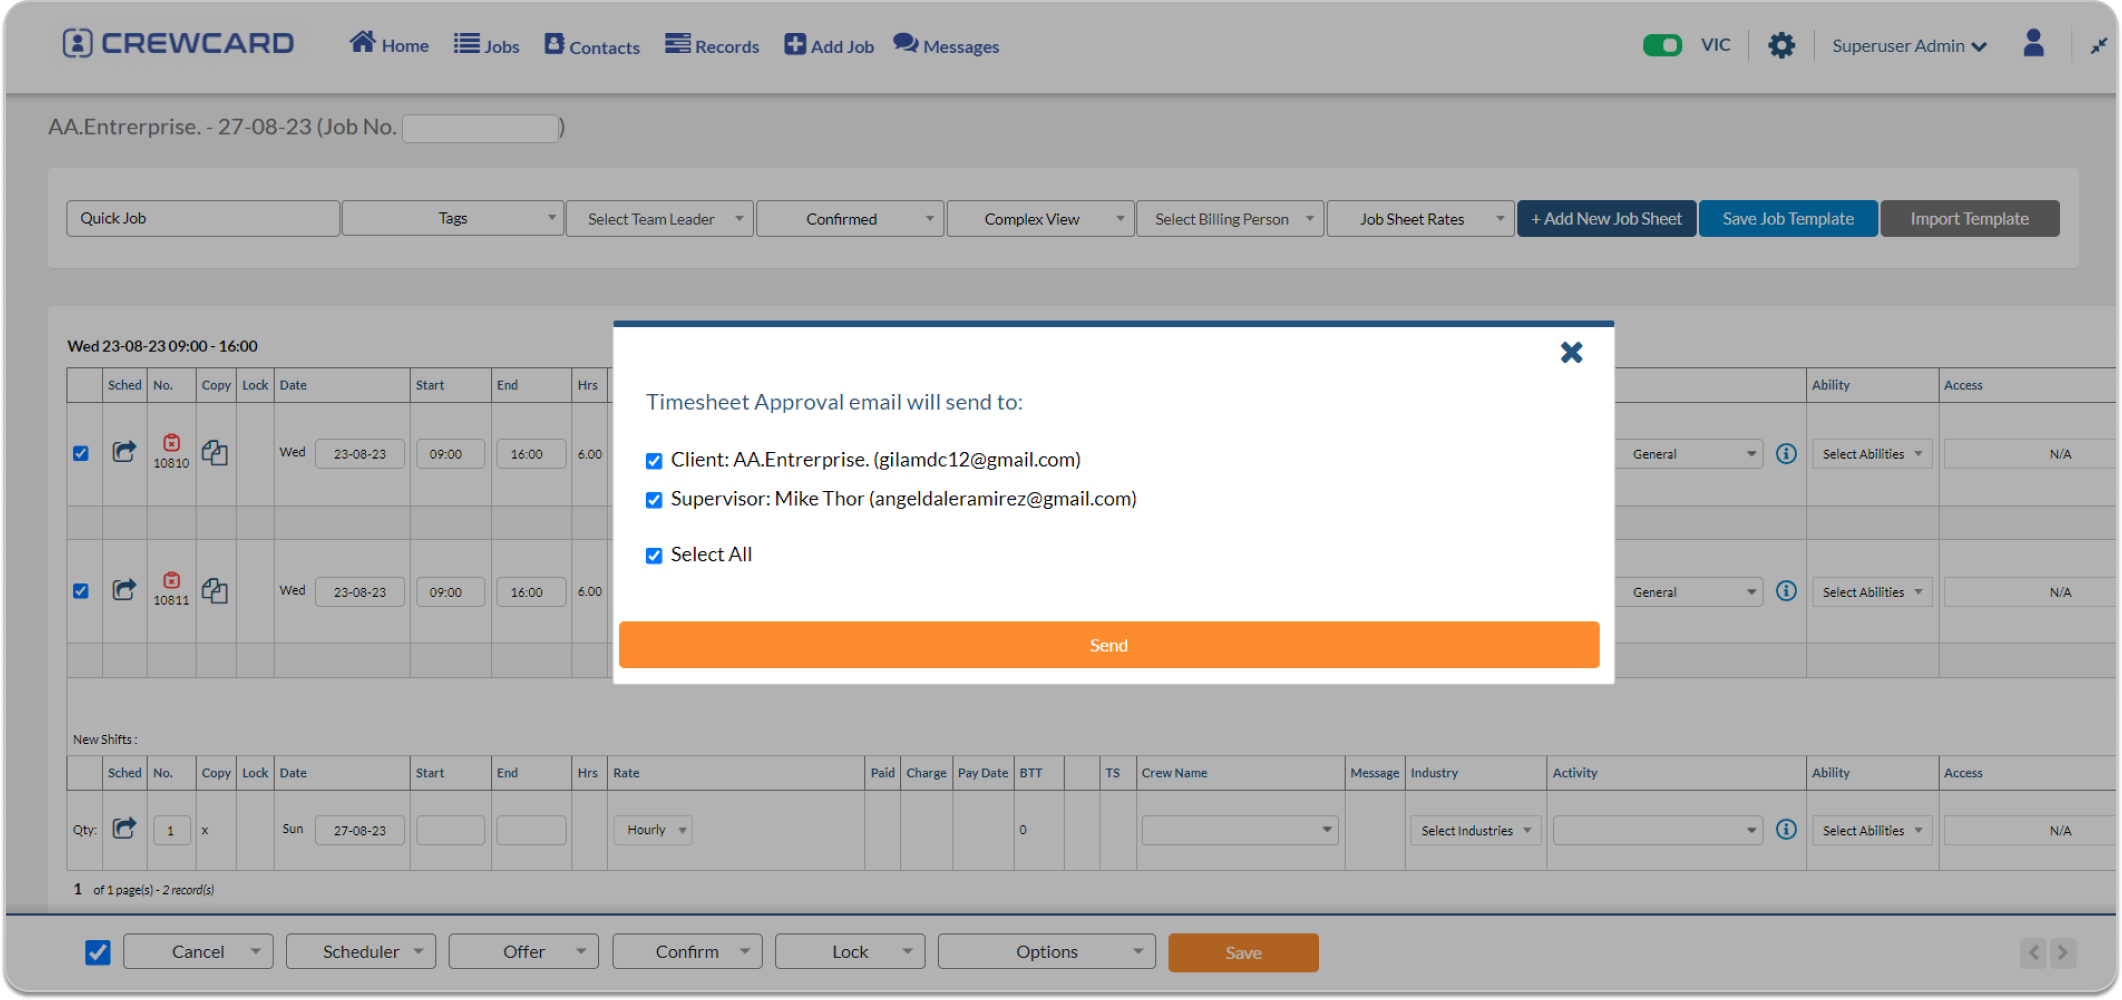
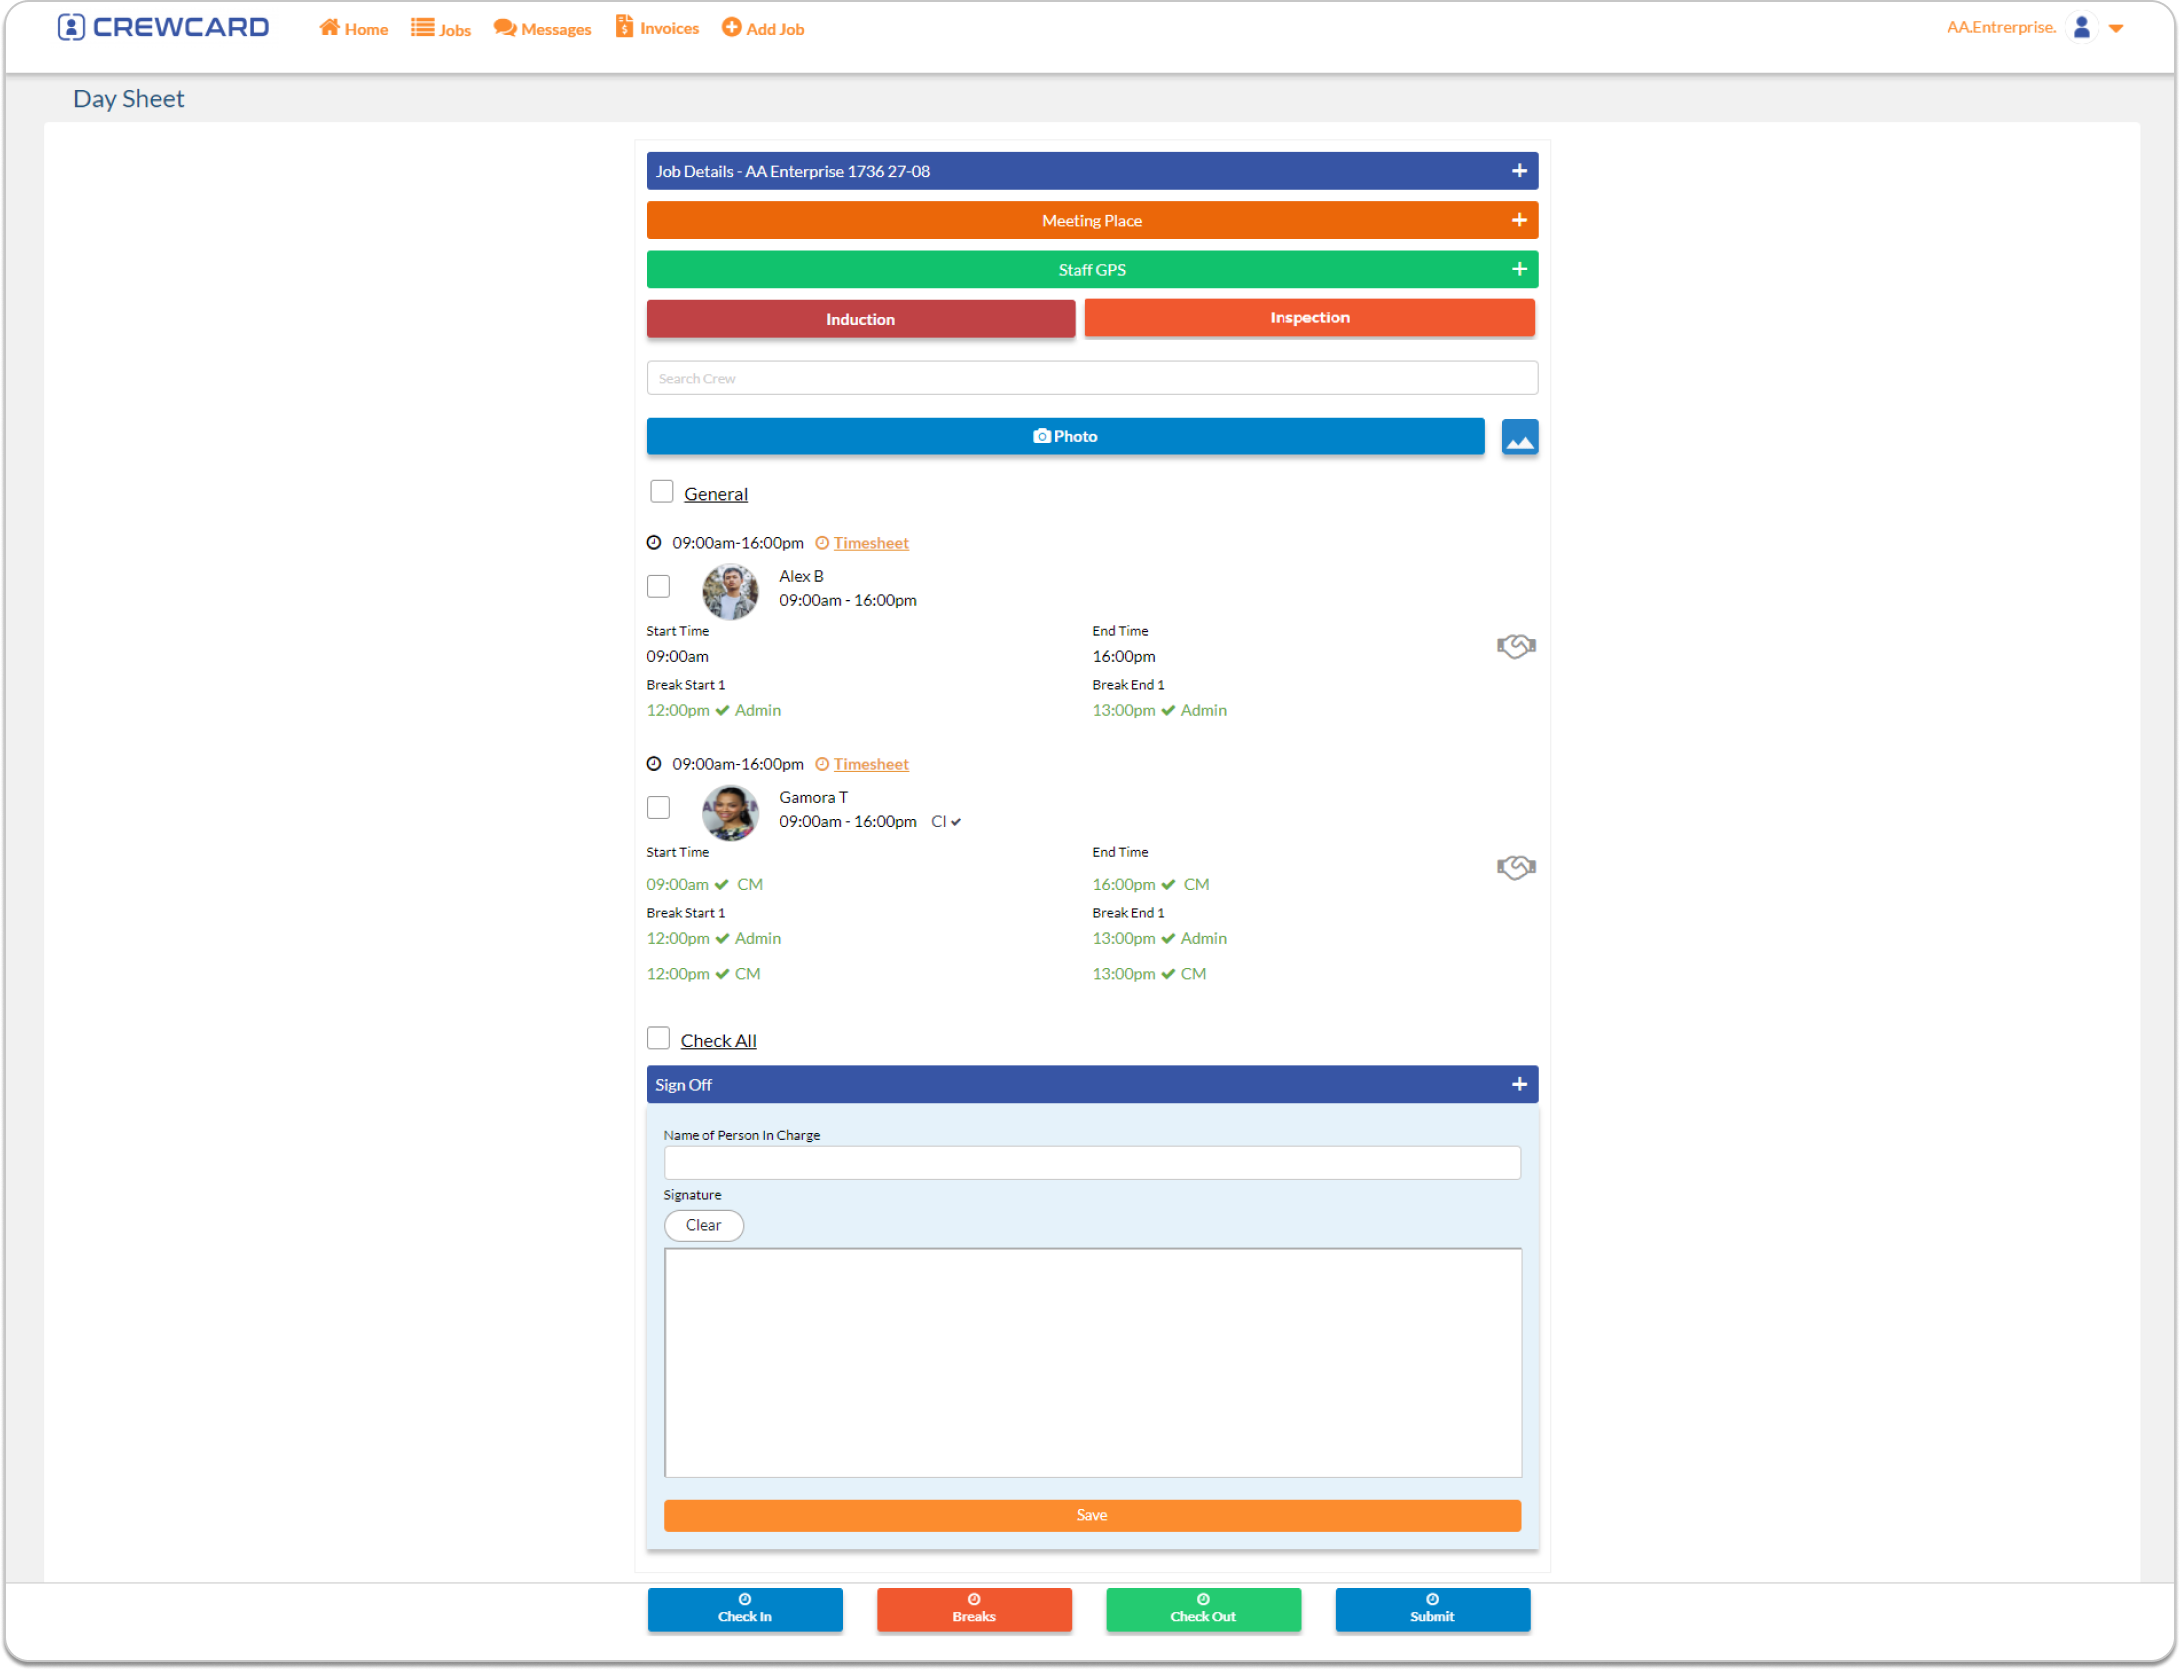
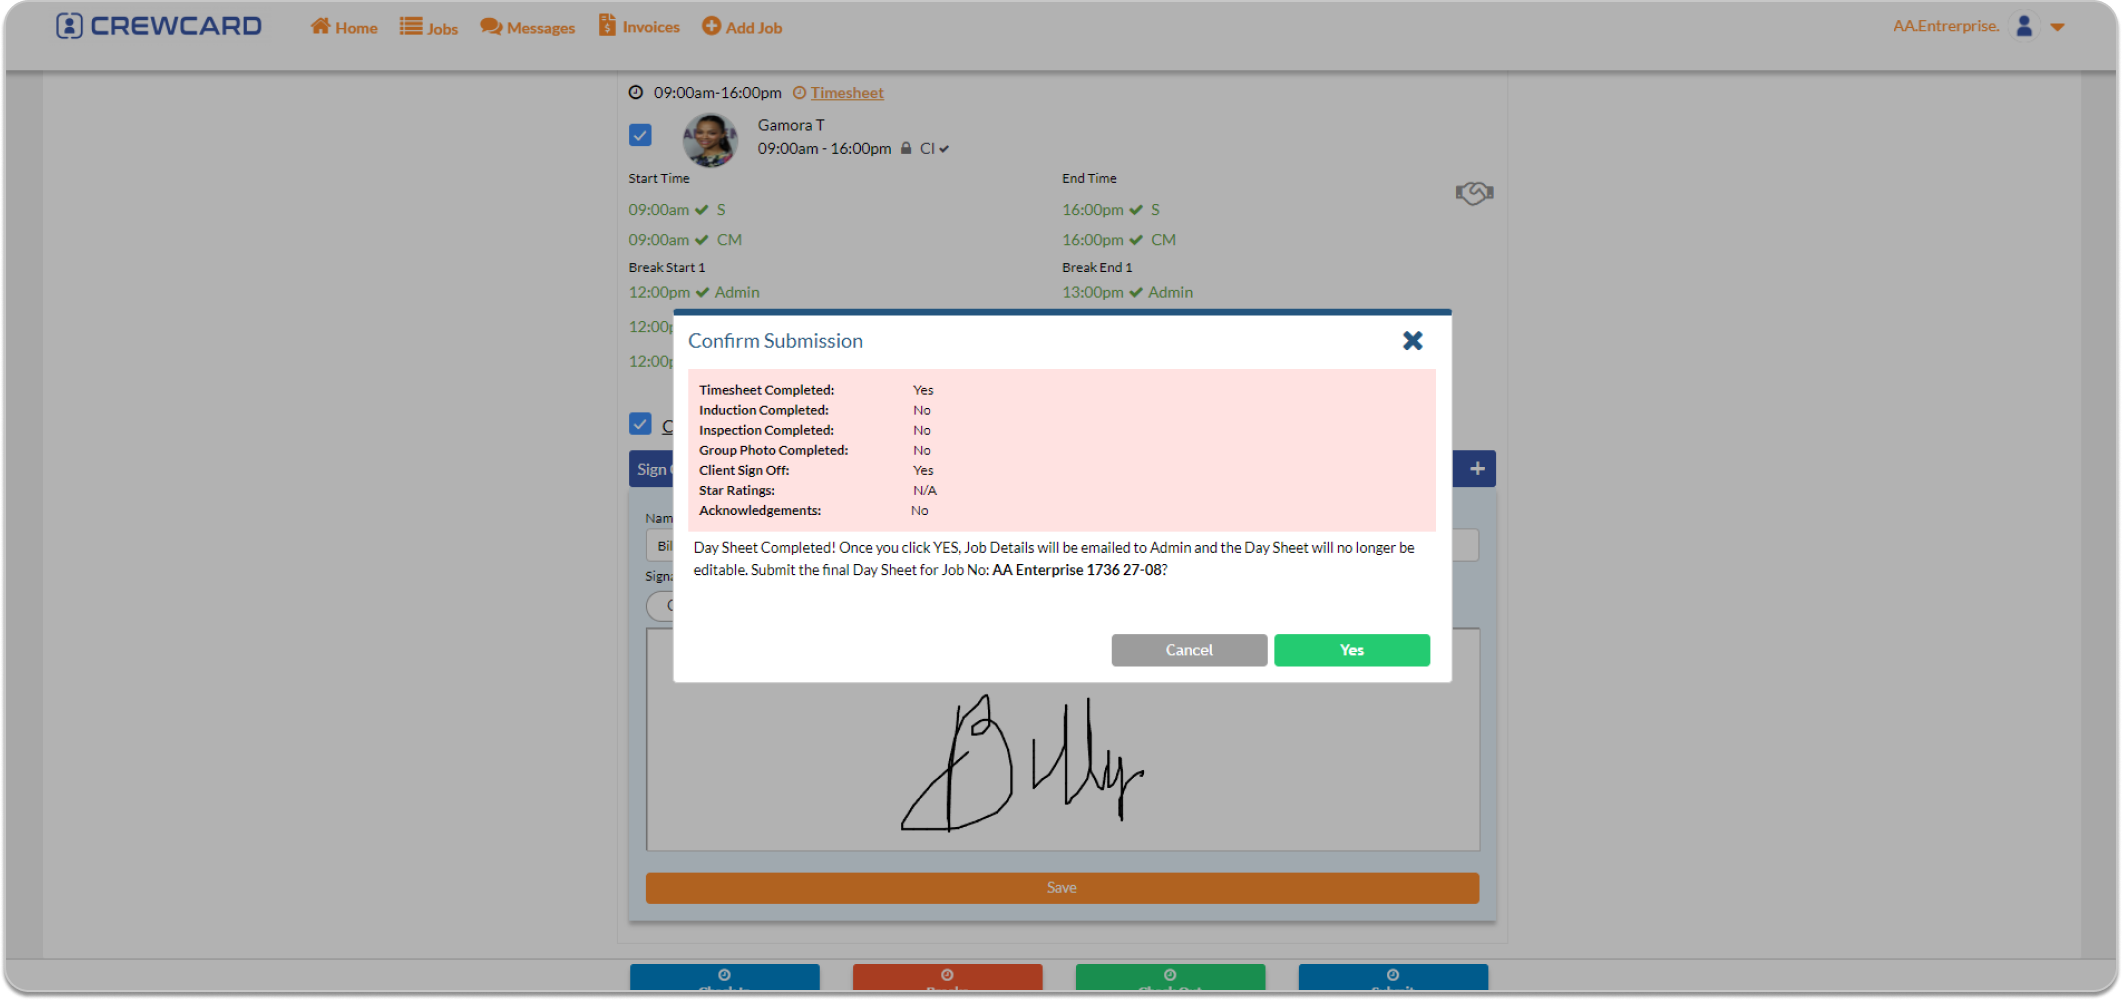
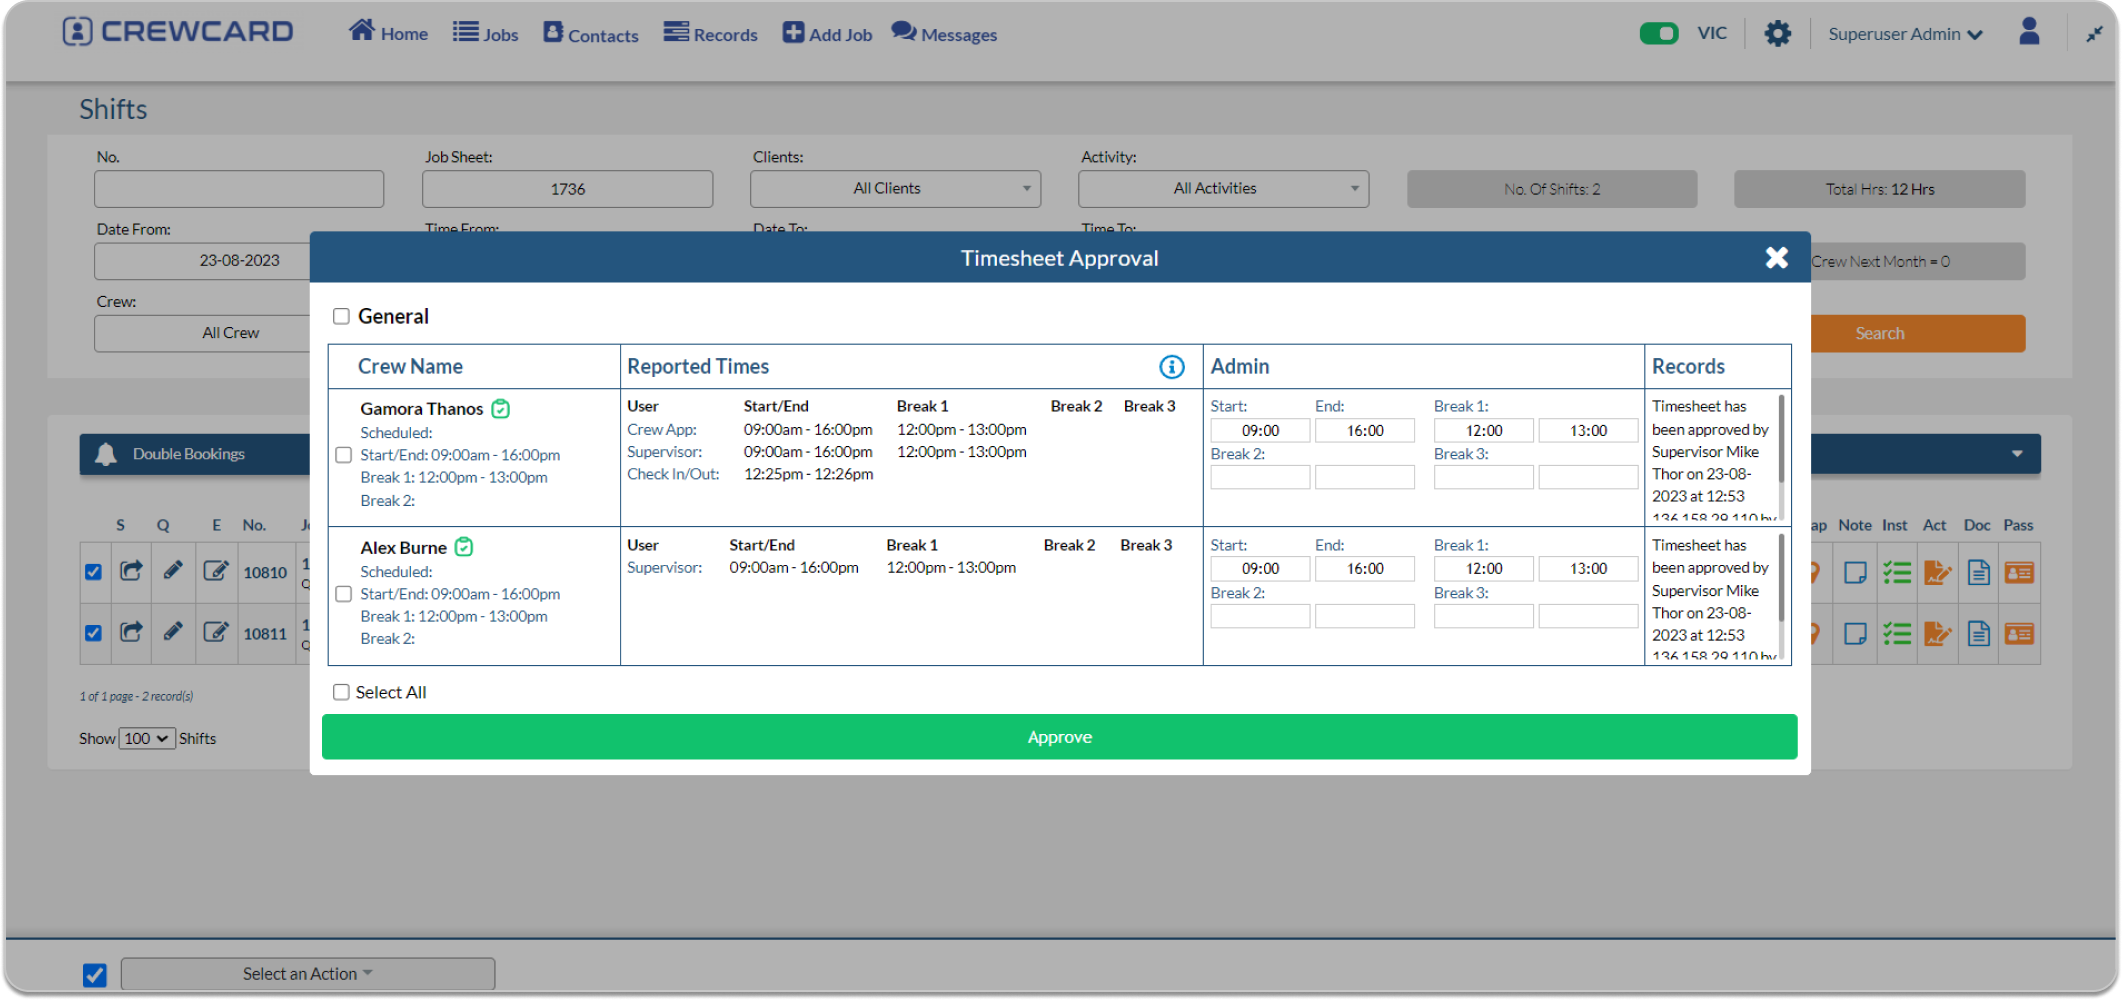

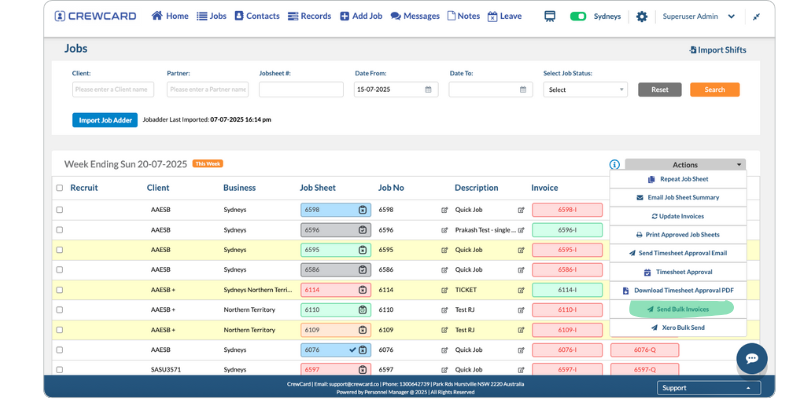
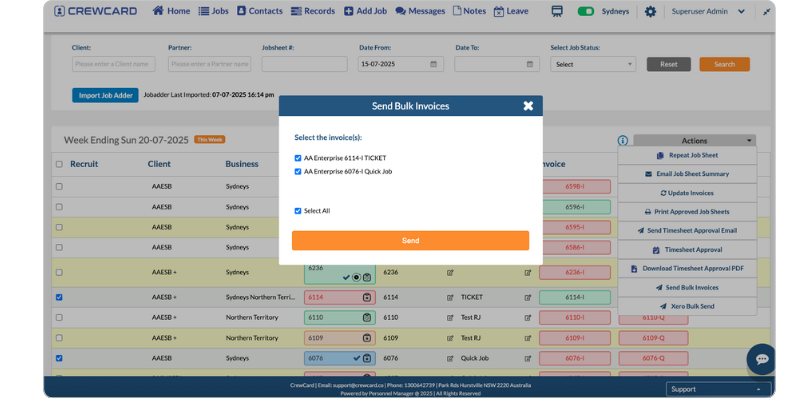


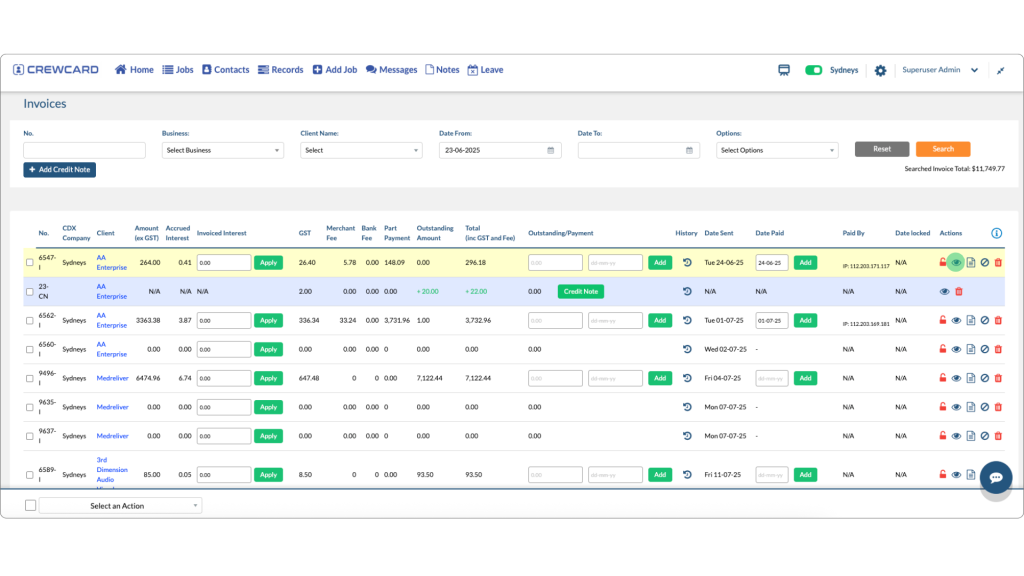
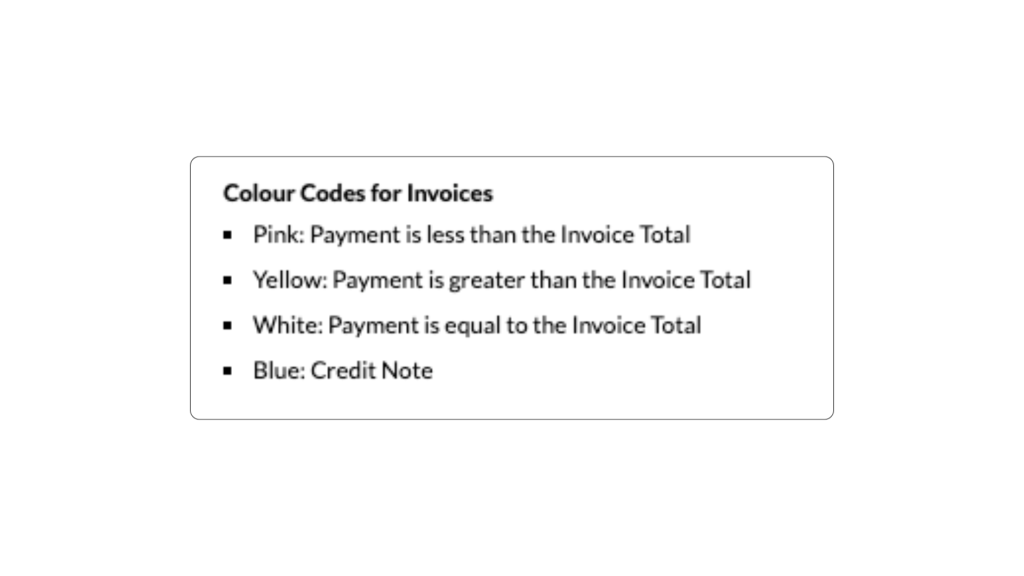 Find the invoice that you wish to edit on


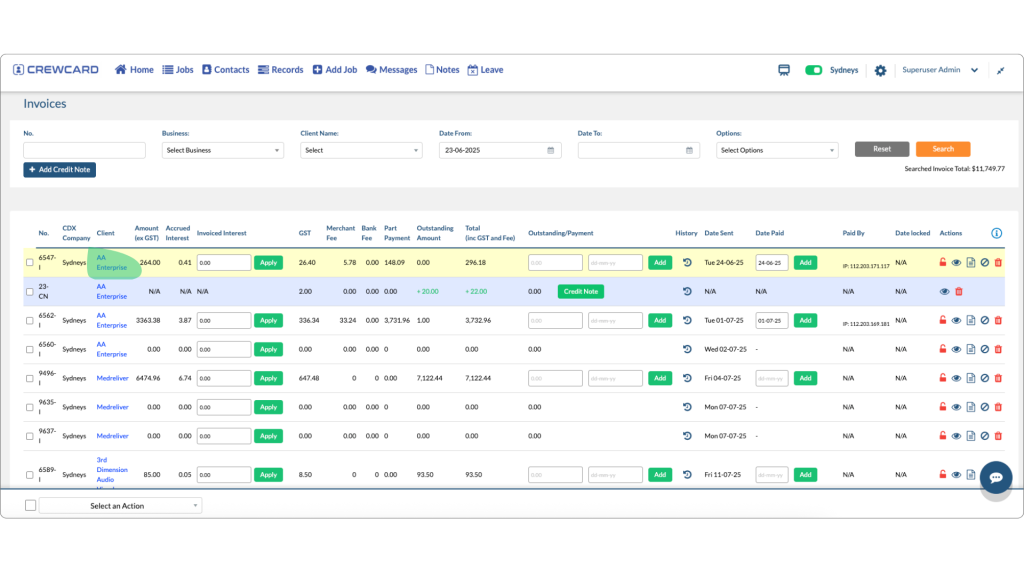


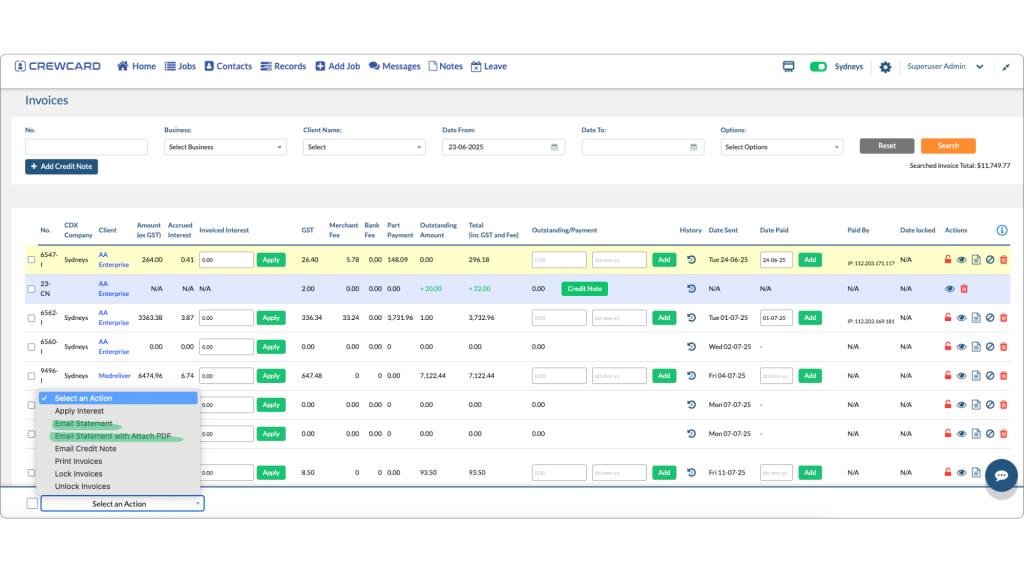
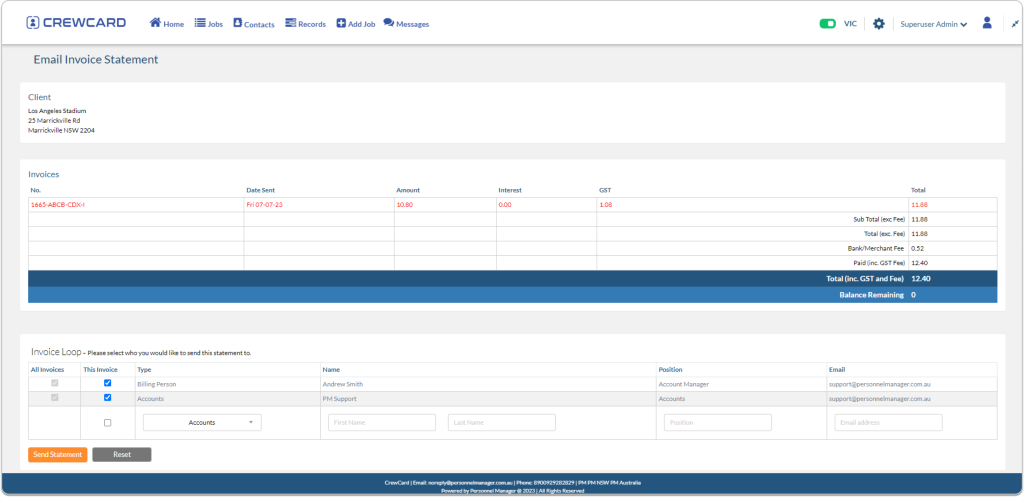
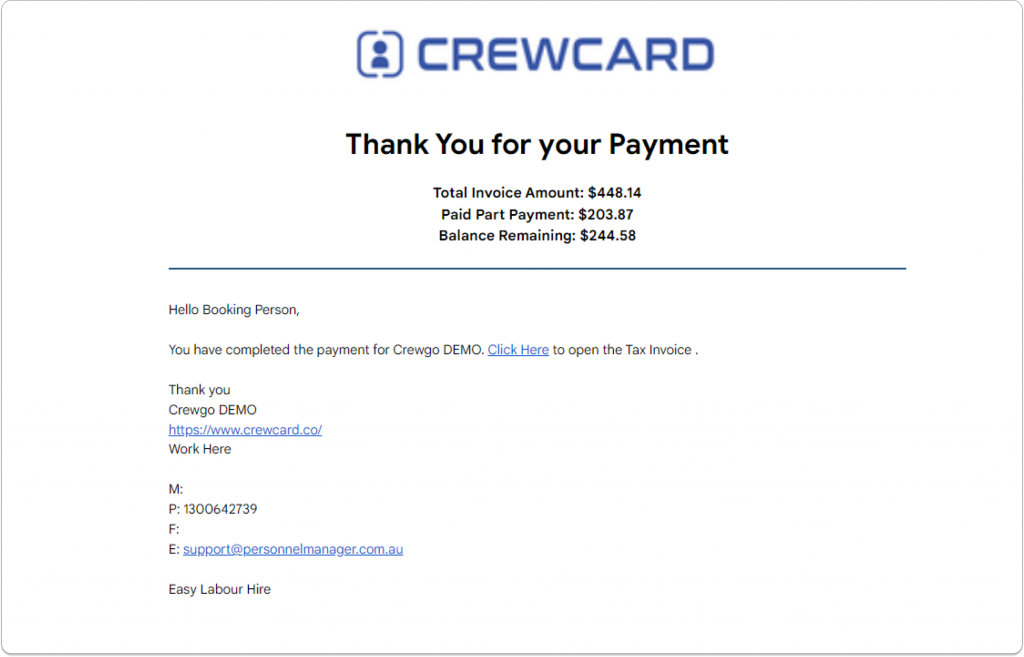
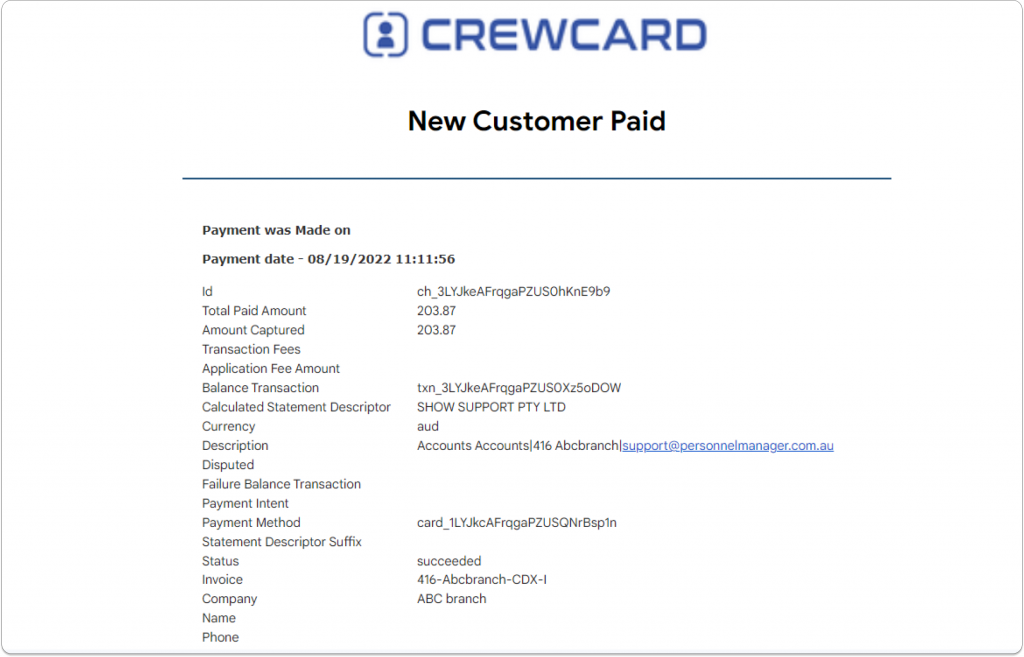
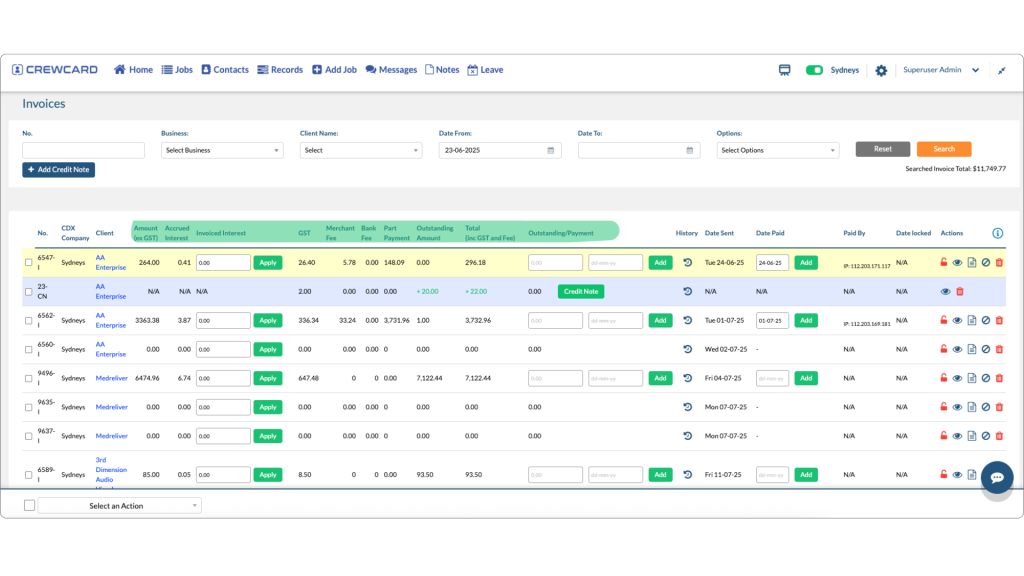

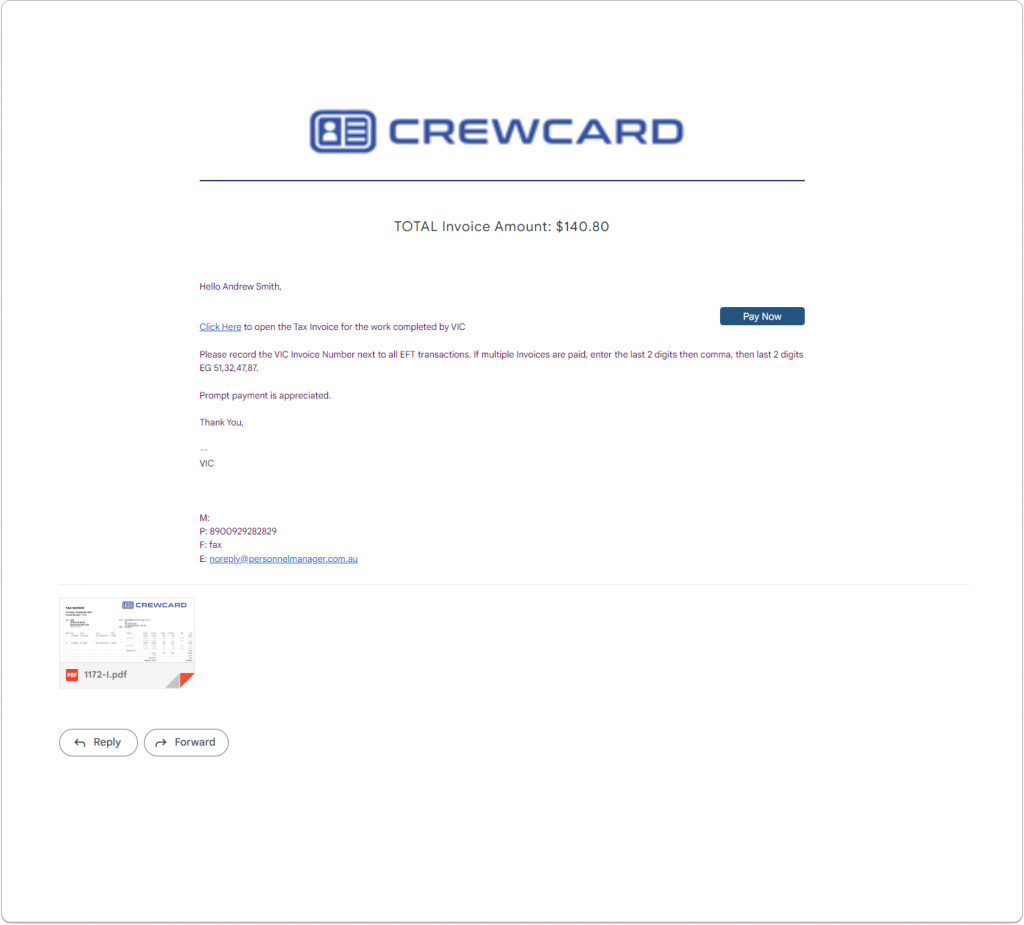
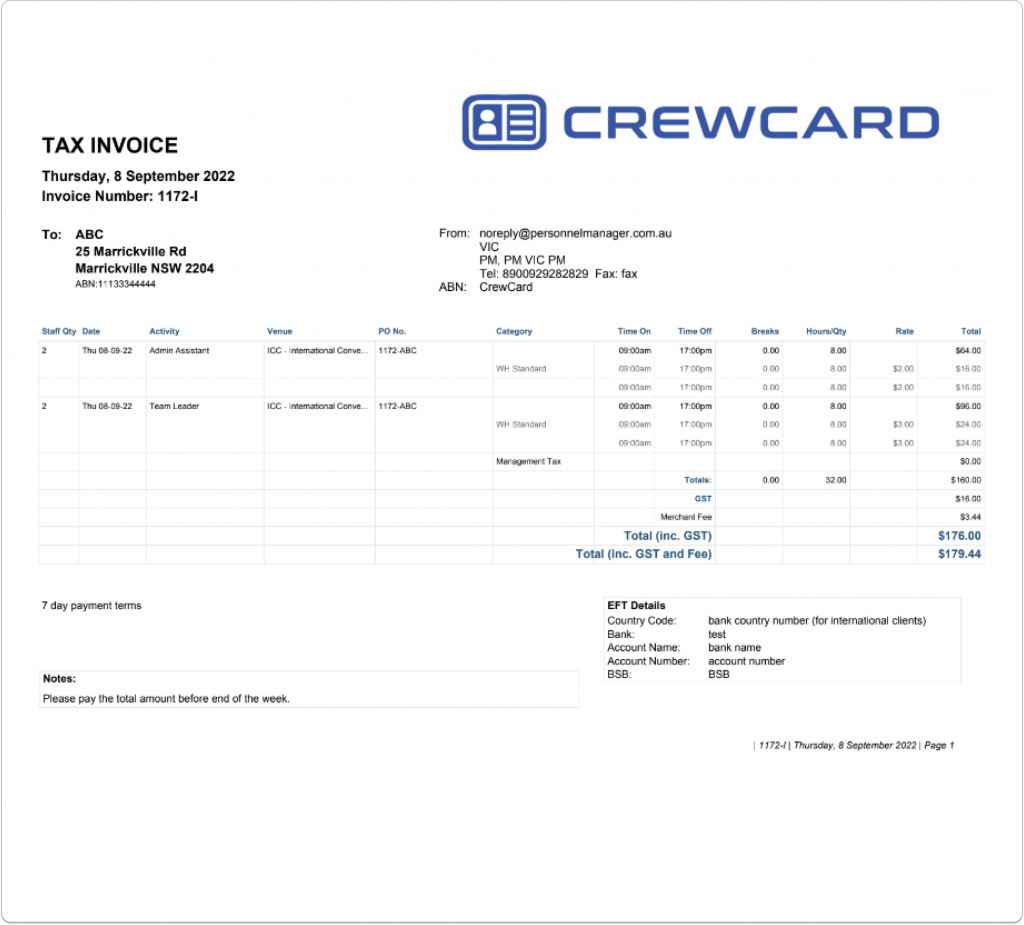


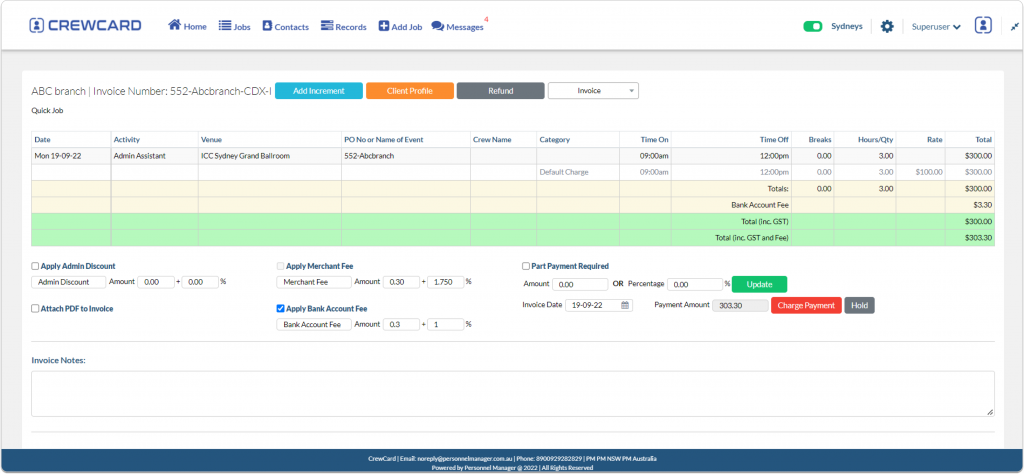

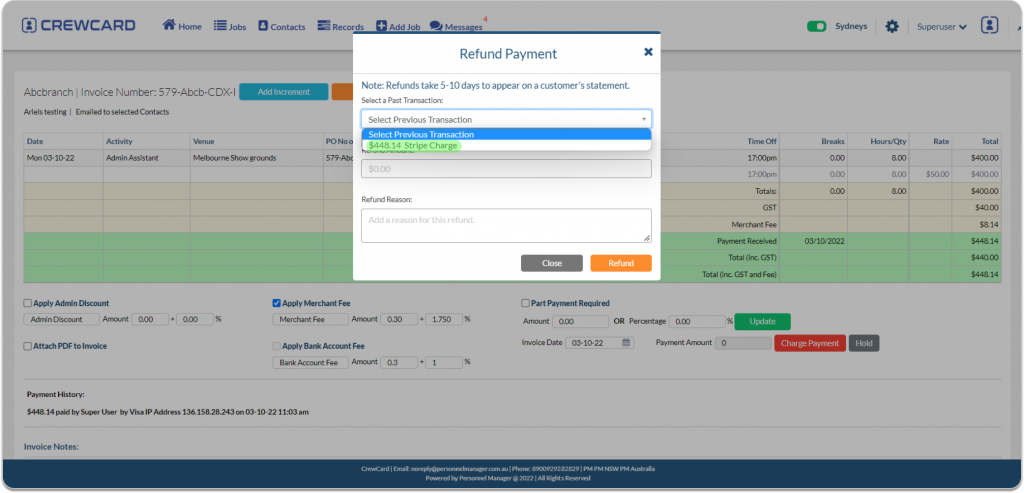
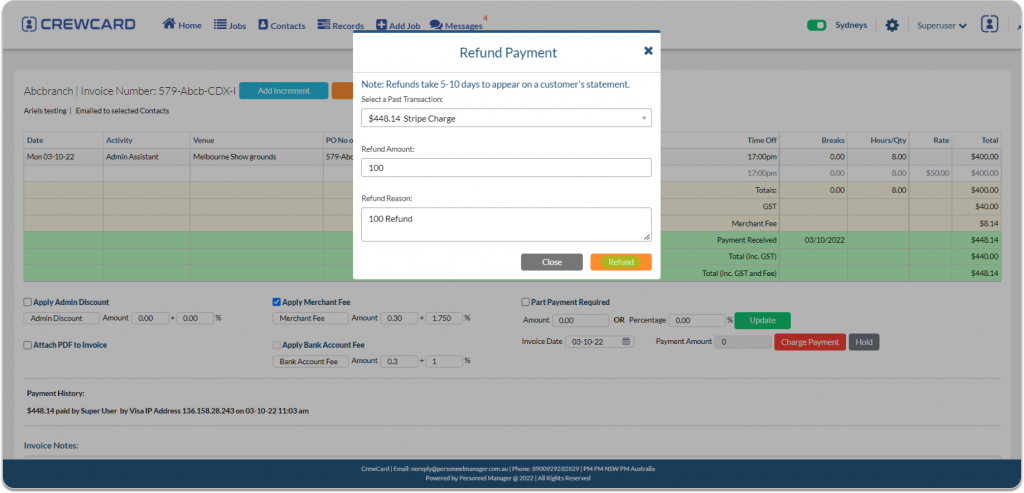
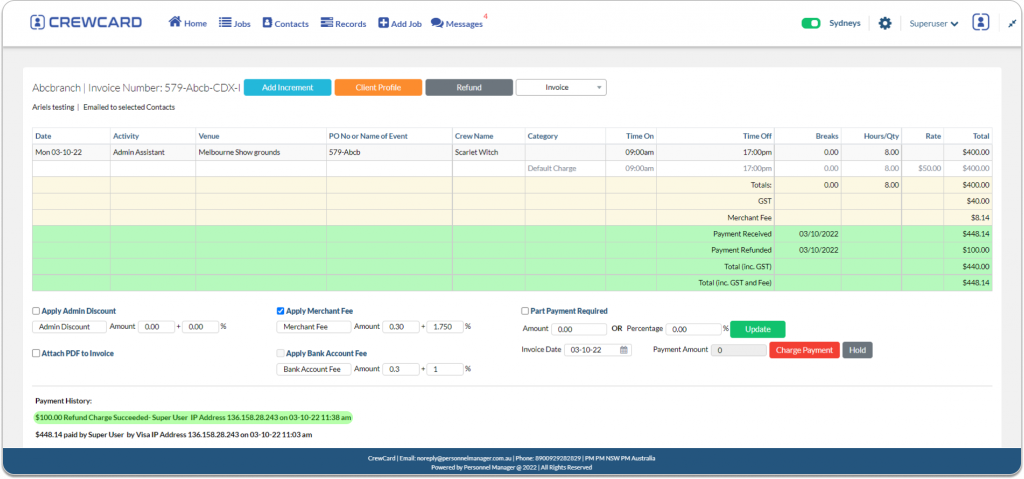
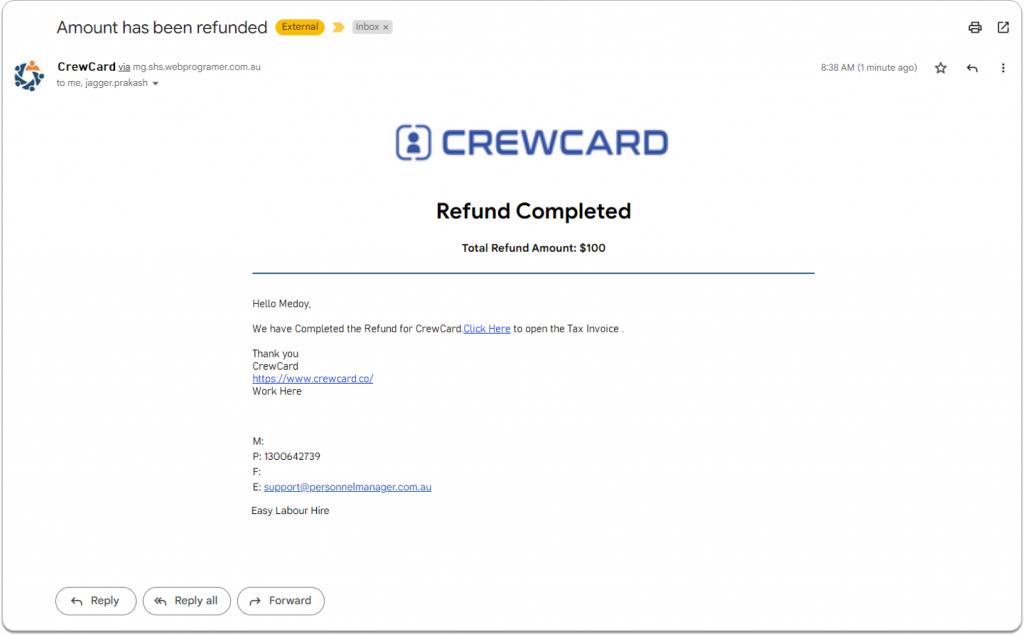
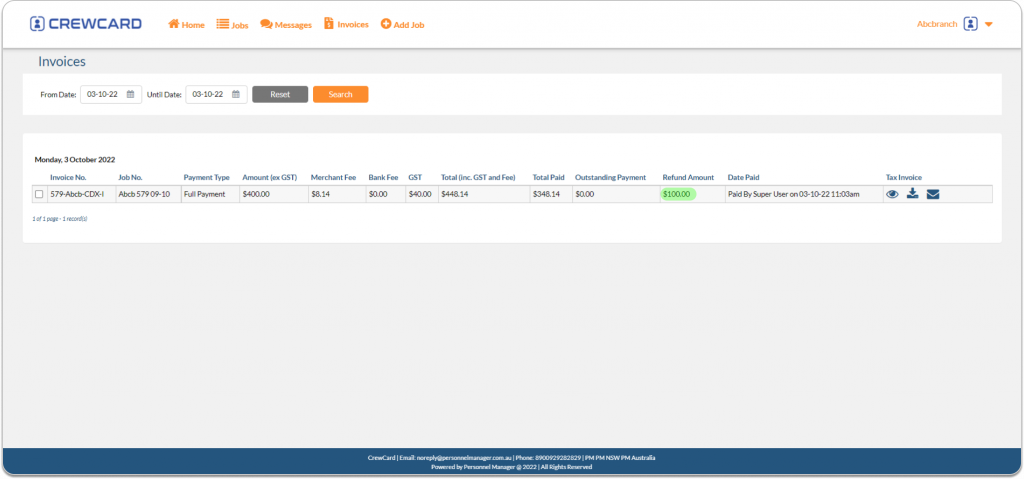


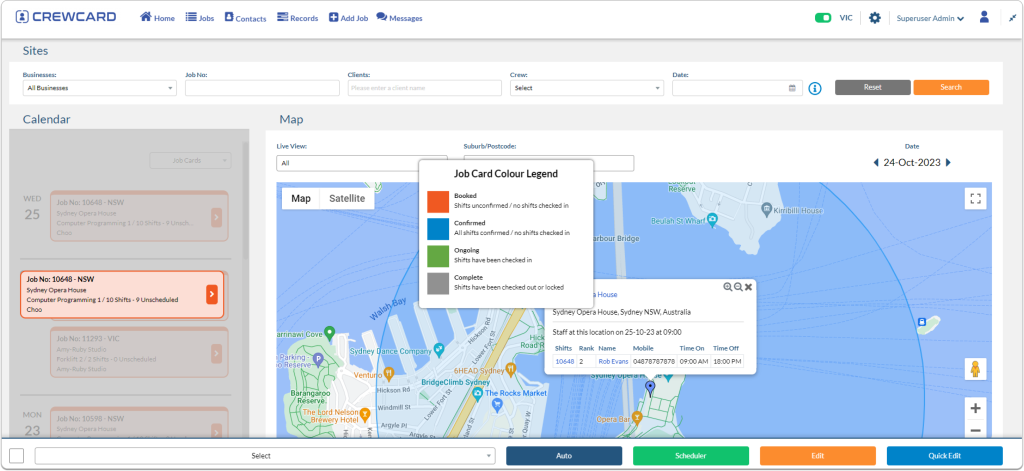


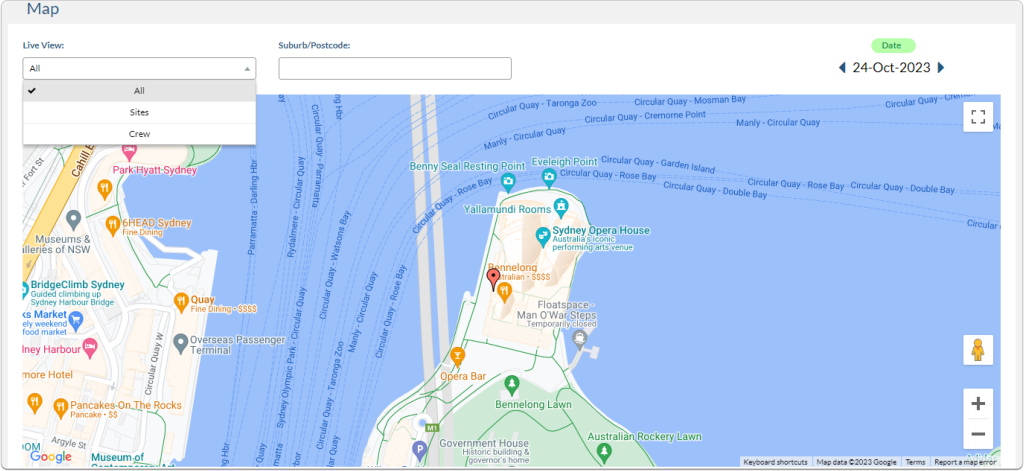
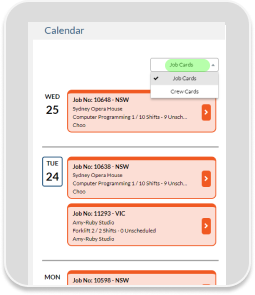
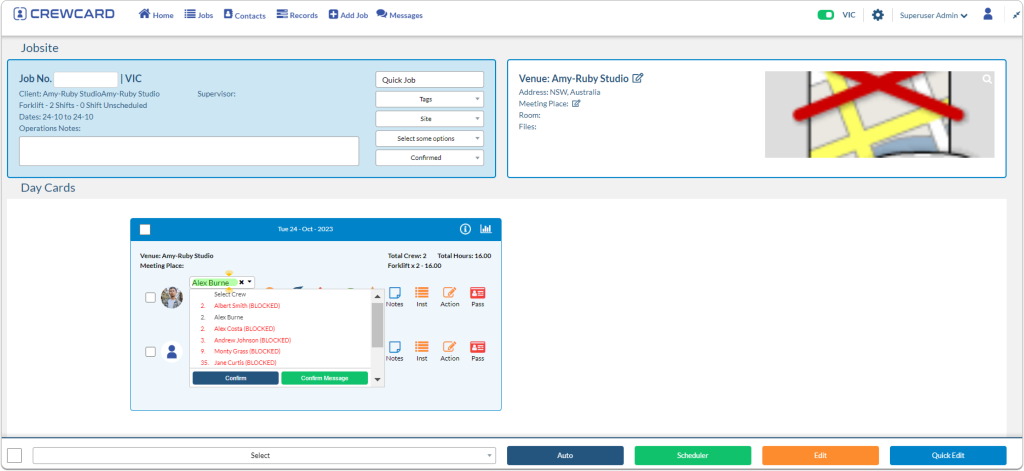
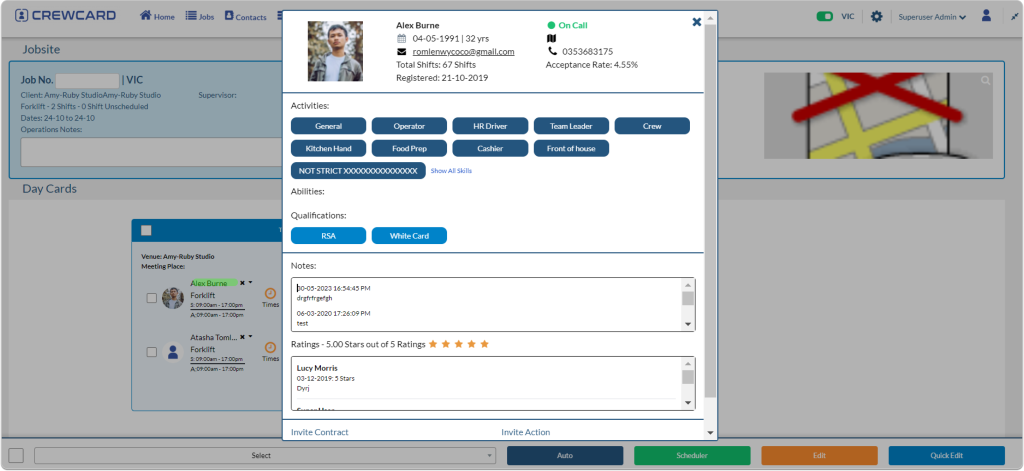
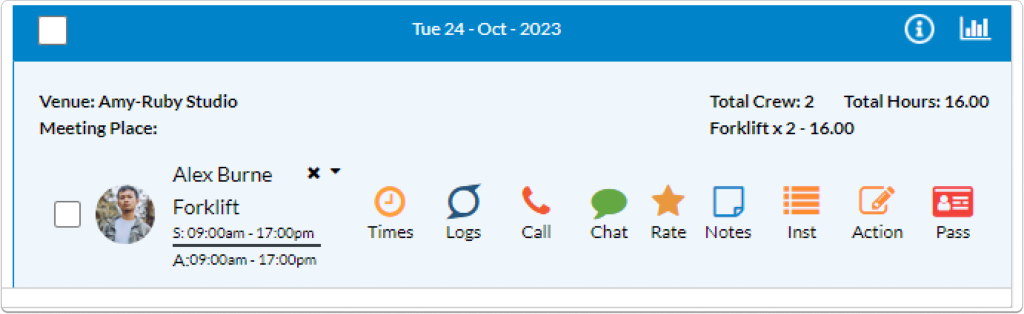
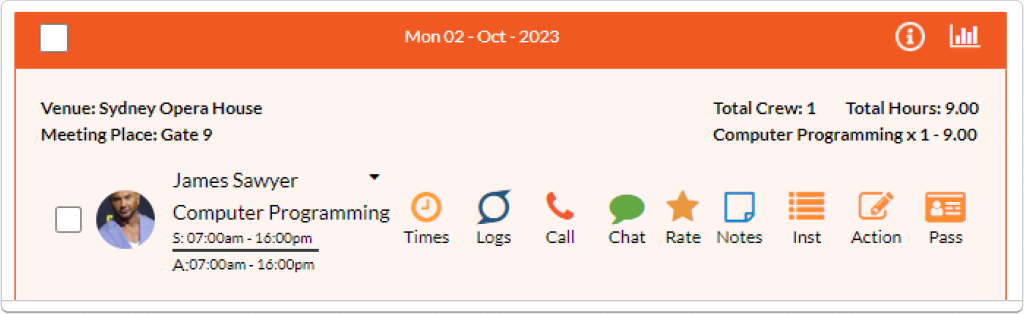
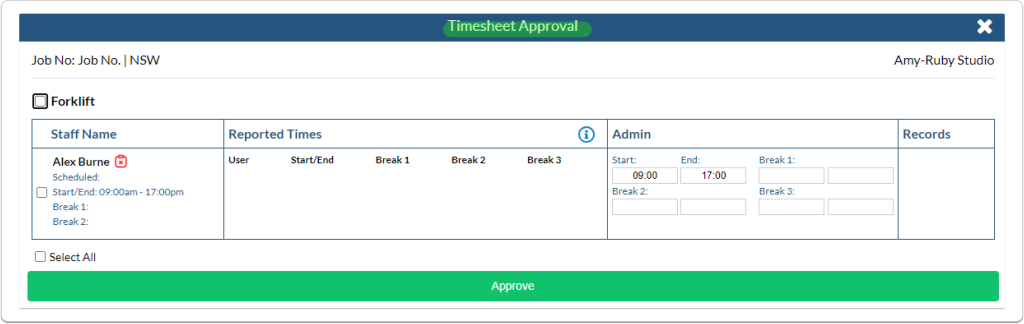
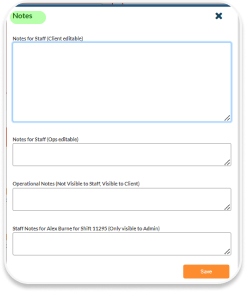
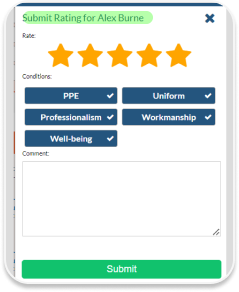
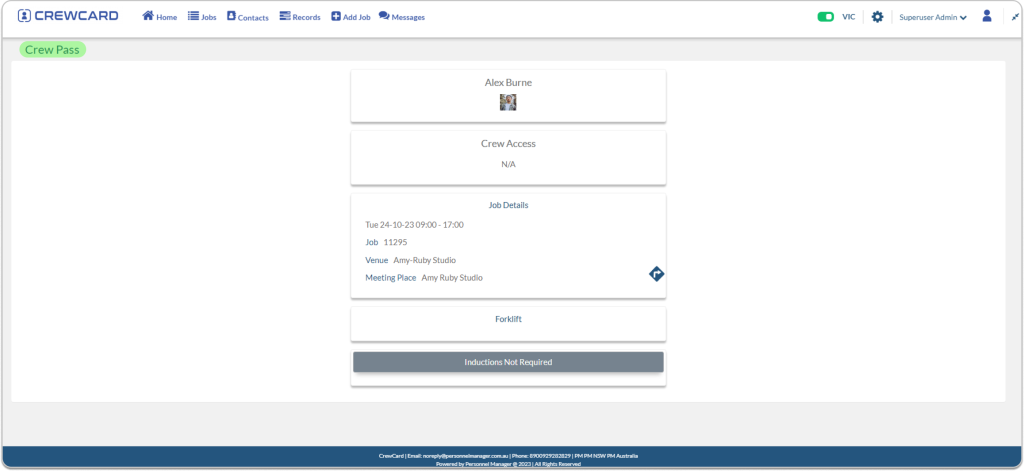

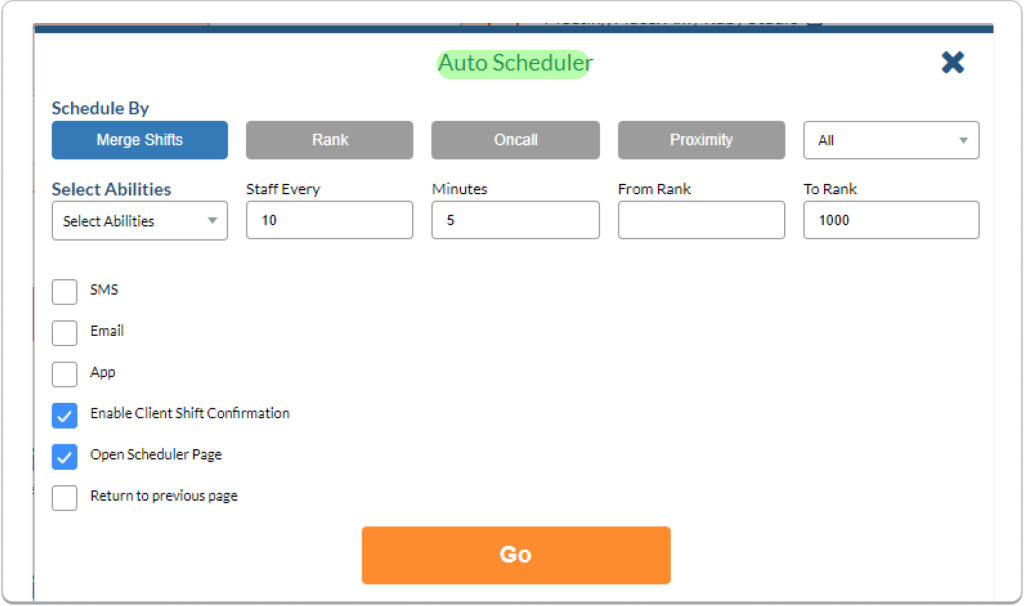
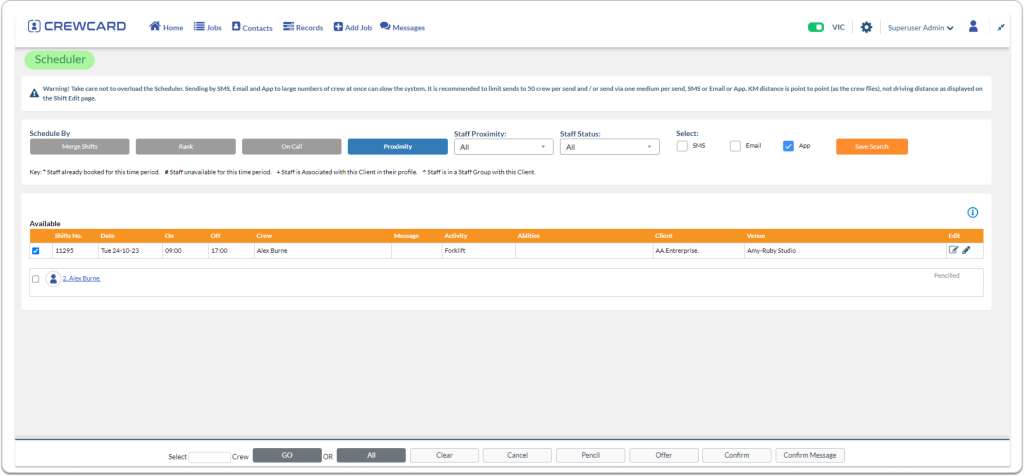
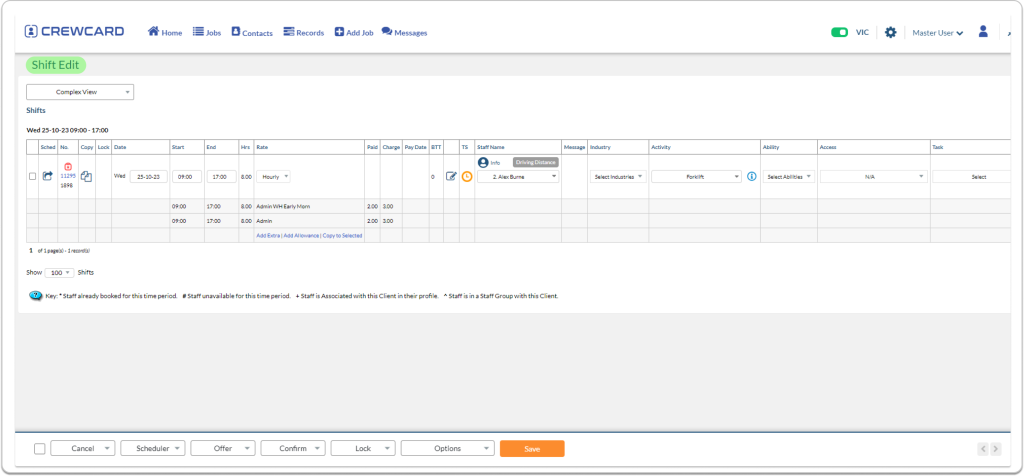
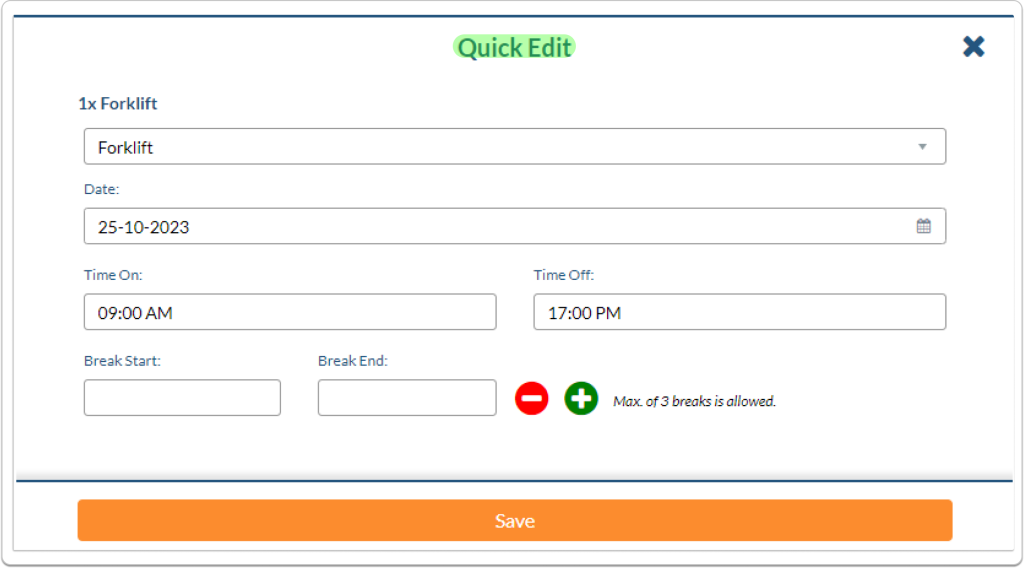
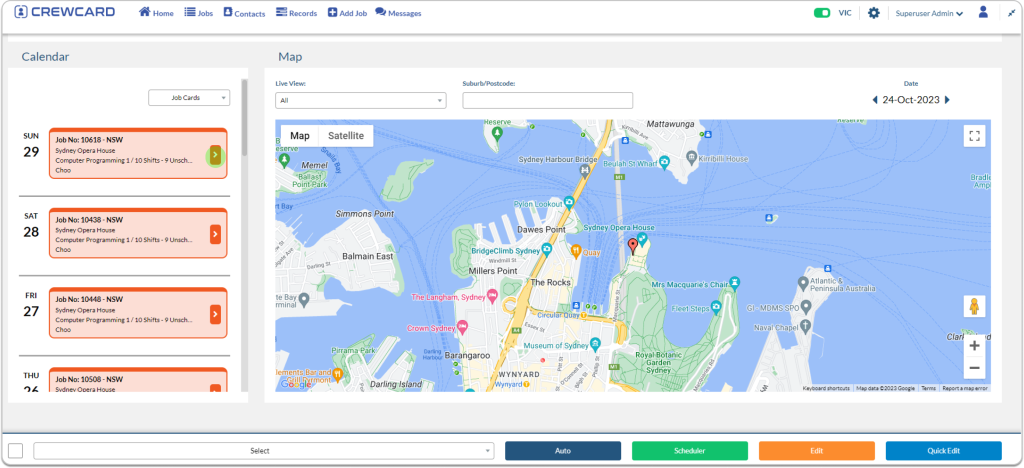

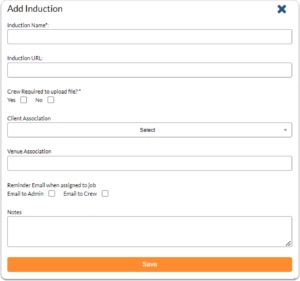
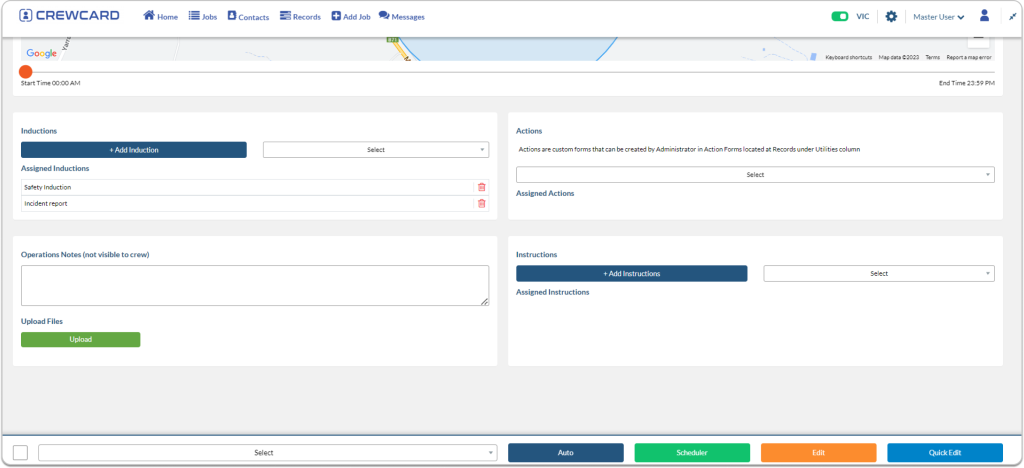

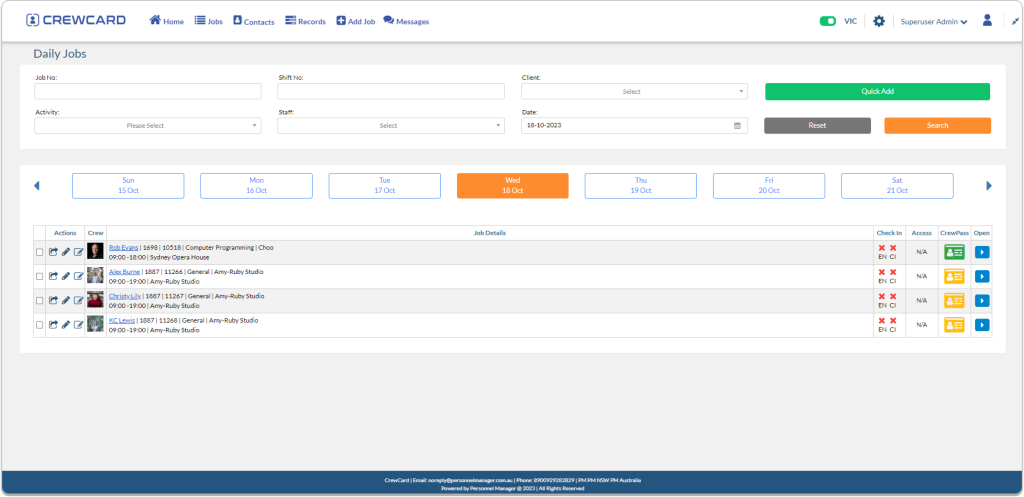


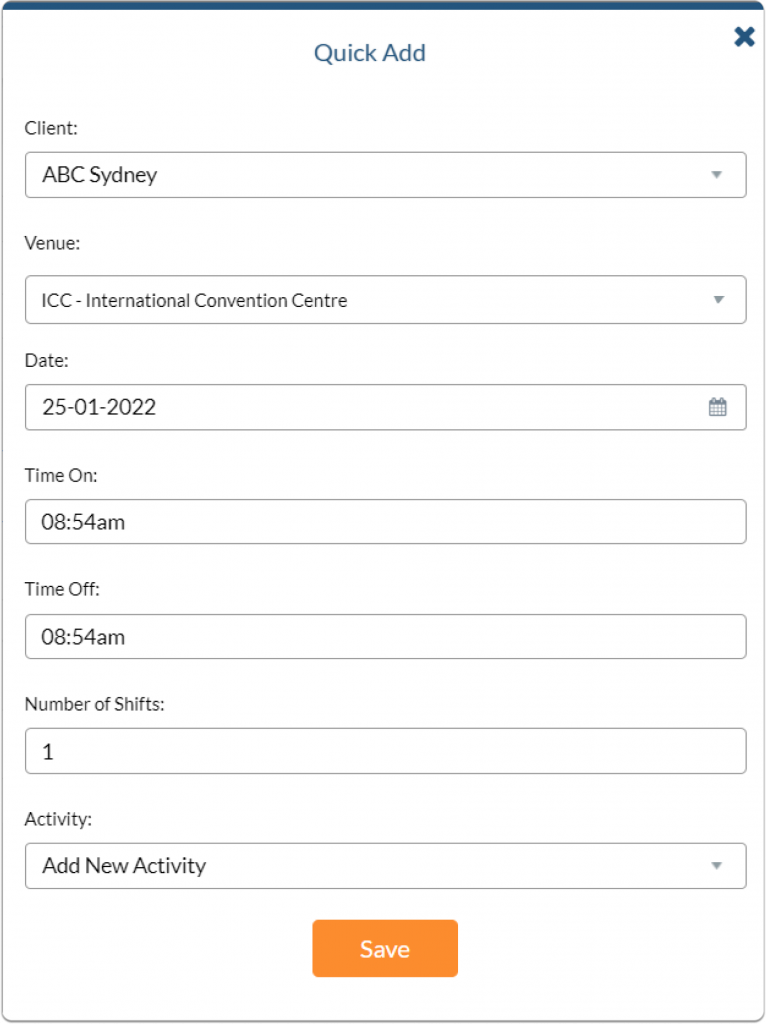
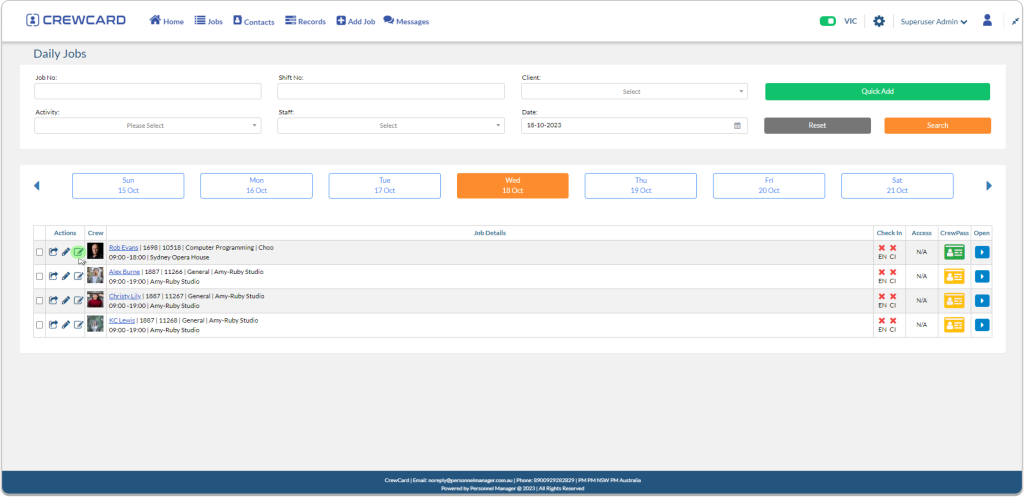


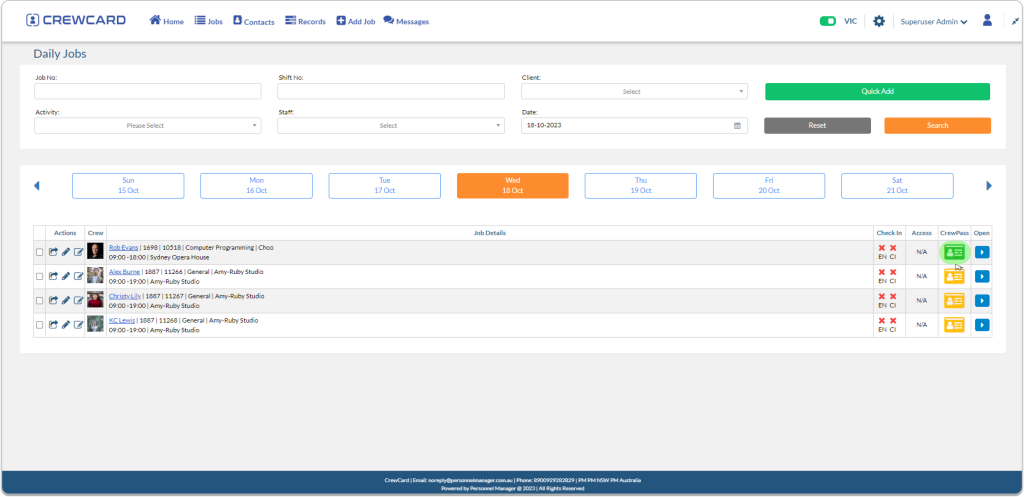


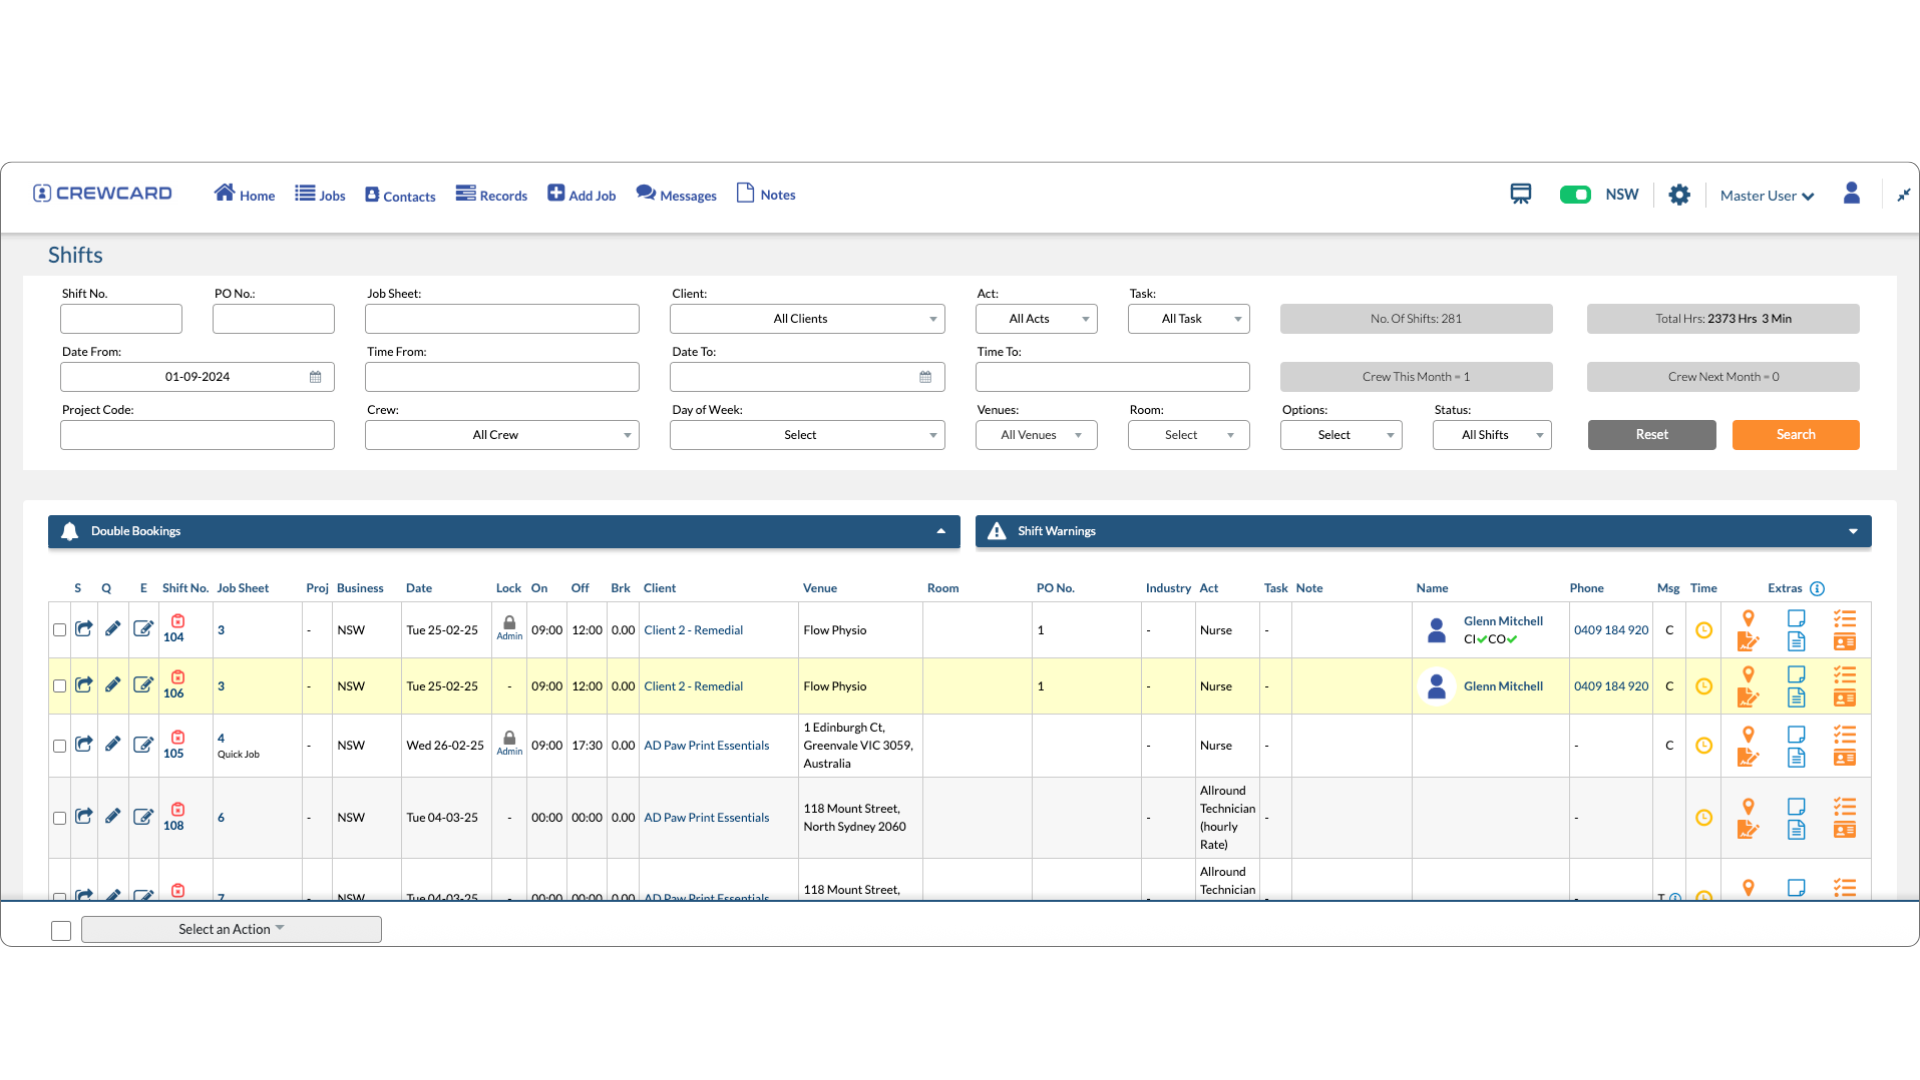
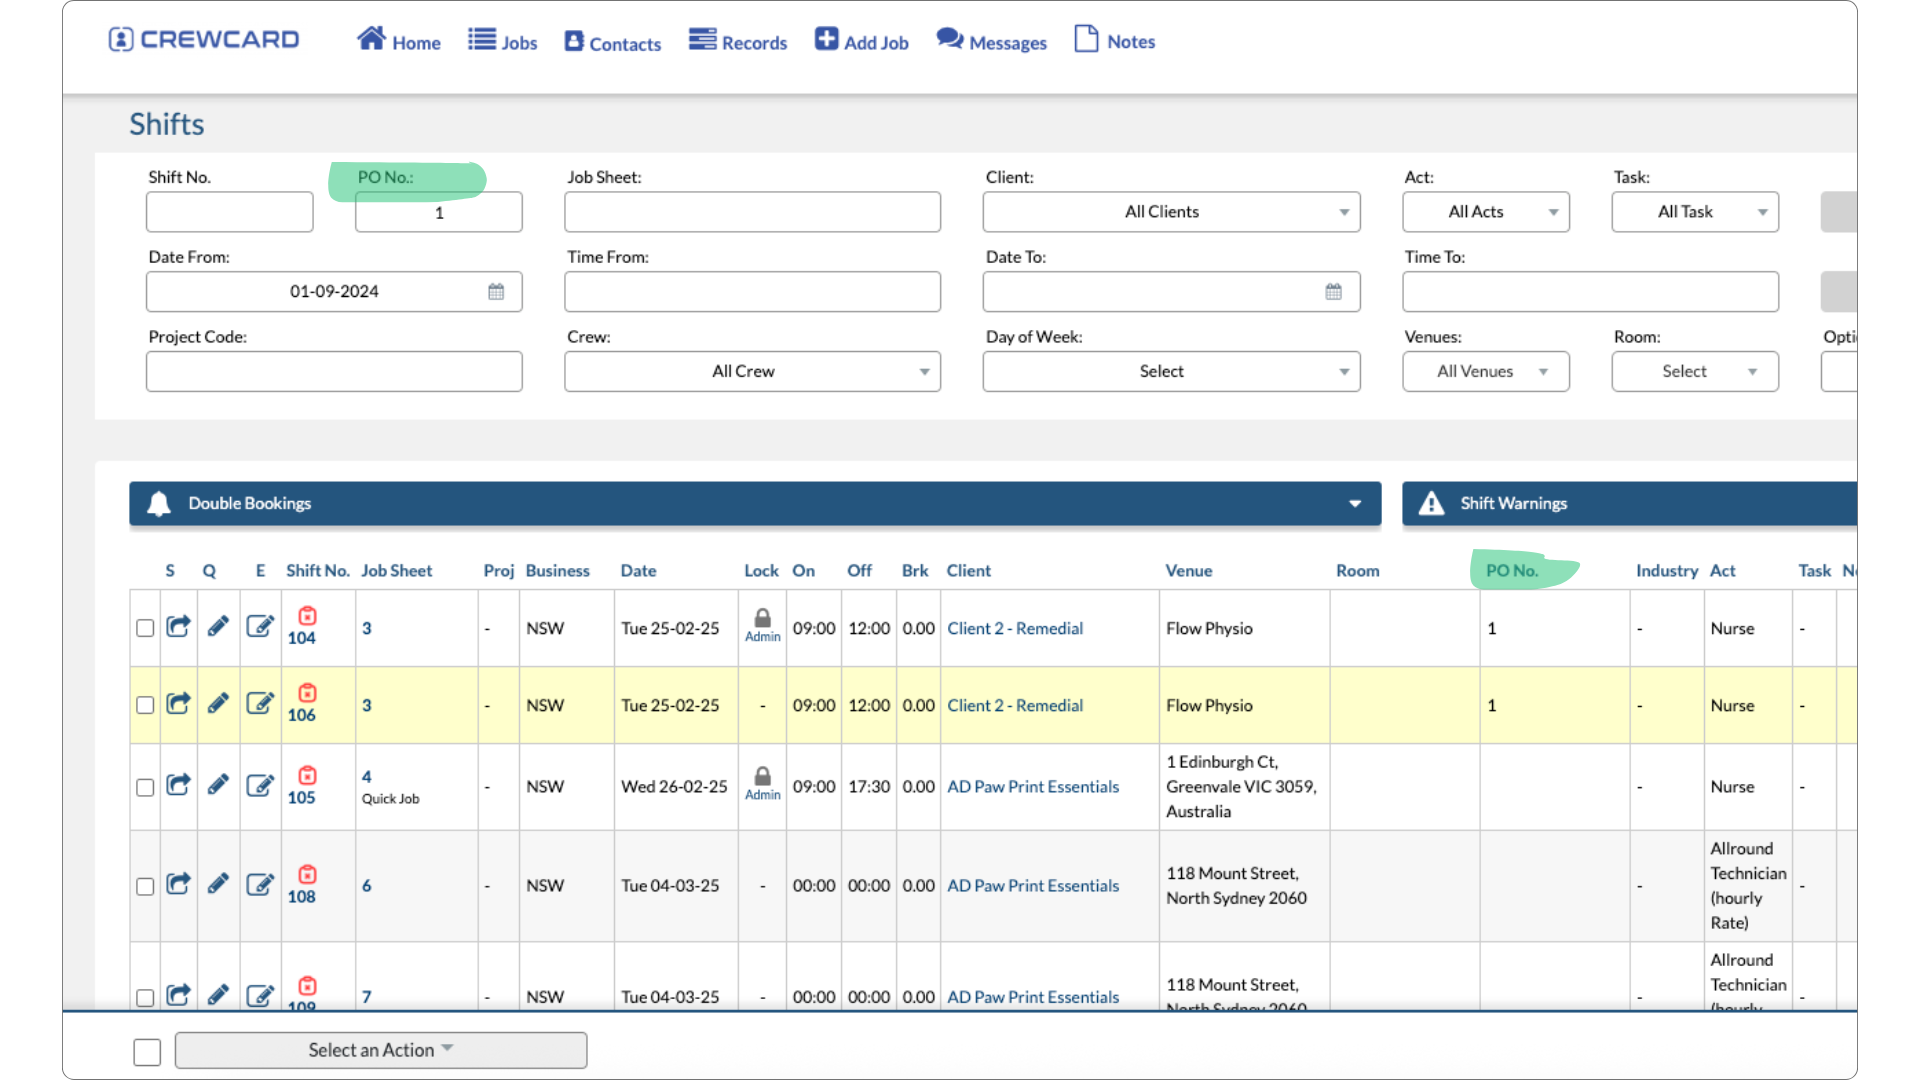


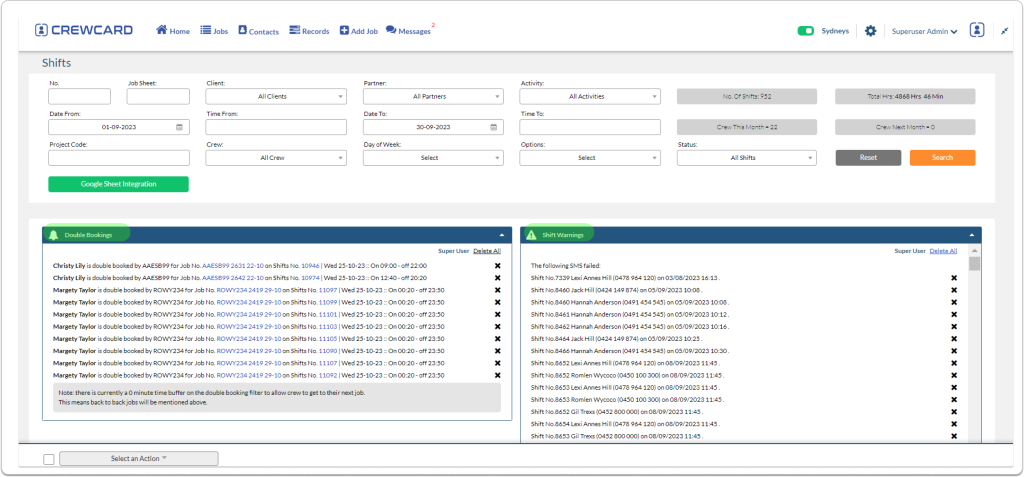
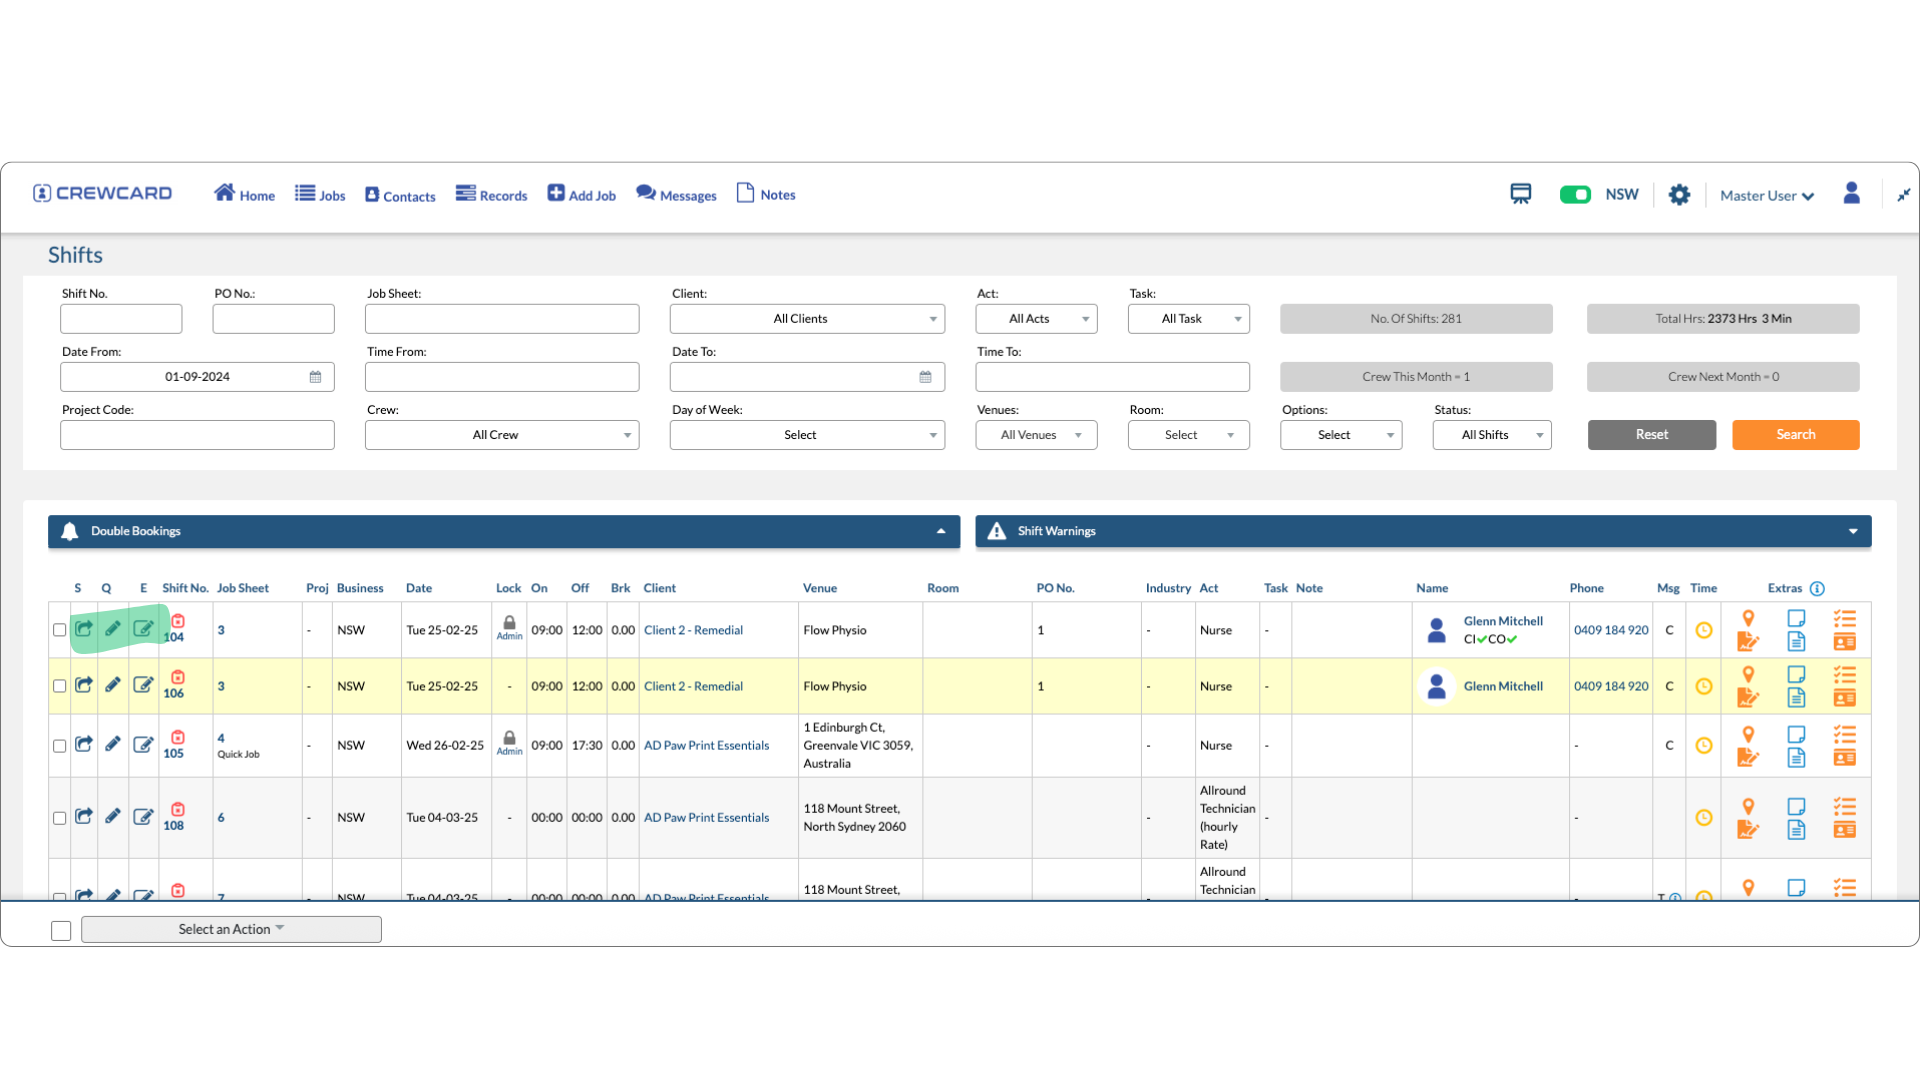

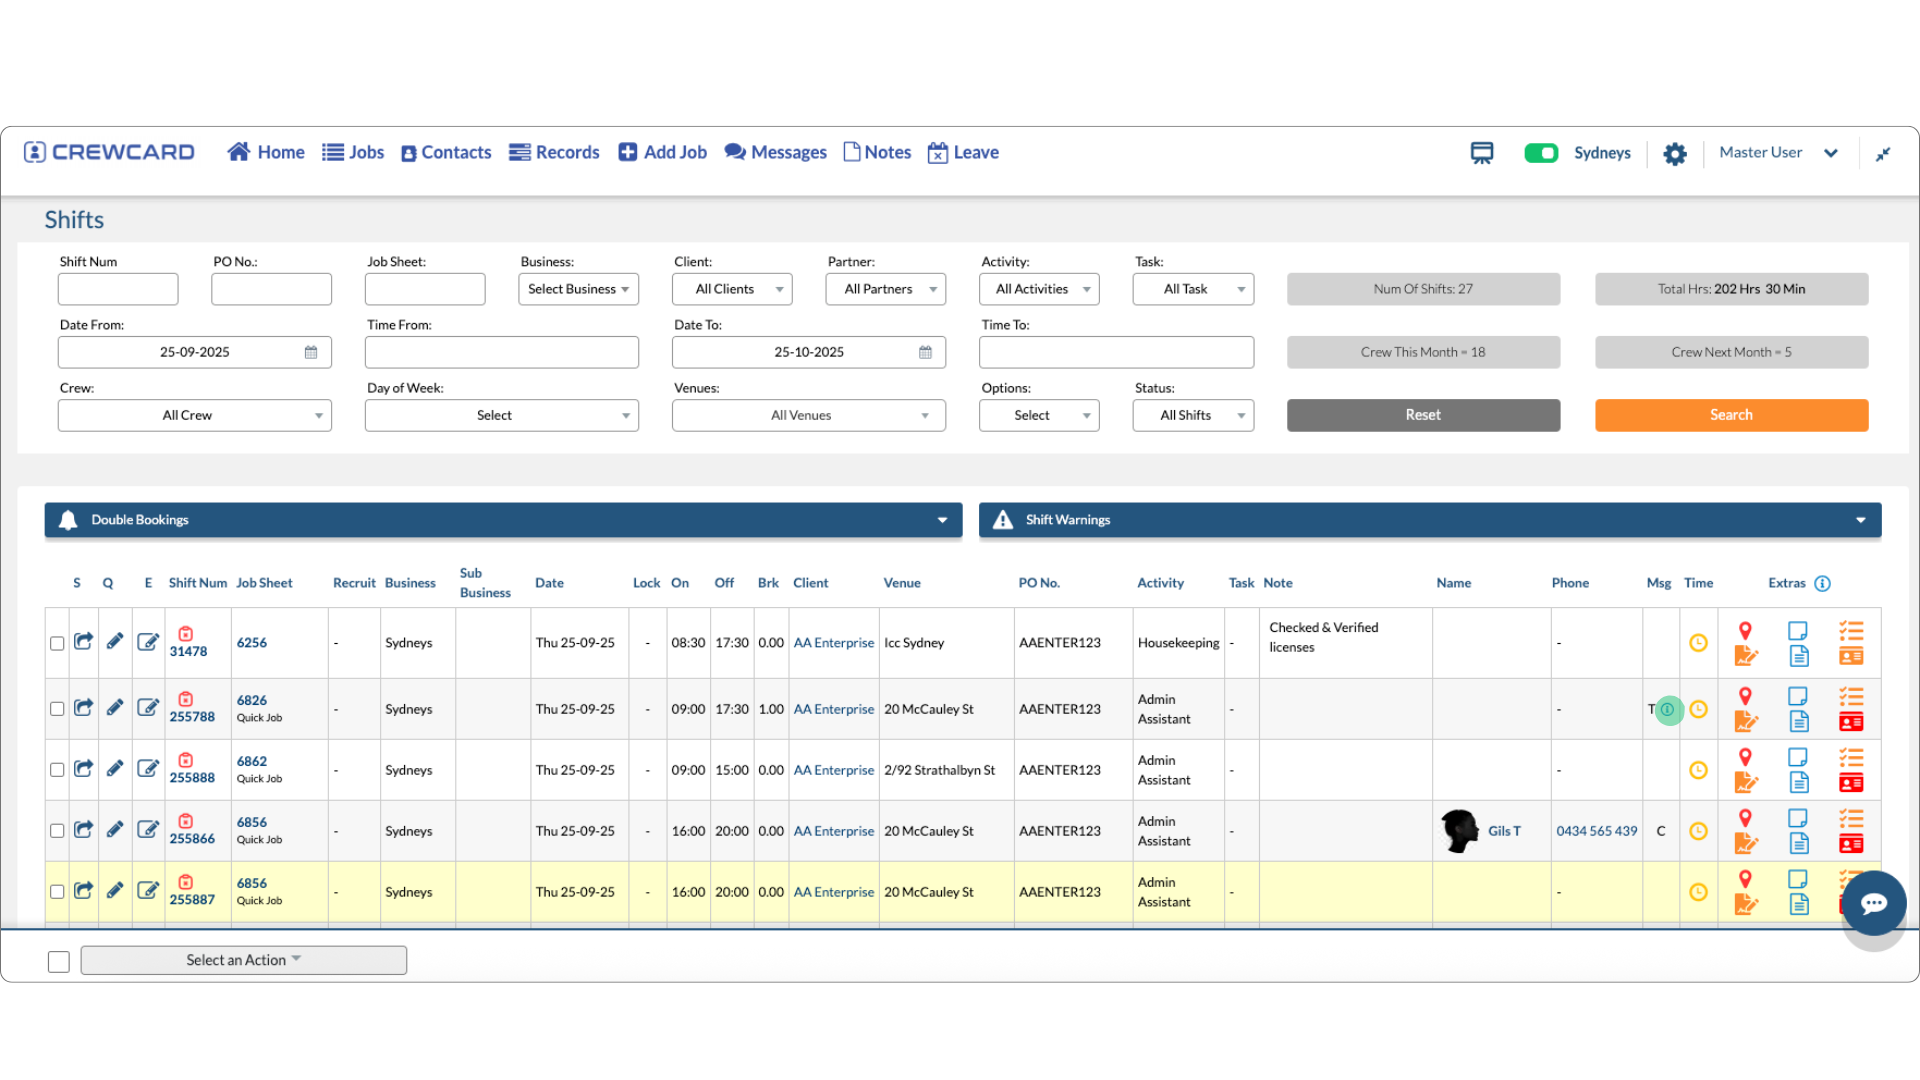
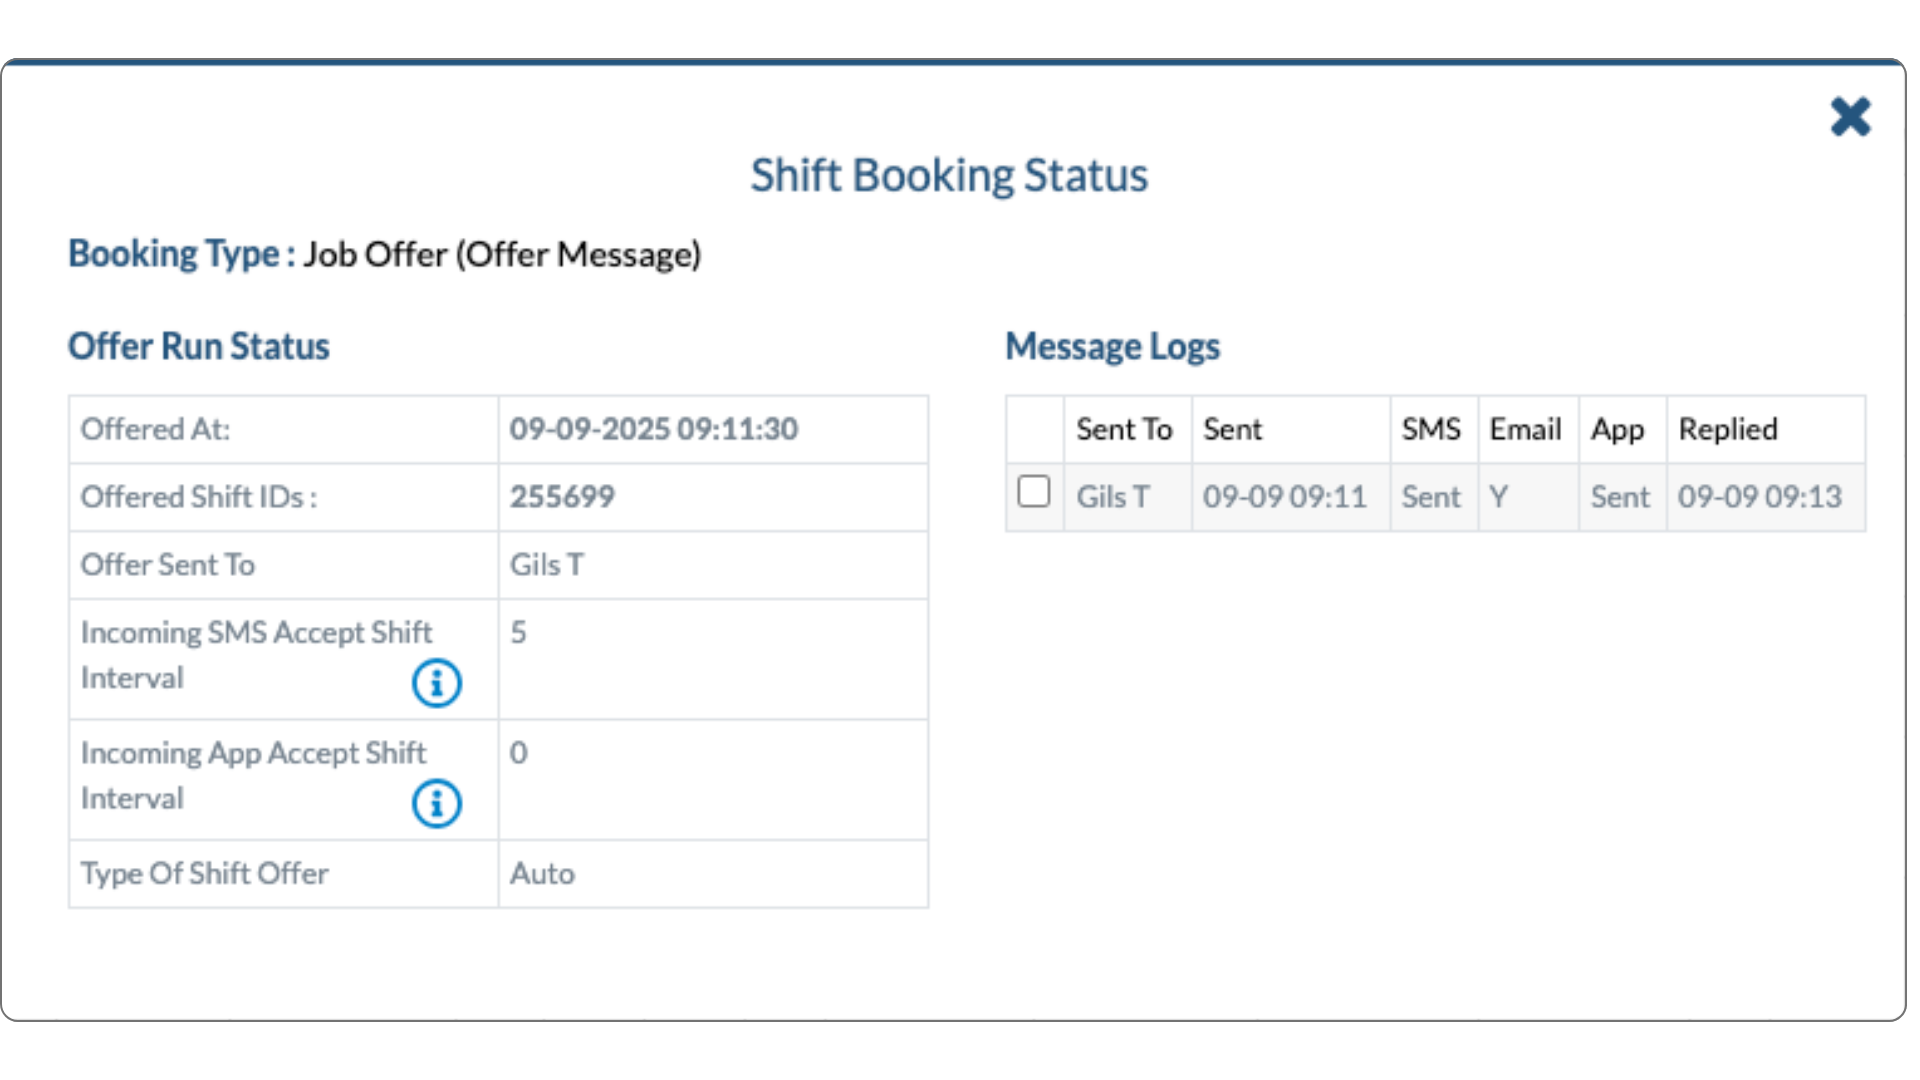


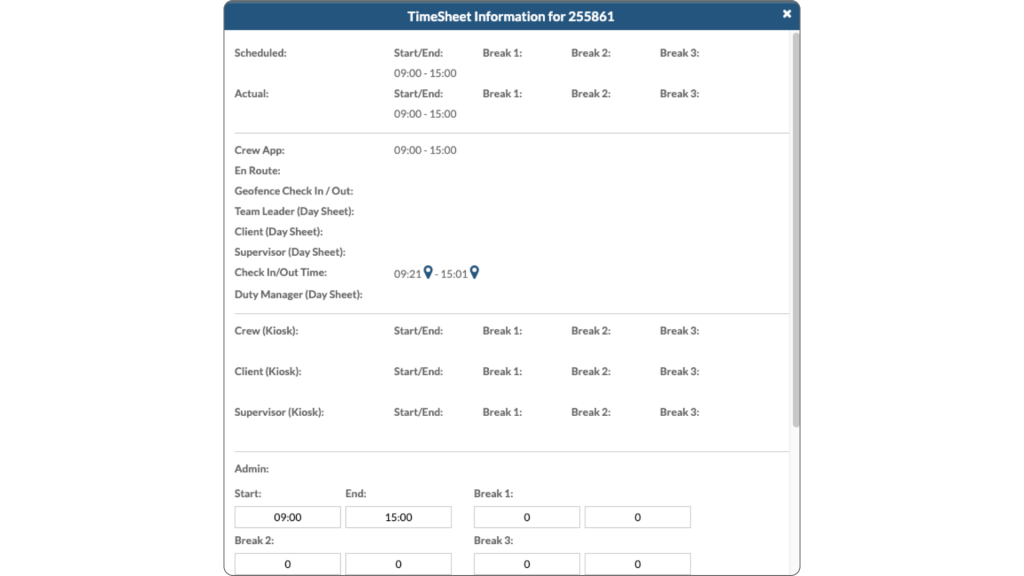
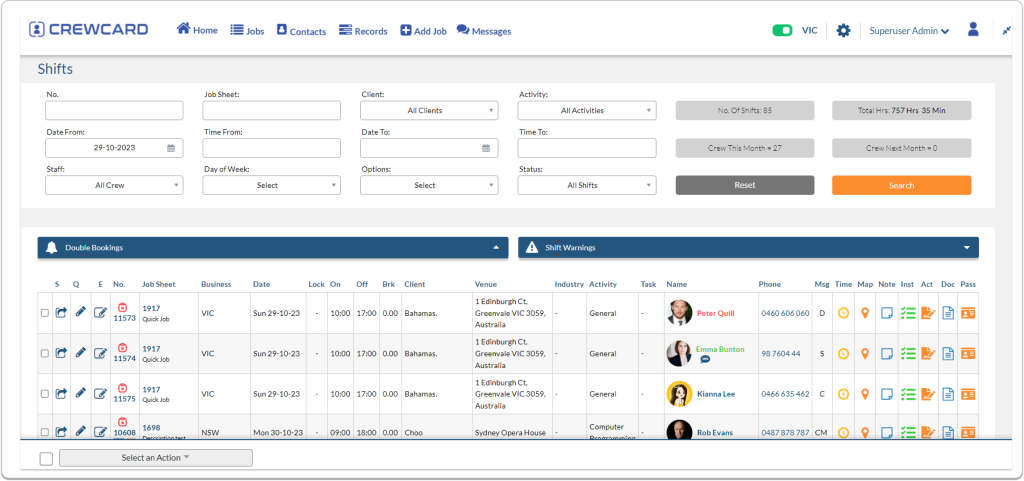
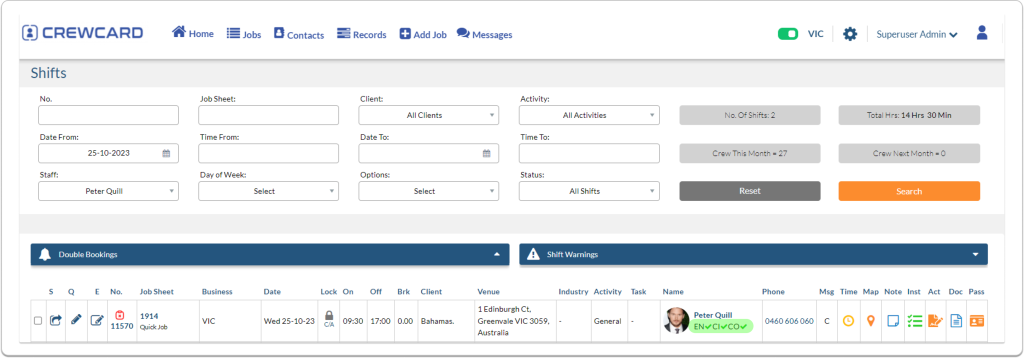
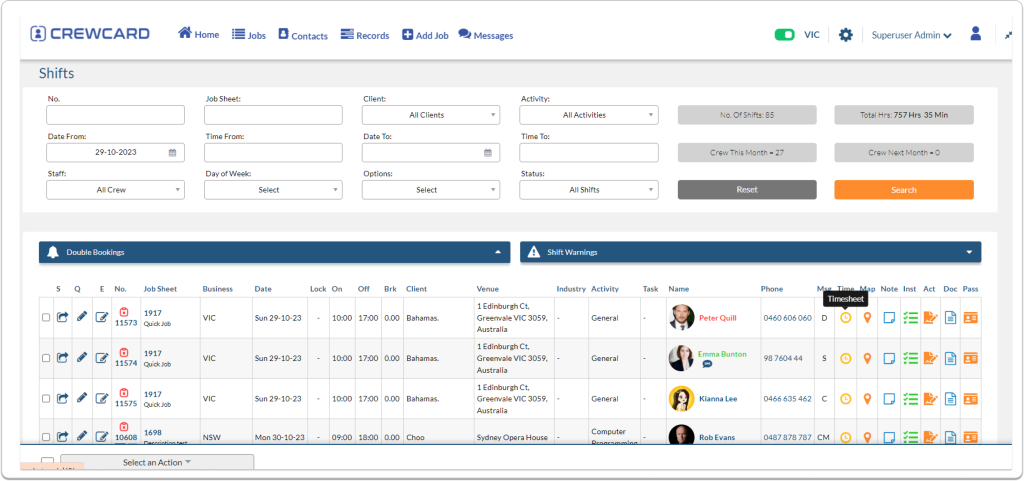
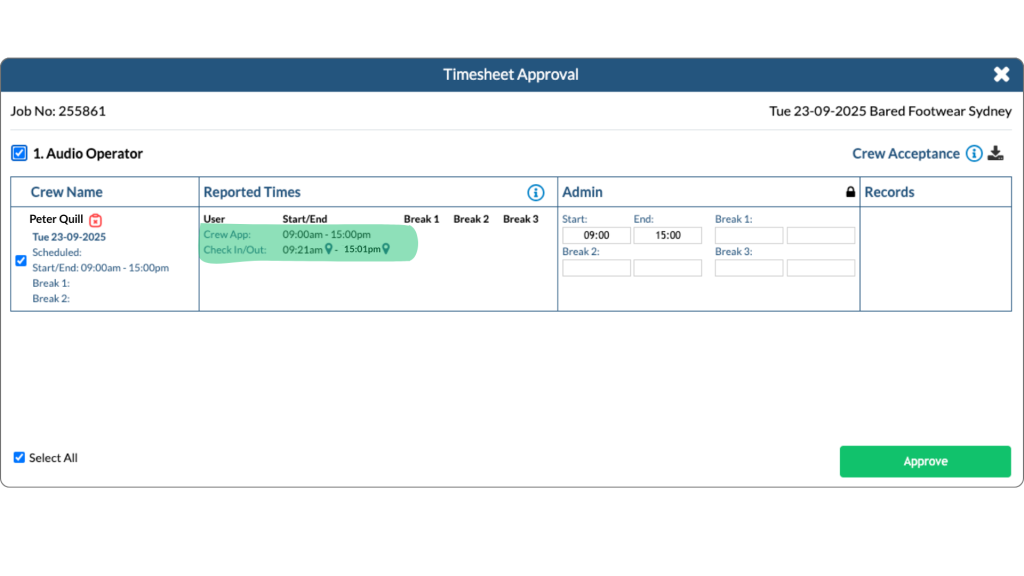
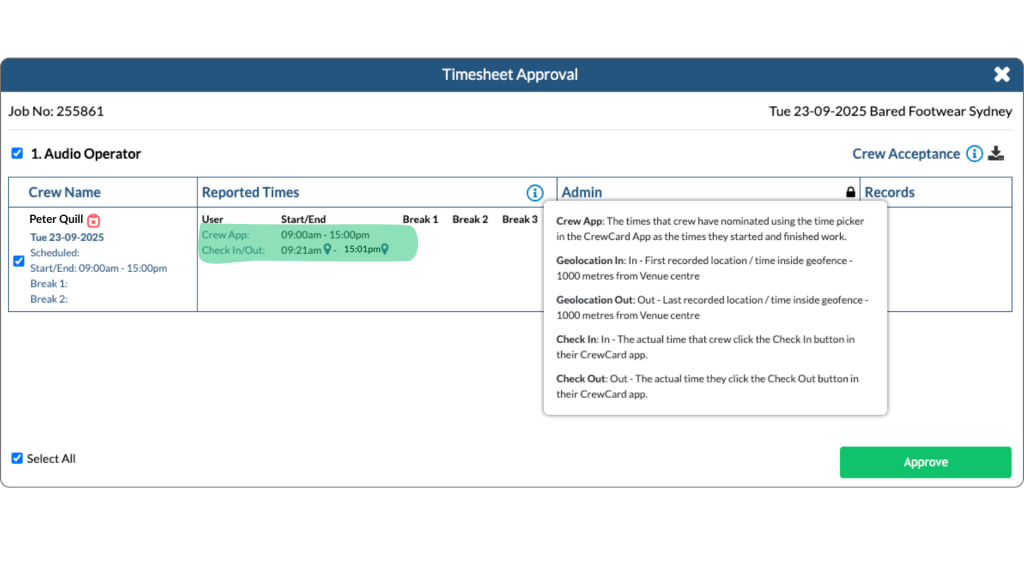
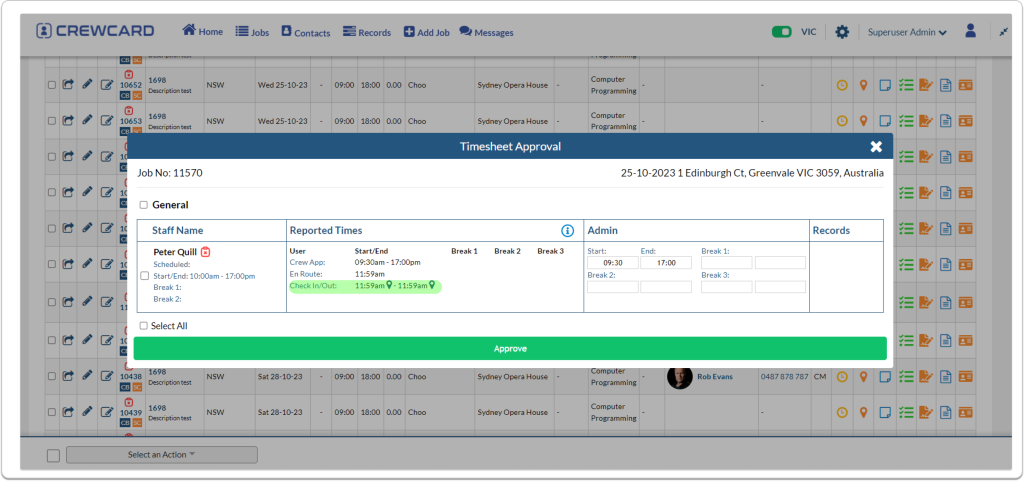
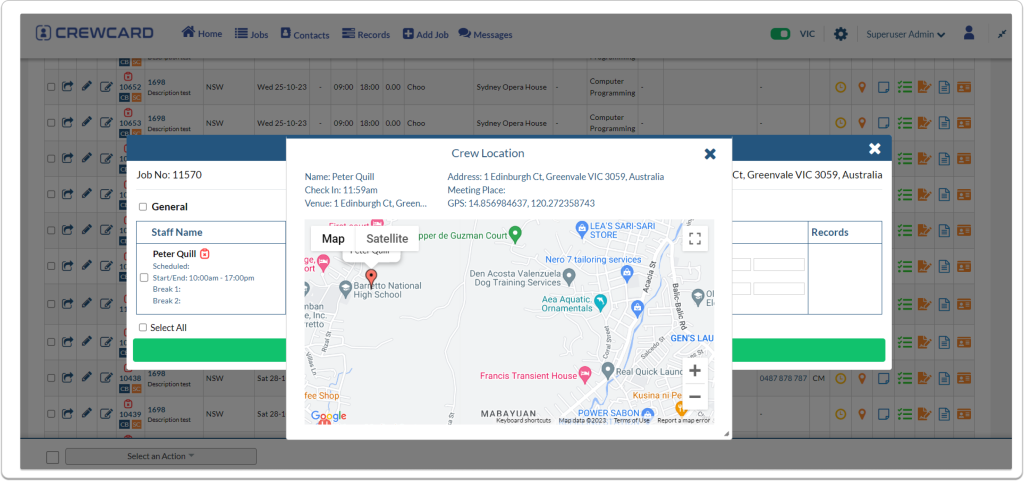

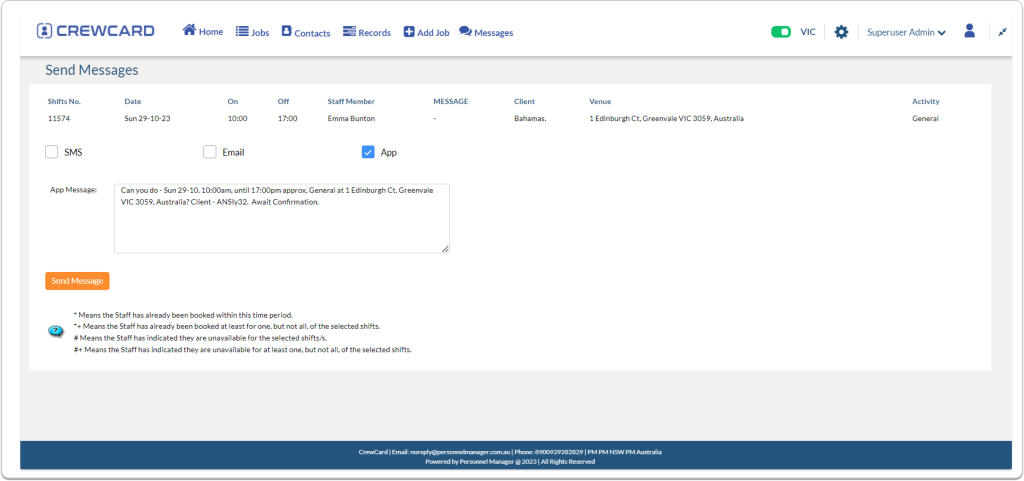
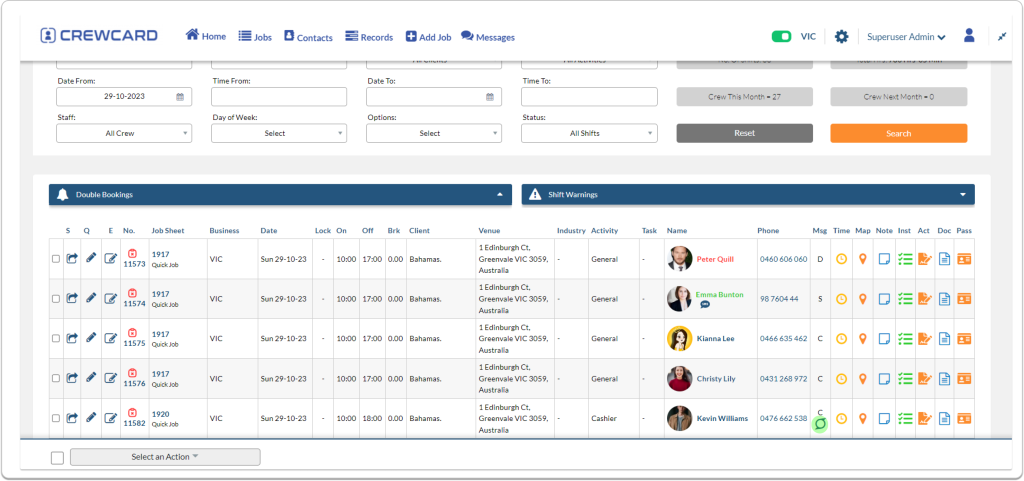
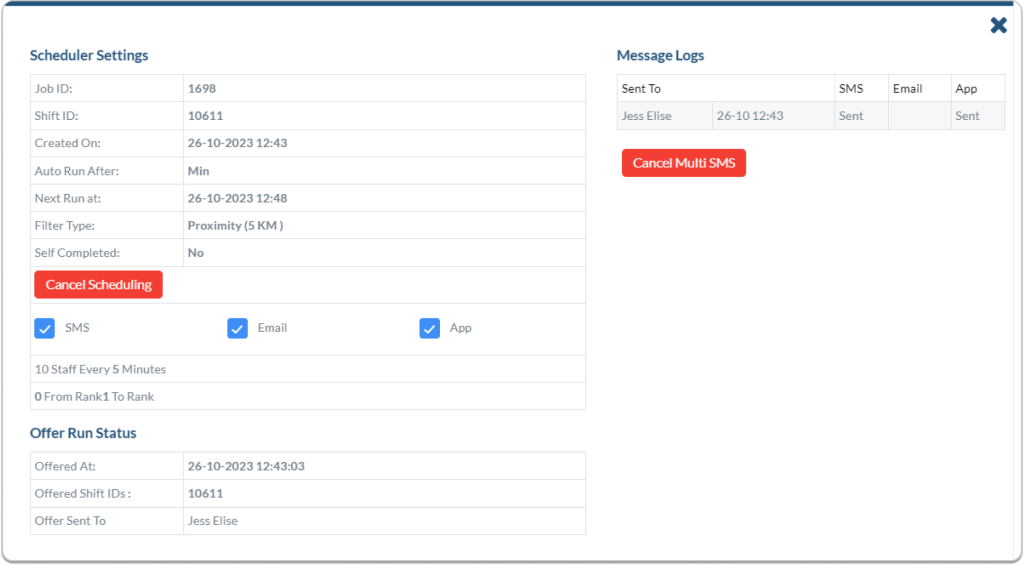

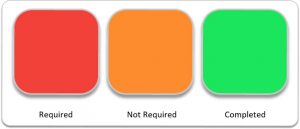
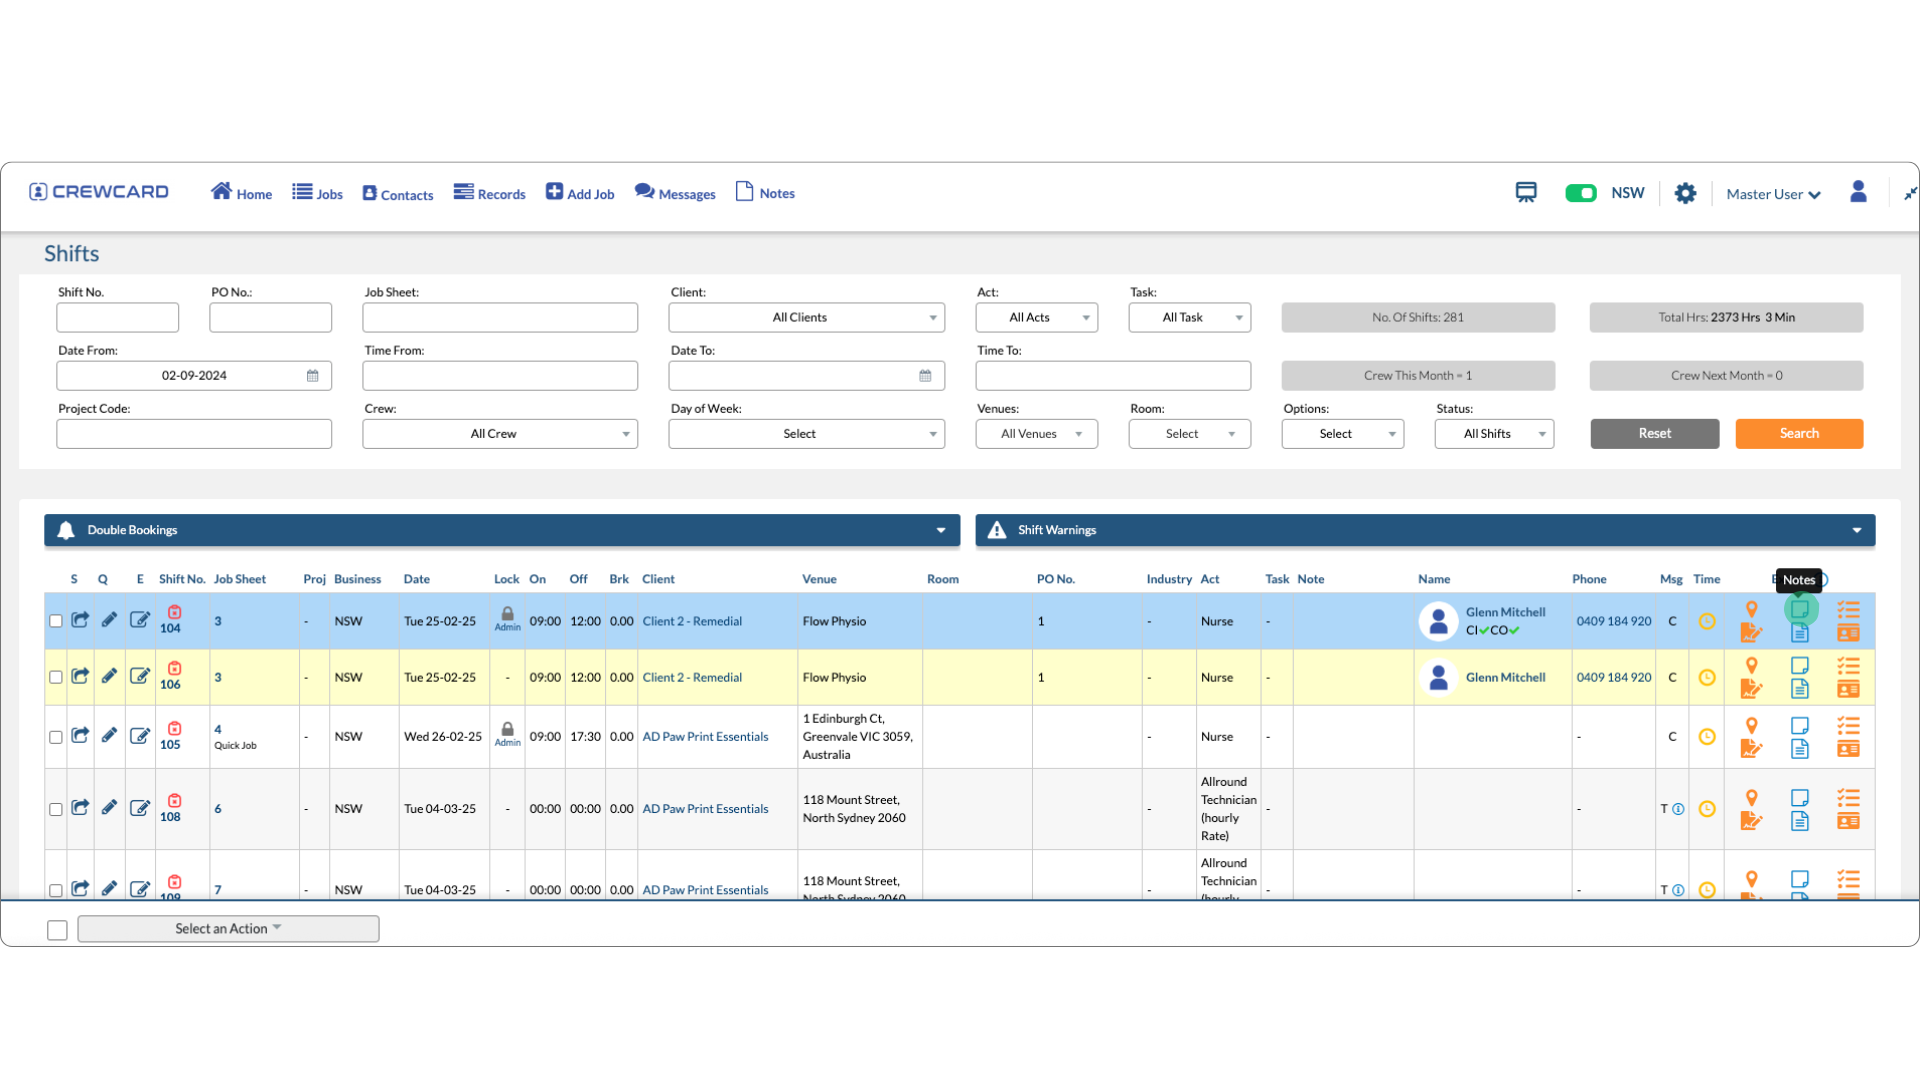
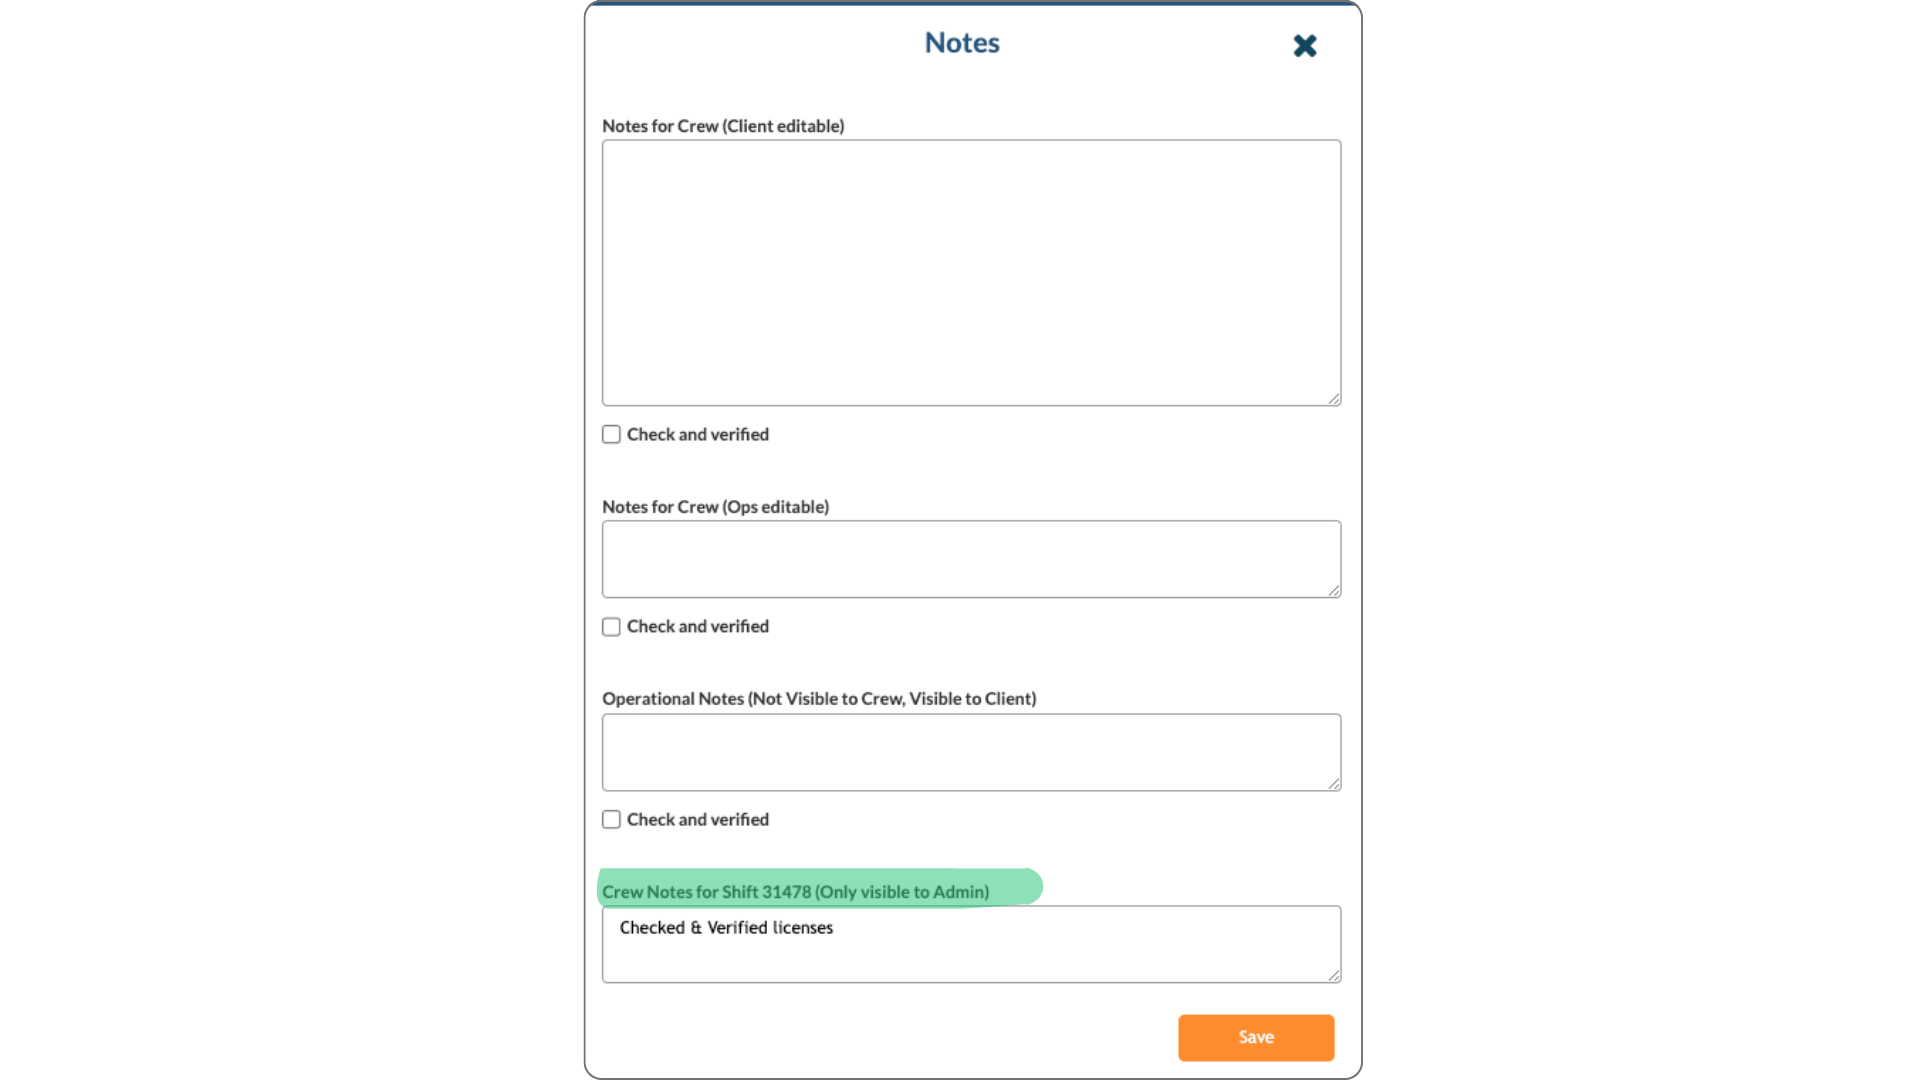
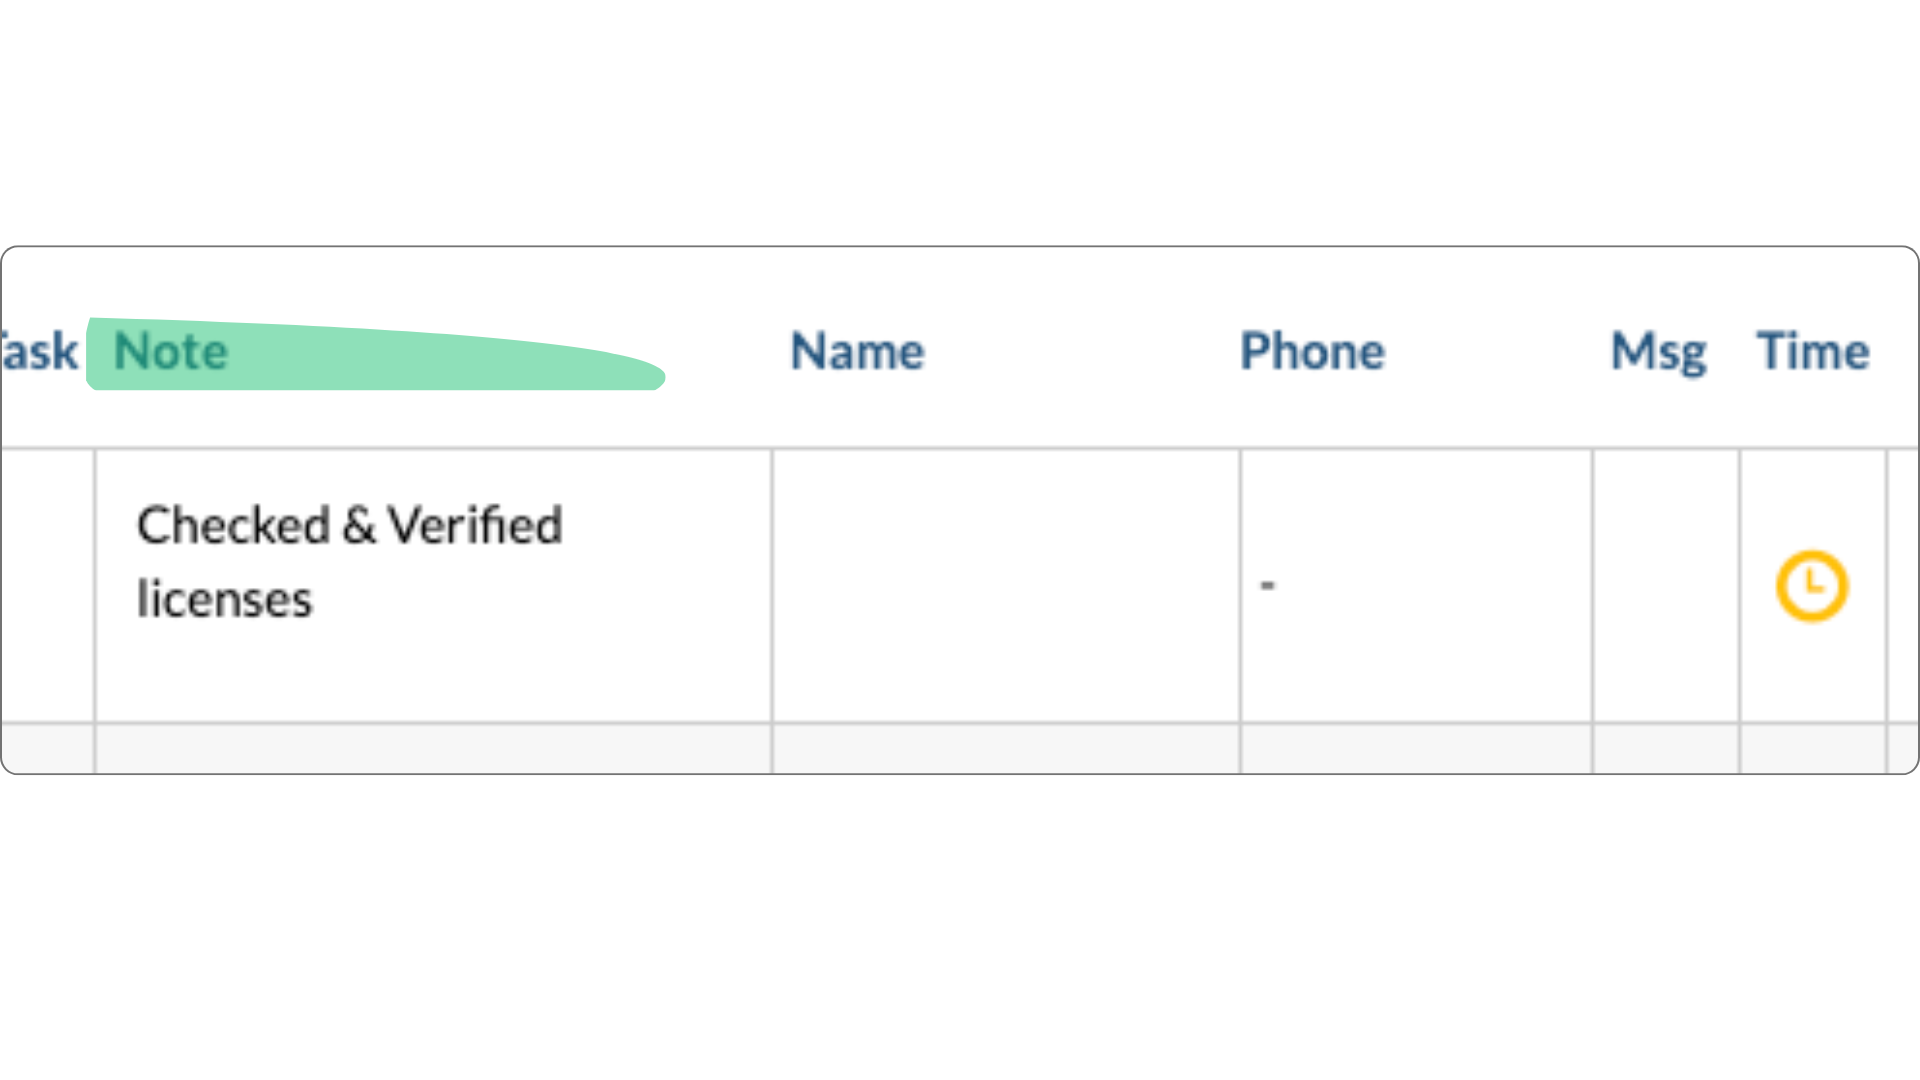
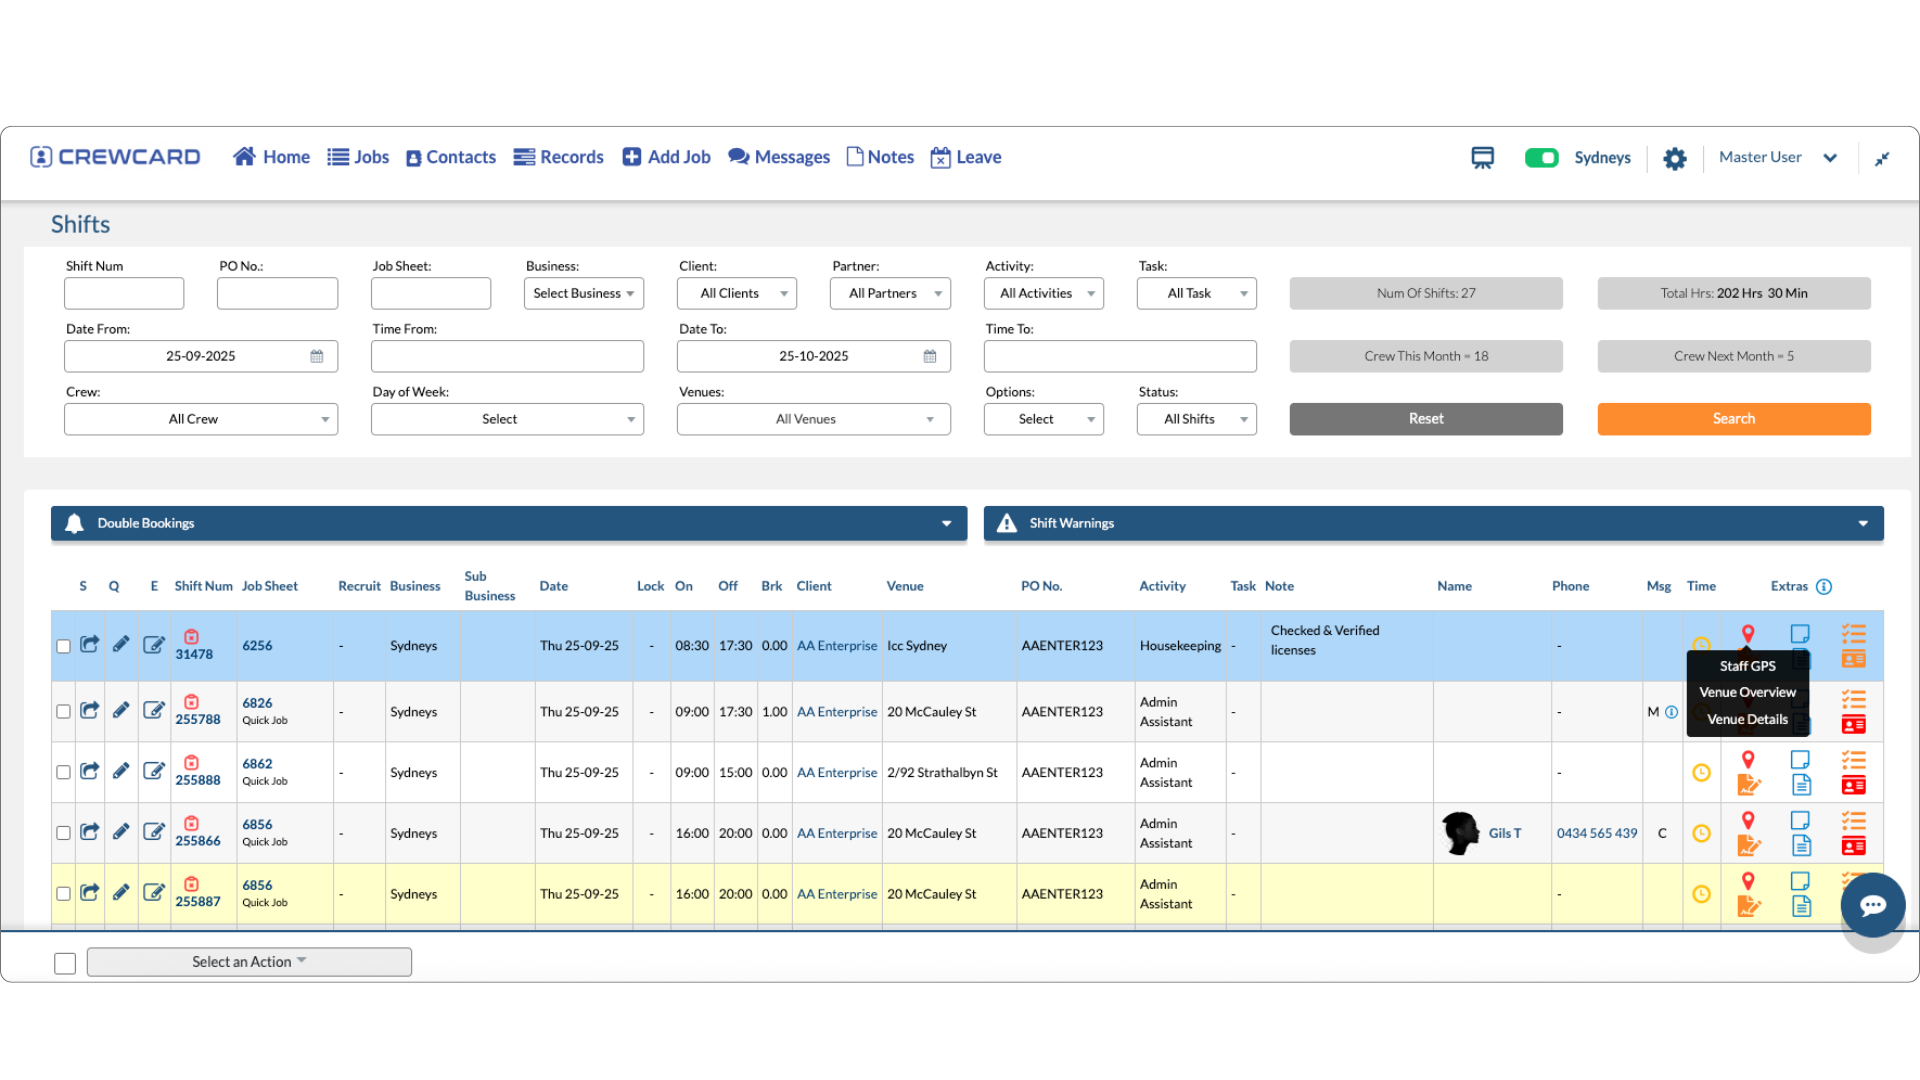
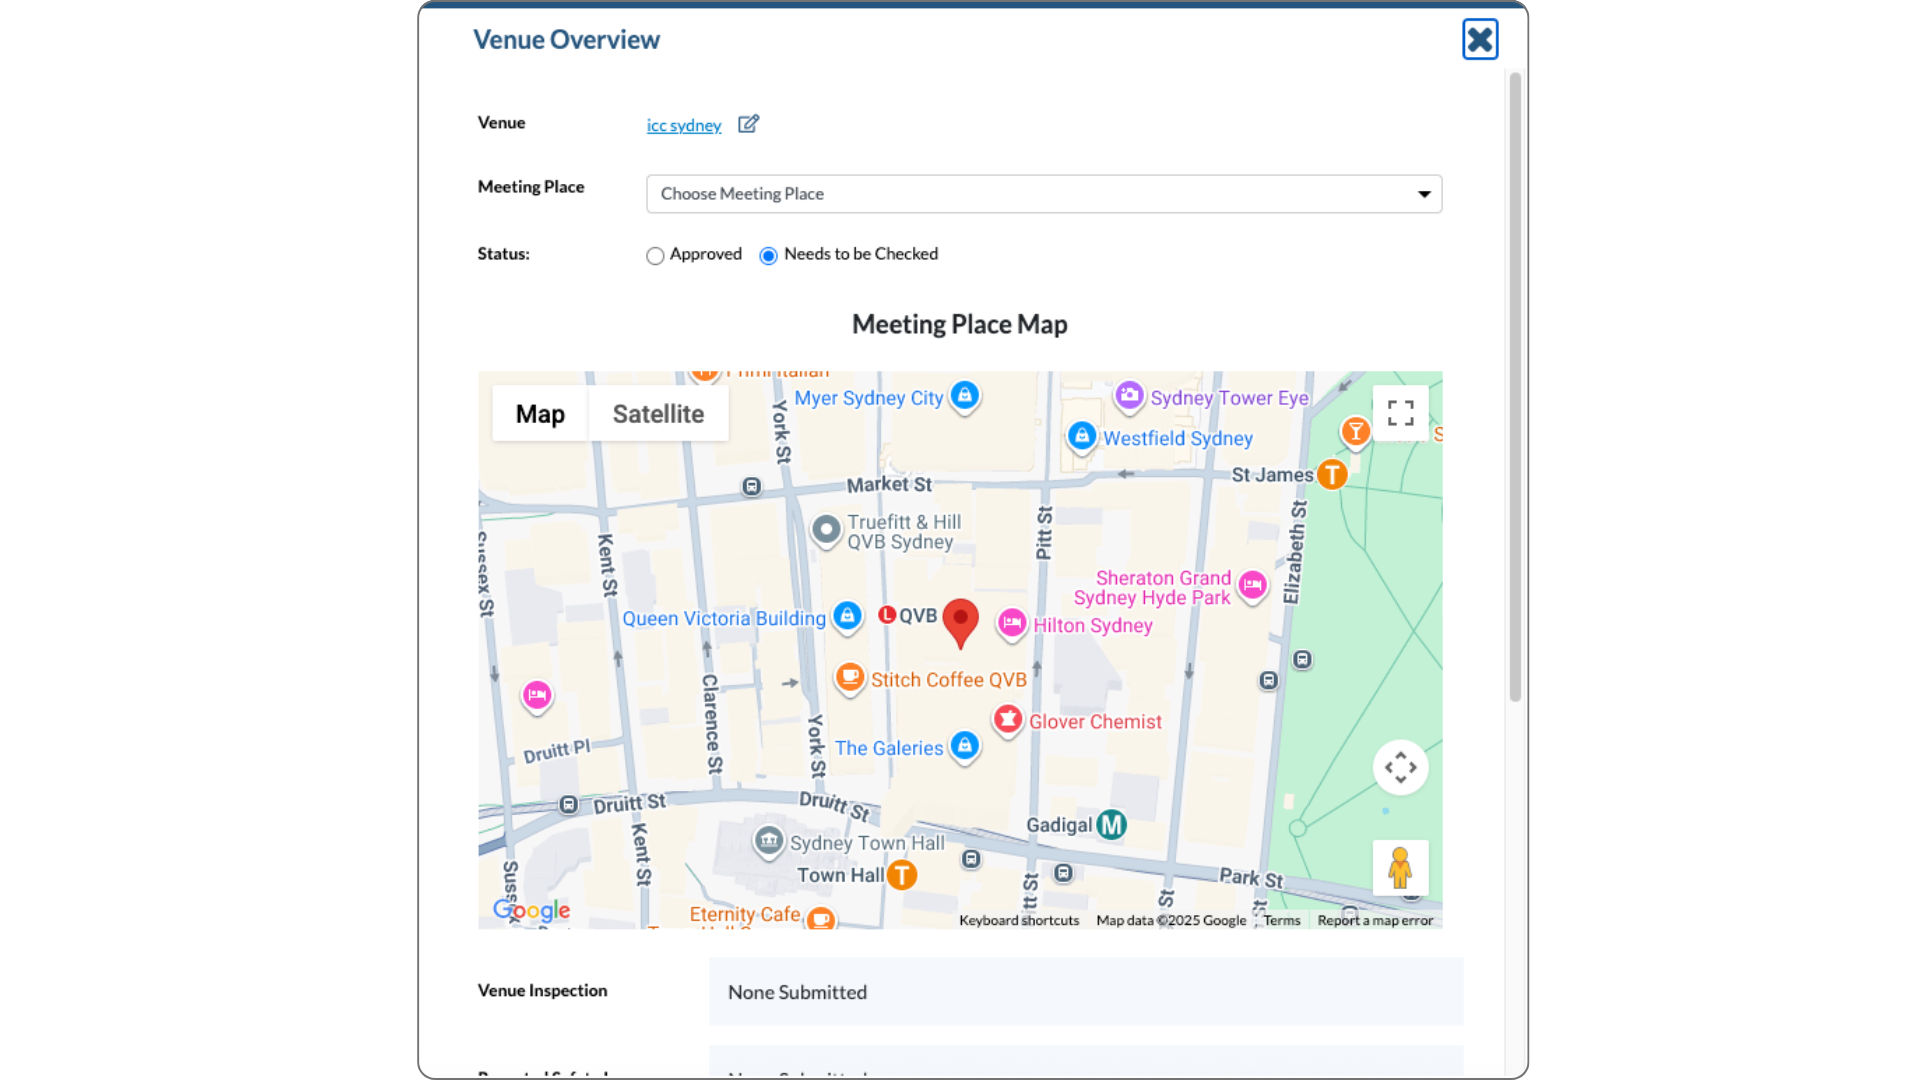
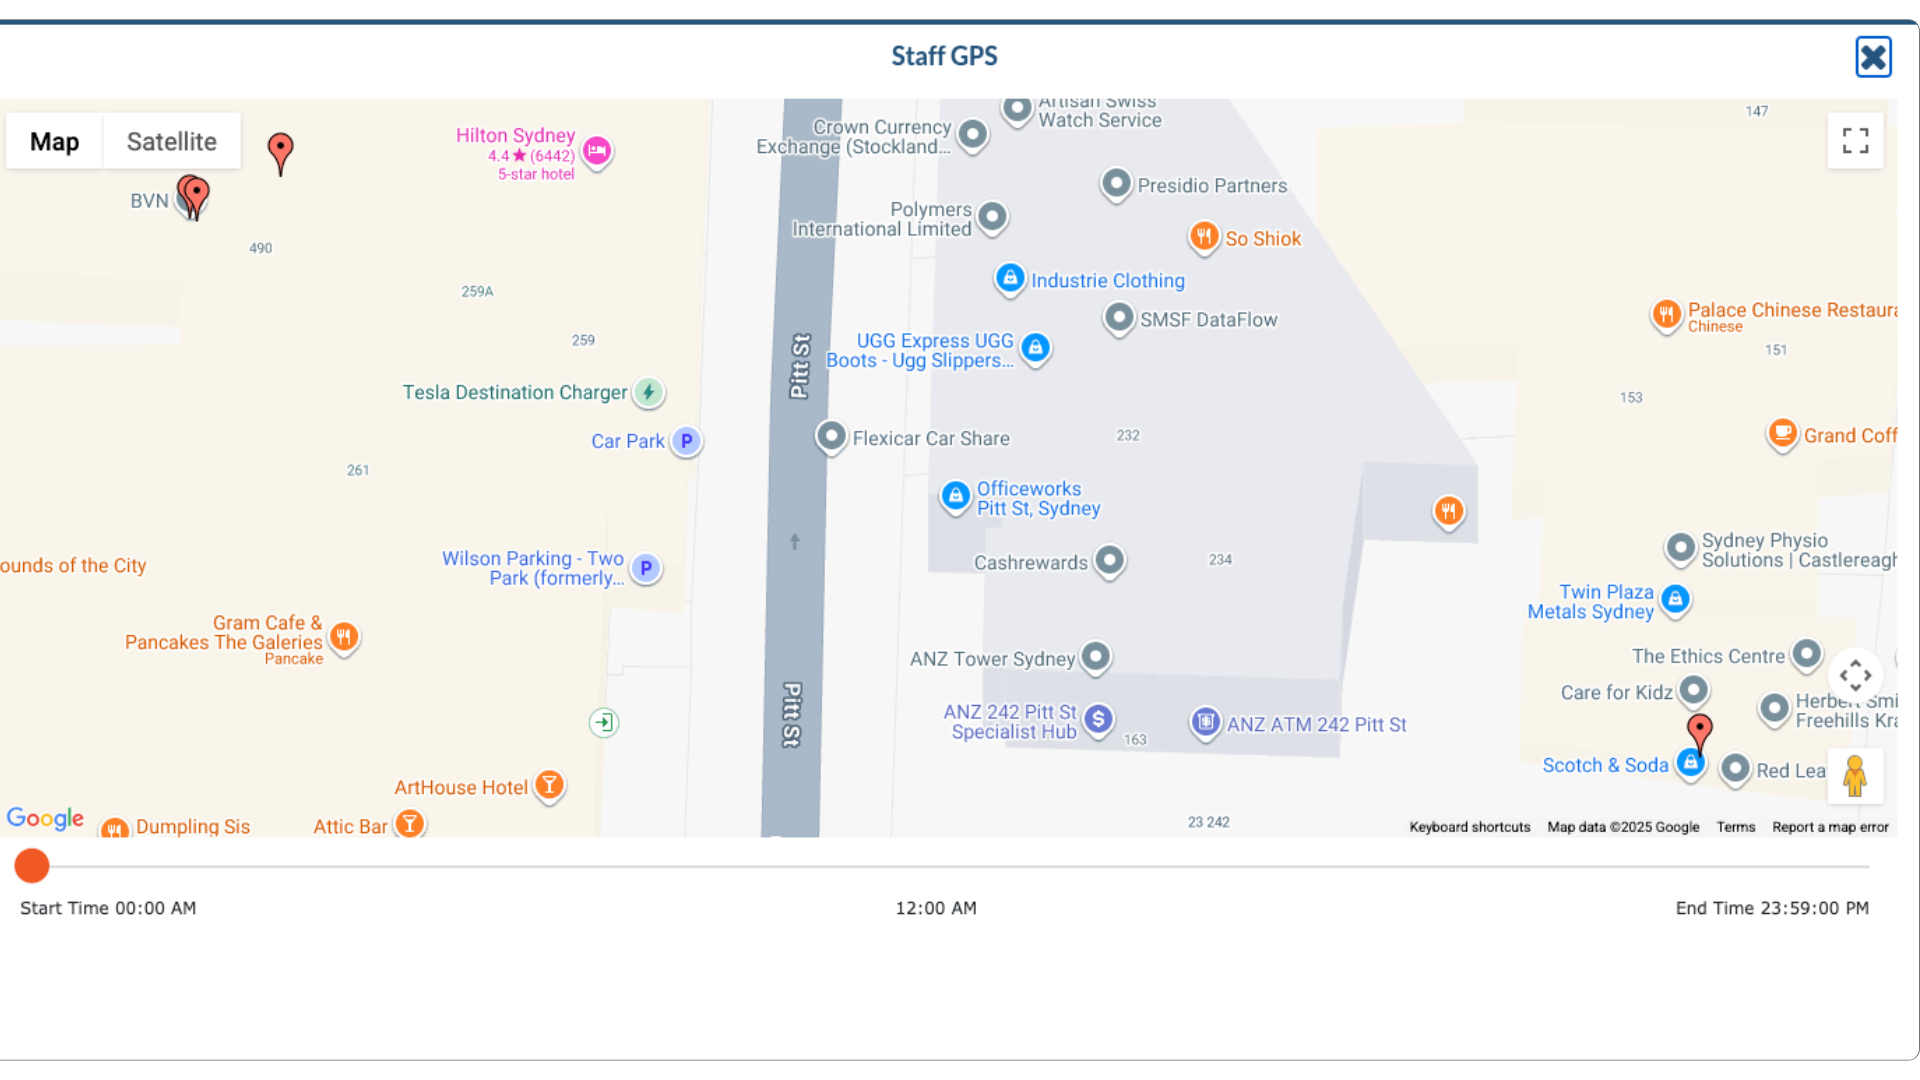
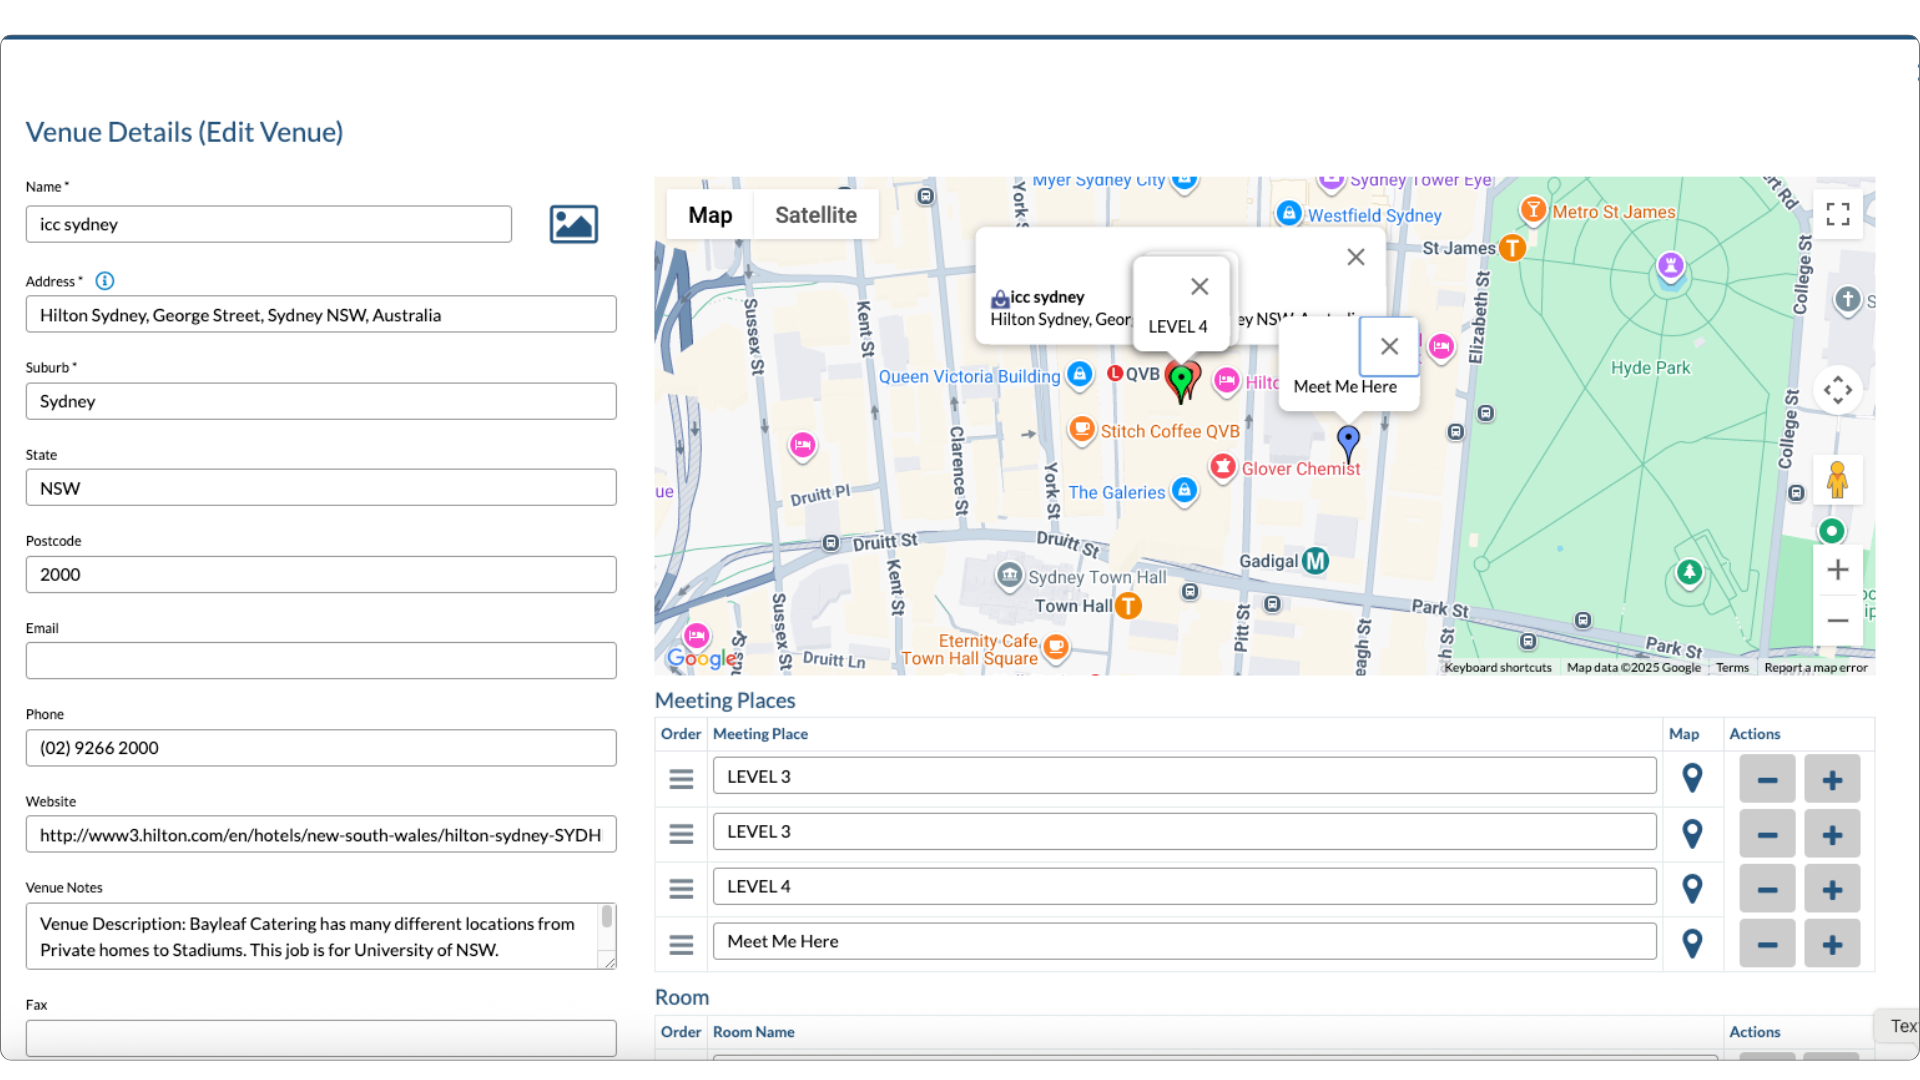
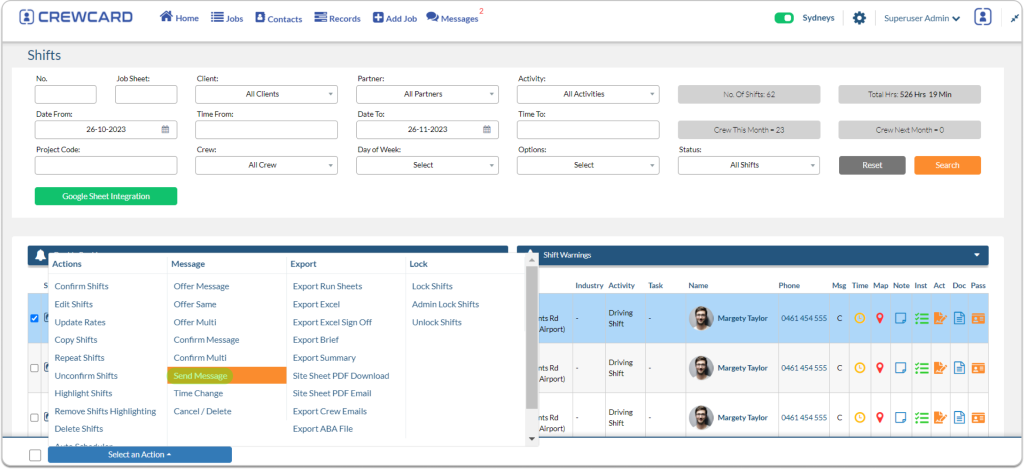
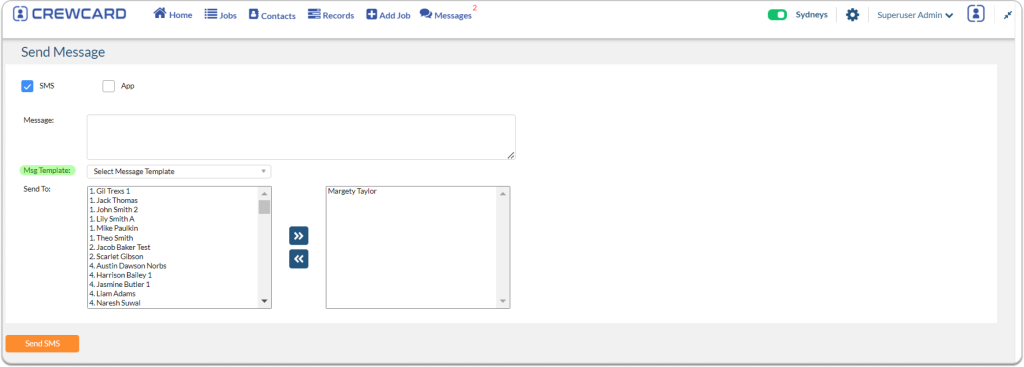
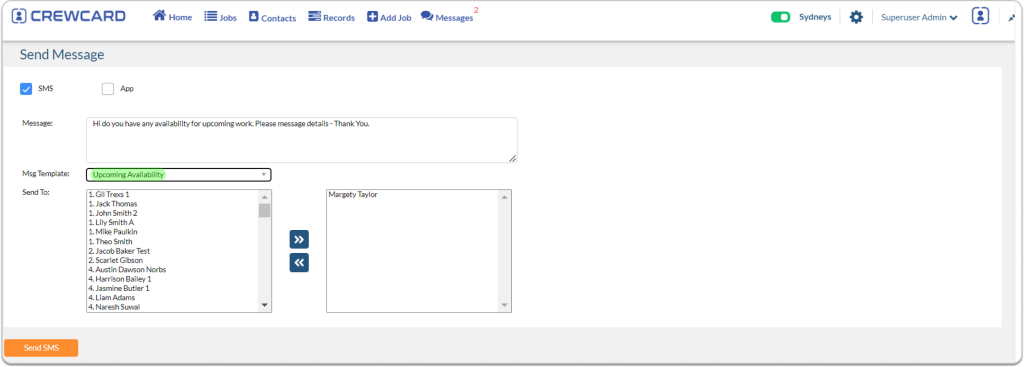
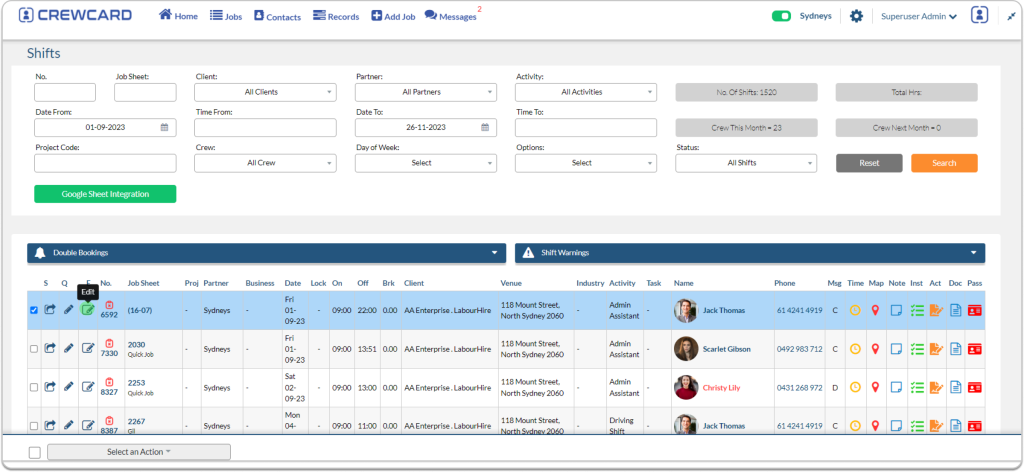
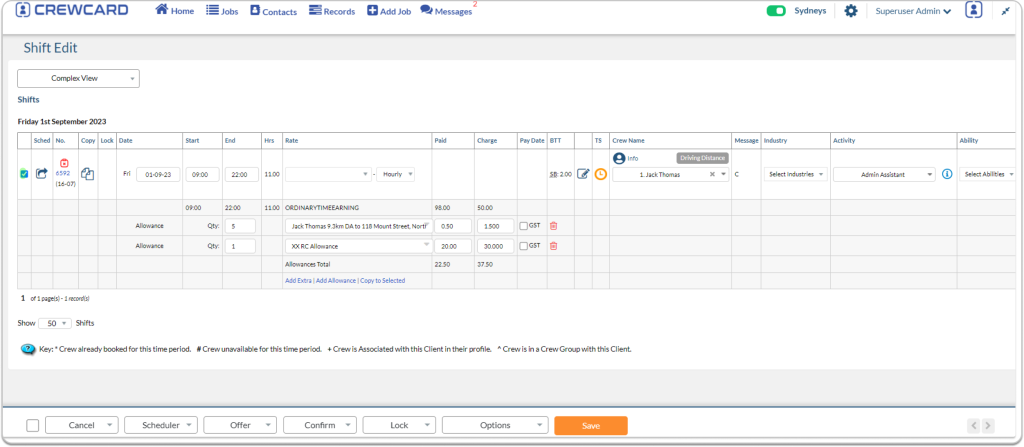
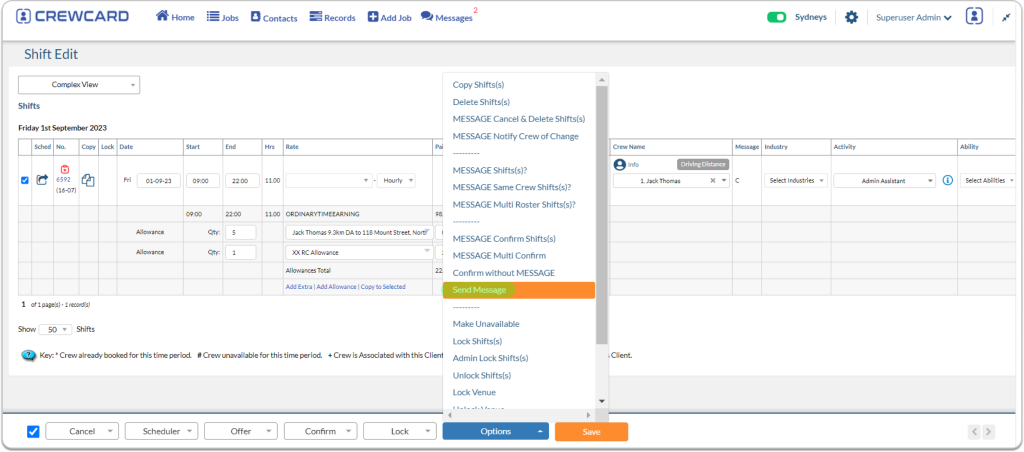


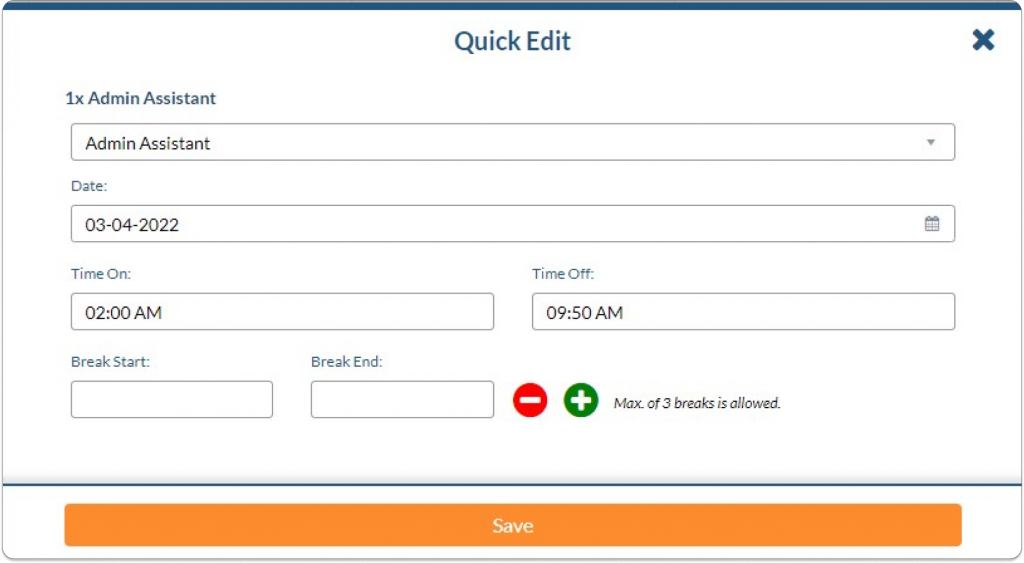


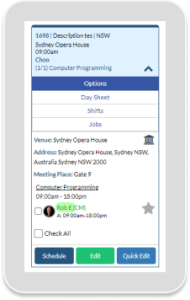
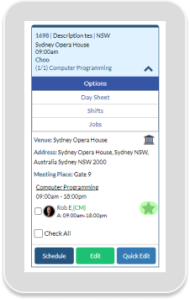
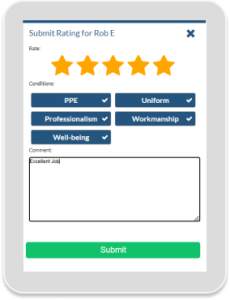
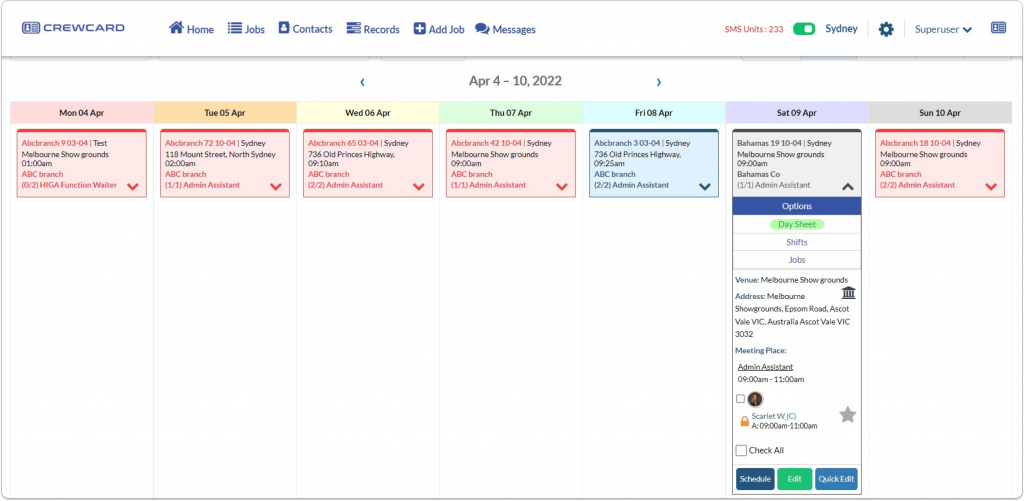


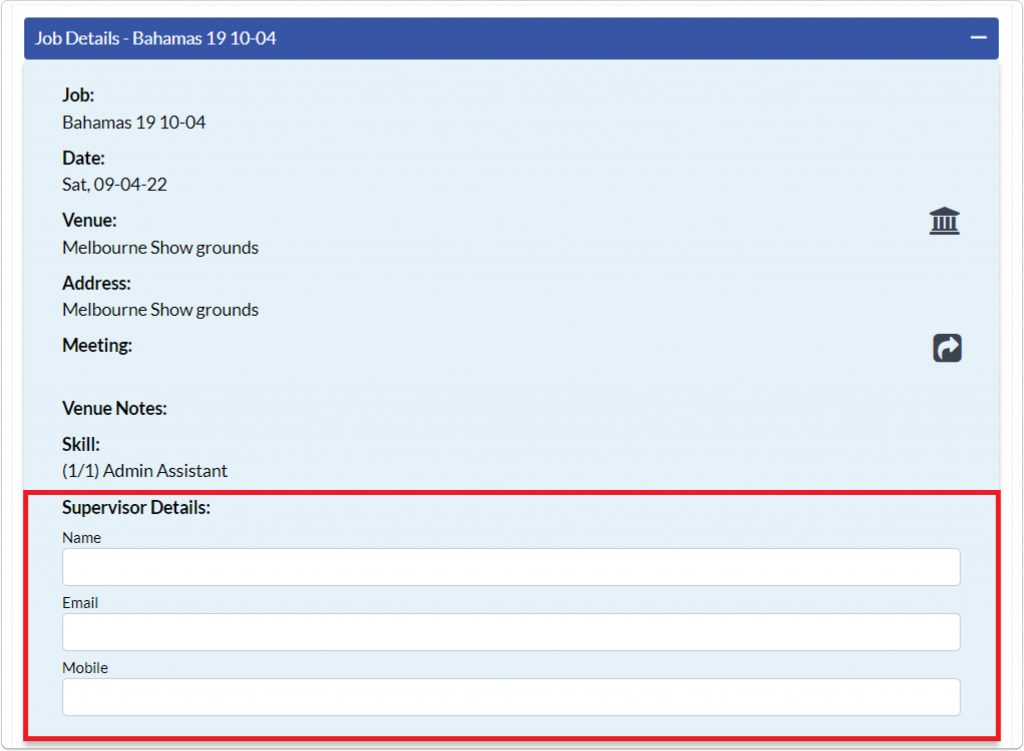


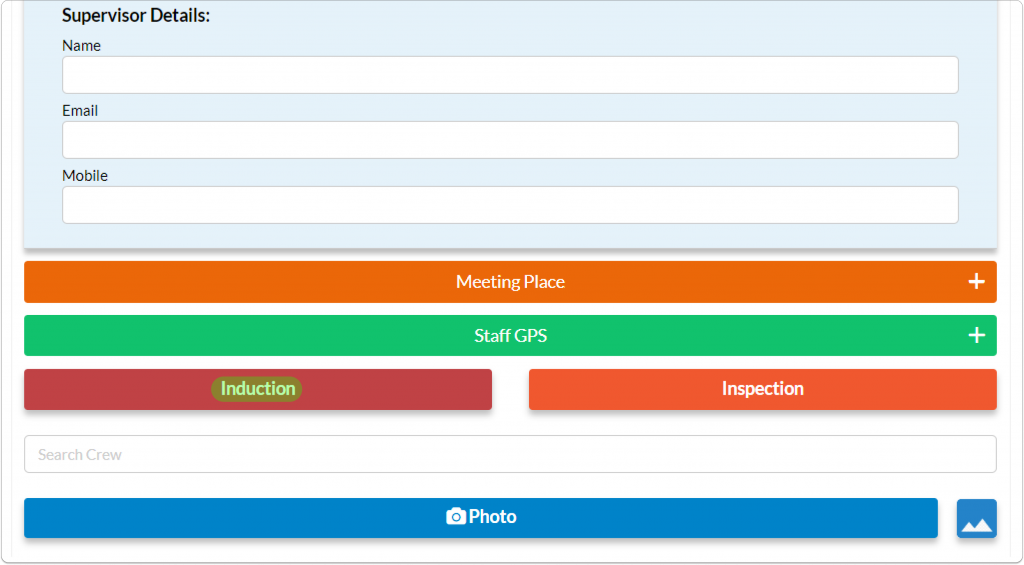
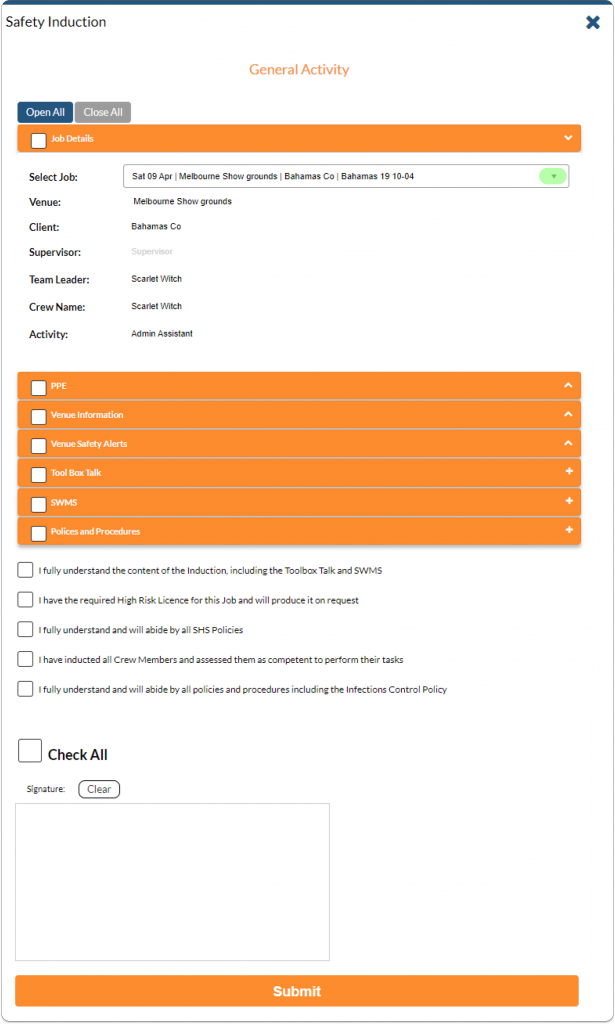

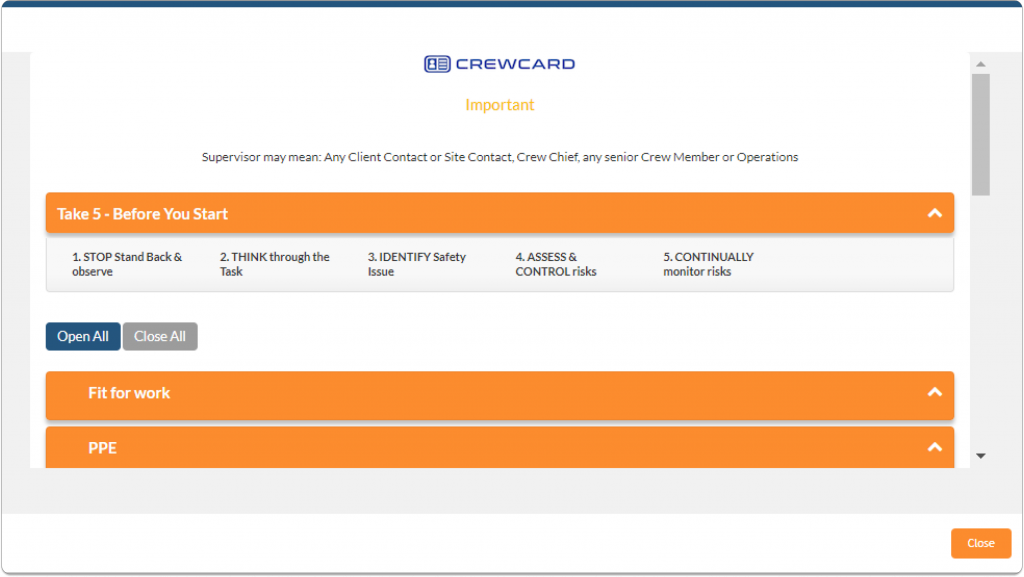
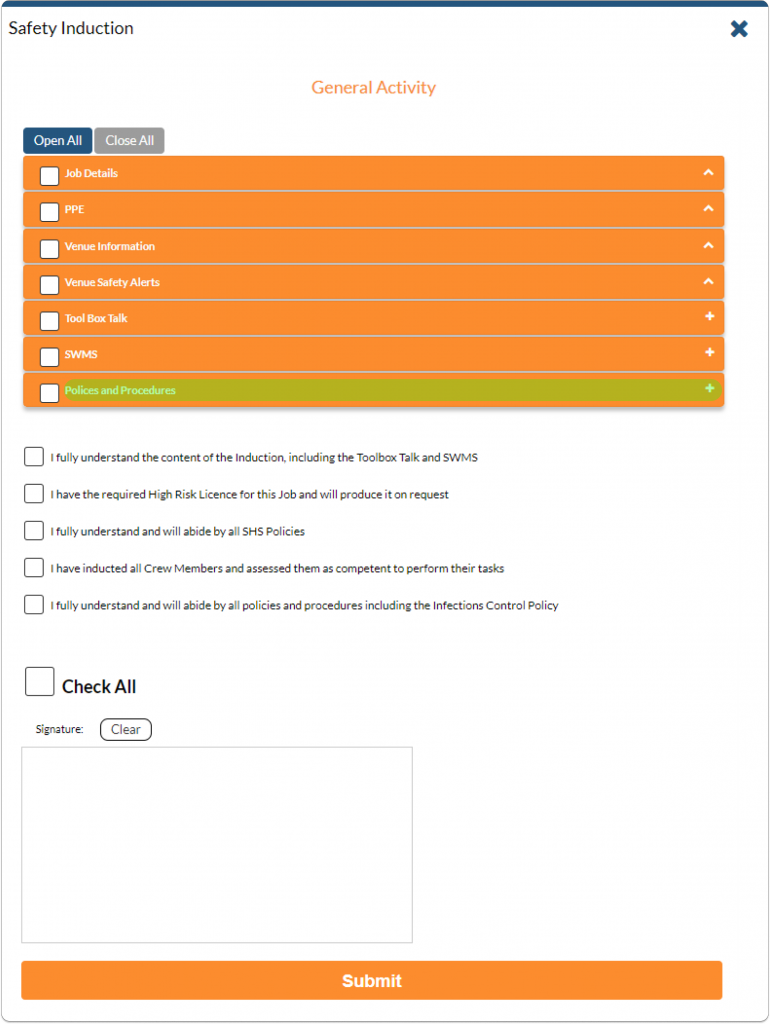
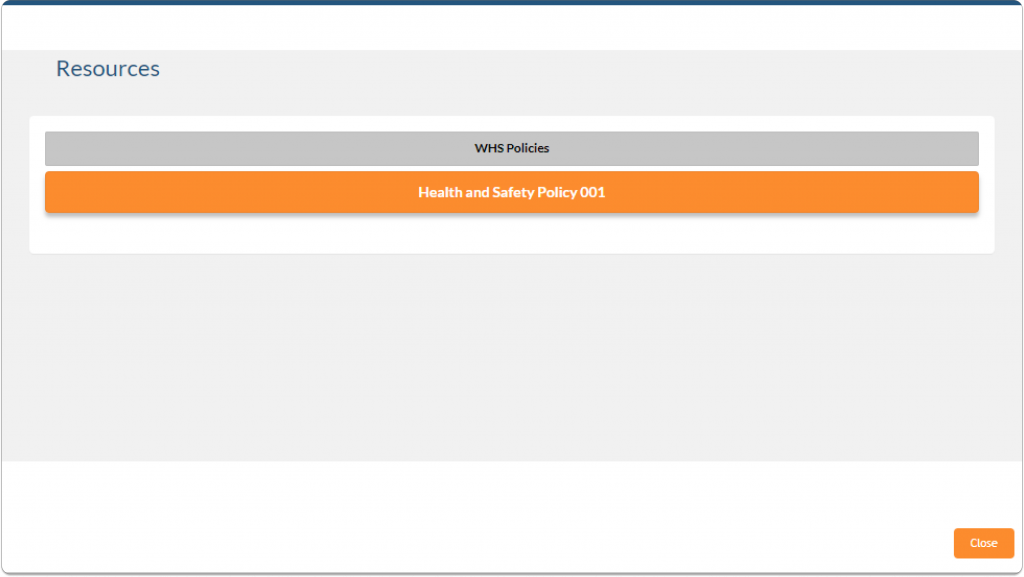
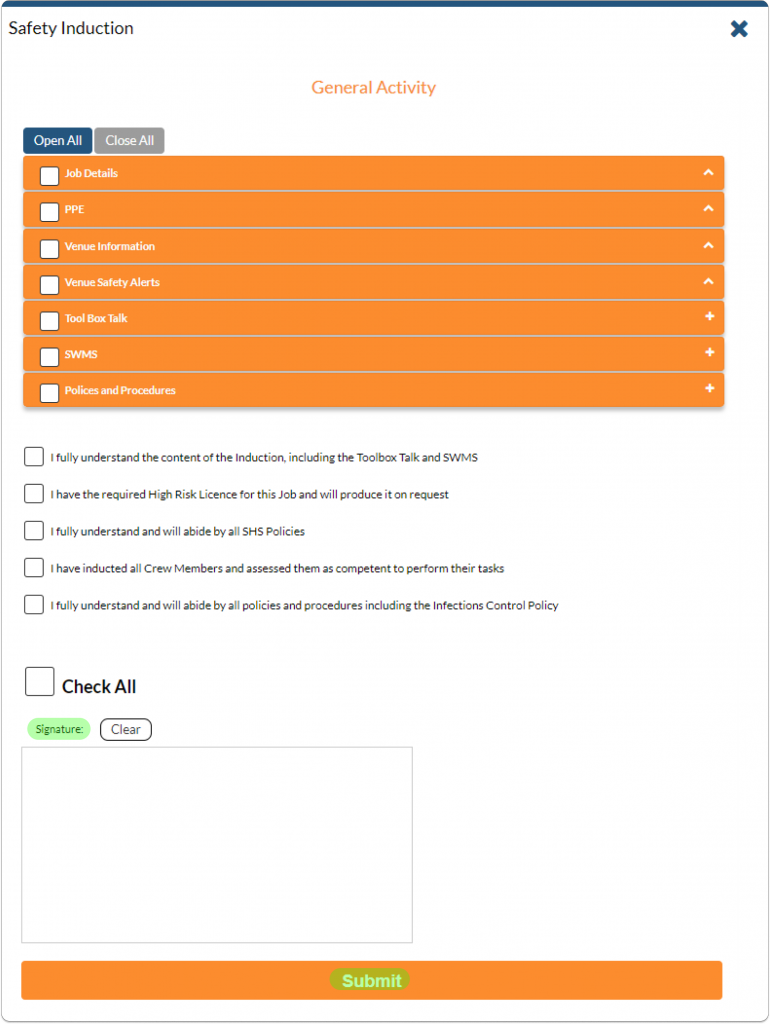

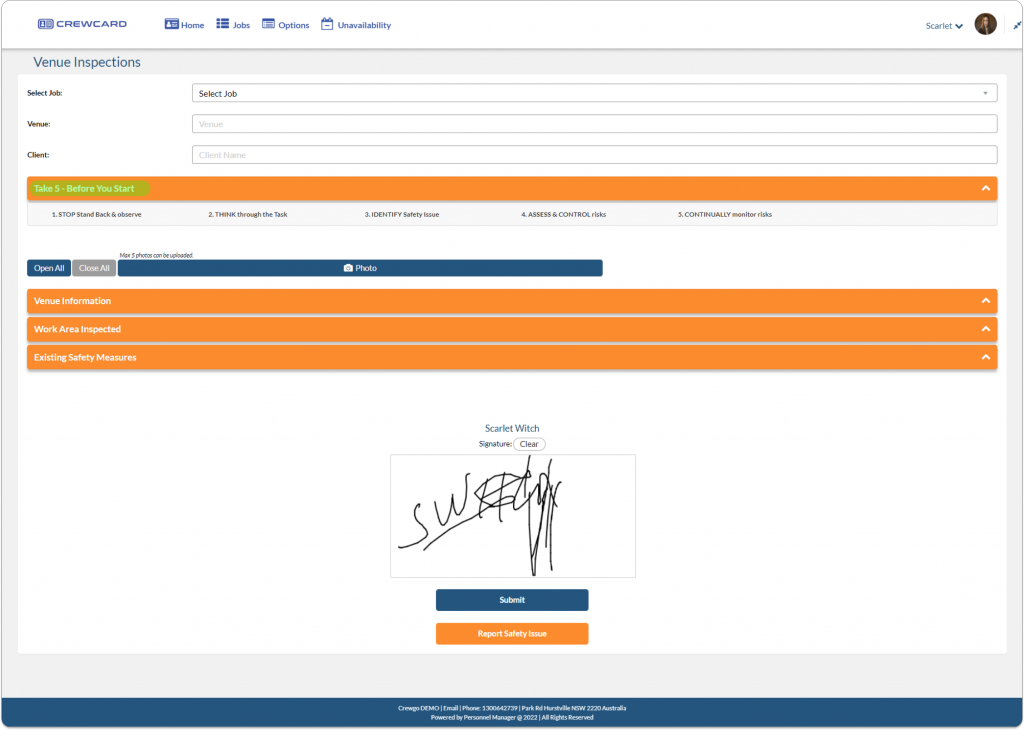

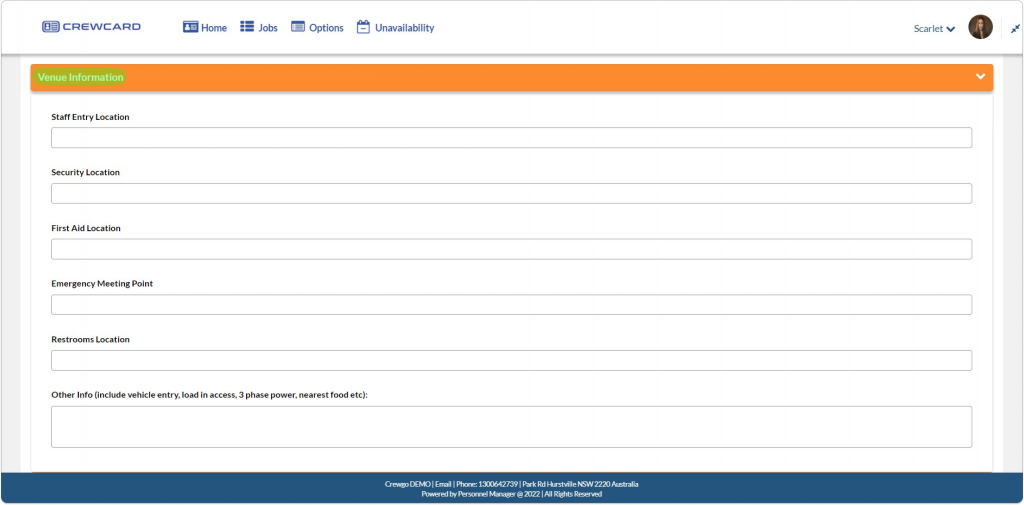
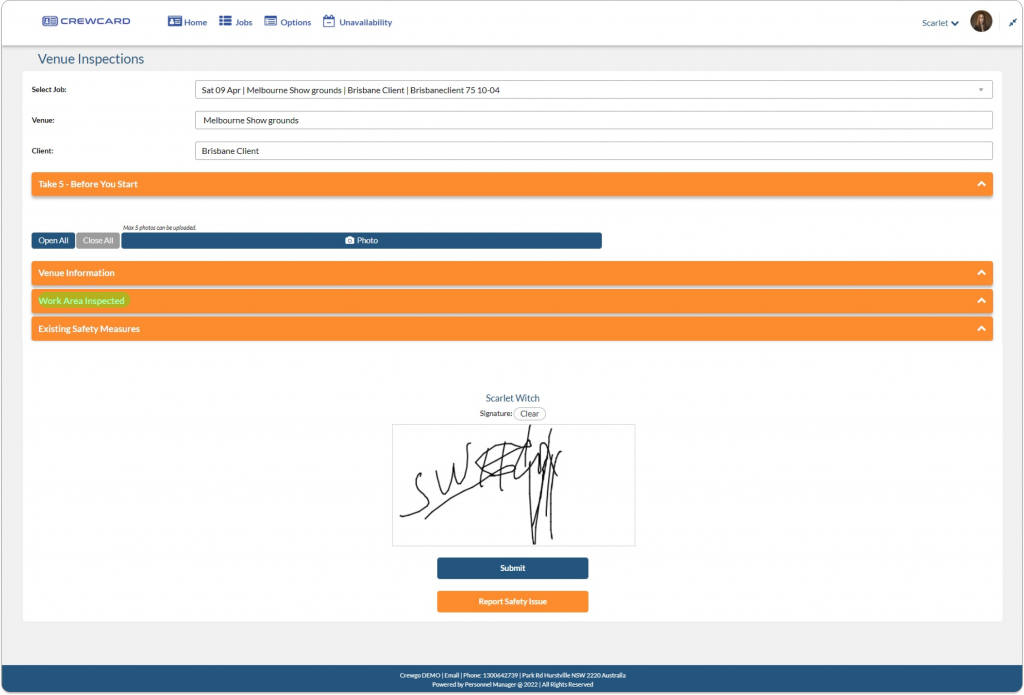

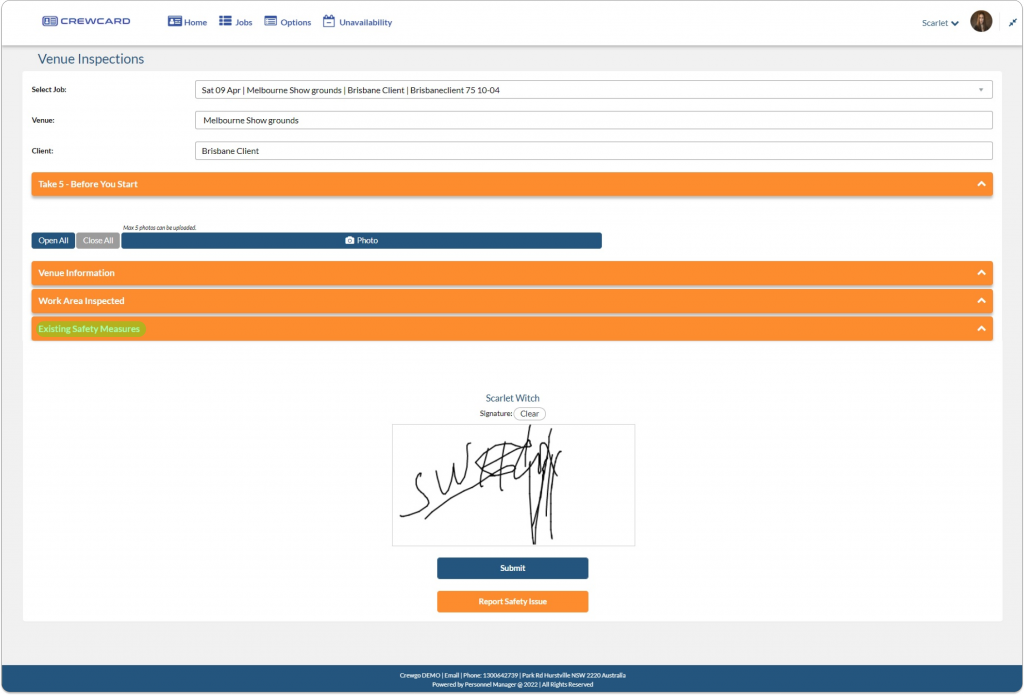
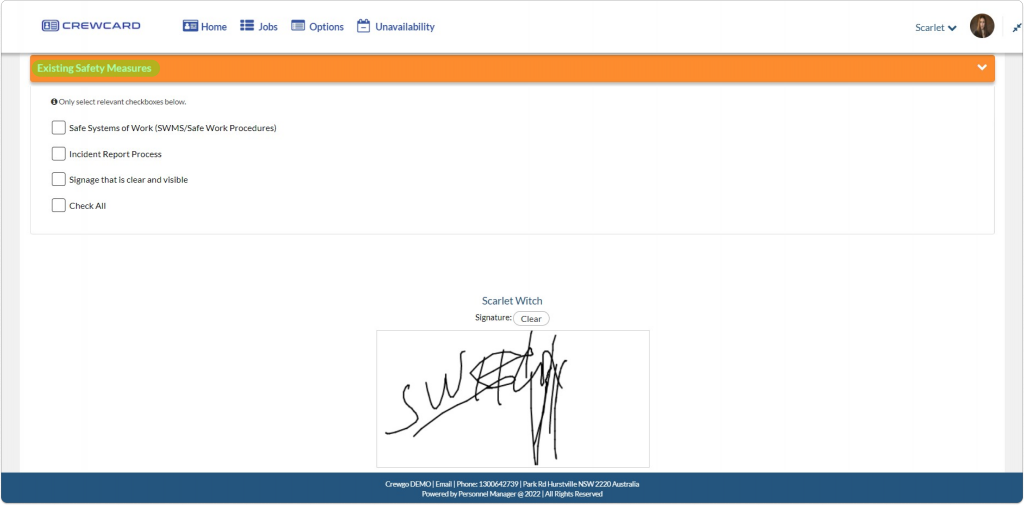
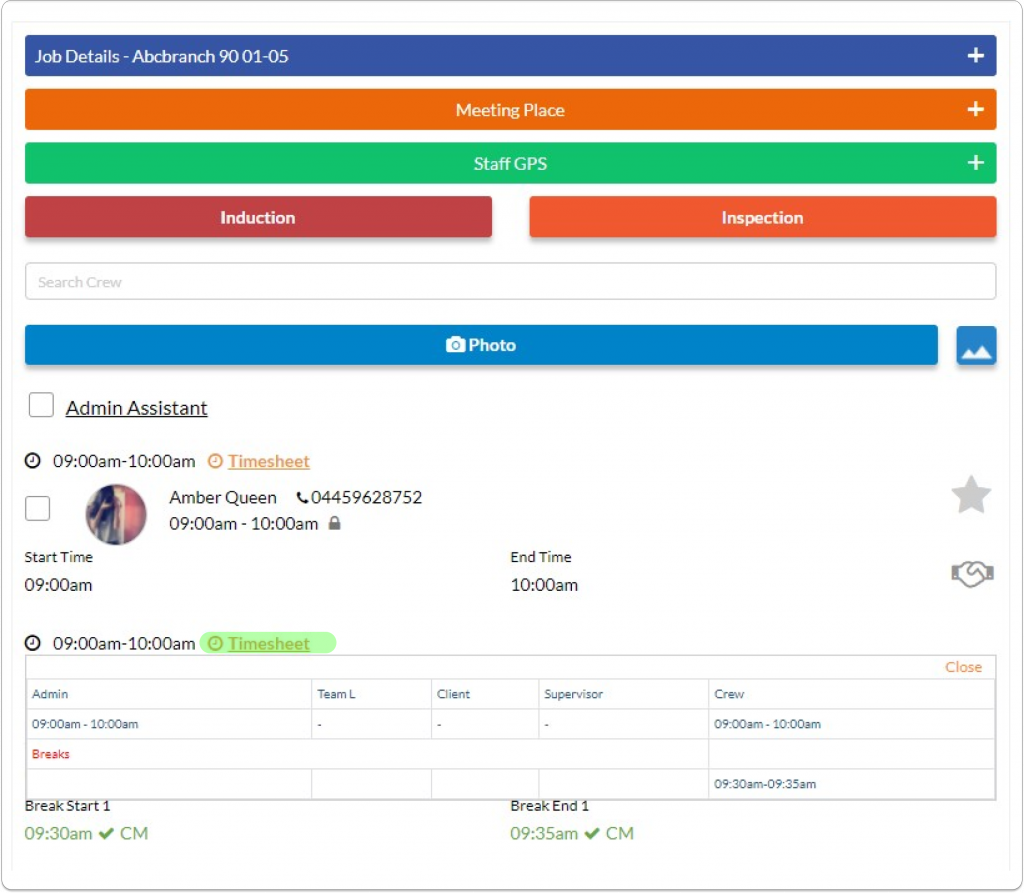
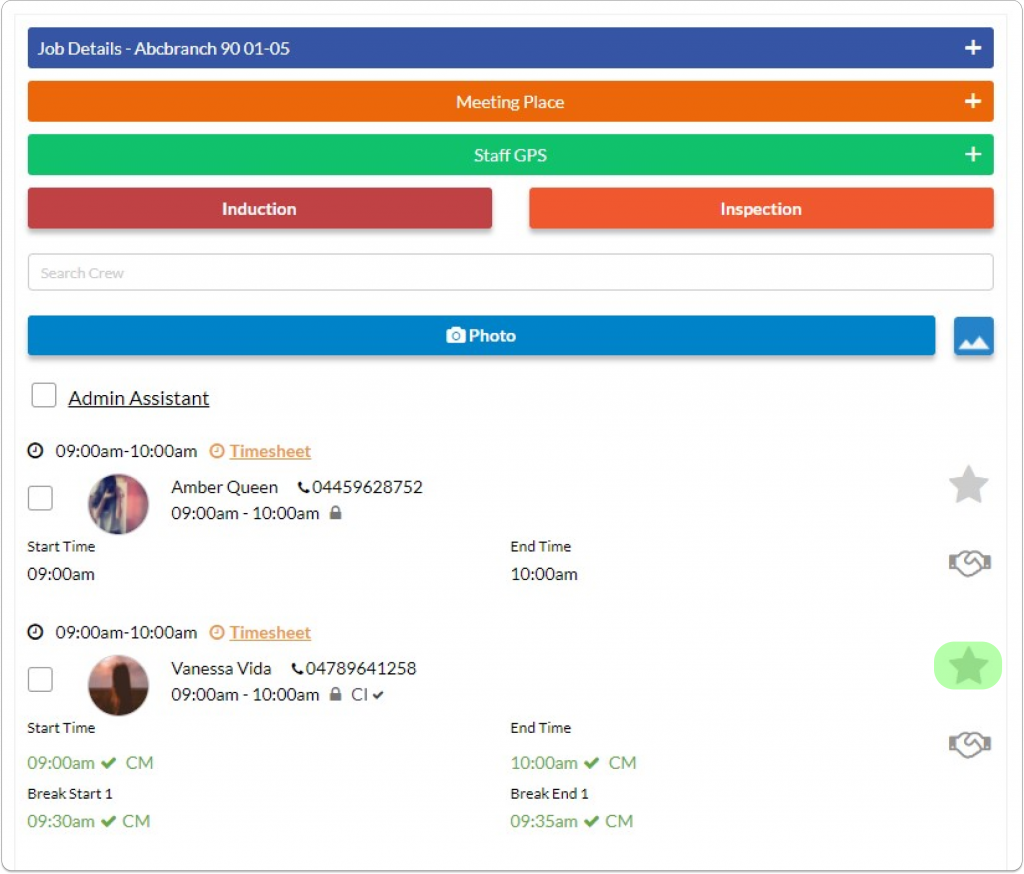

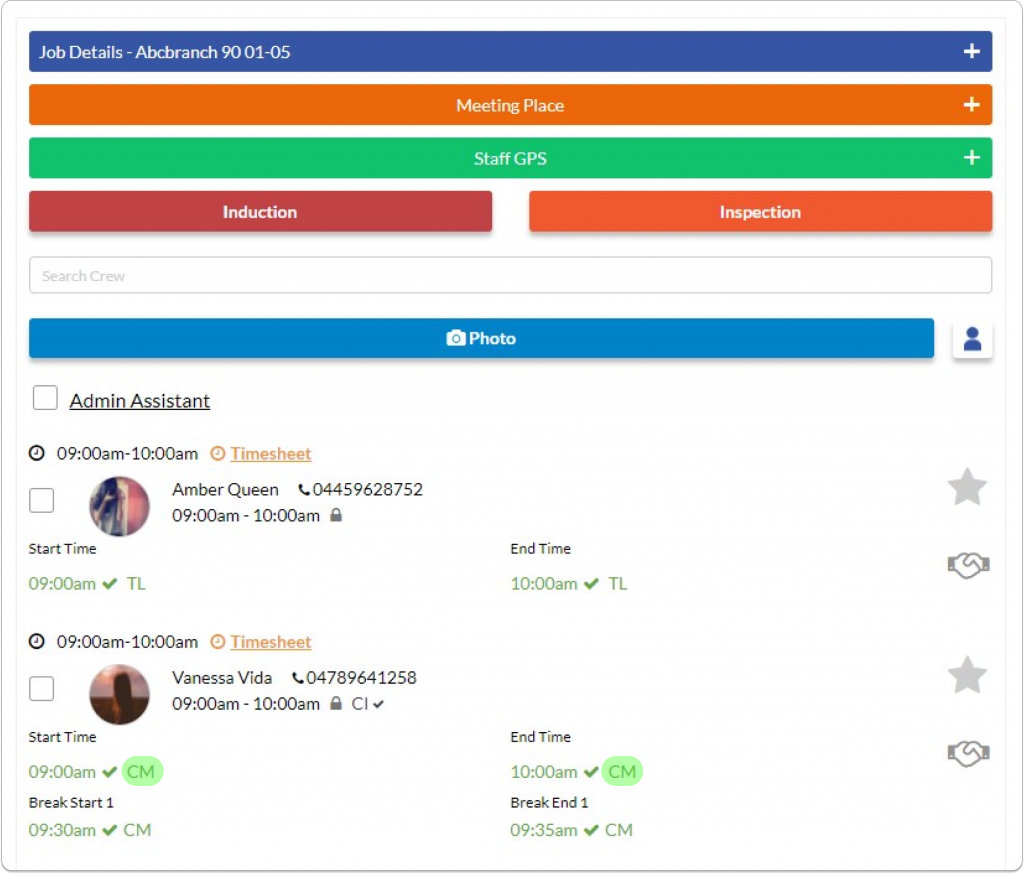

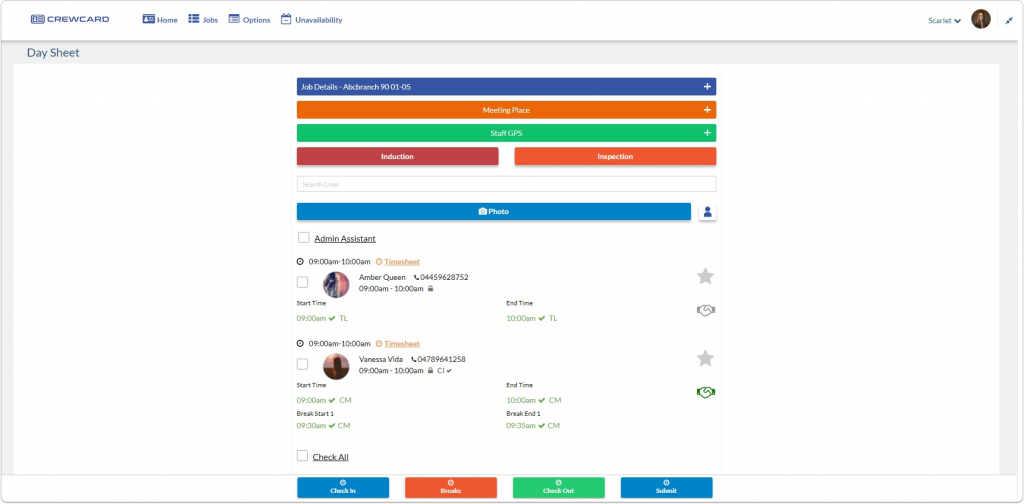
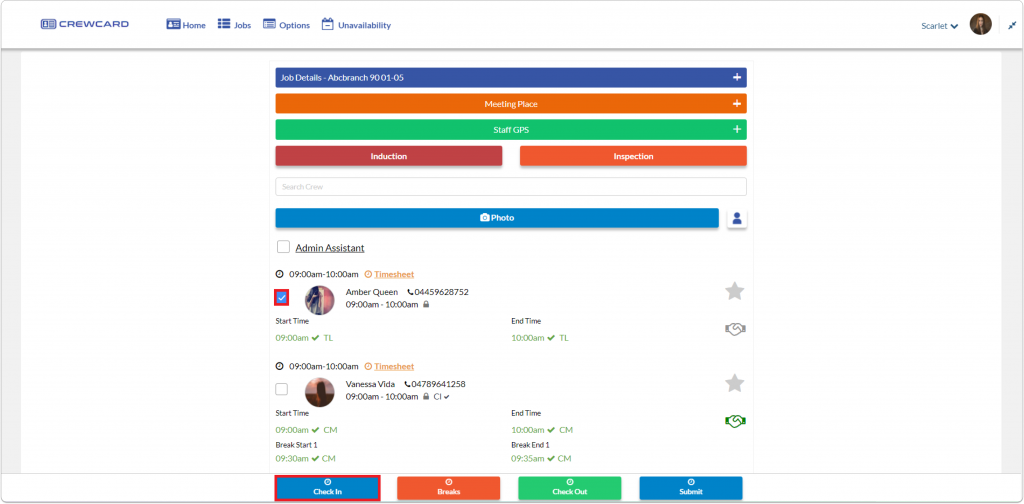

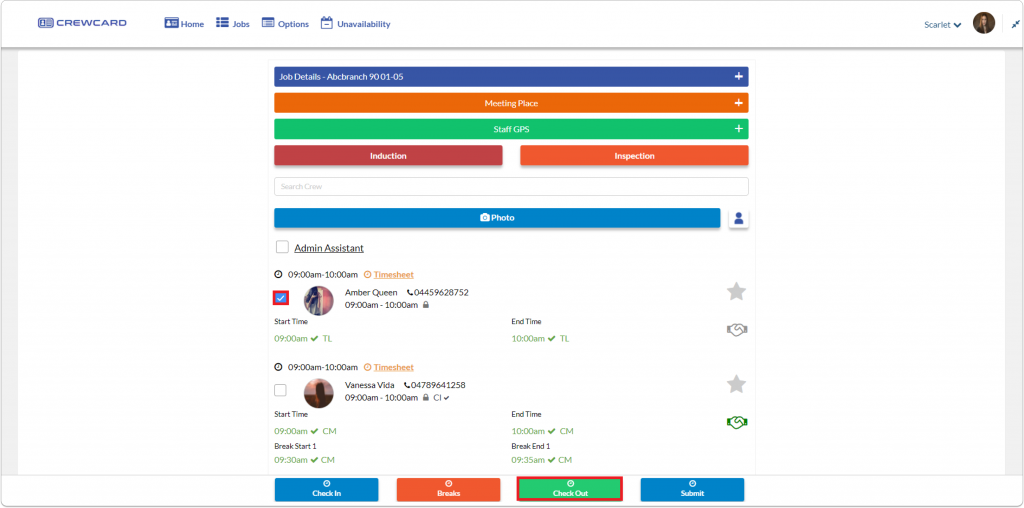
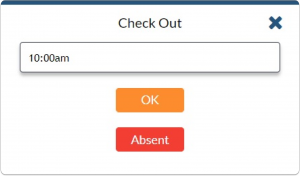
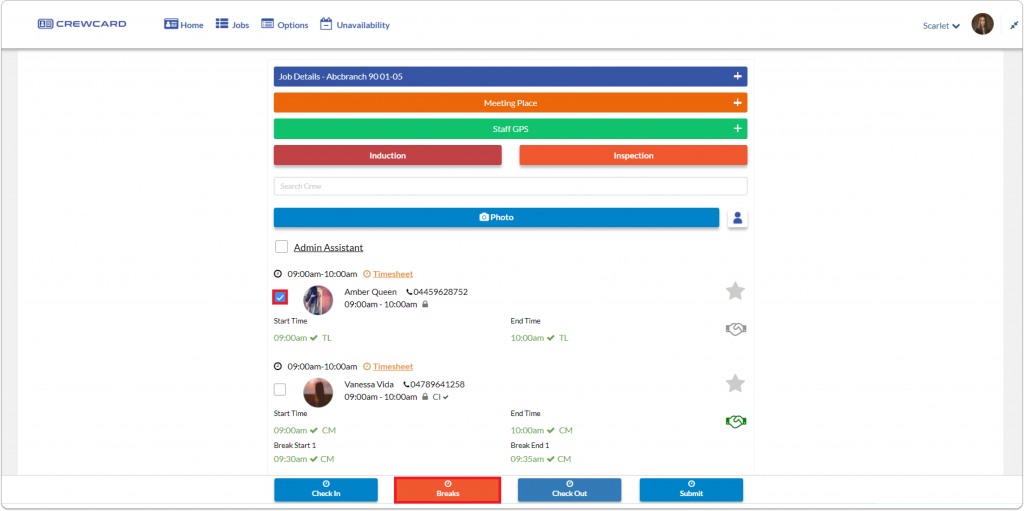
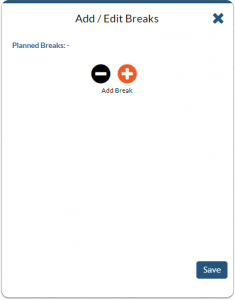
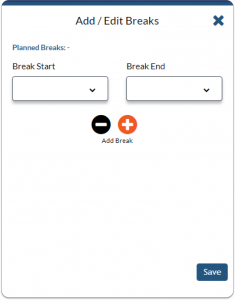
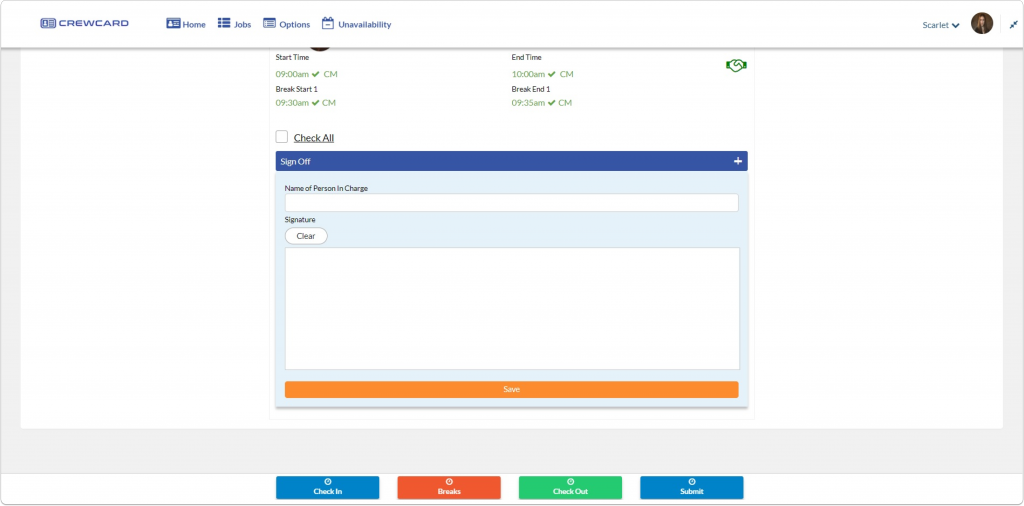
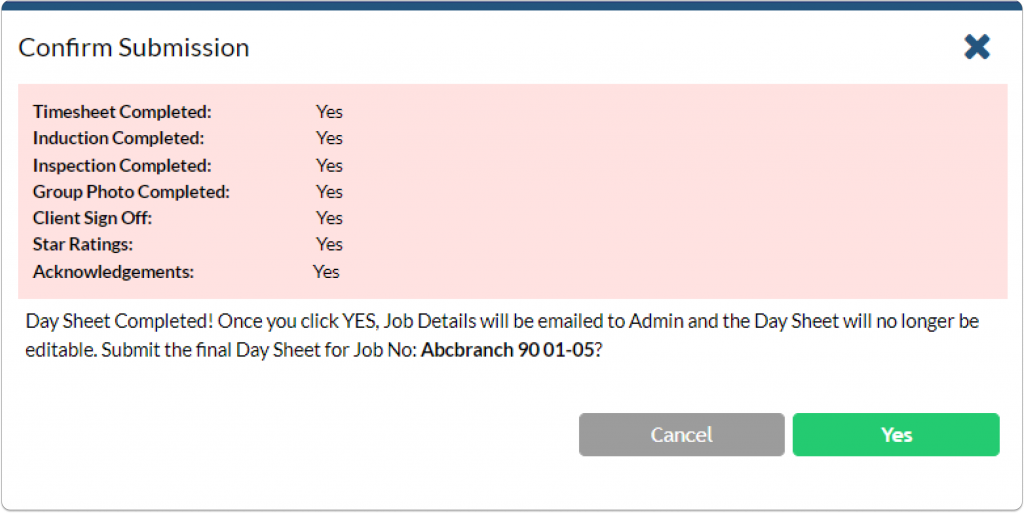
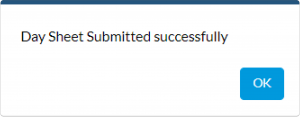
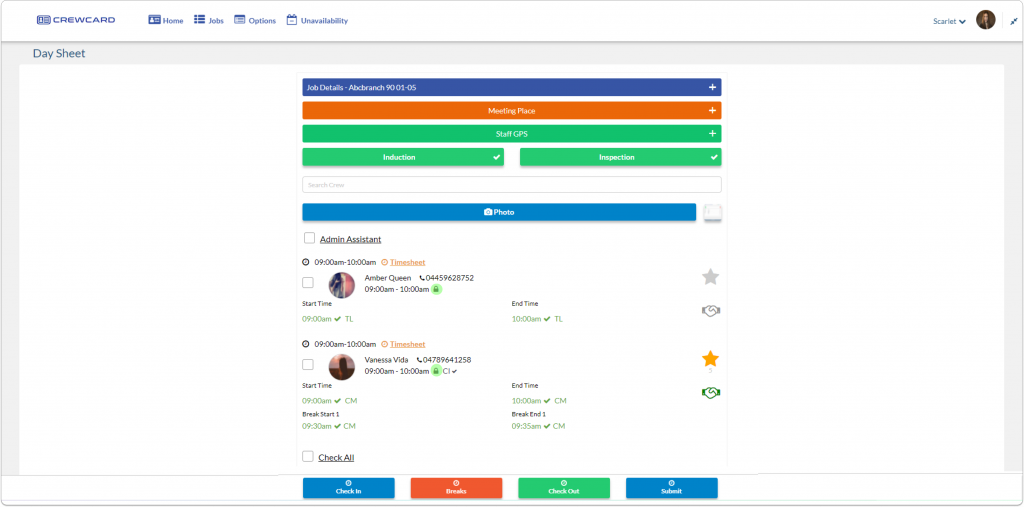


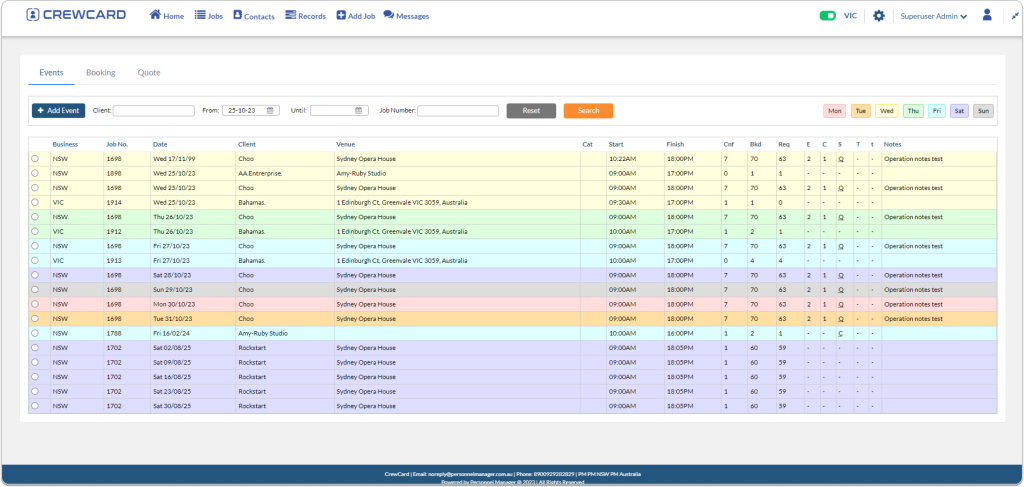

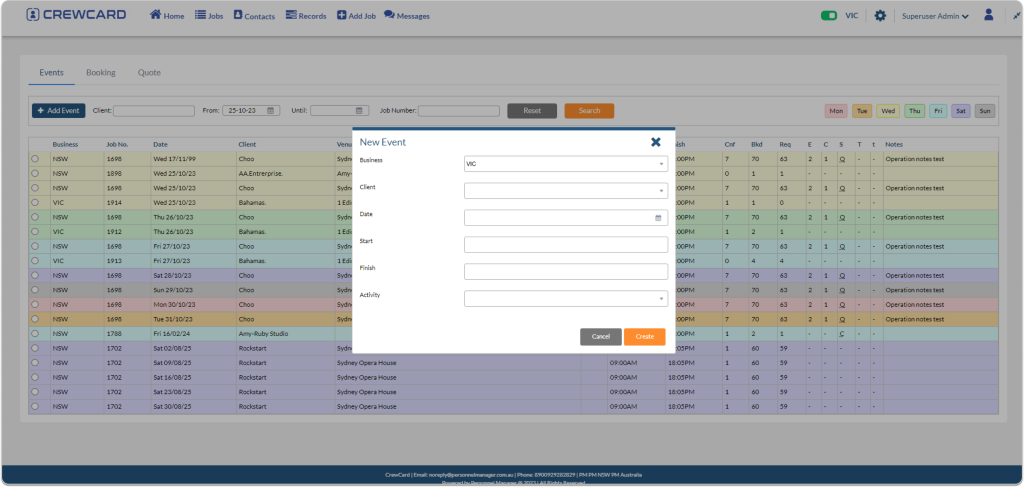
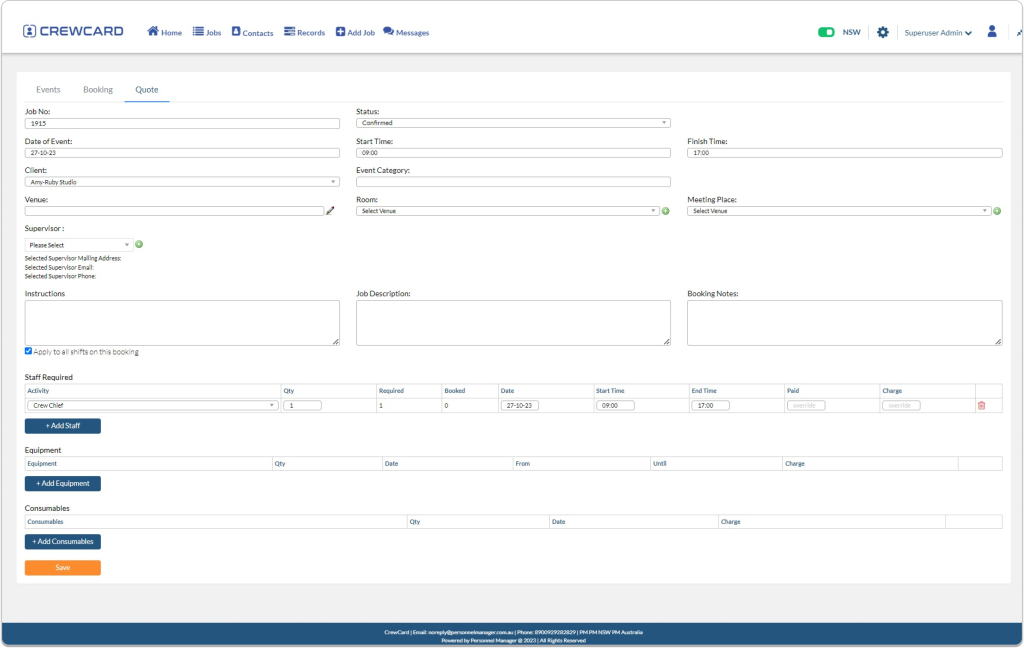
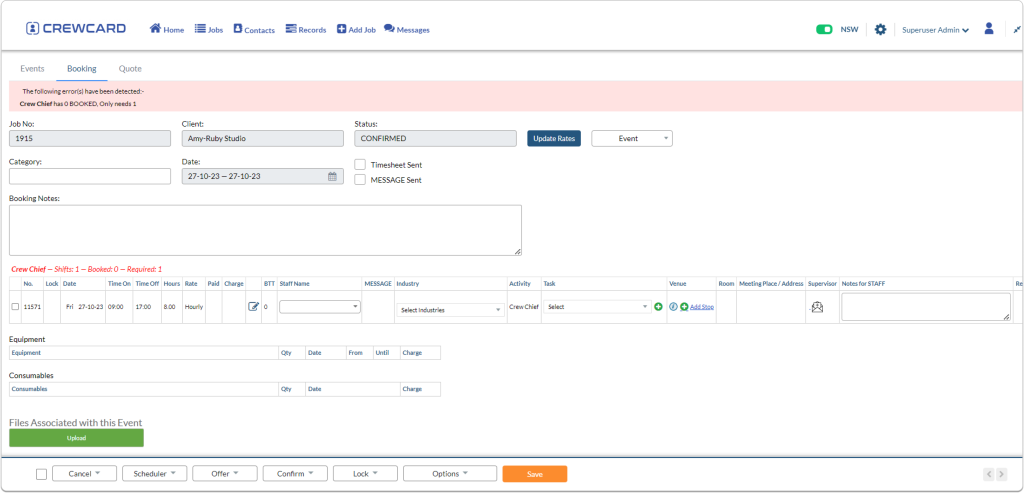
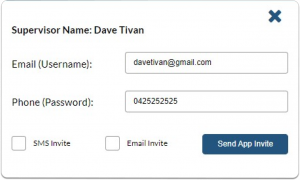
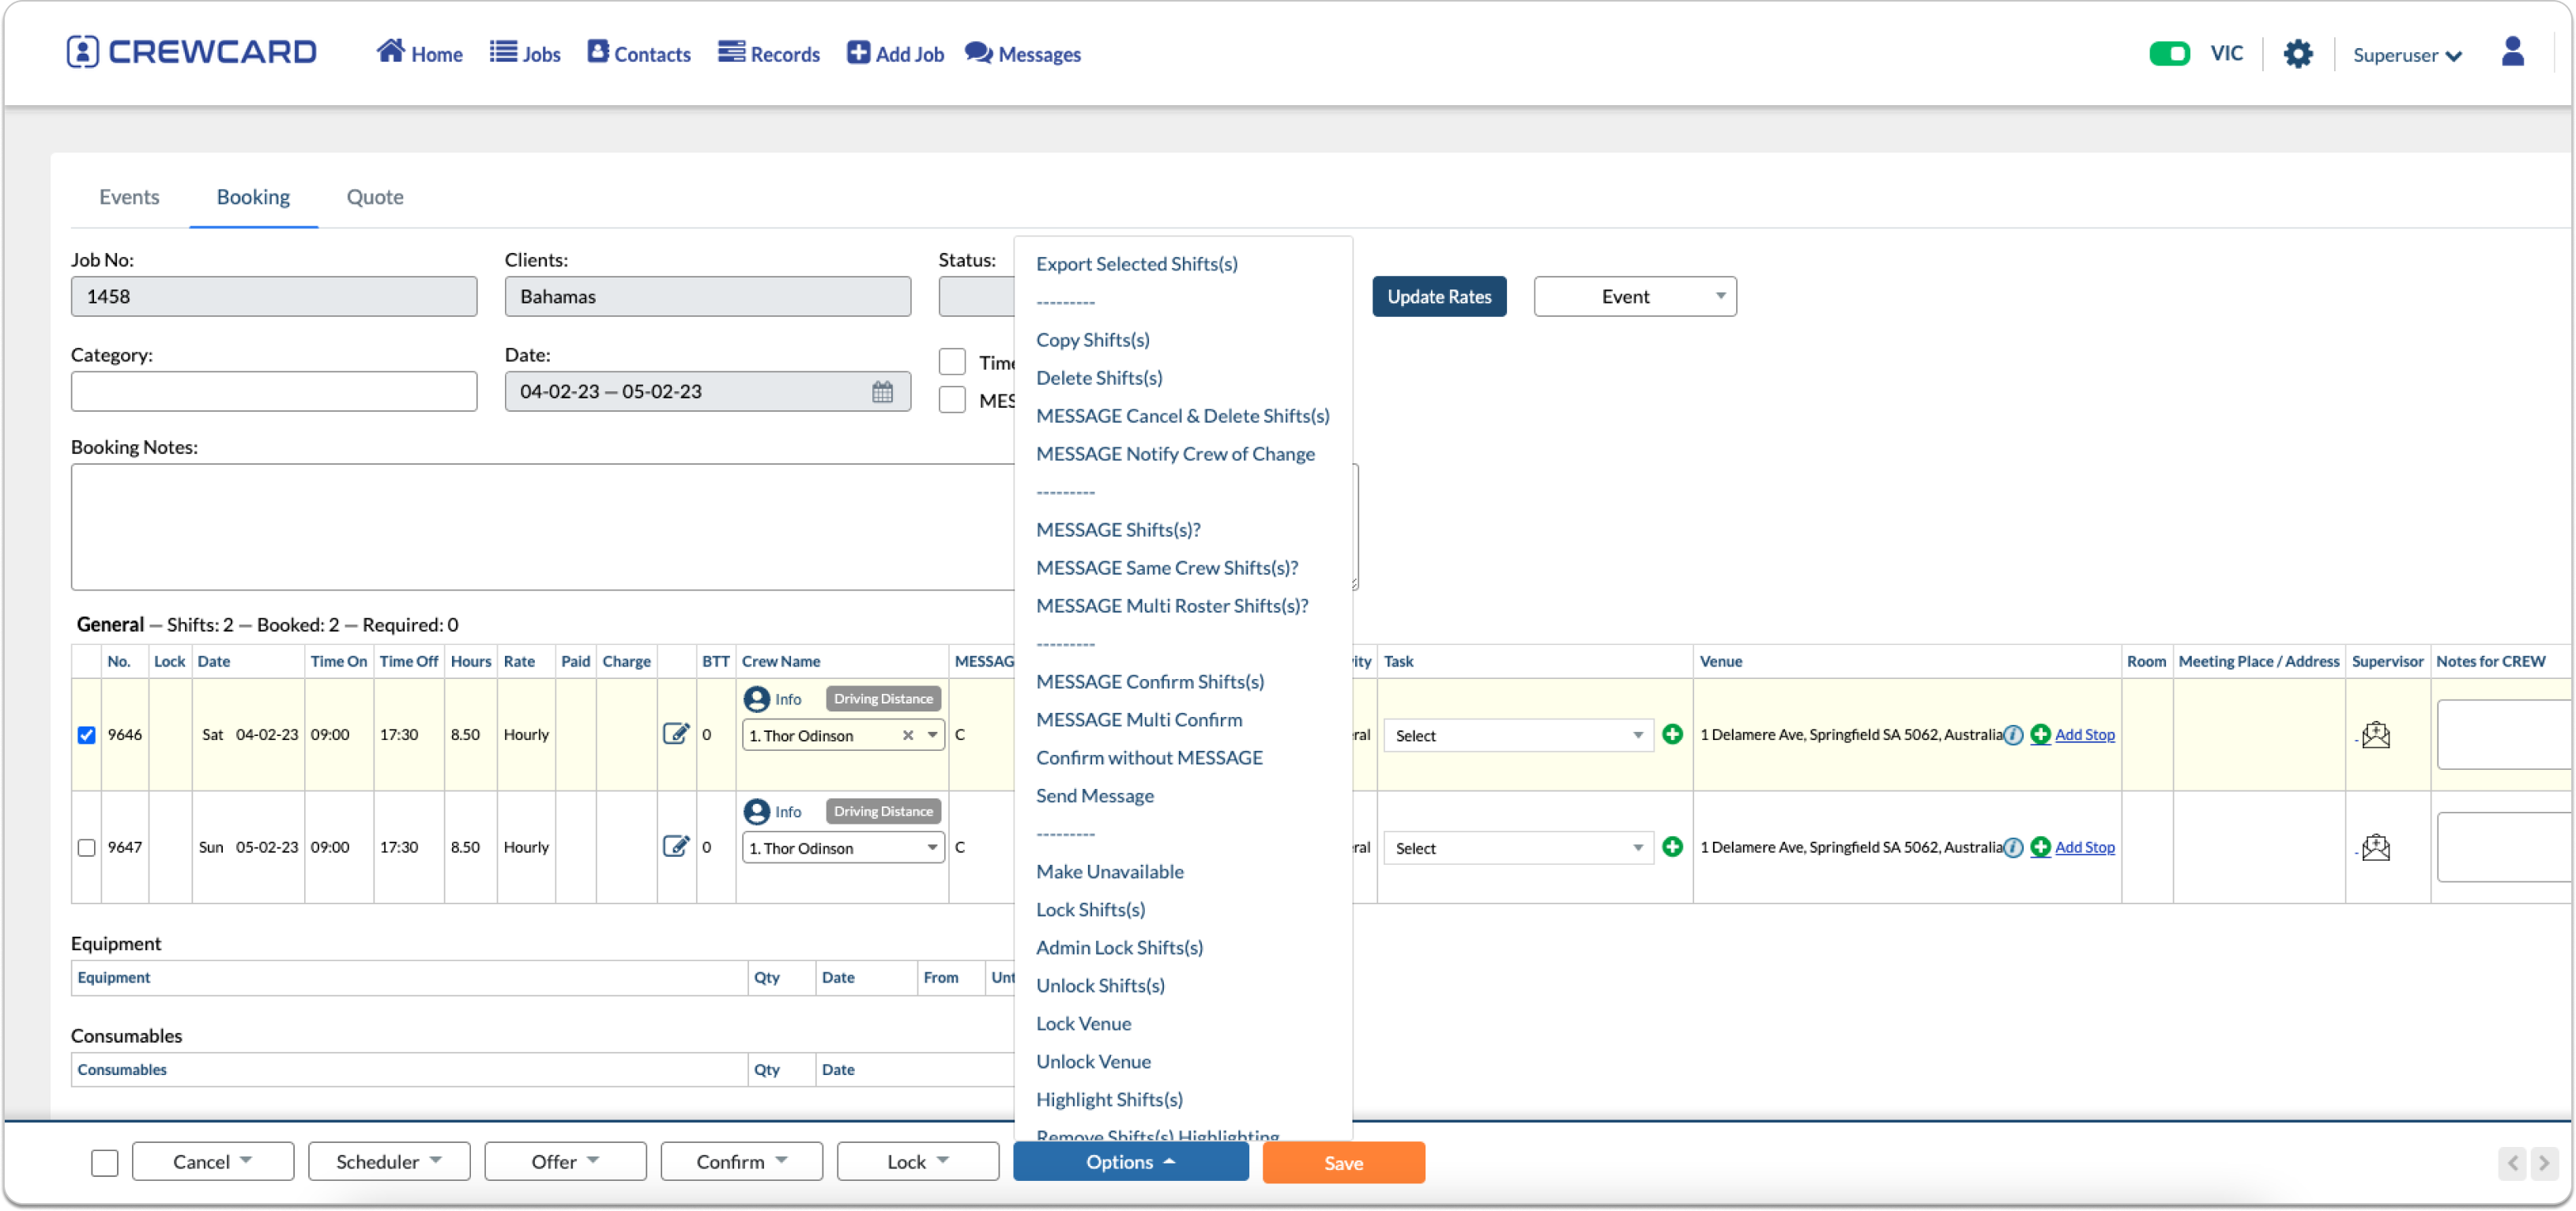
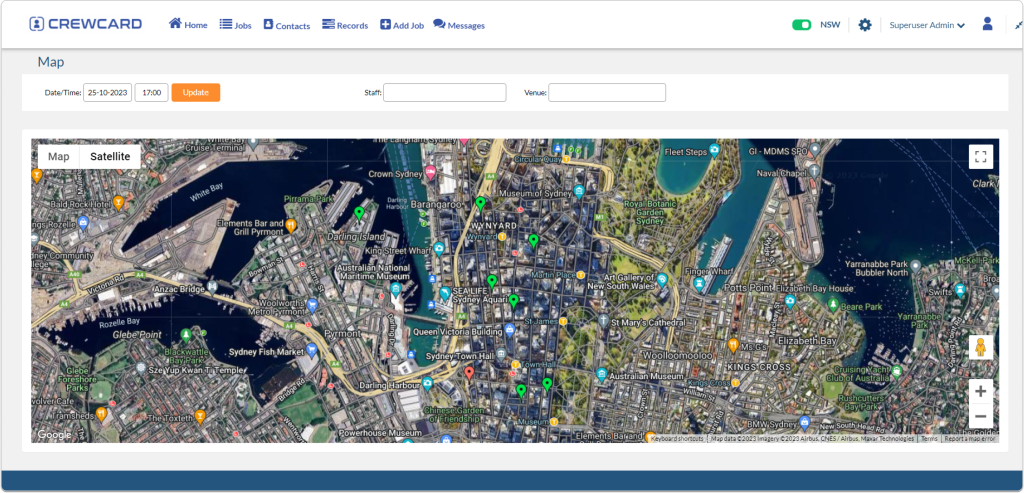
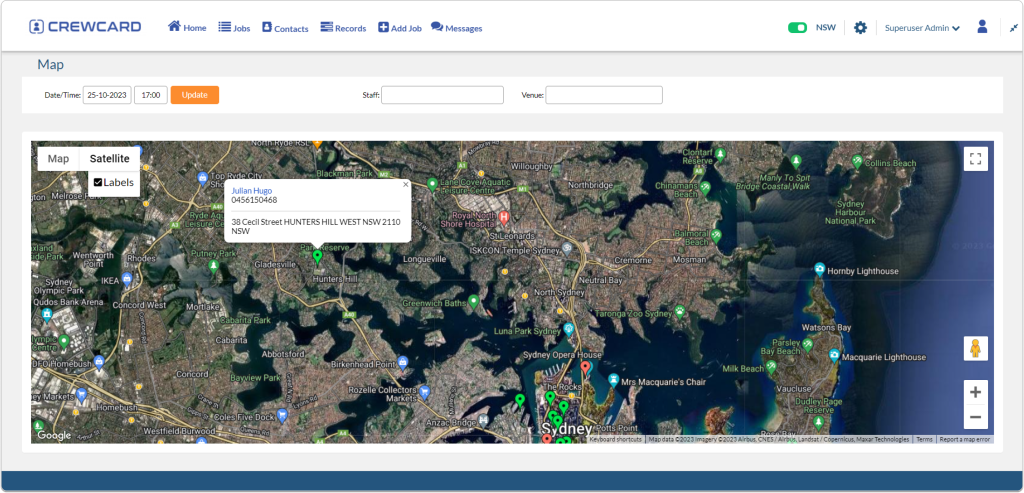
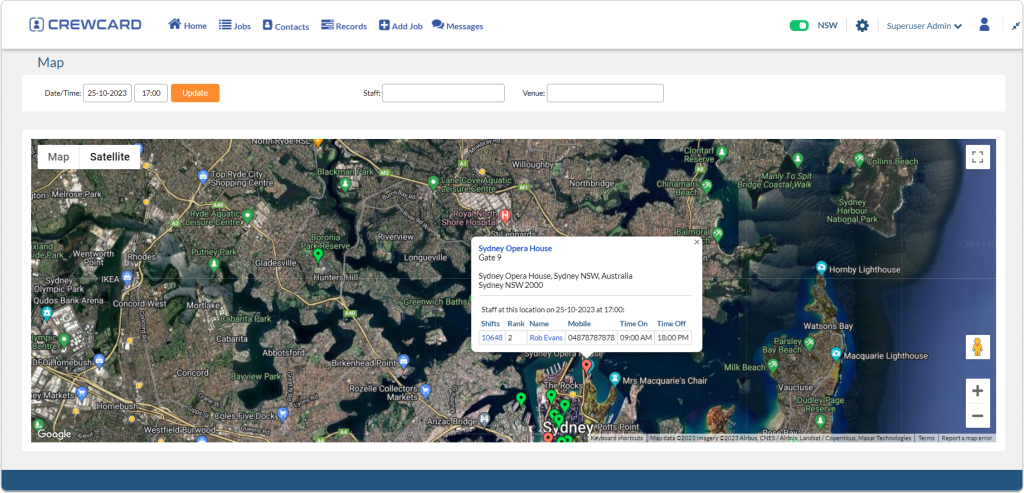
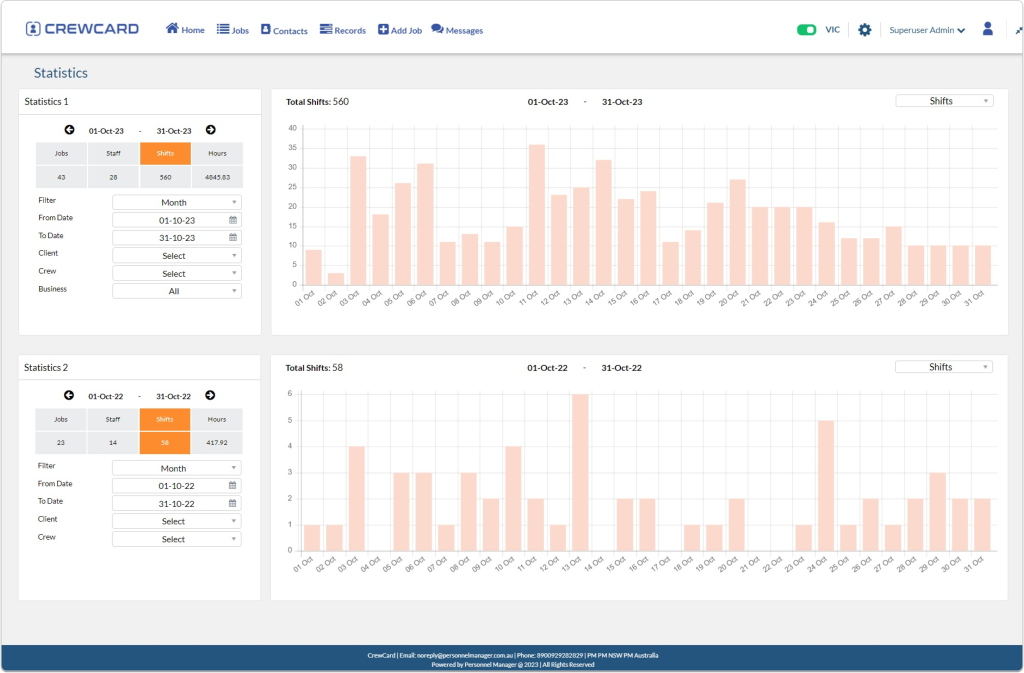


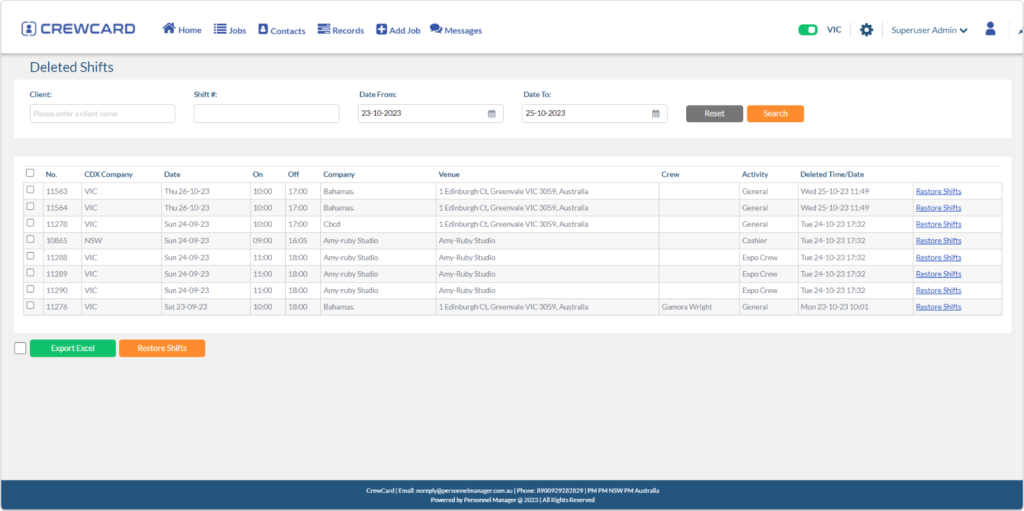

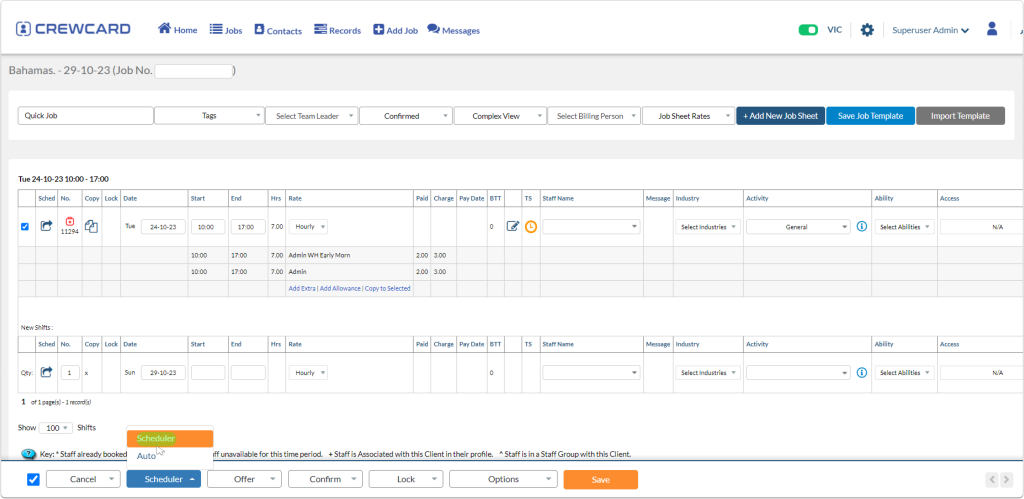
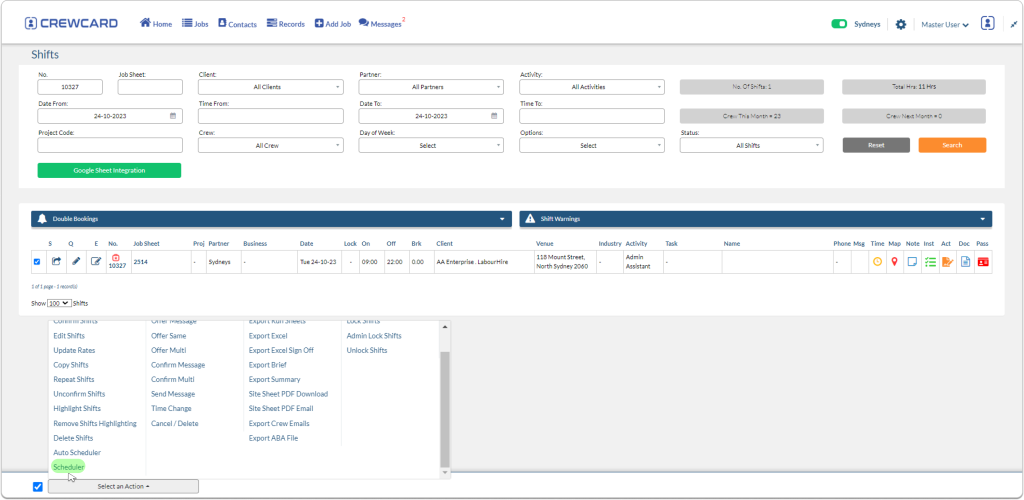
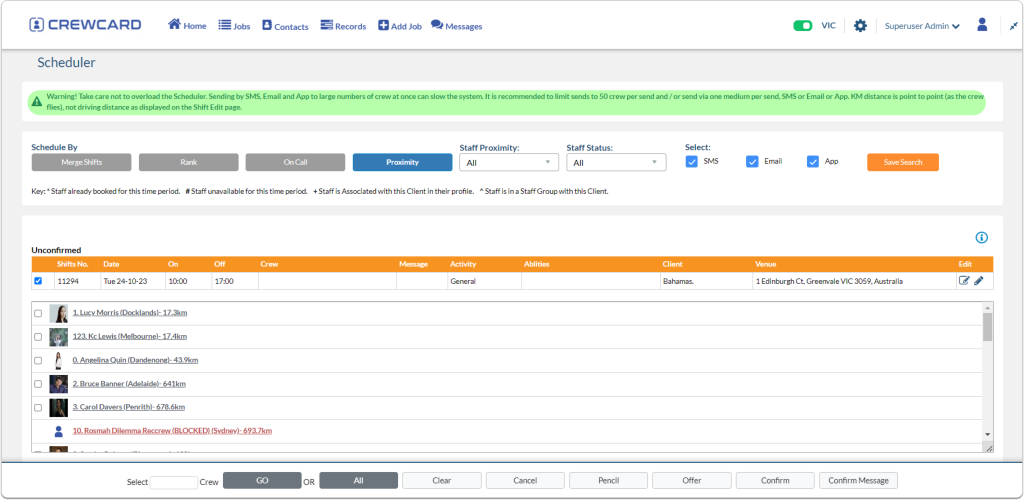
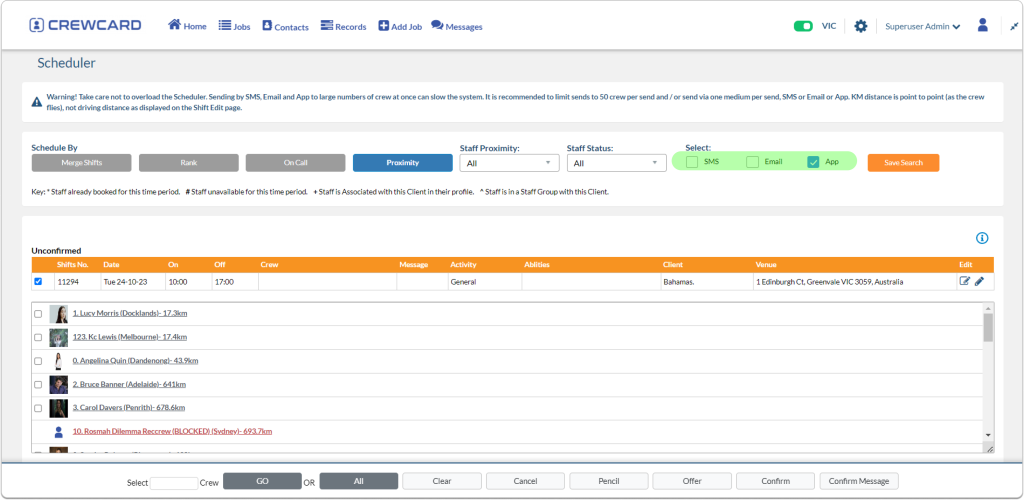
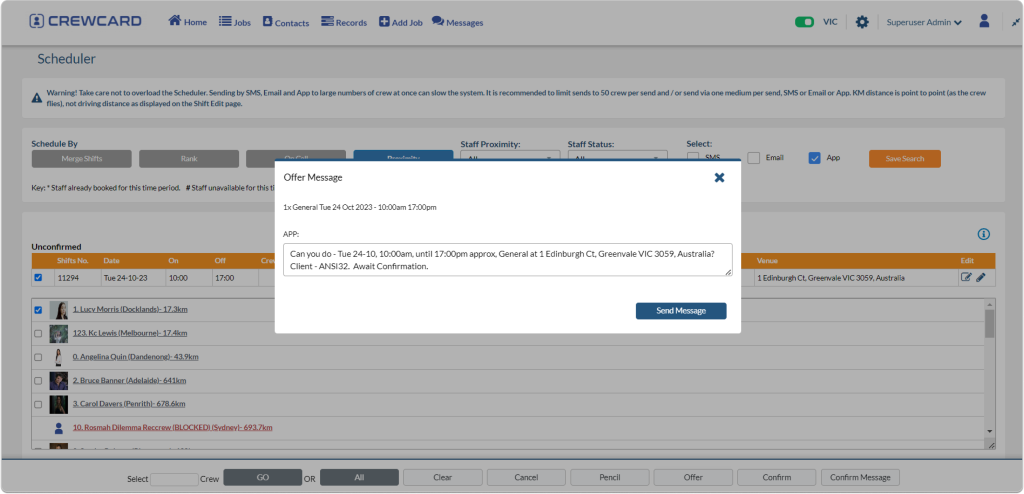
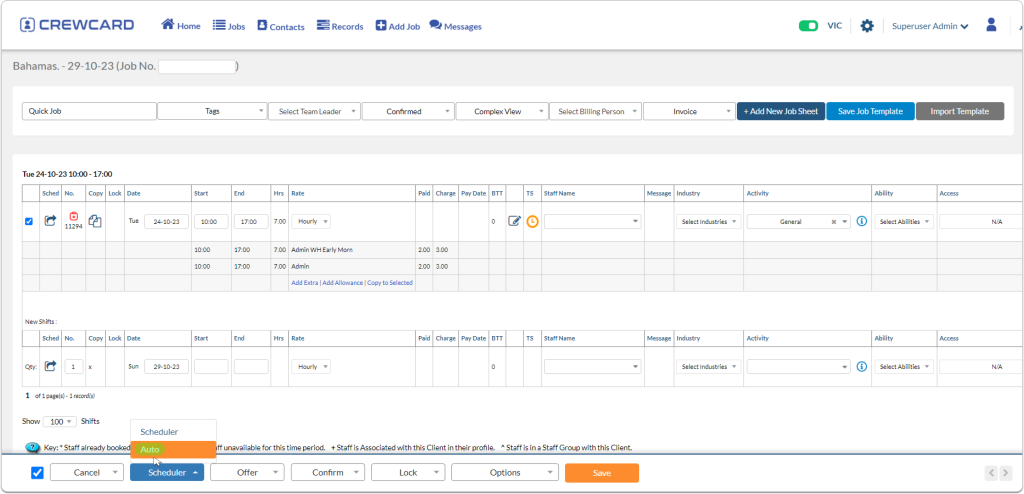
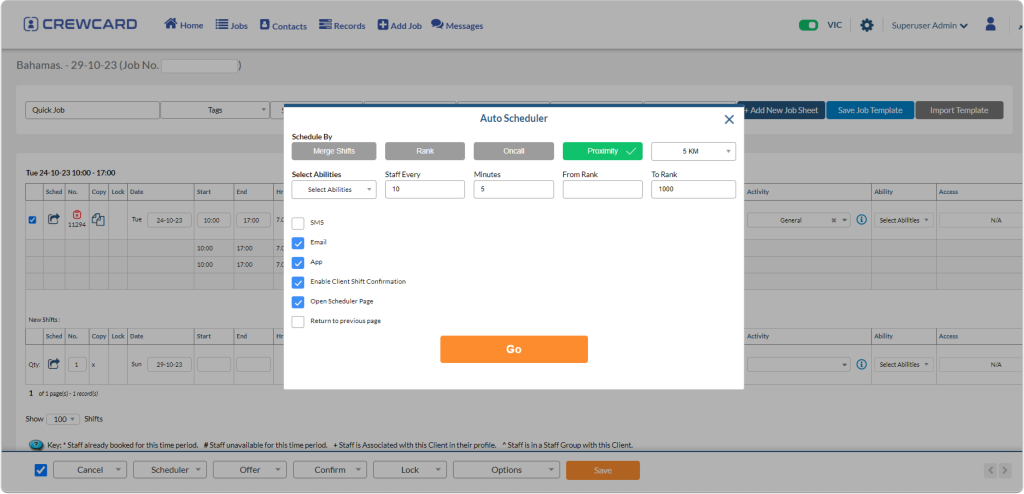
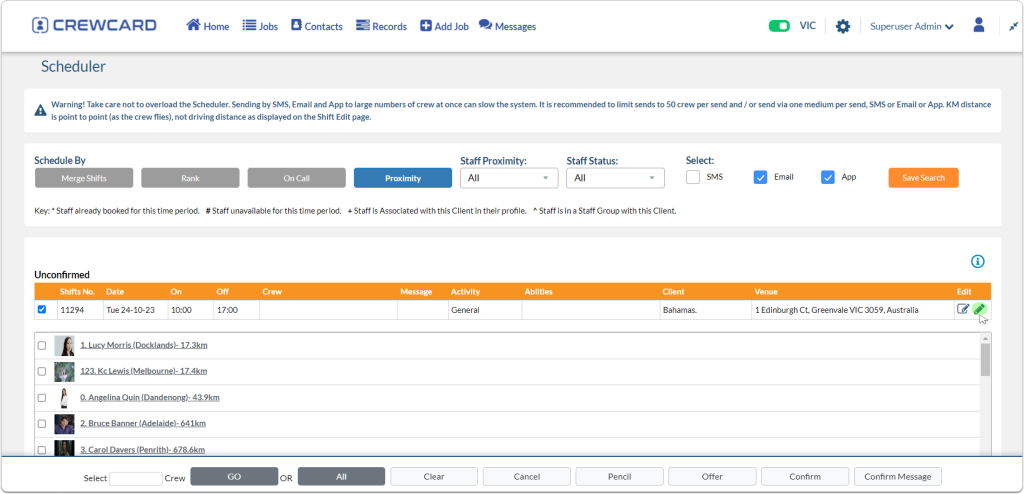
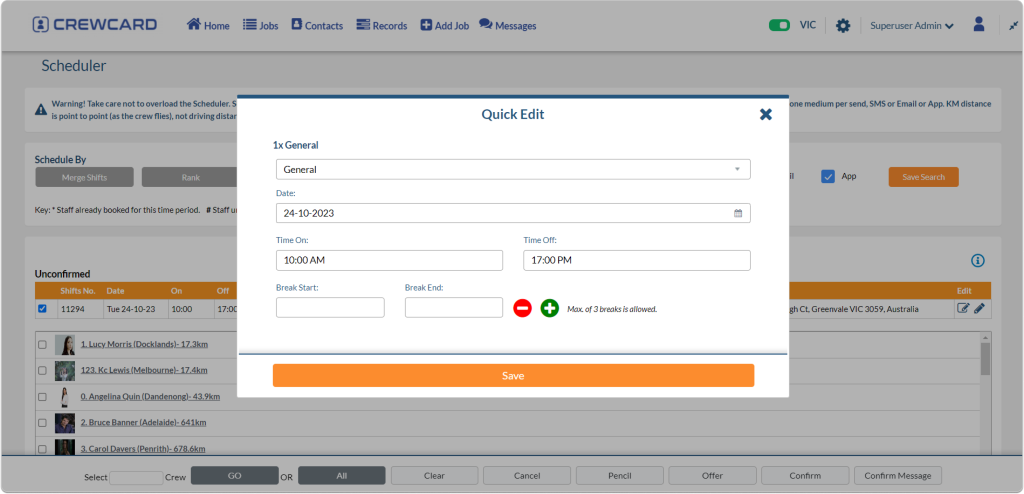
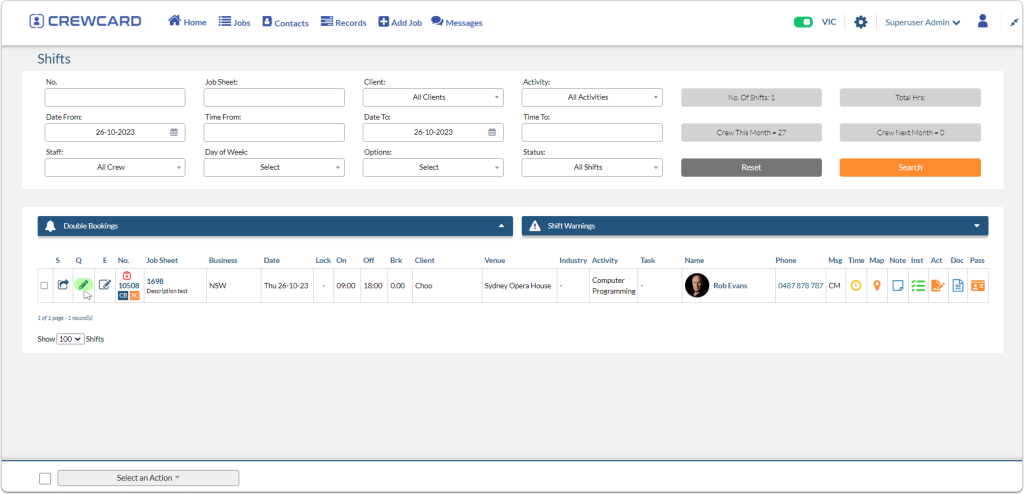
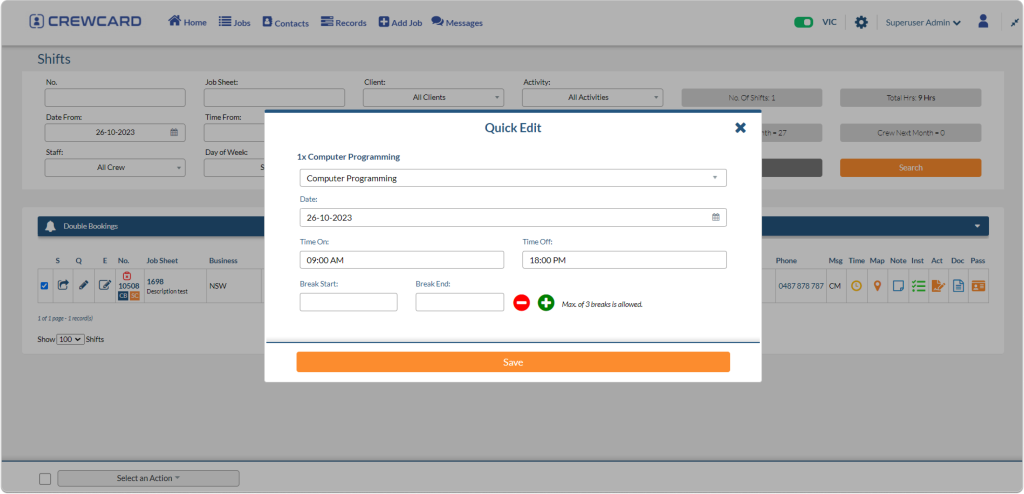
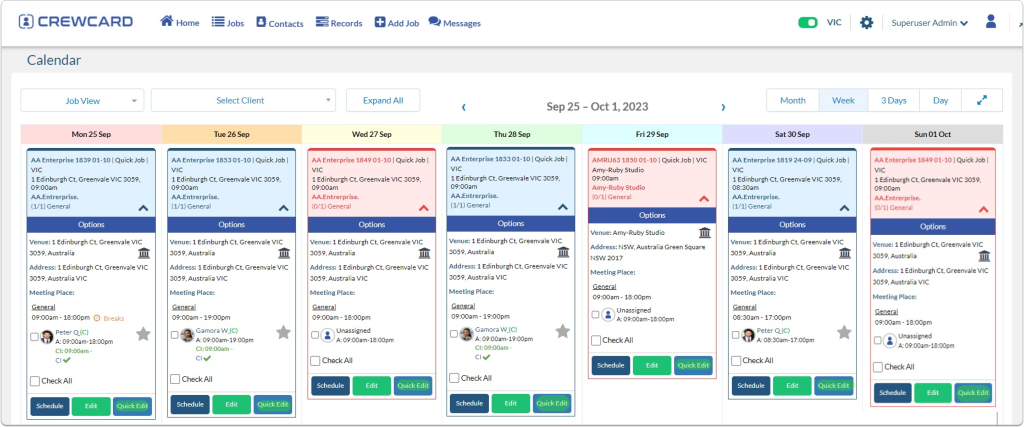
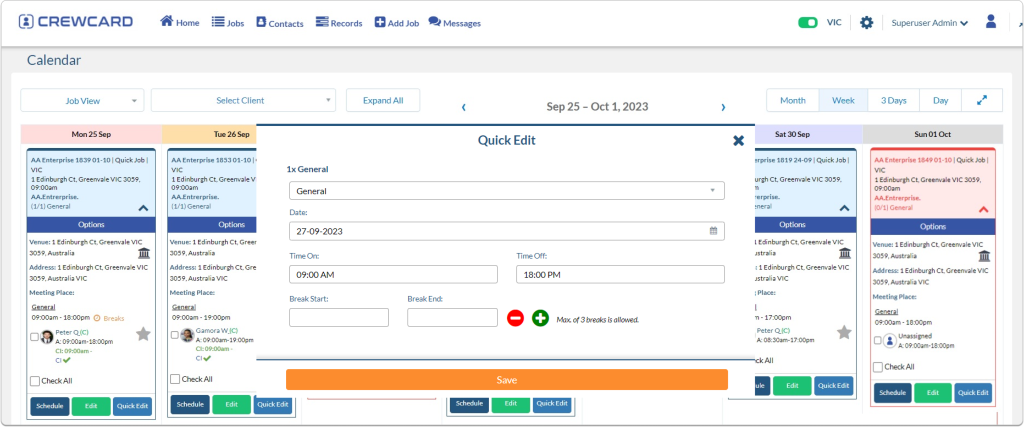
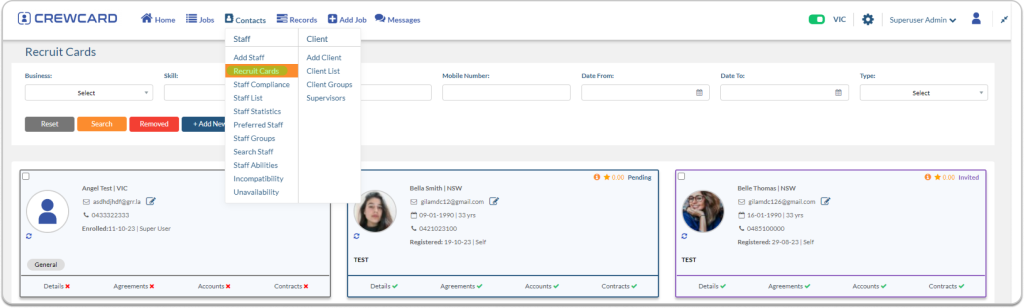

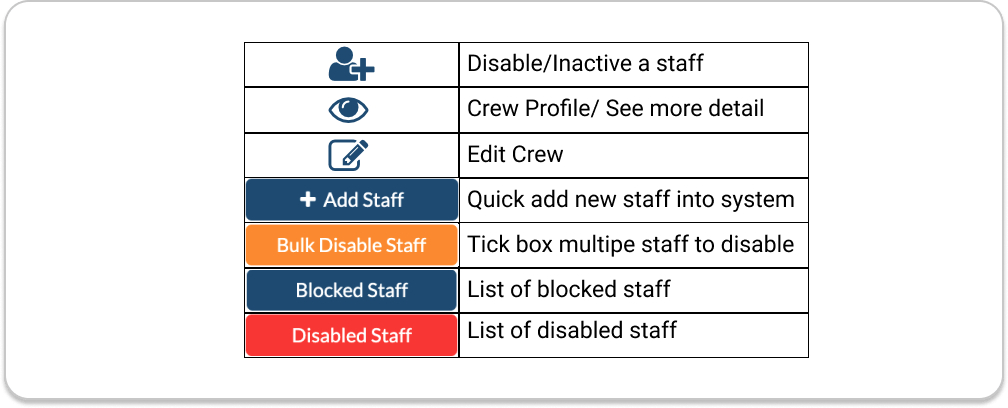

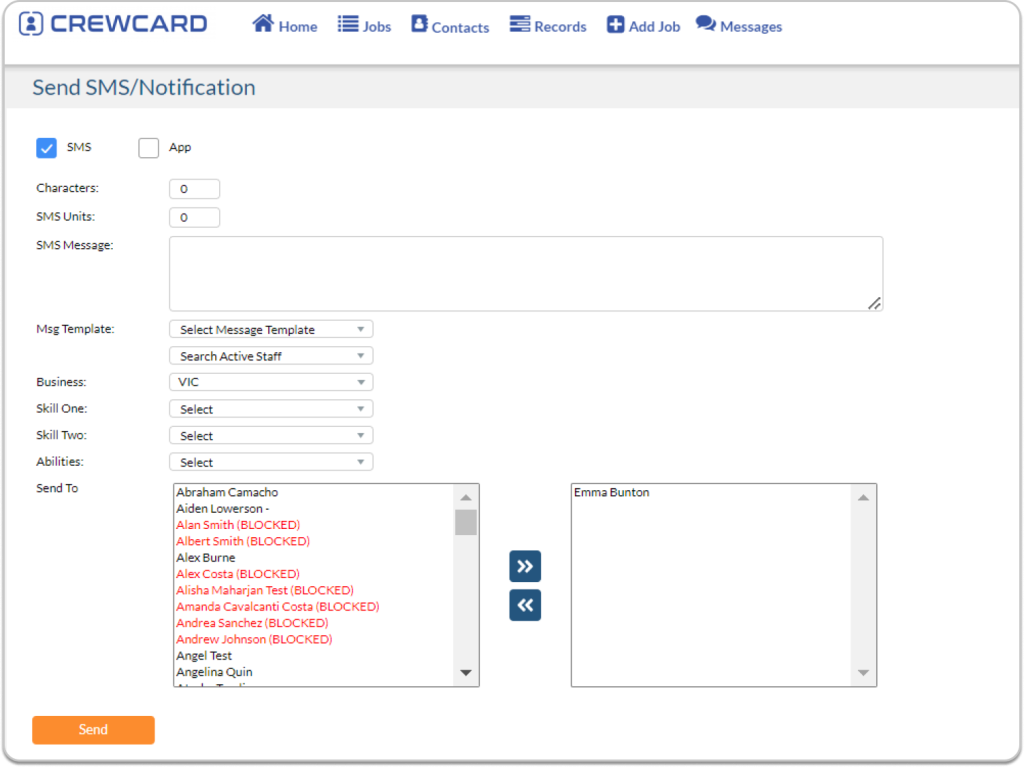
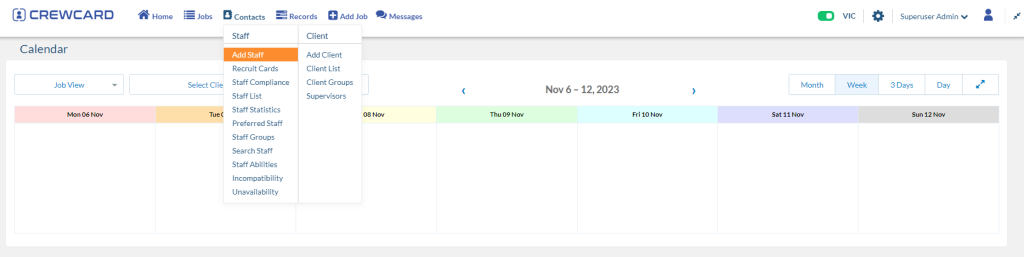
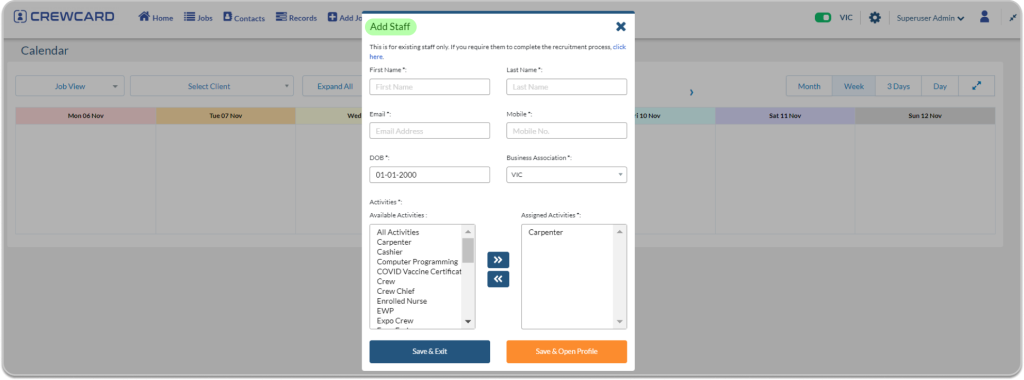
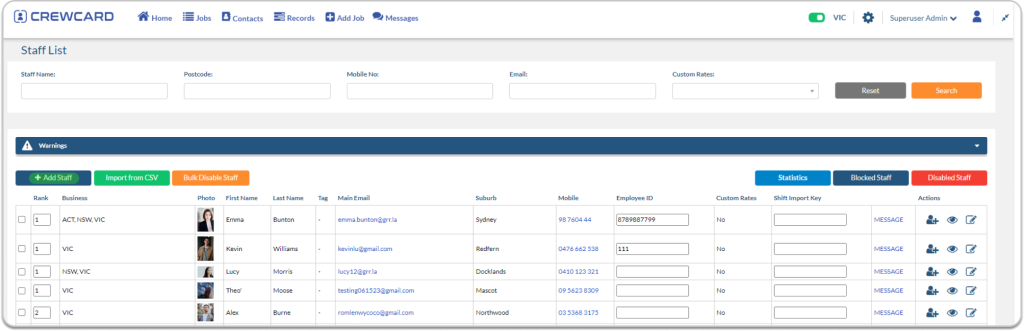
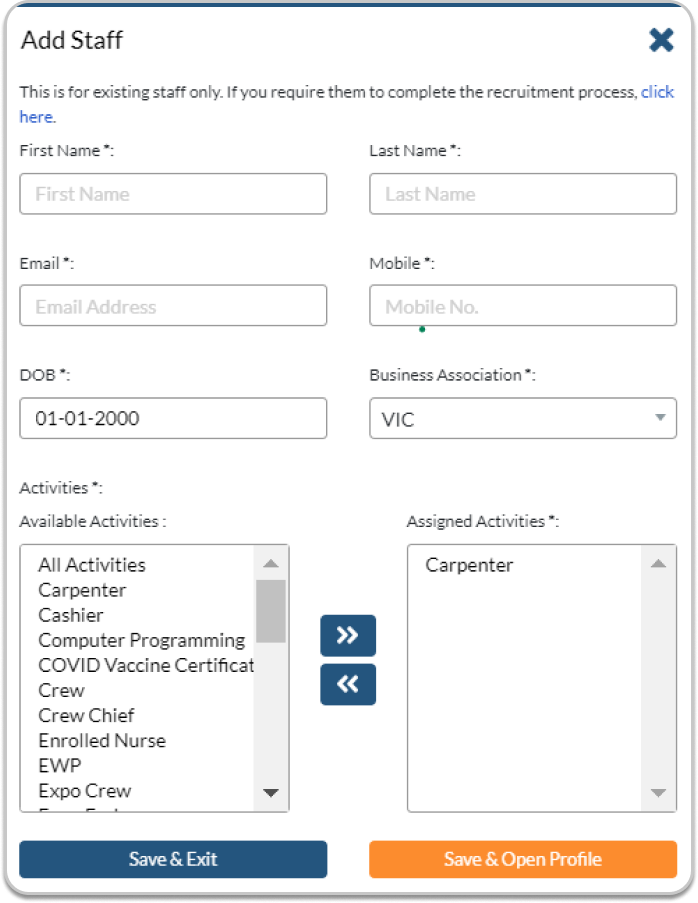

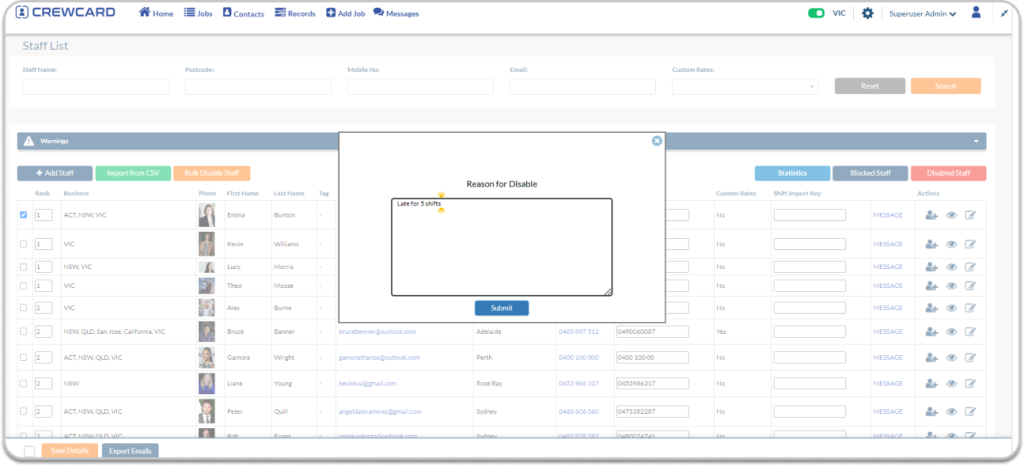
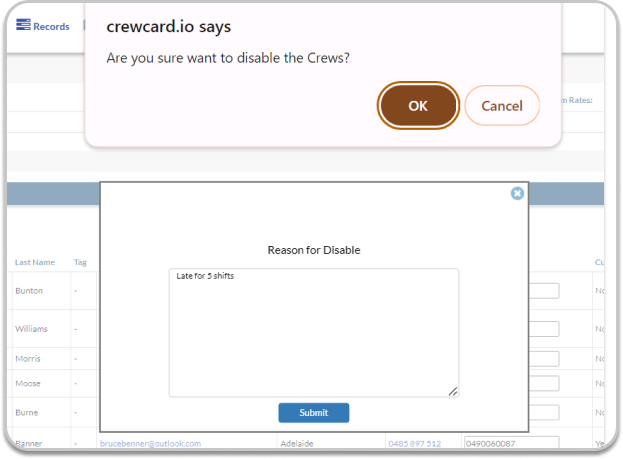
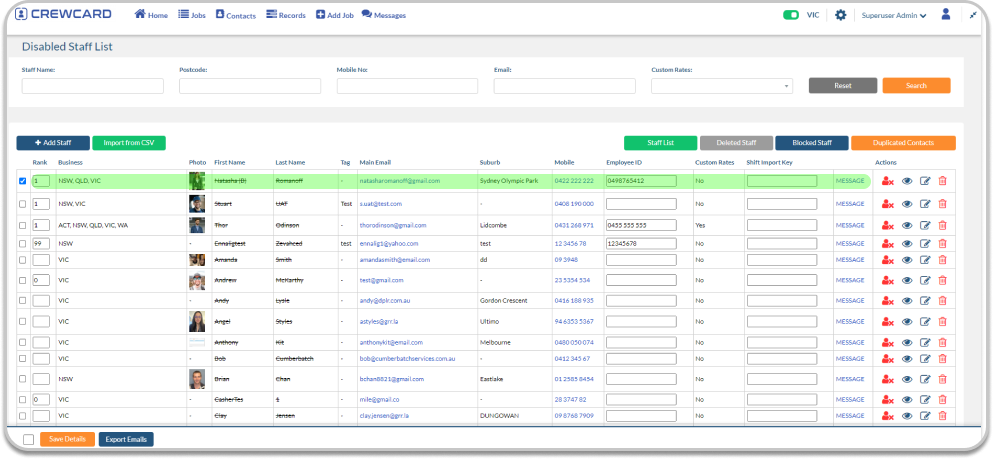
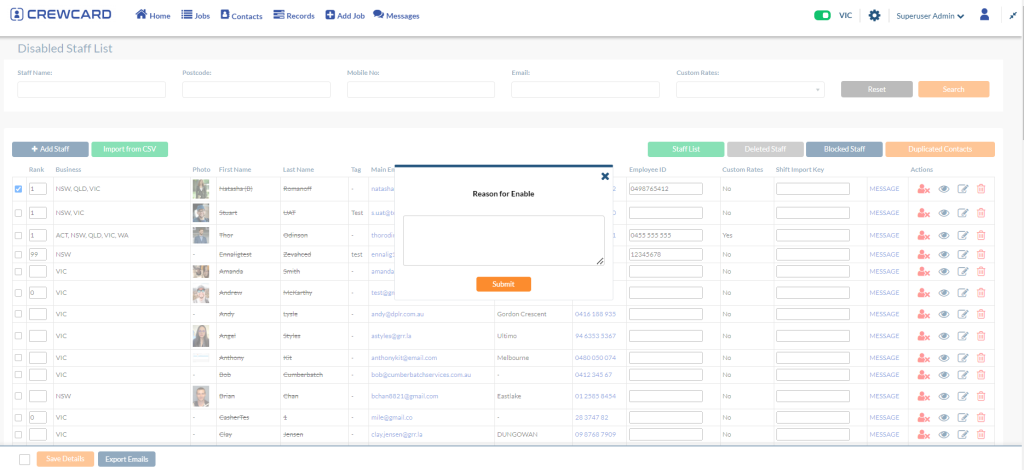
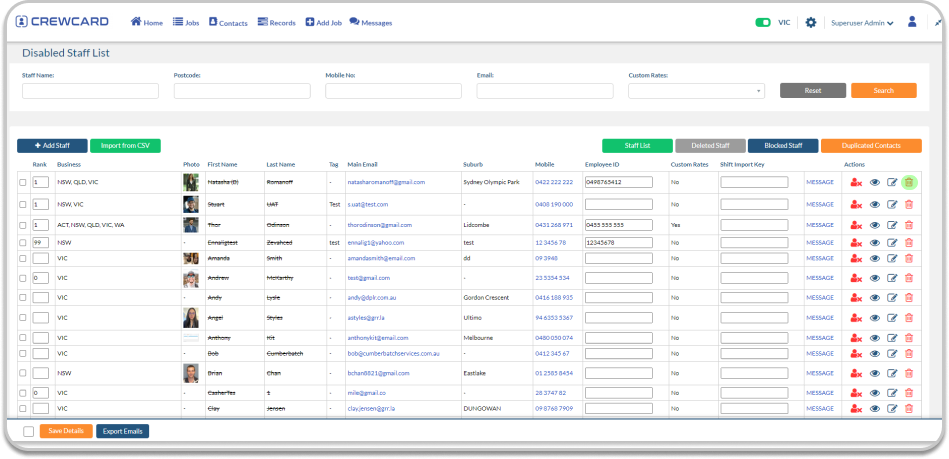

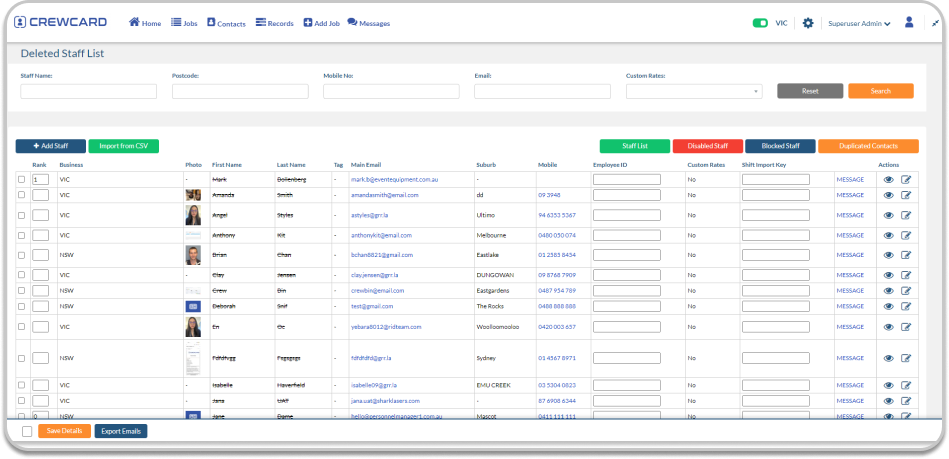

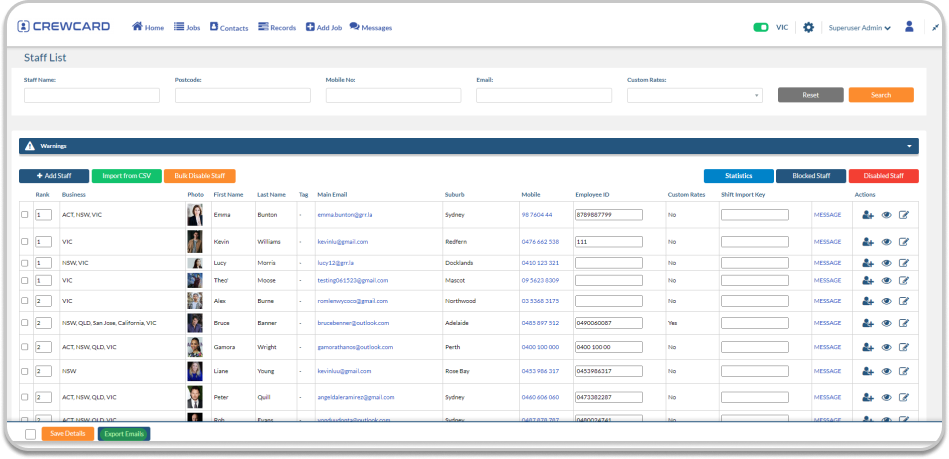


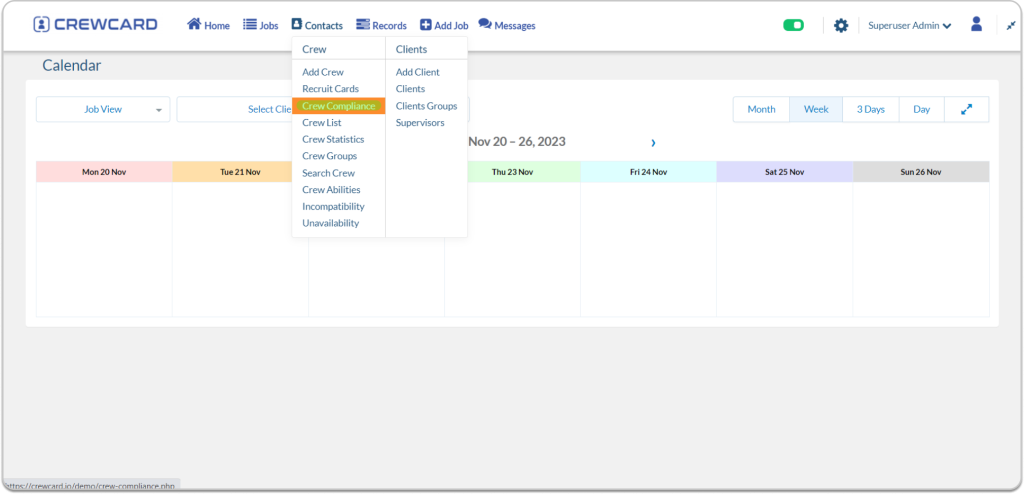
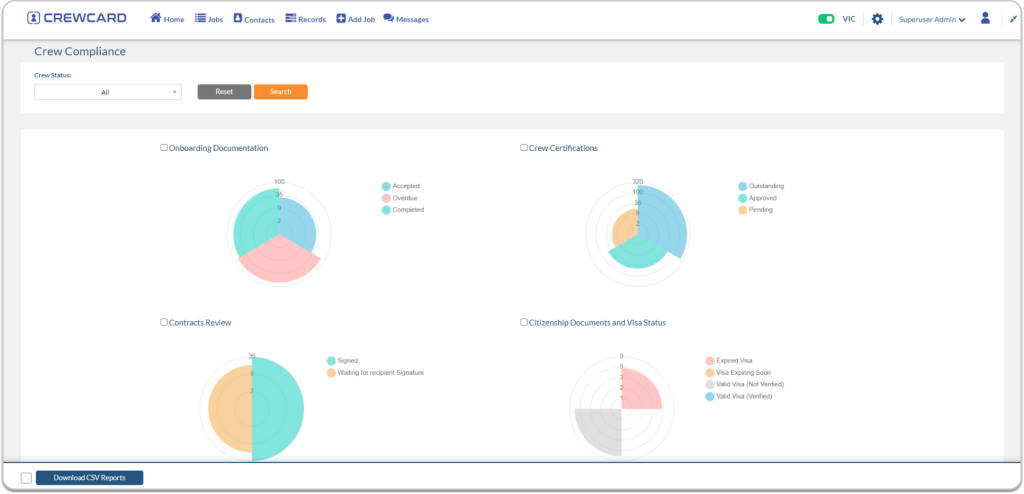
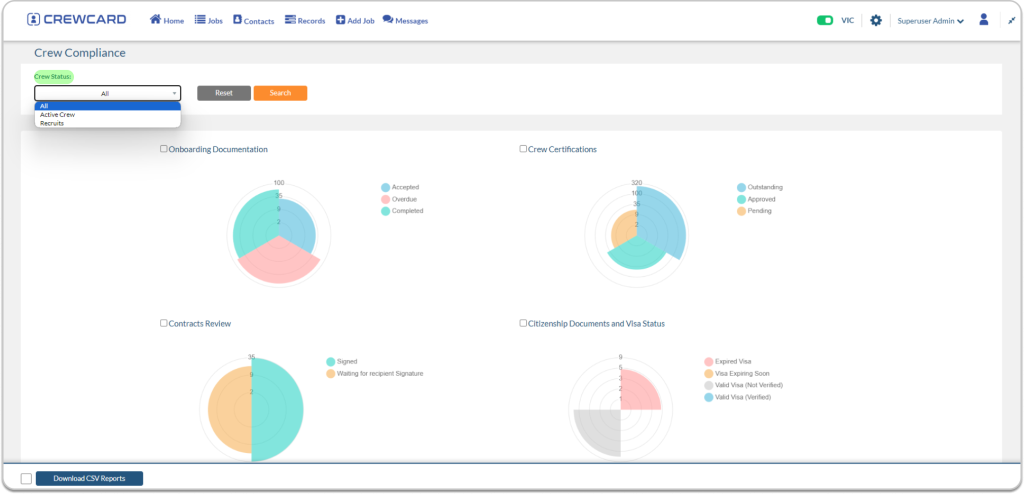
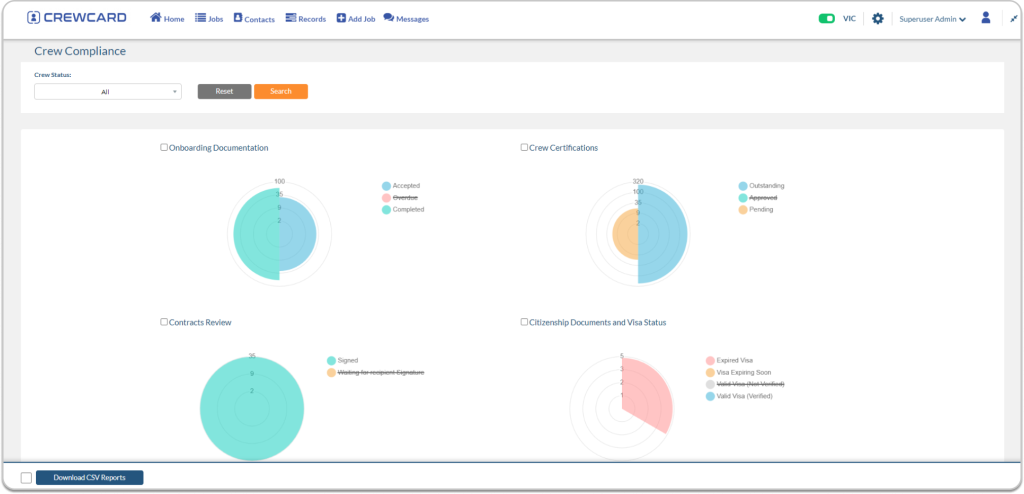
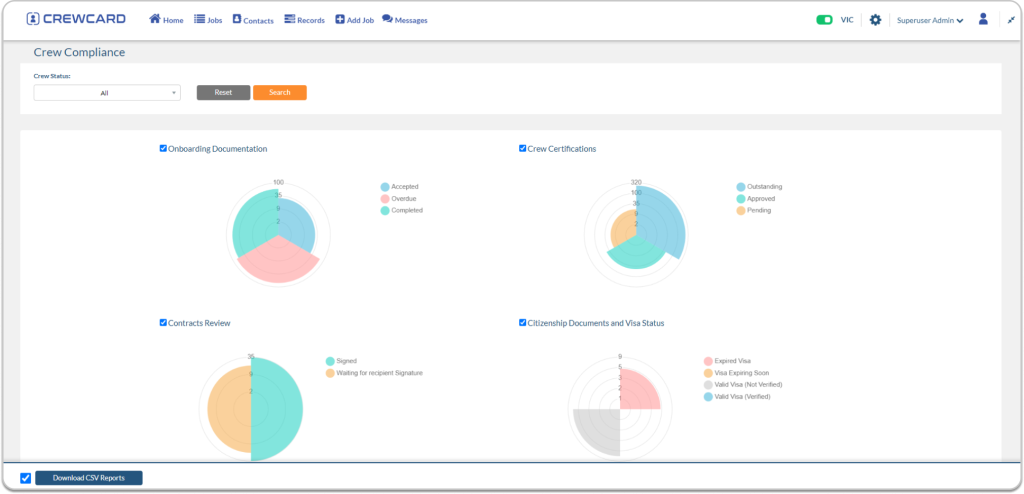
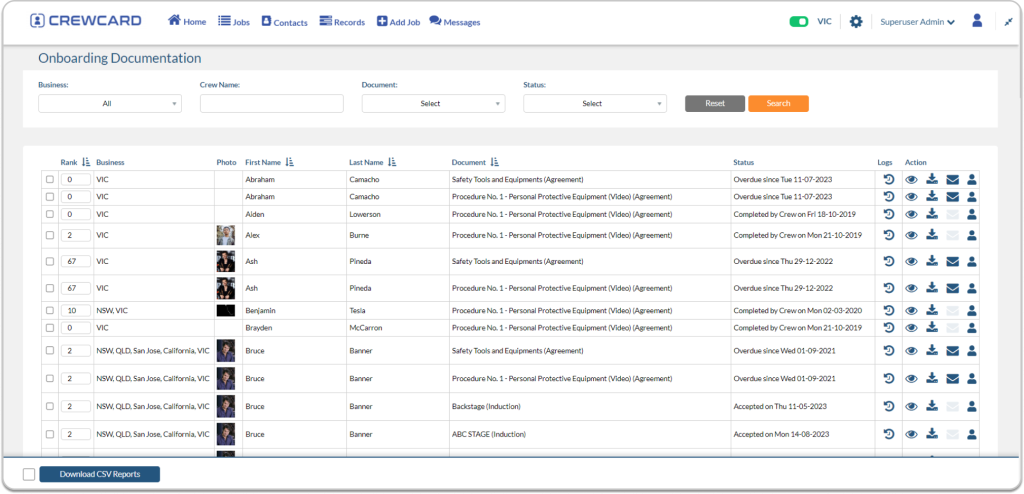
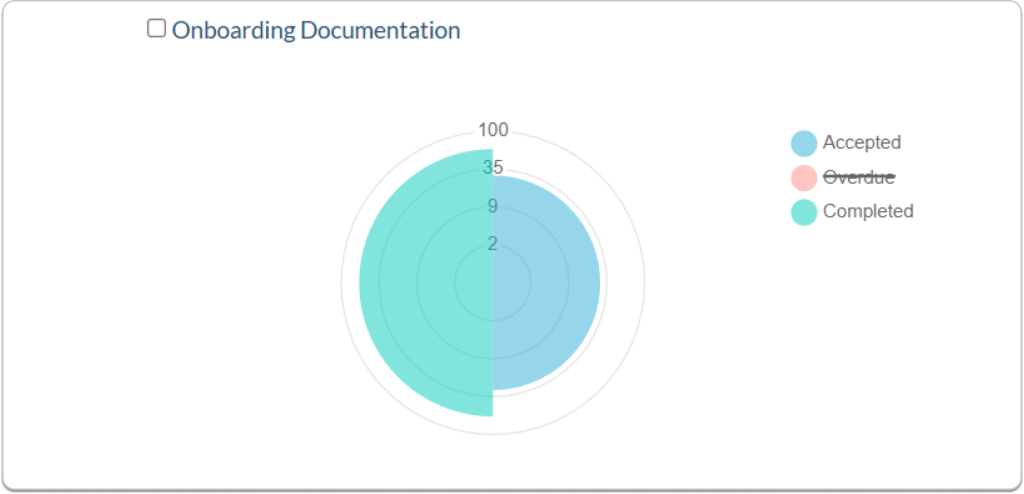
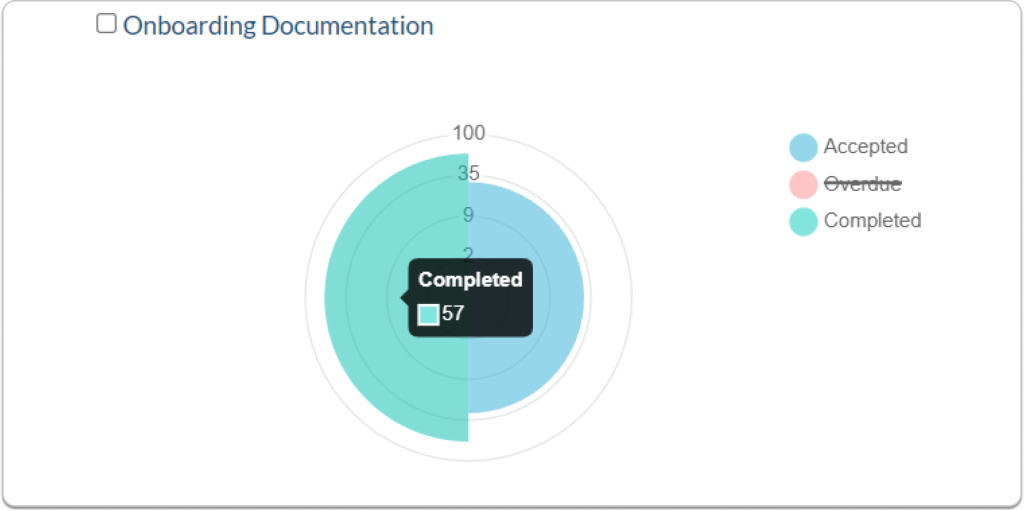
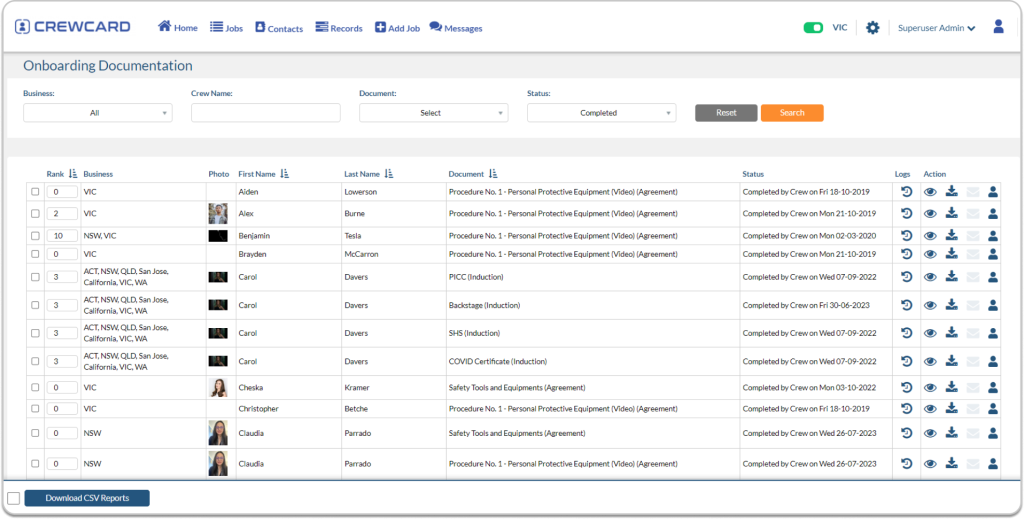
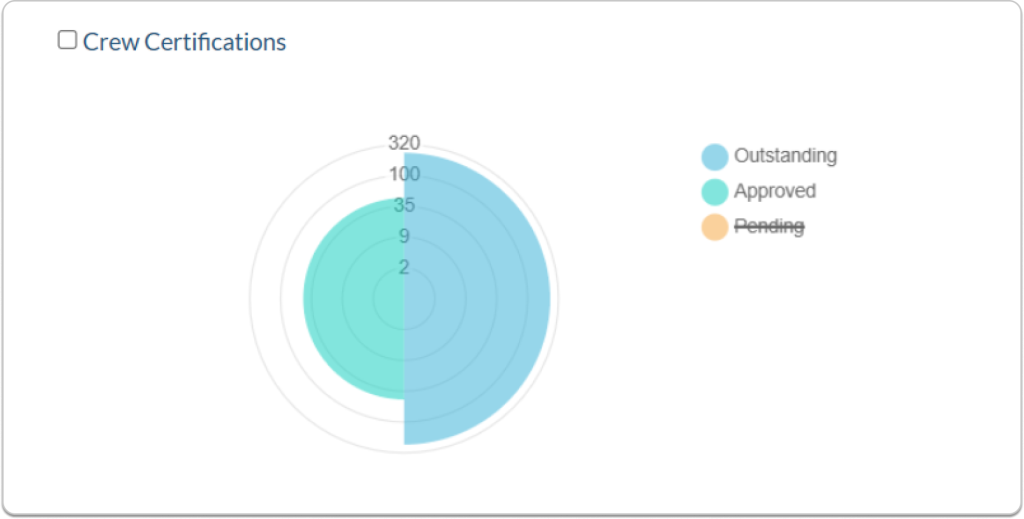
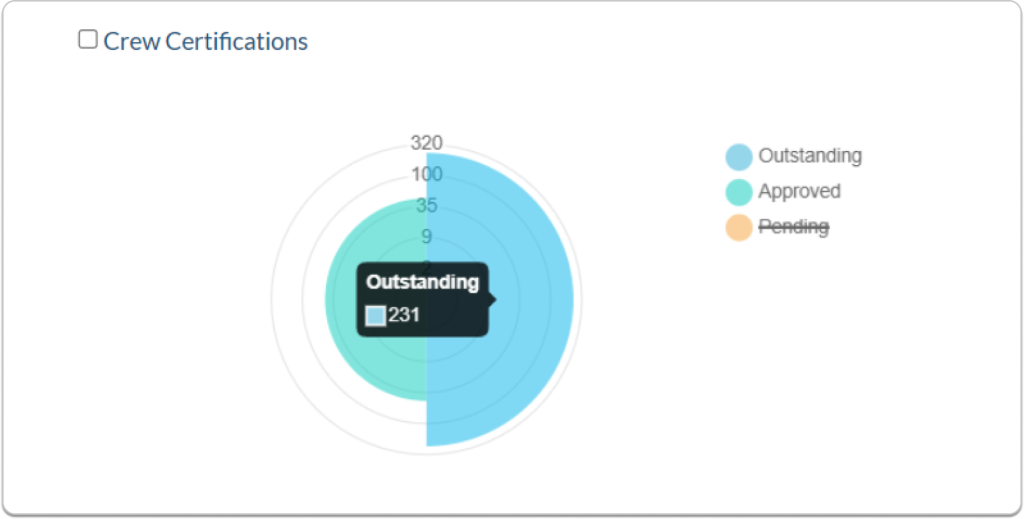

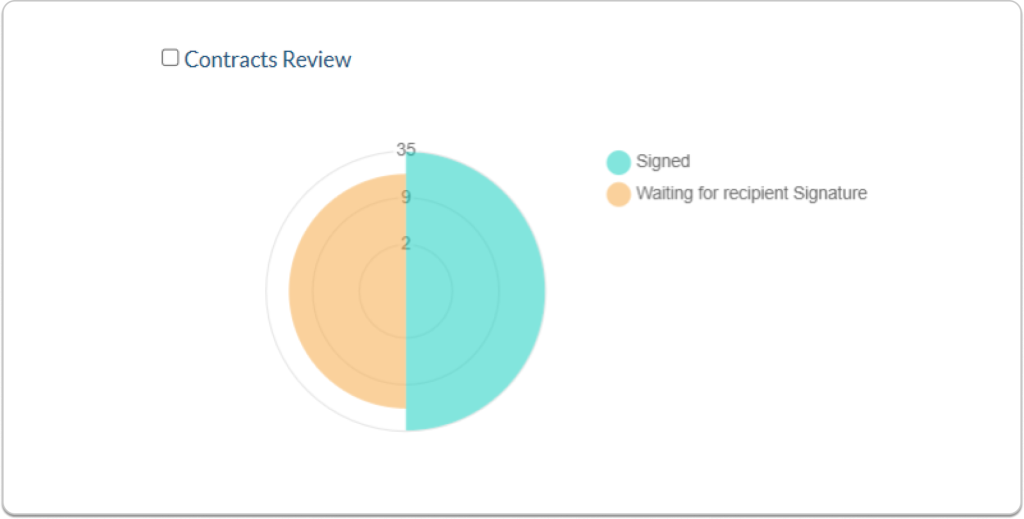
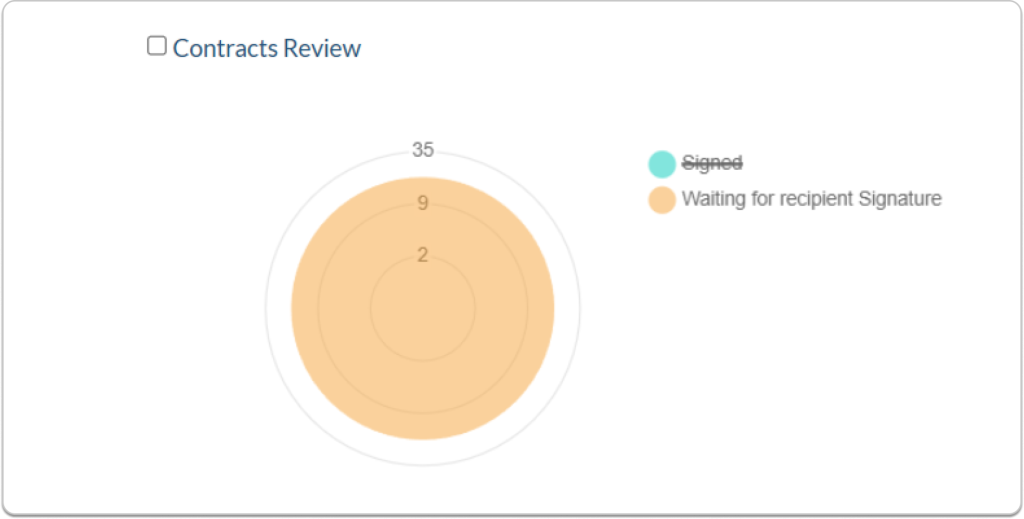
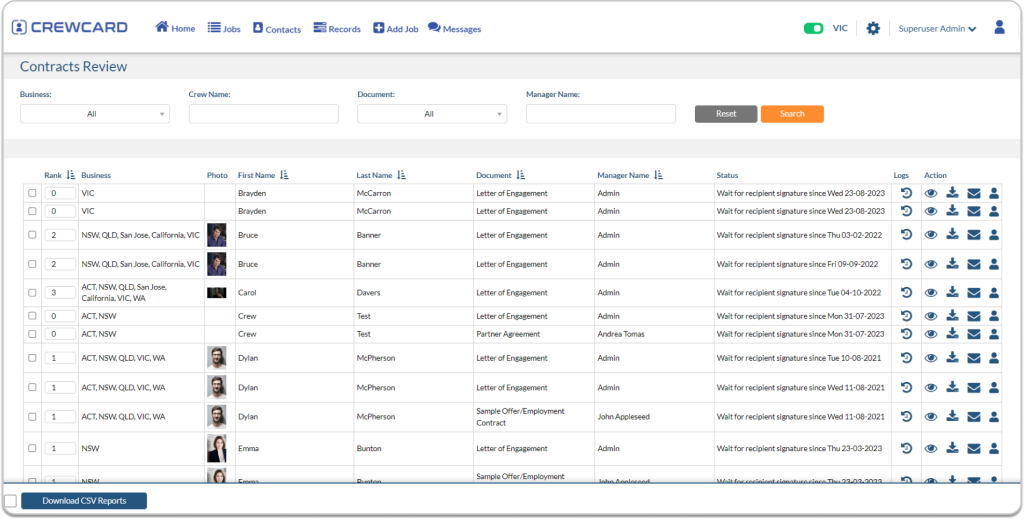
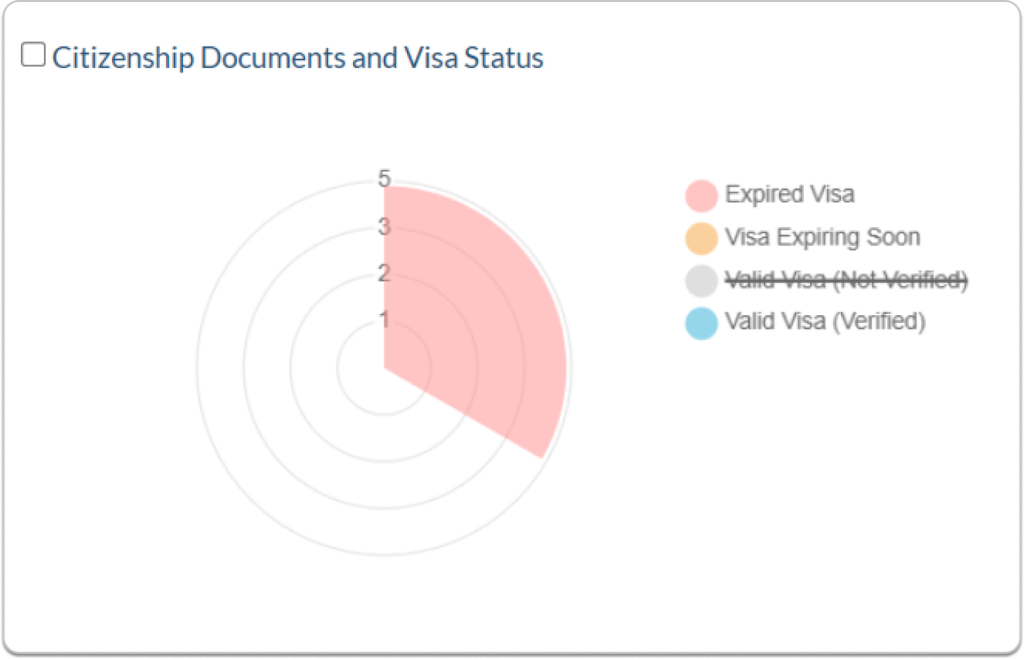
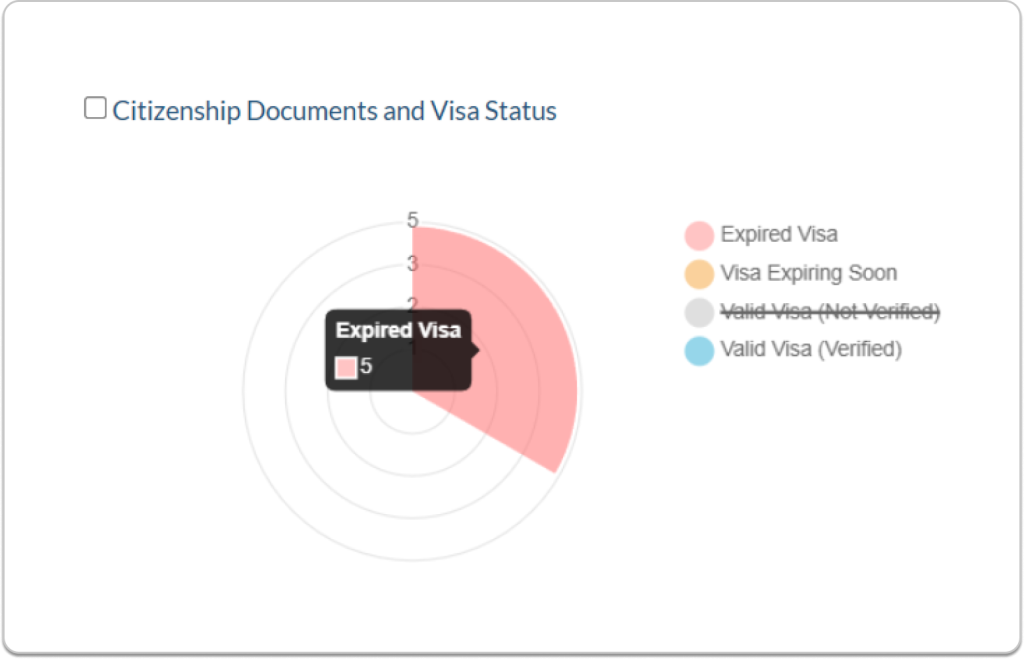
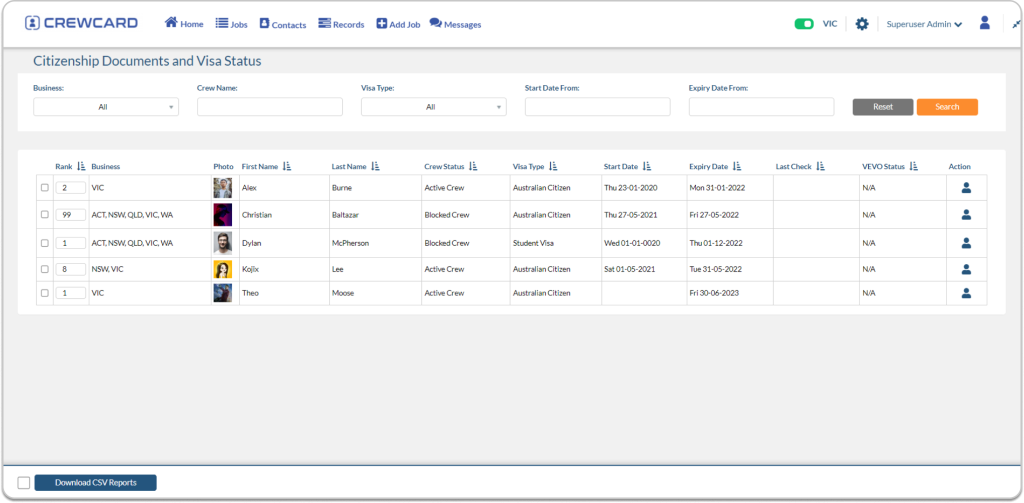
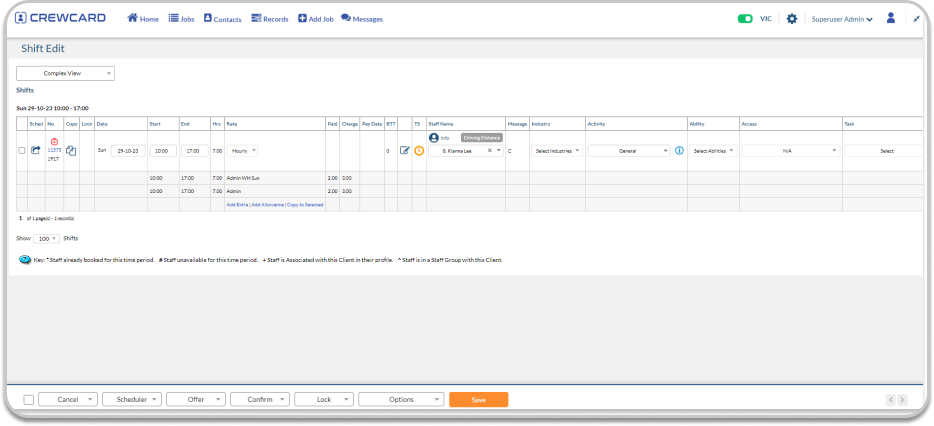

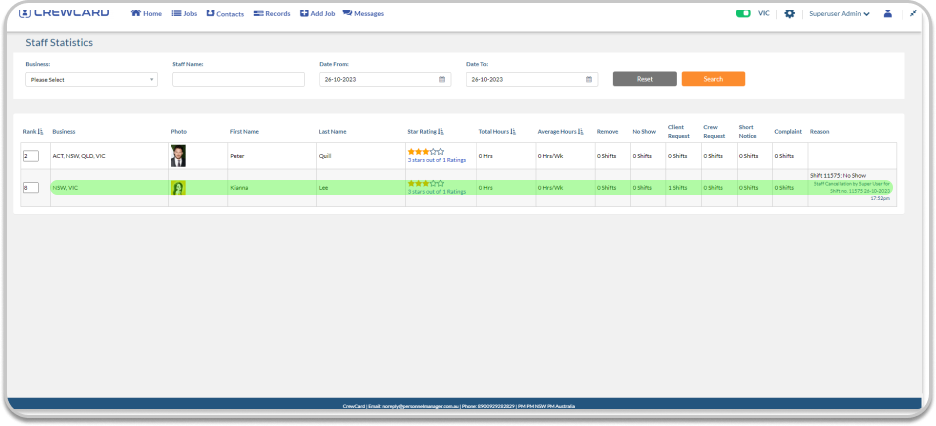
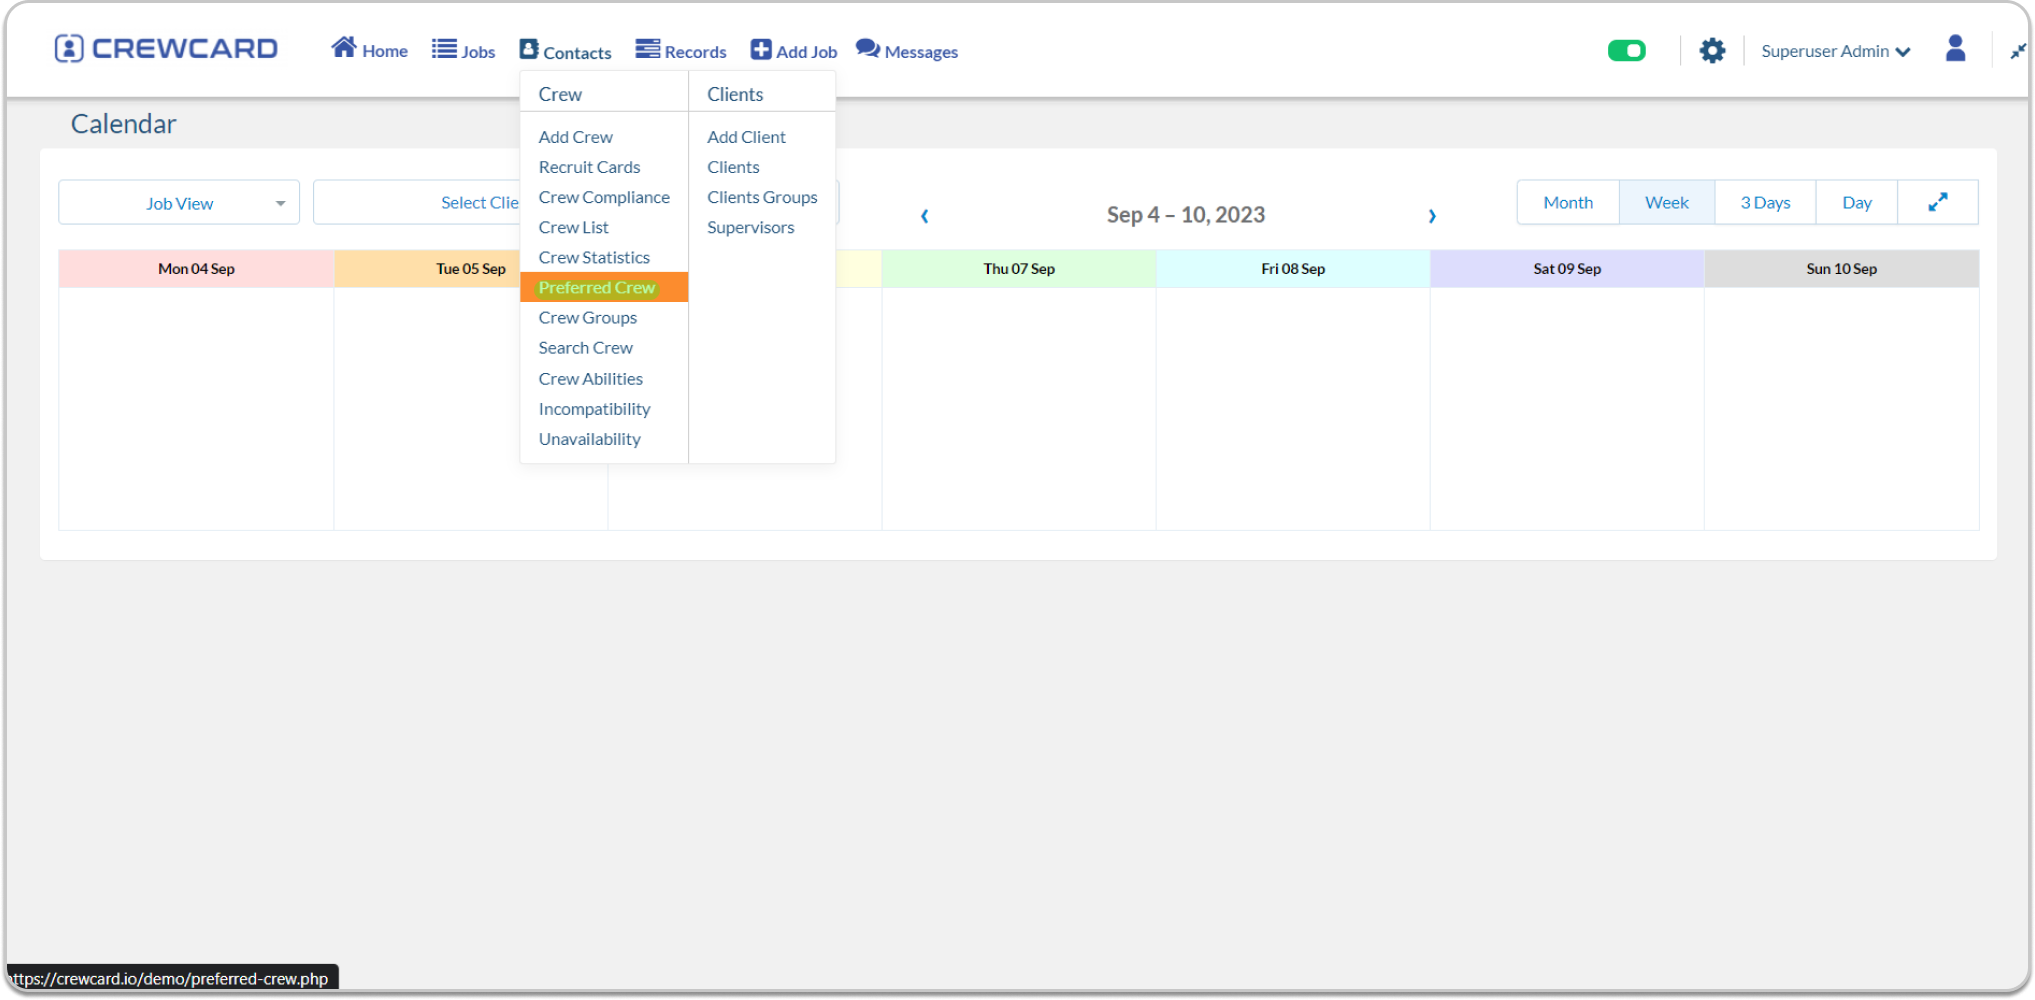

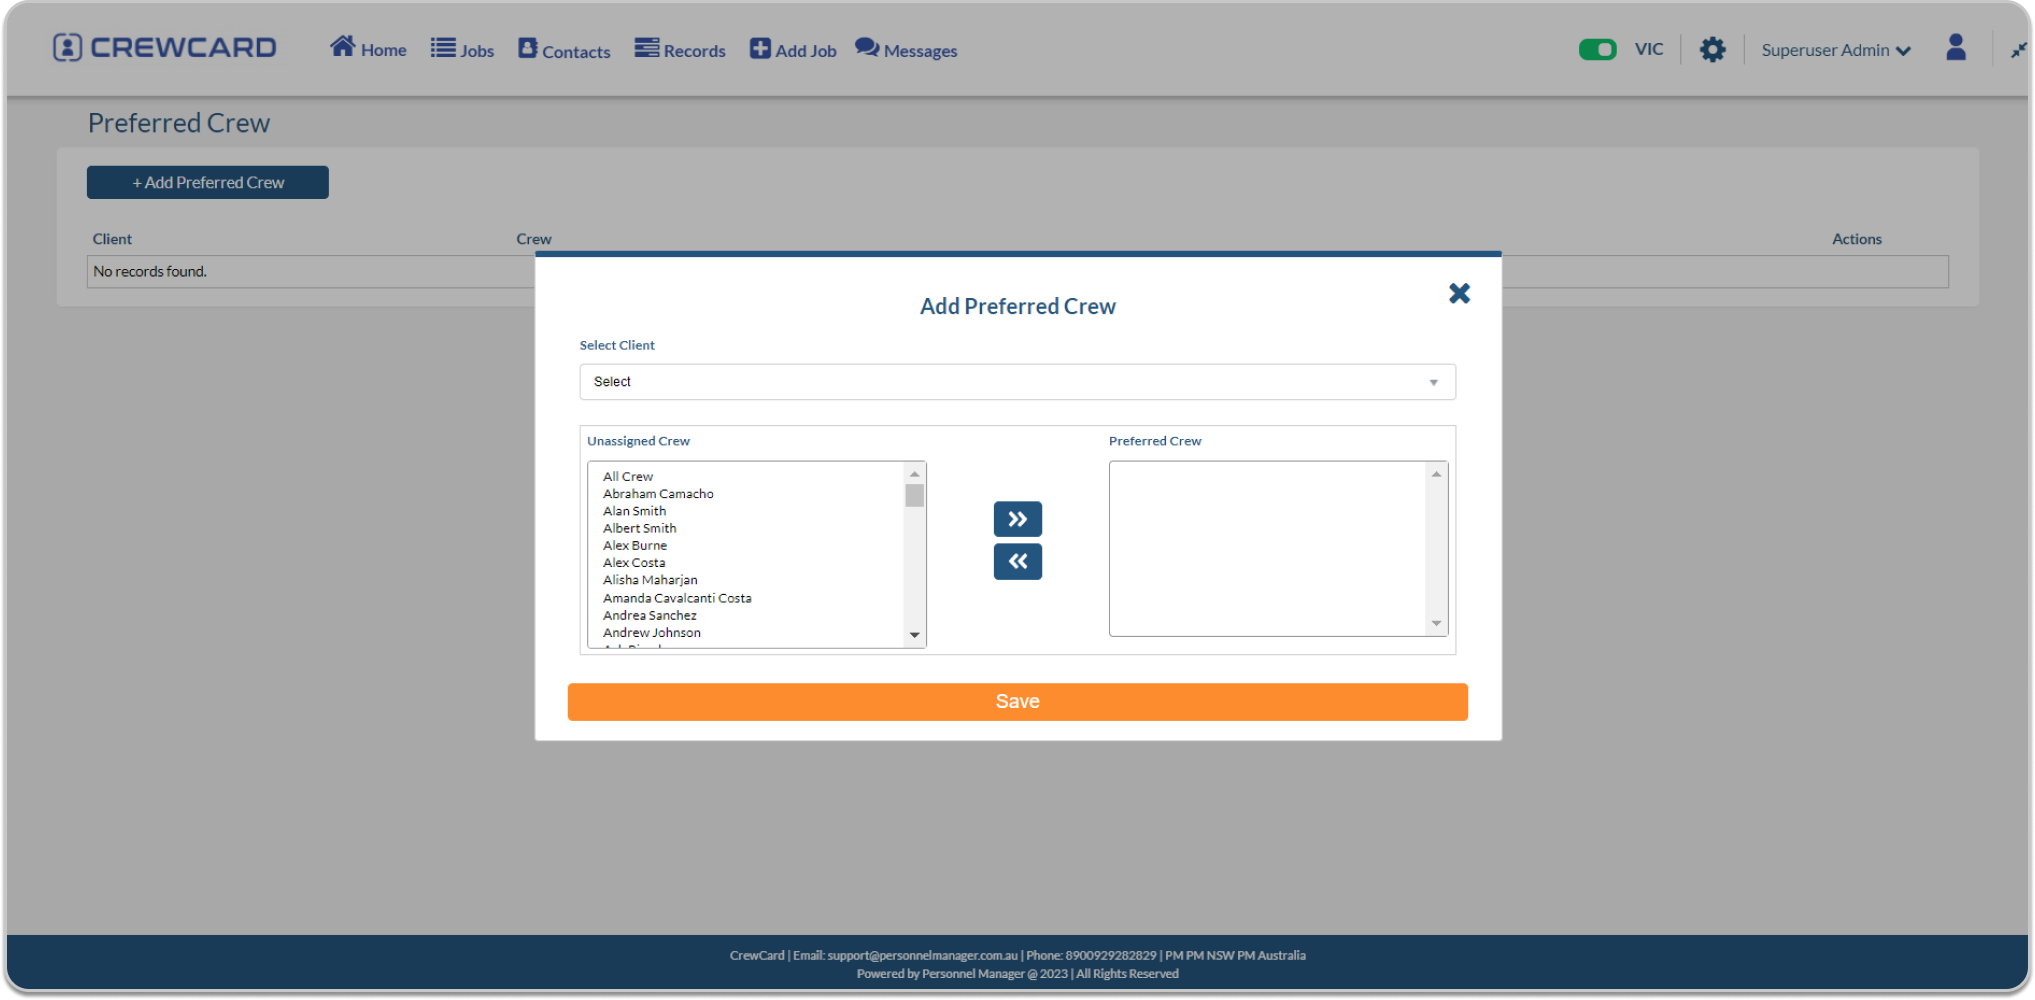
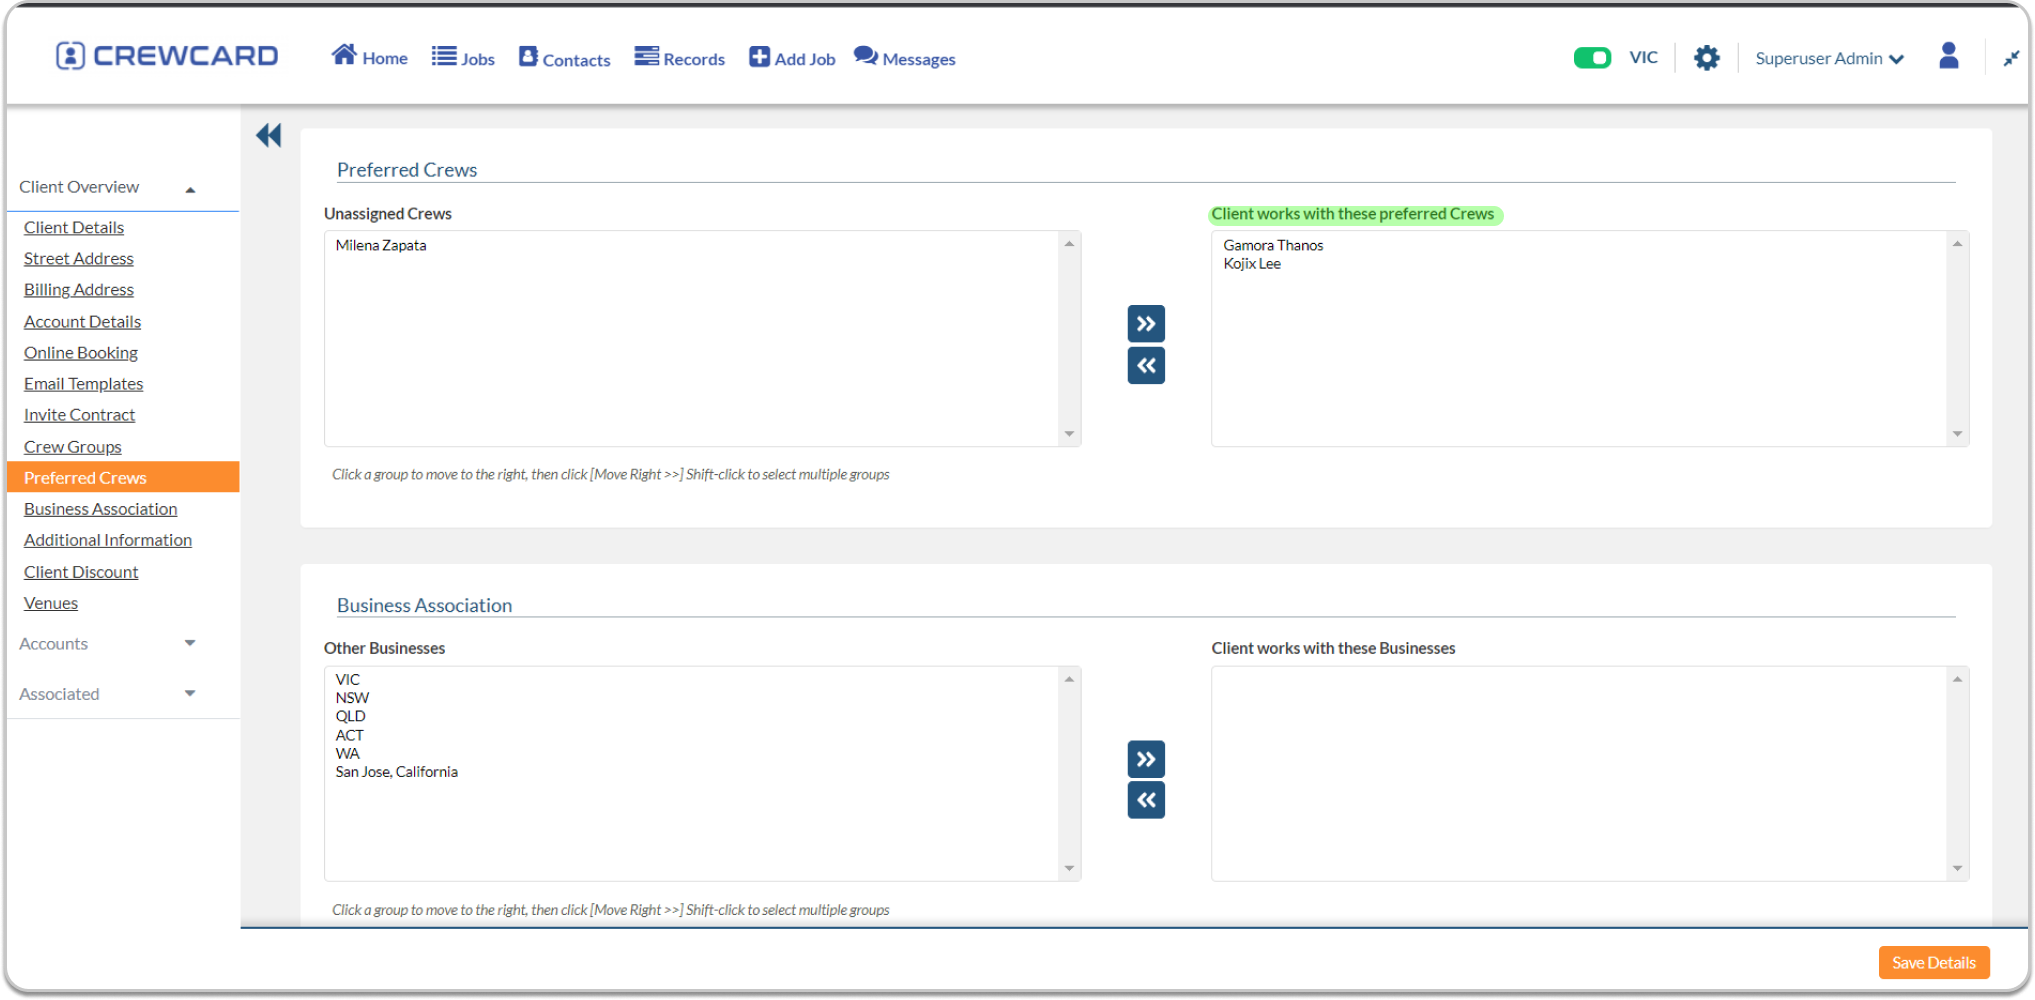
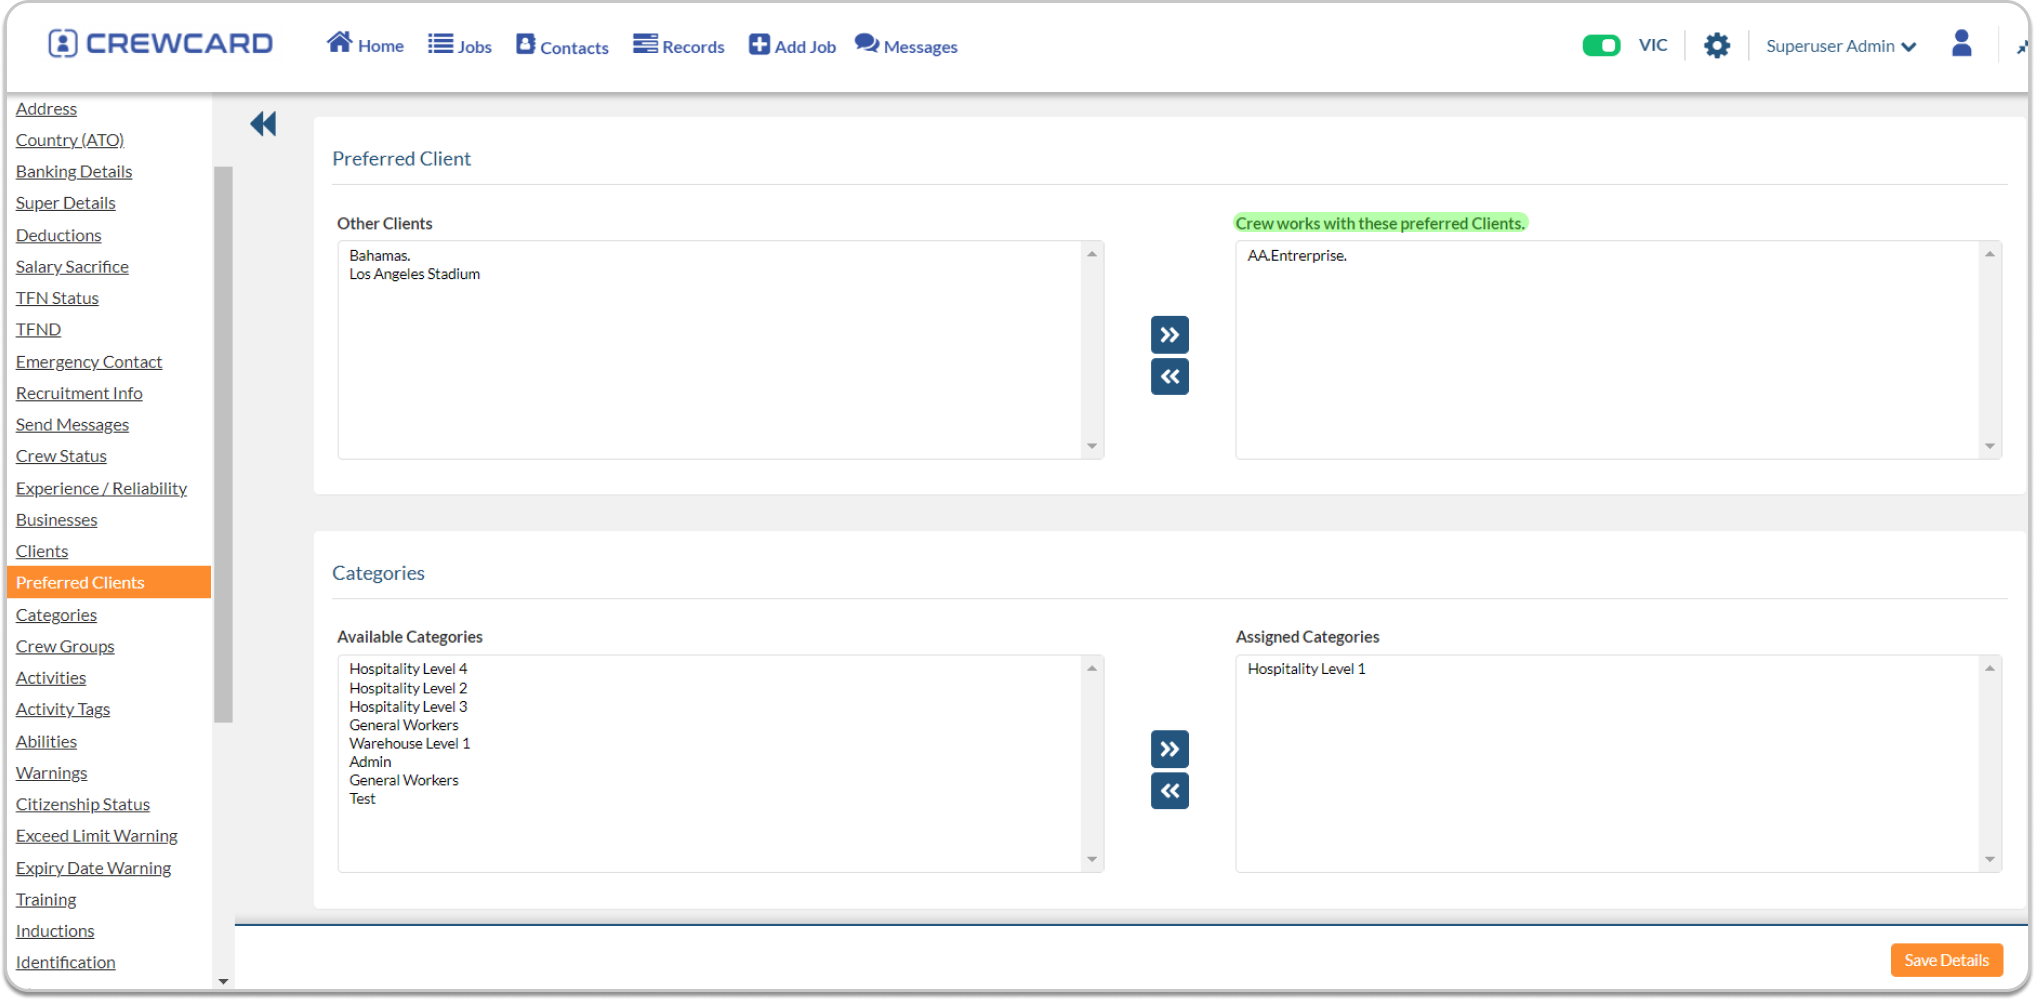

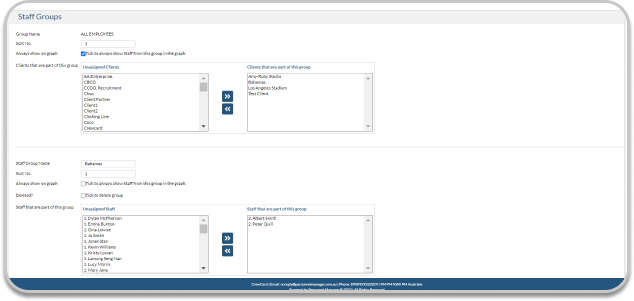
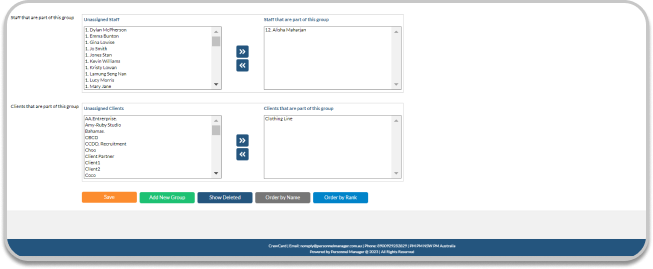
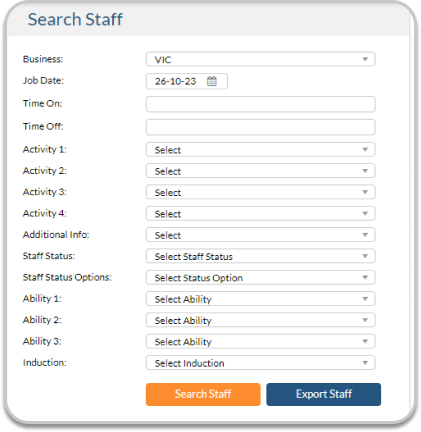 Additional info is based on what is set in general settings for the crew profile.
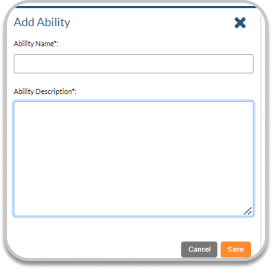
 When edit icon is clicked, we can edit the ability and assign Qualifications.This is done through selecting a qualification and assigning it to the Ability. It is only possible to add one Qualification per Ability
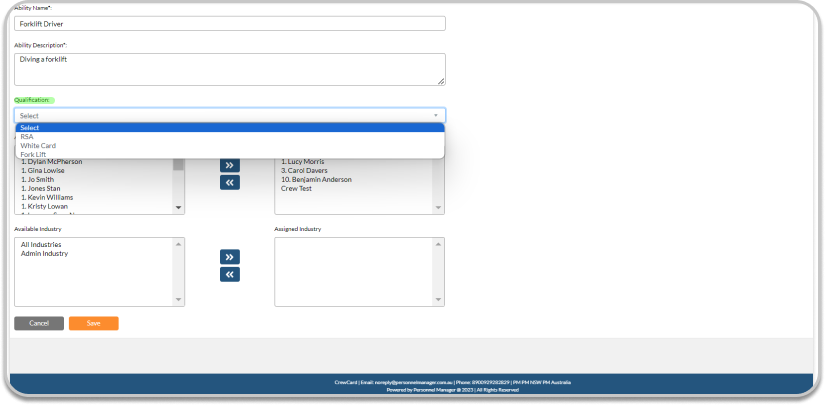
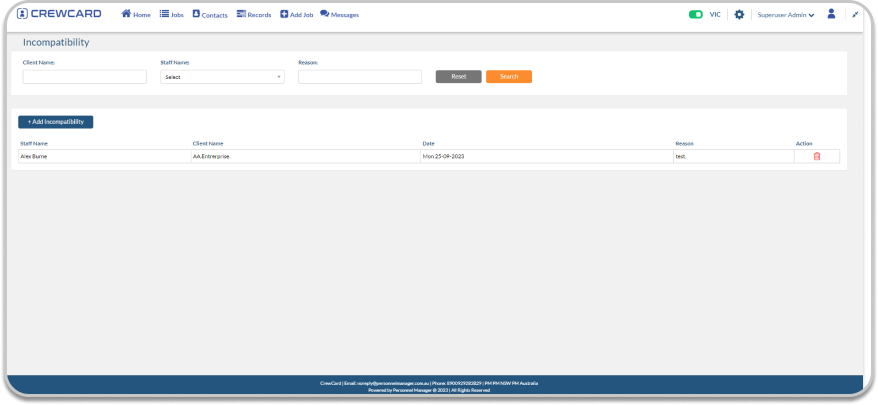


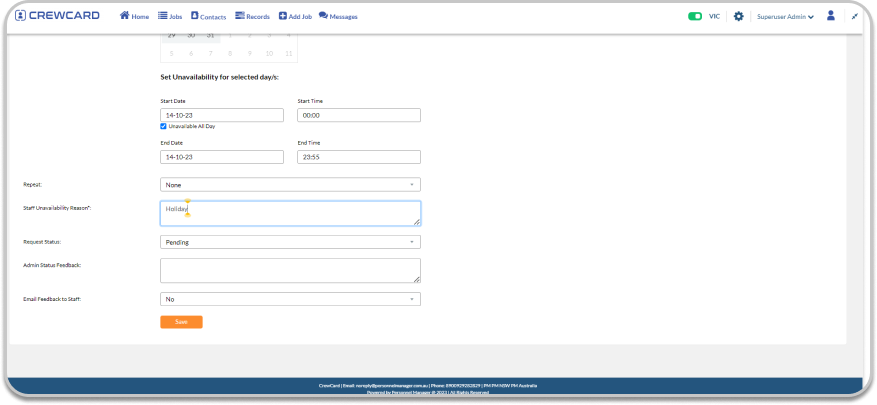
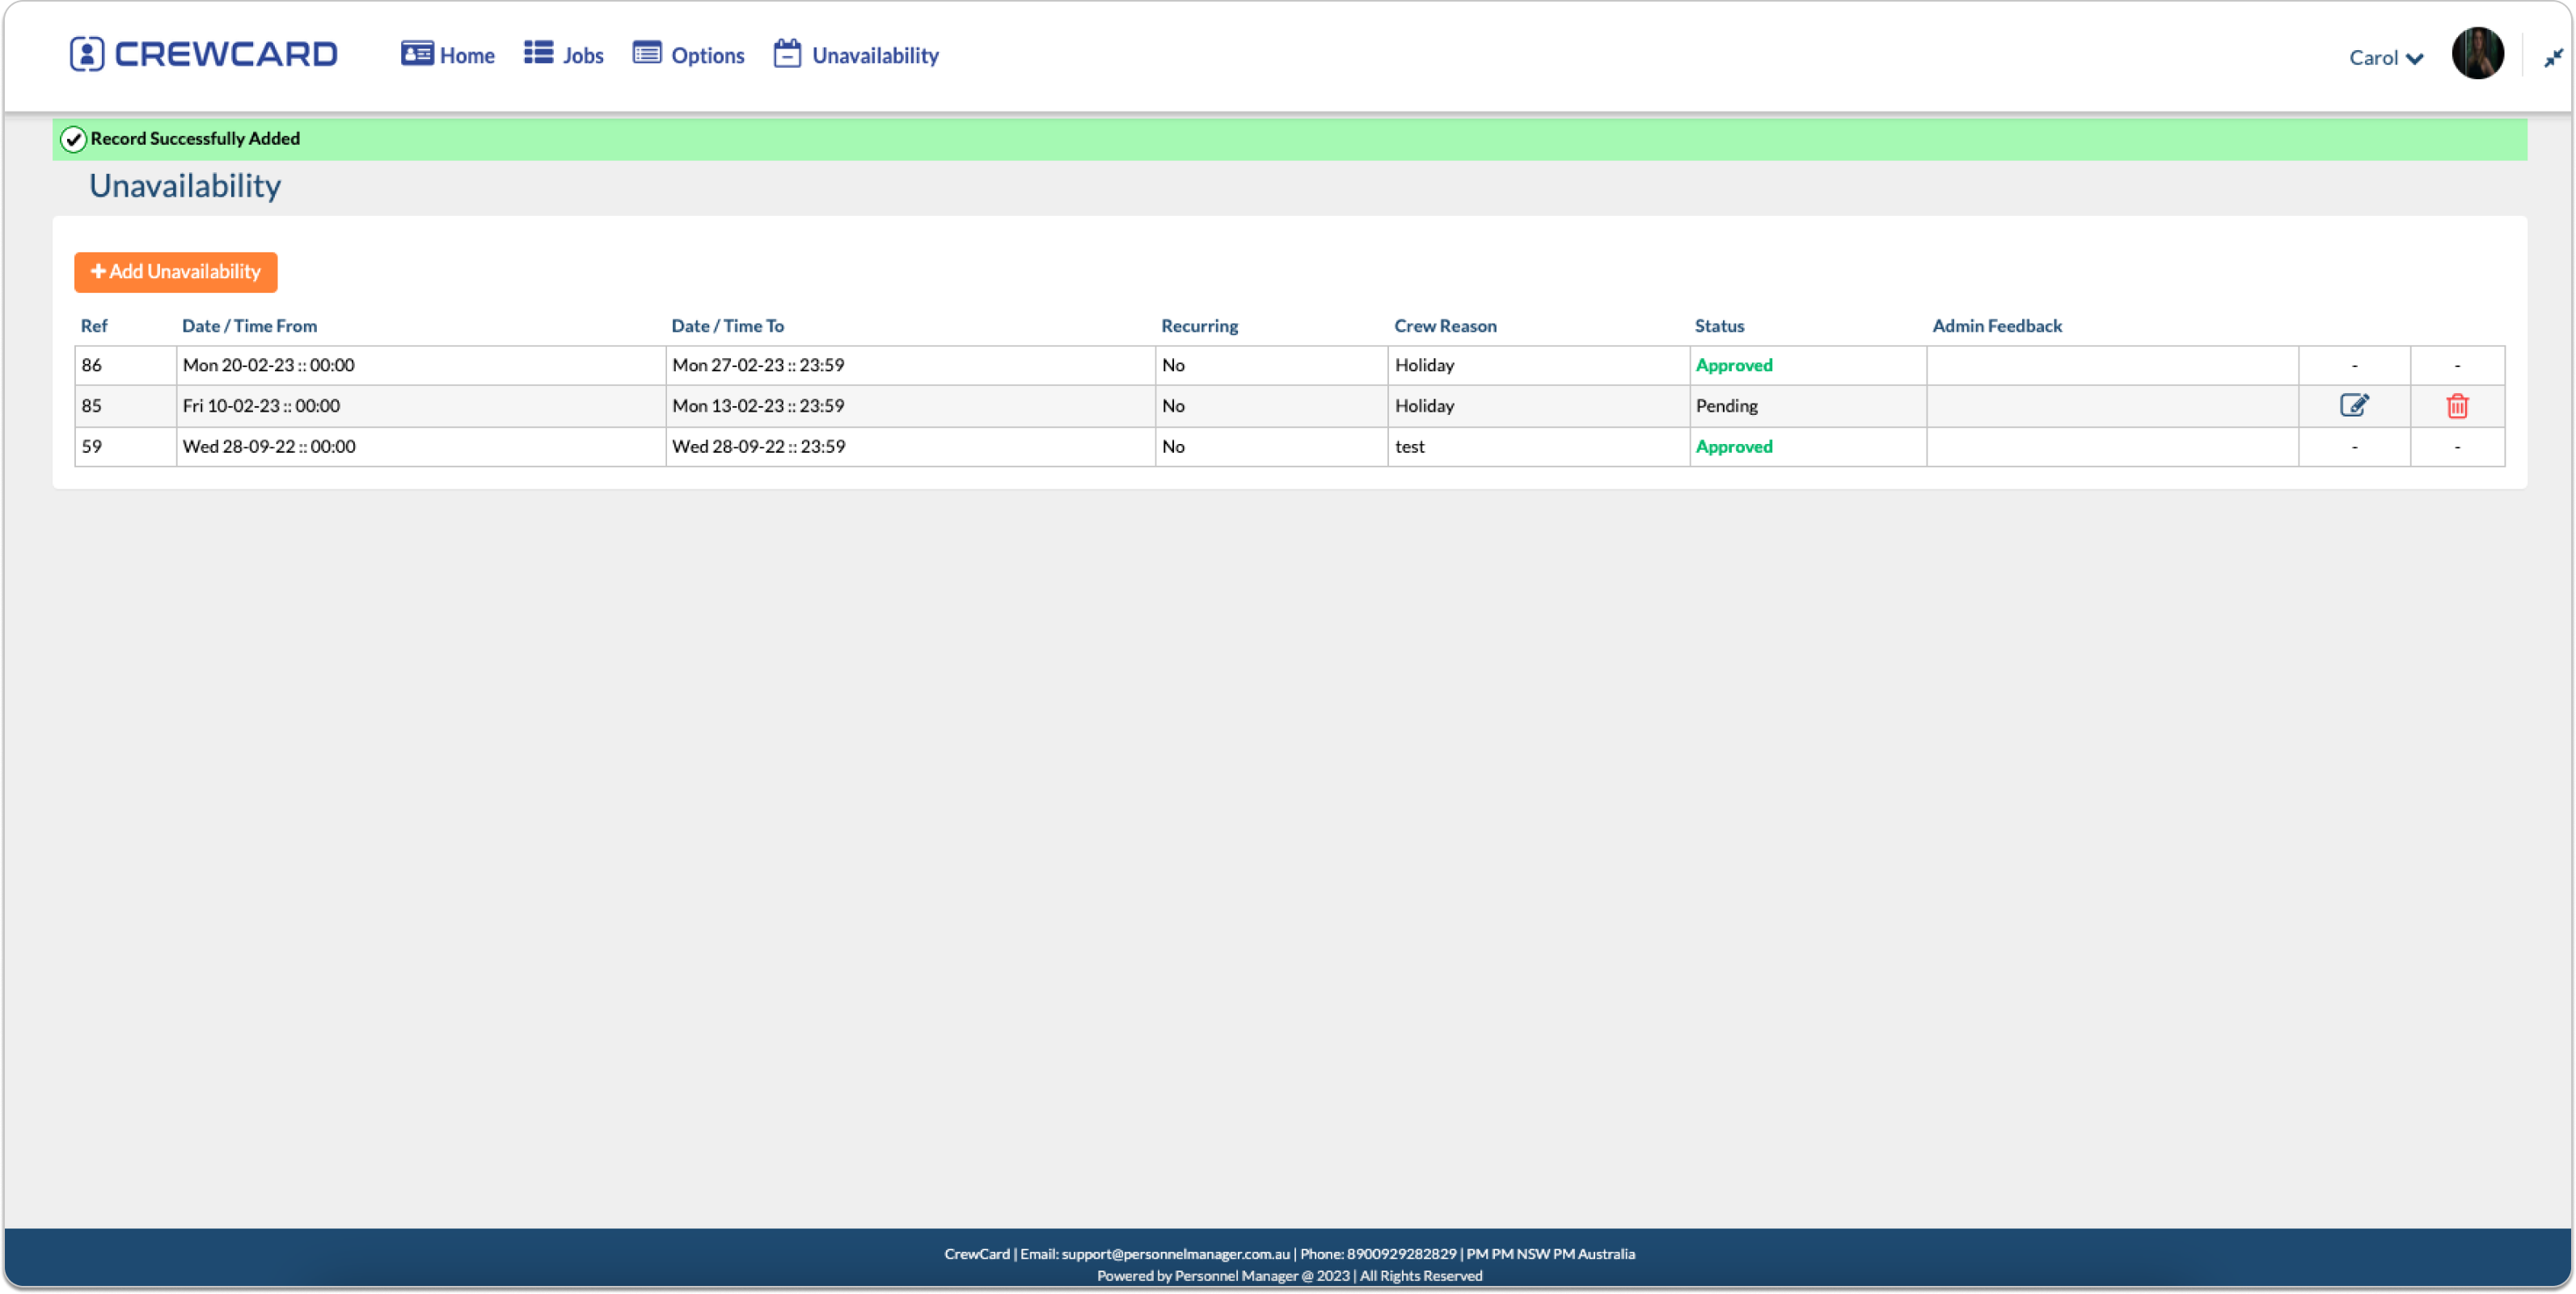


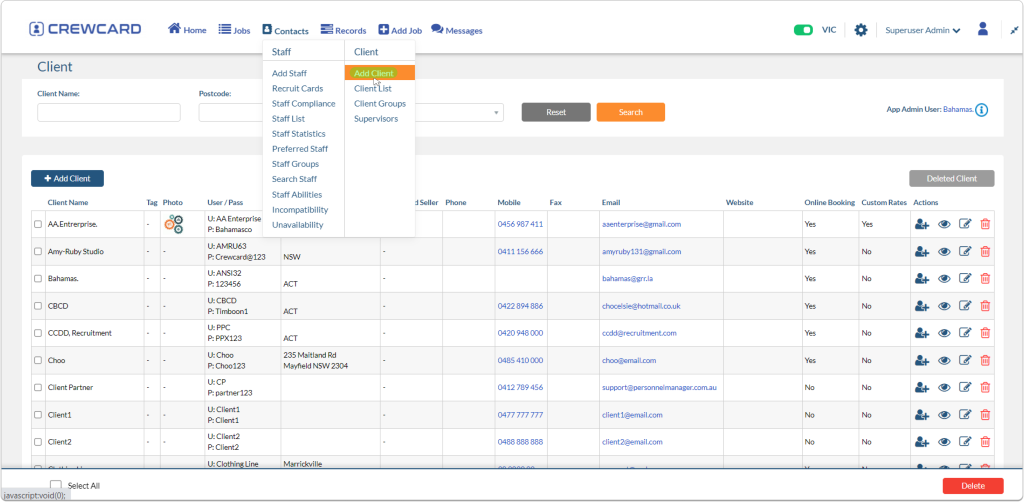
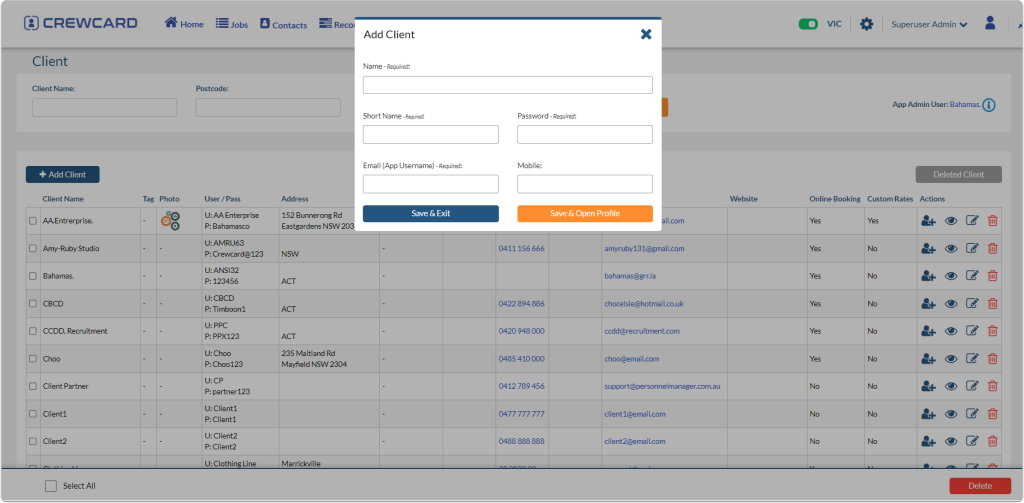


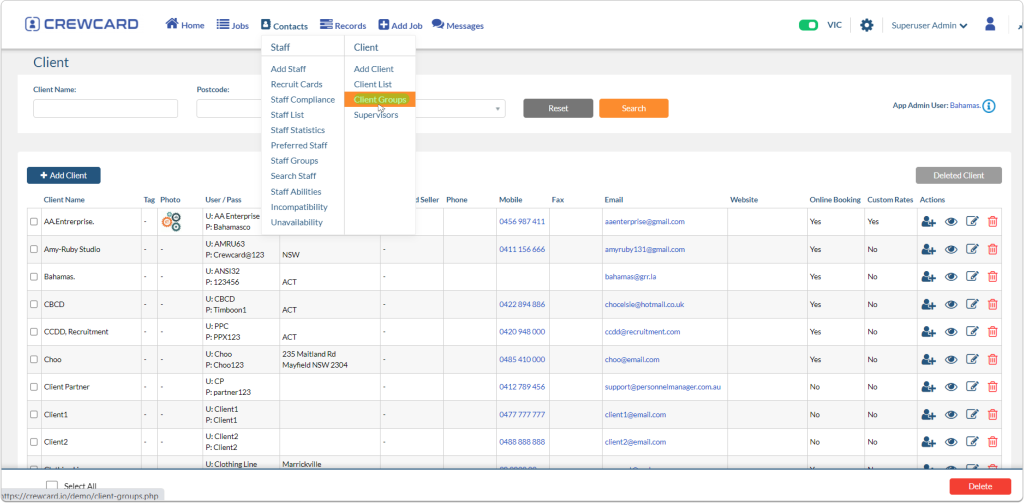
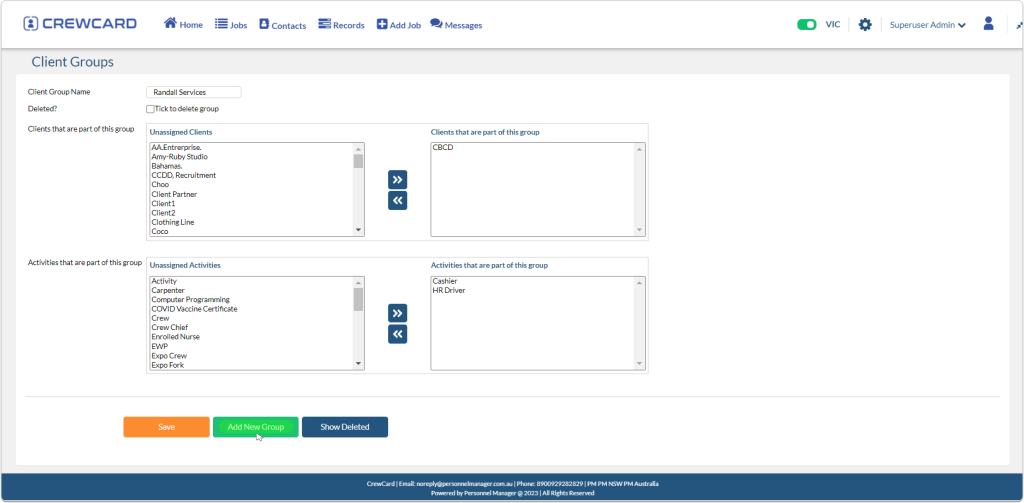
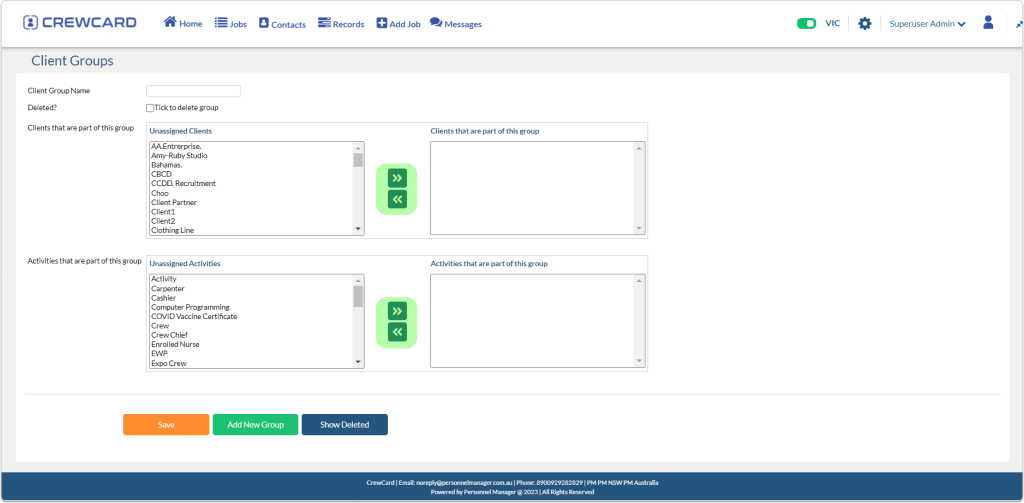
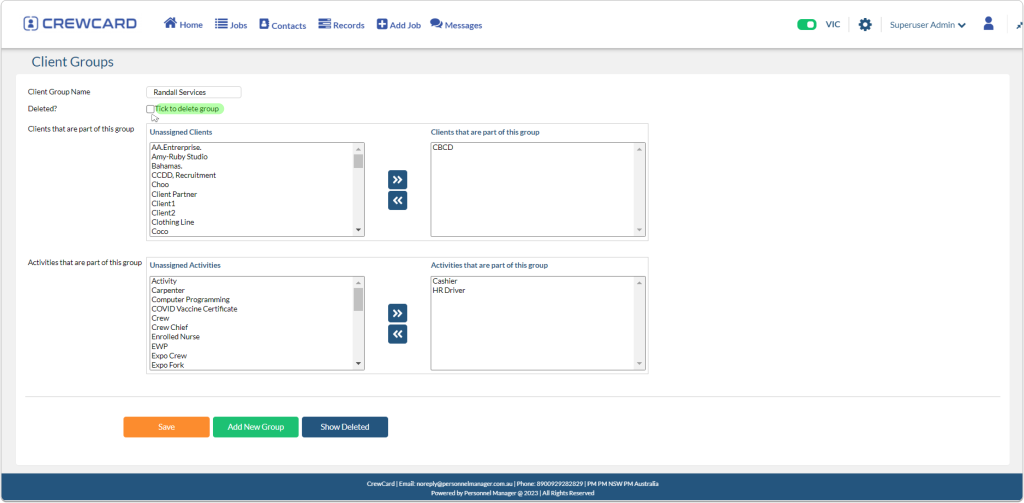
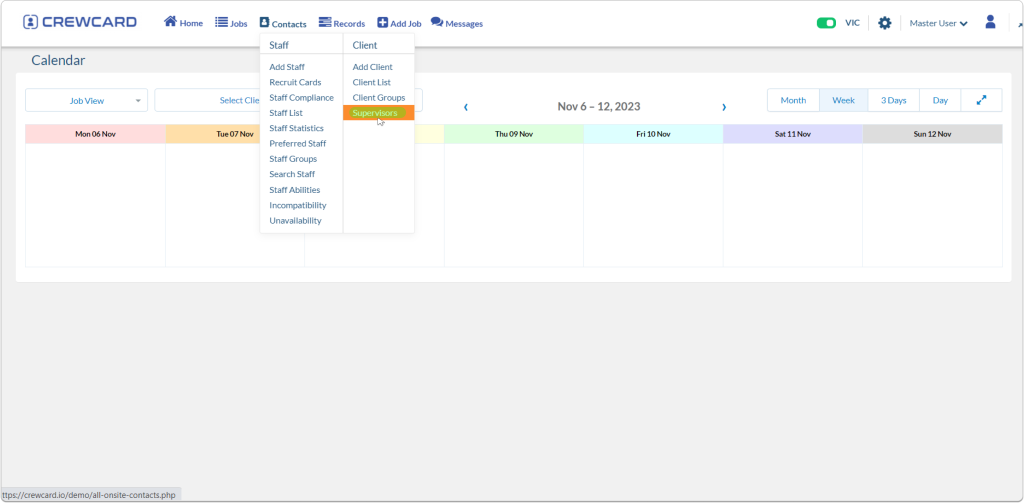
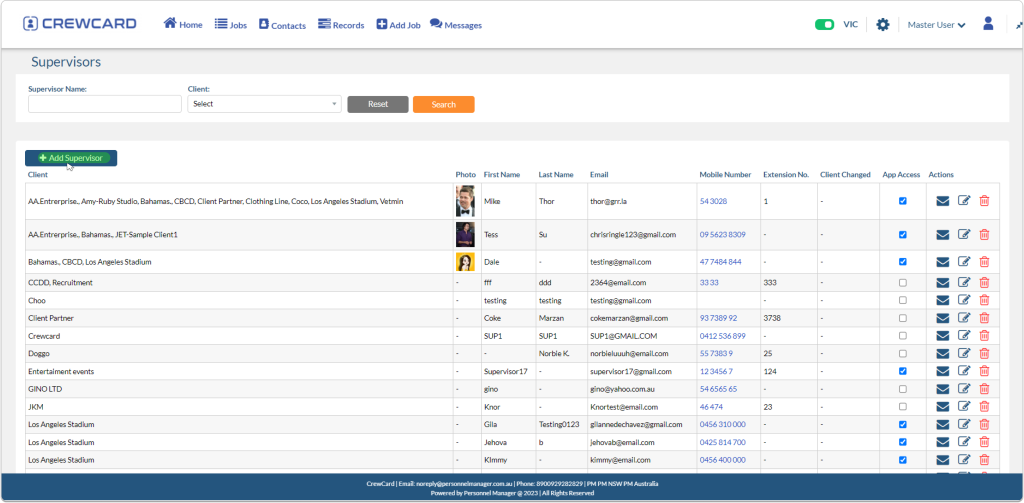
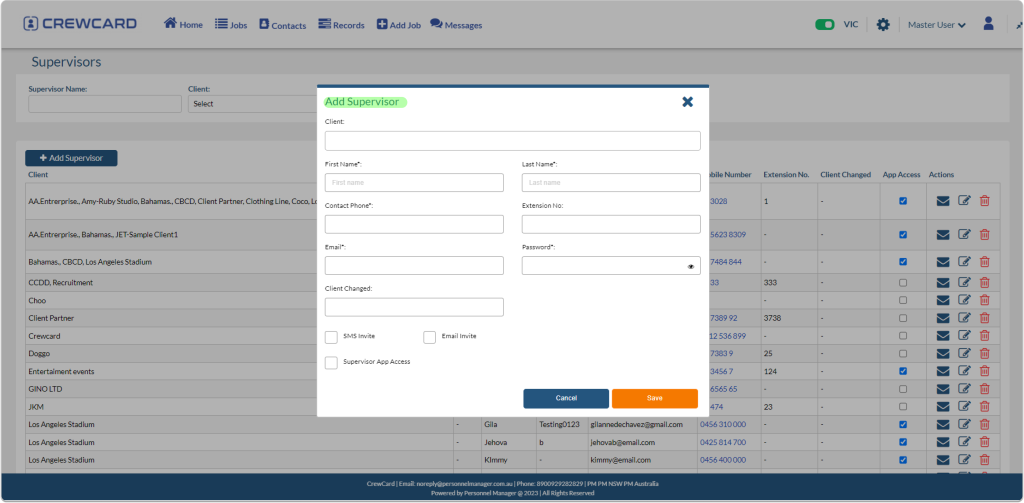
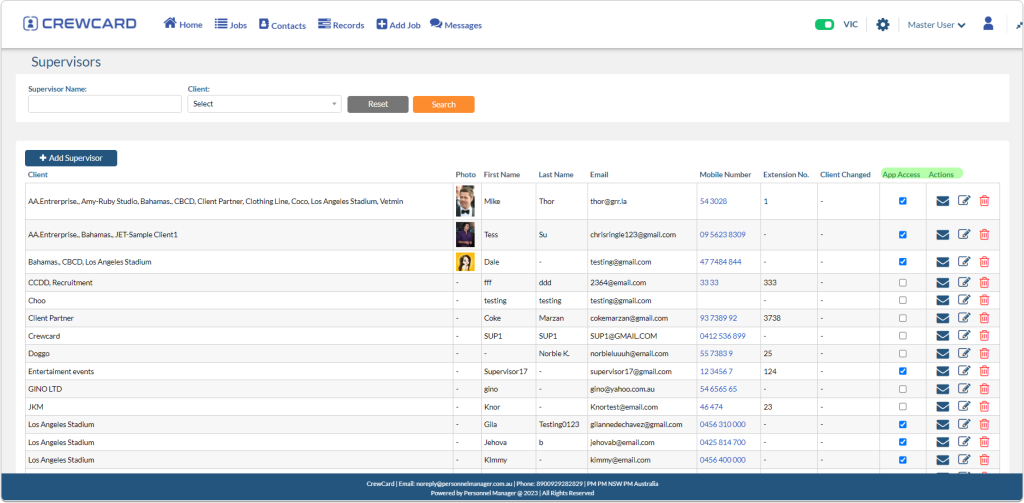
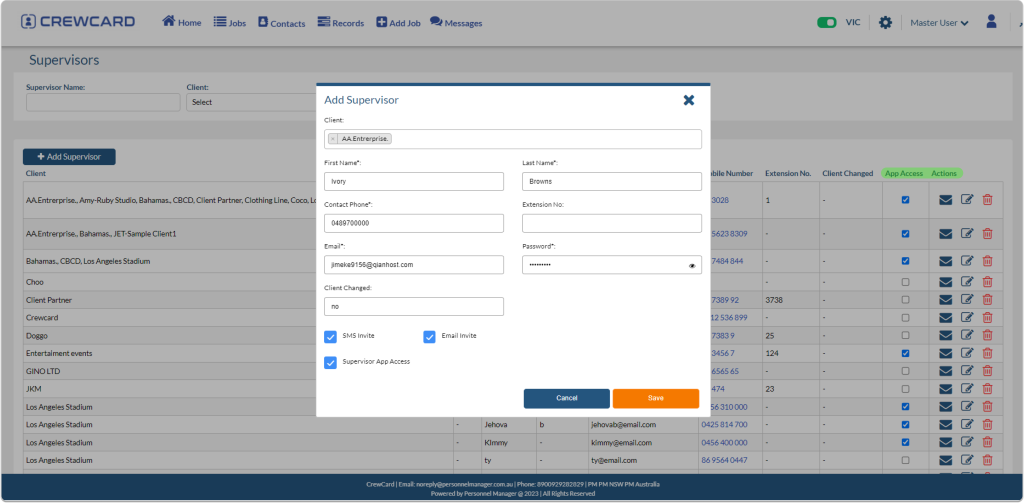
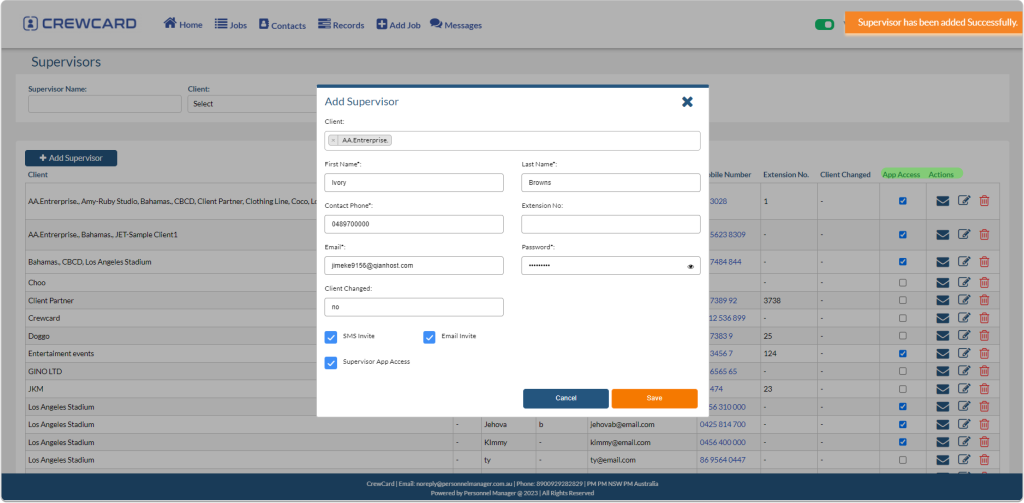
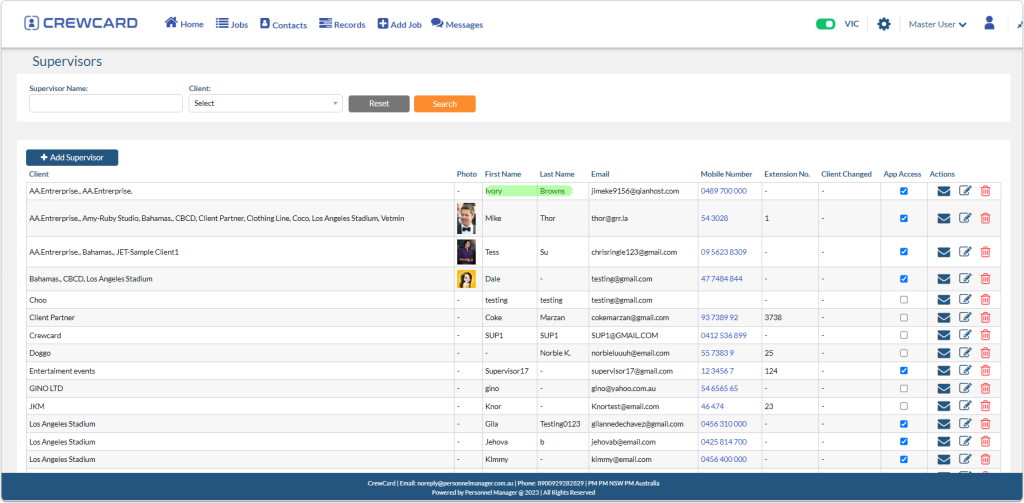
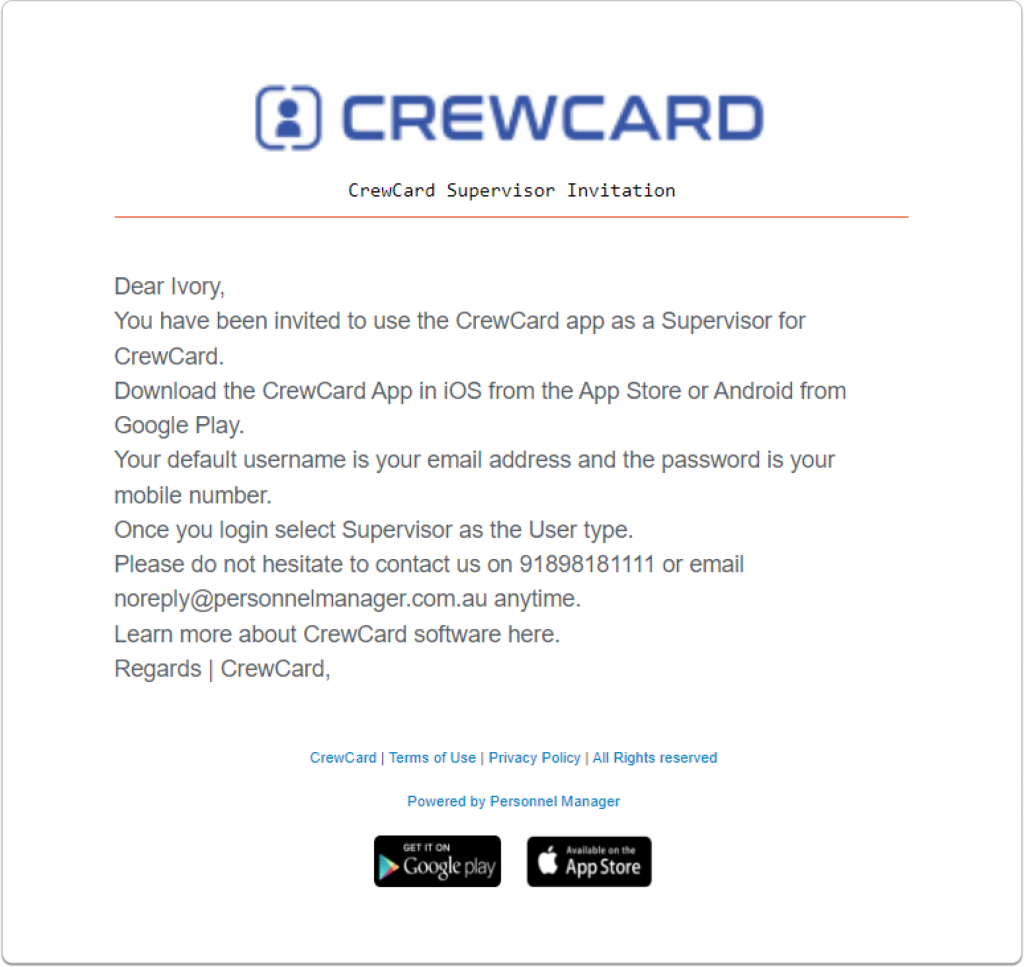
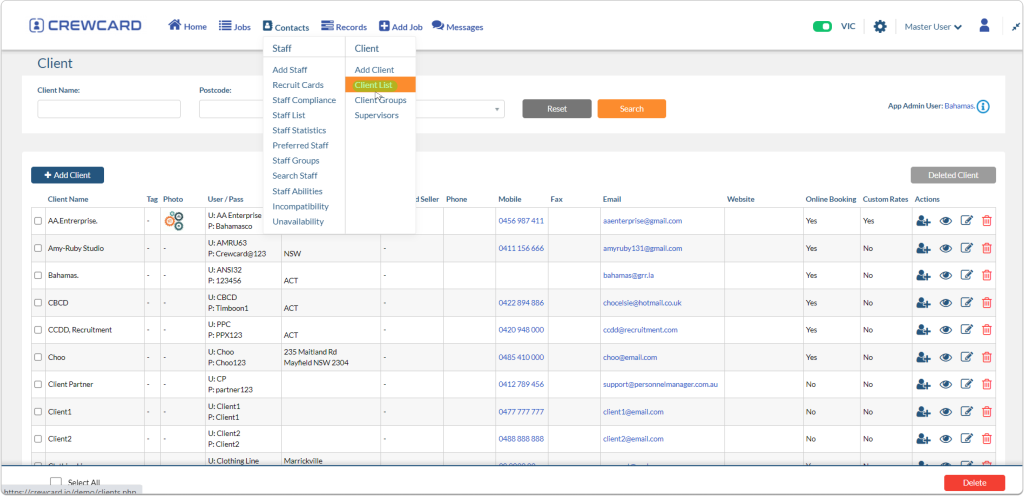
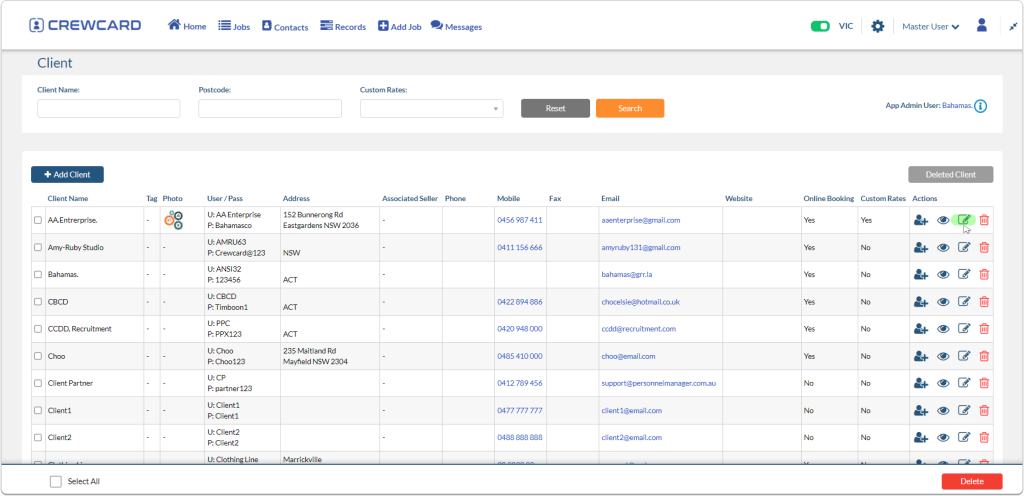
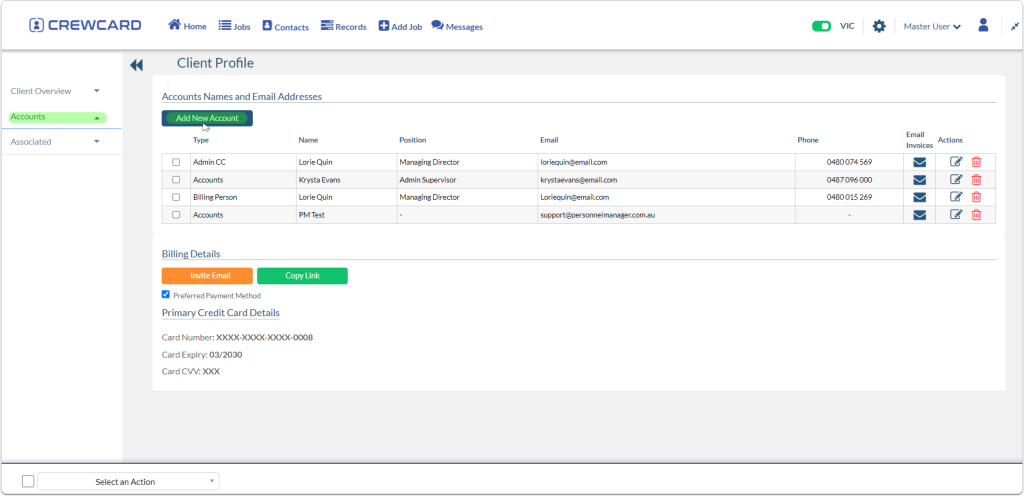

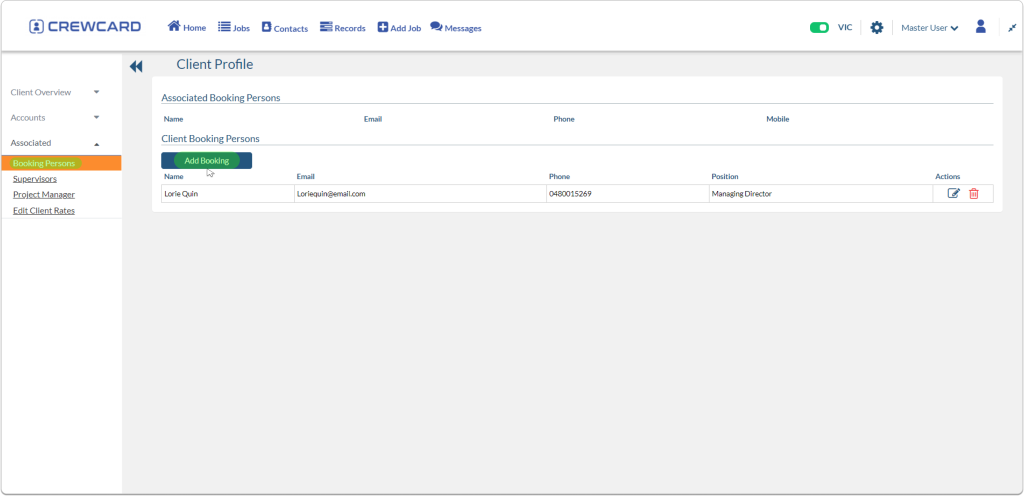
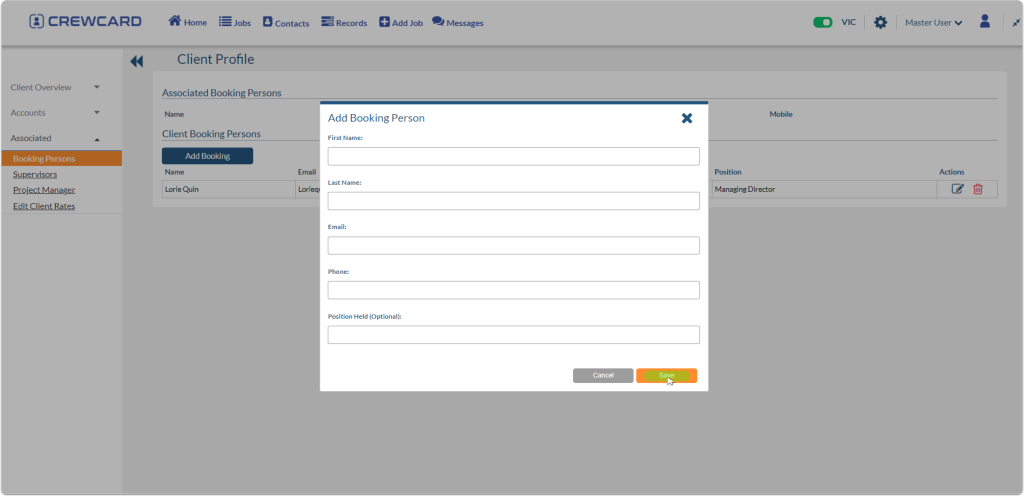
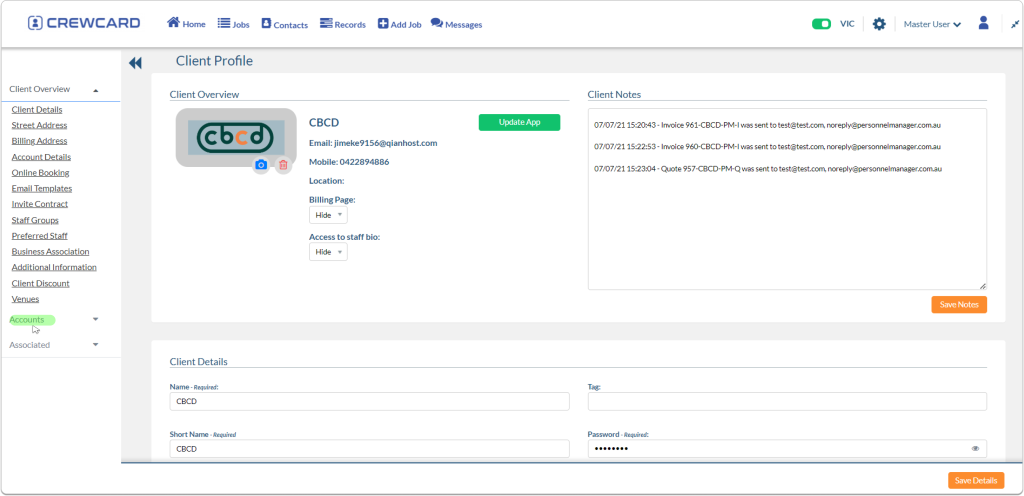
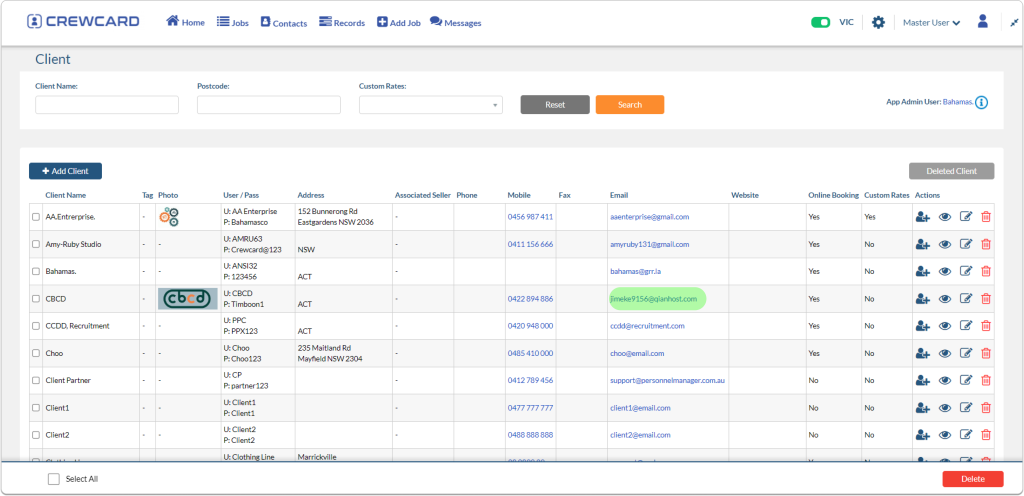
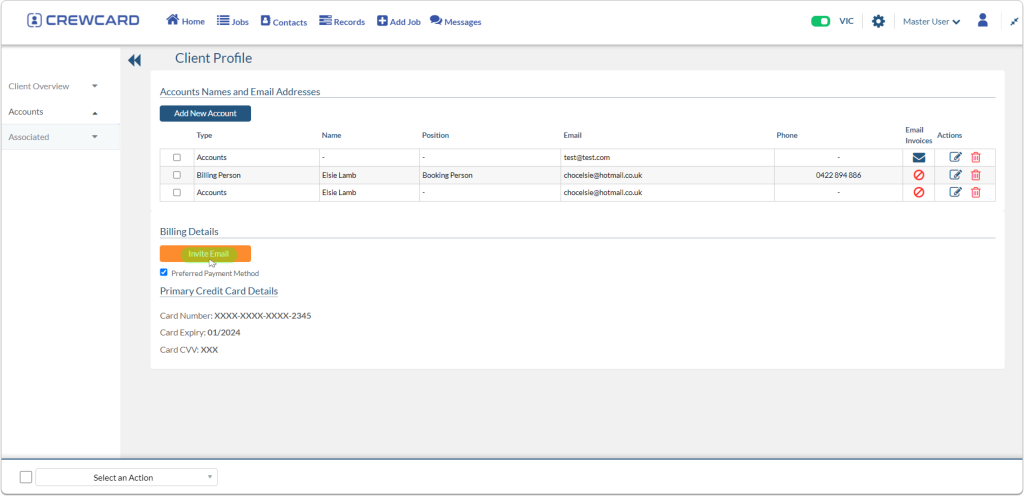
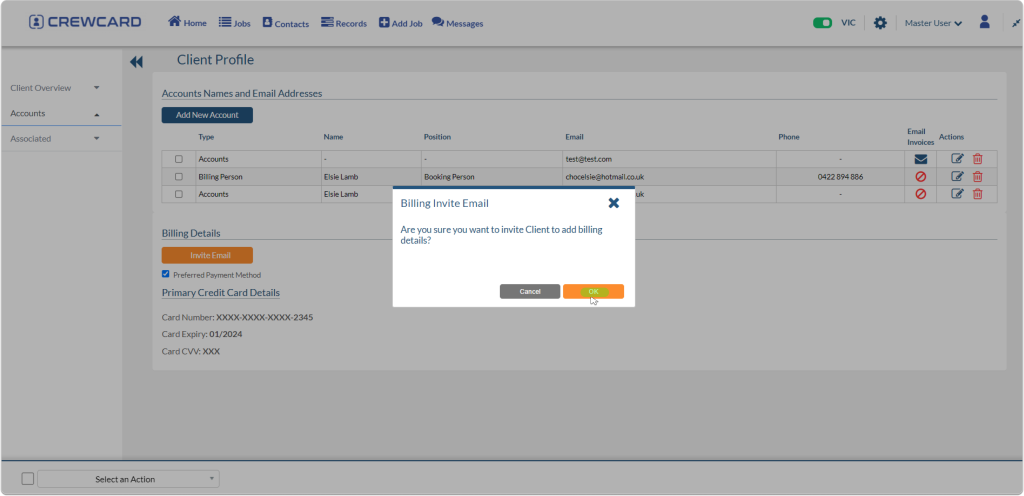
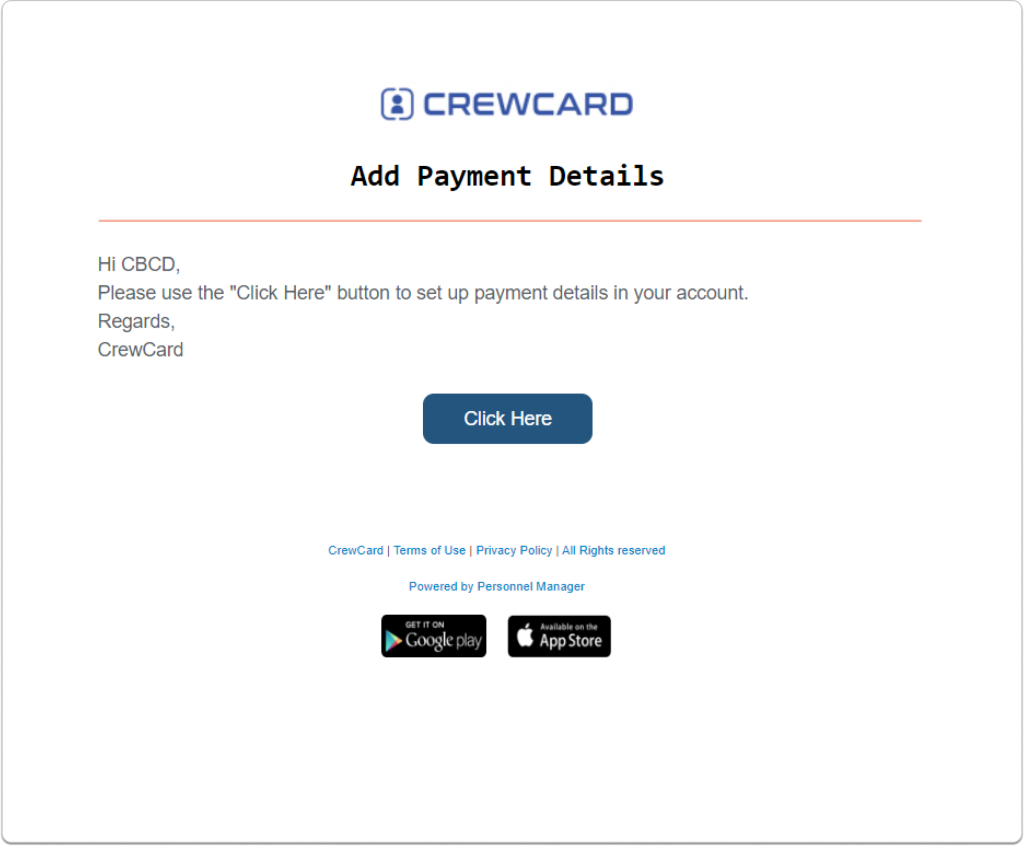
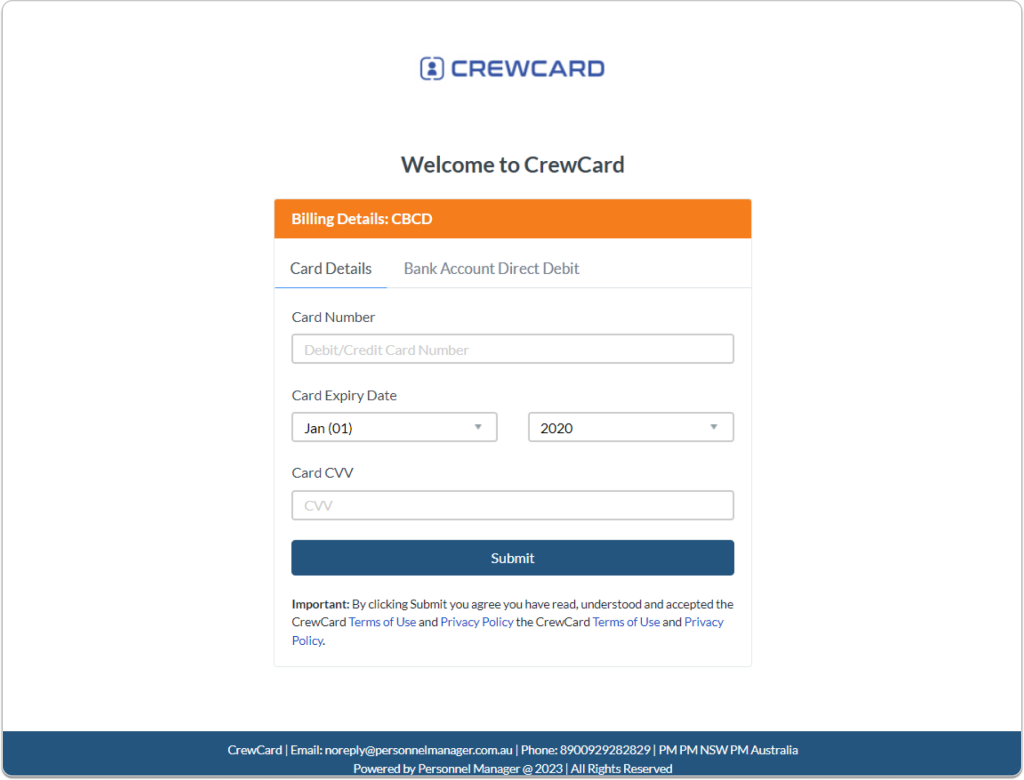
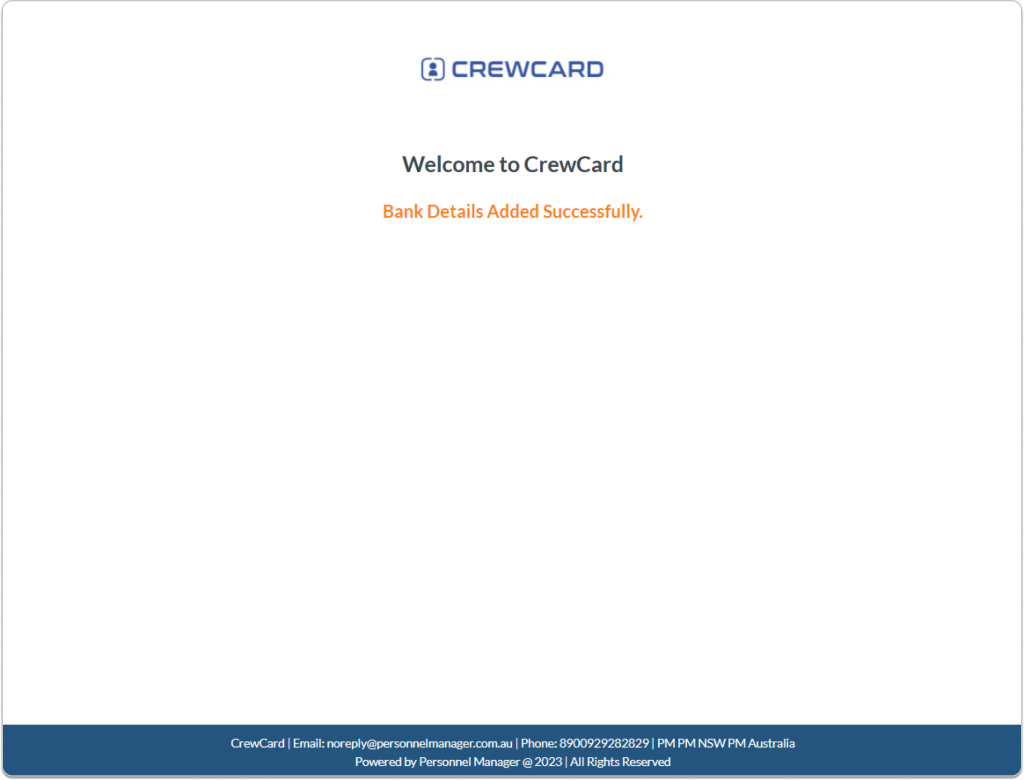
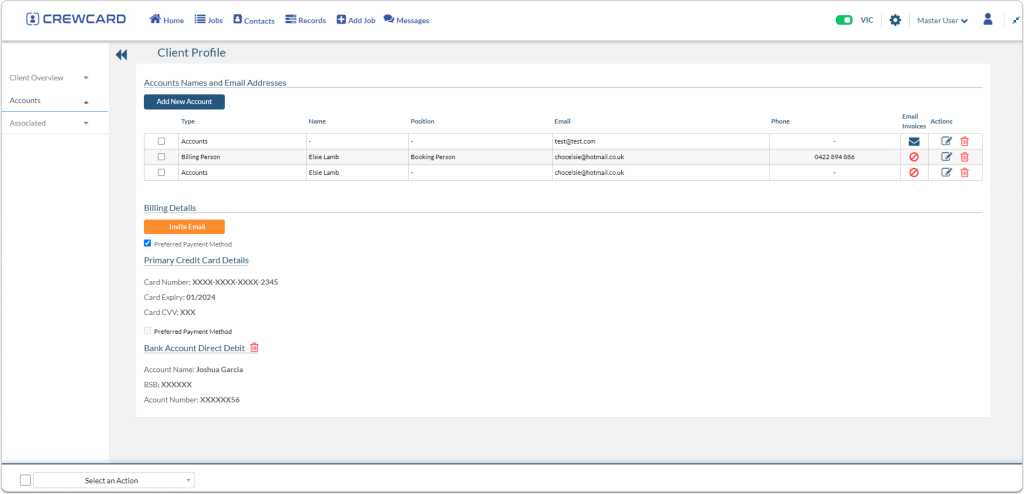

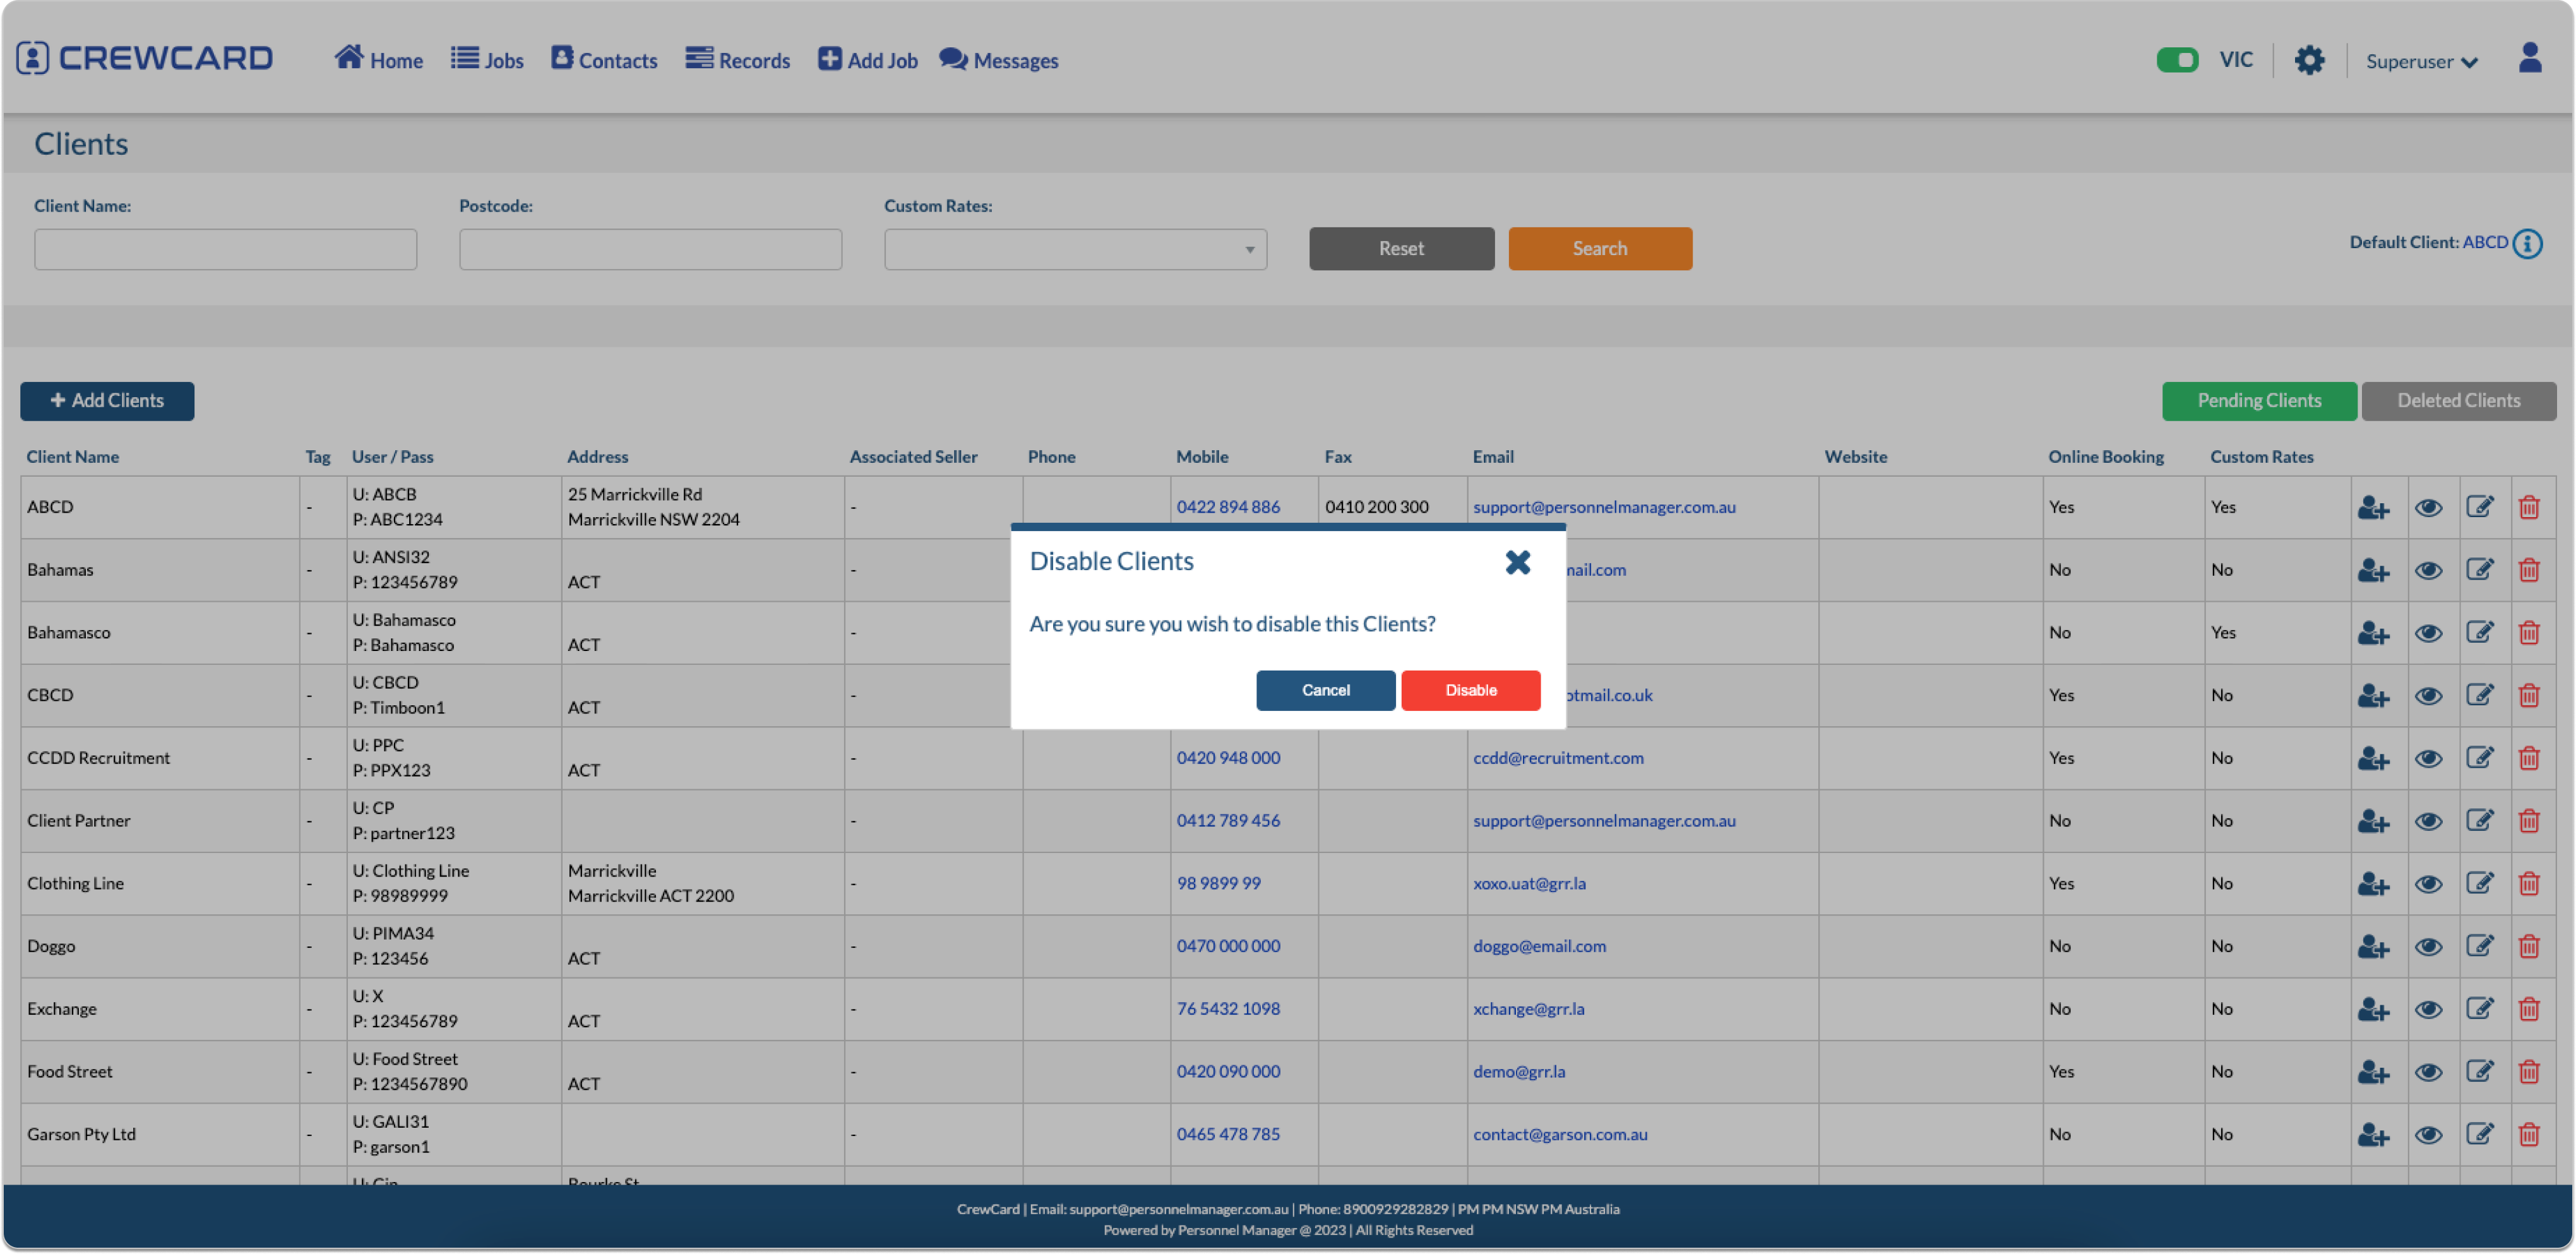
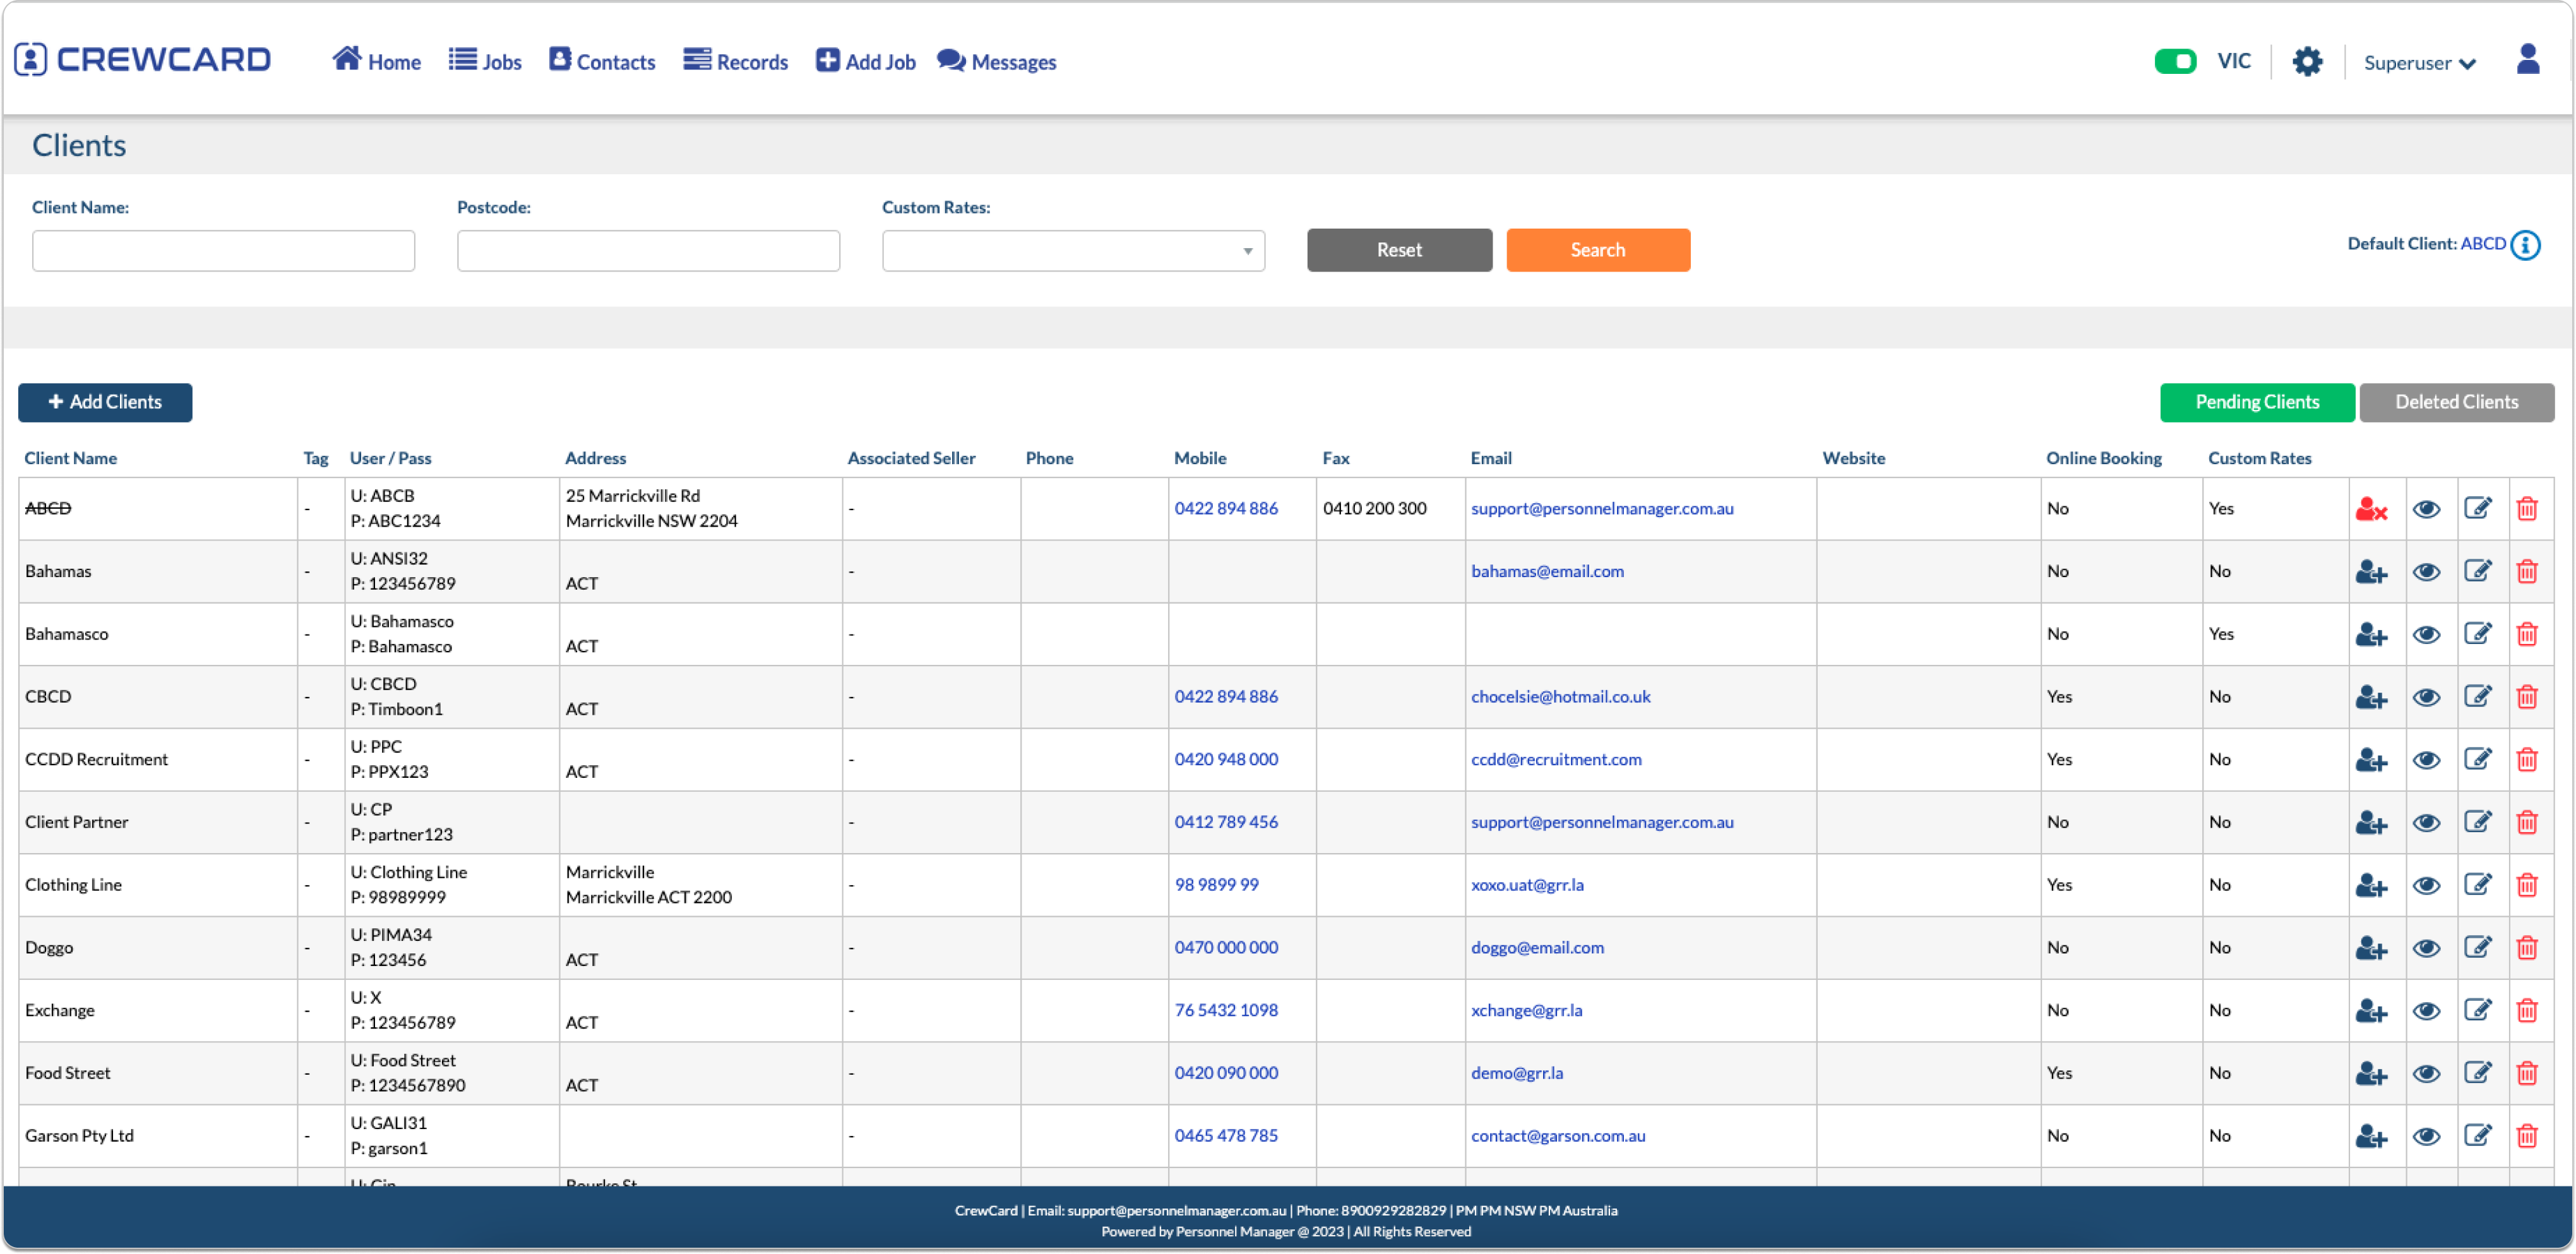
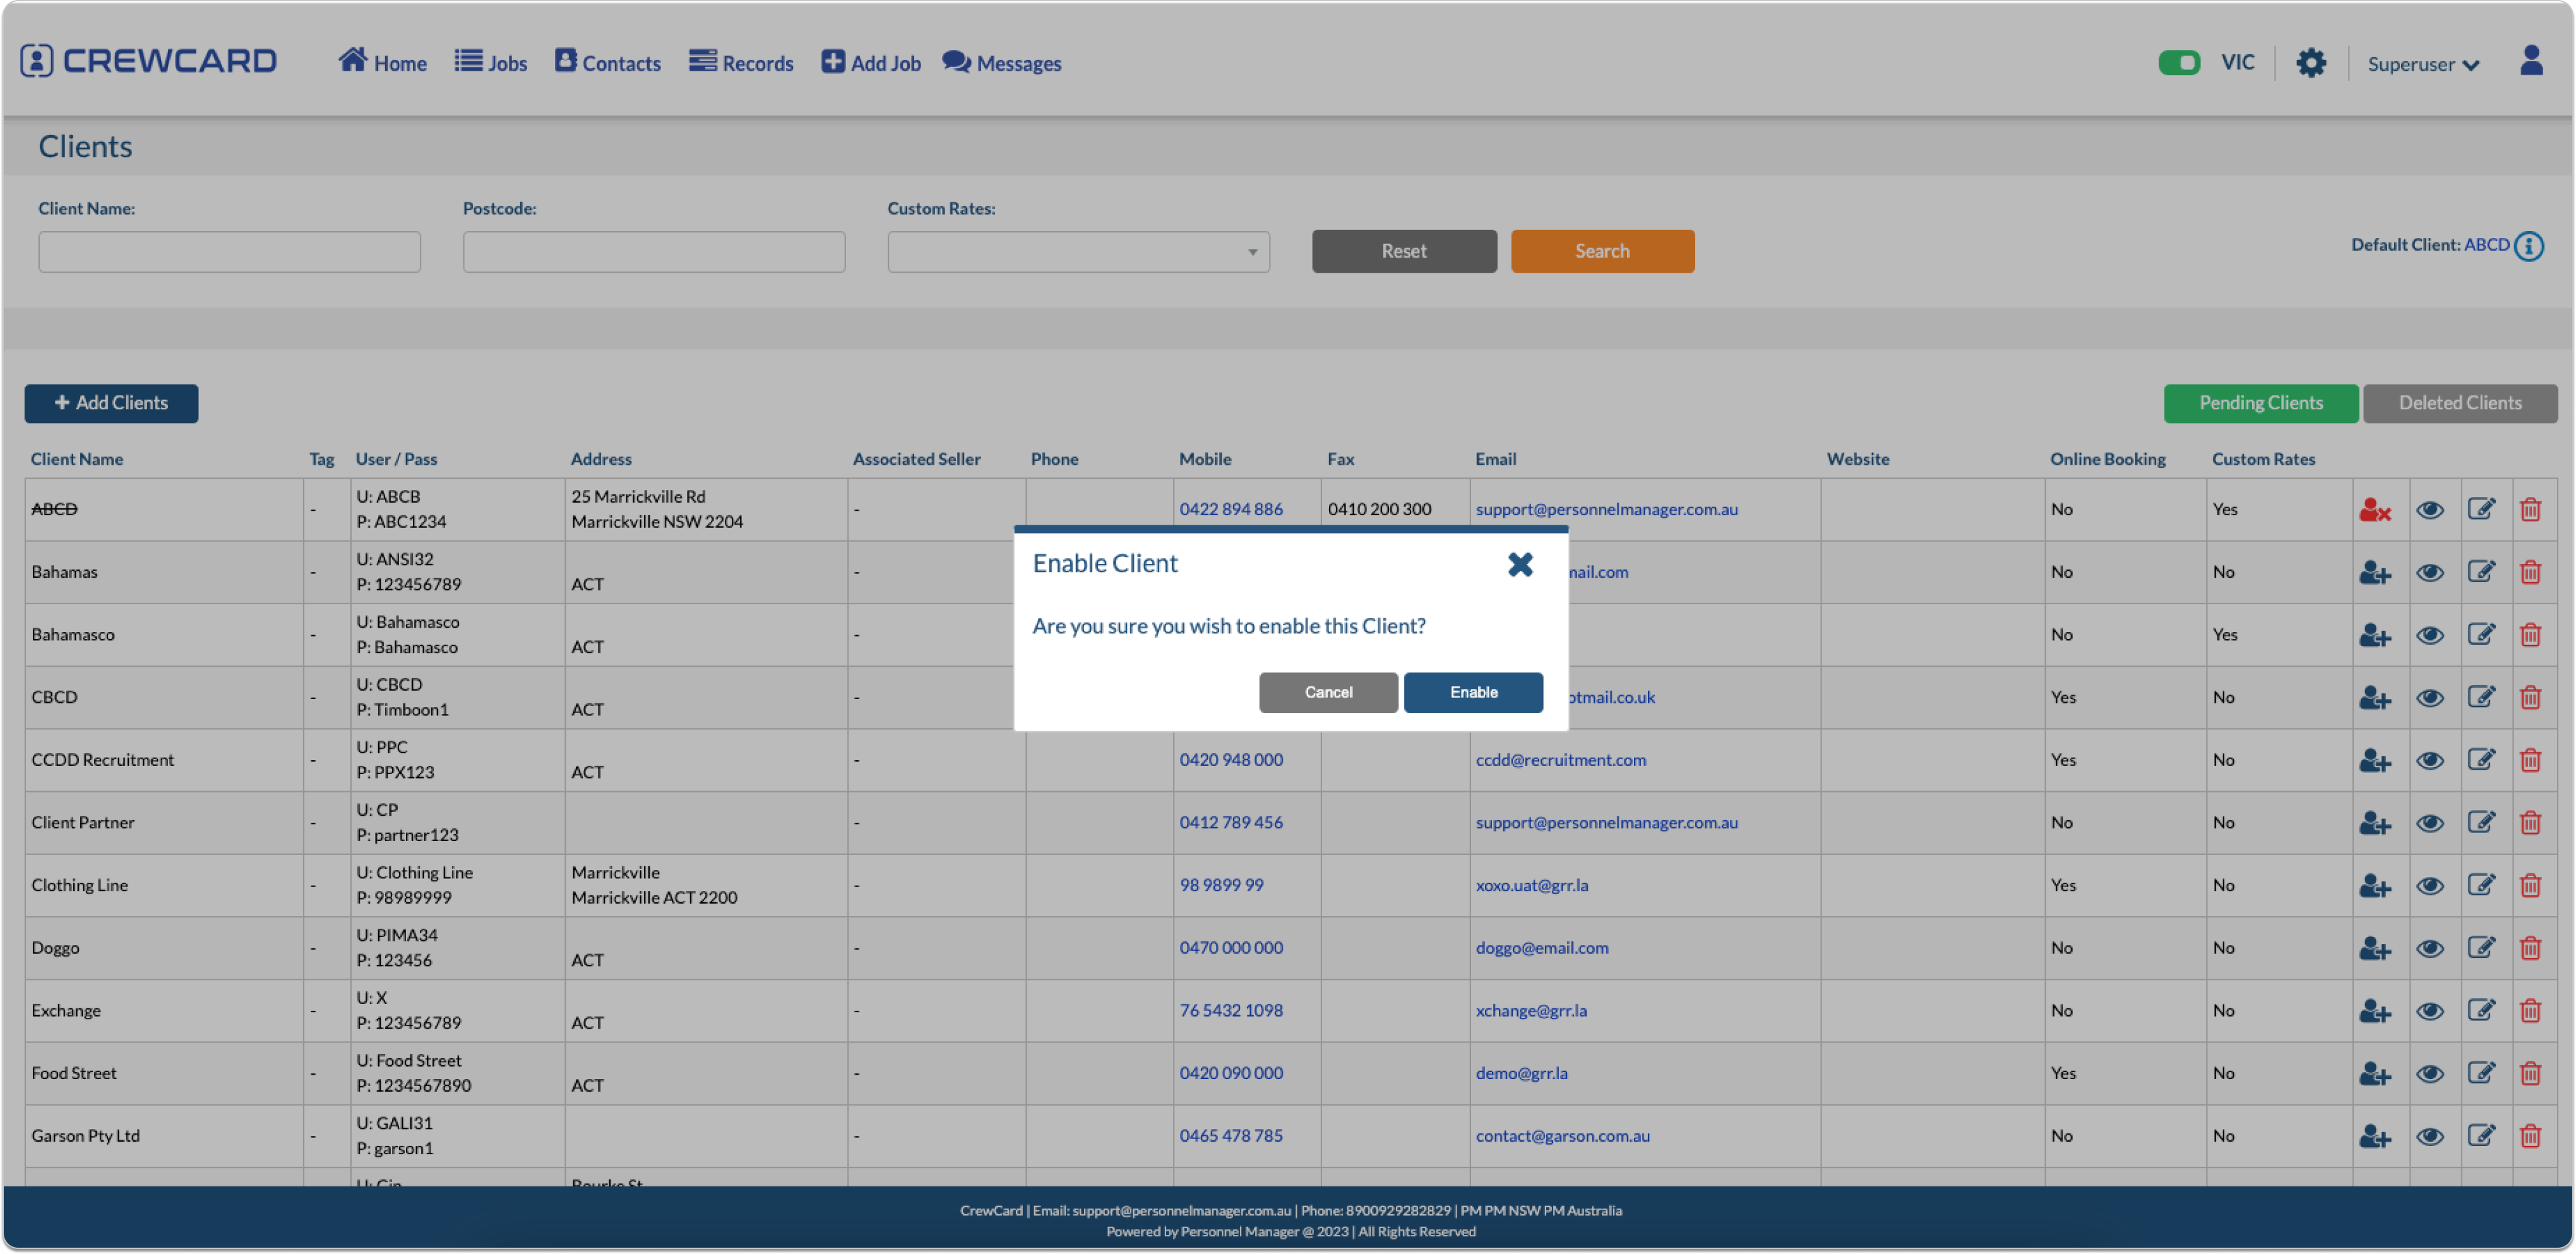
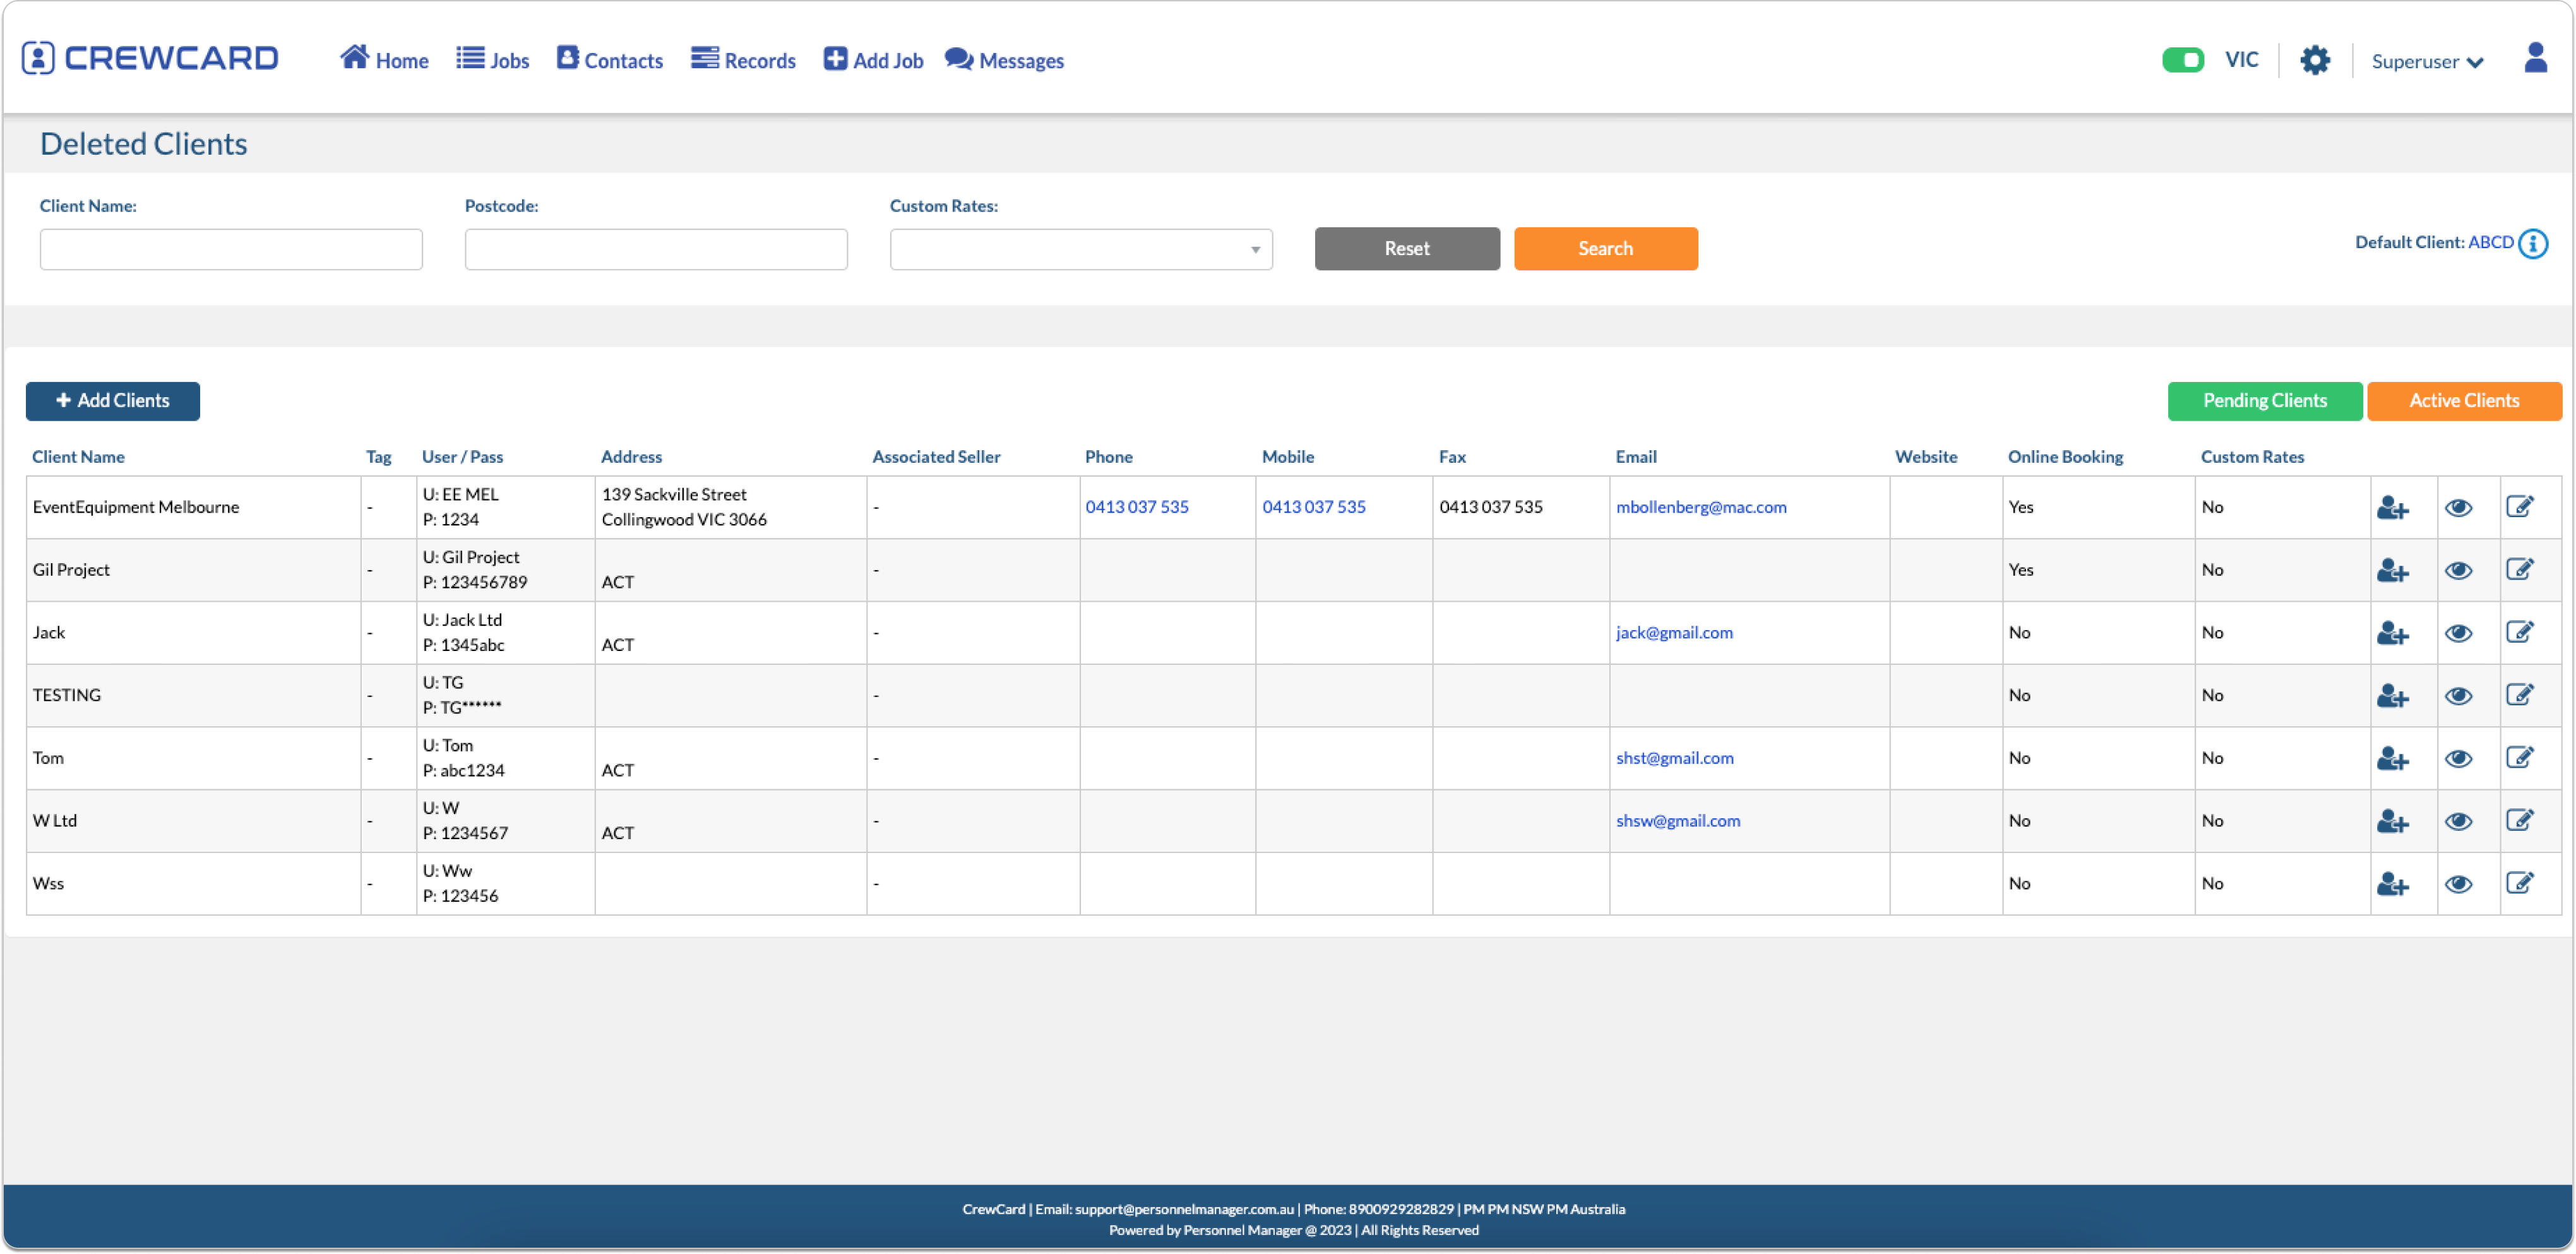
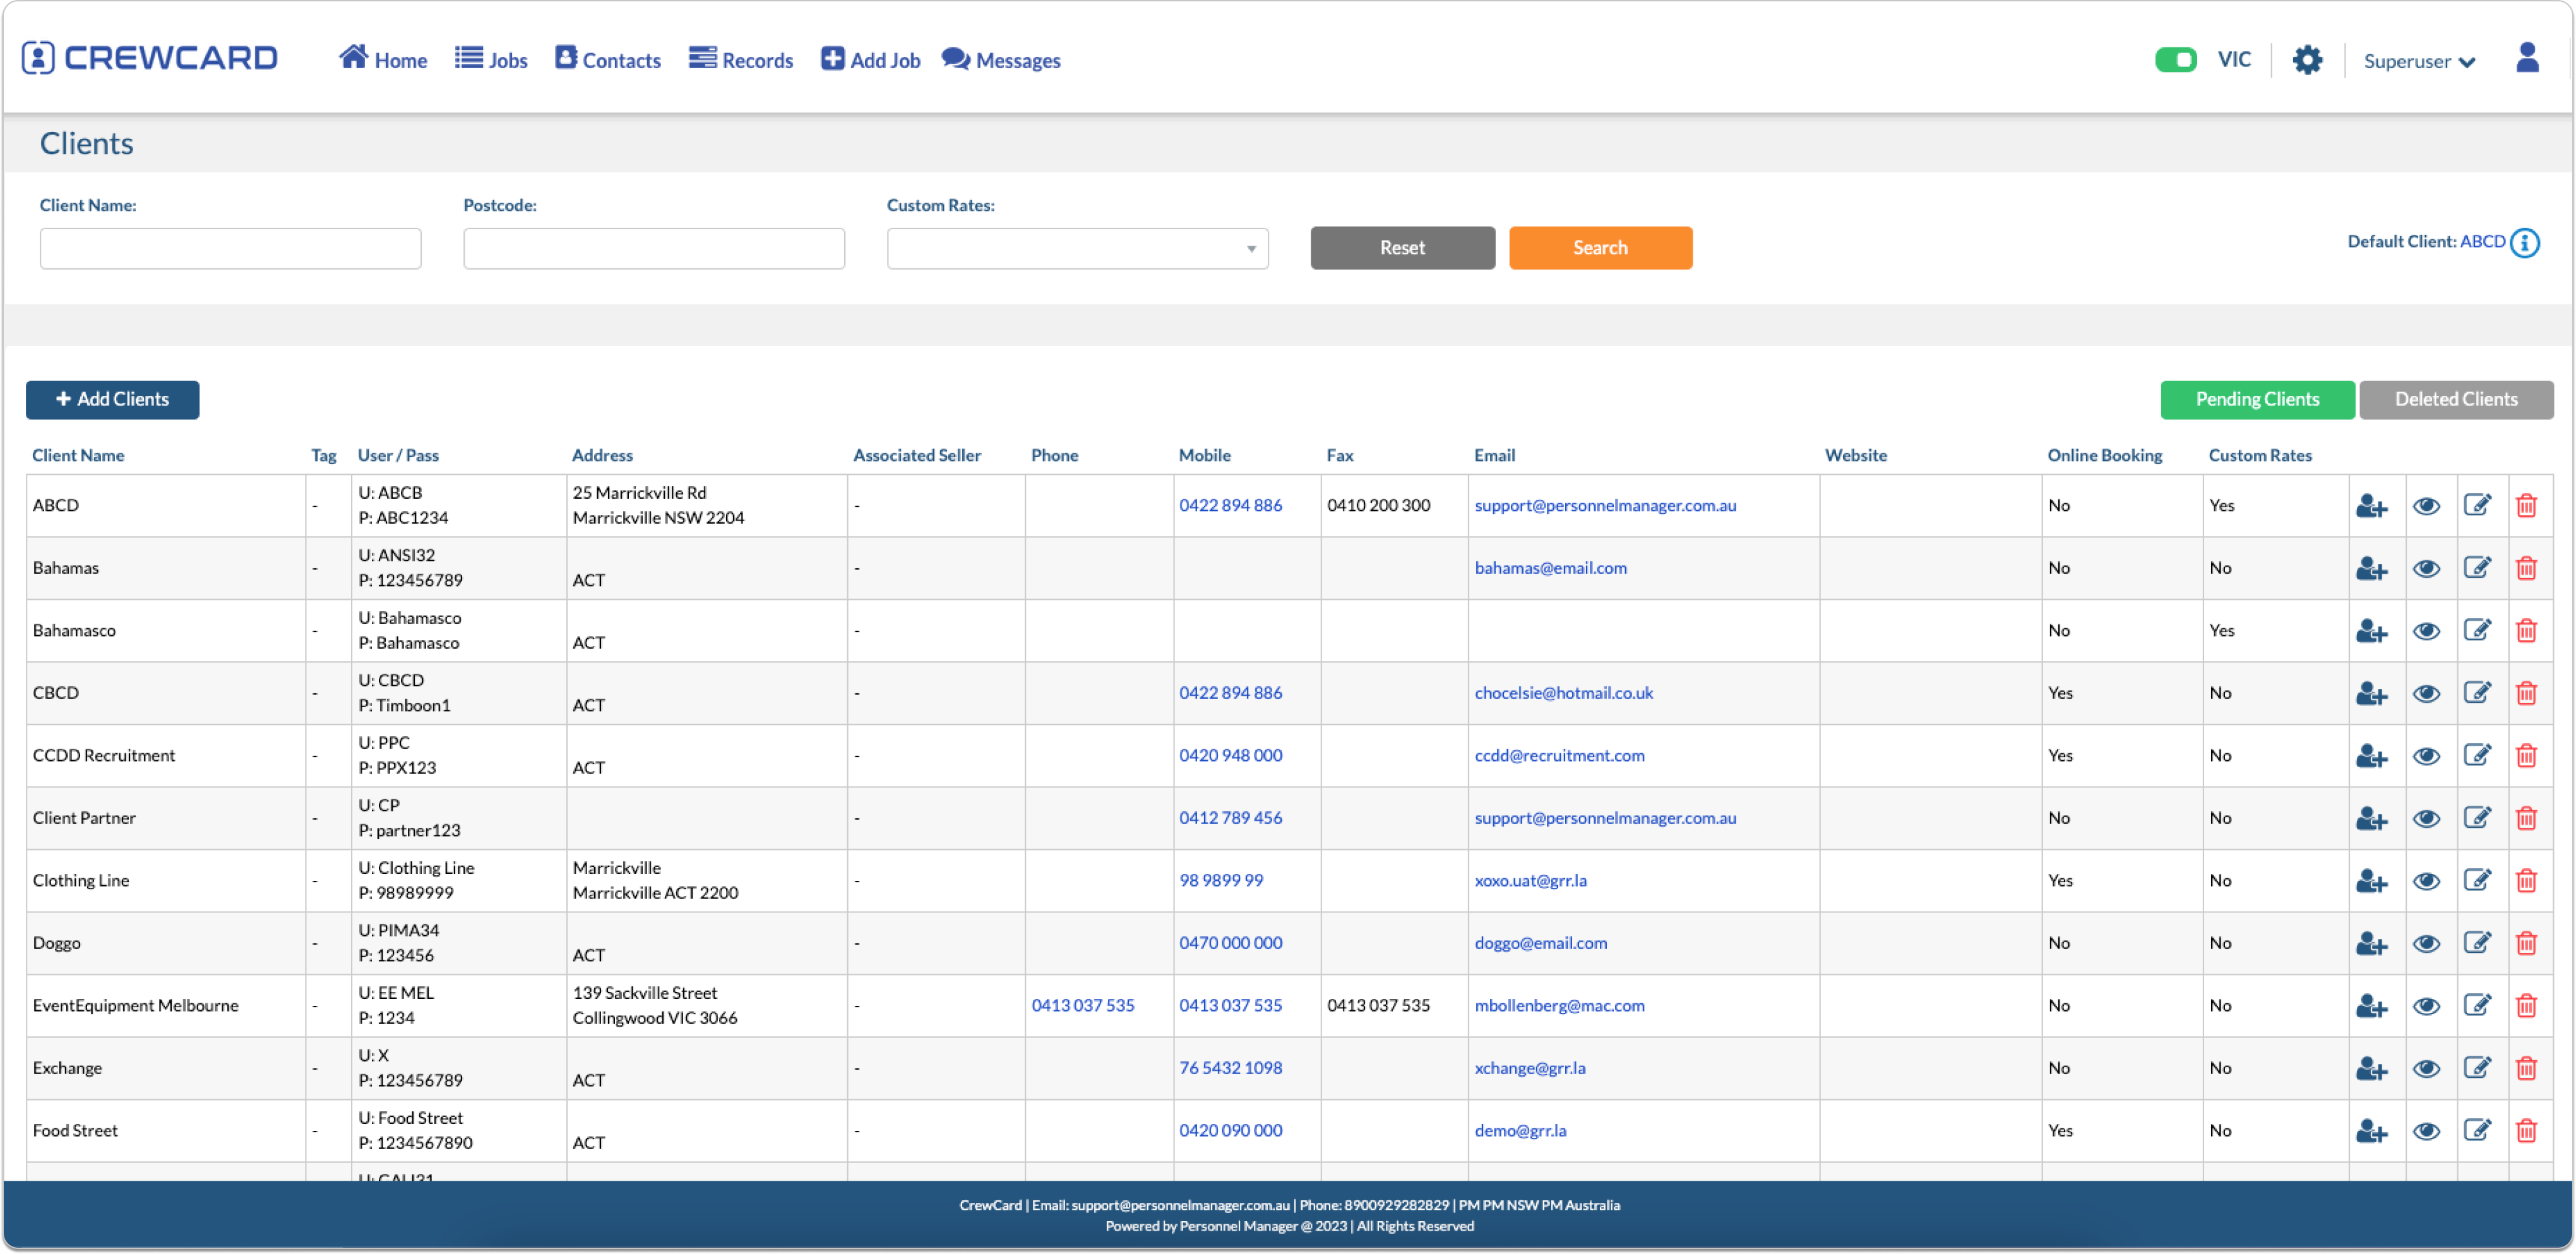
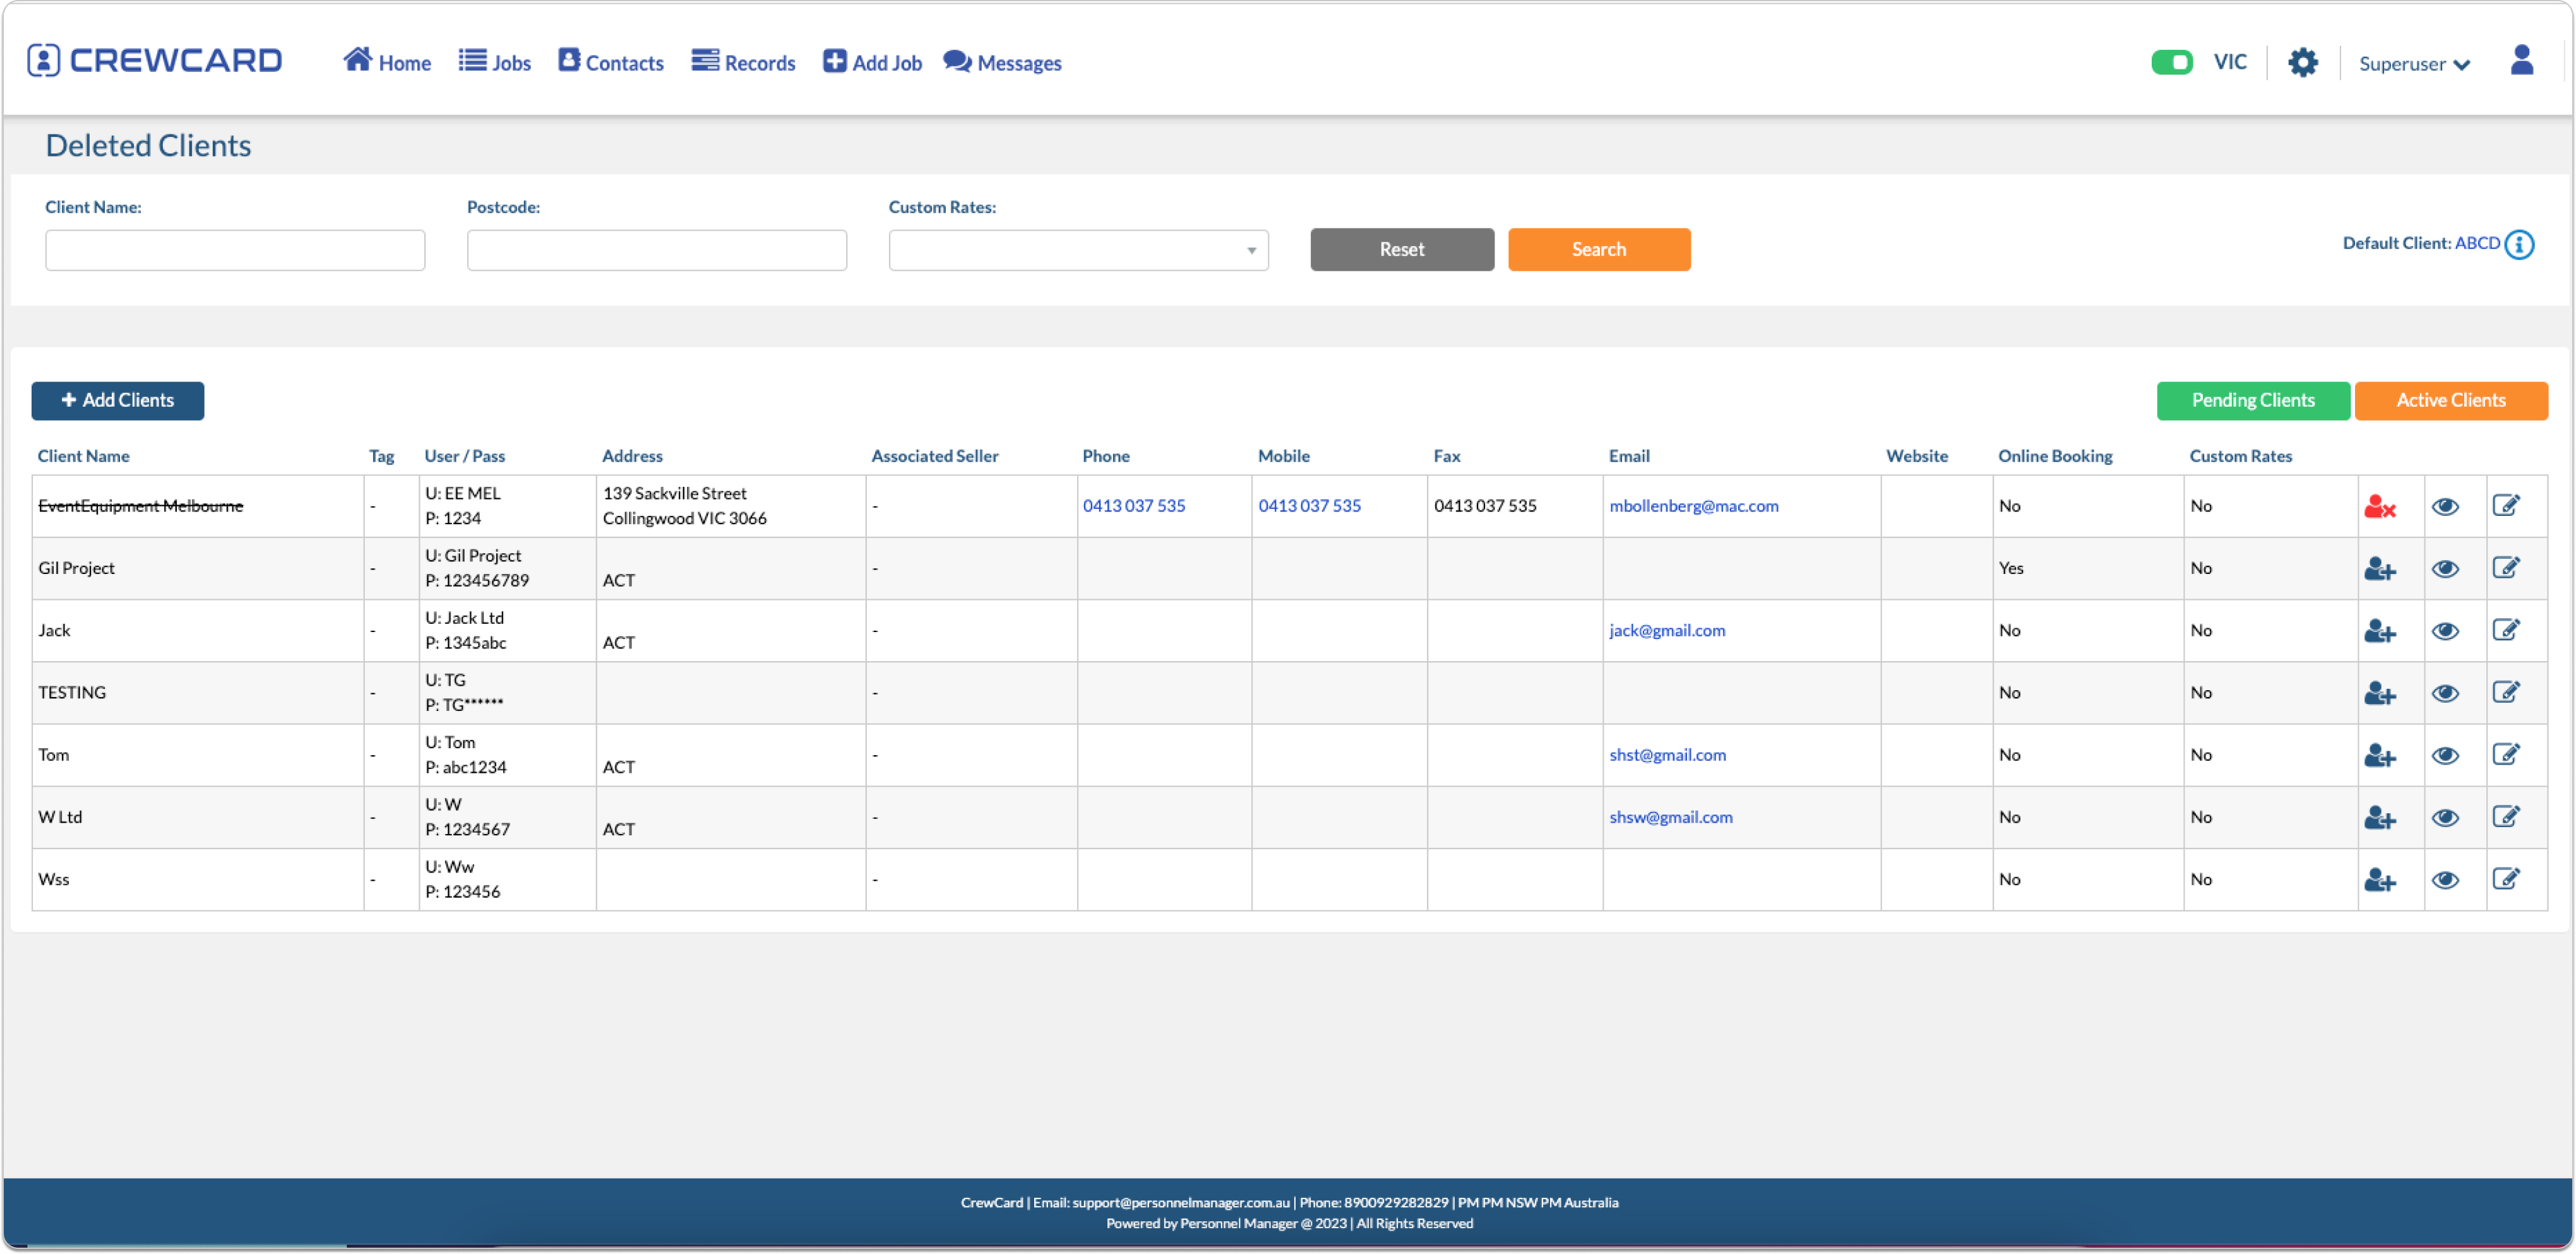
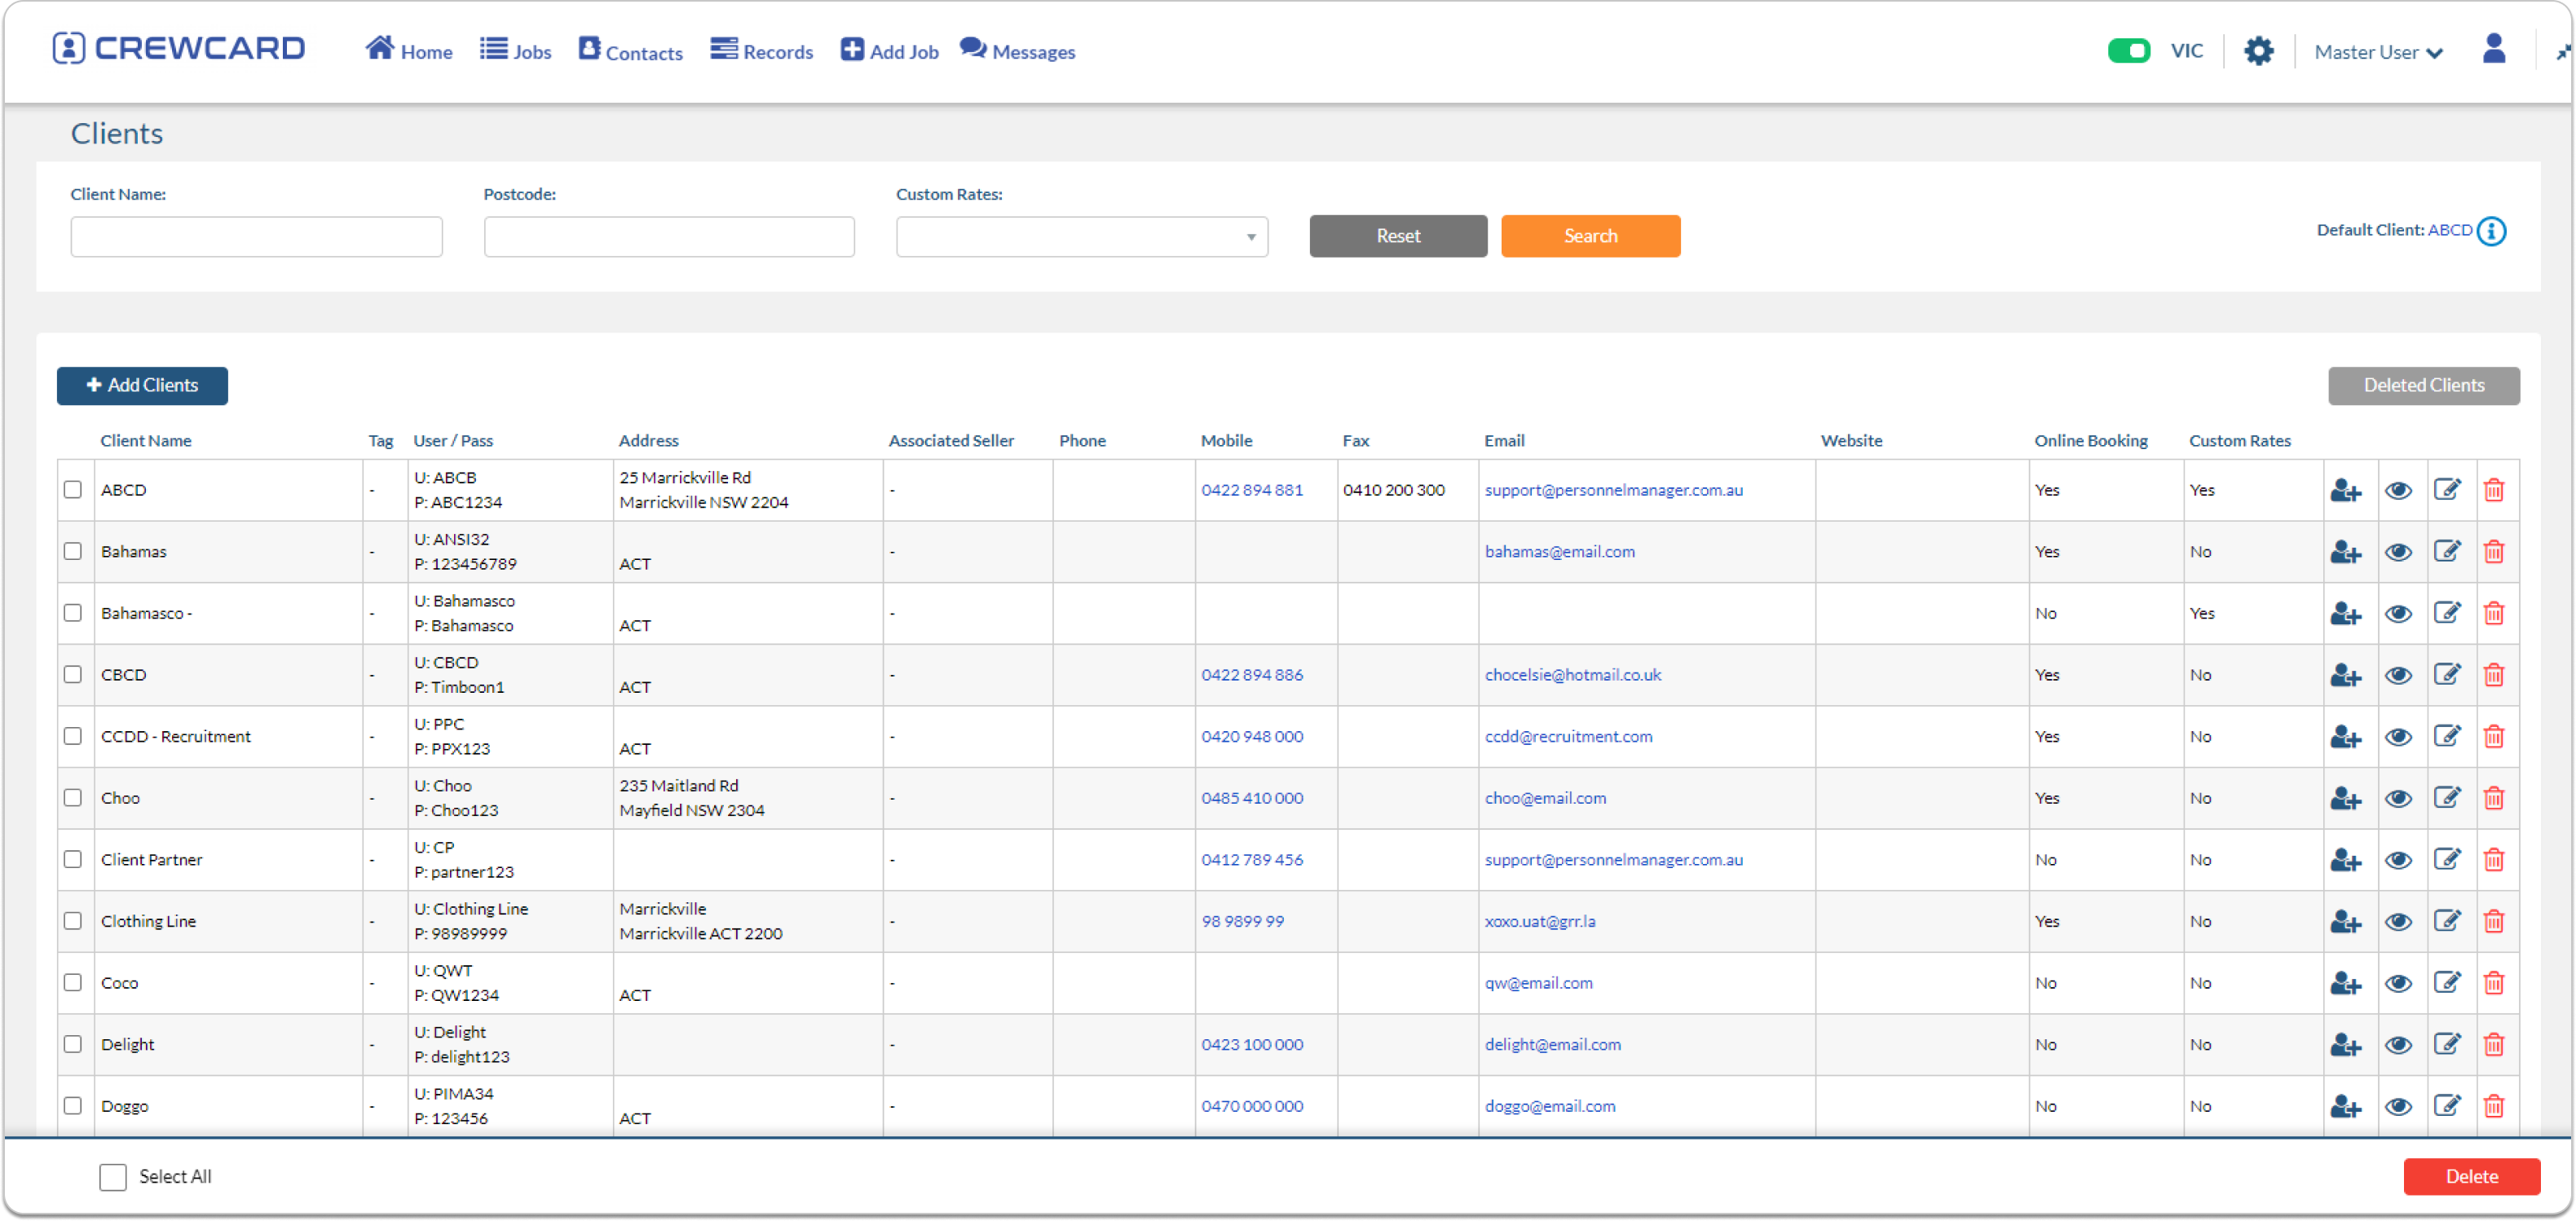
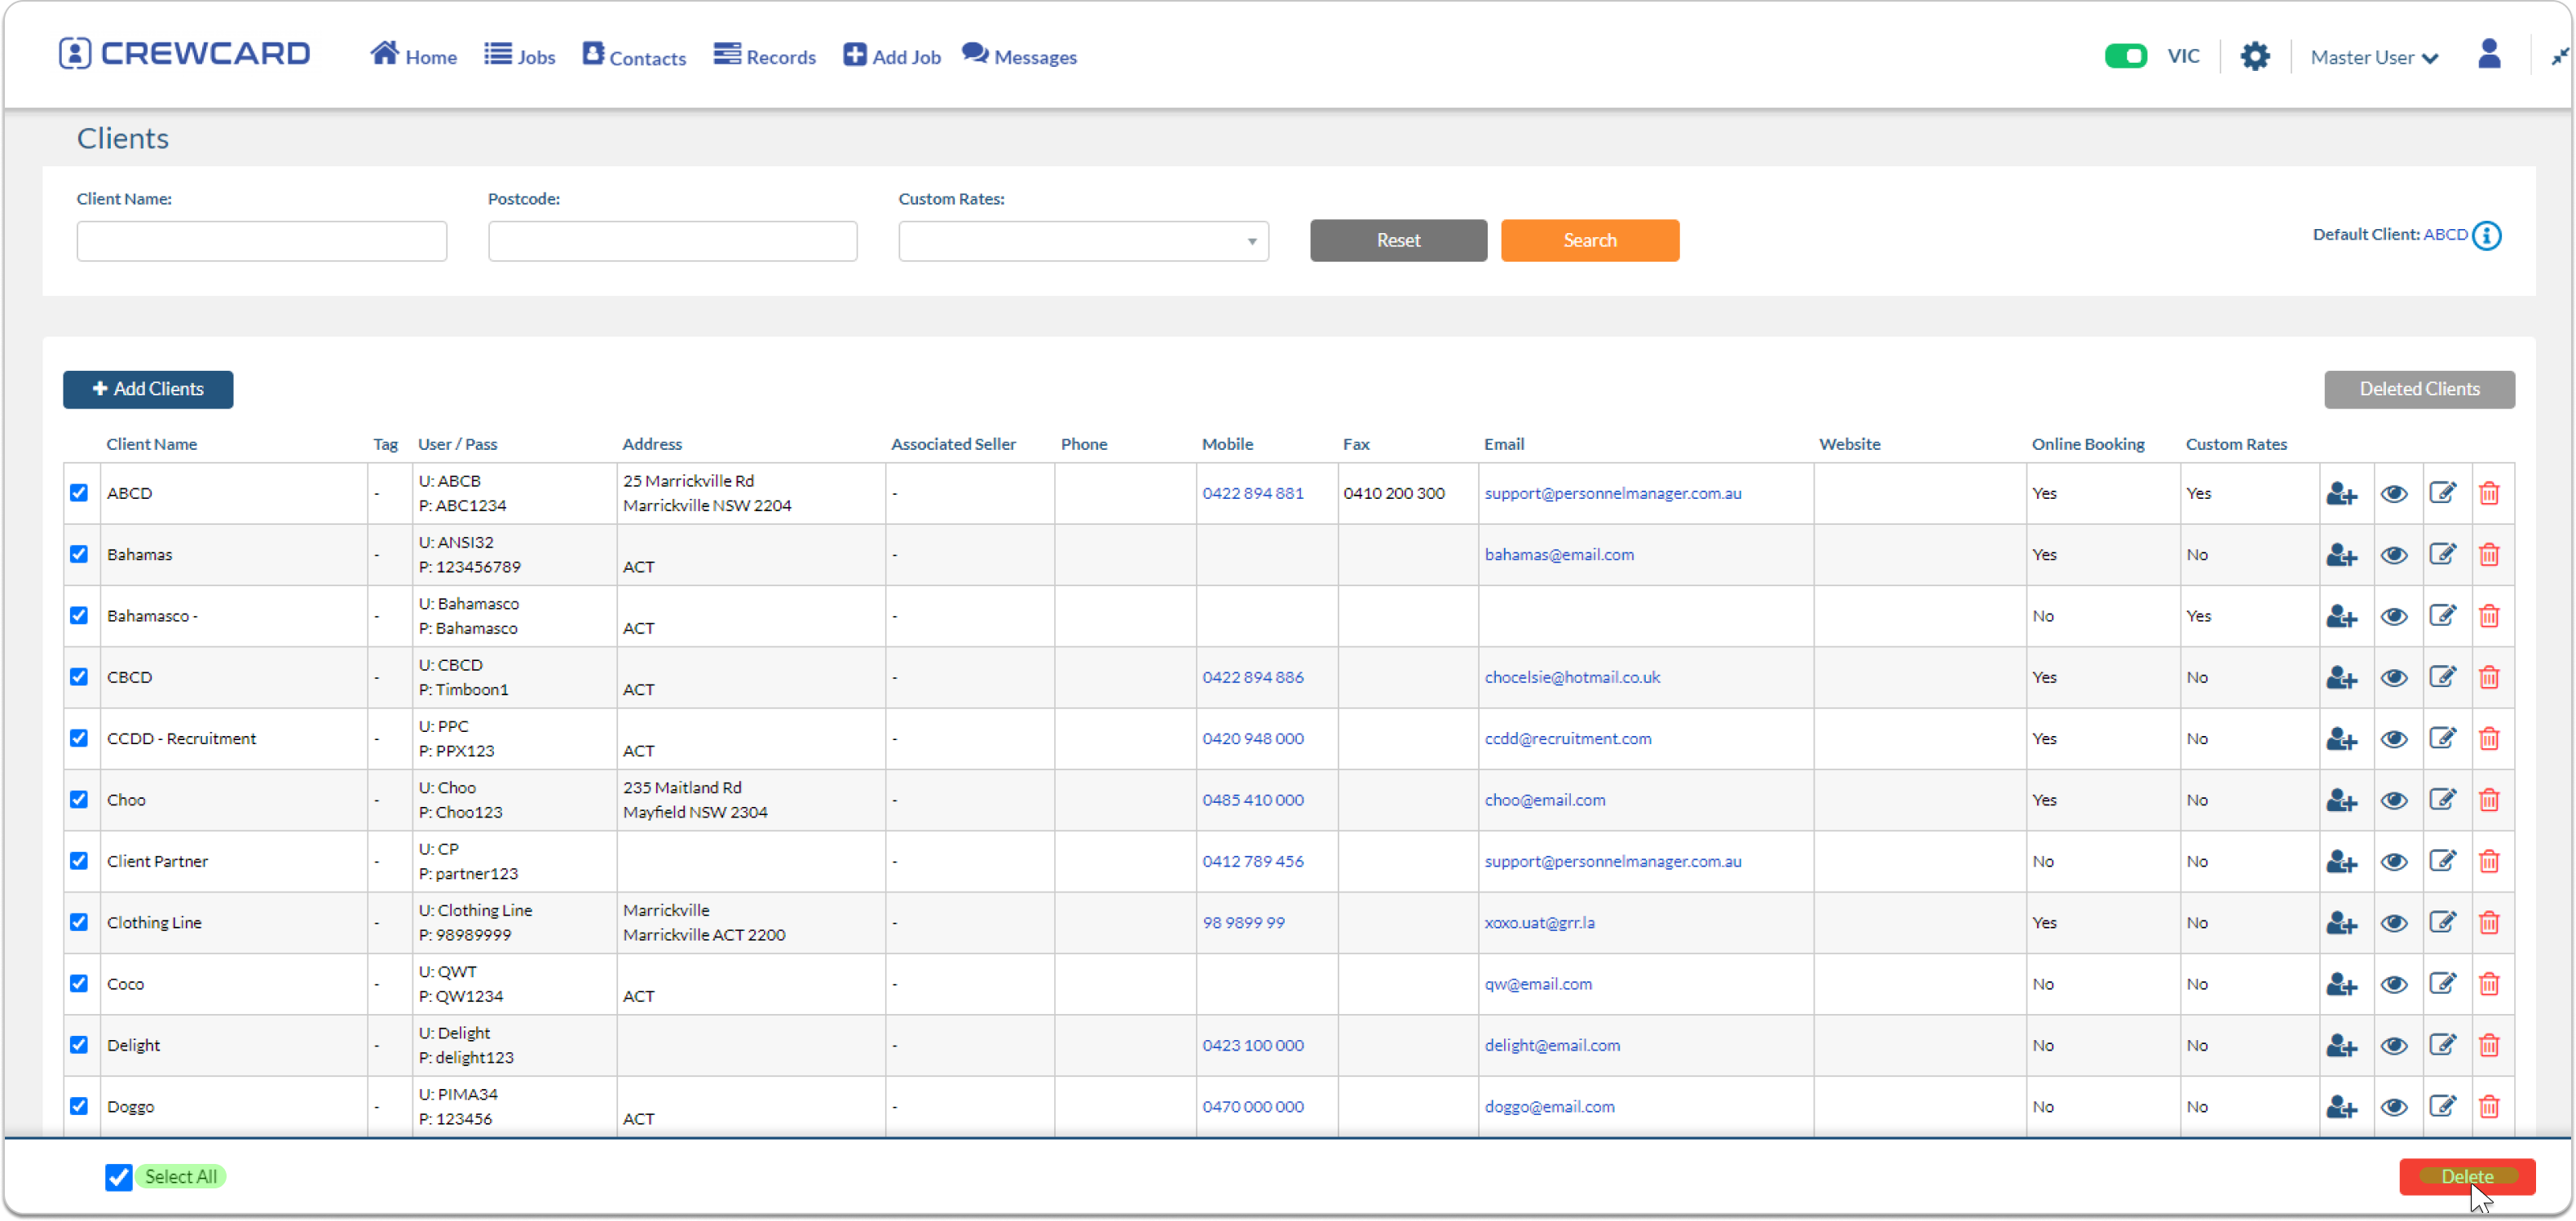
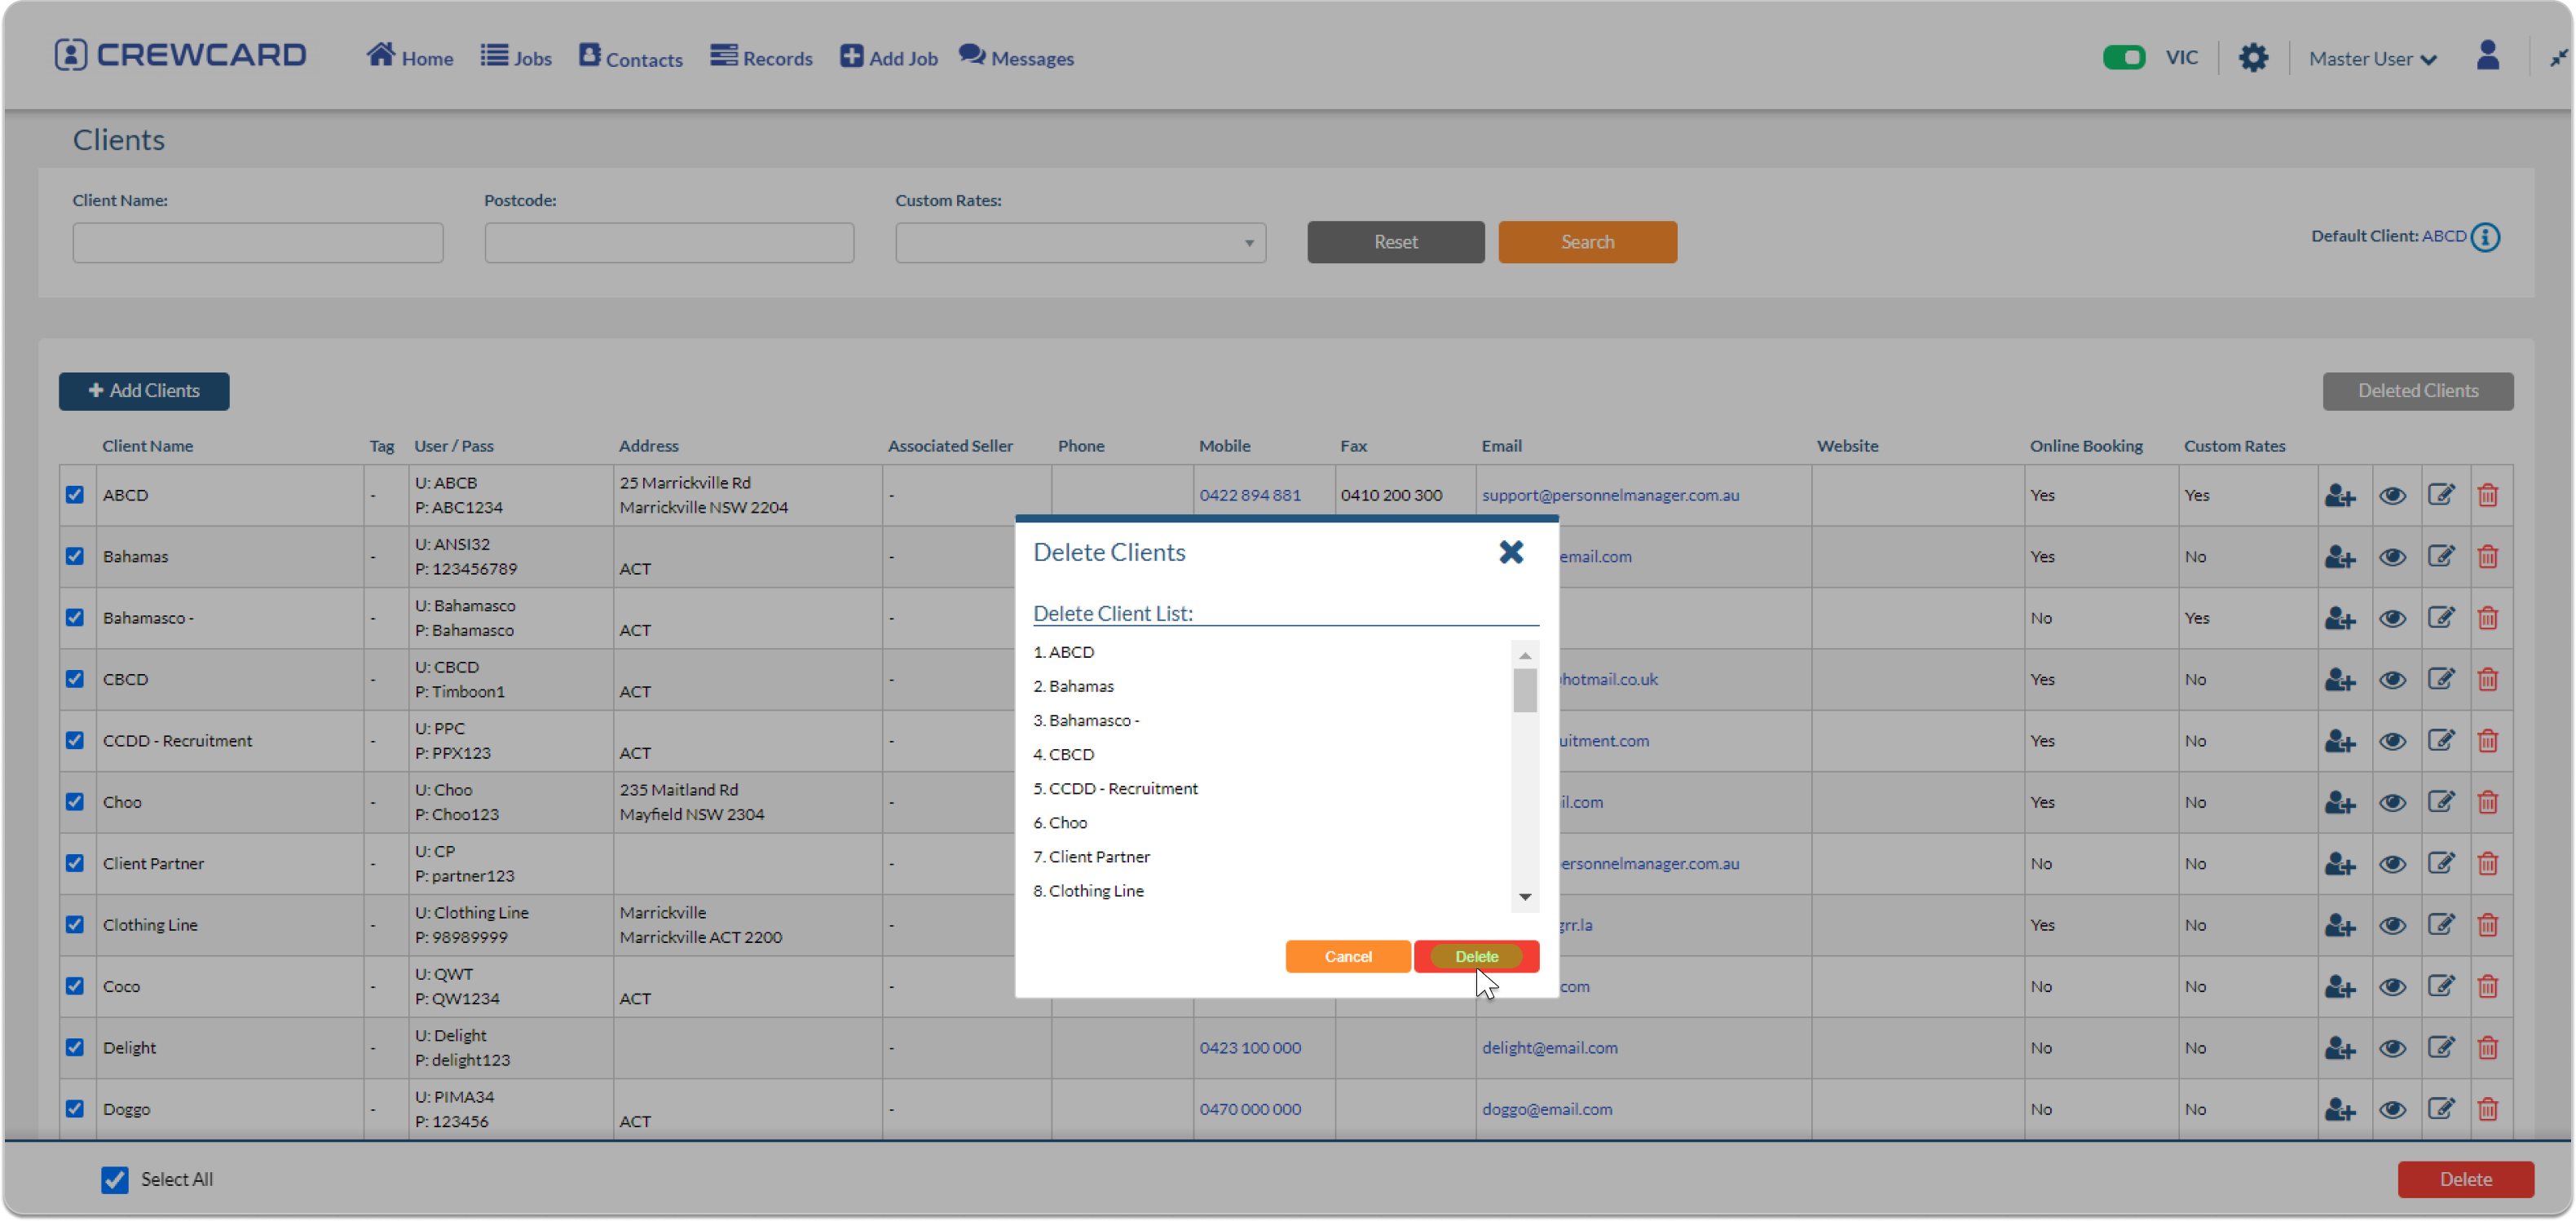


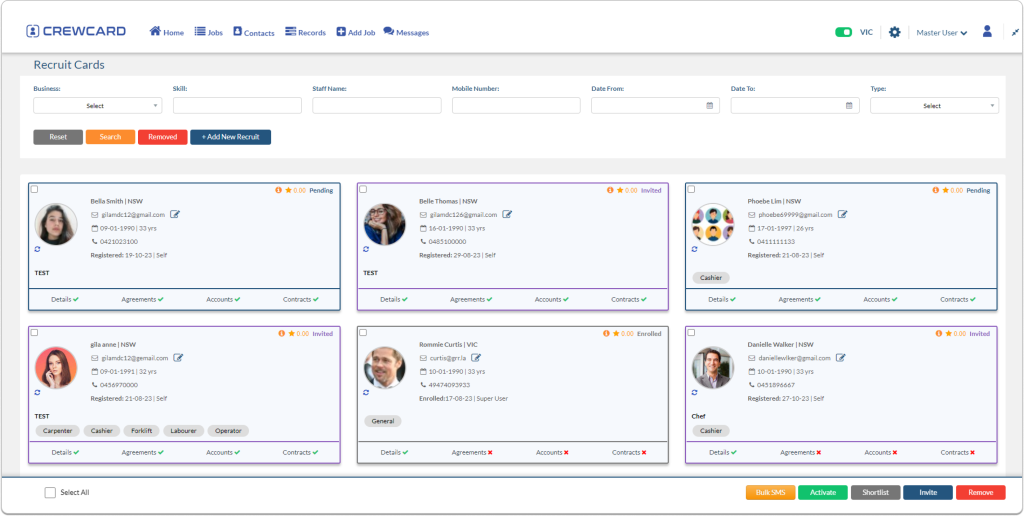
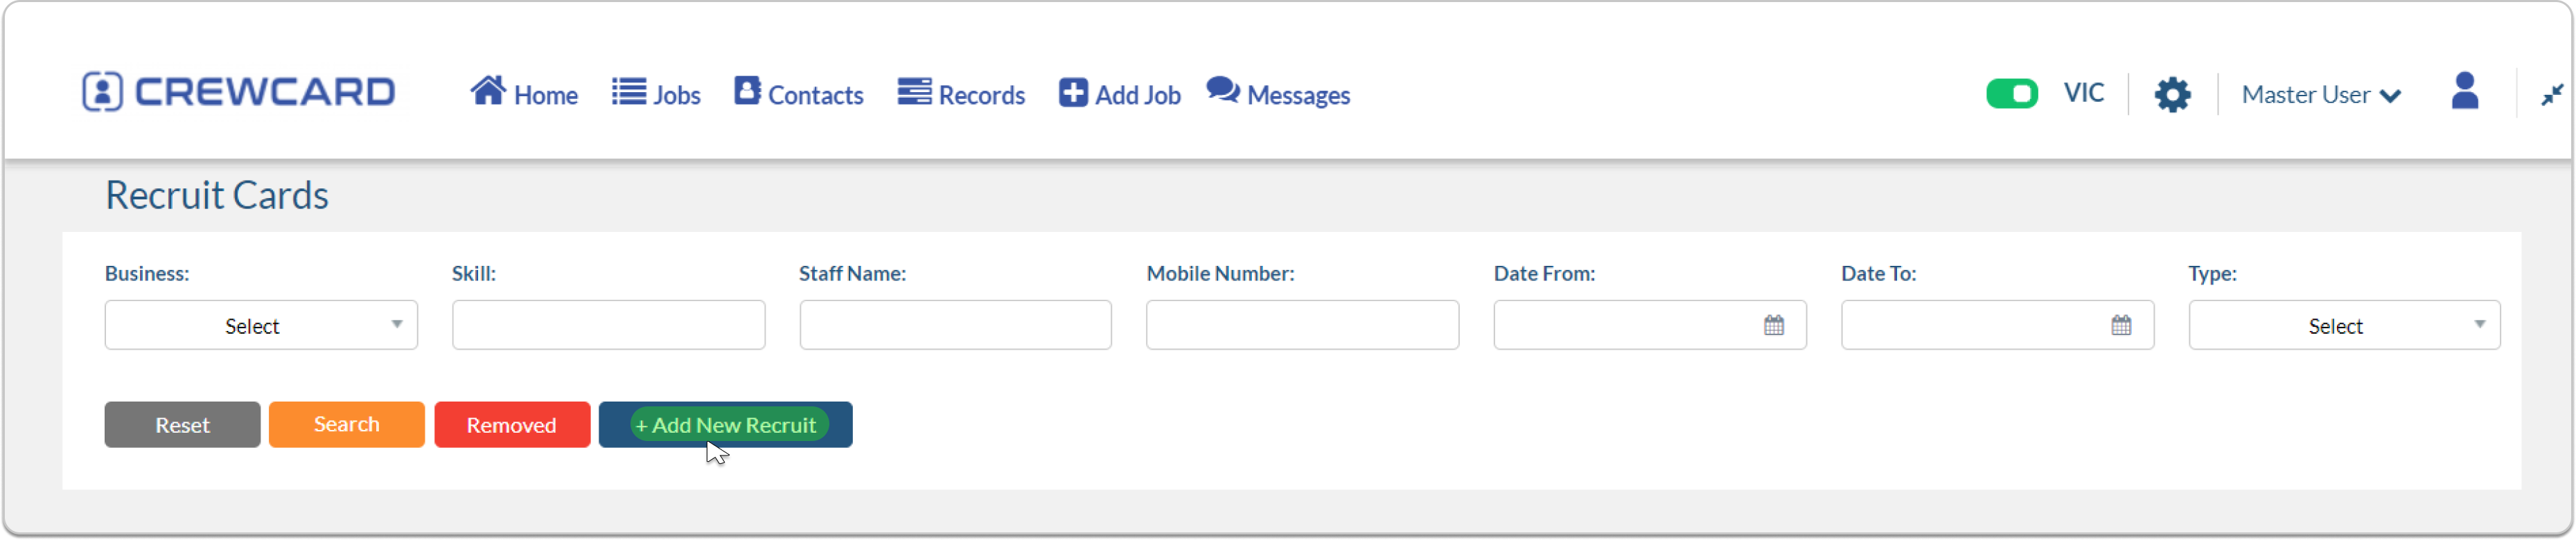
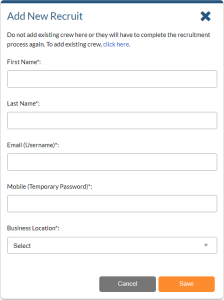
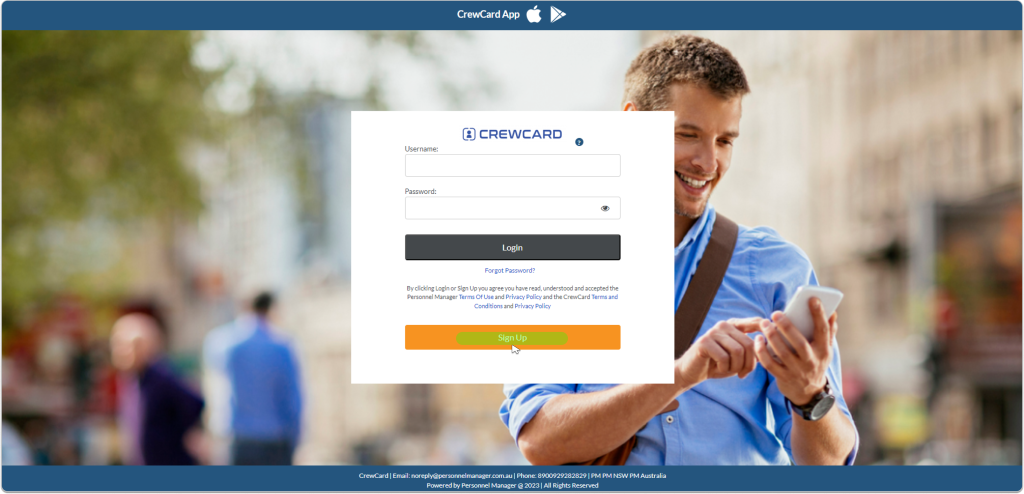
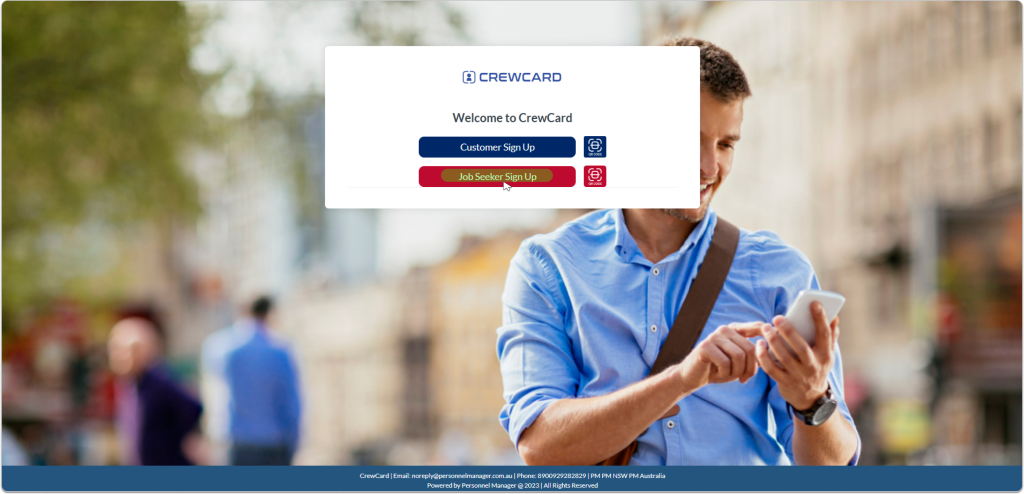
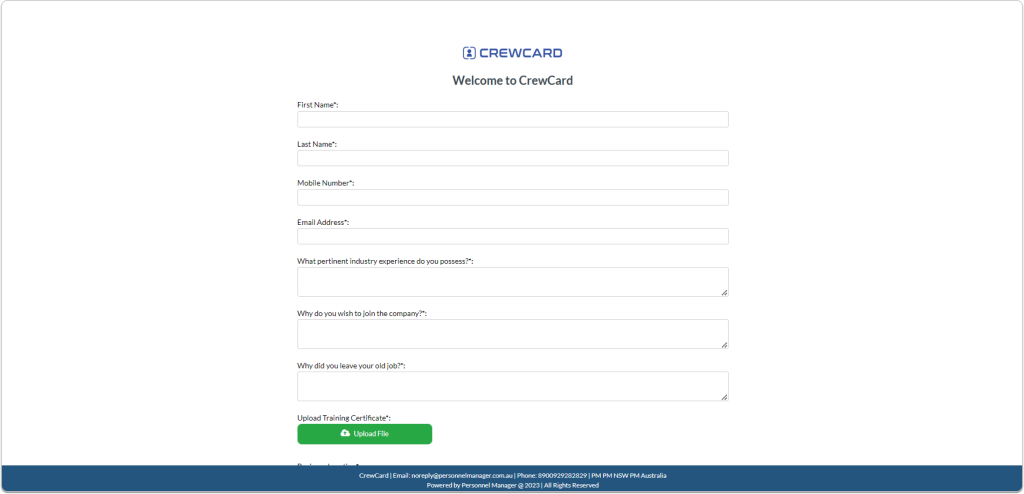

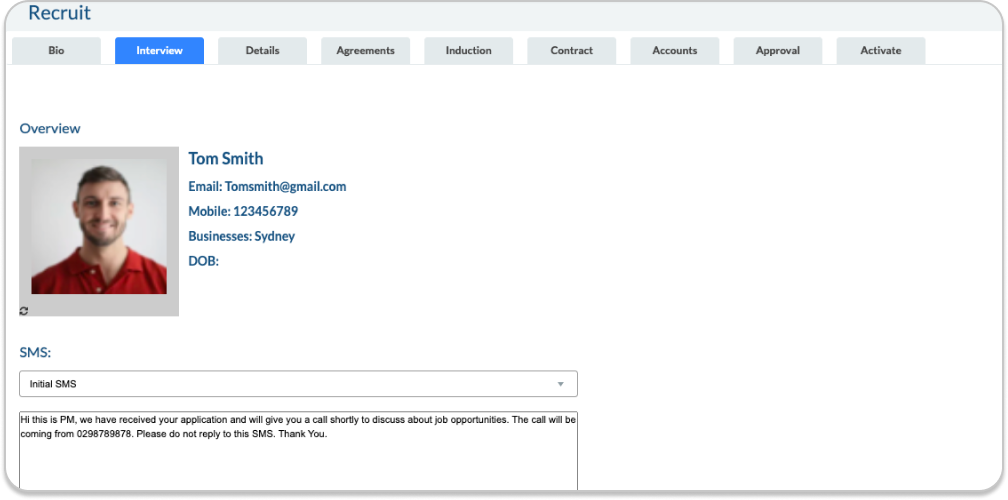
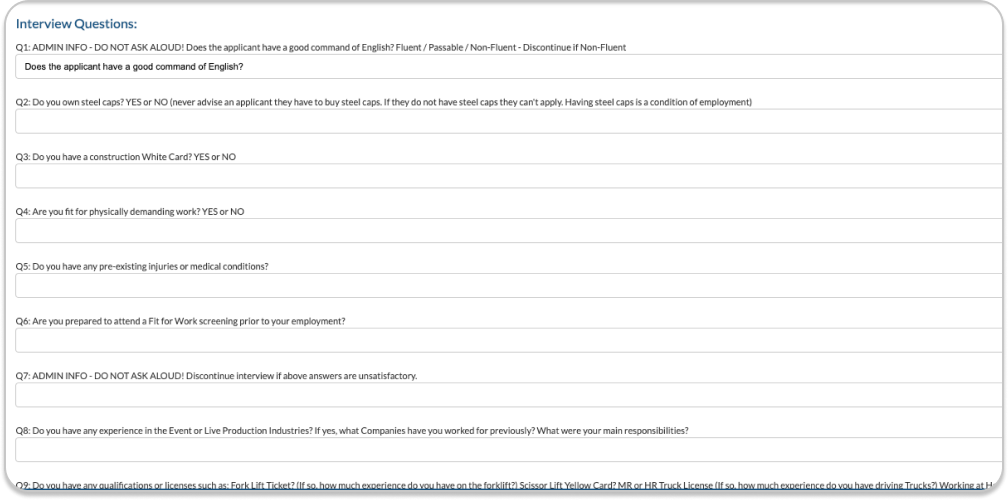
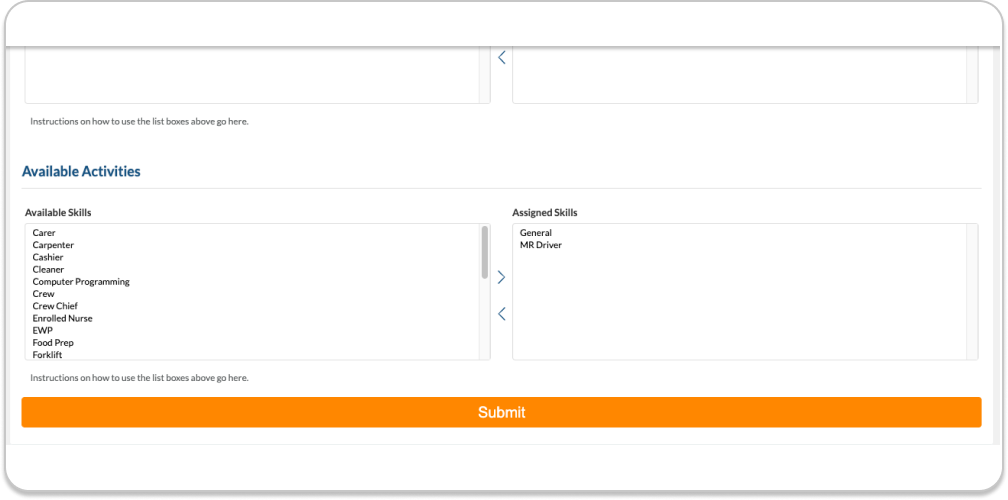

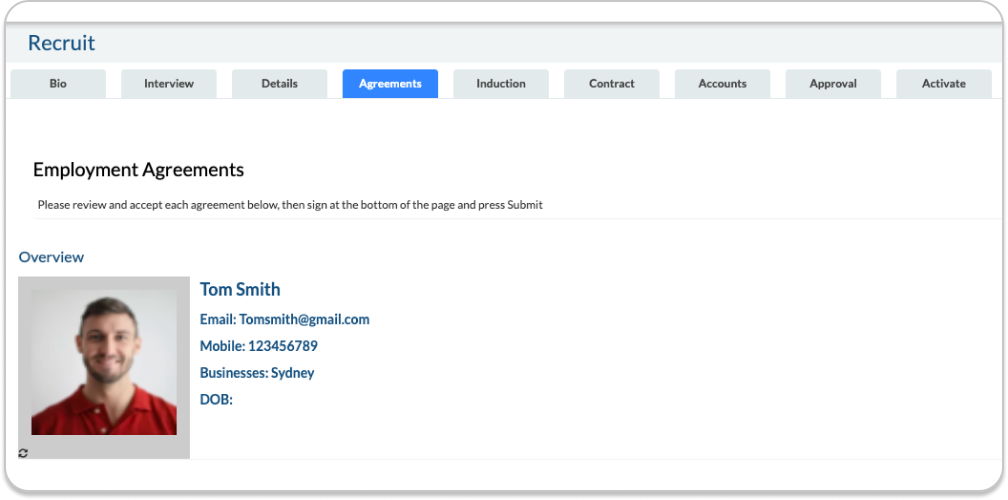
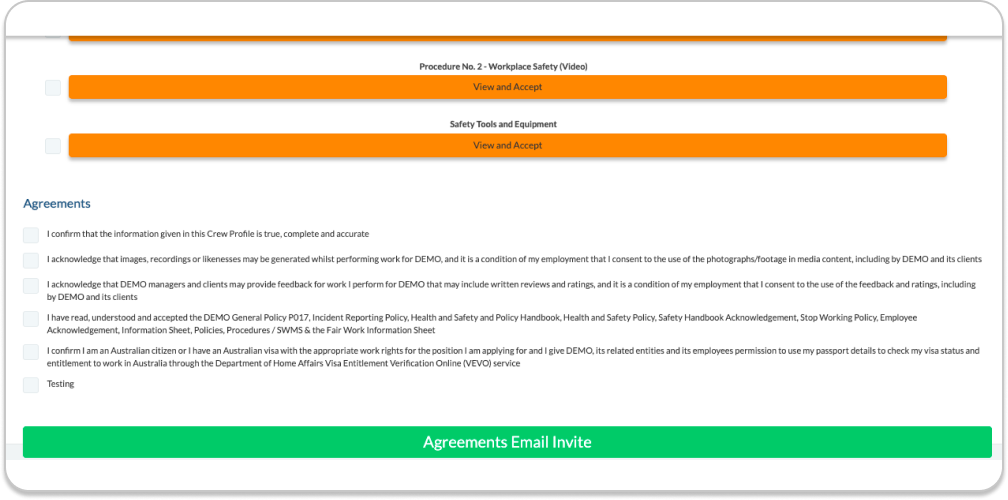
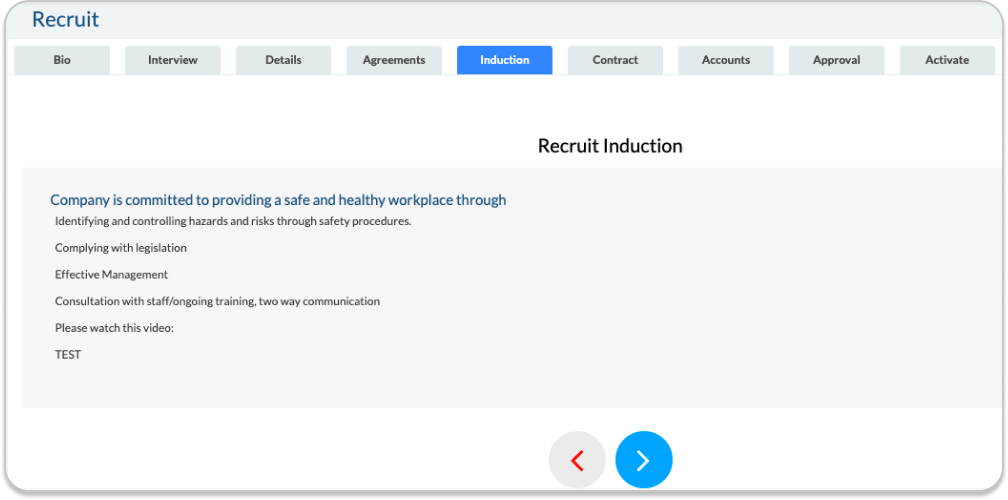
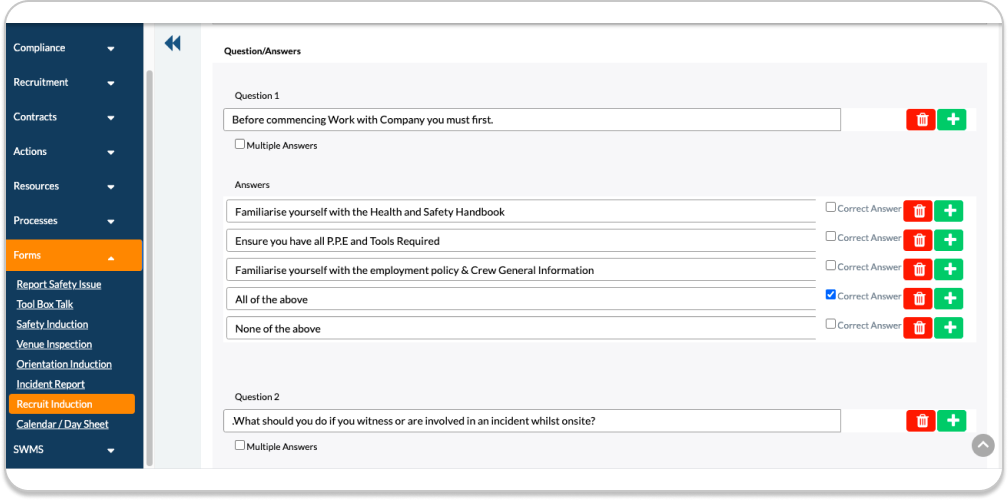
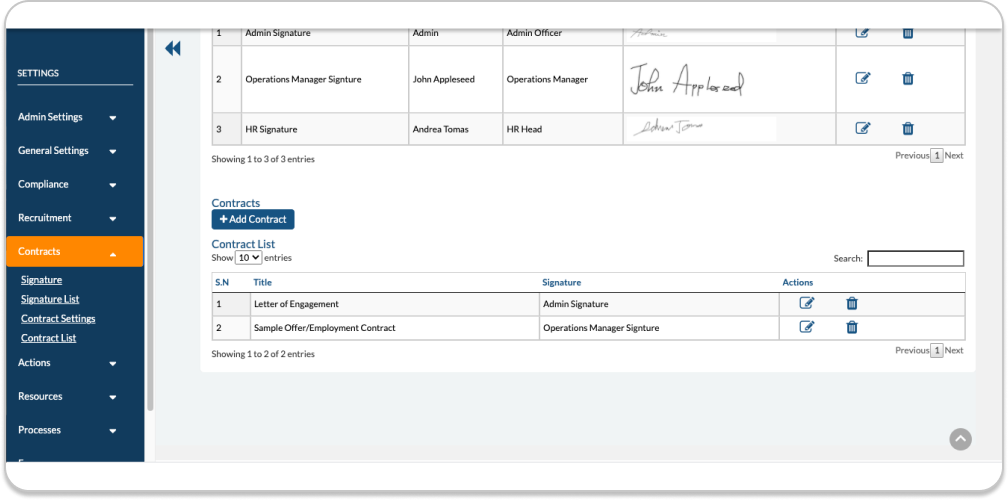
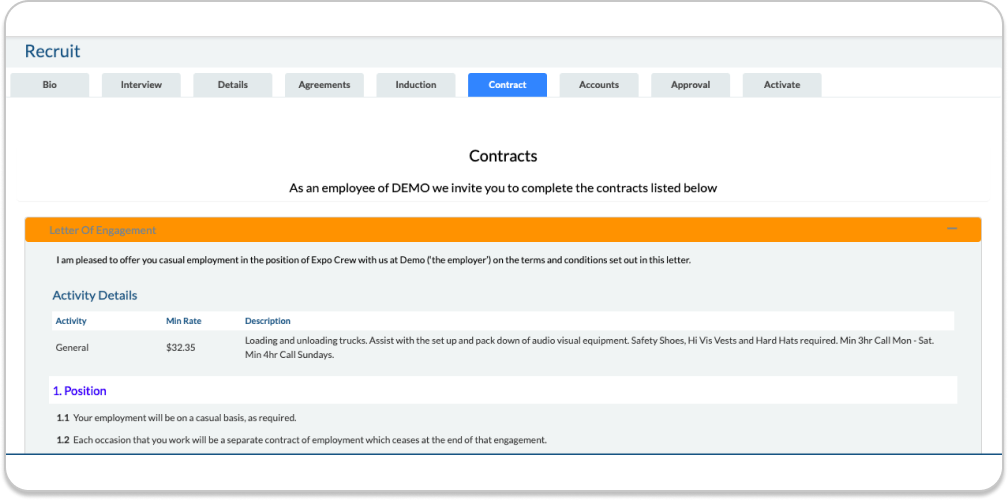
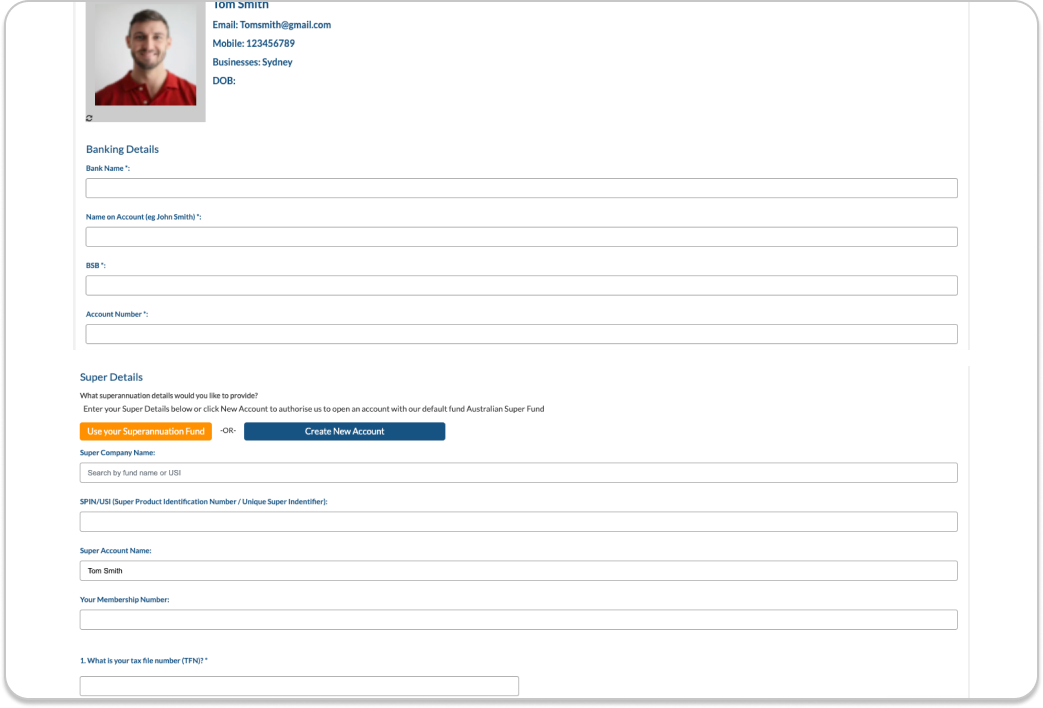
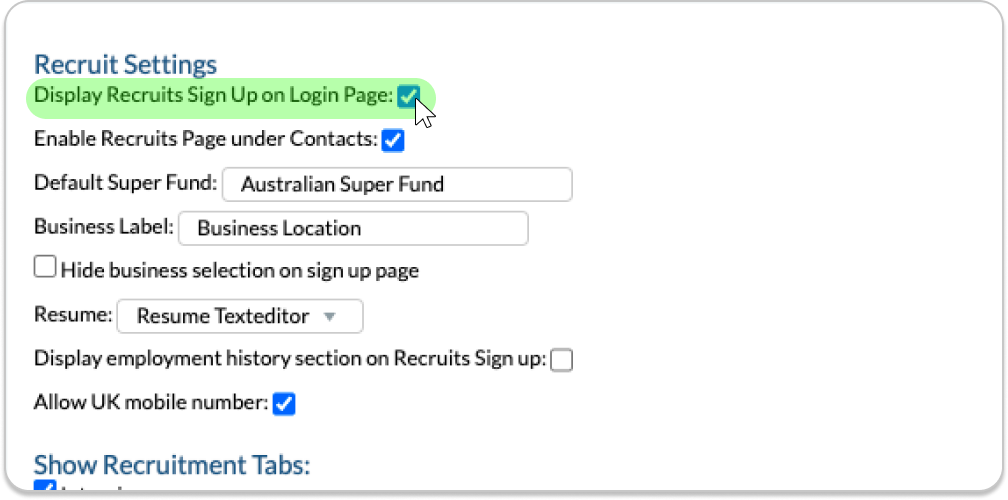
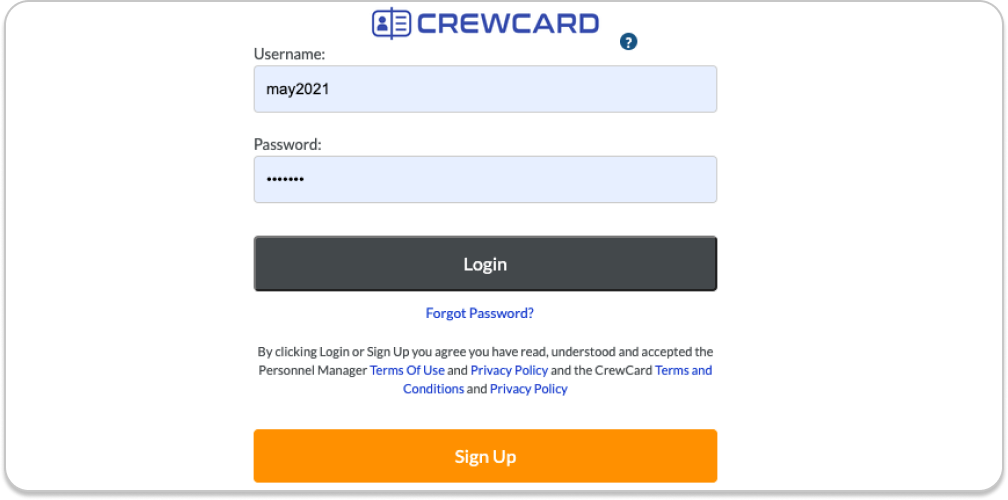
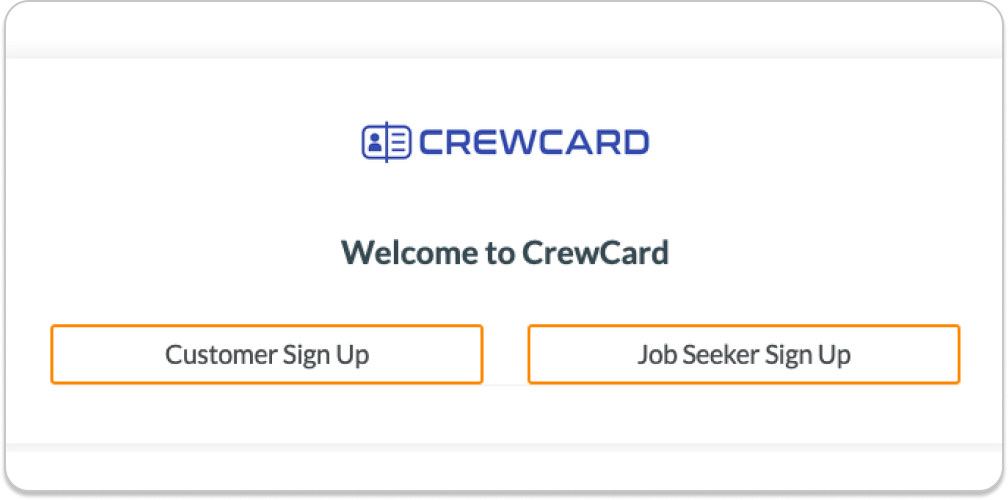
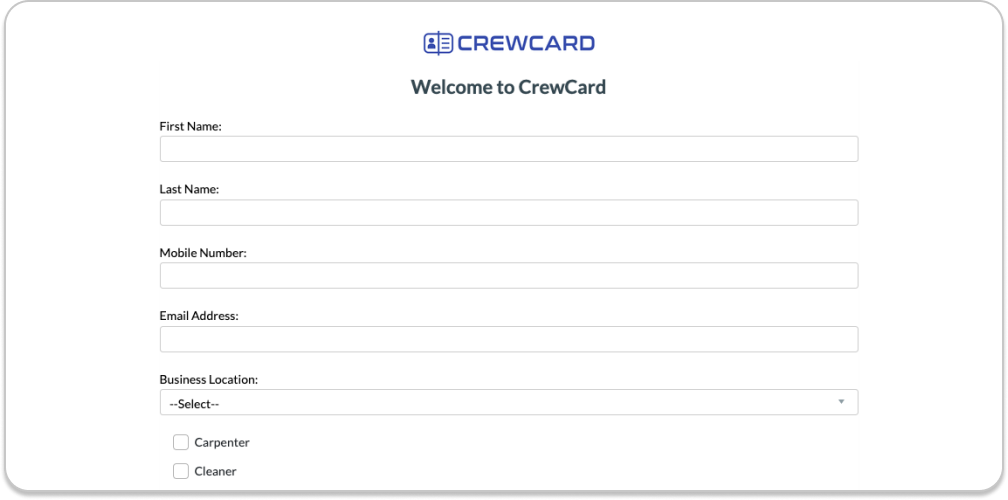
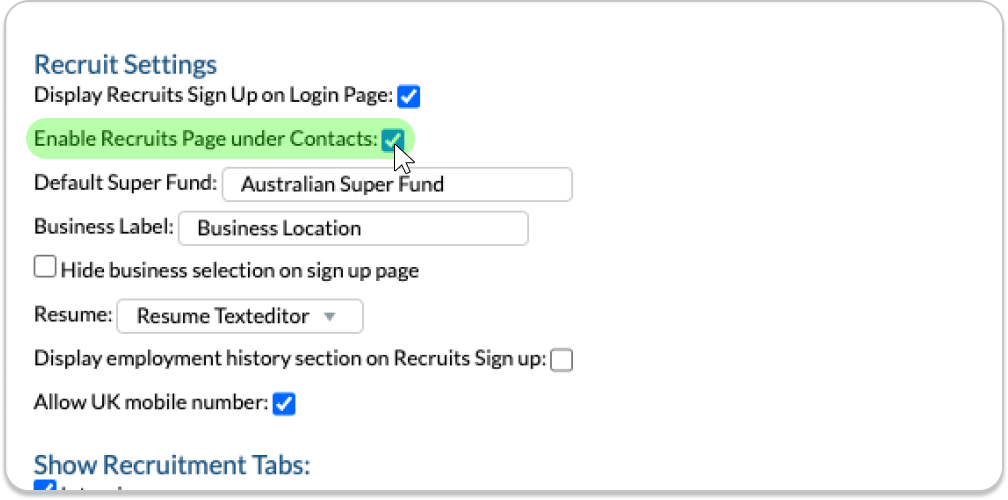
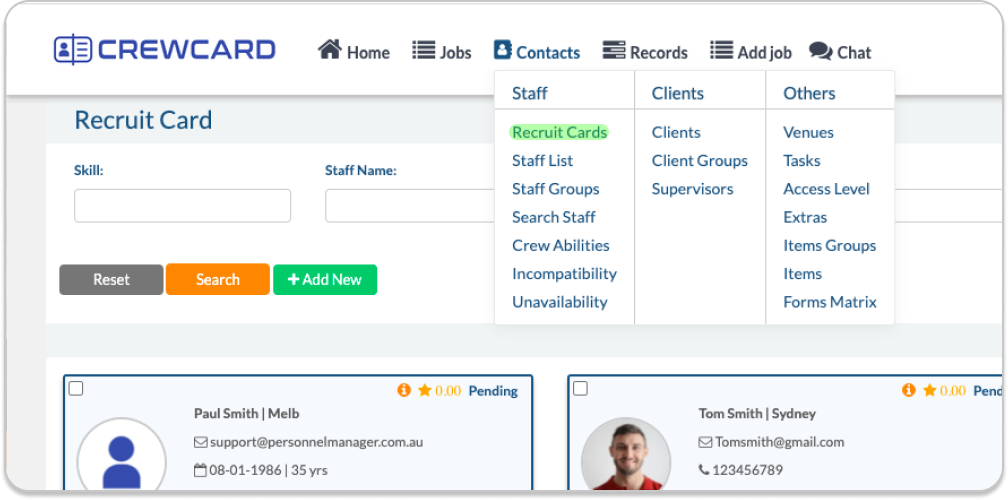
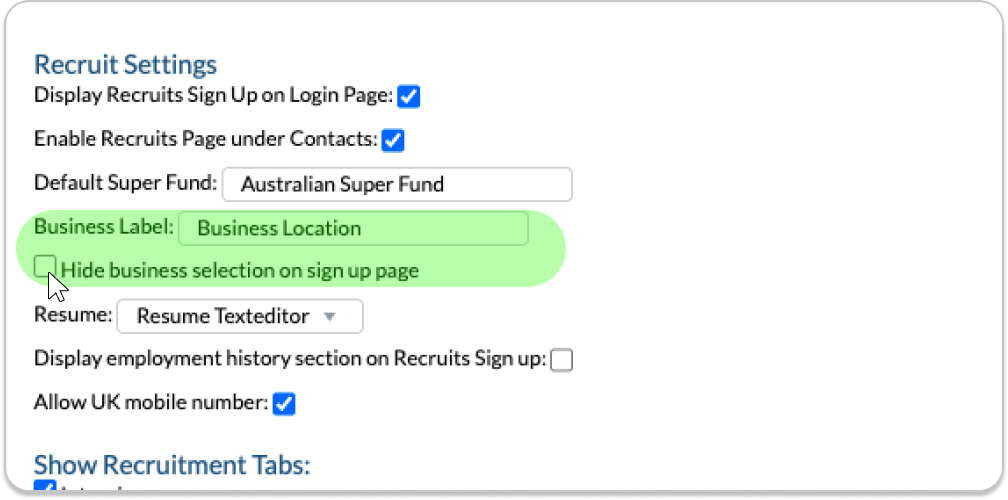
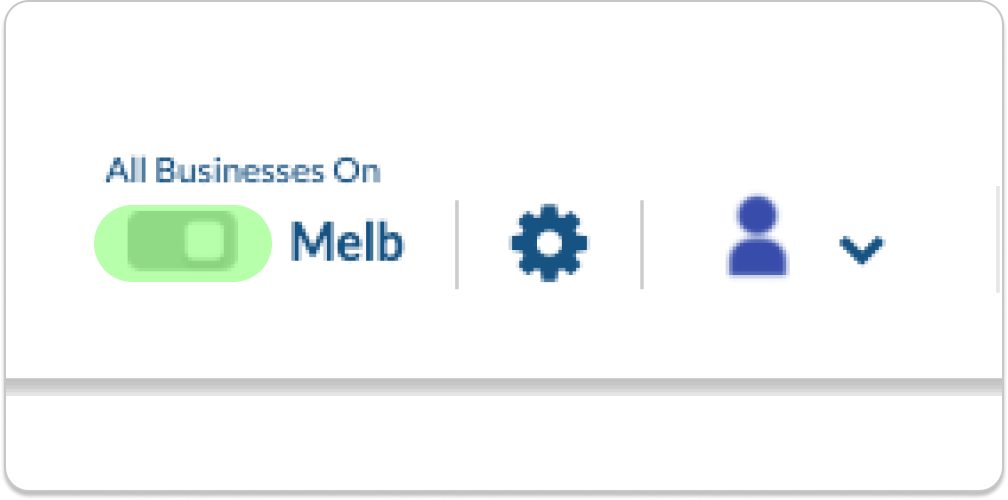
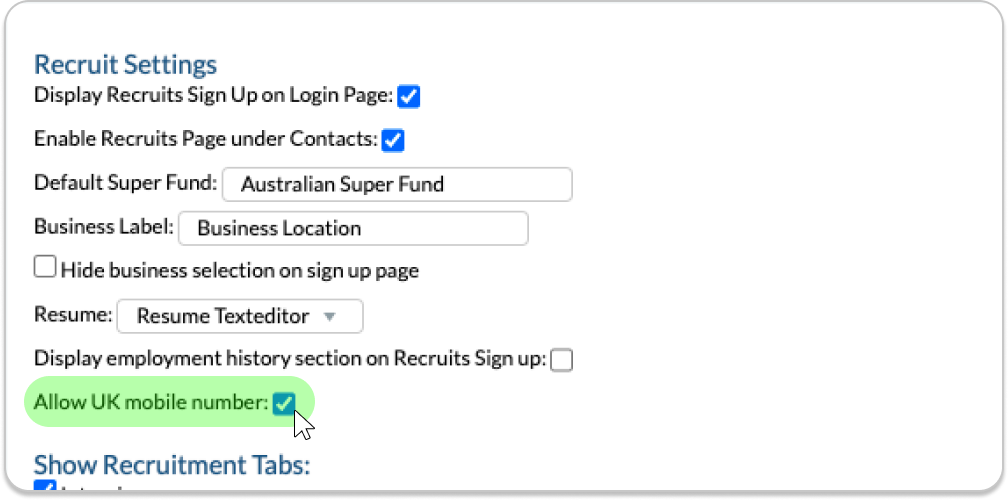
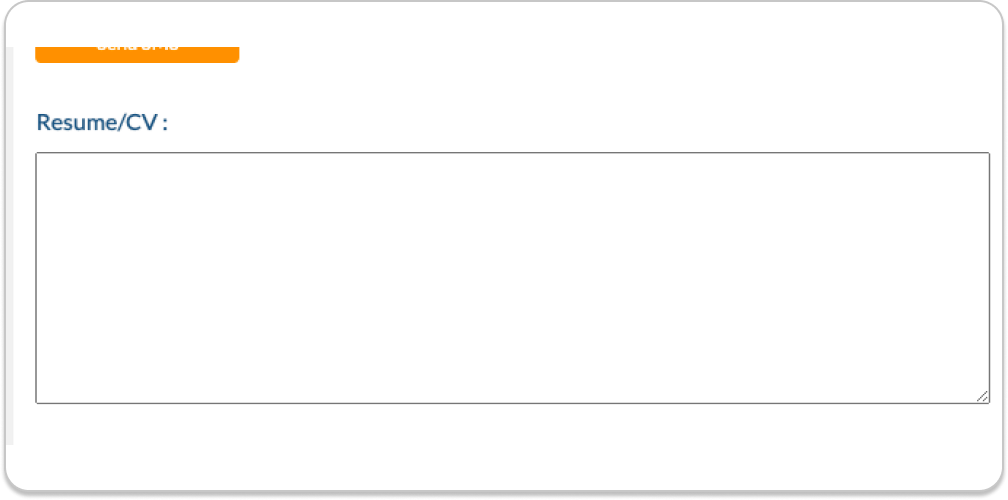
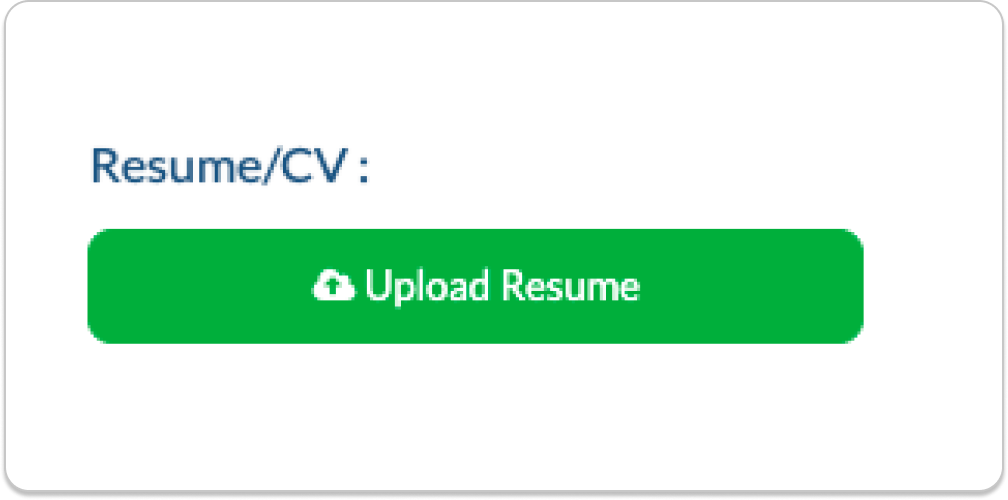
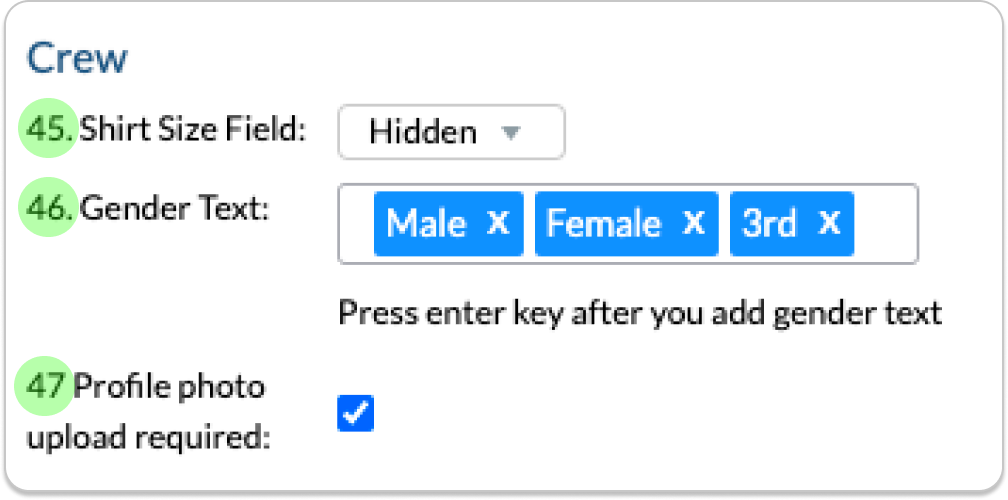
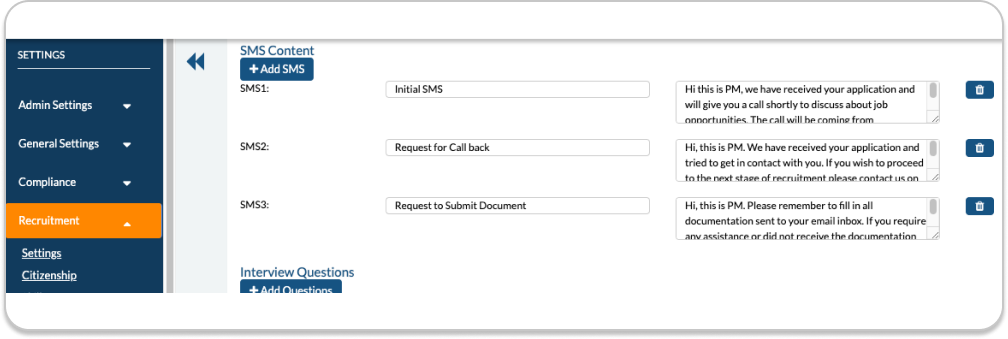
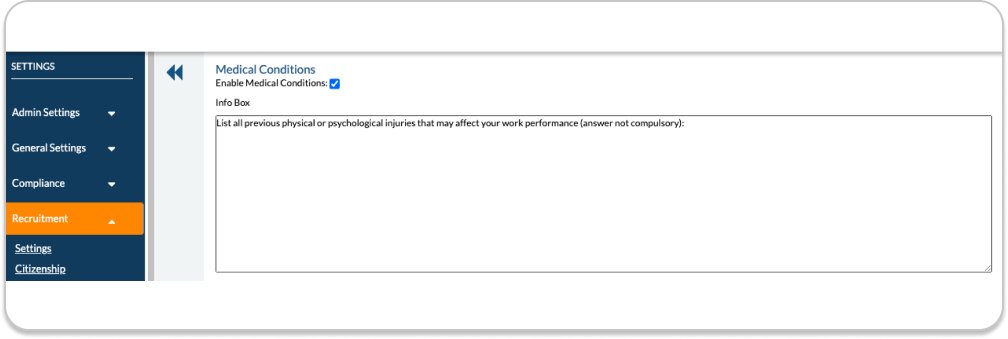
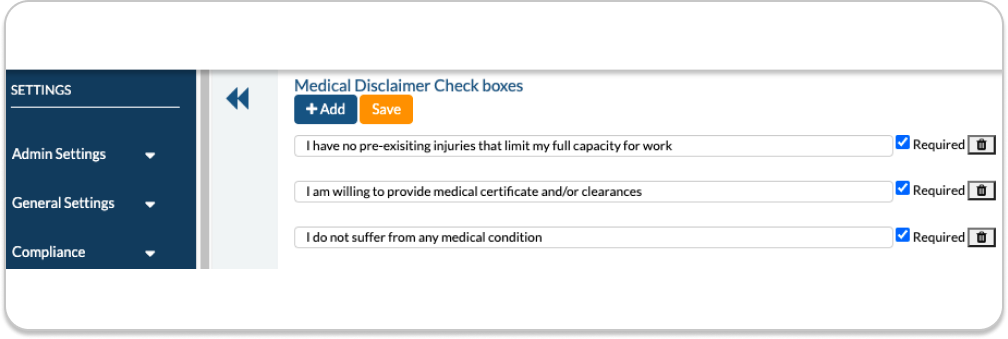
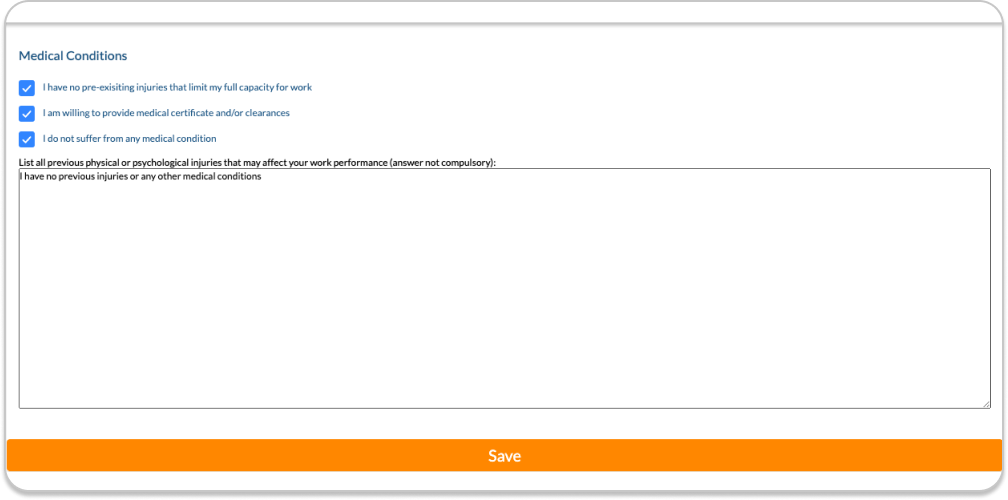
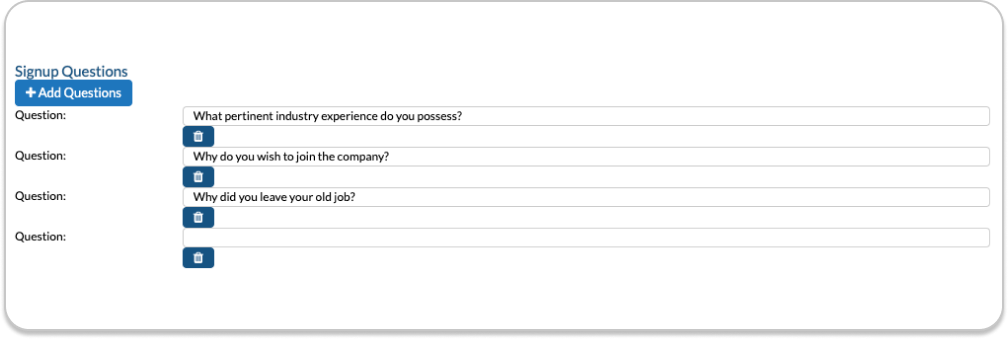

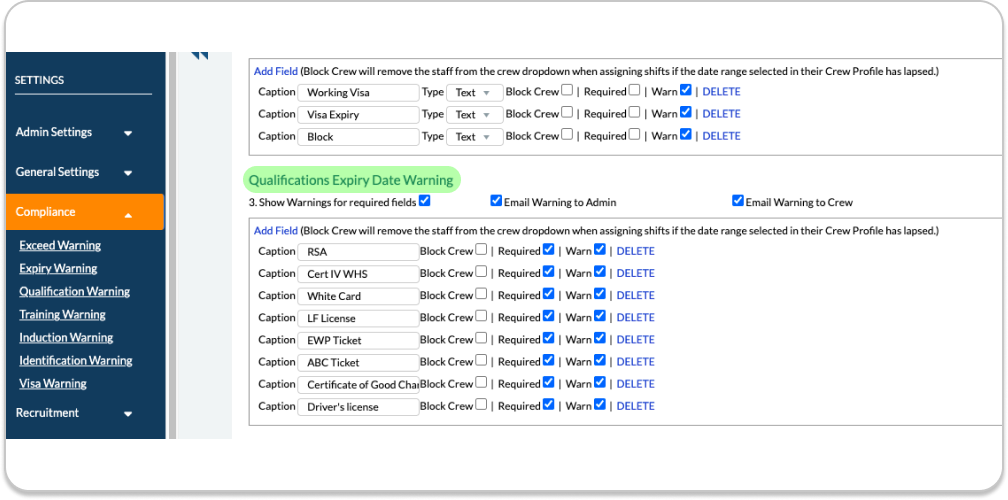

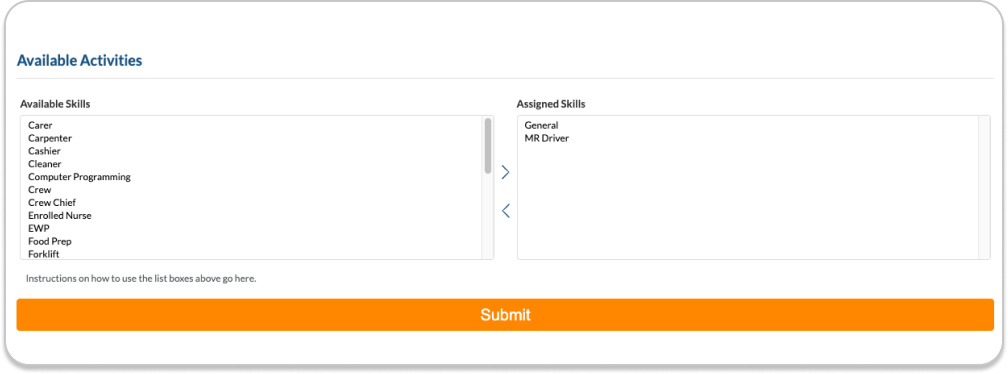
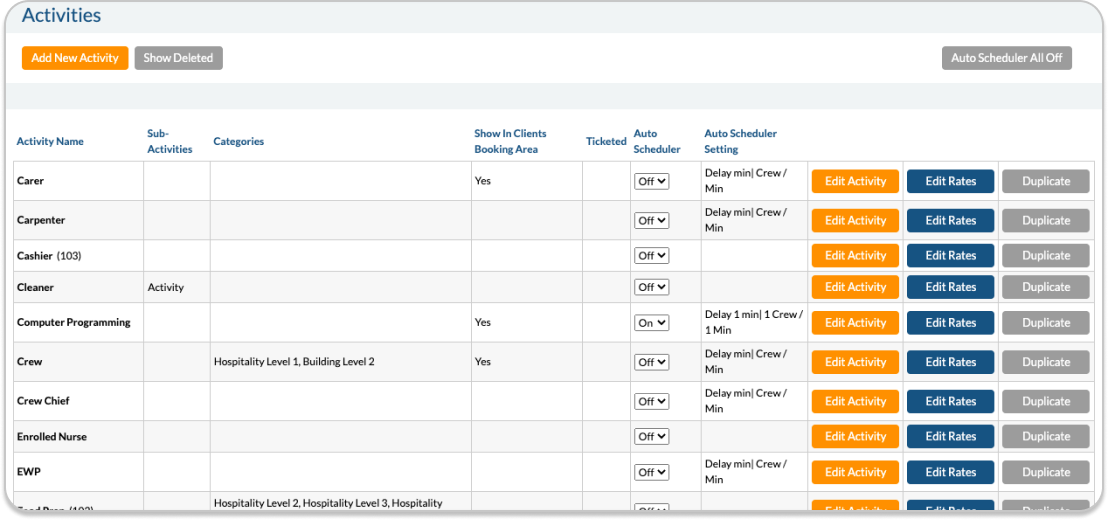
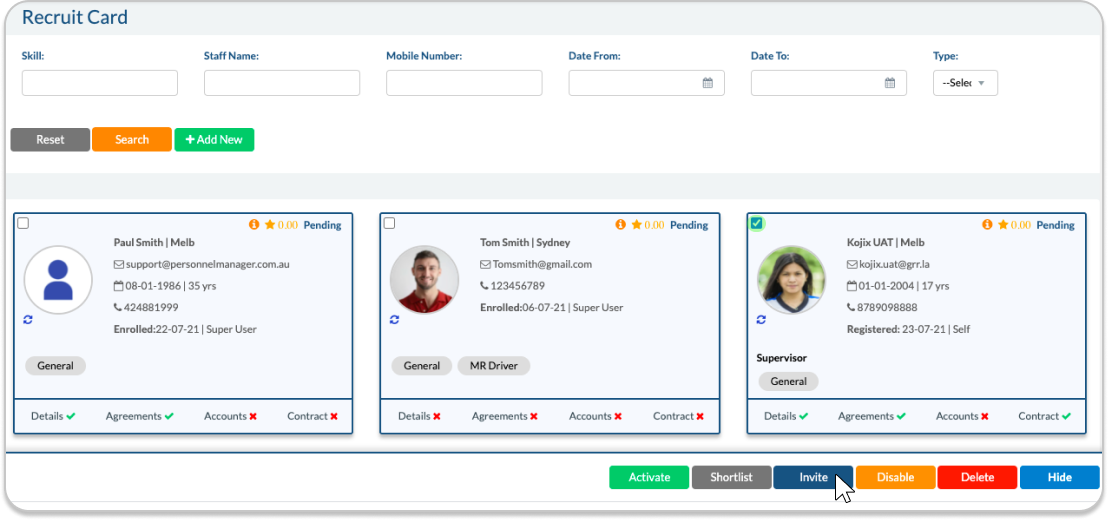
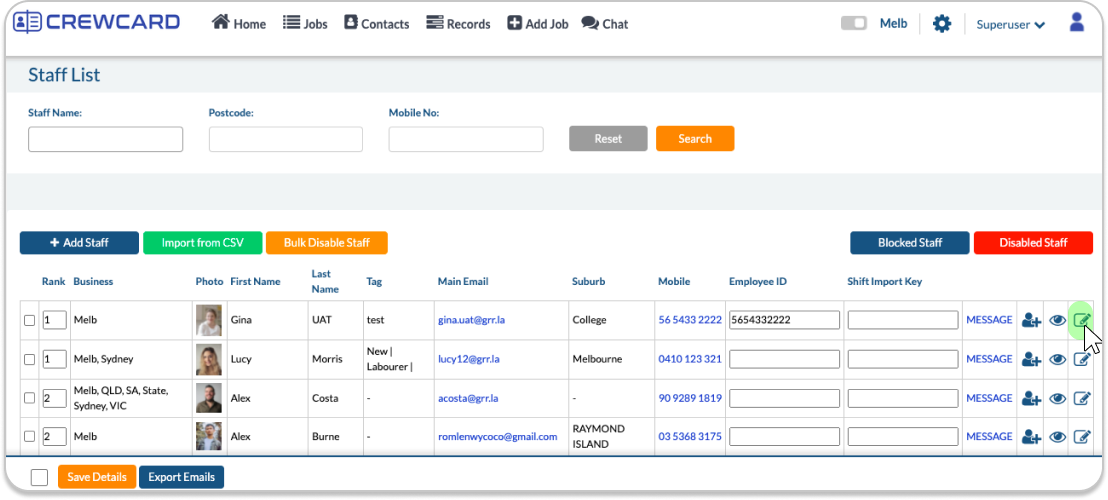
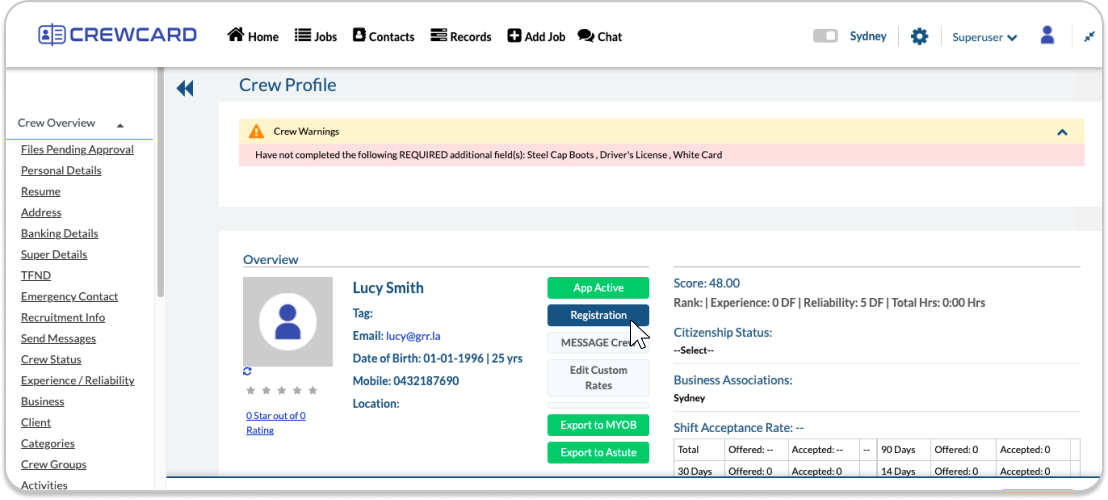
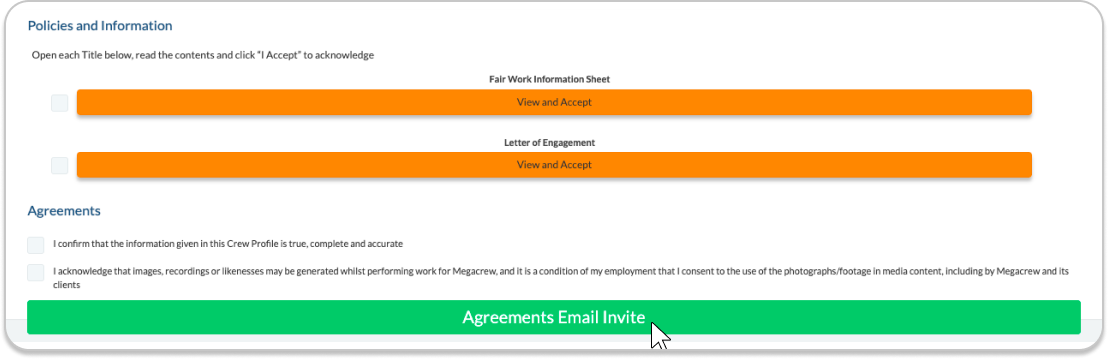
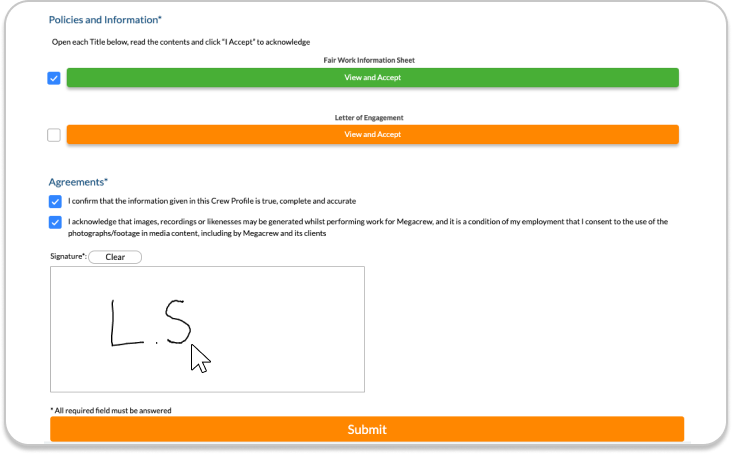
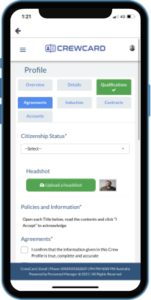
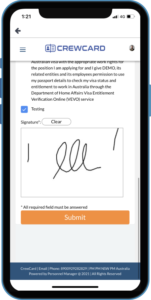
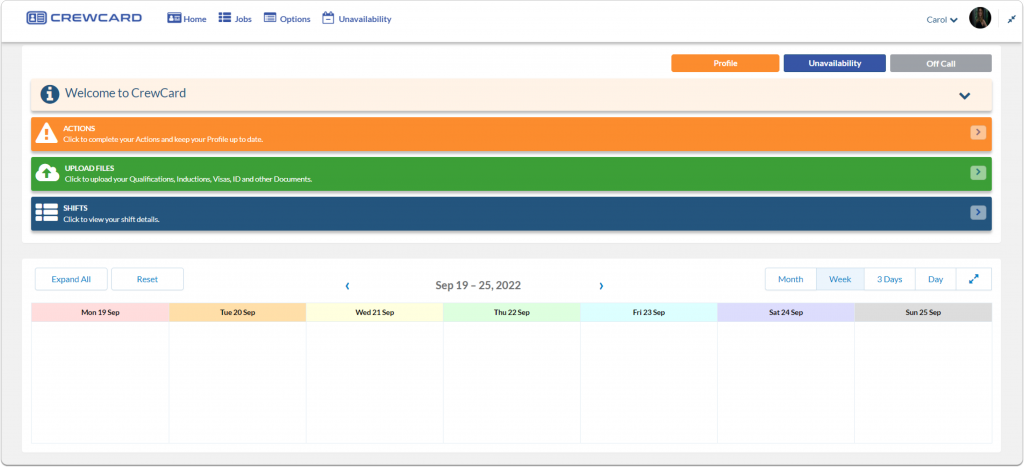

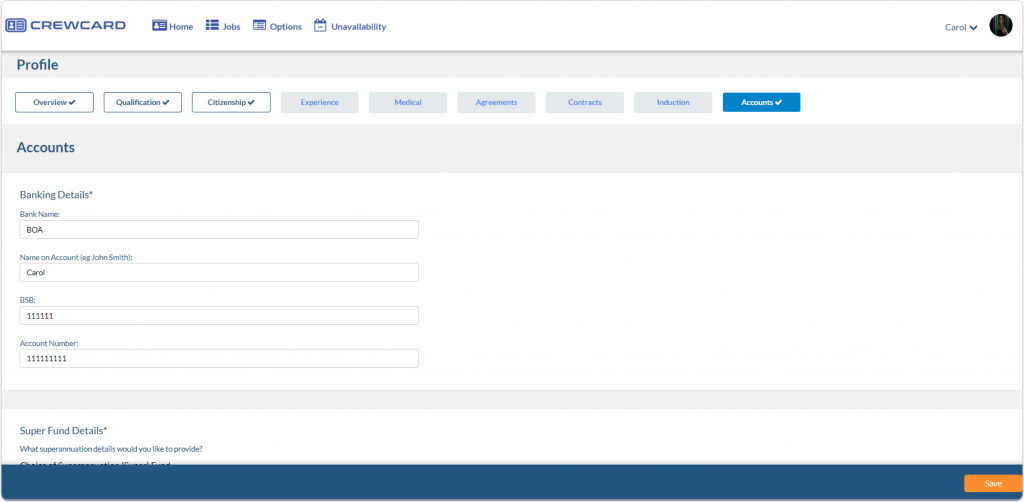
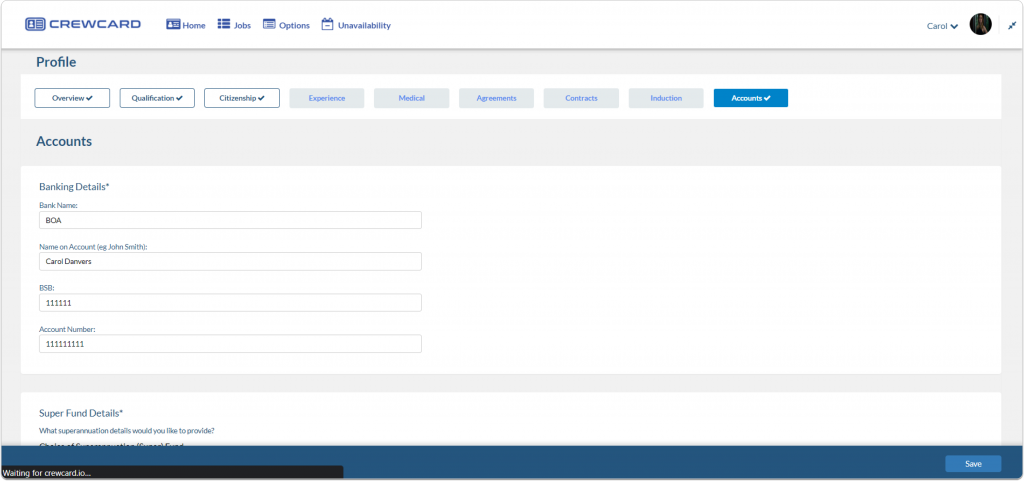
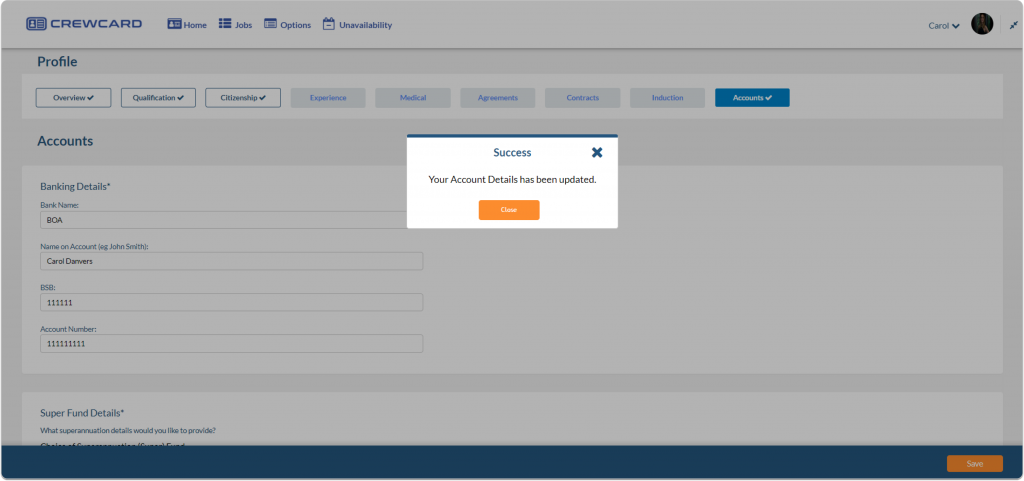

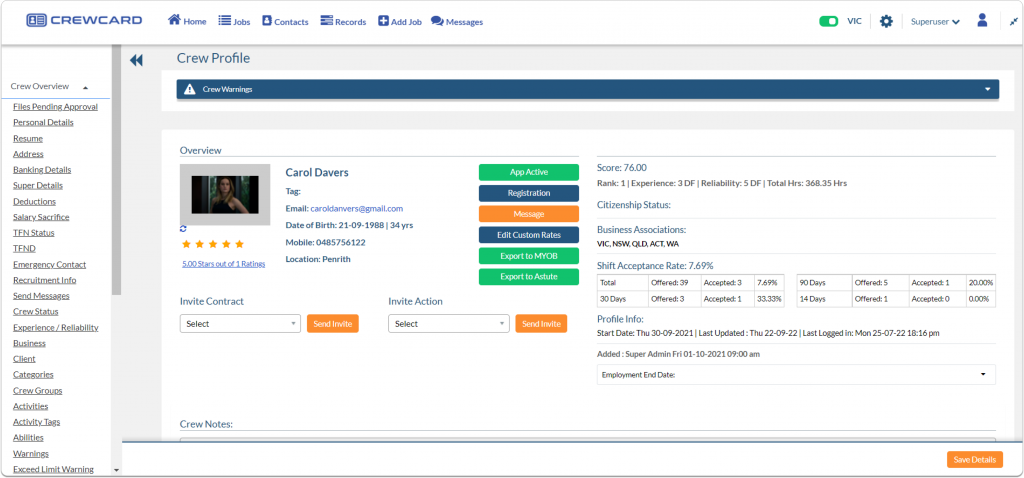

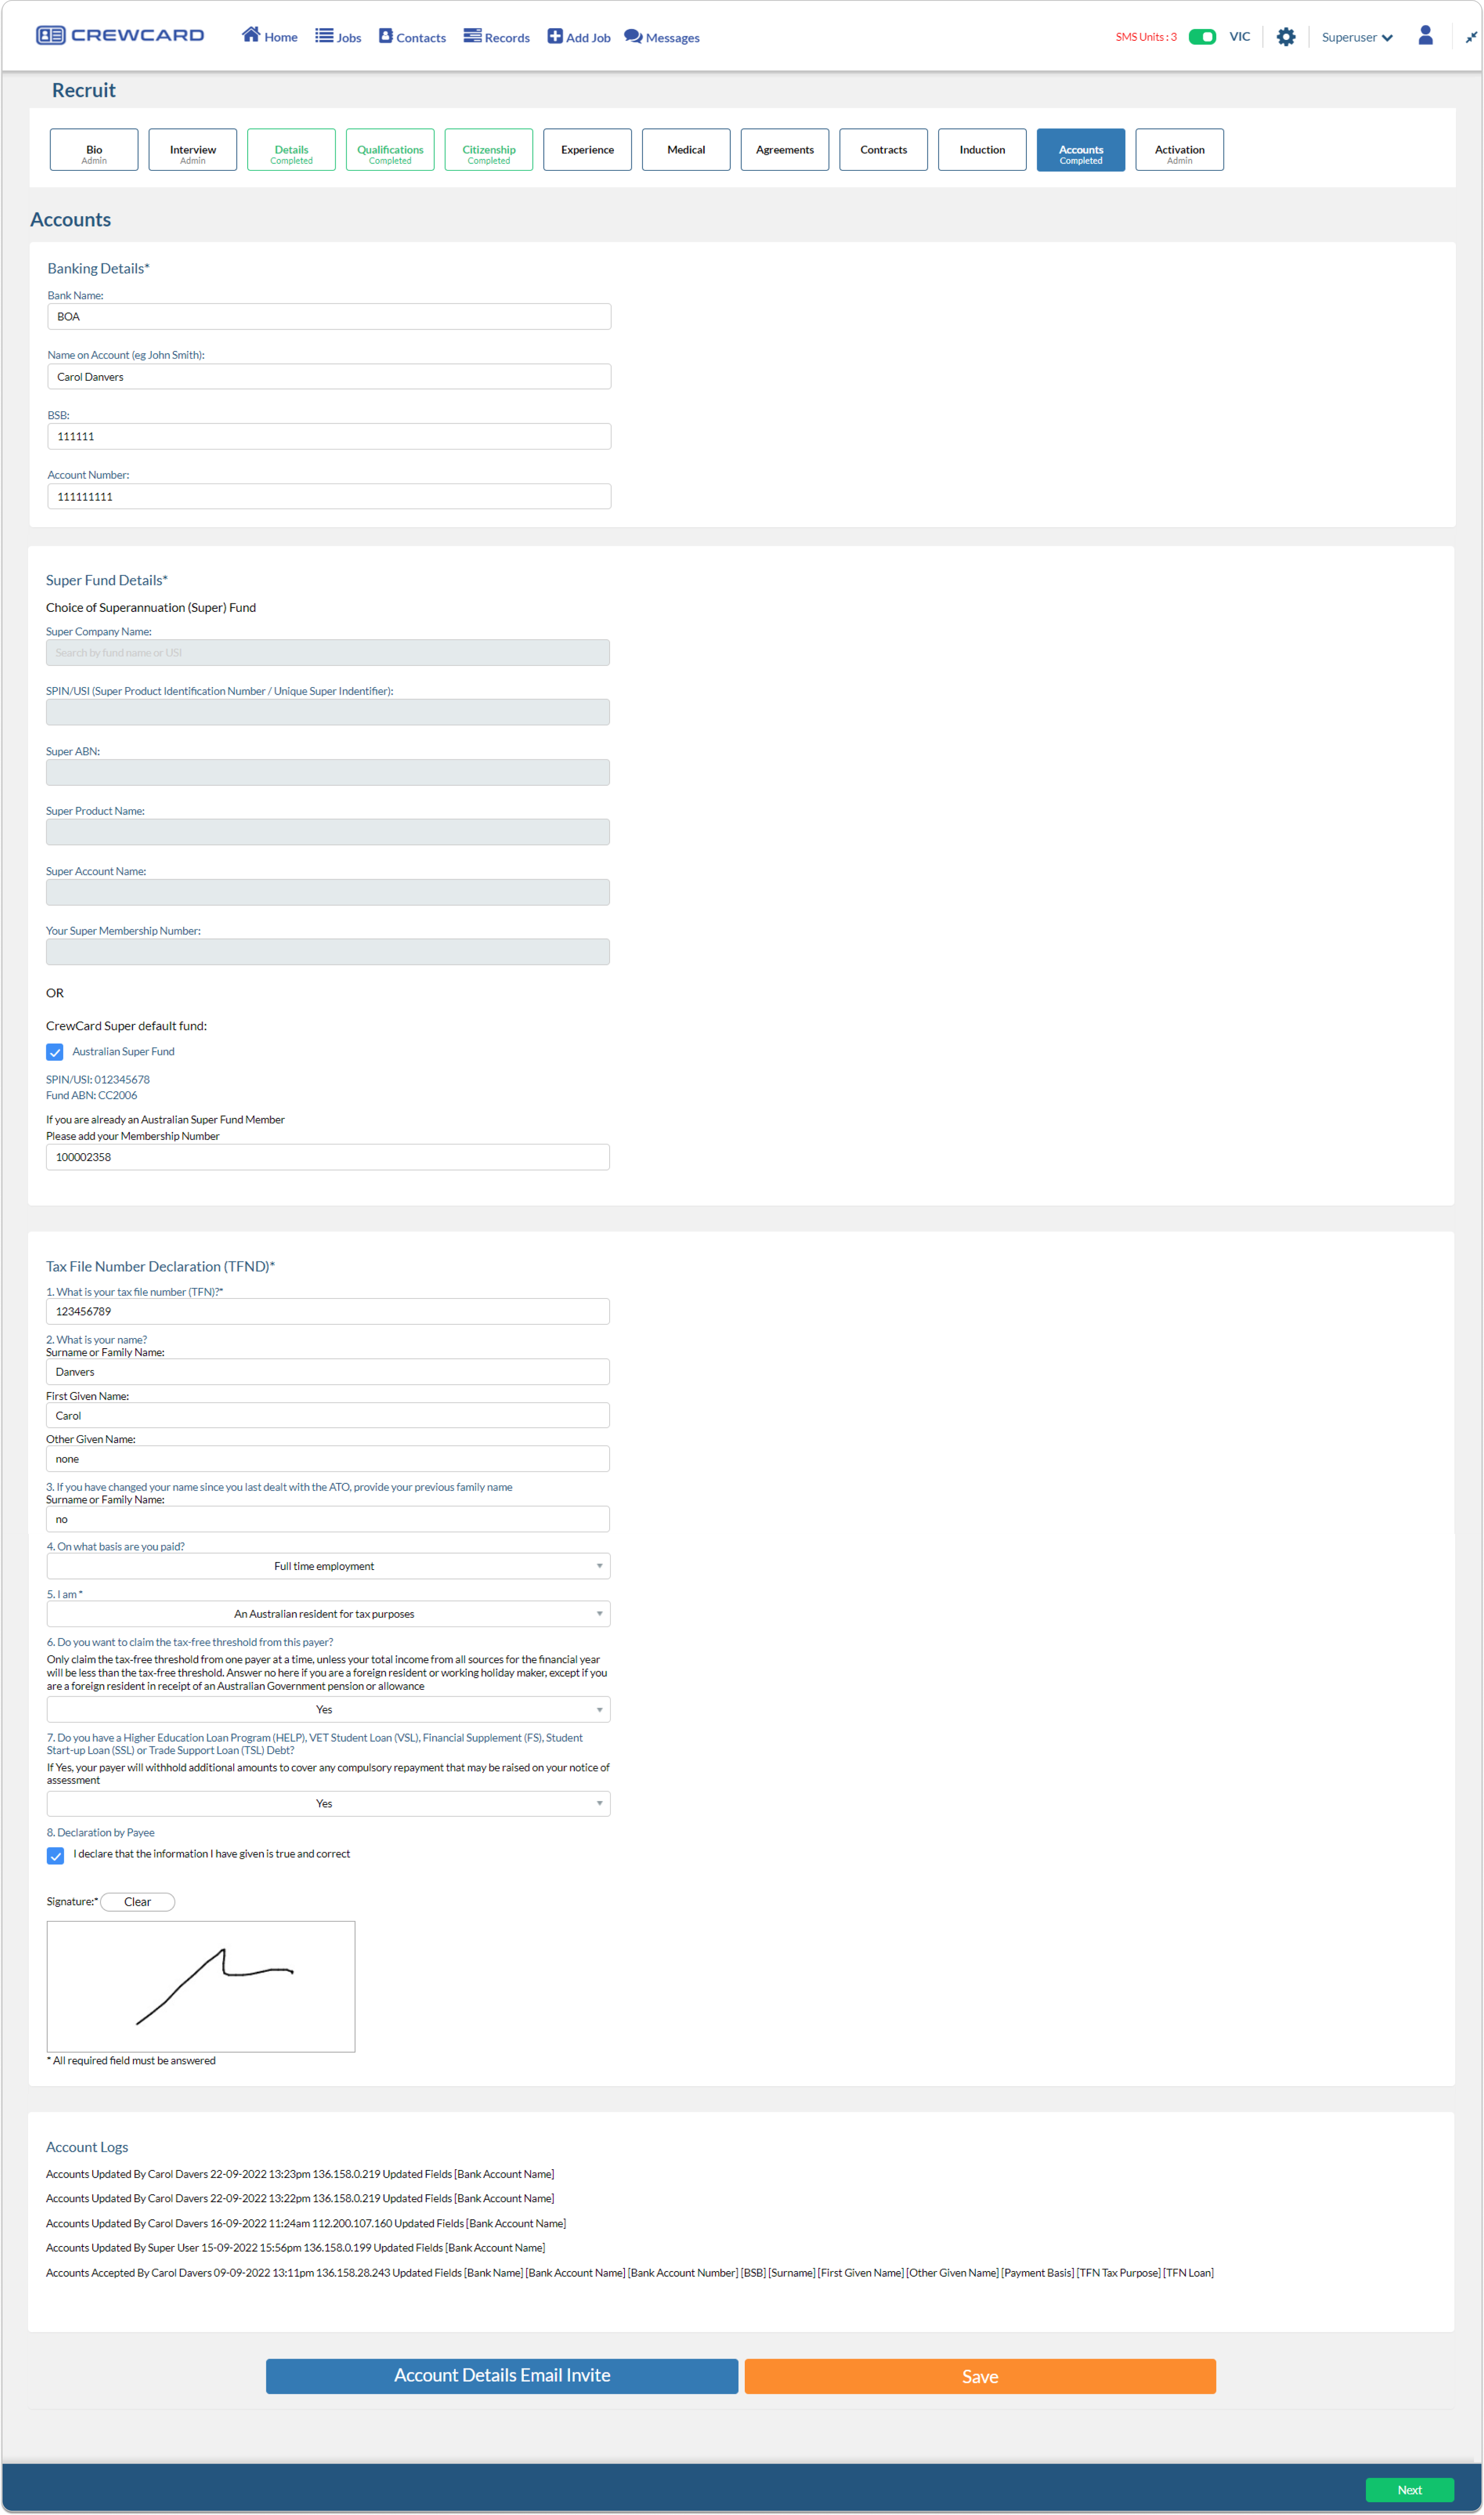

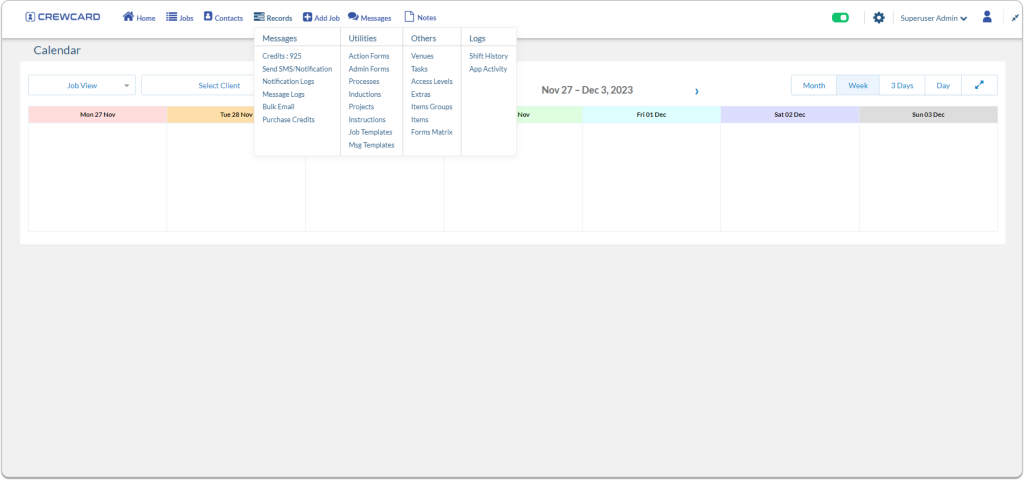


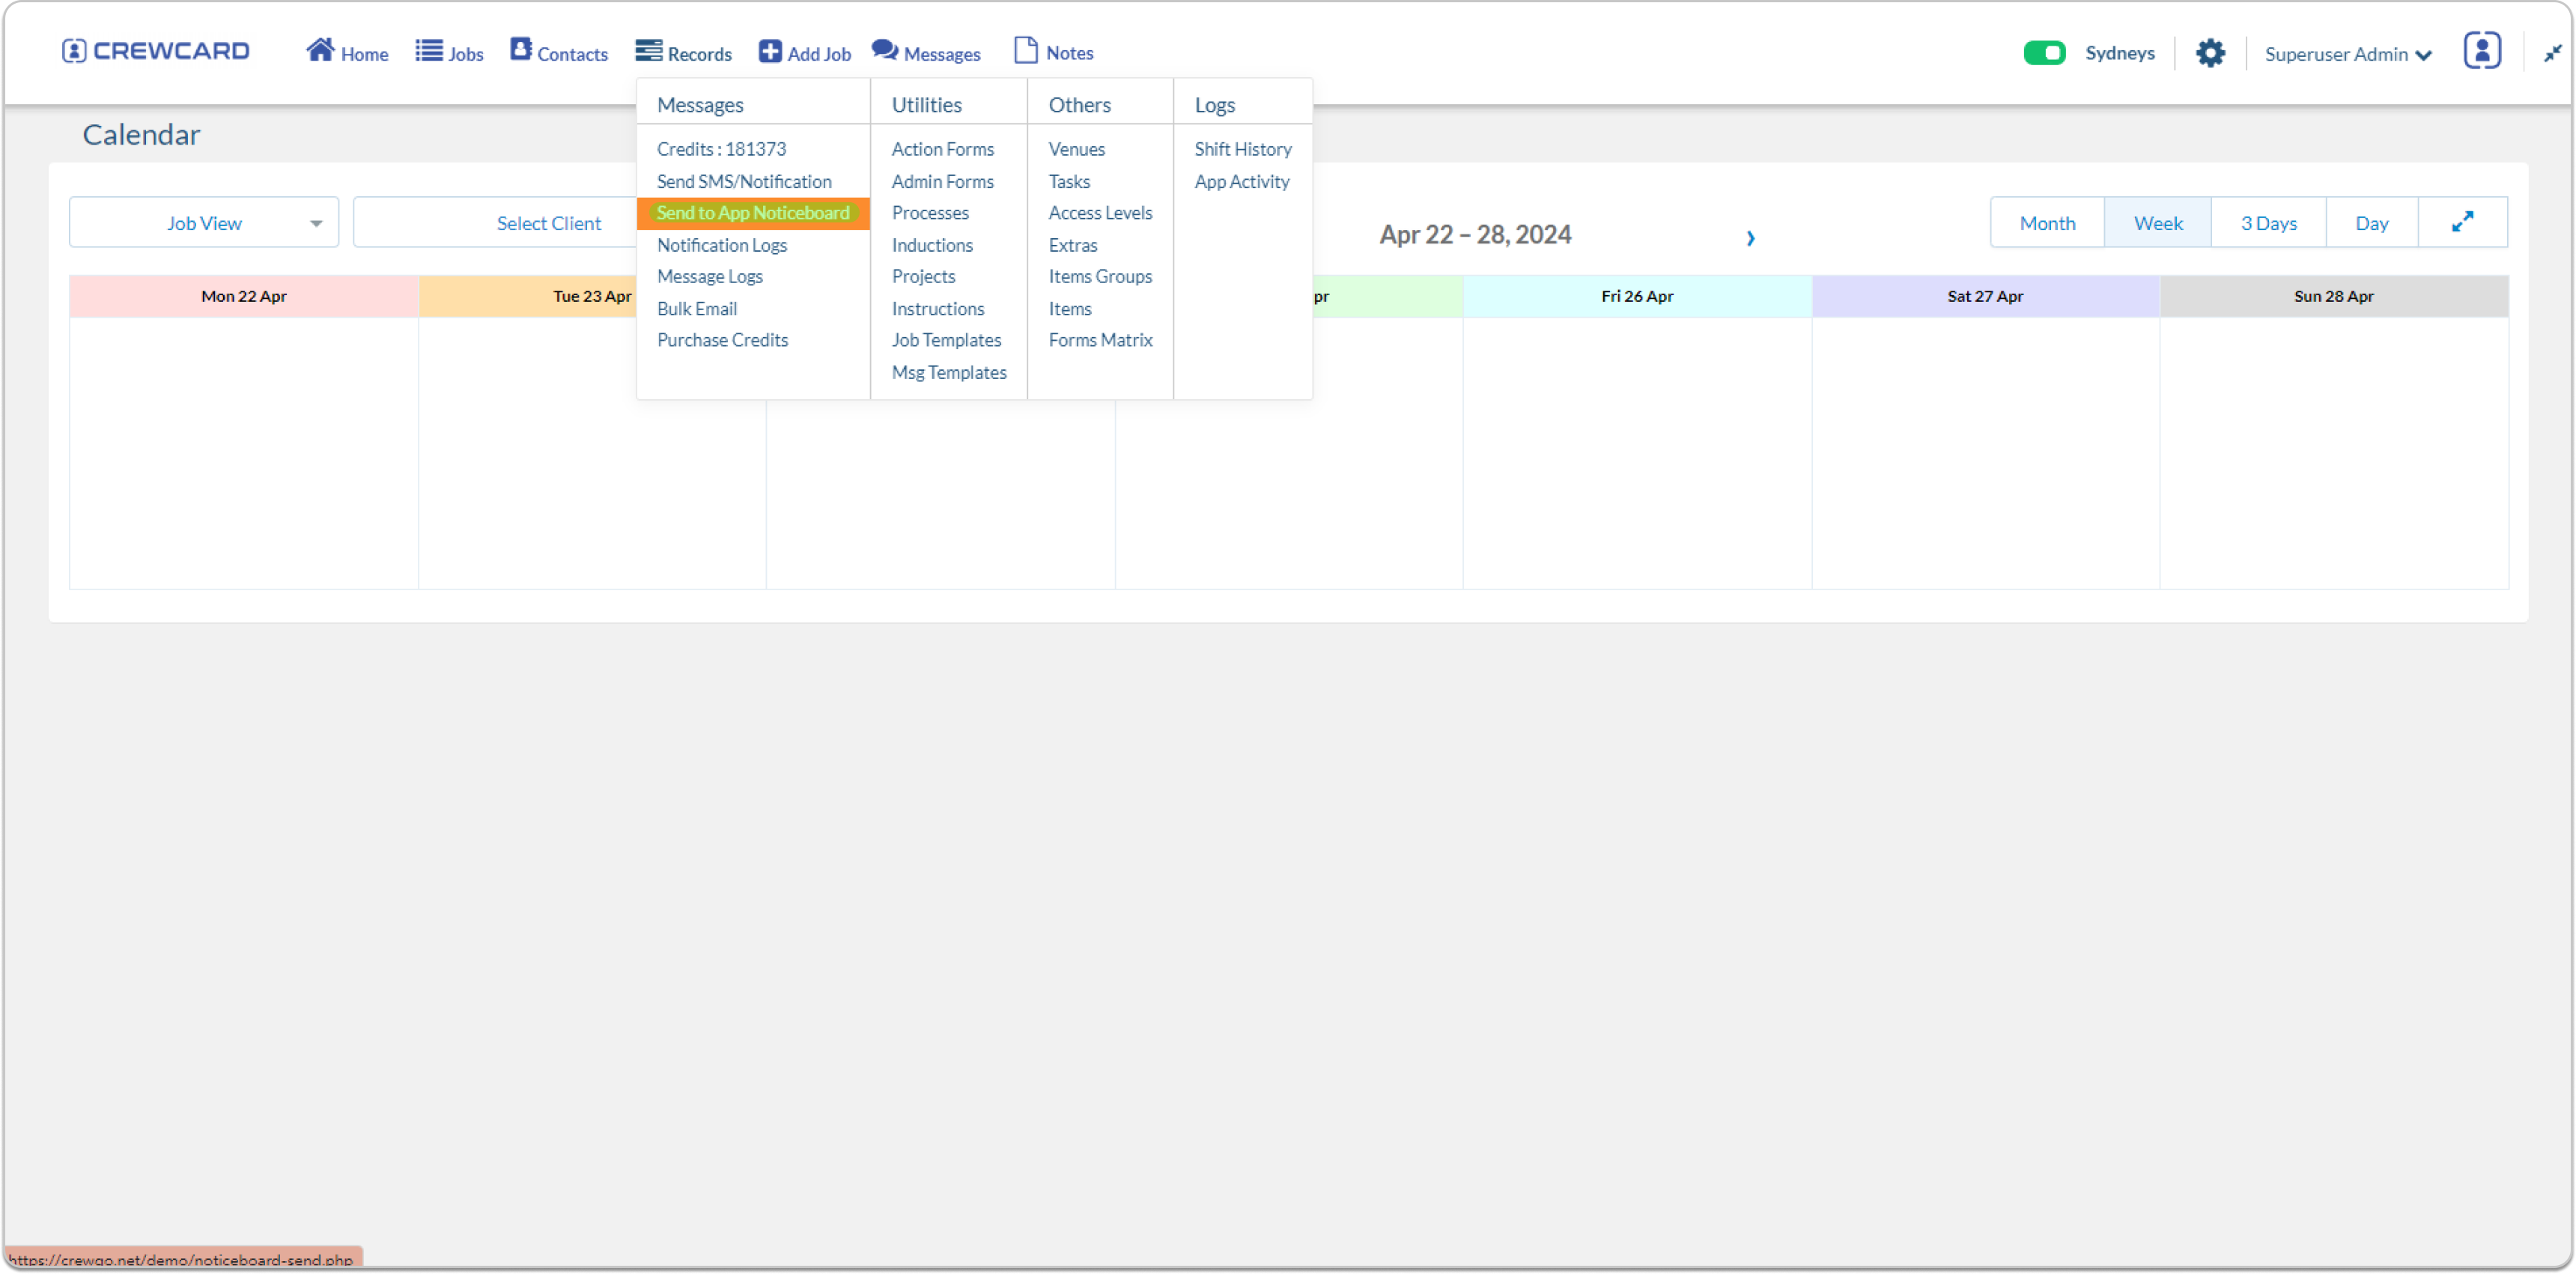


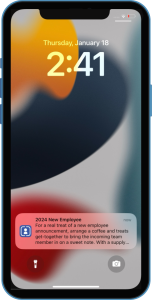
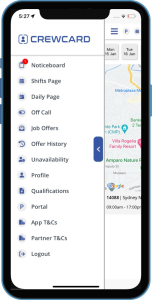
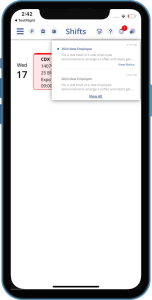
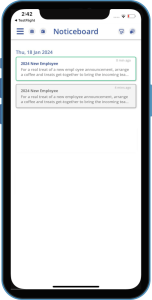
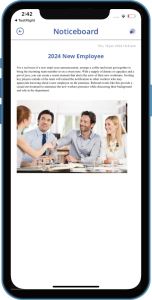
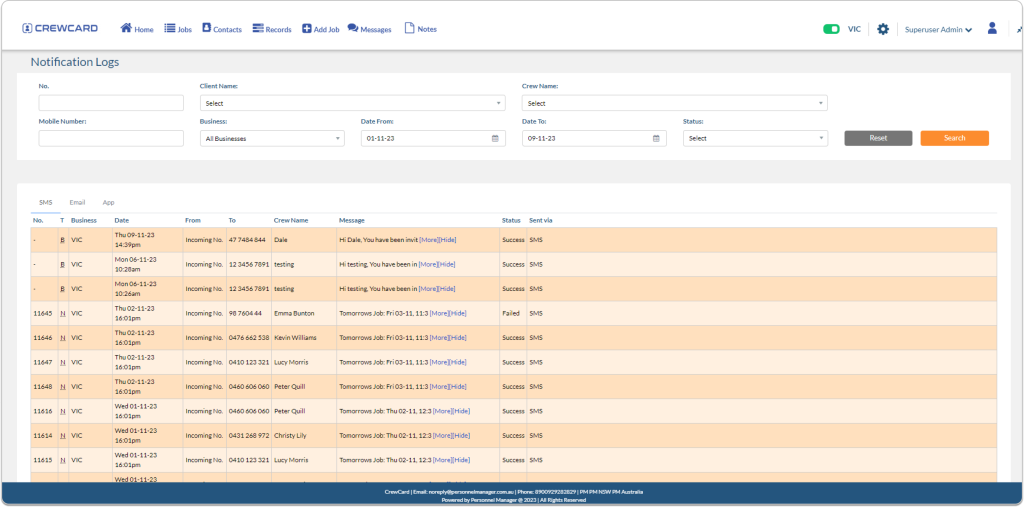
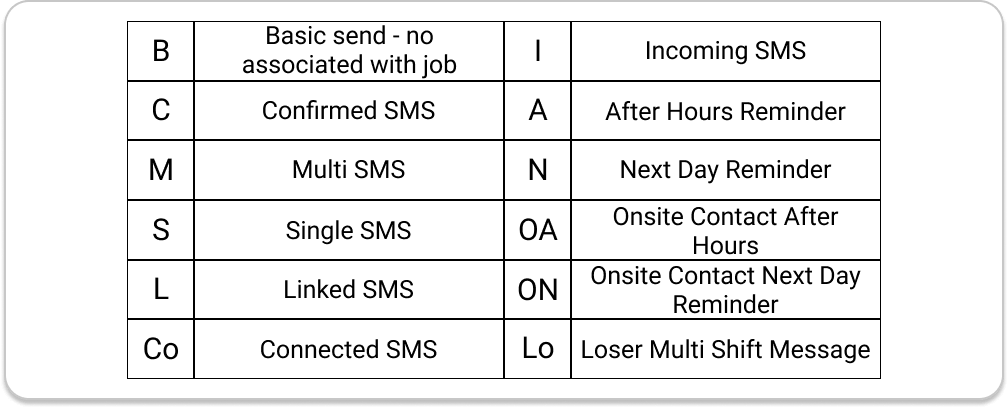

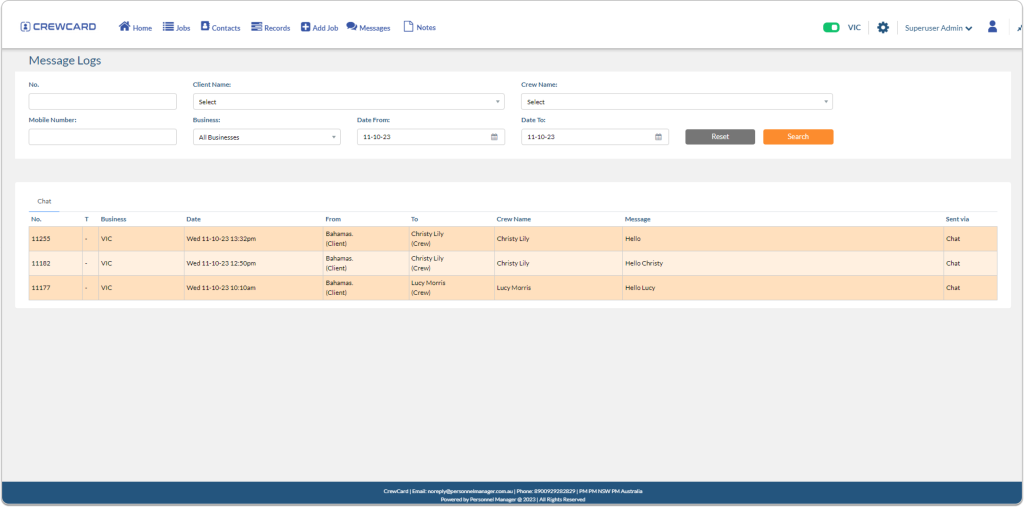


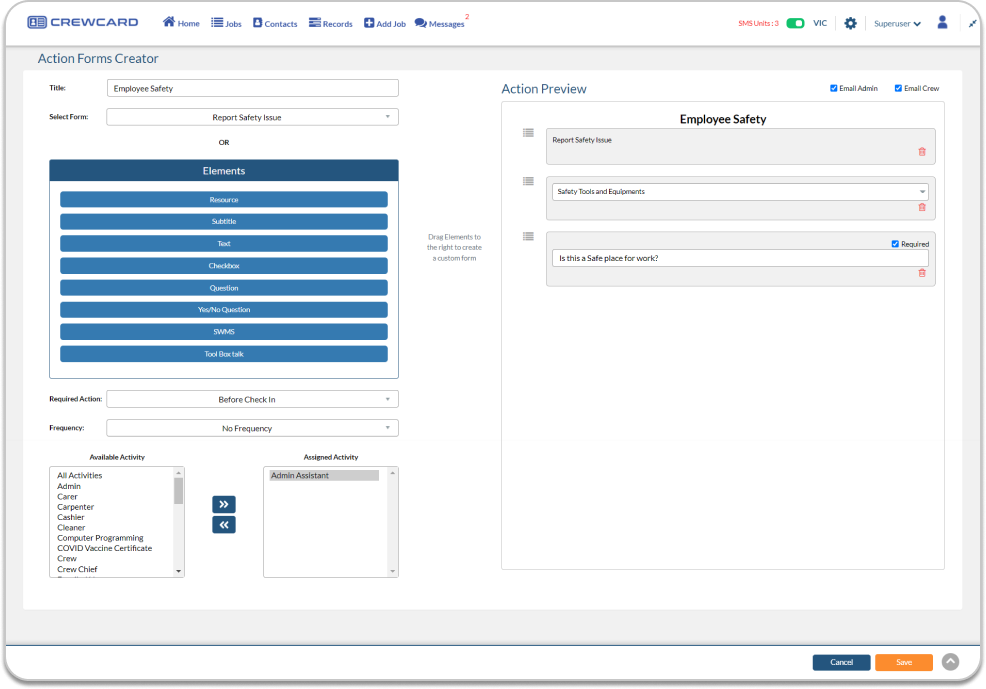
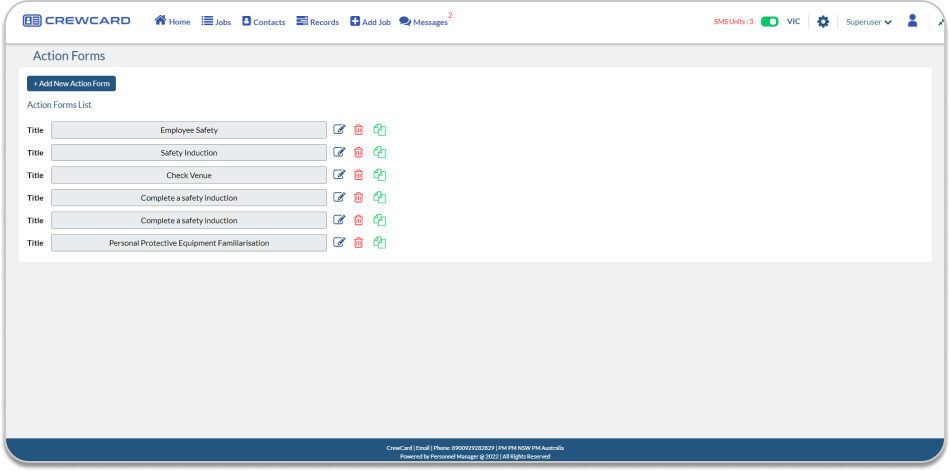
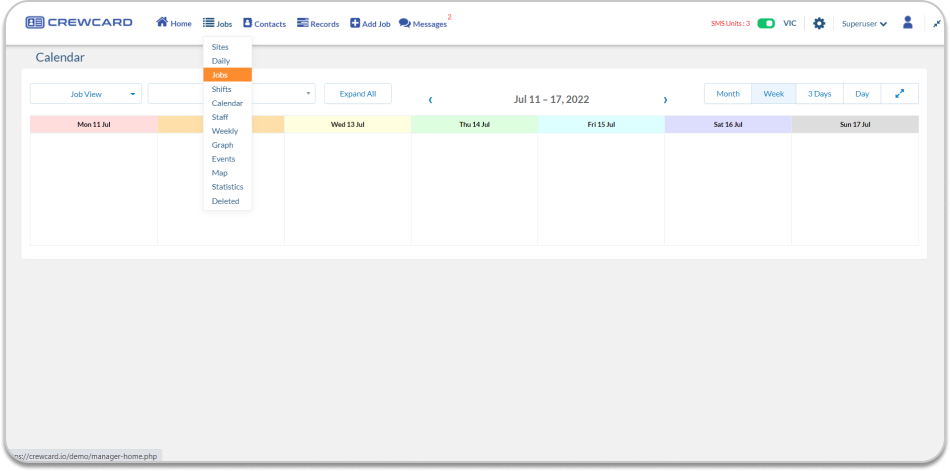
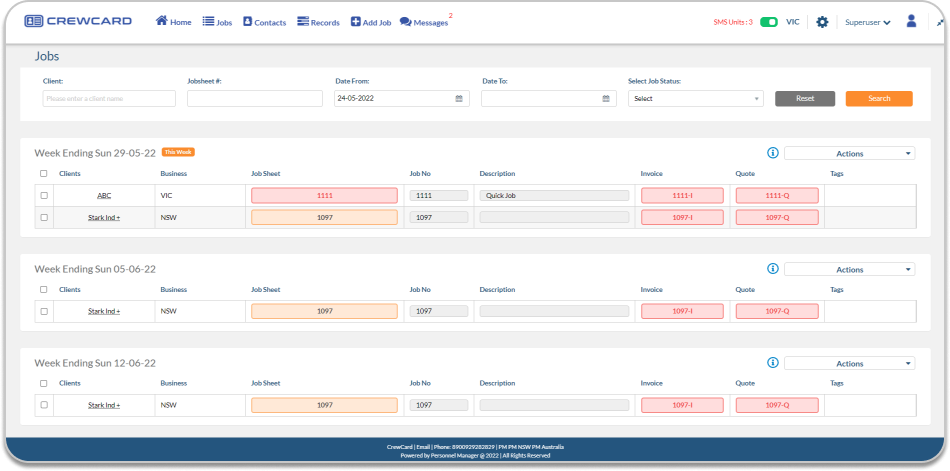
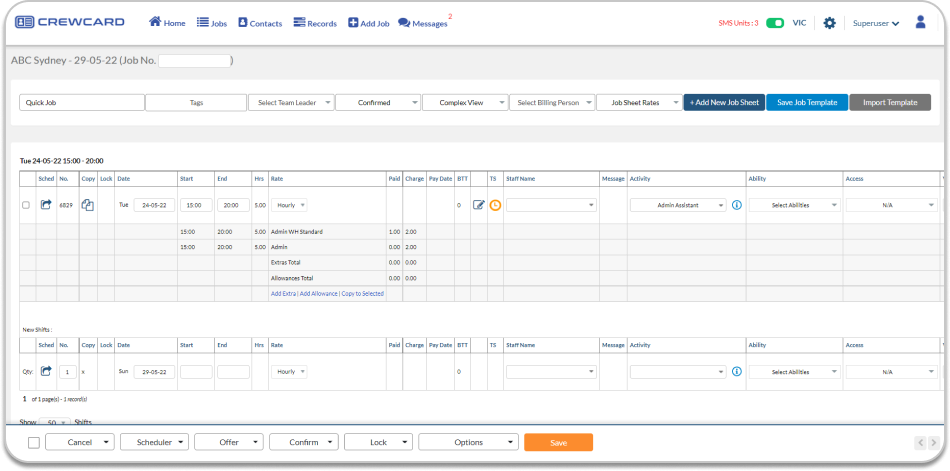
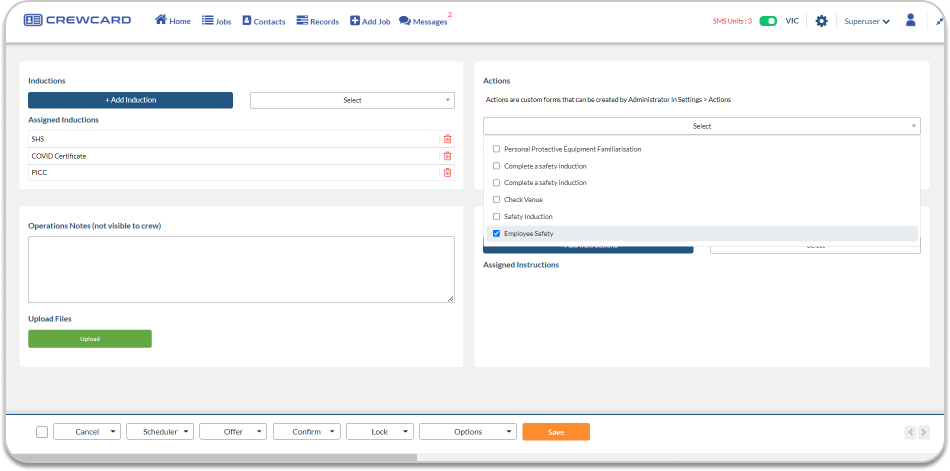
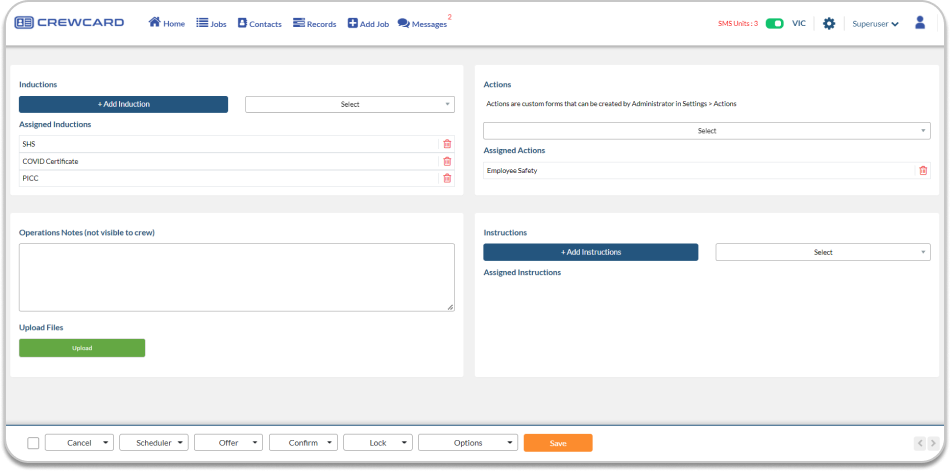


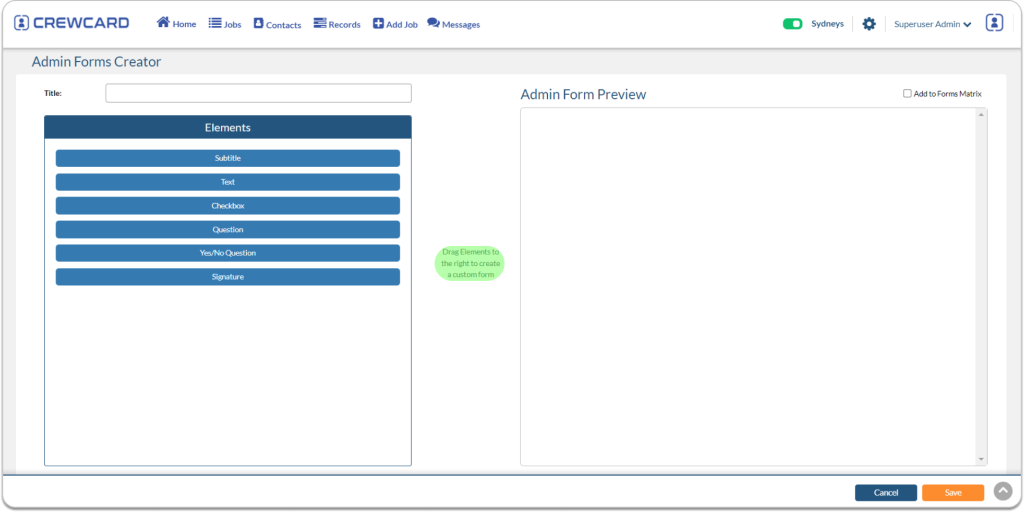
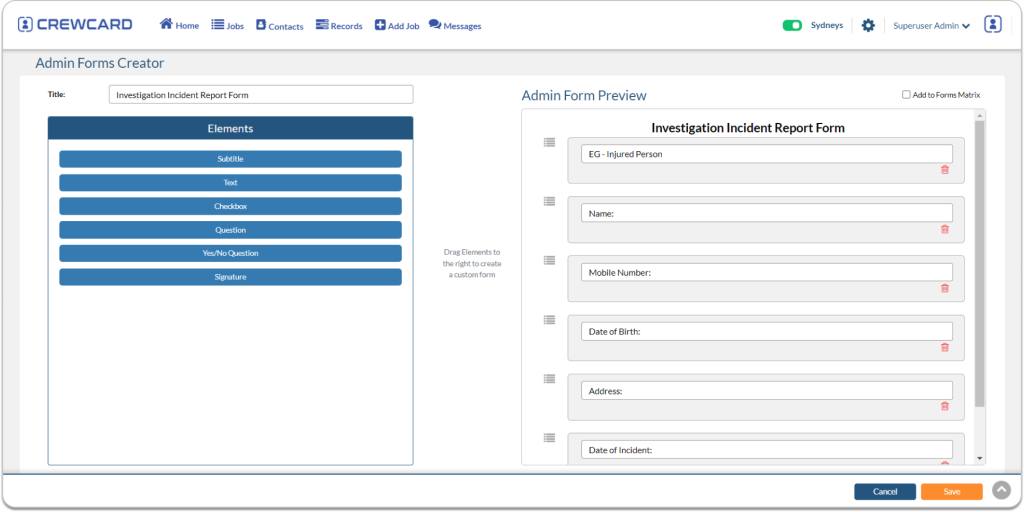
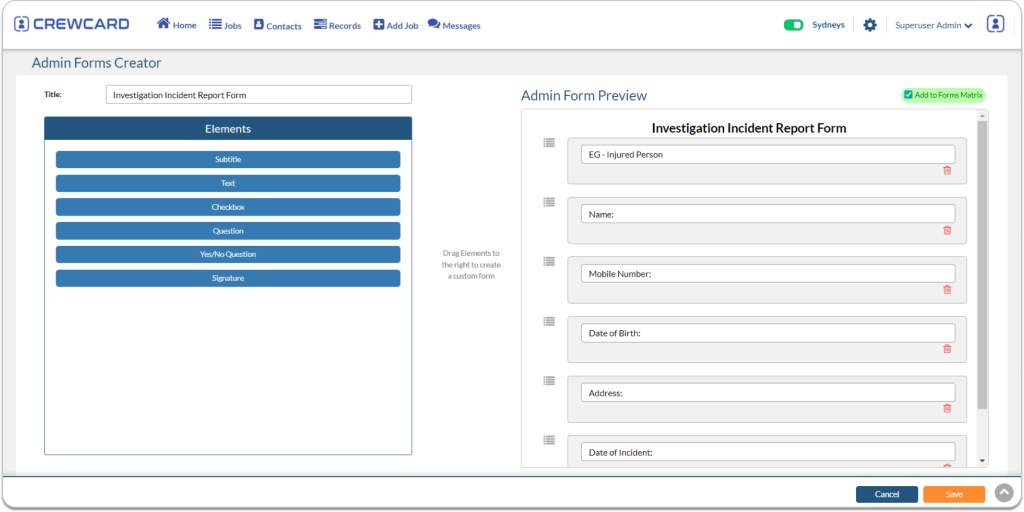
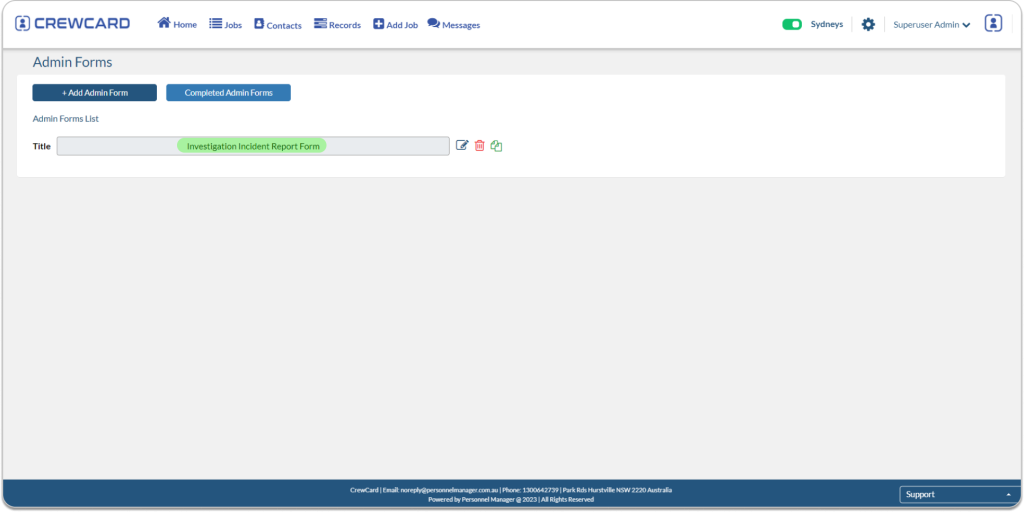
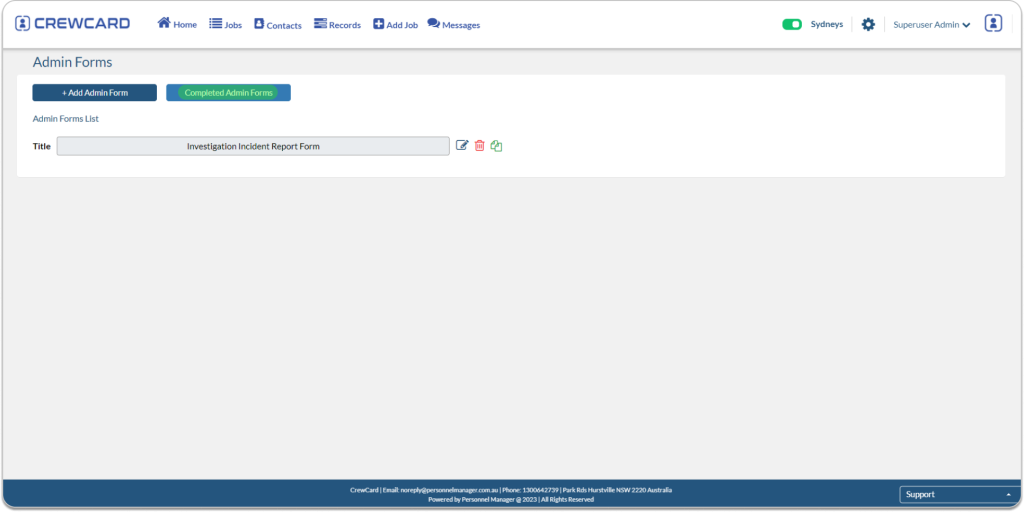
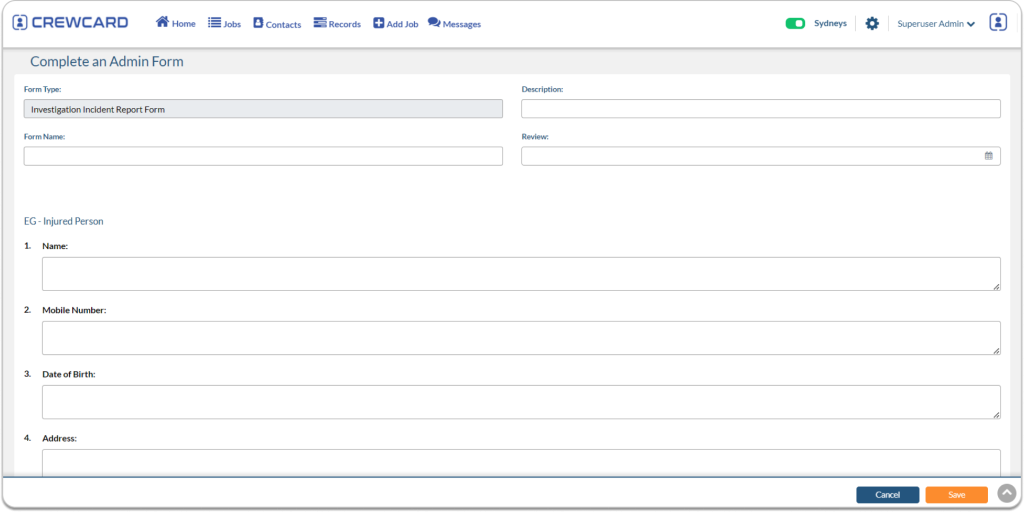
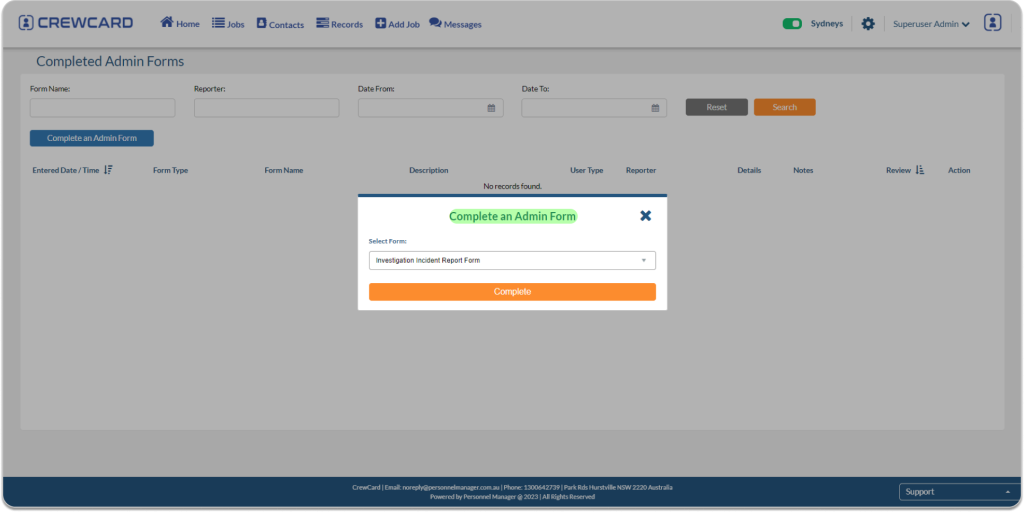


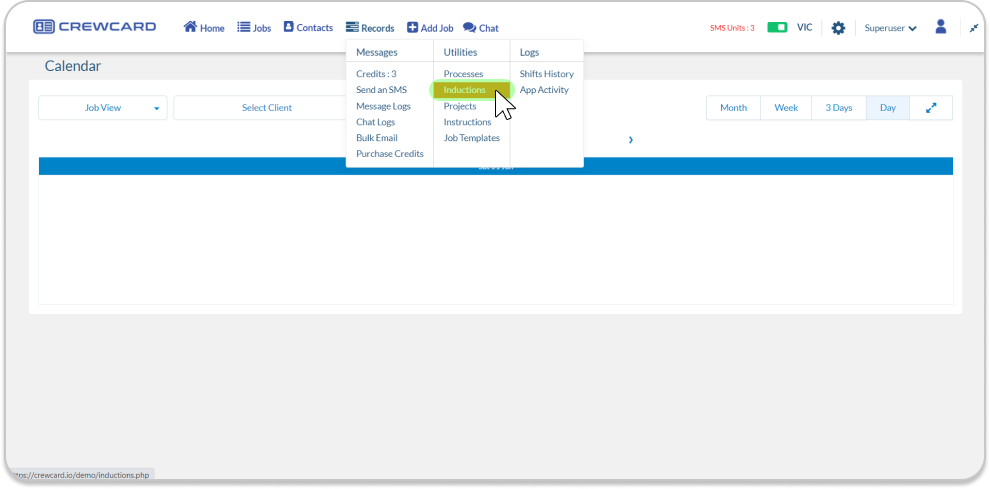
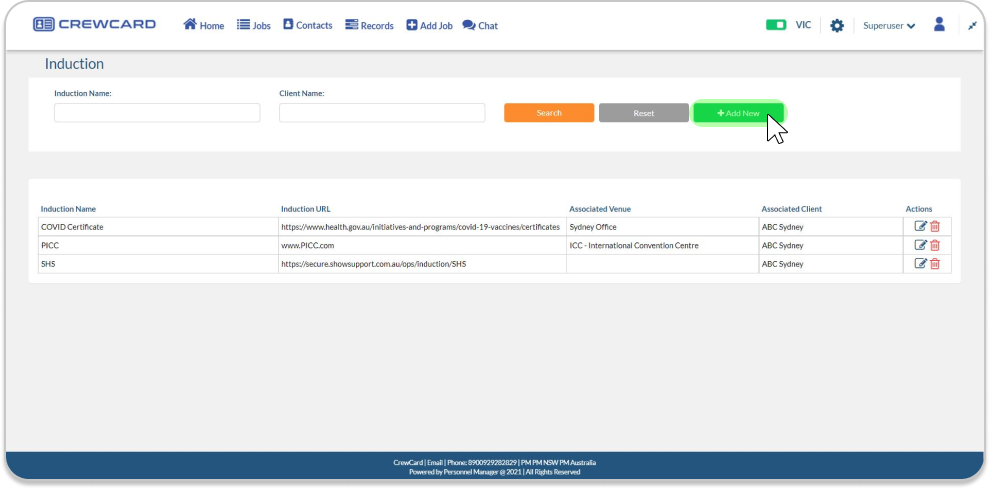
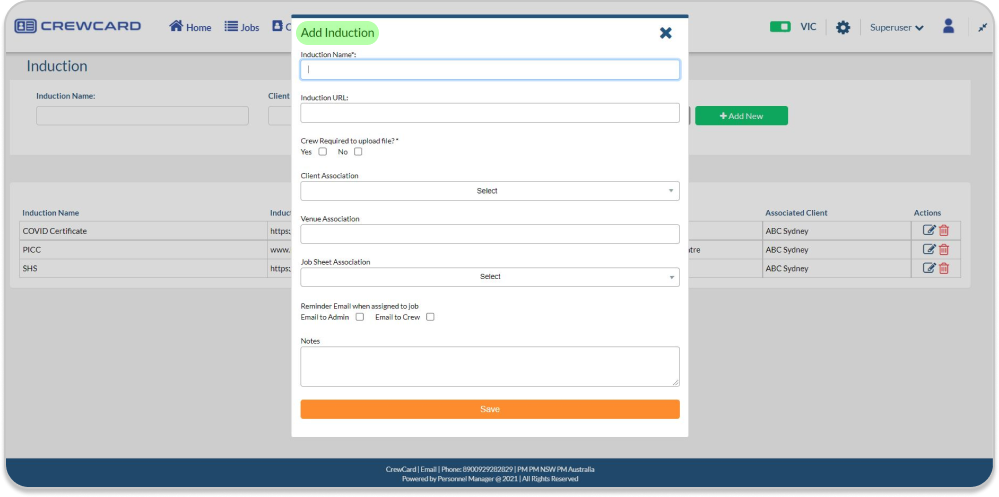
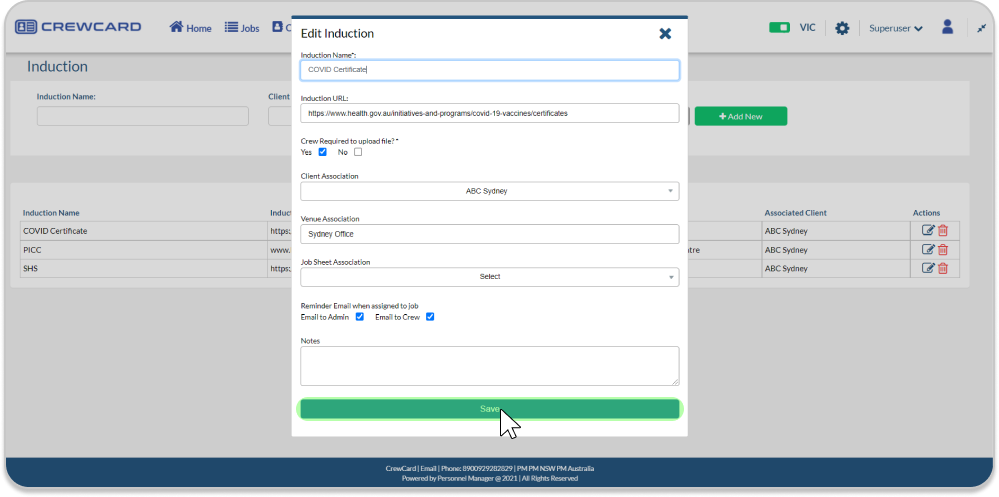
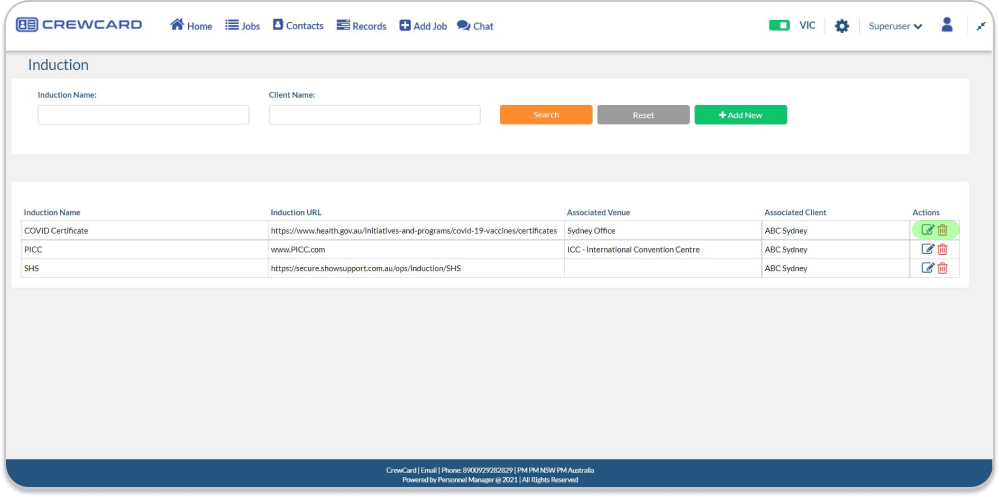
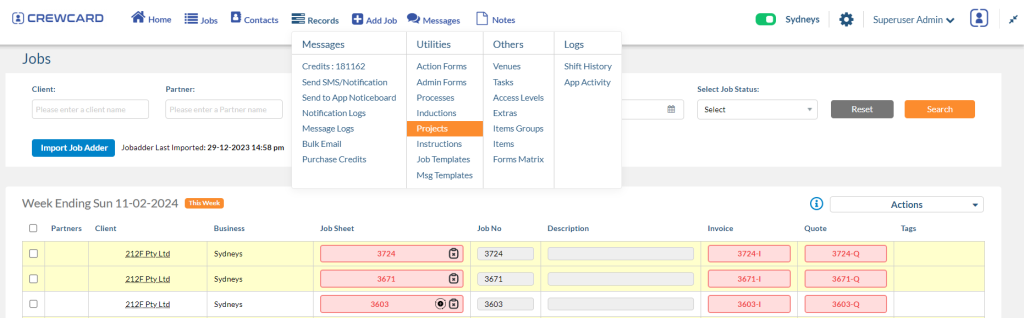
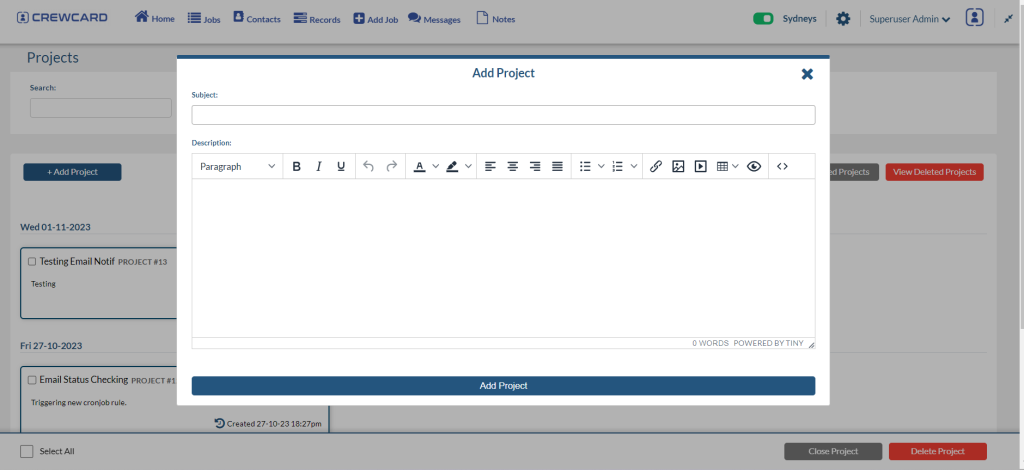

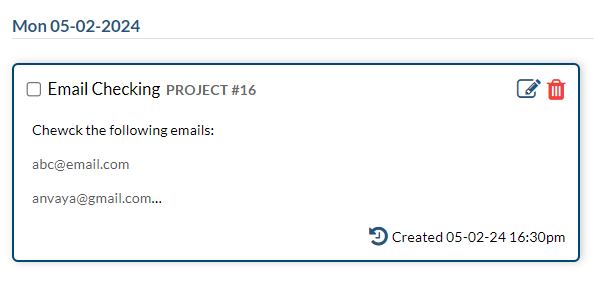

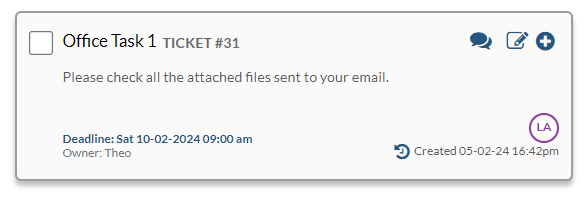
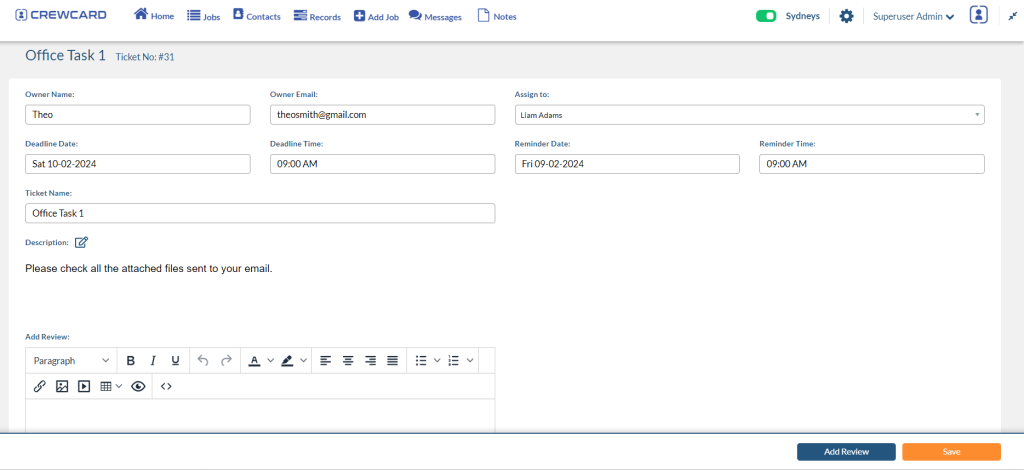
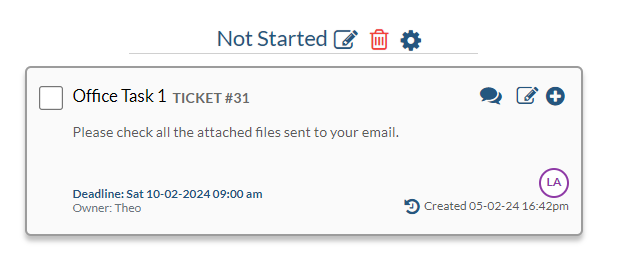
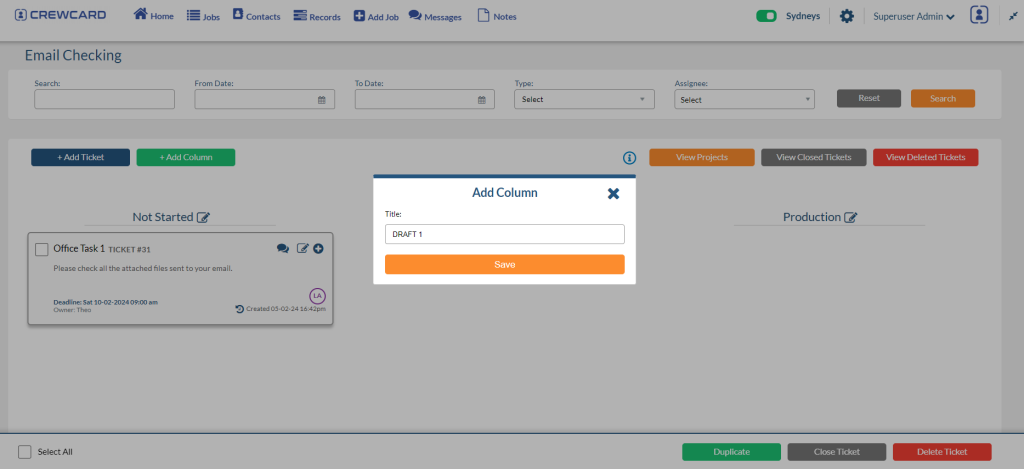
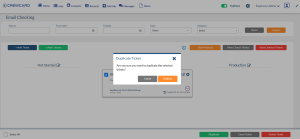
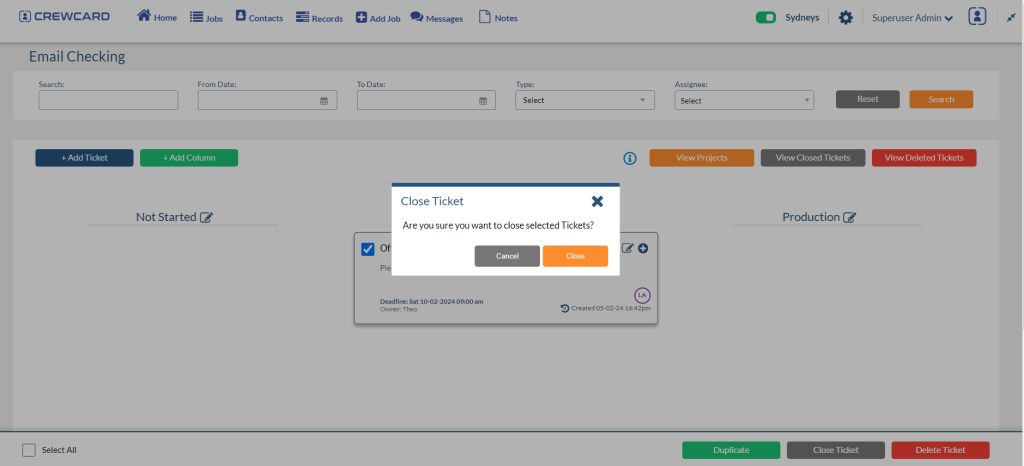
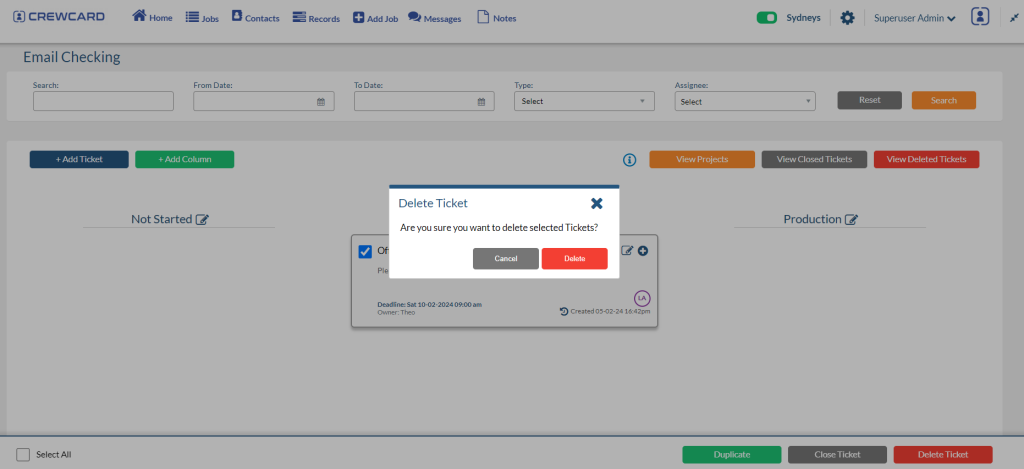
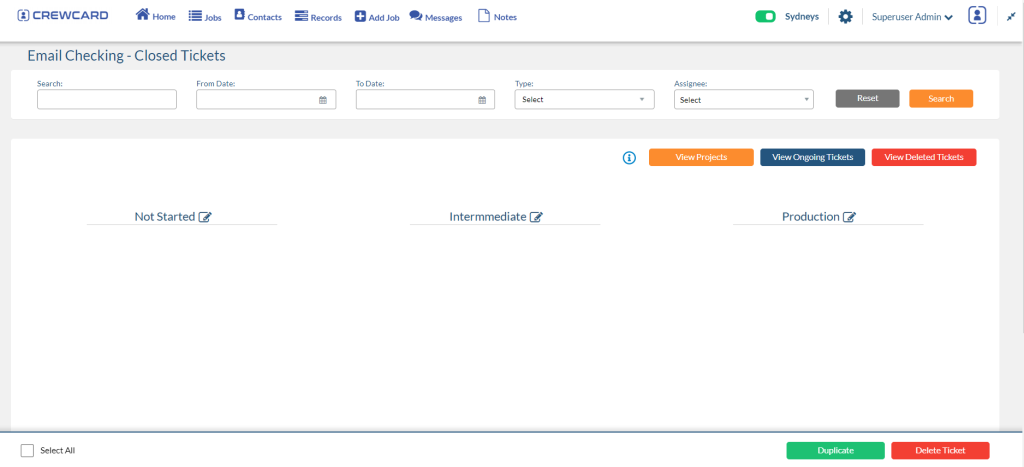

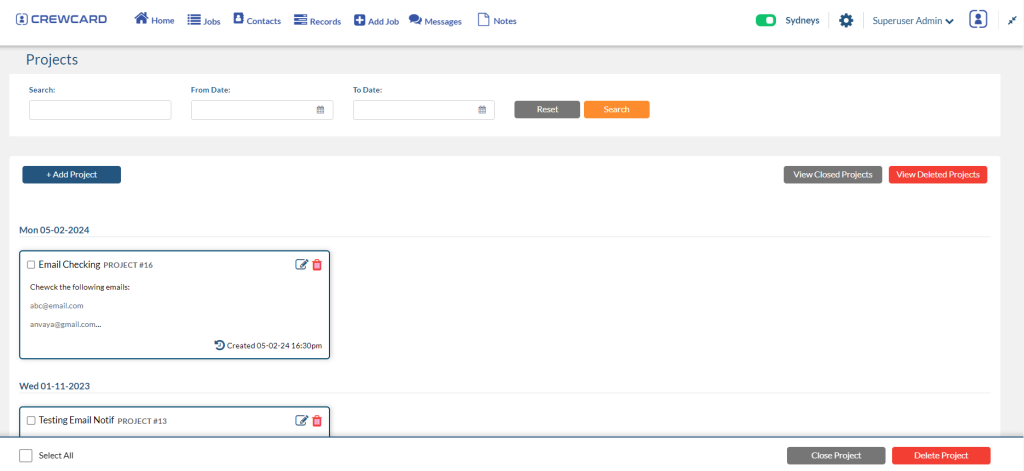
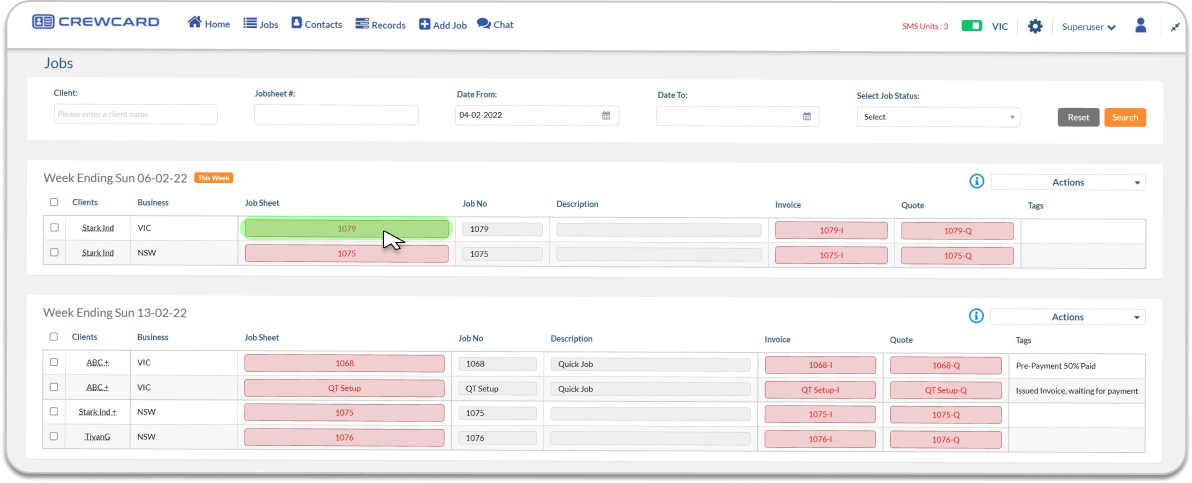
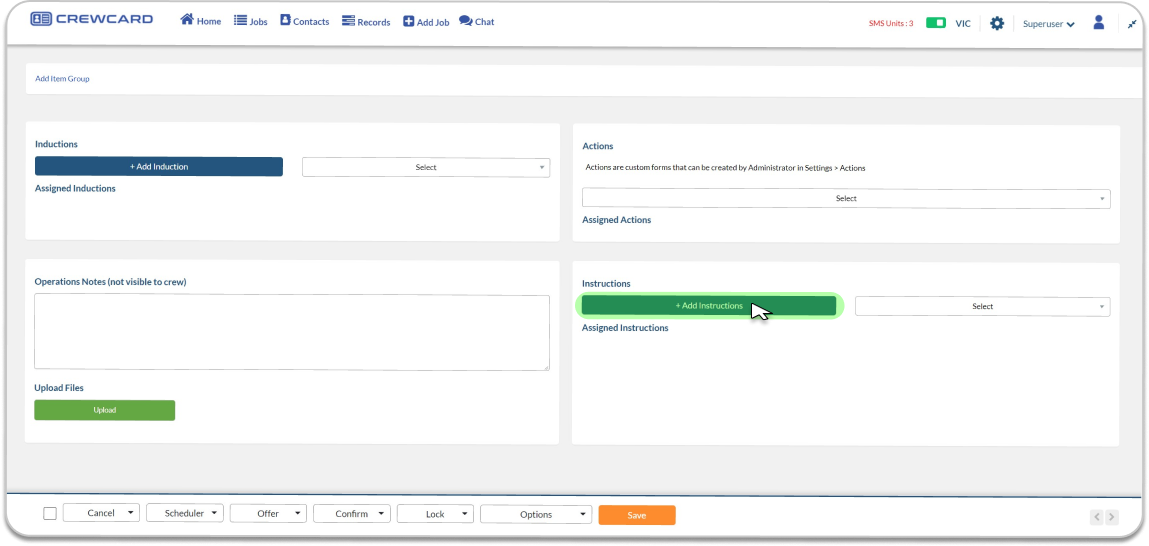

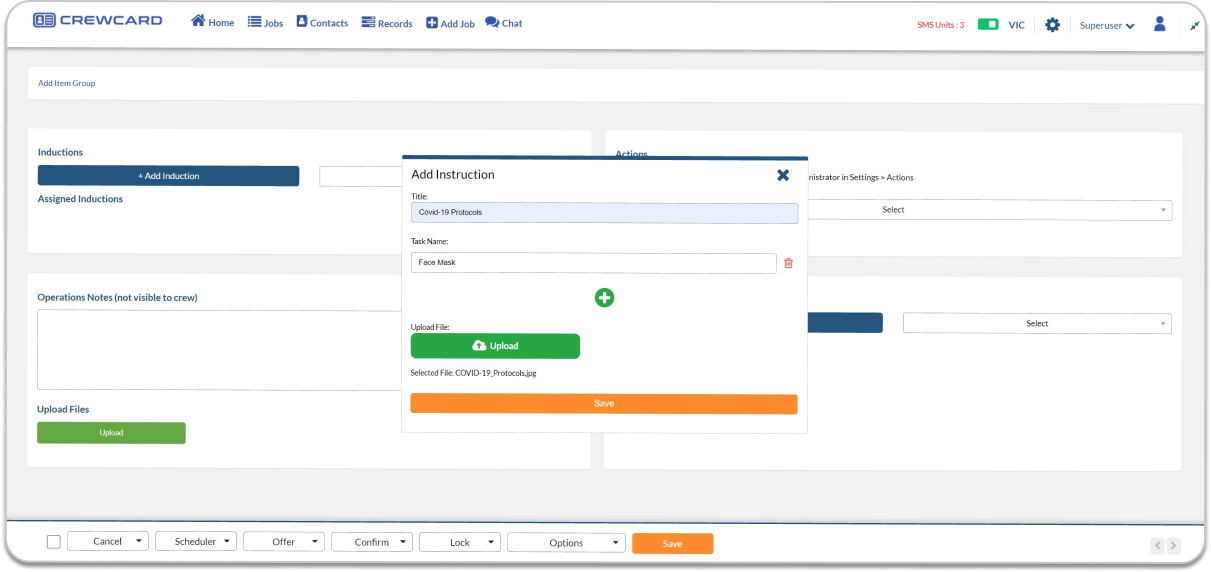
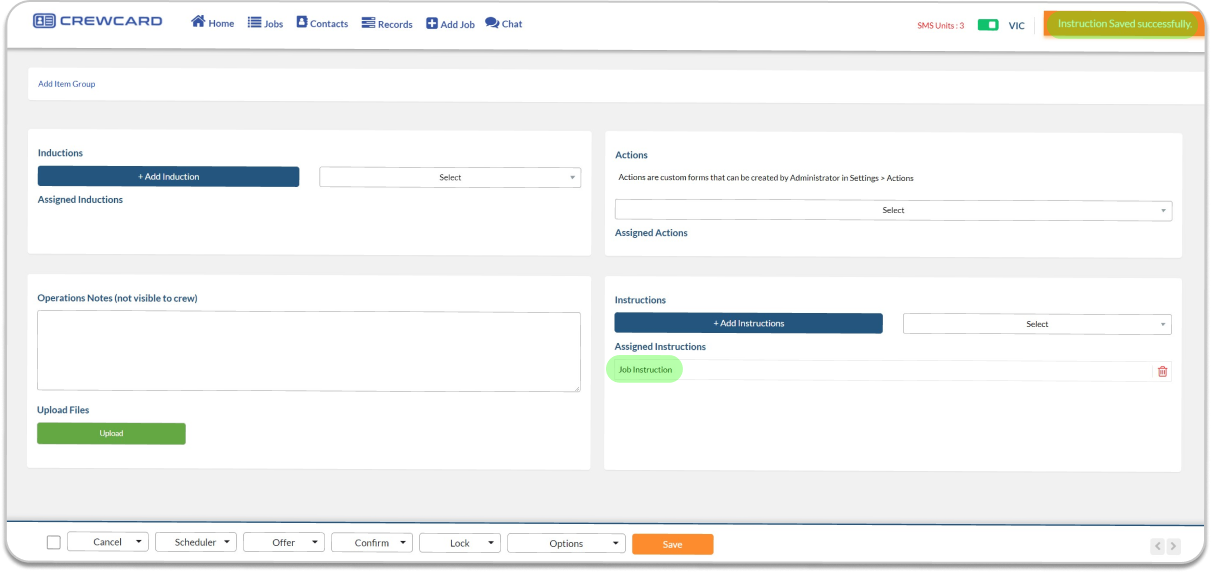
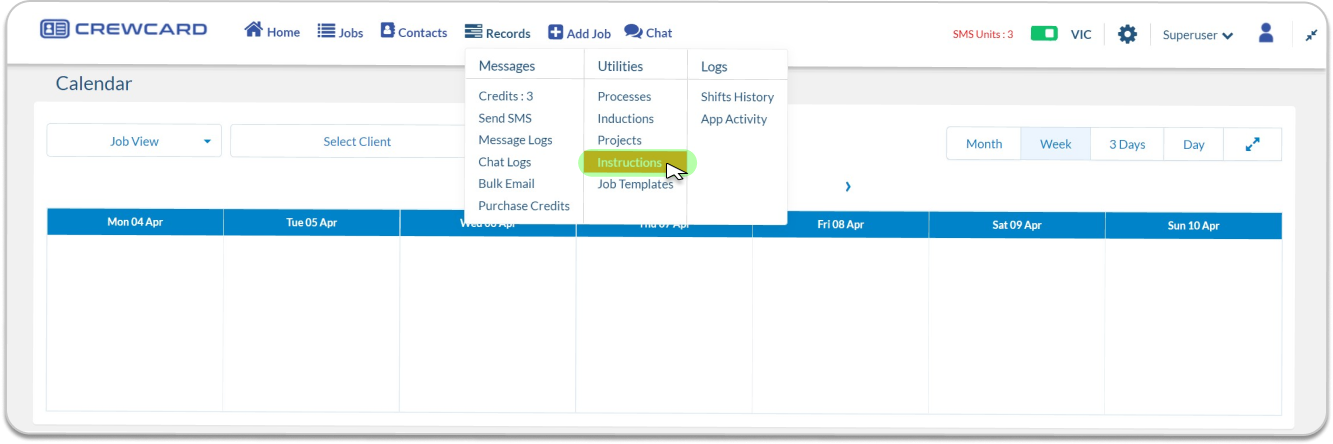
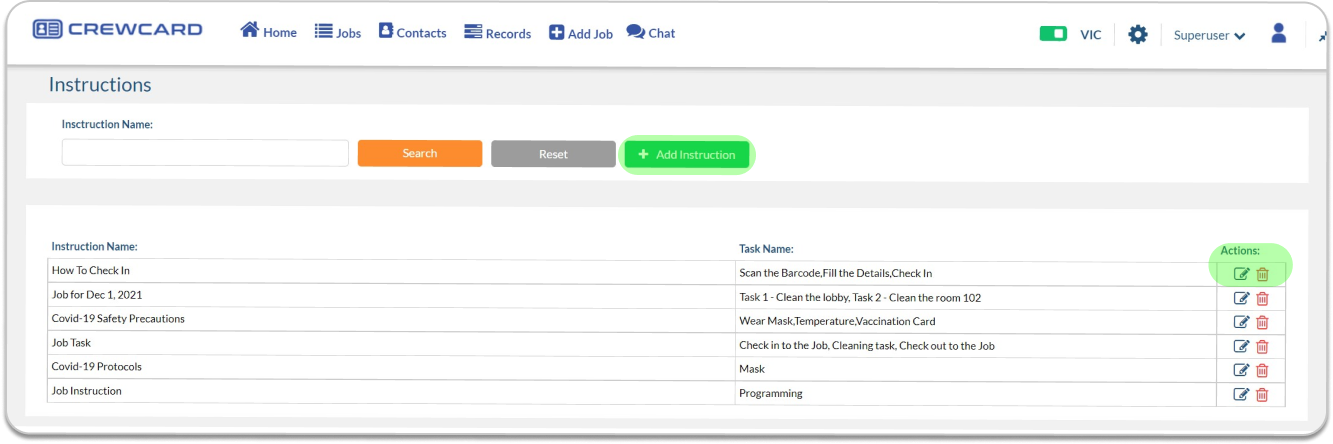

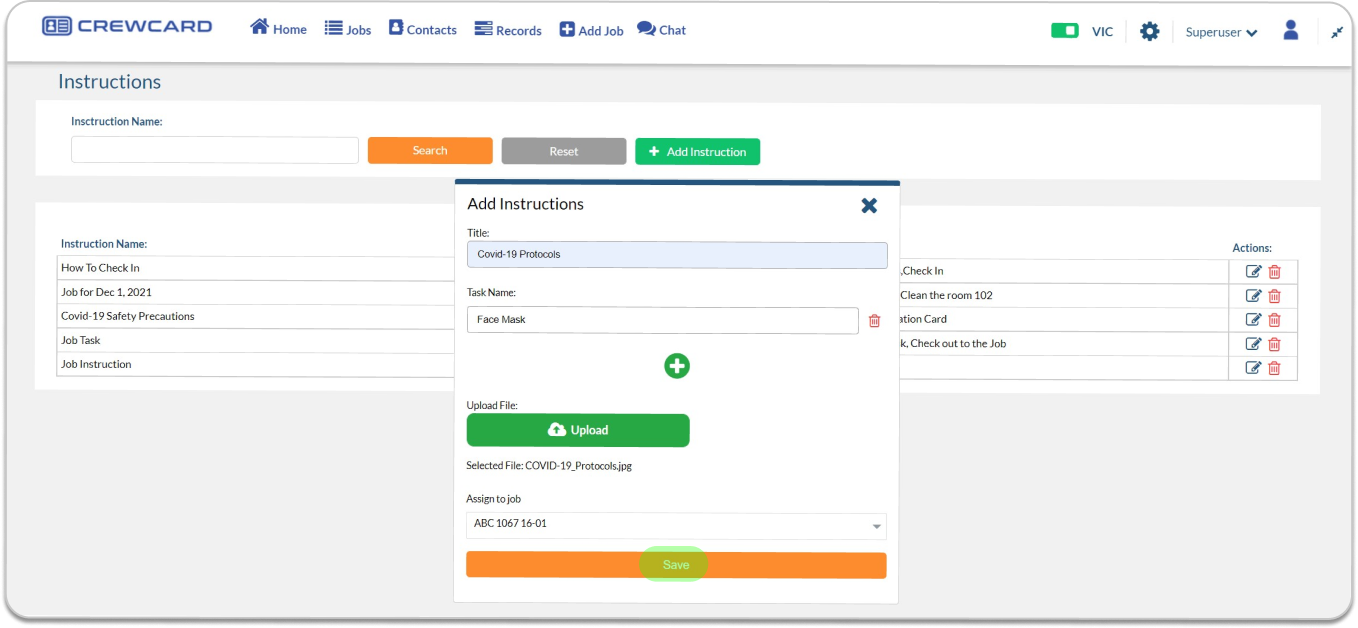
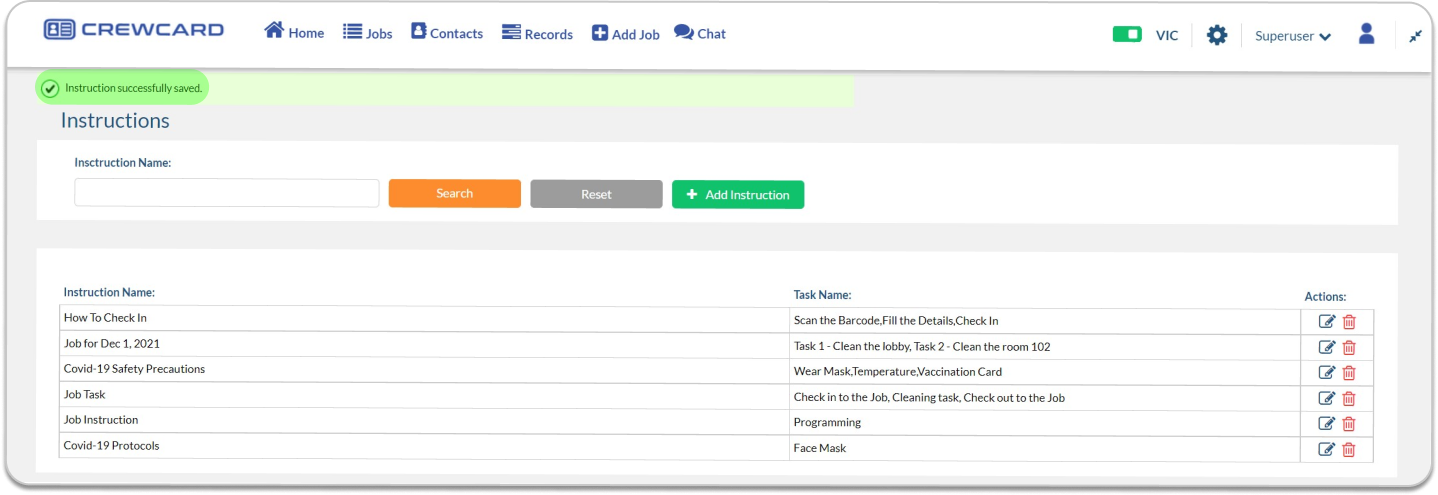
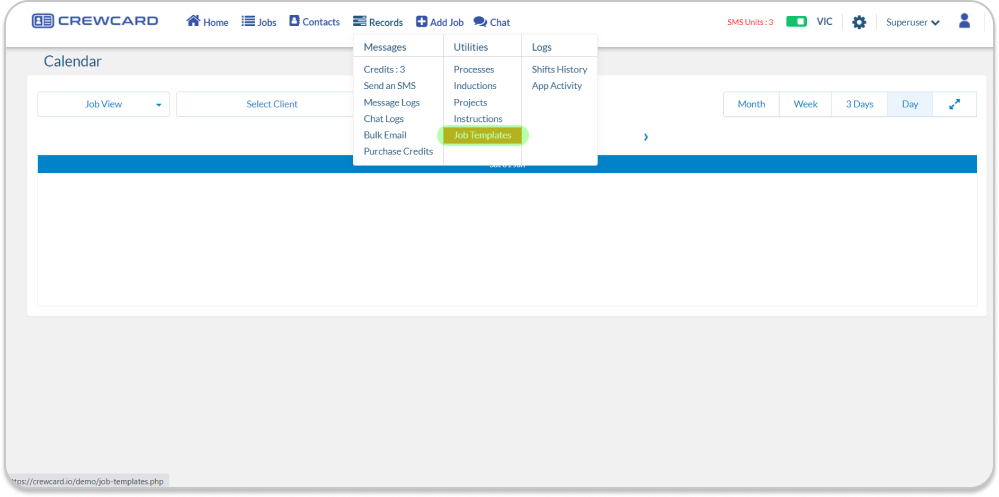
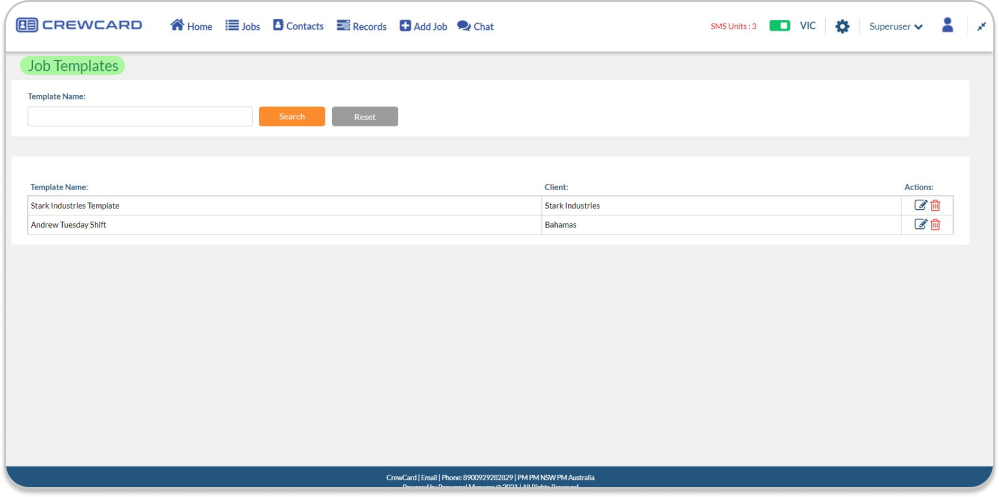
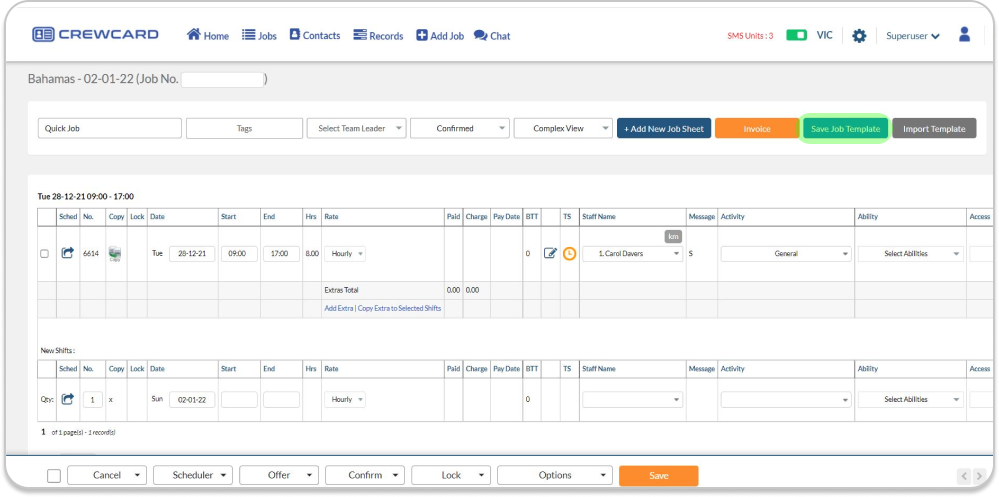

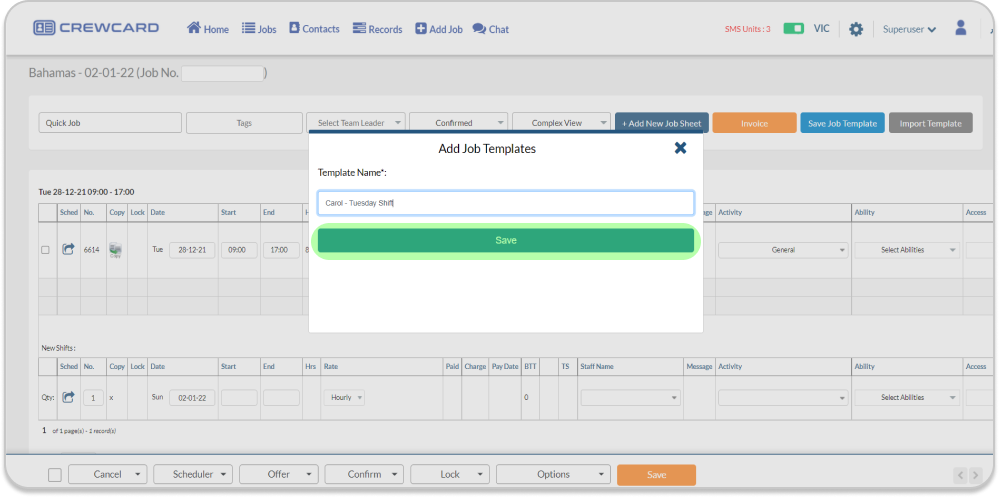
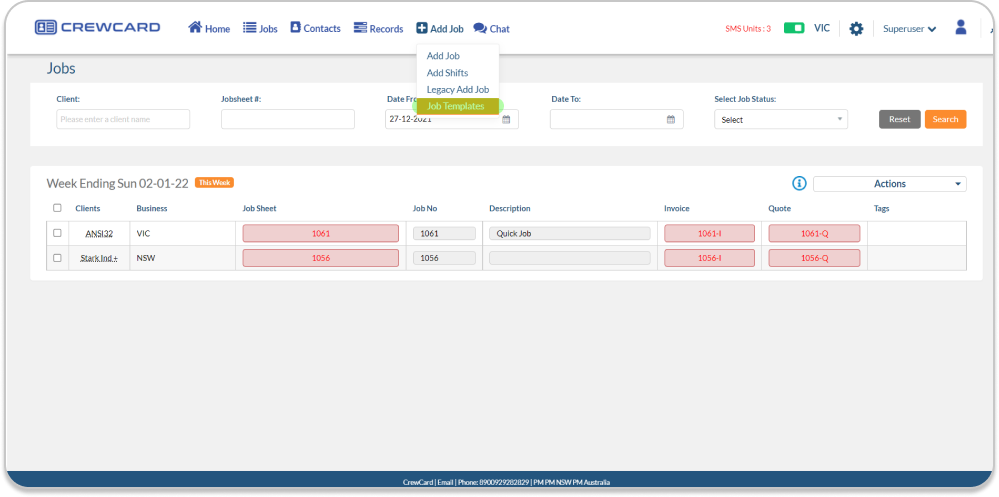


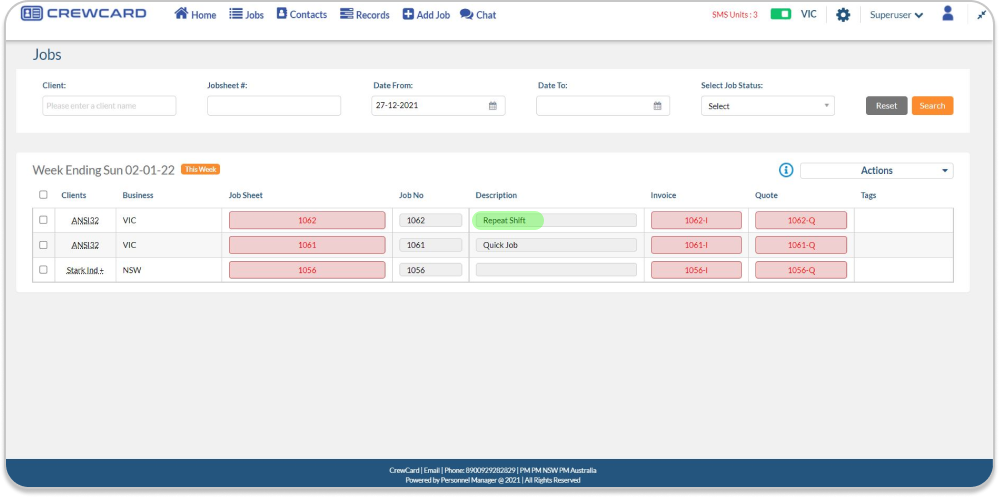

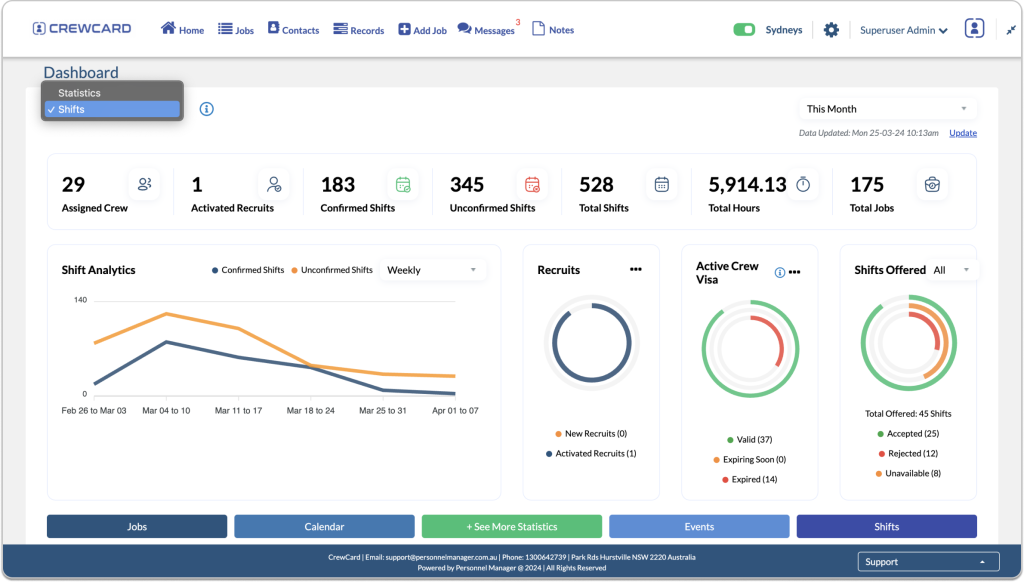

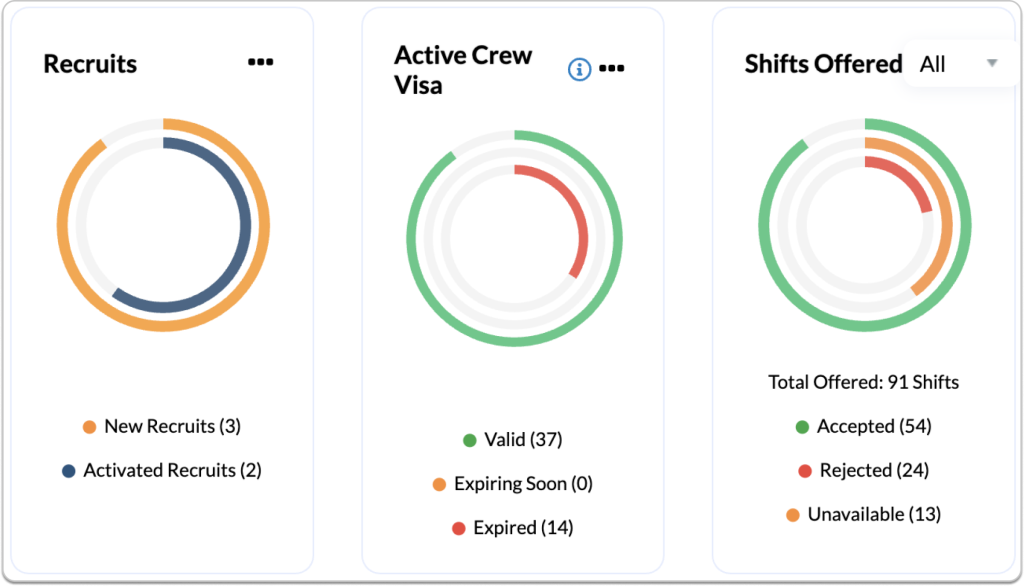
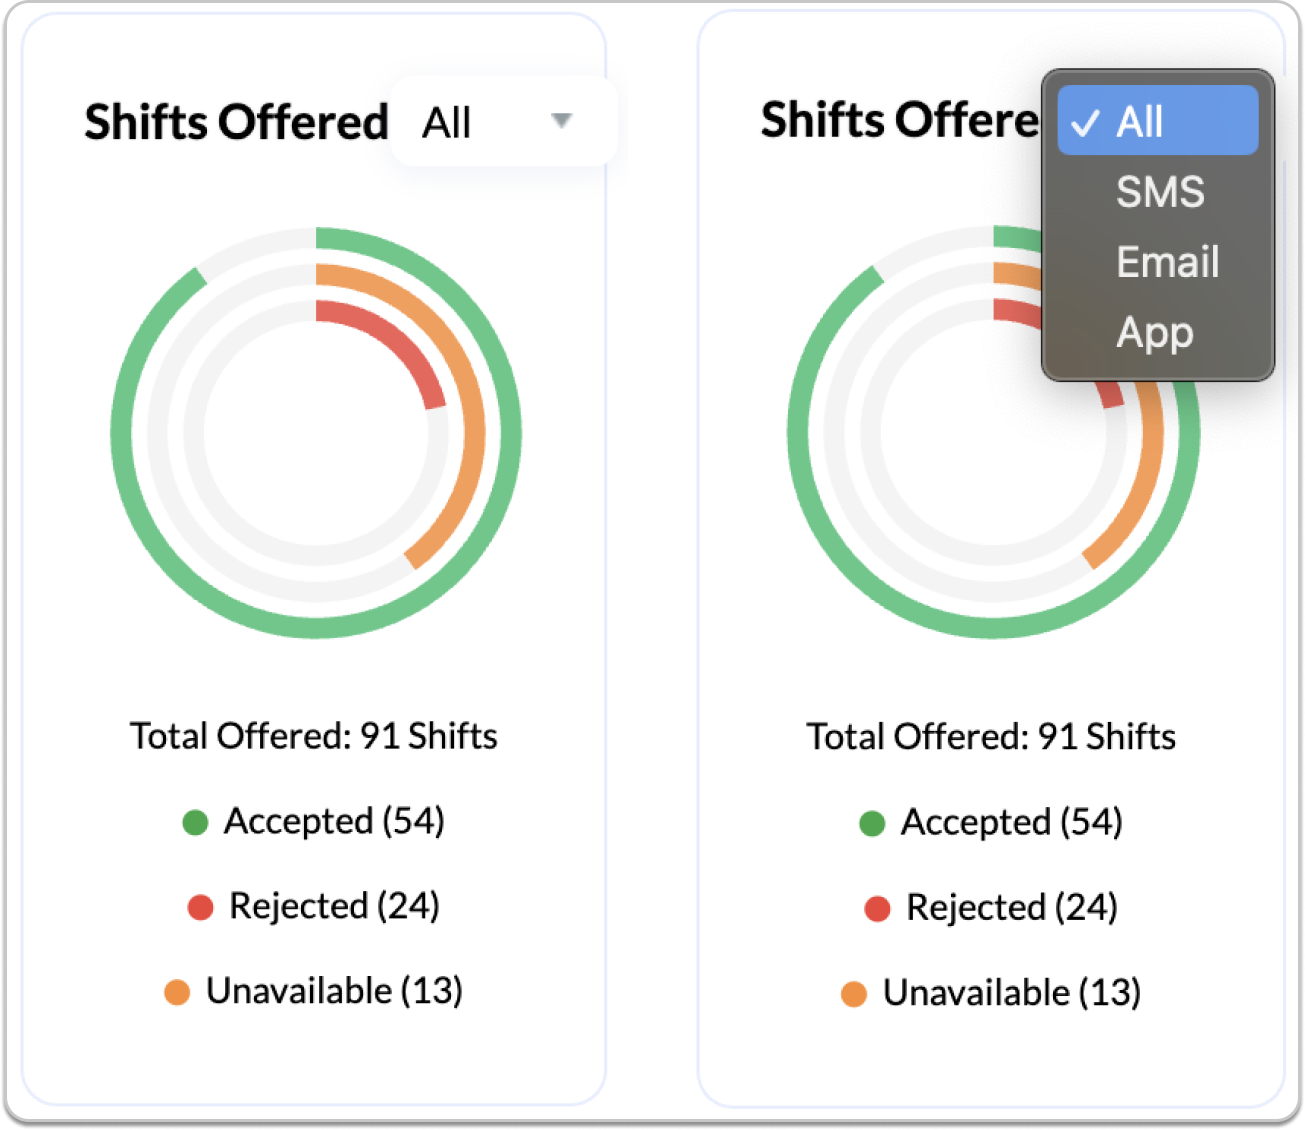
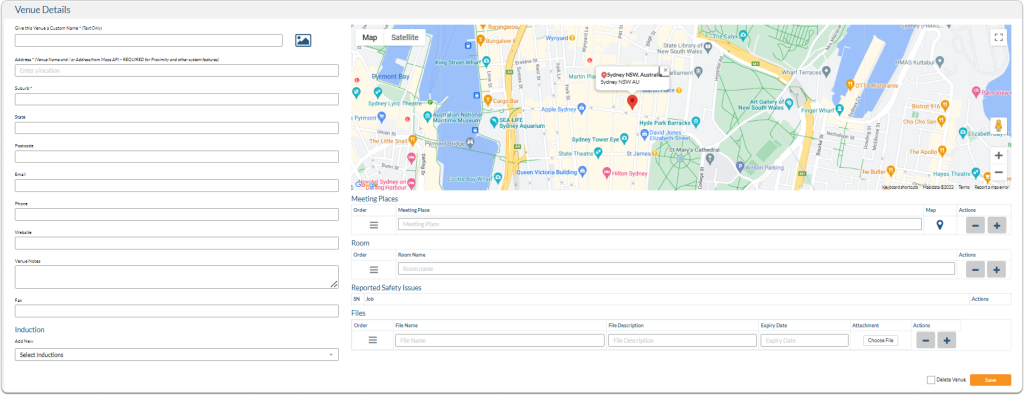


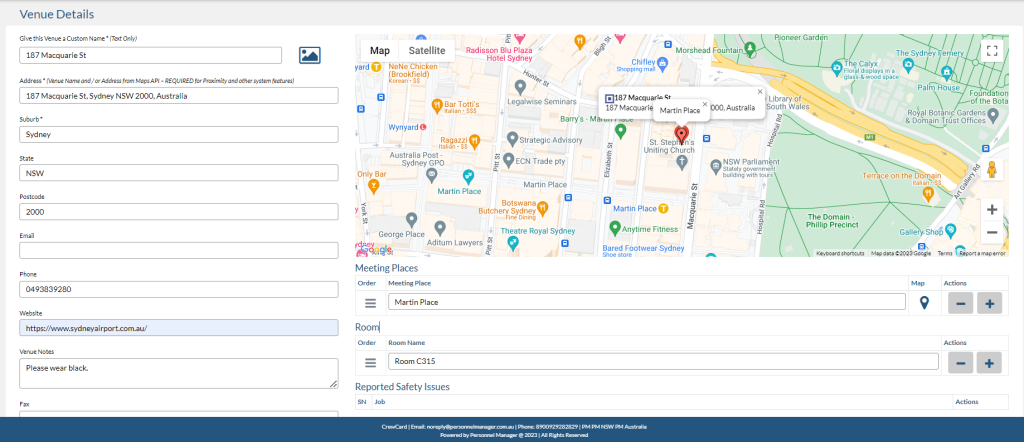
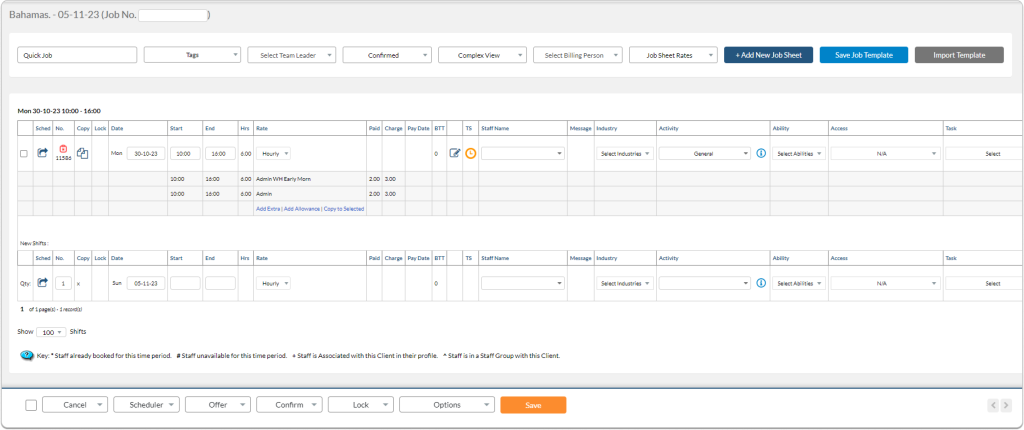
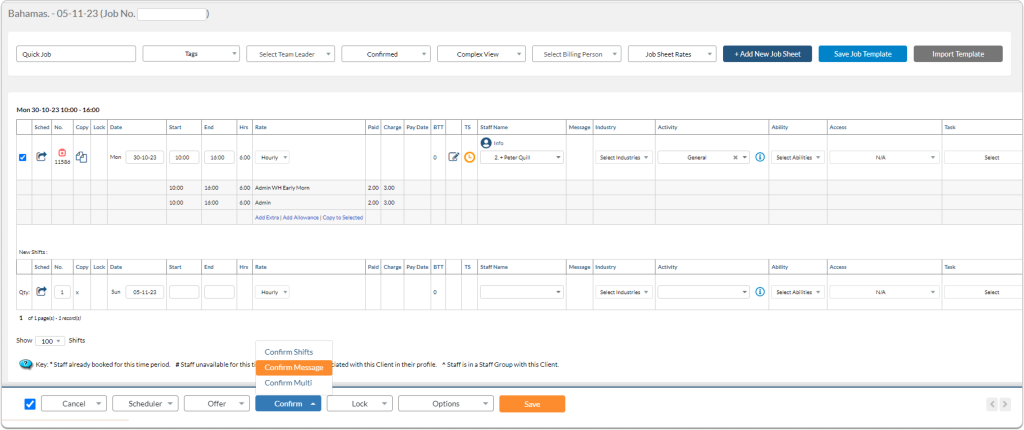
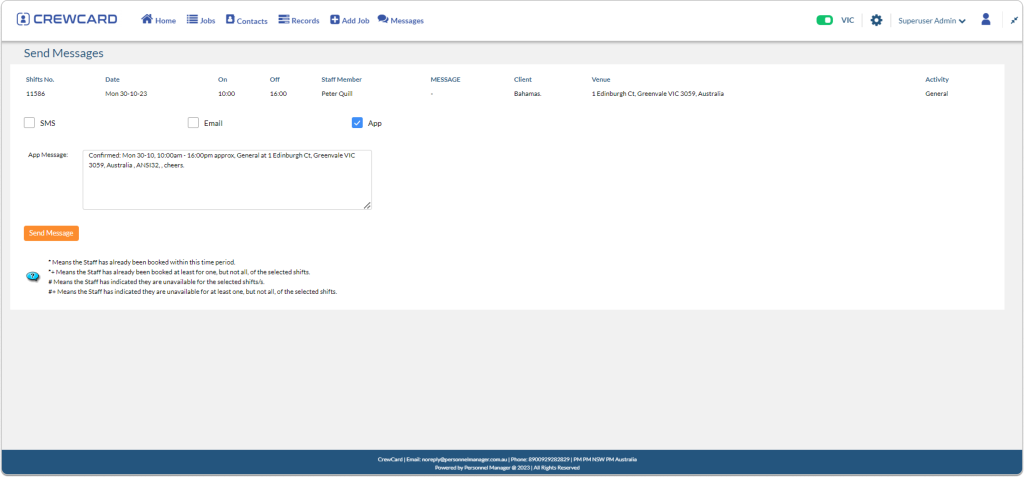
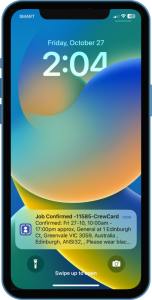
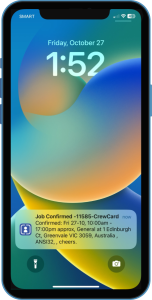
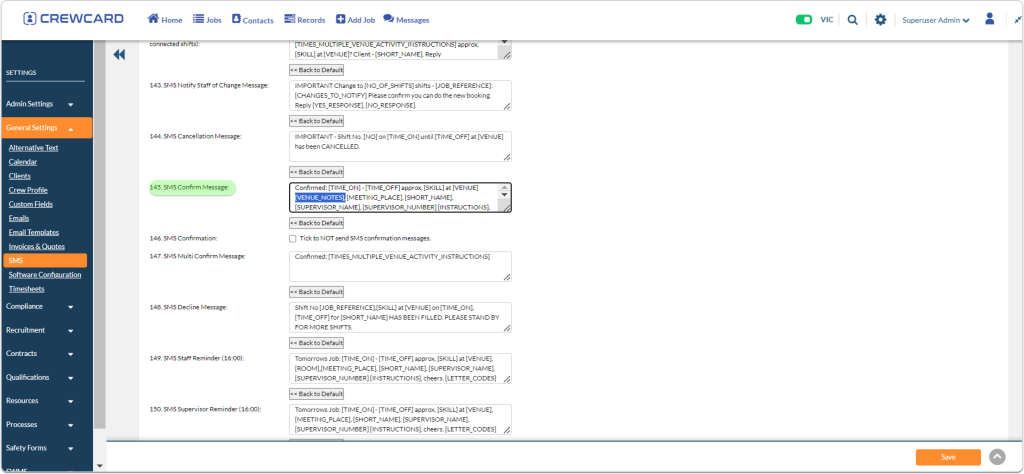
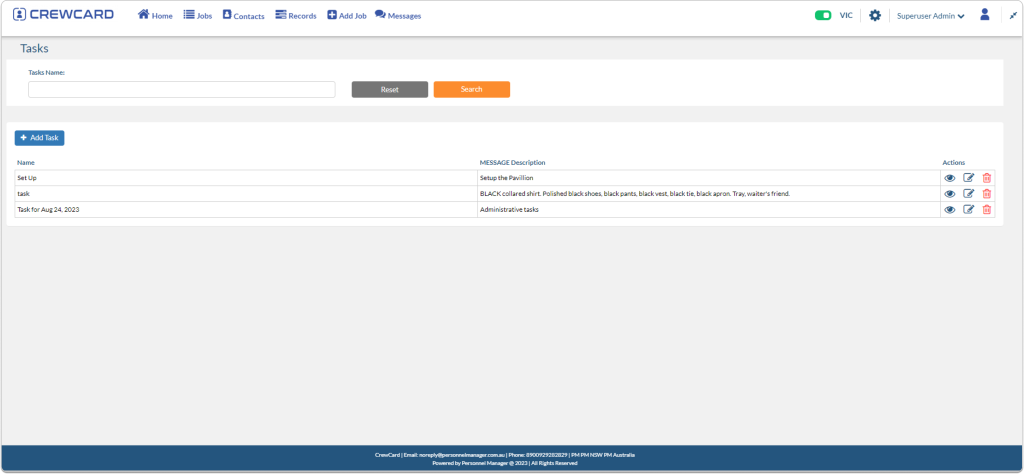
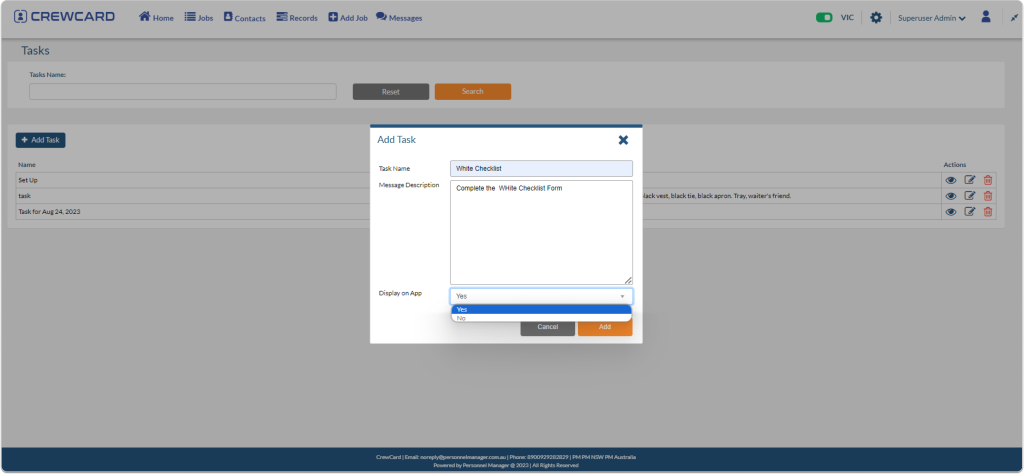
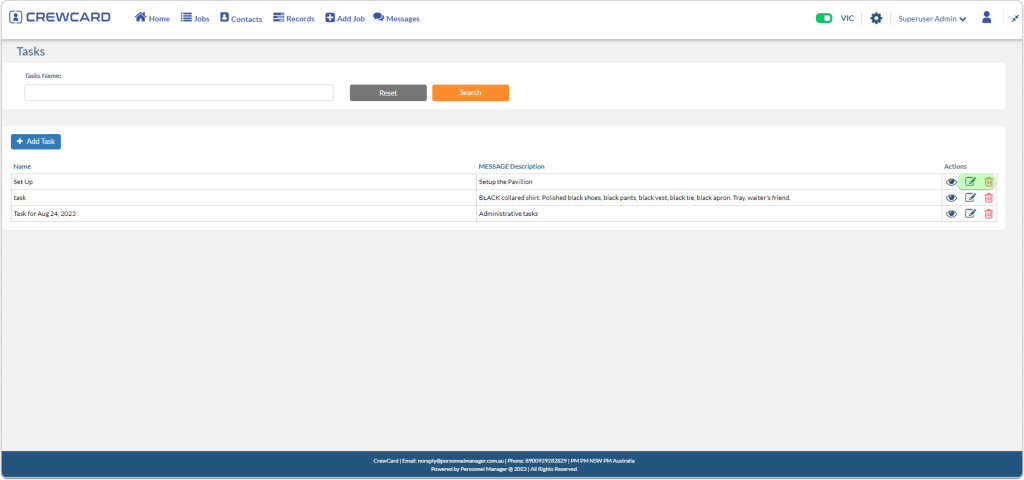
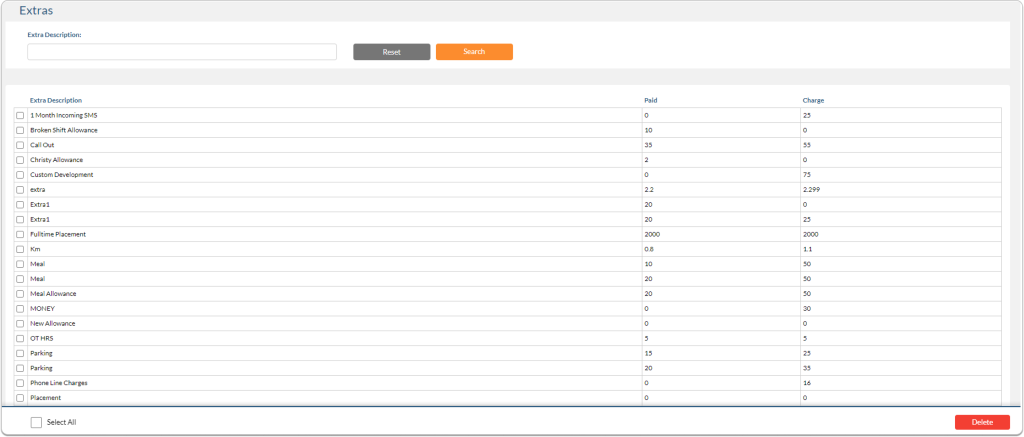
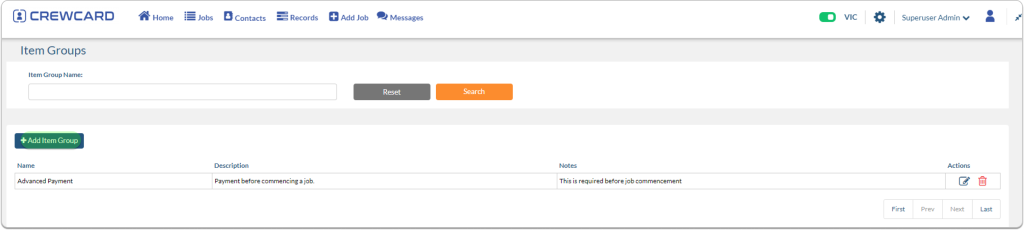
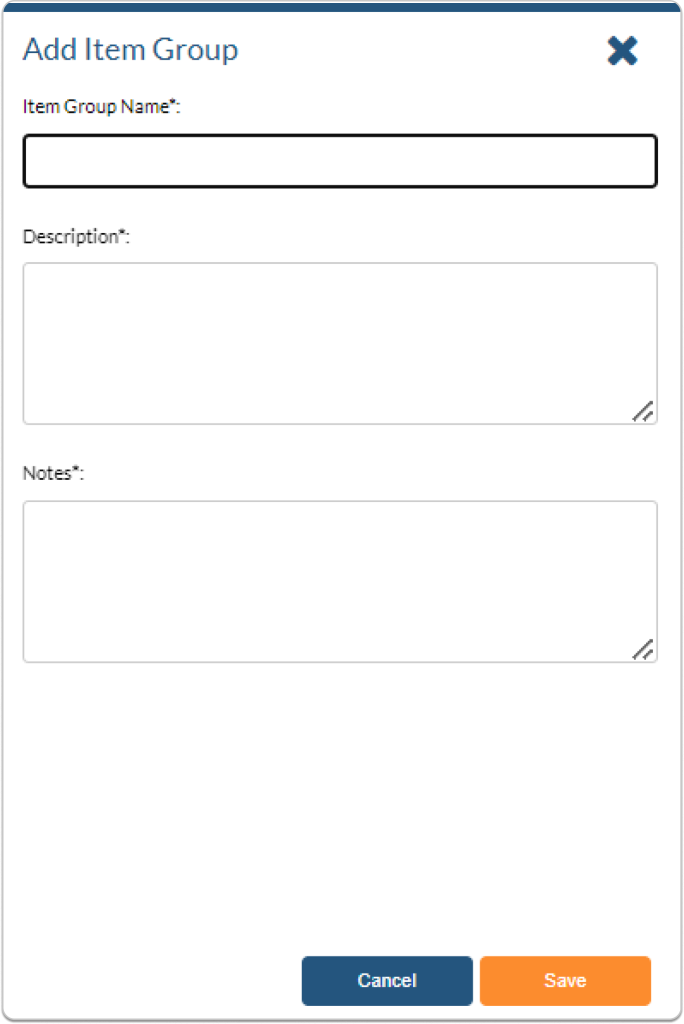

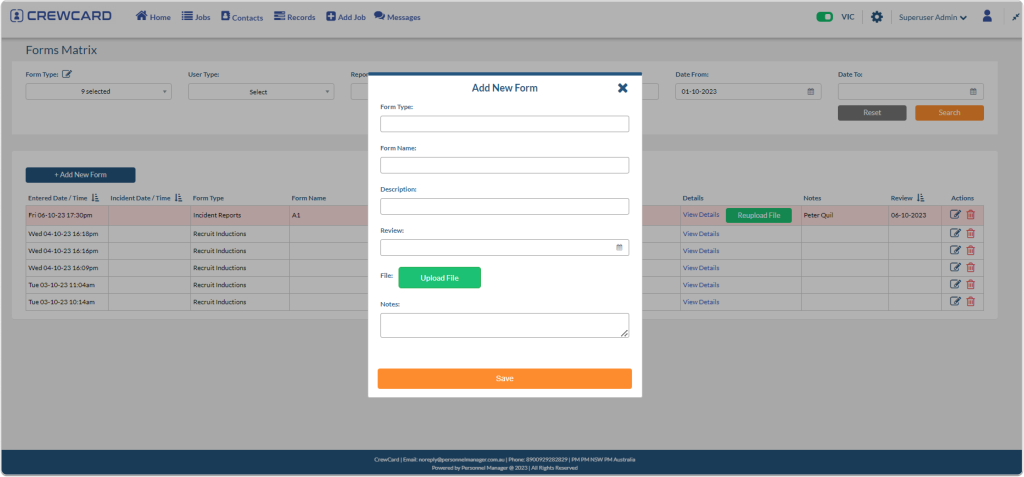
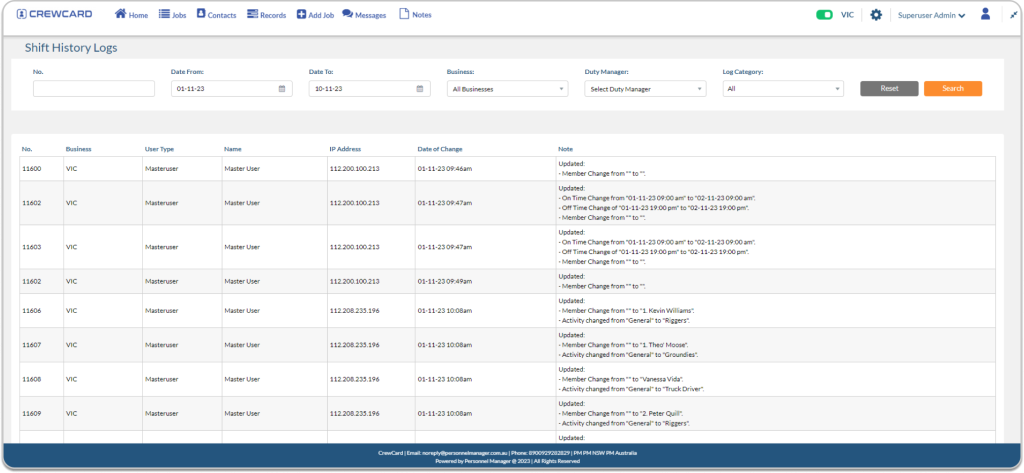


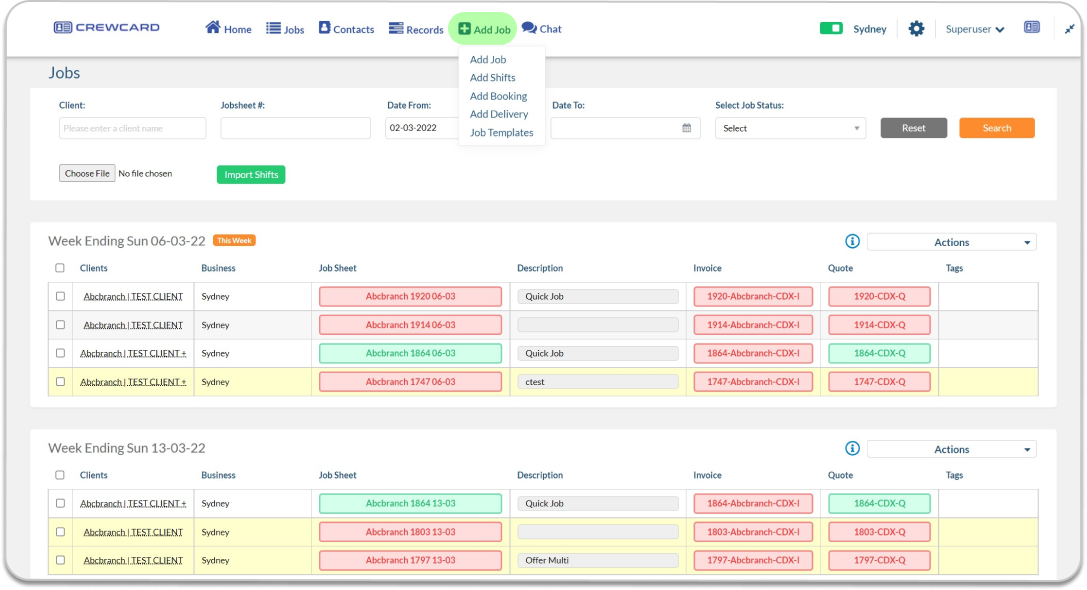
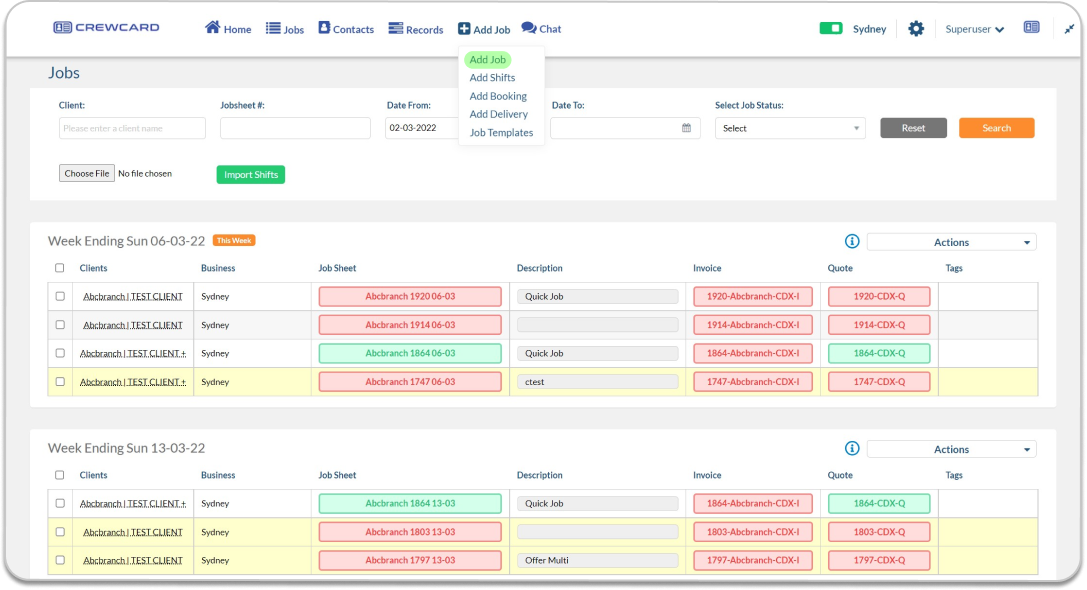

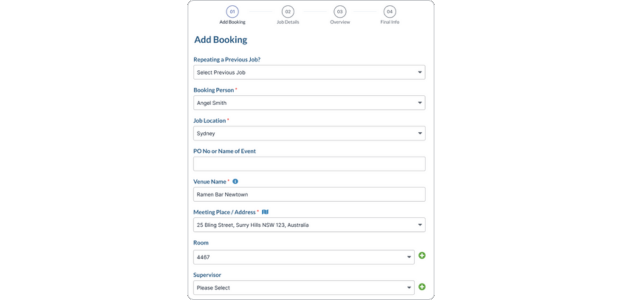
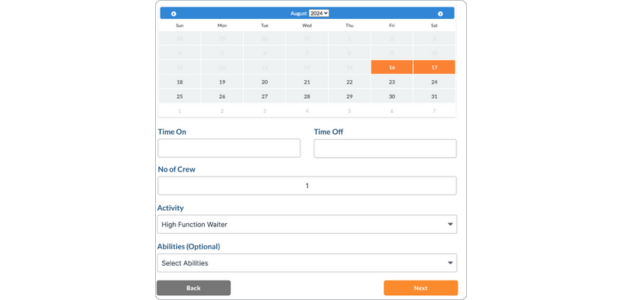
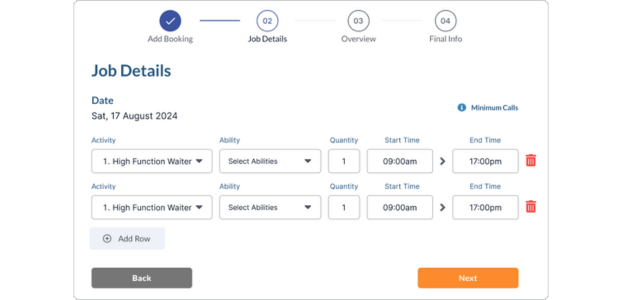

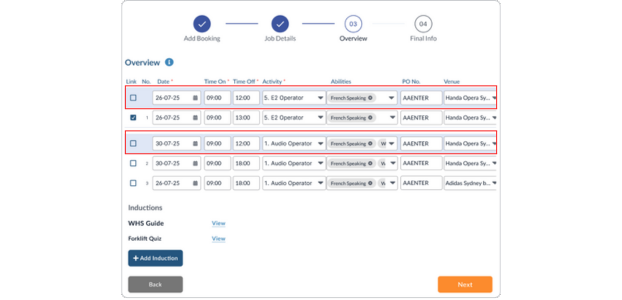
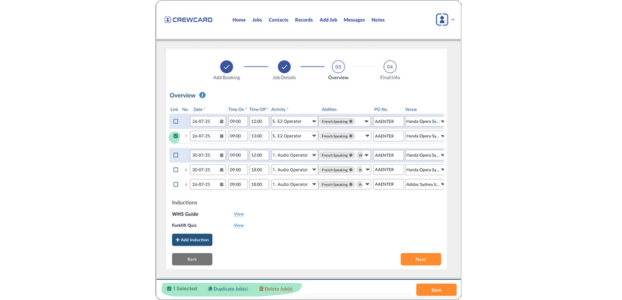
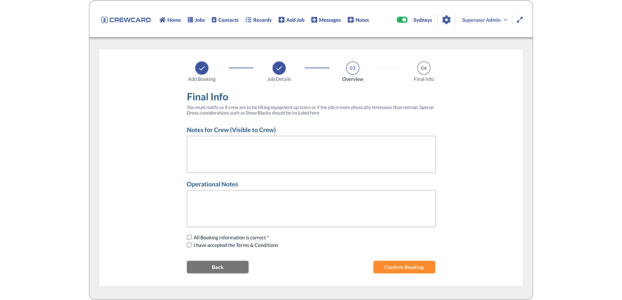


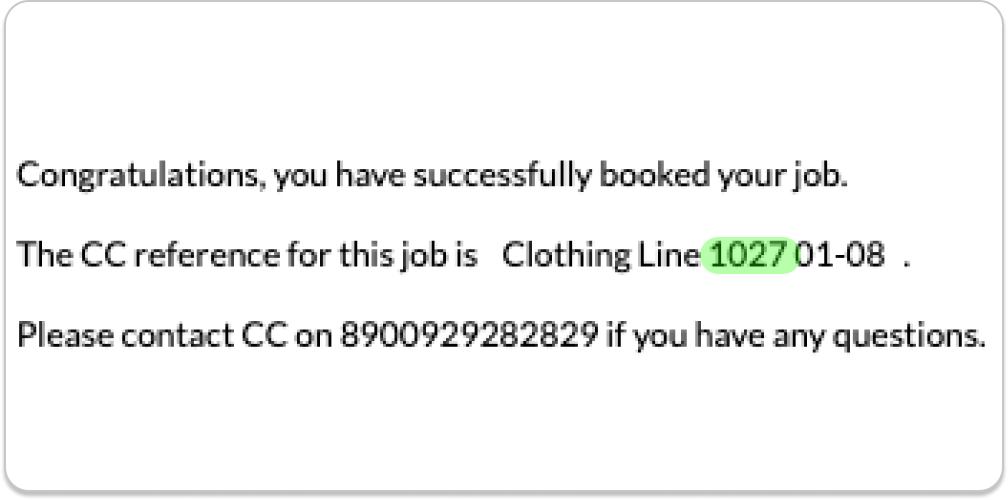


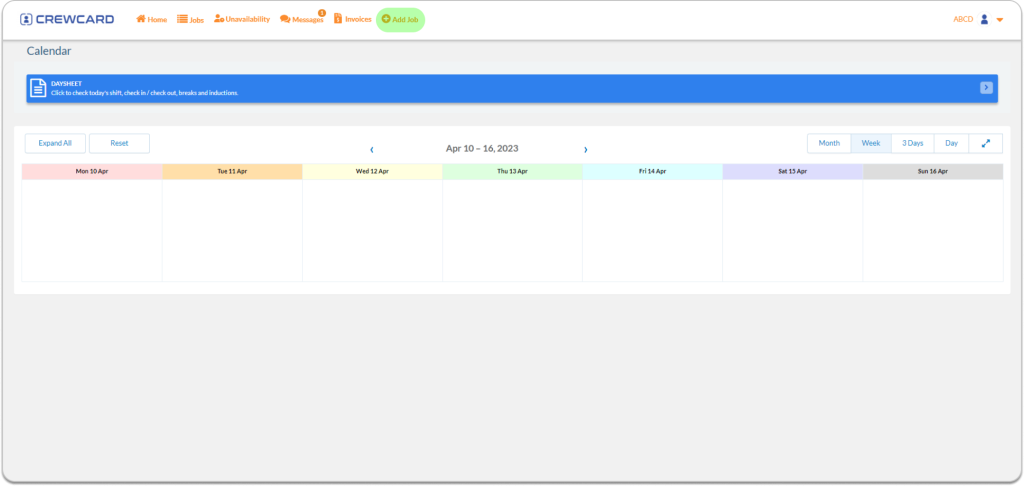
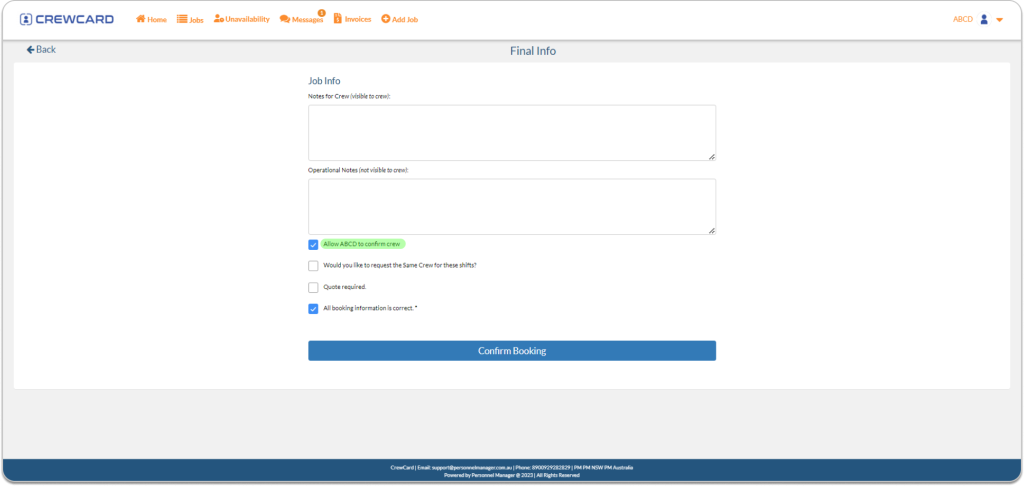


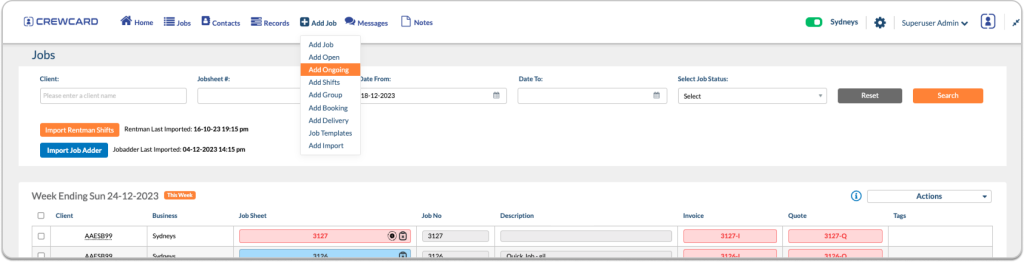
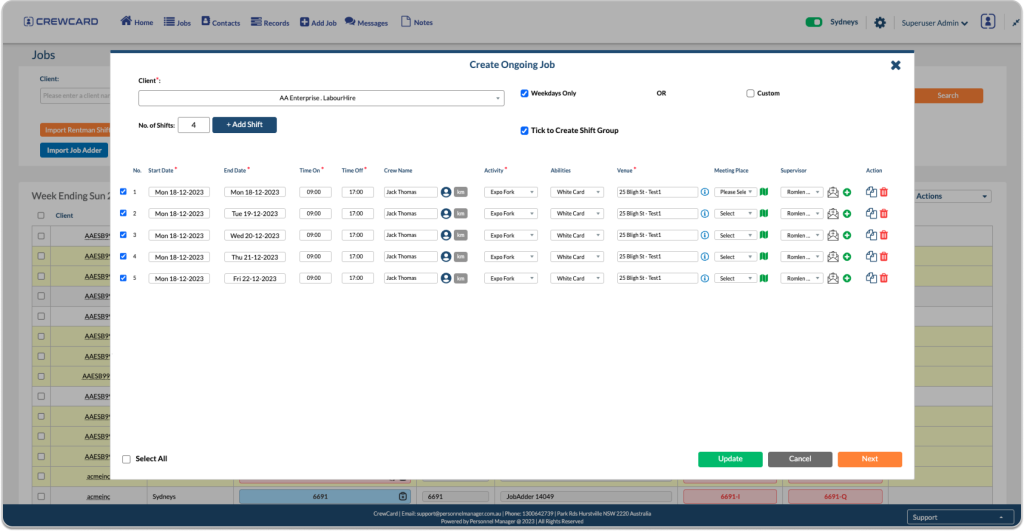
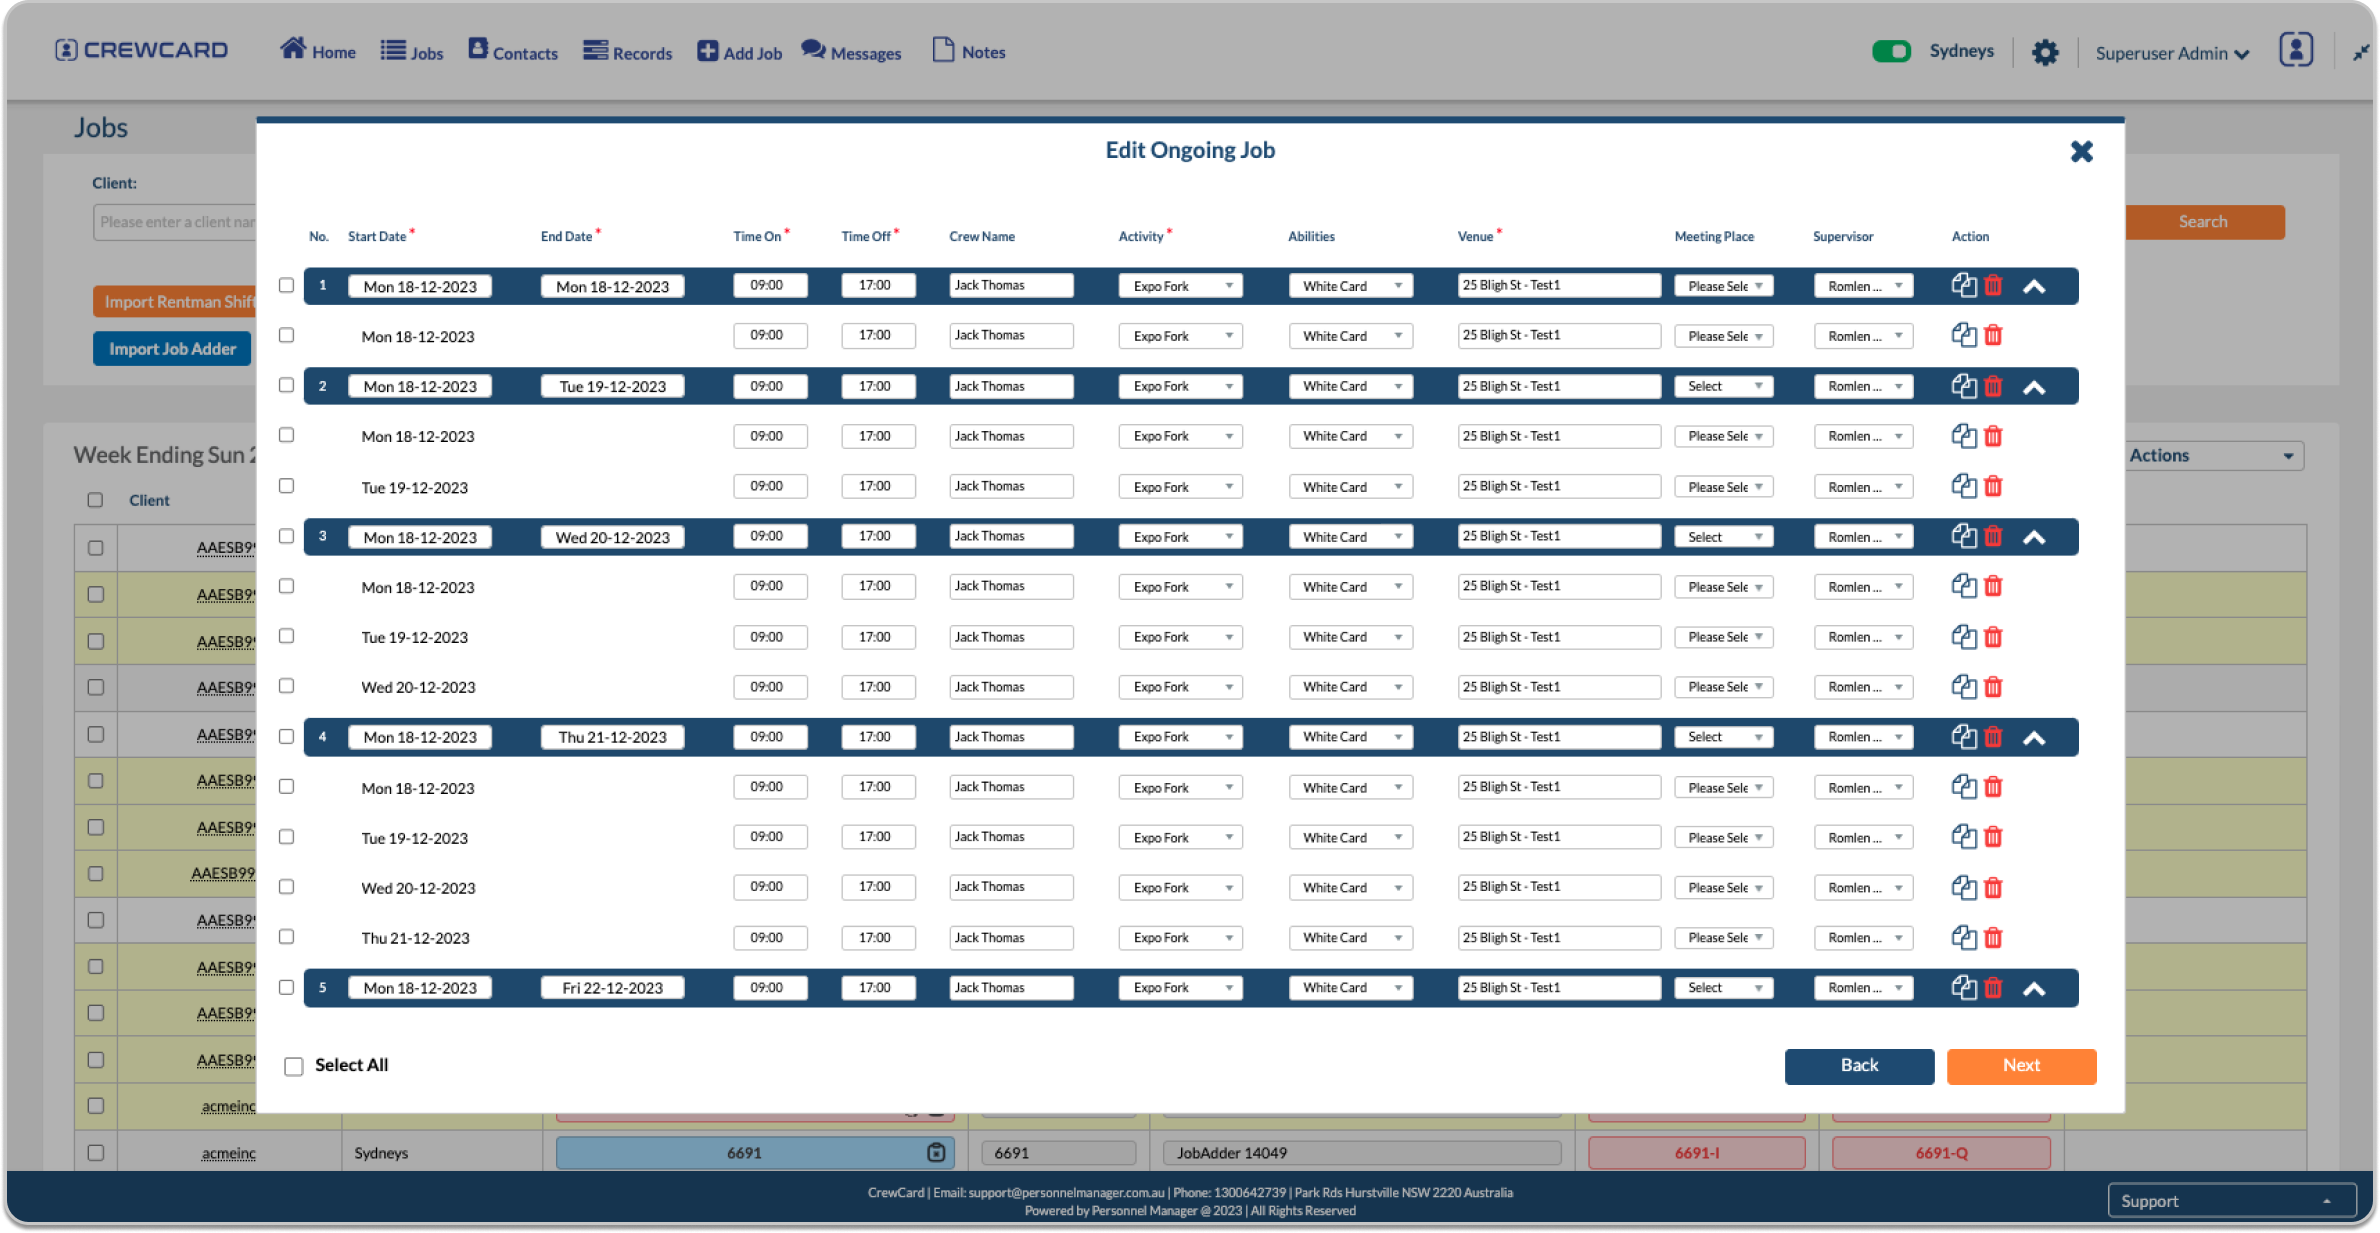
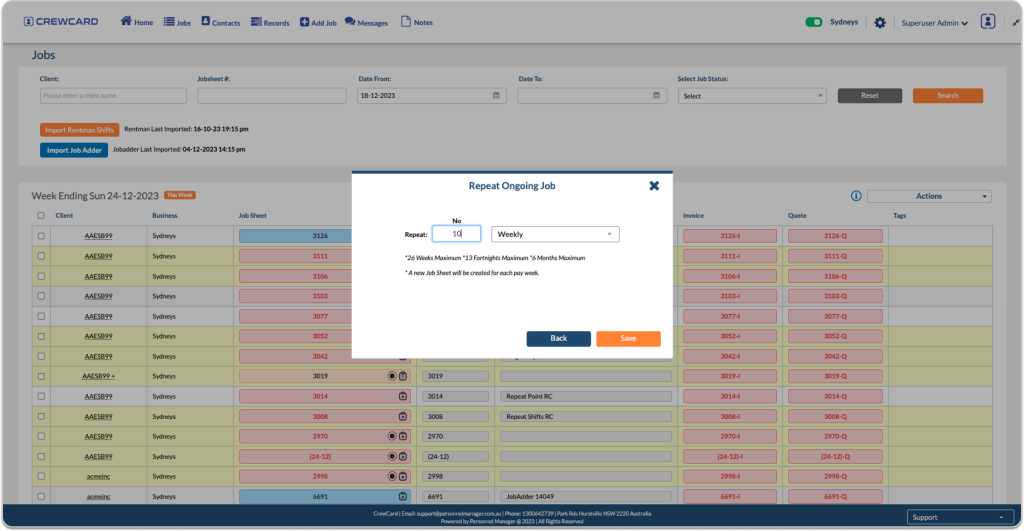
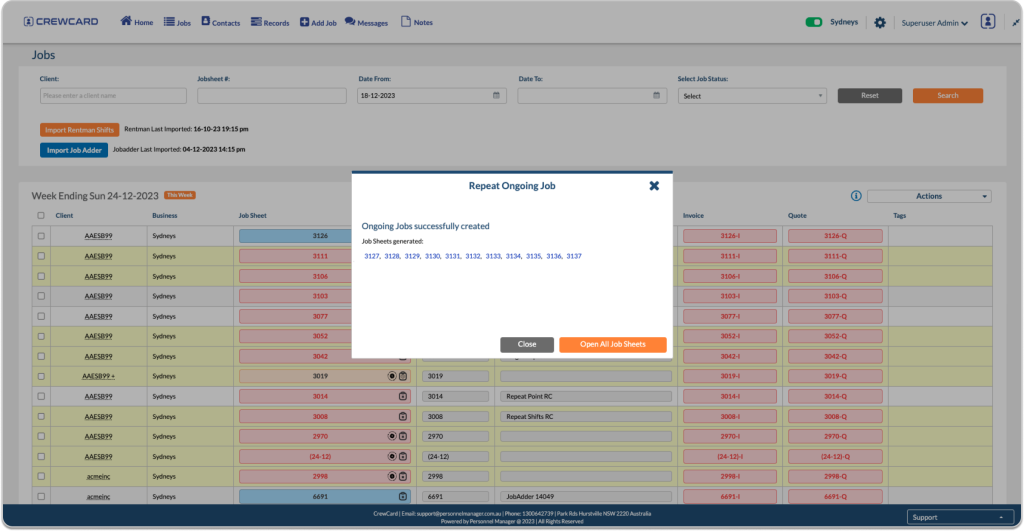
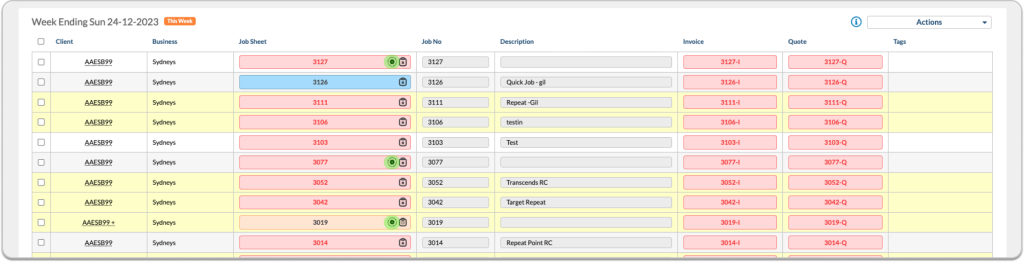
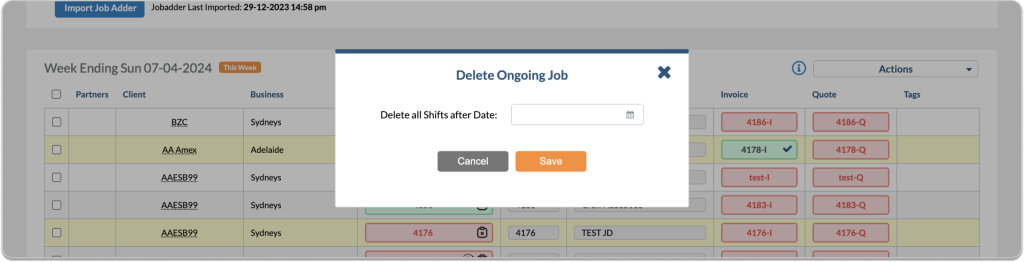
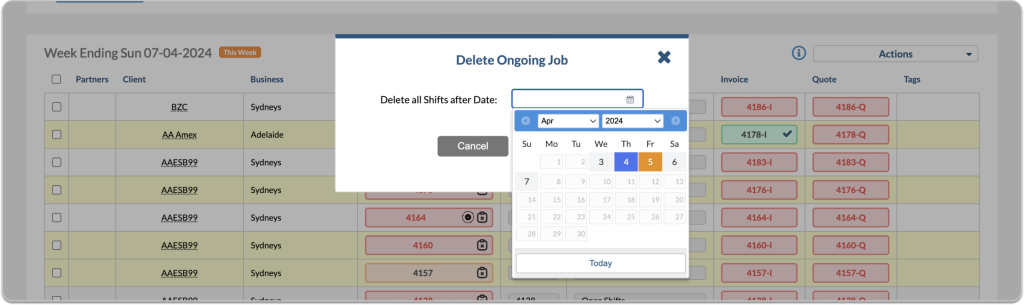
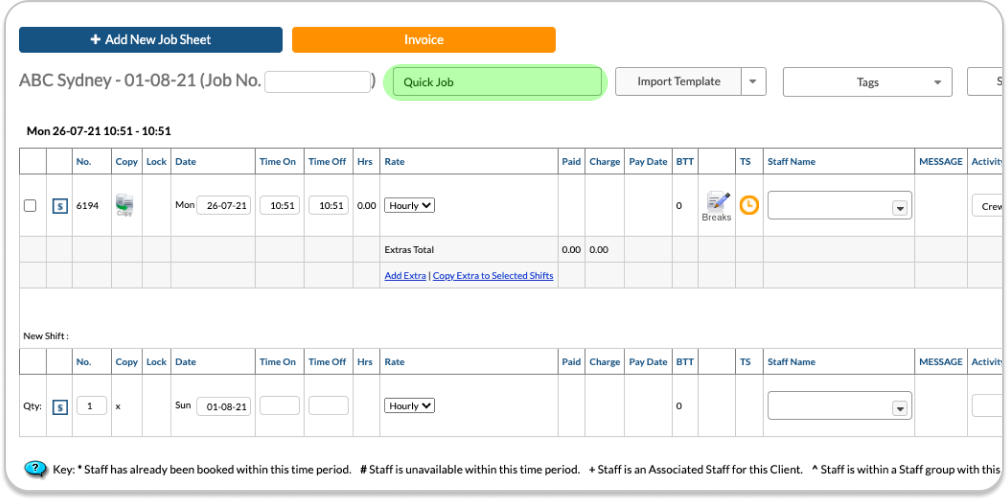
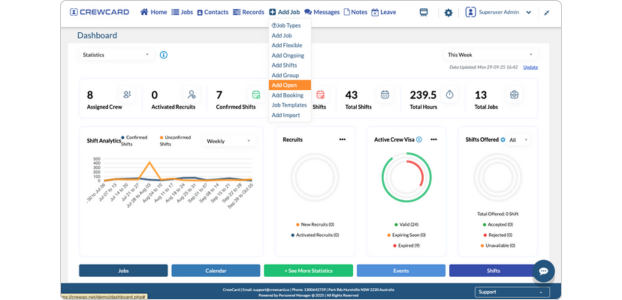
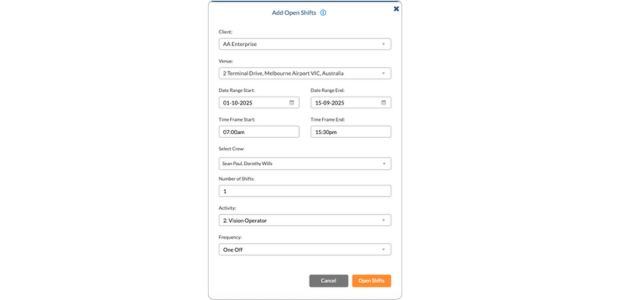
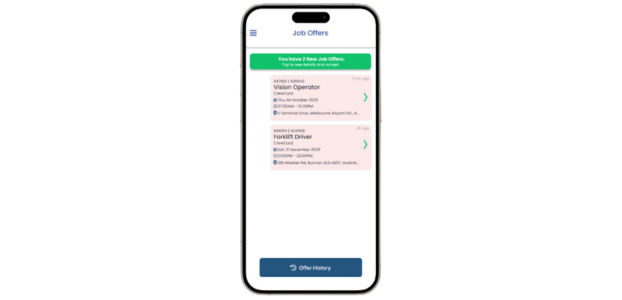 Crew self-assignment
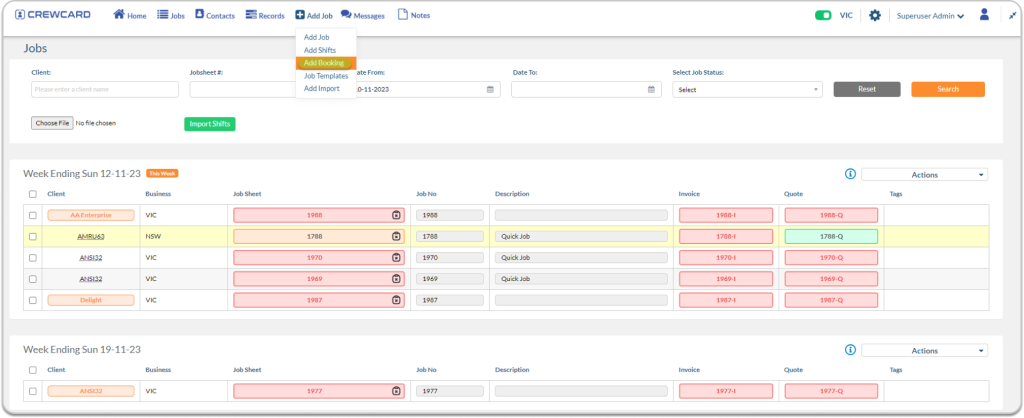
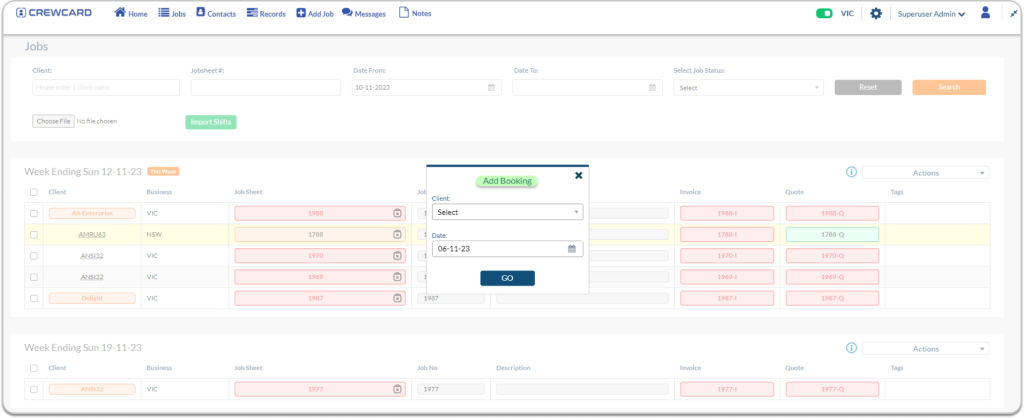
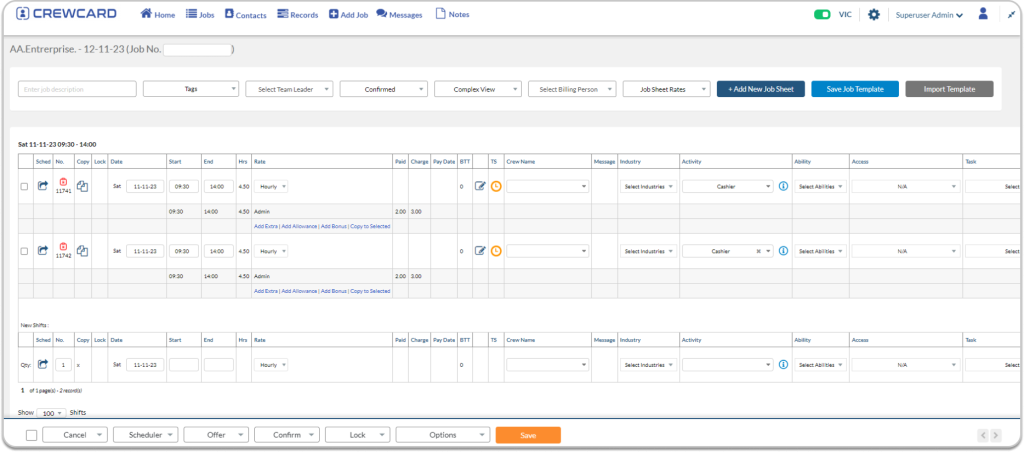
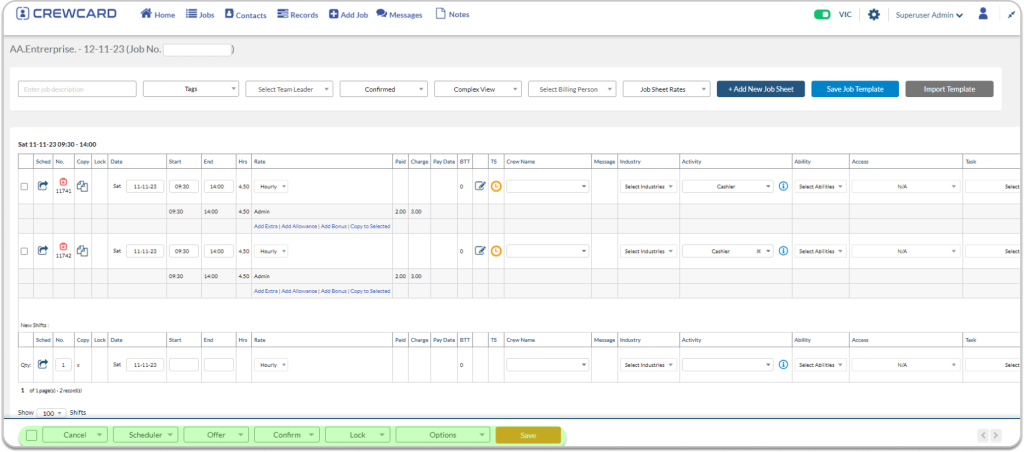
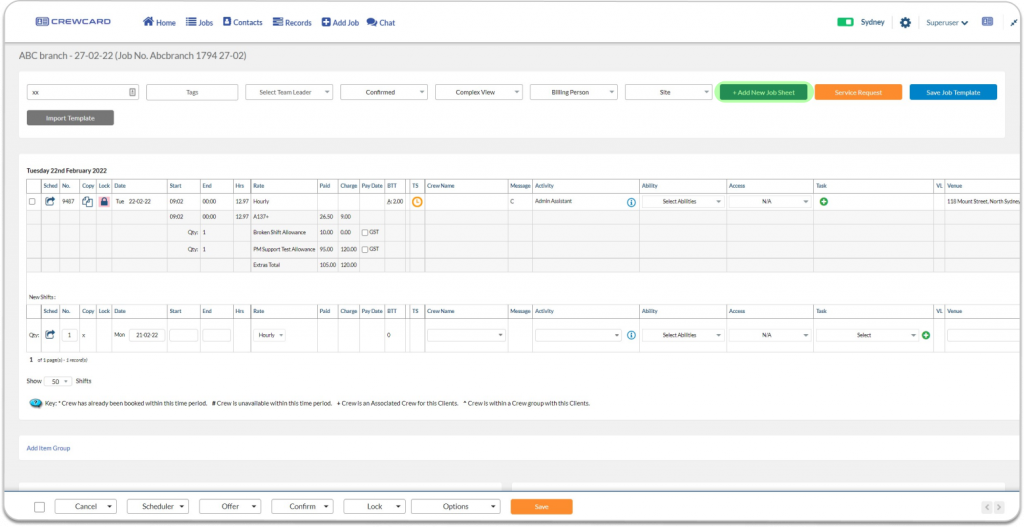
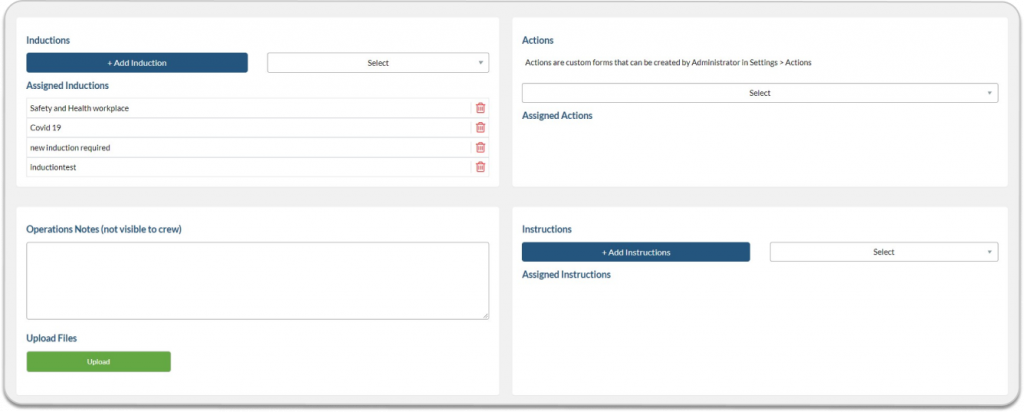
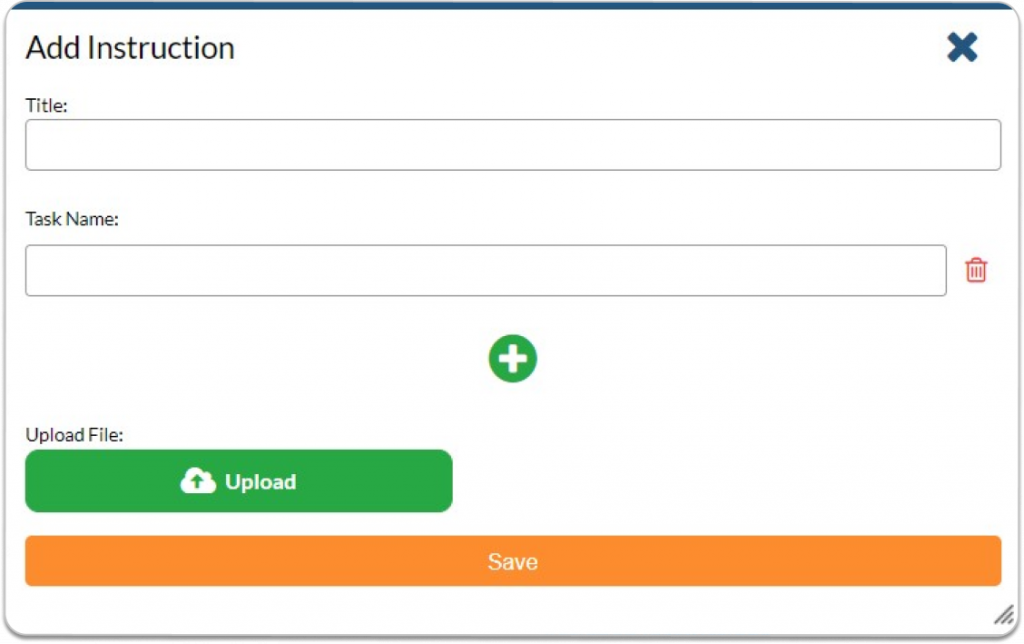
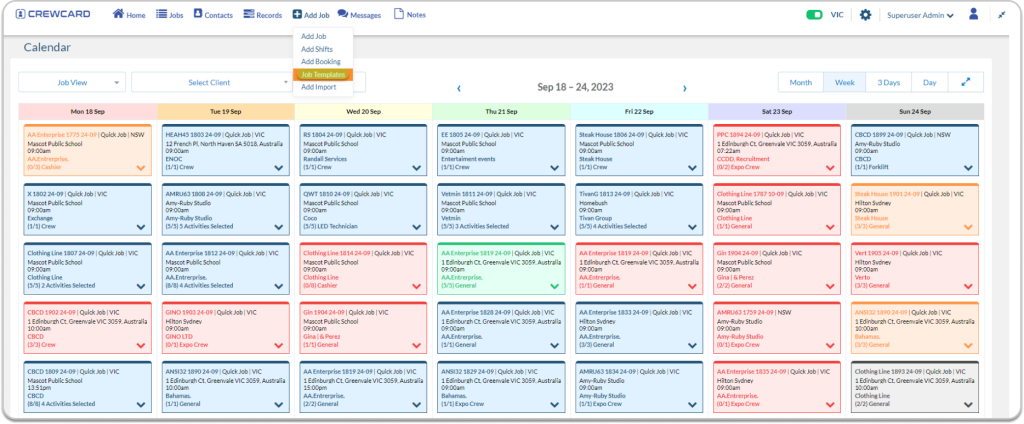
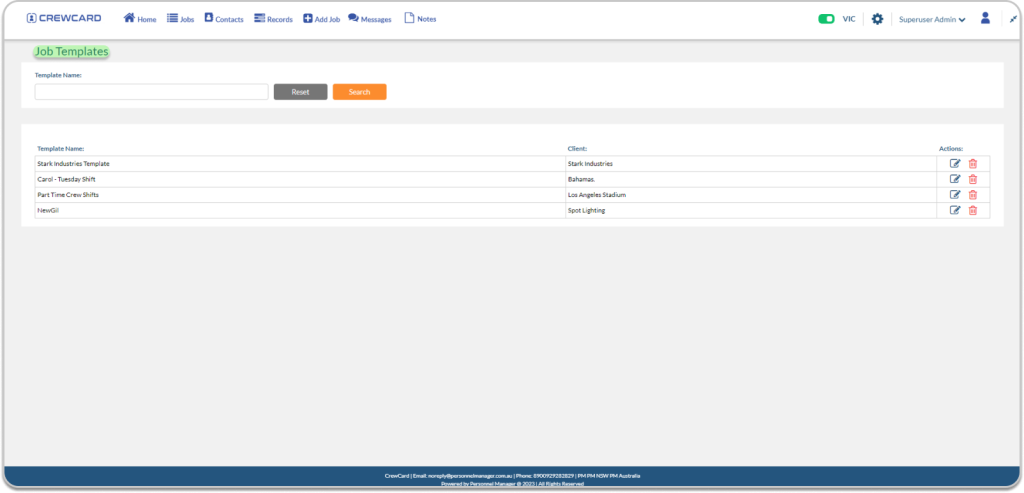

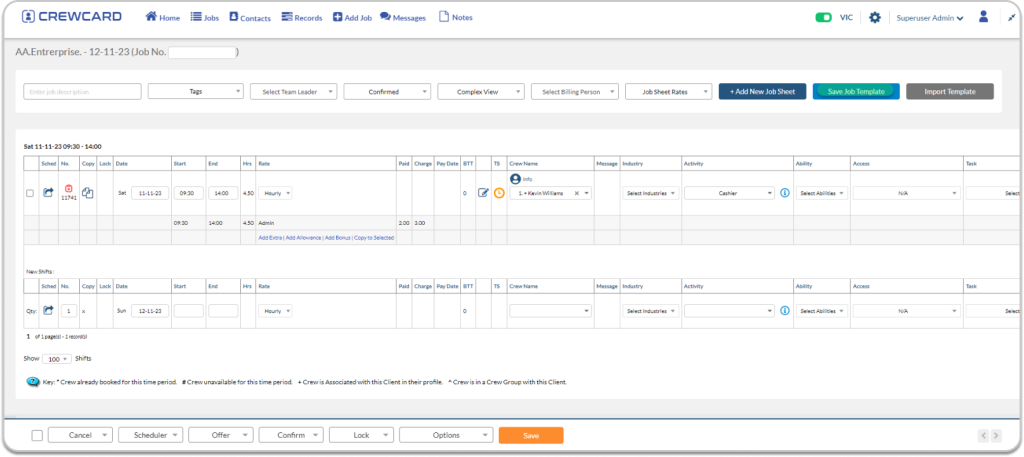
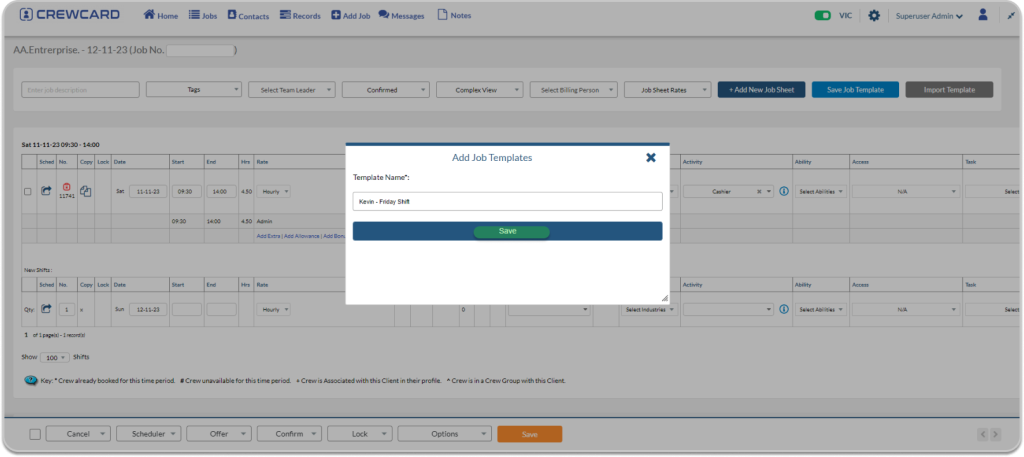
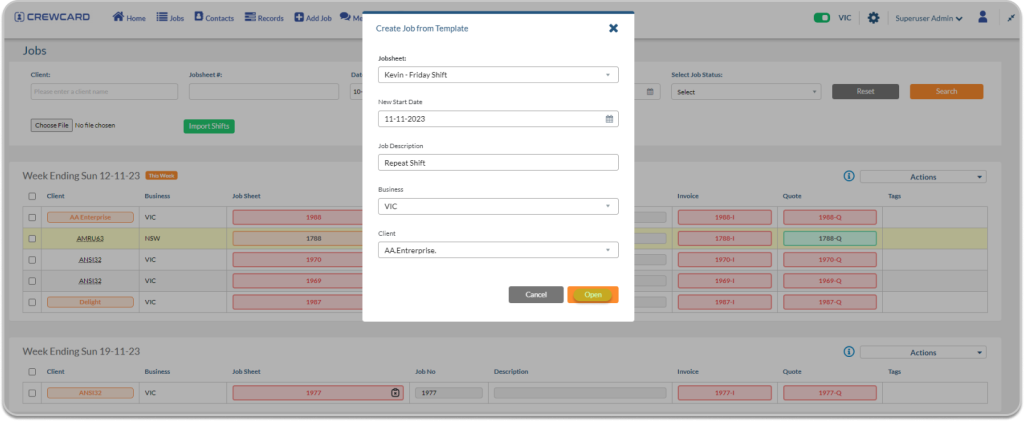


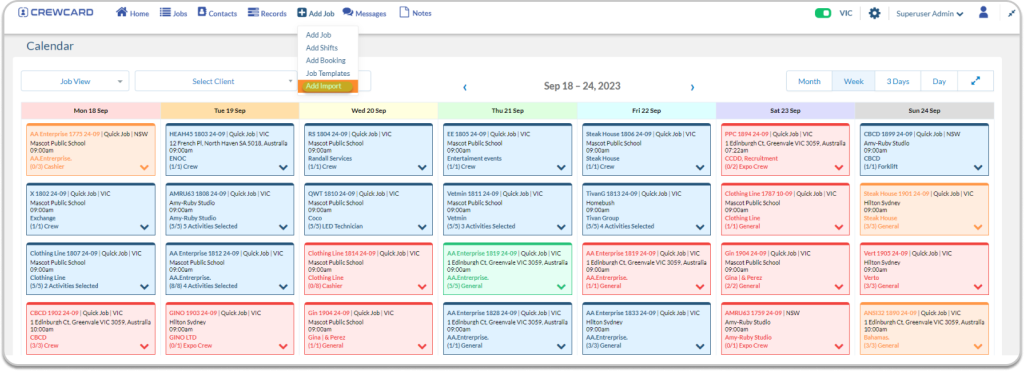
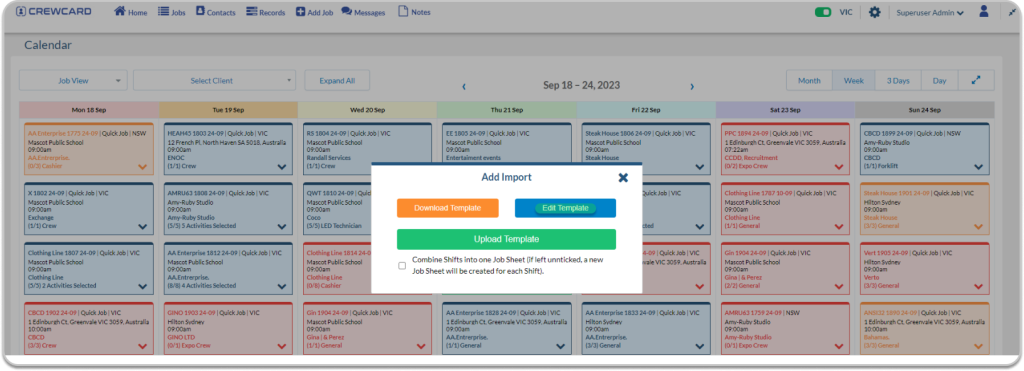
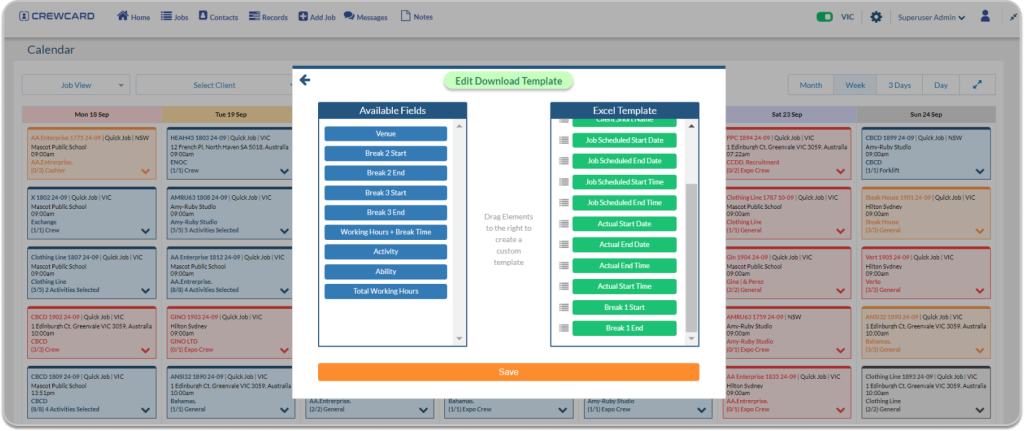
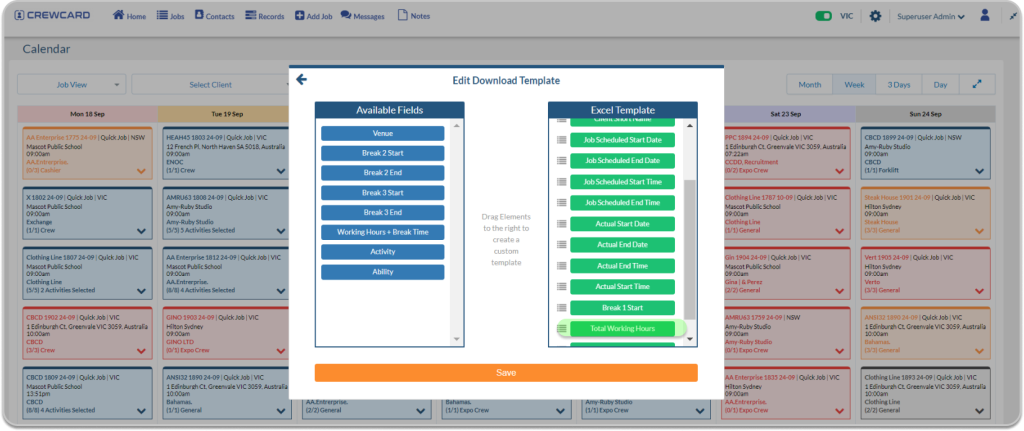
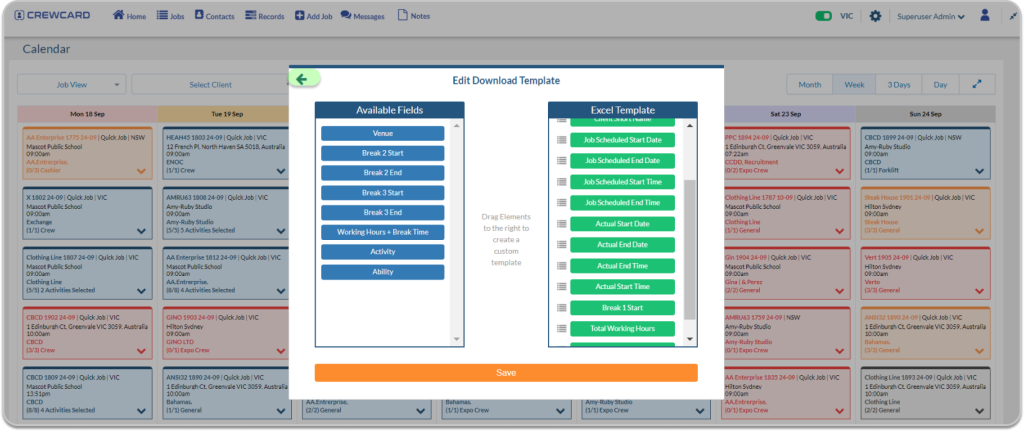

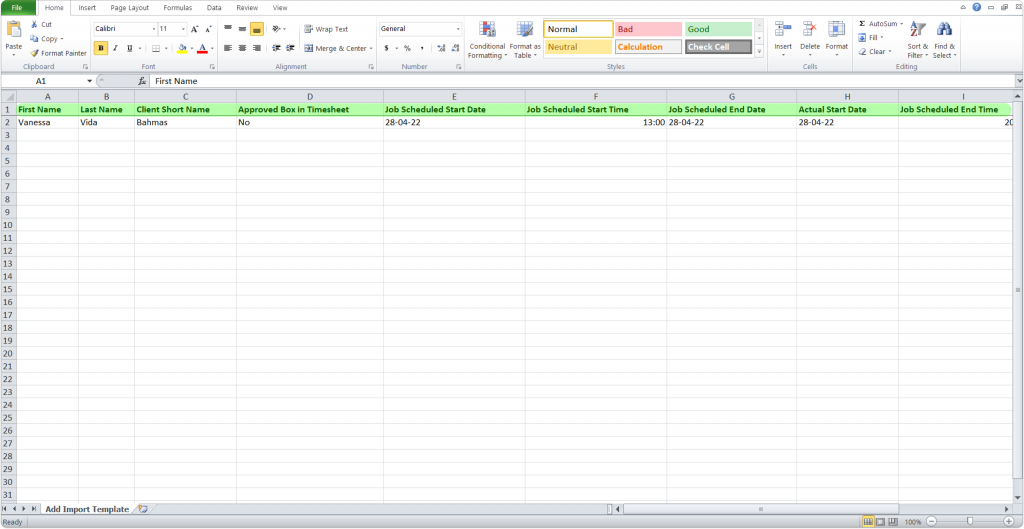
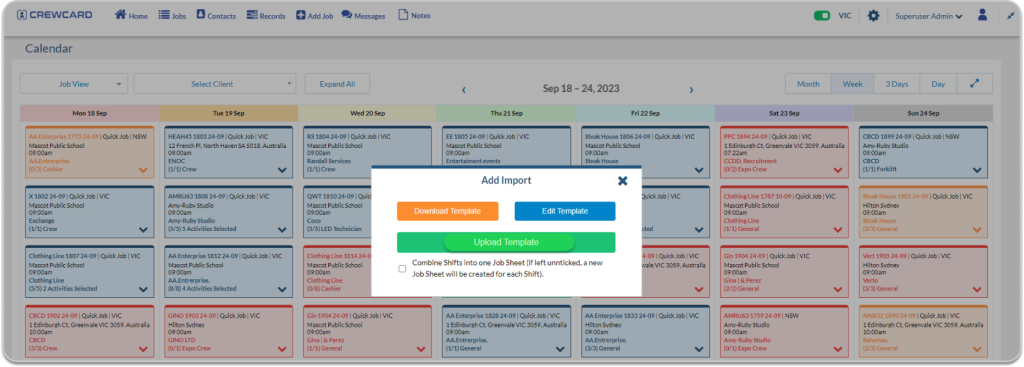
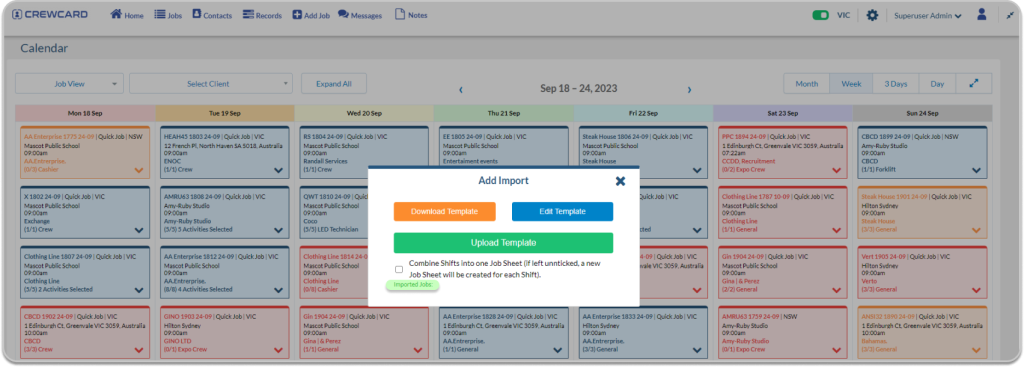
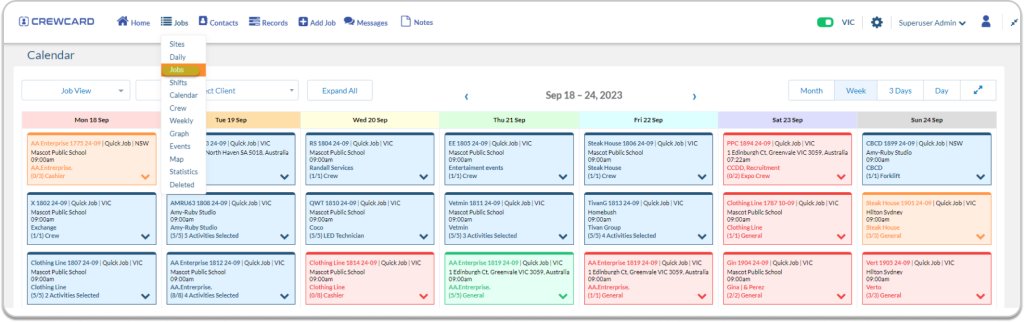
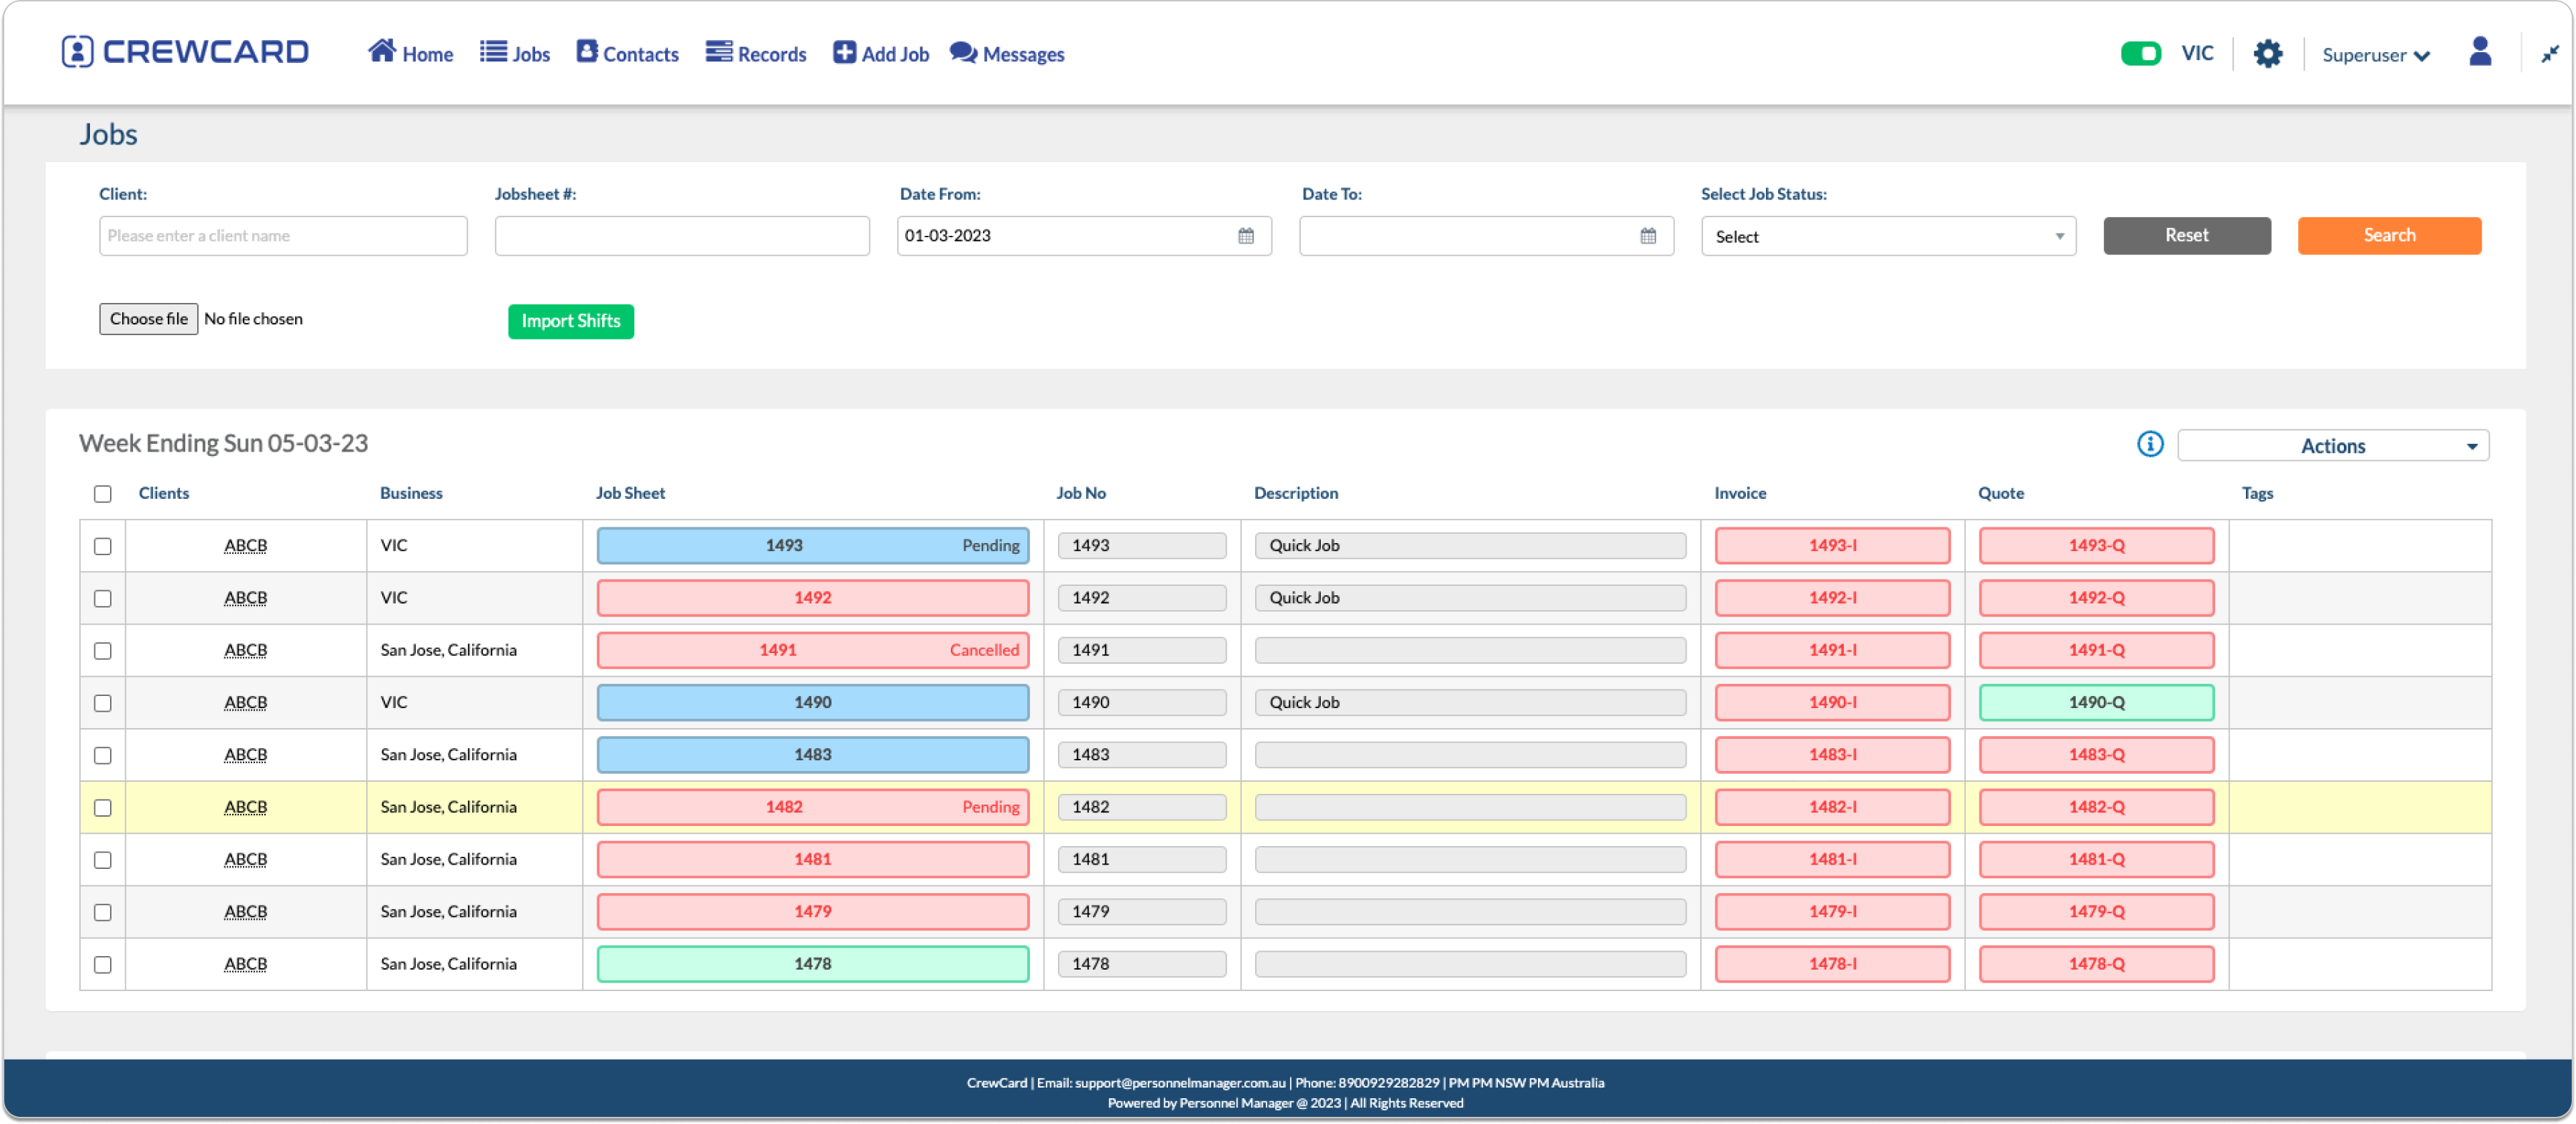
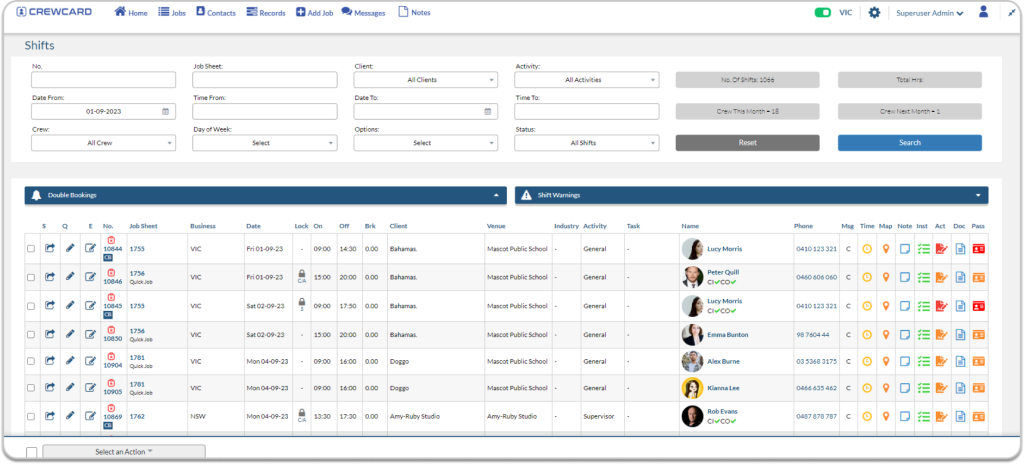
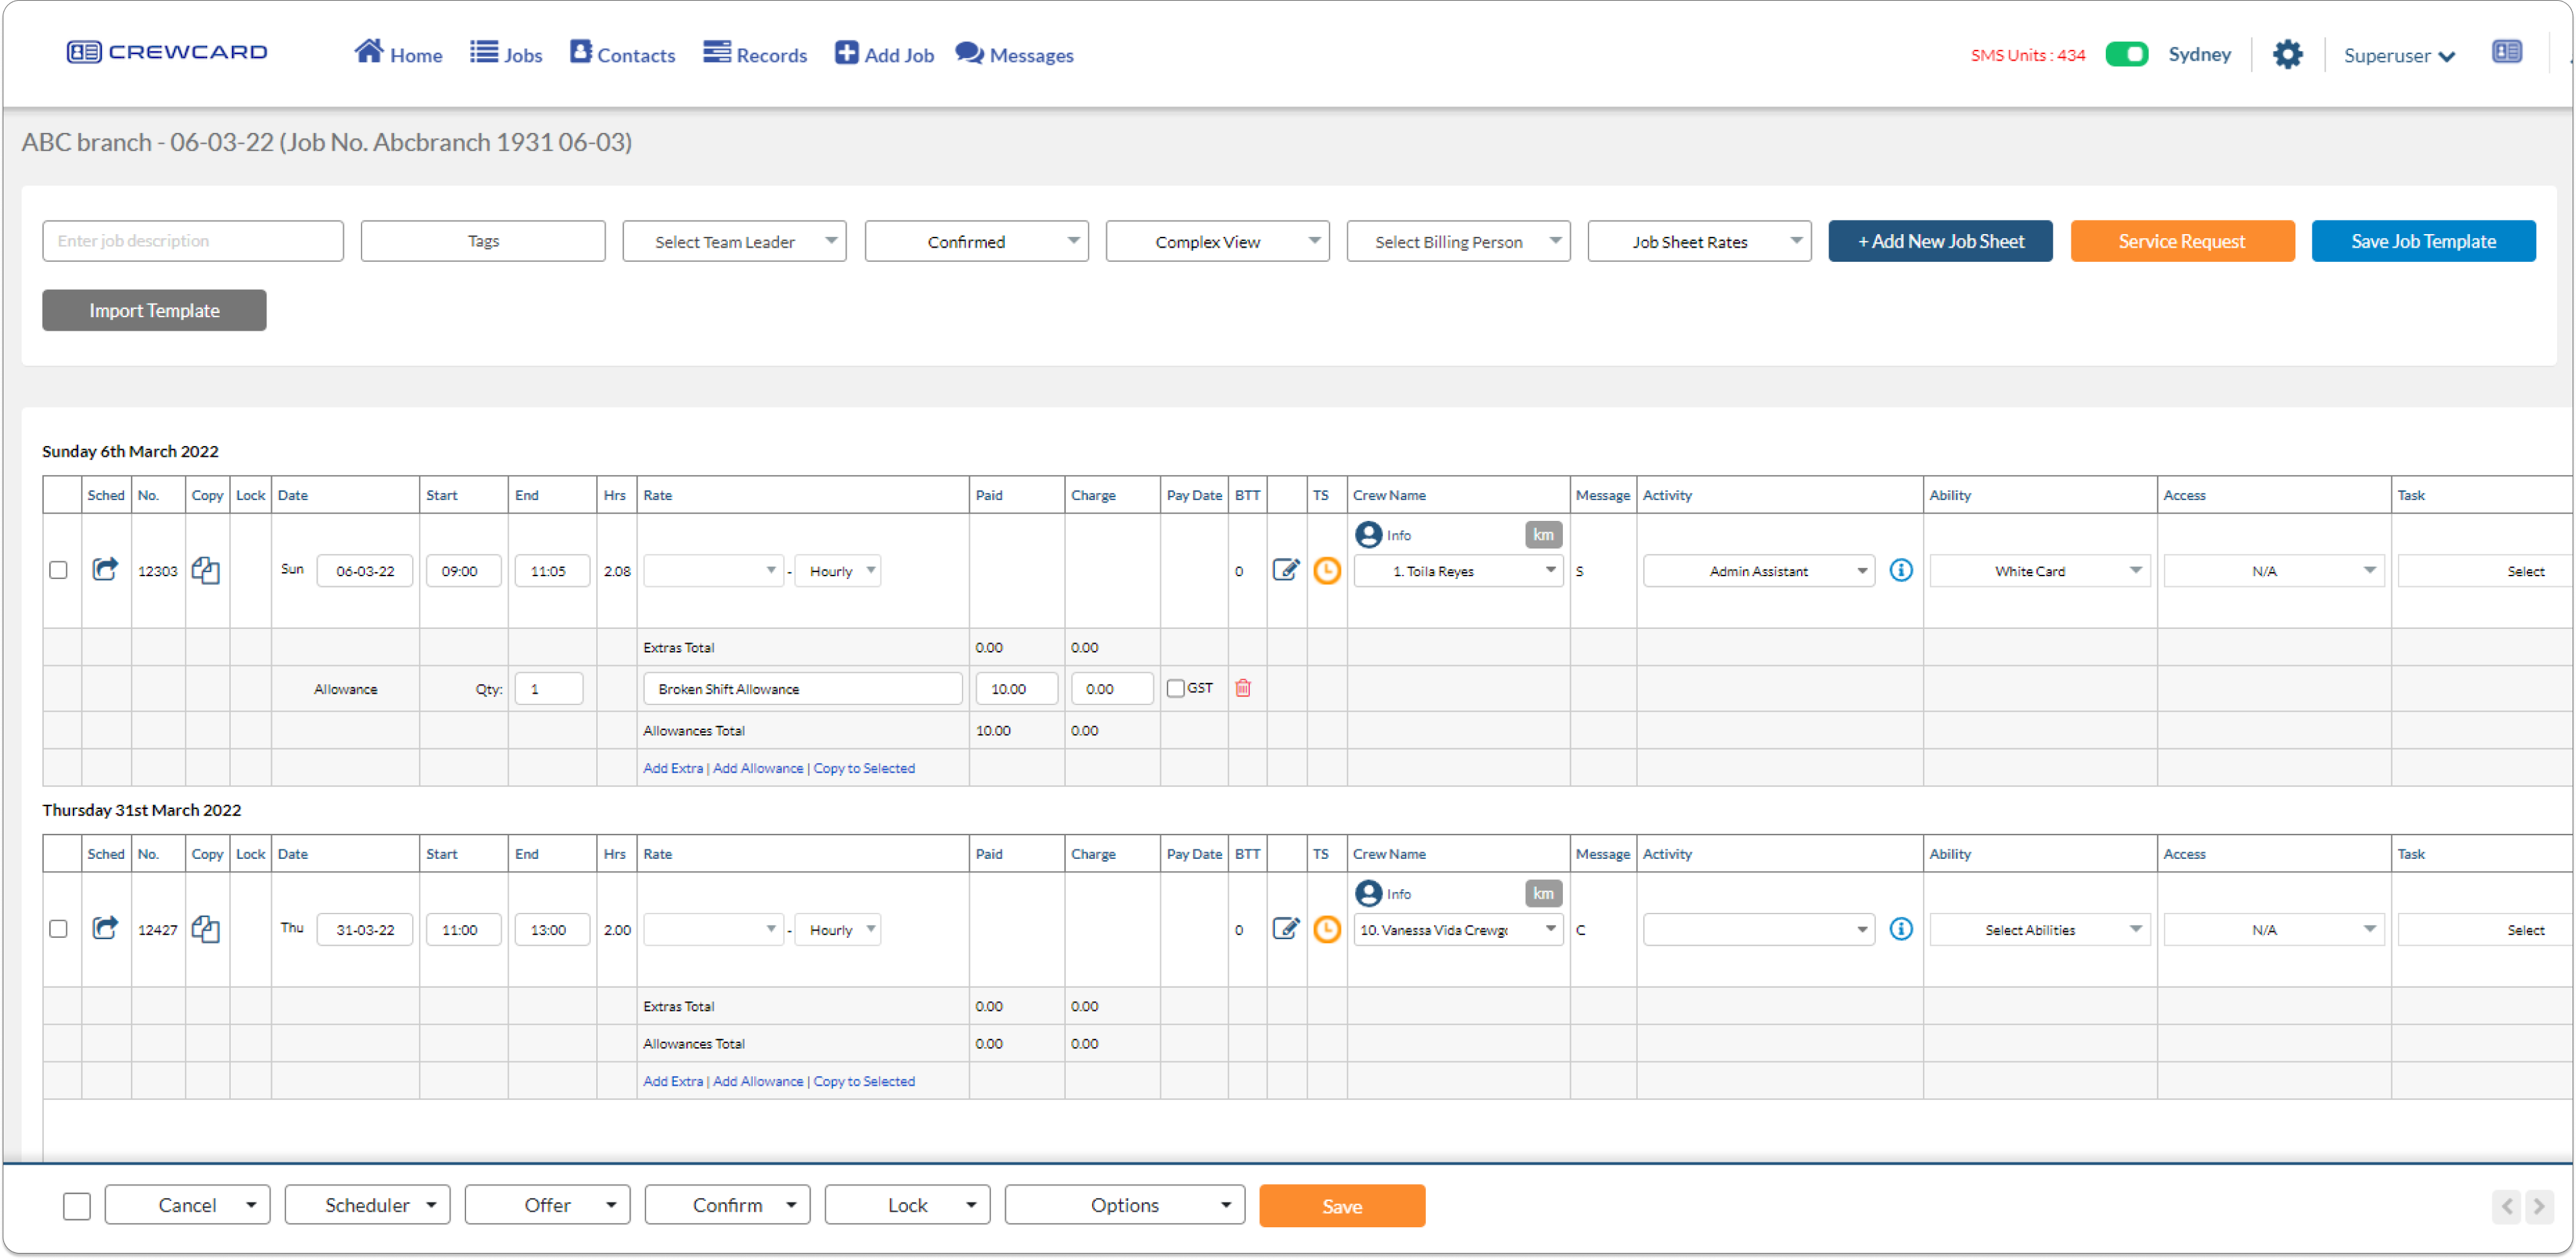
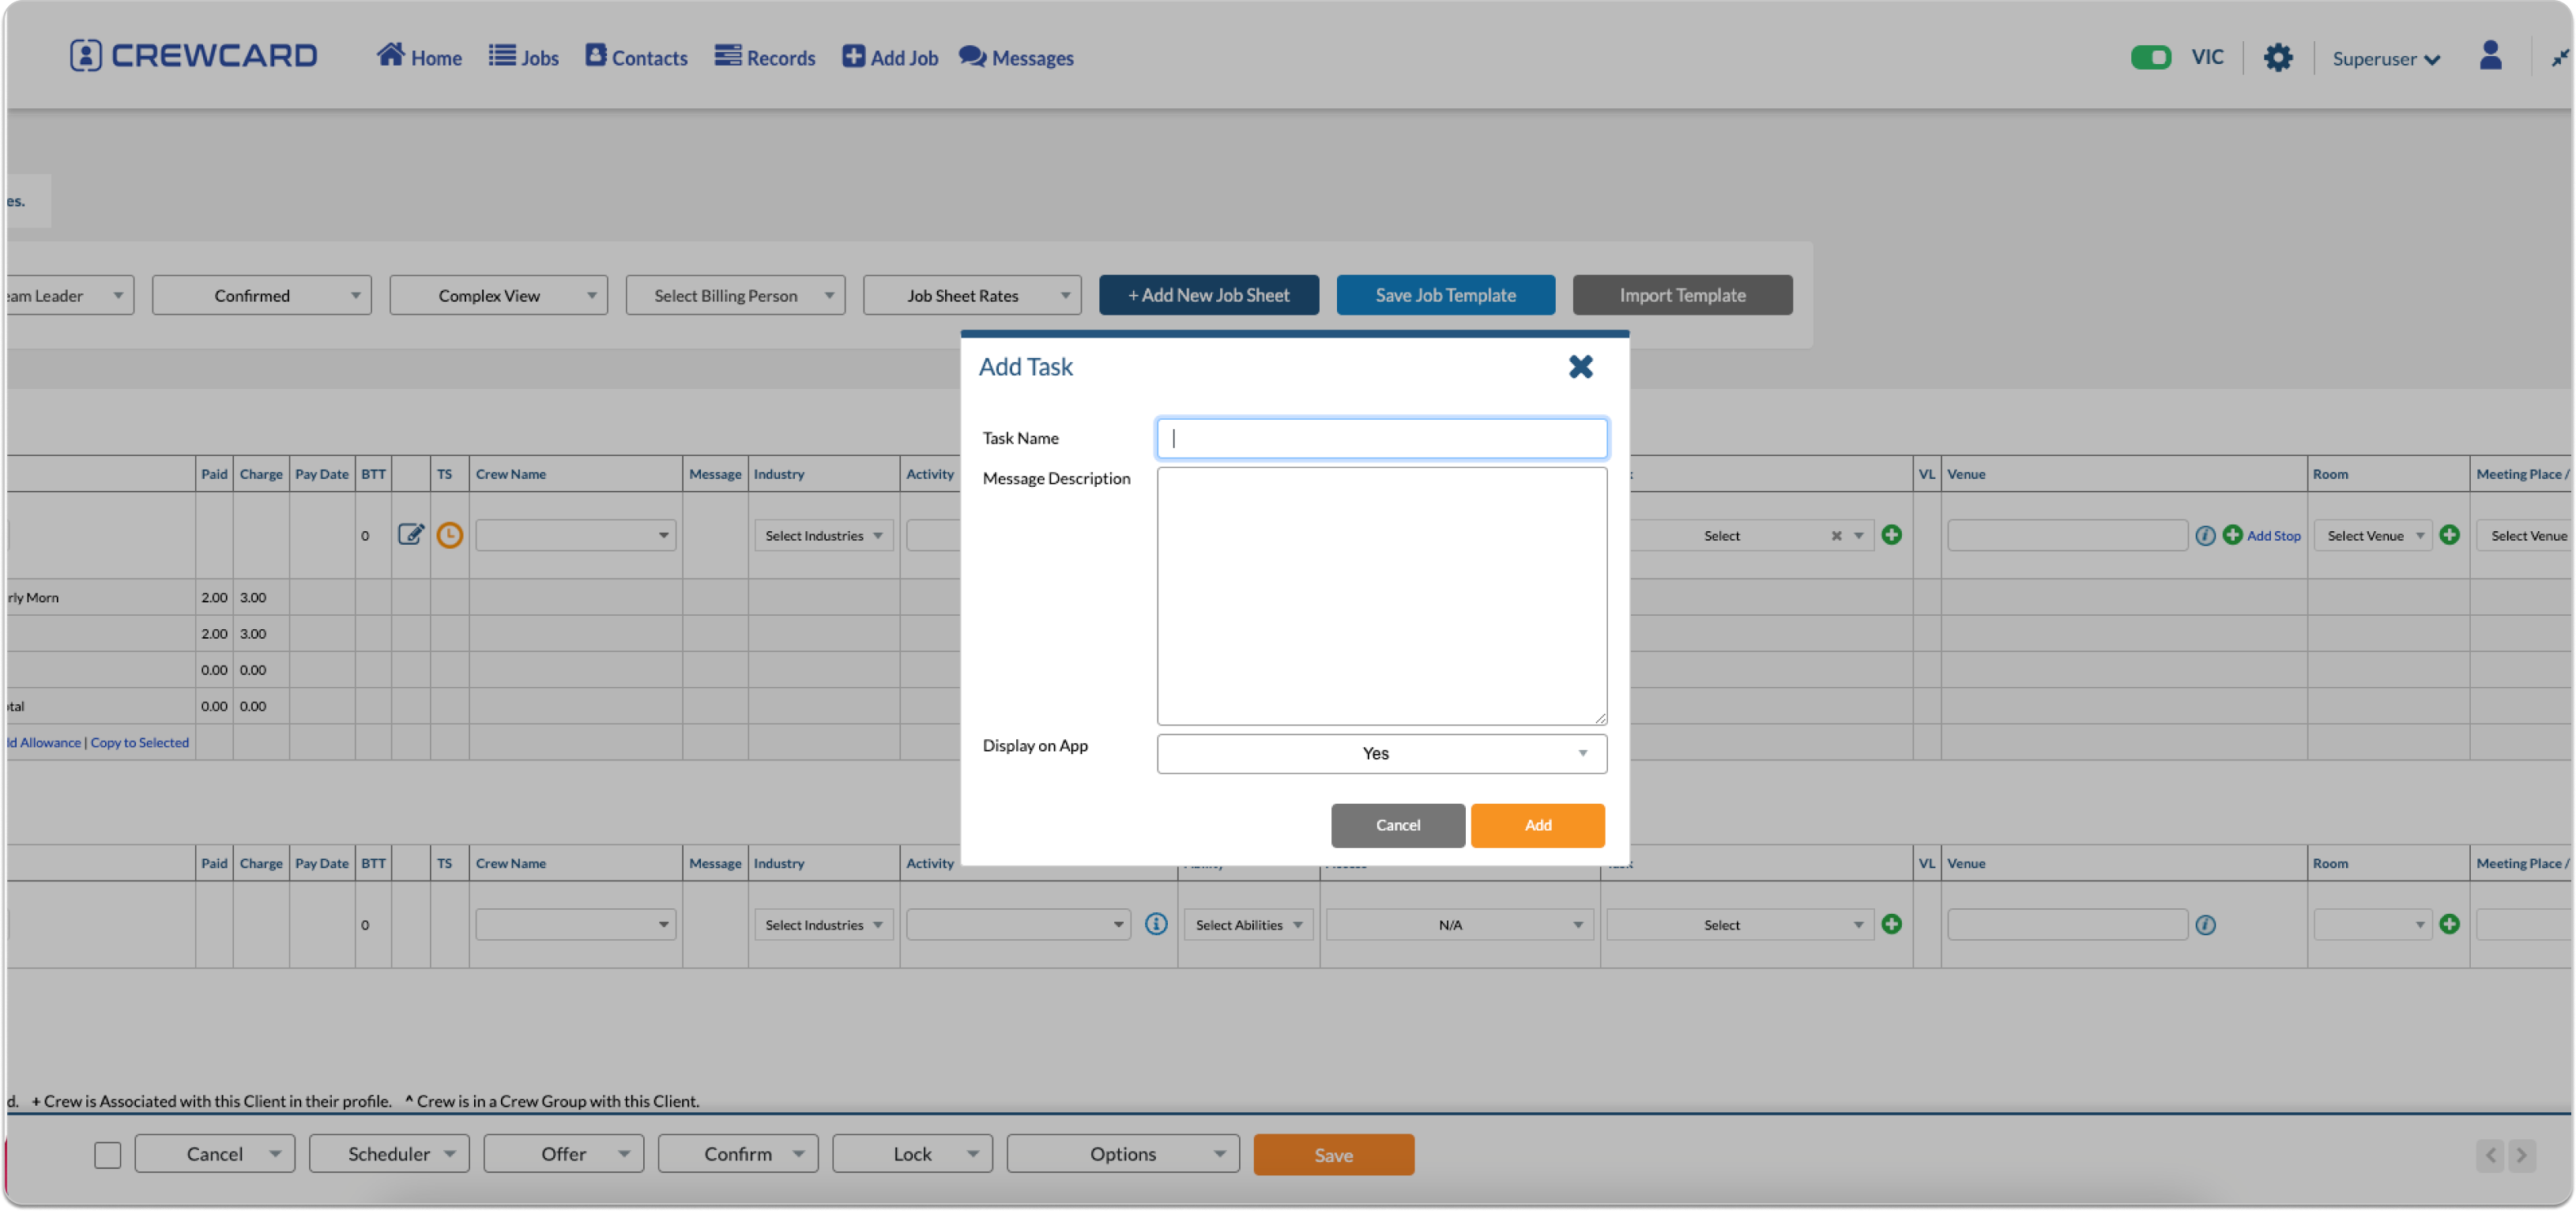
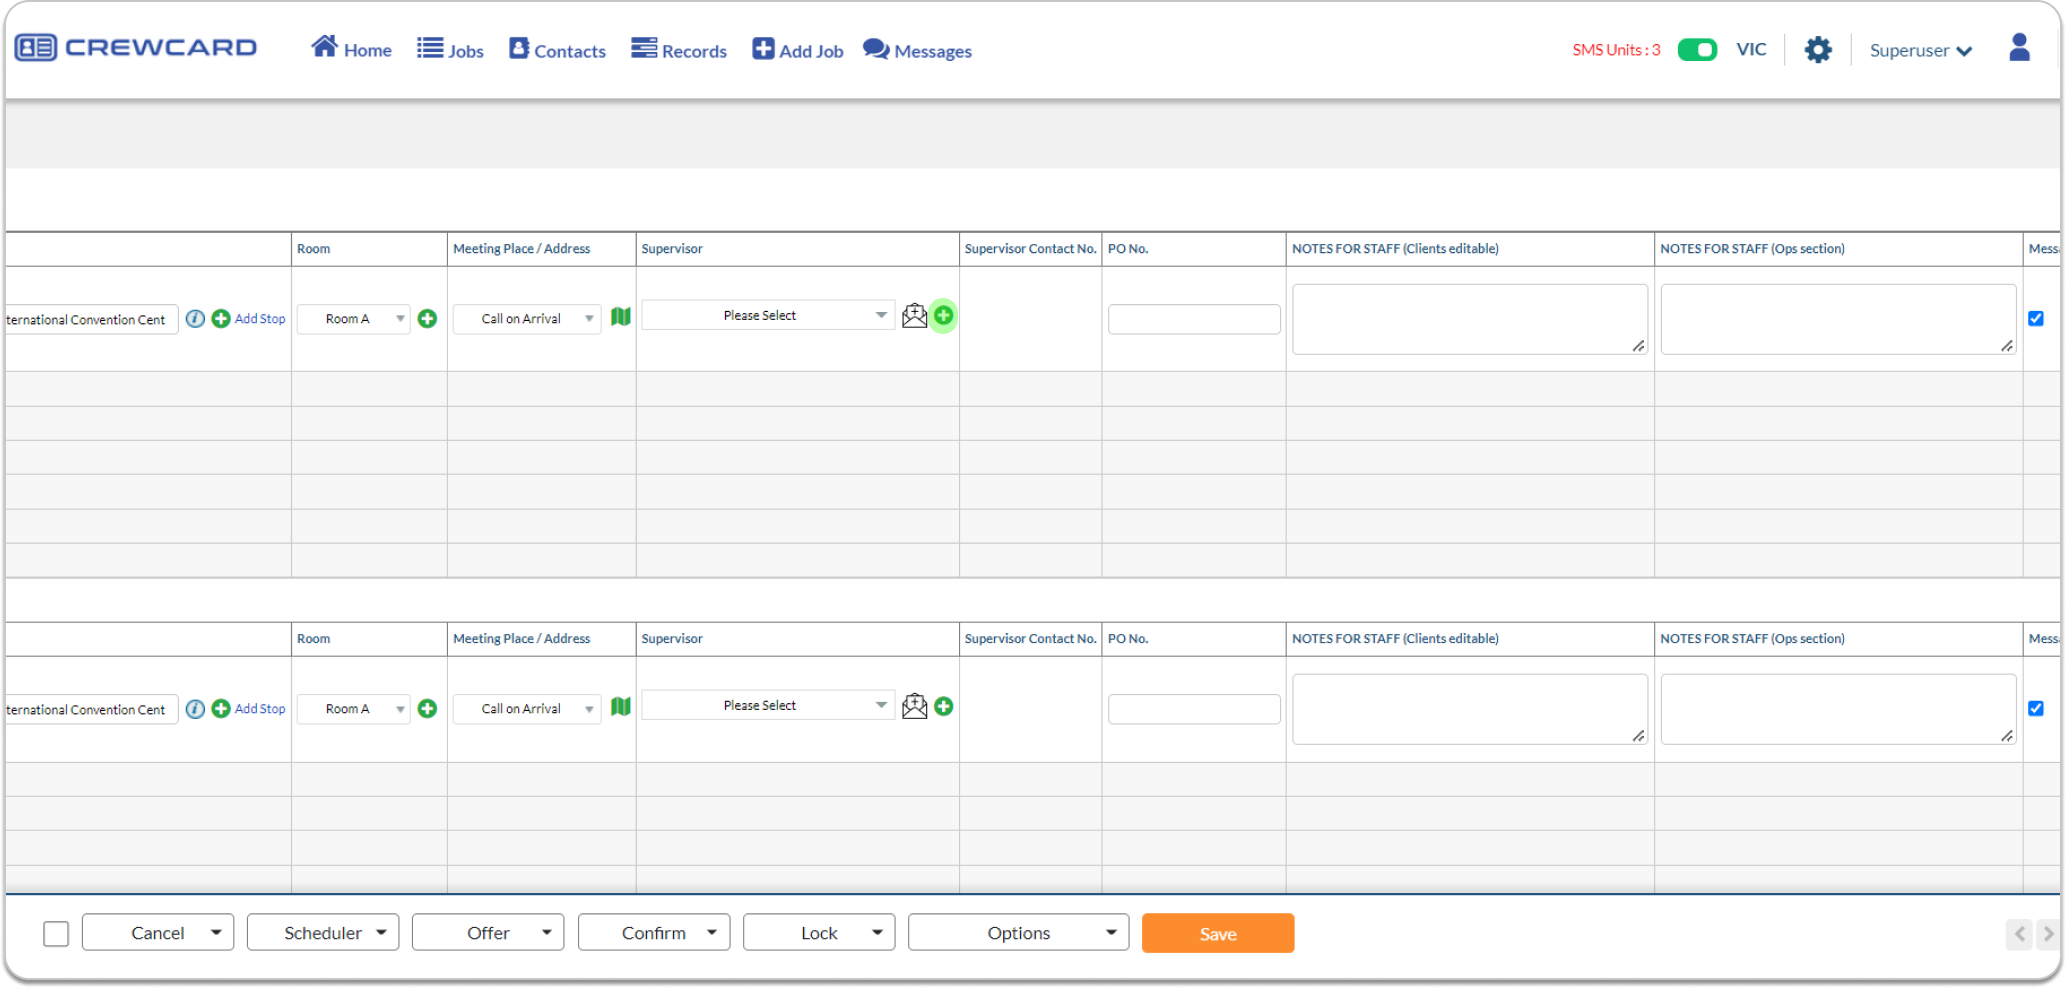
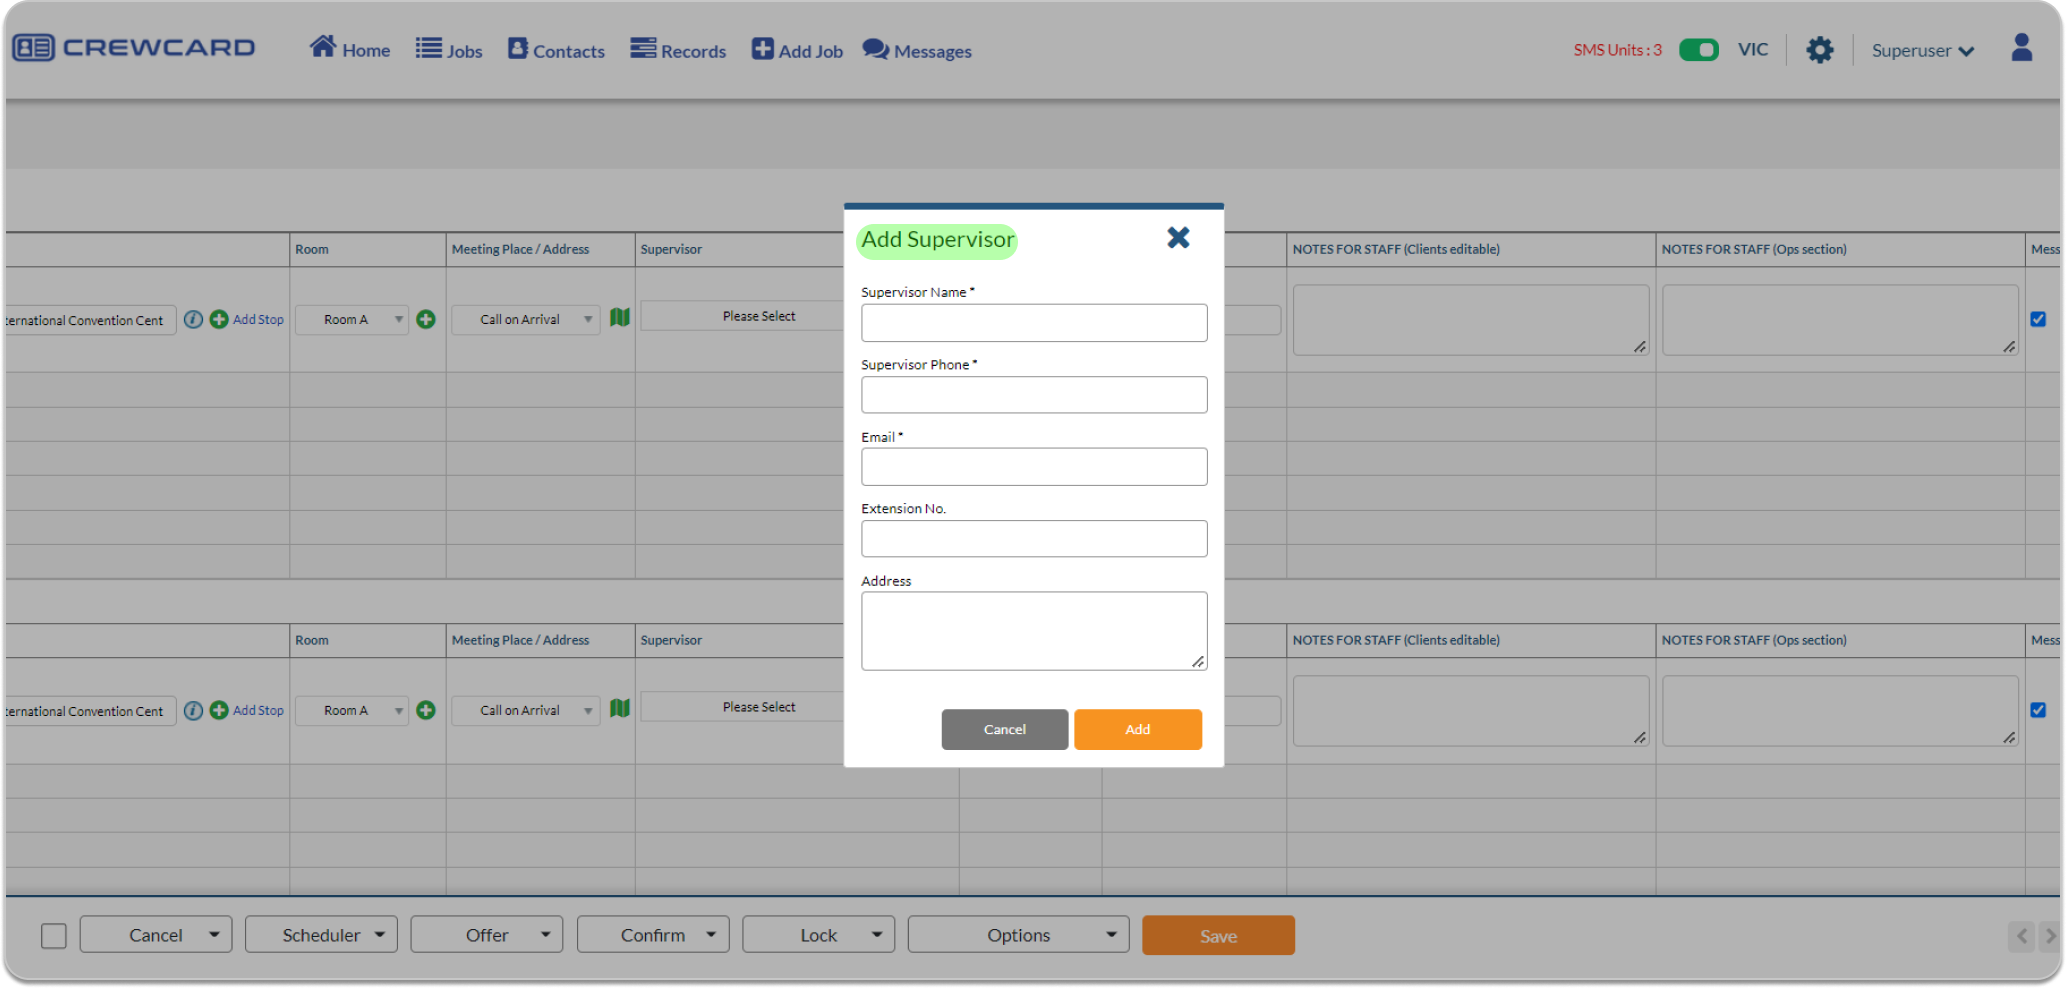
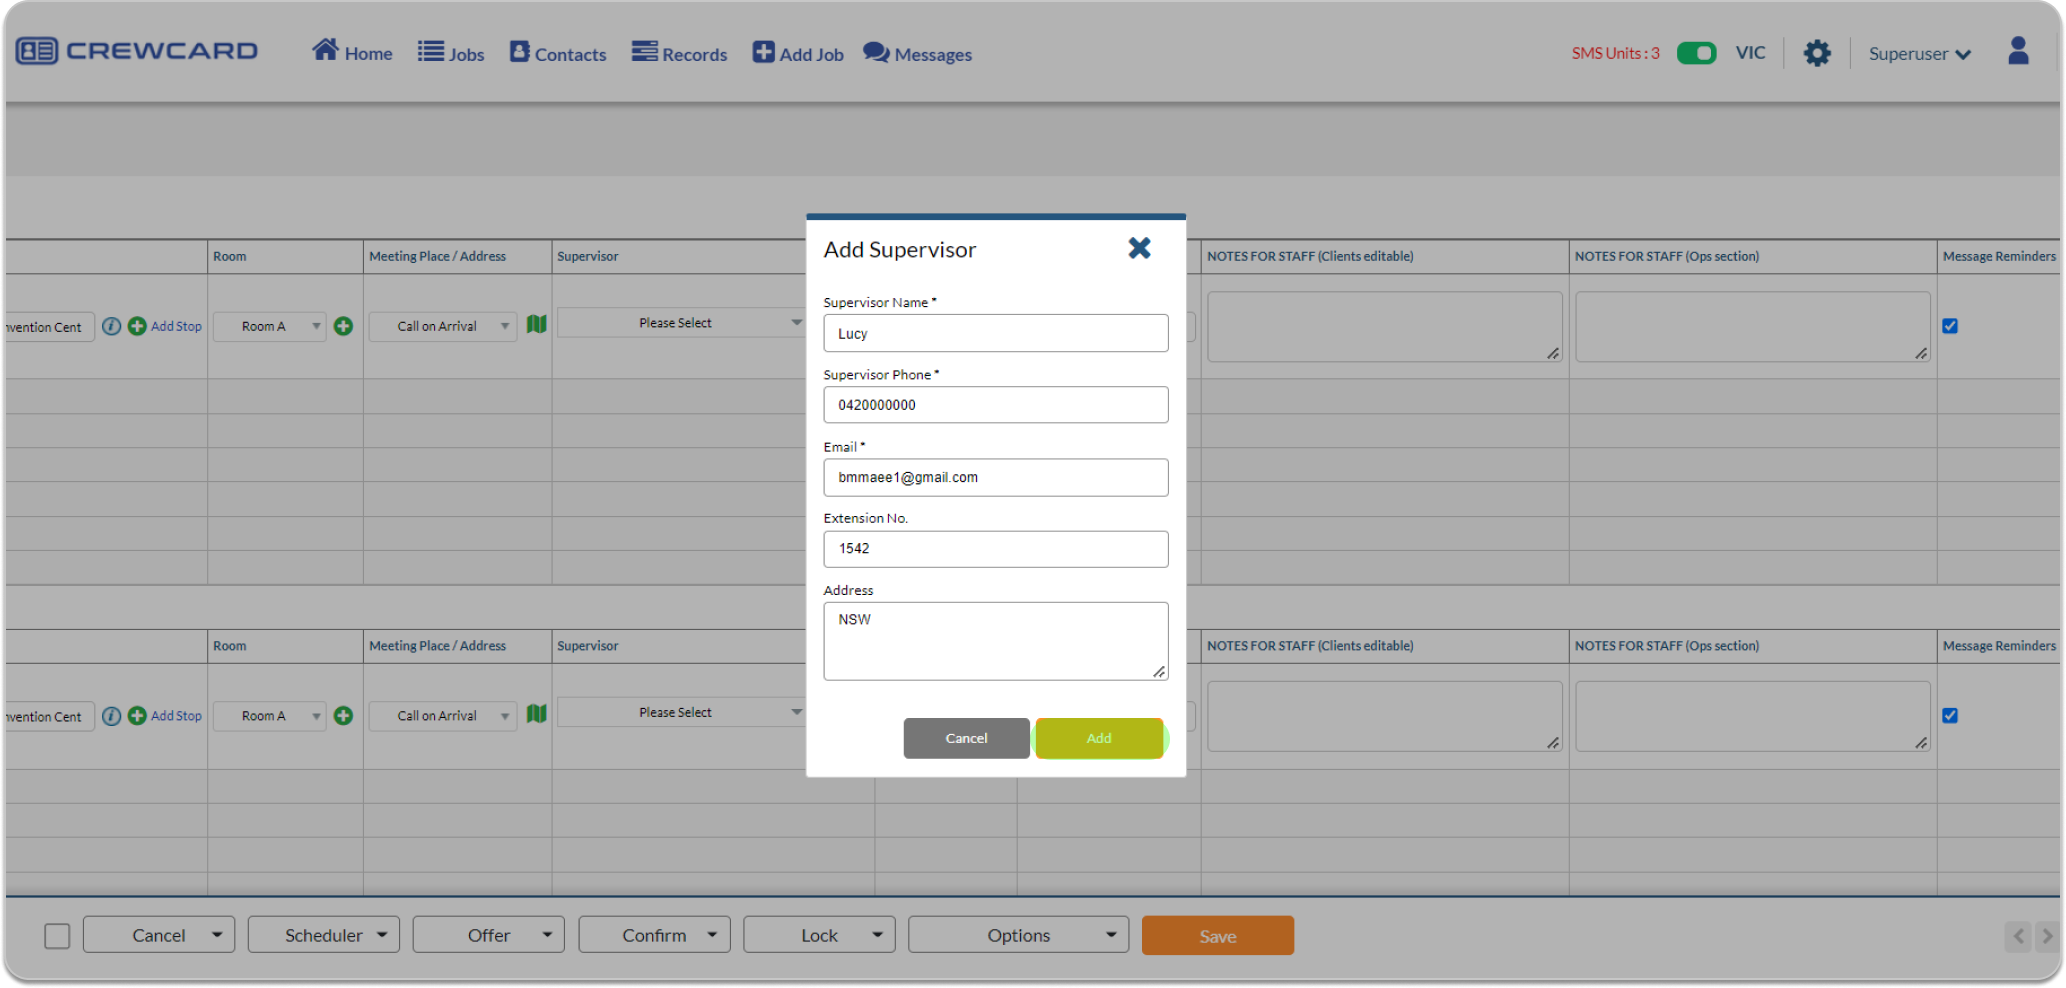
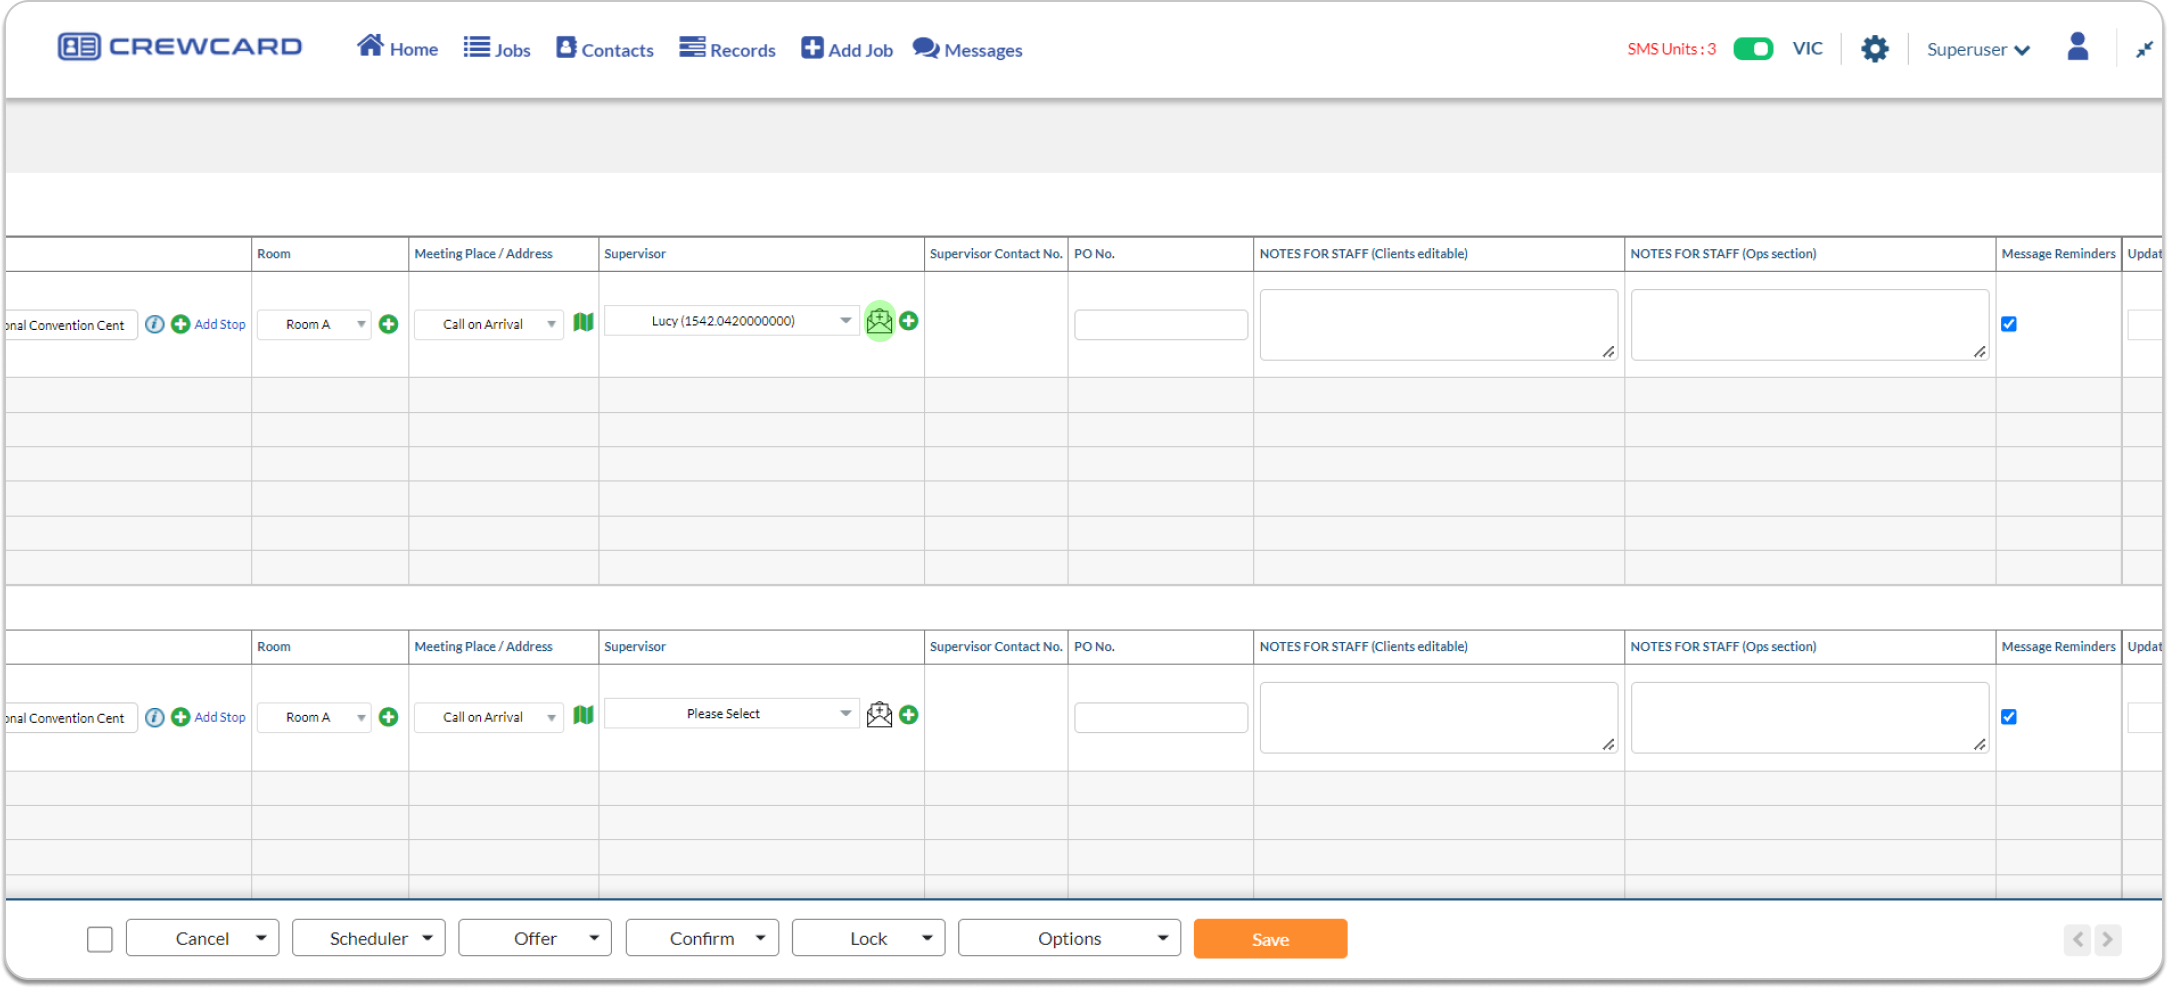
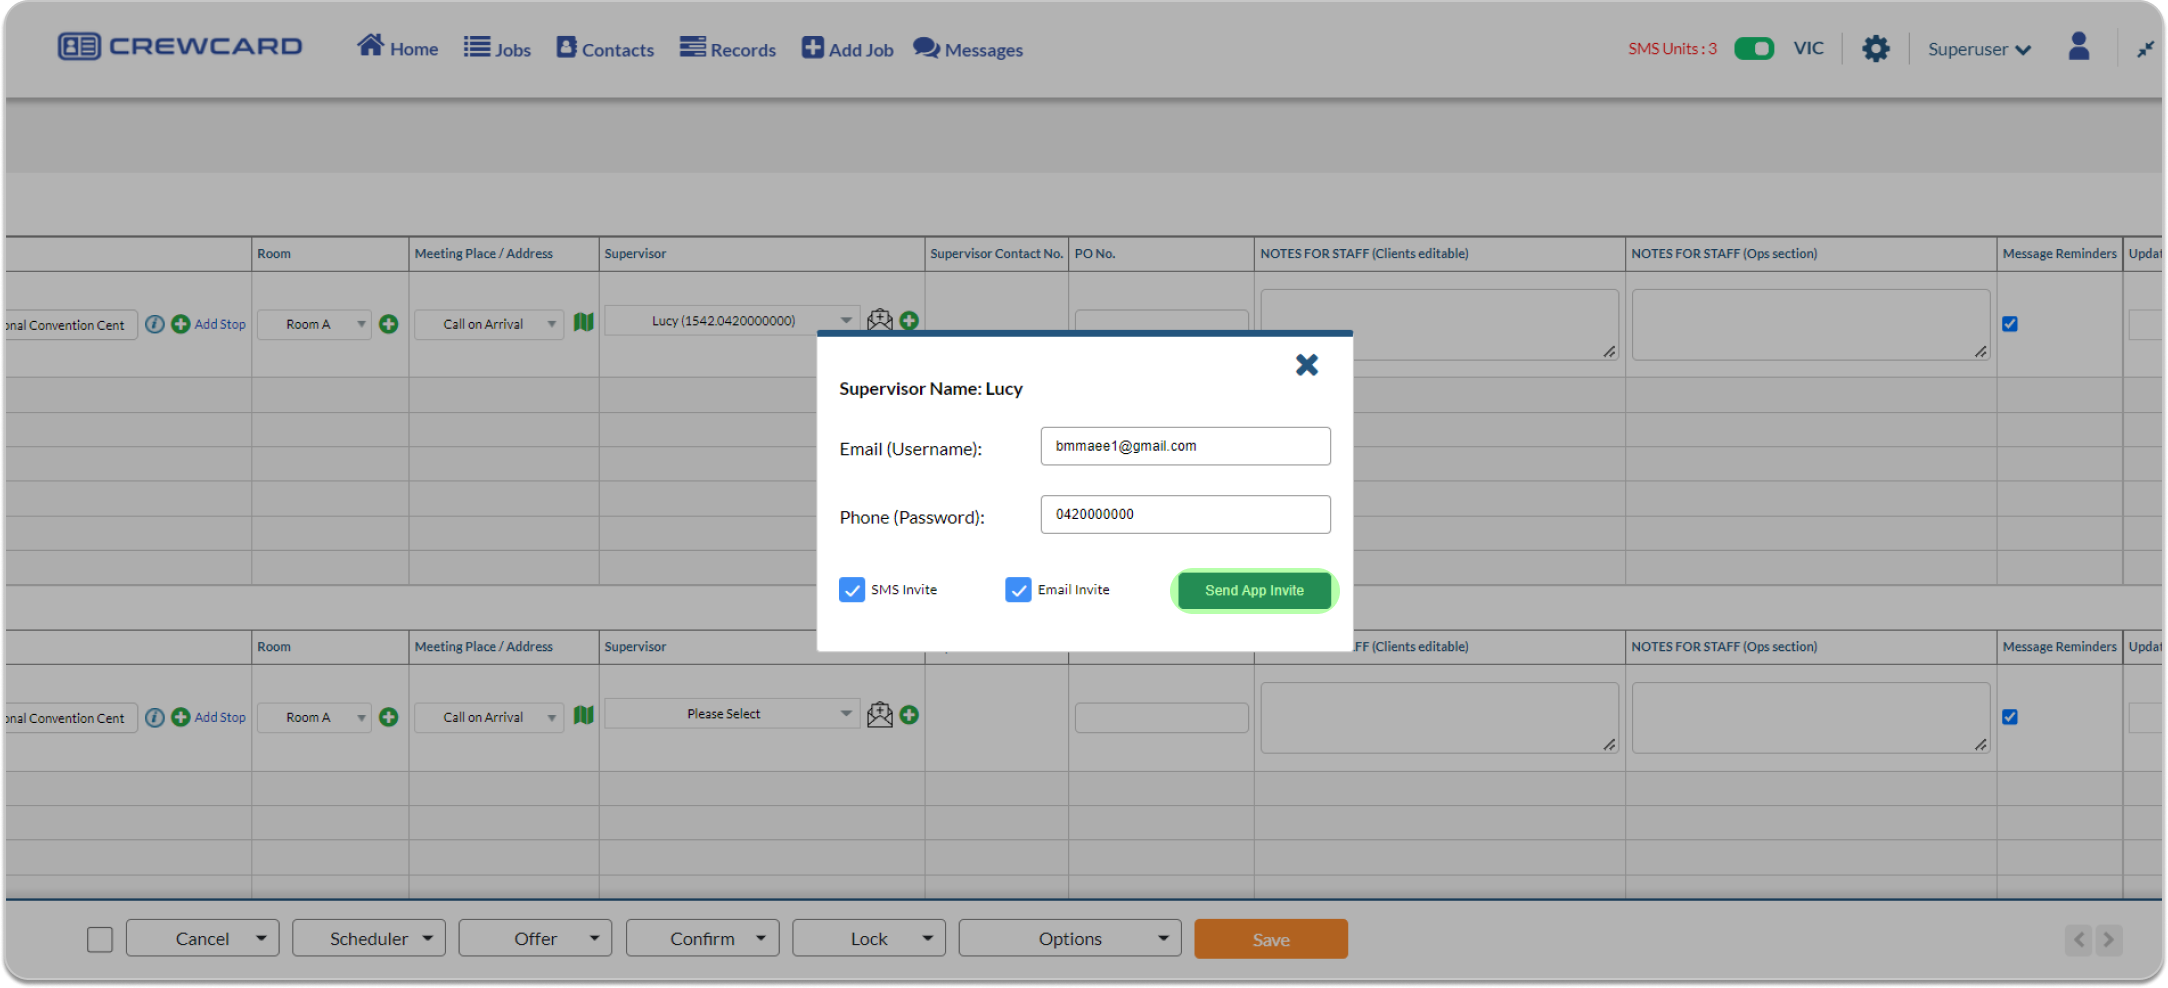
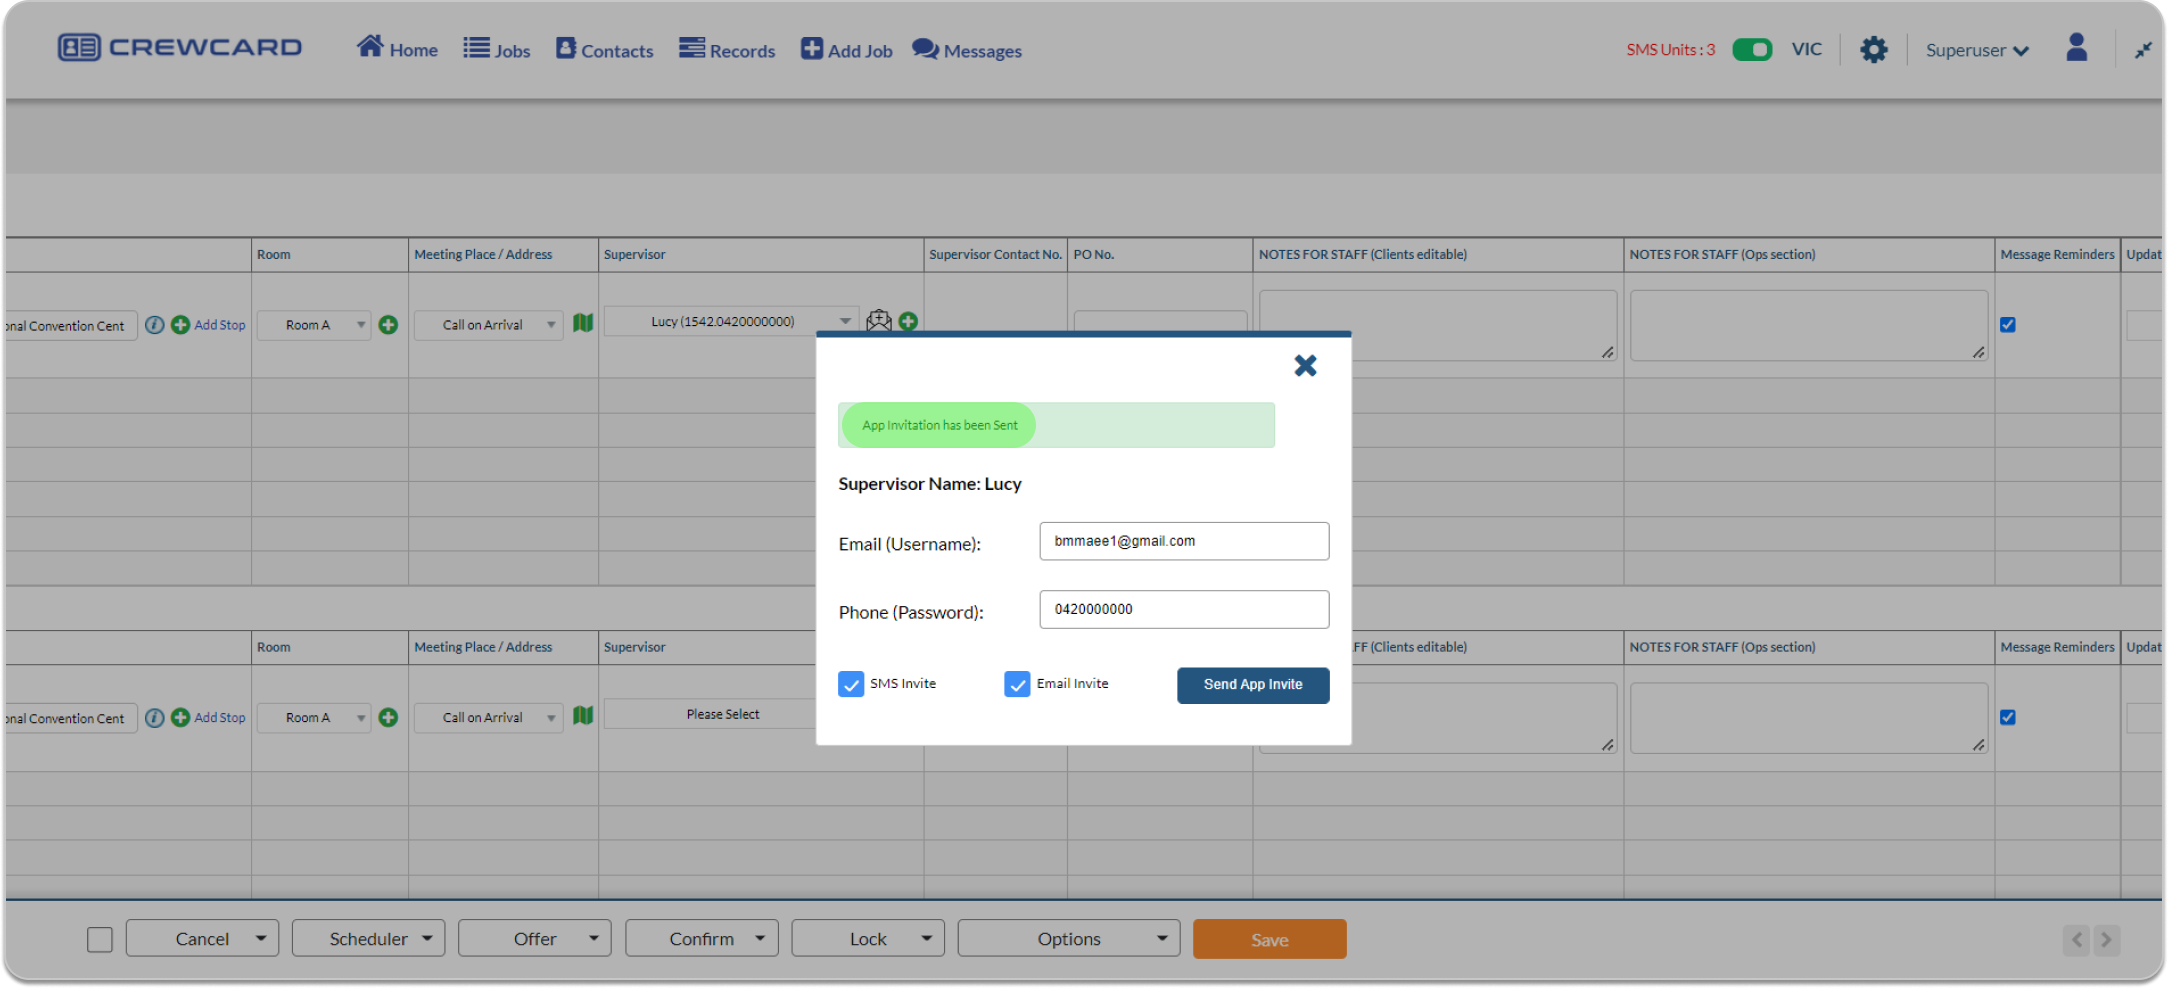
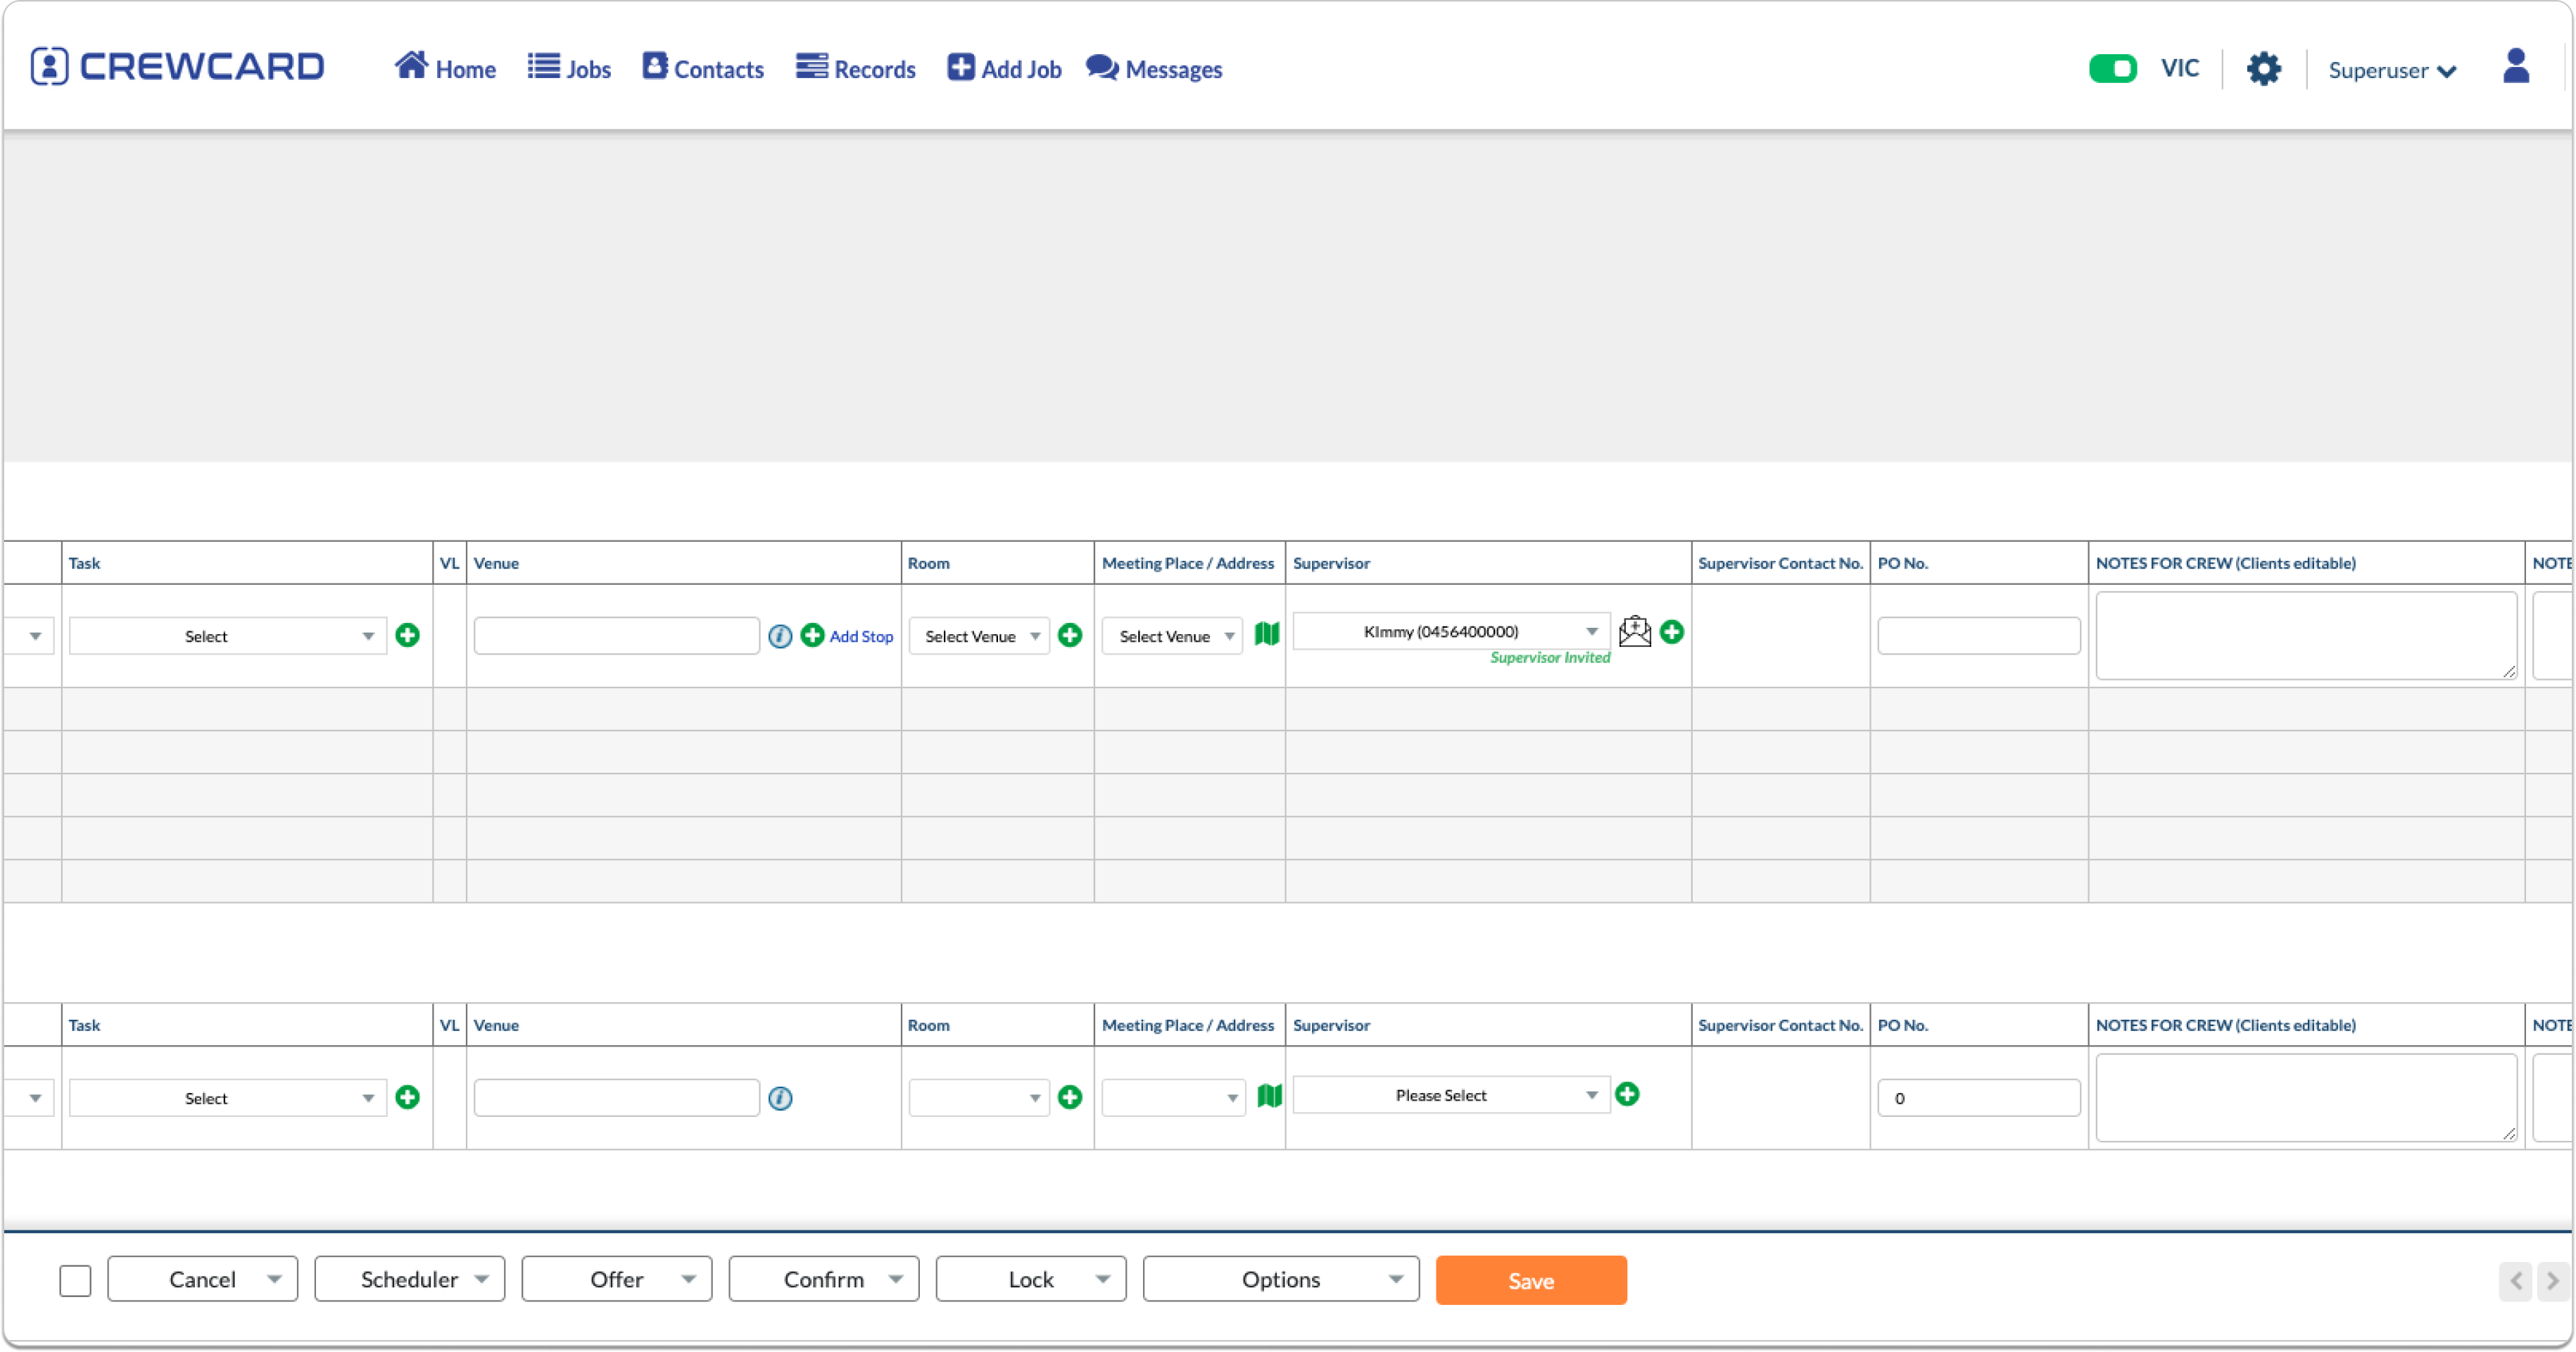

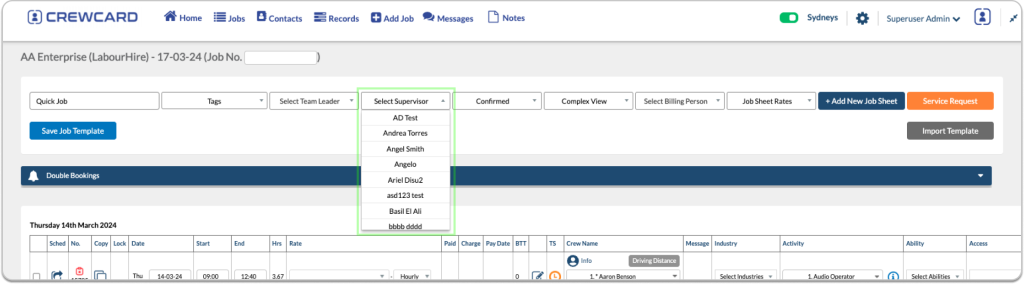
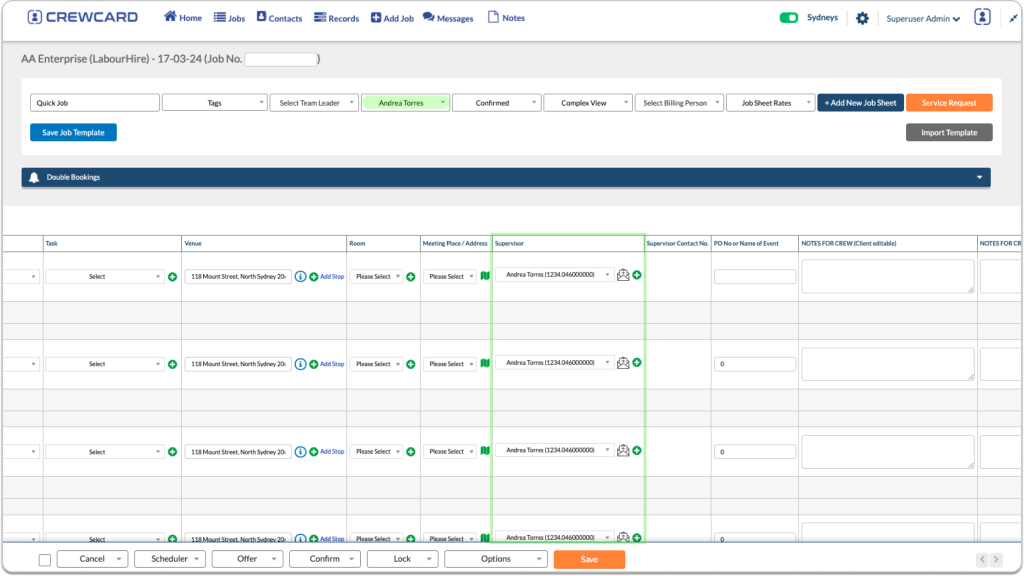
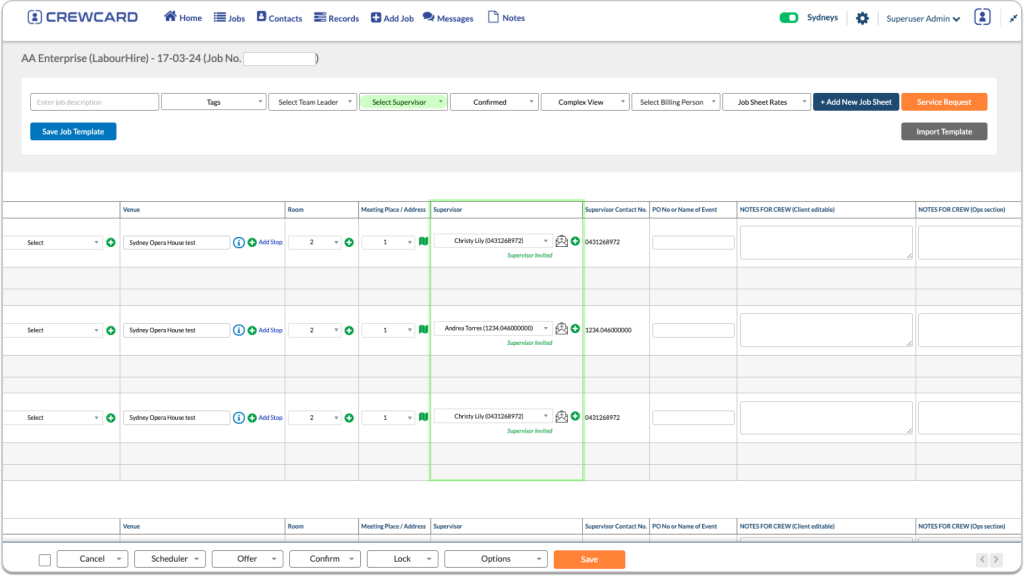
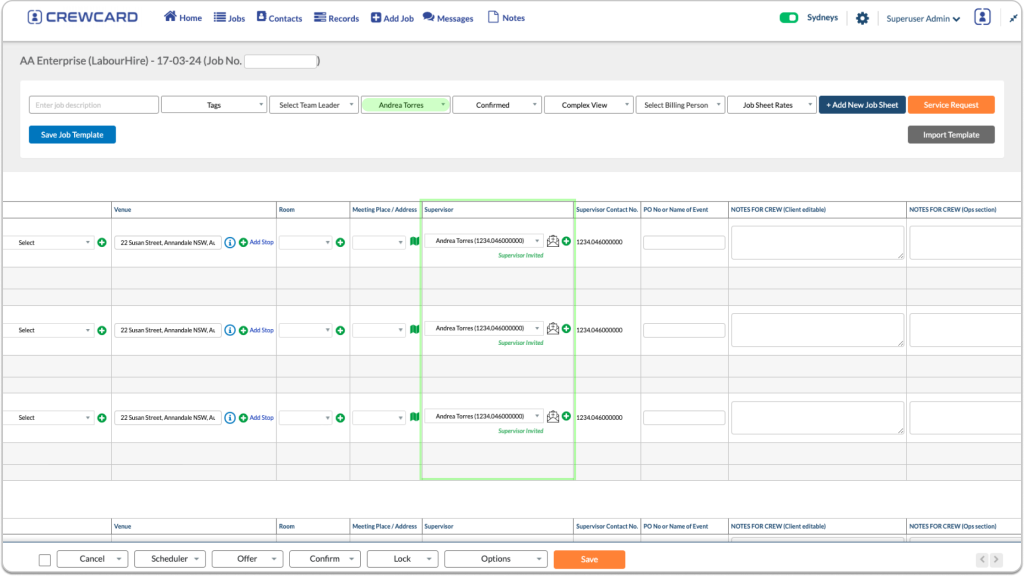

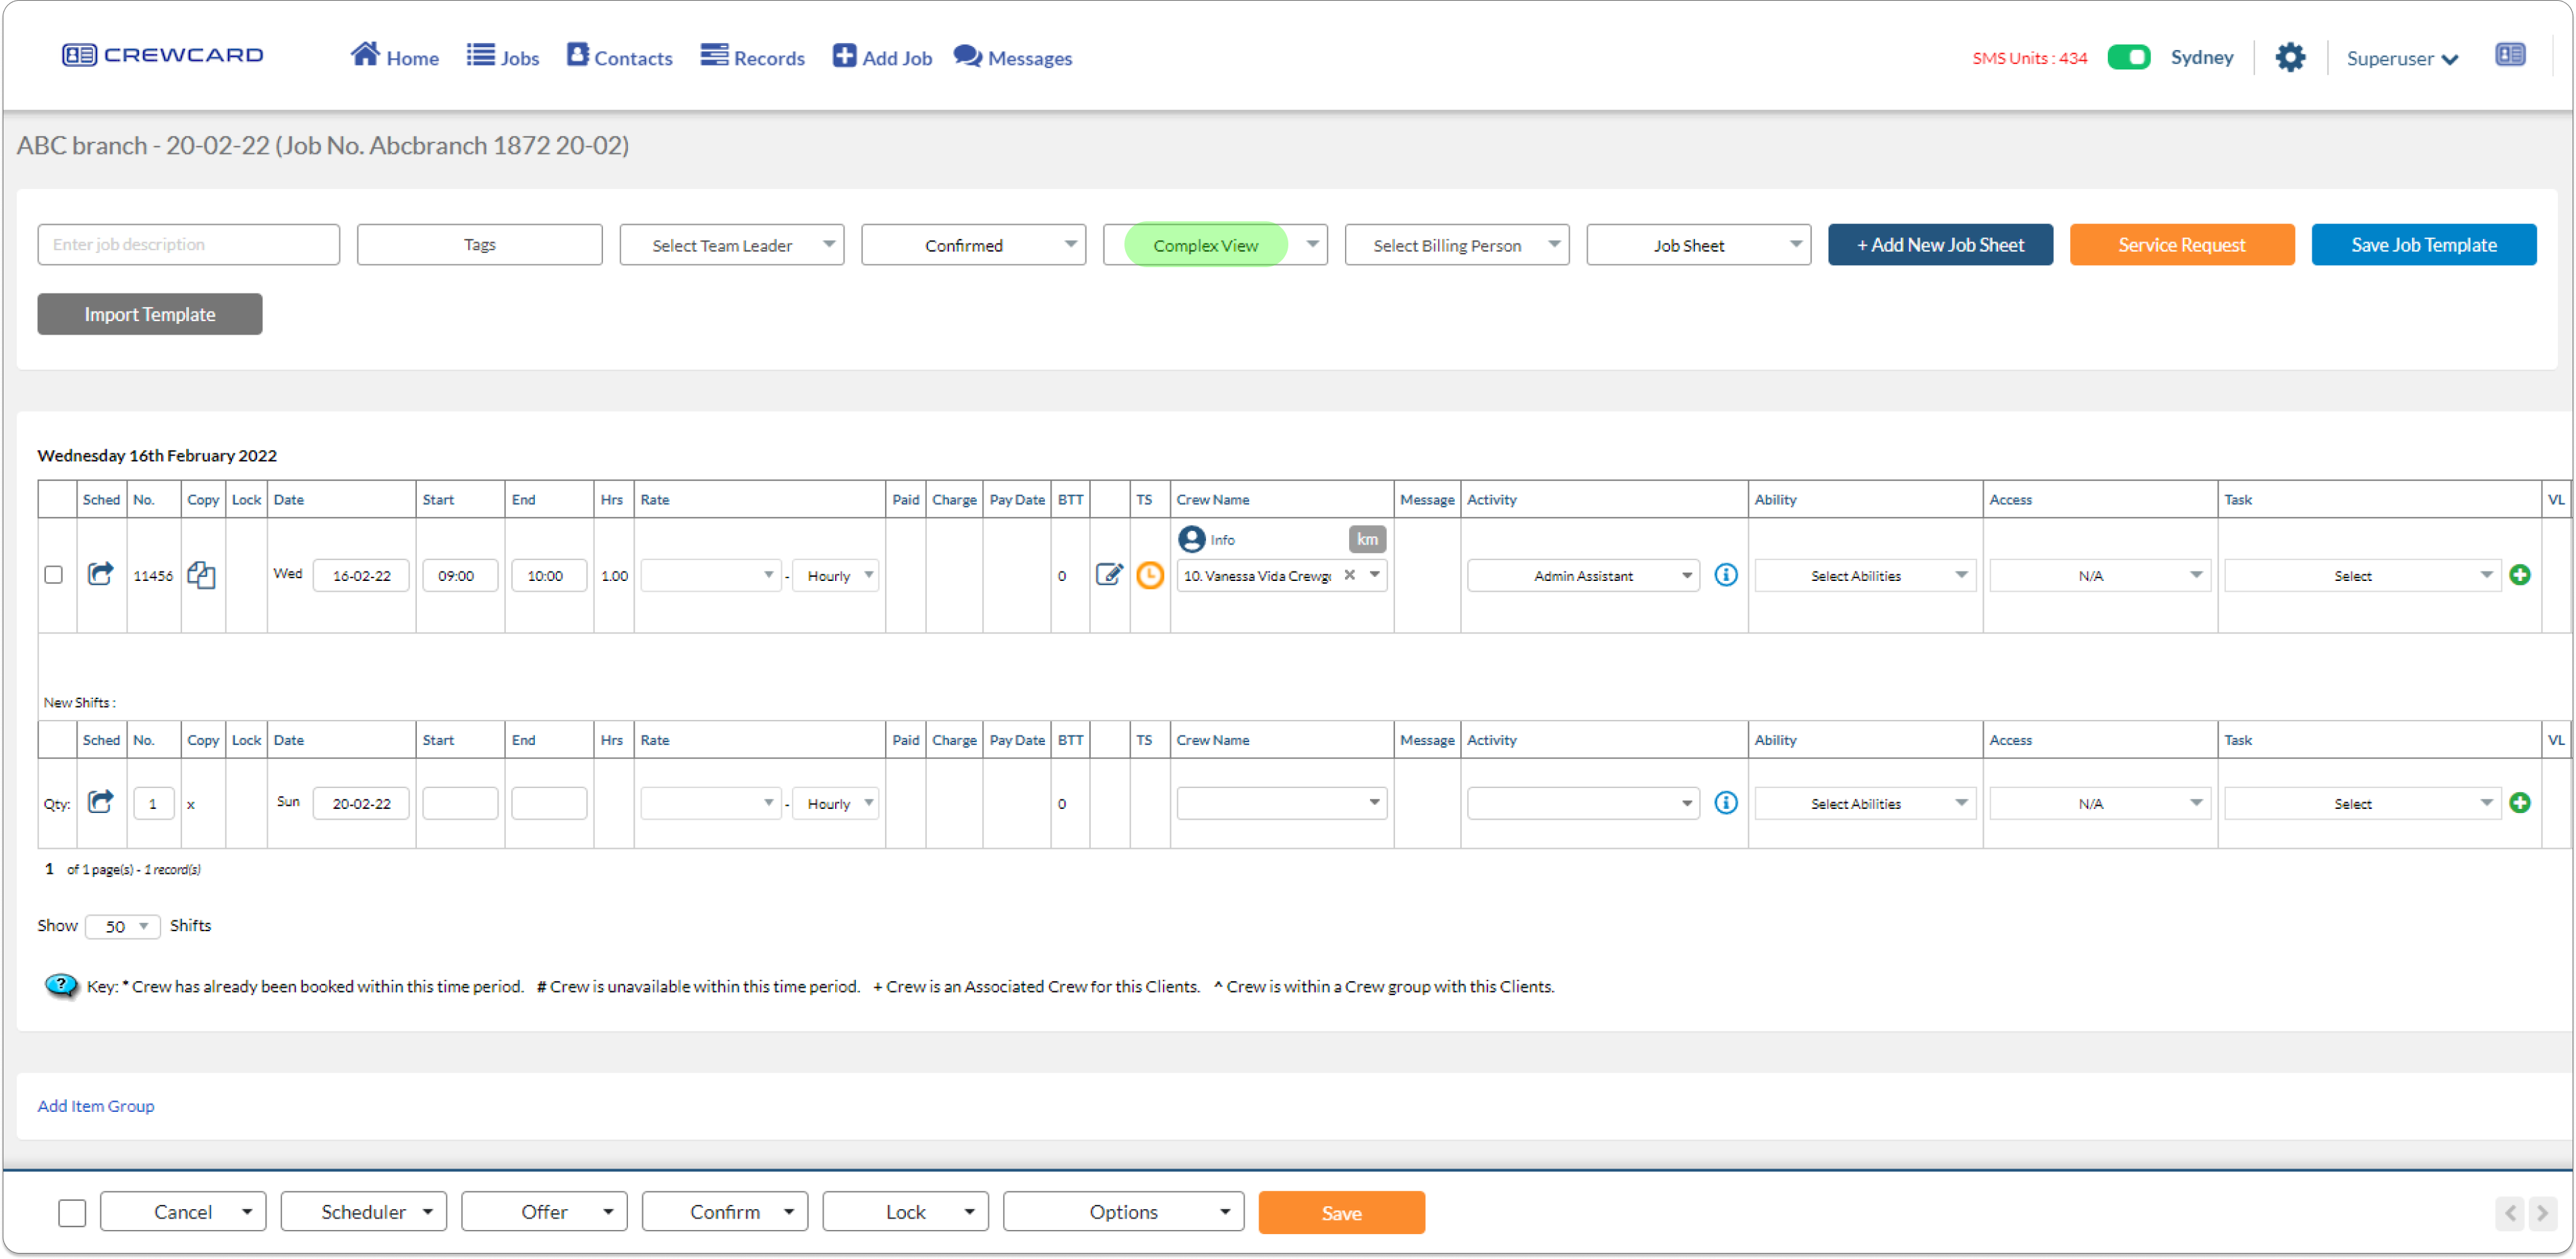
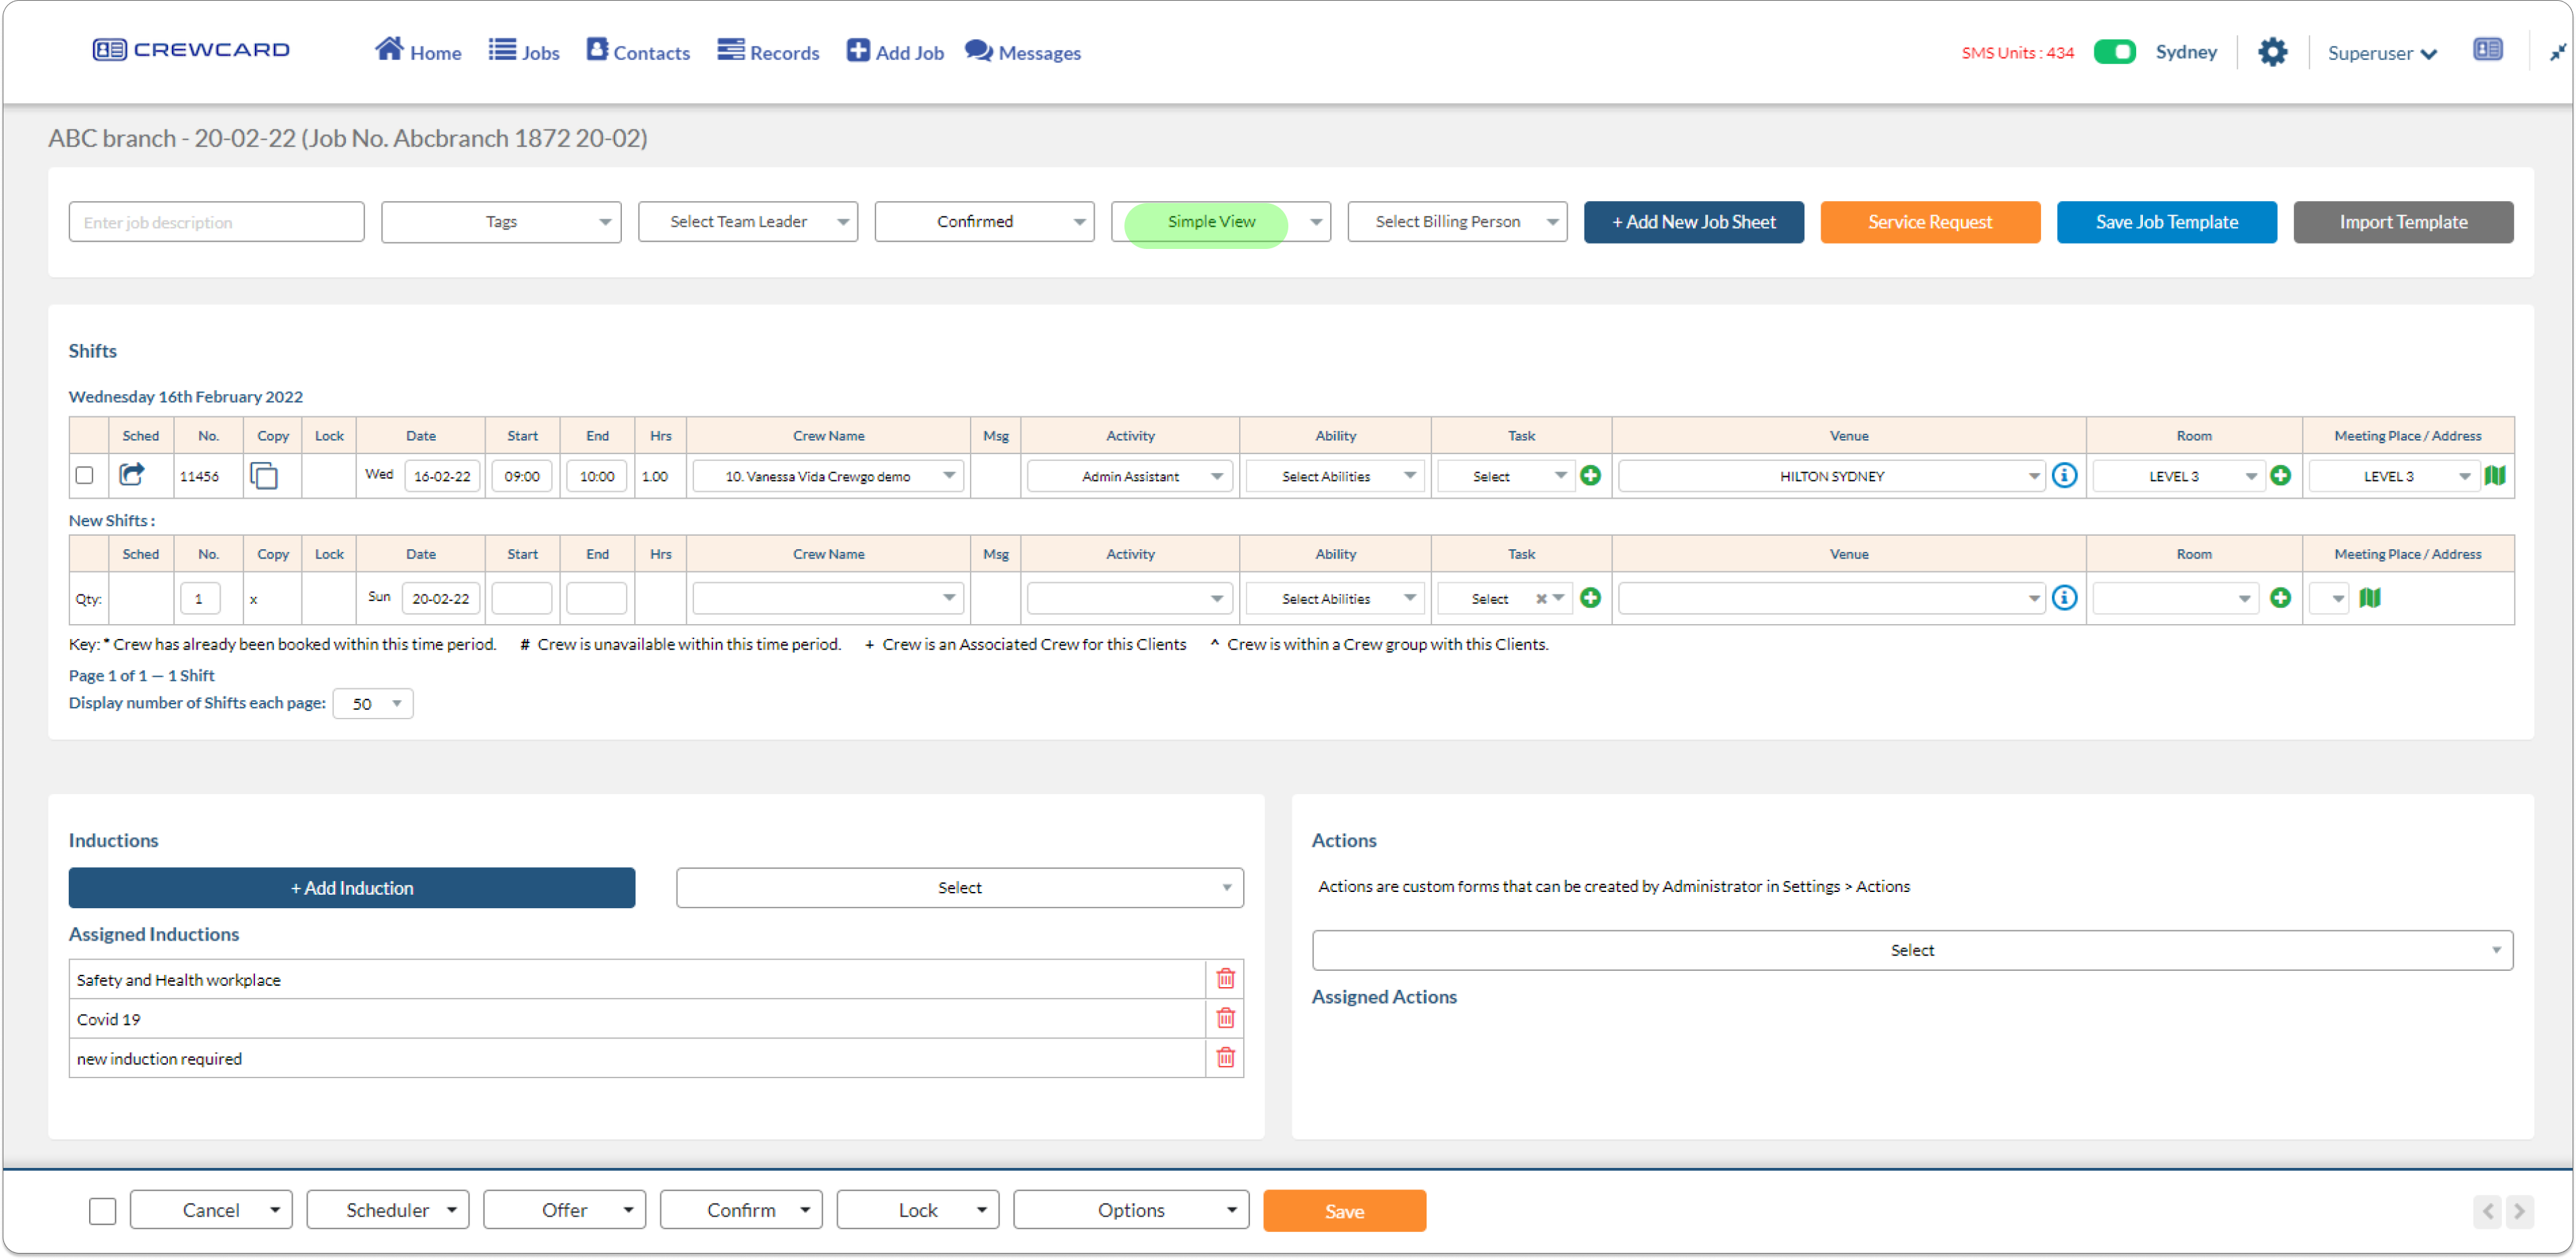
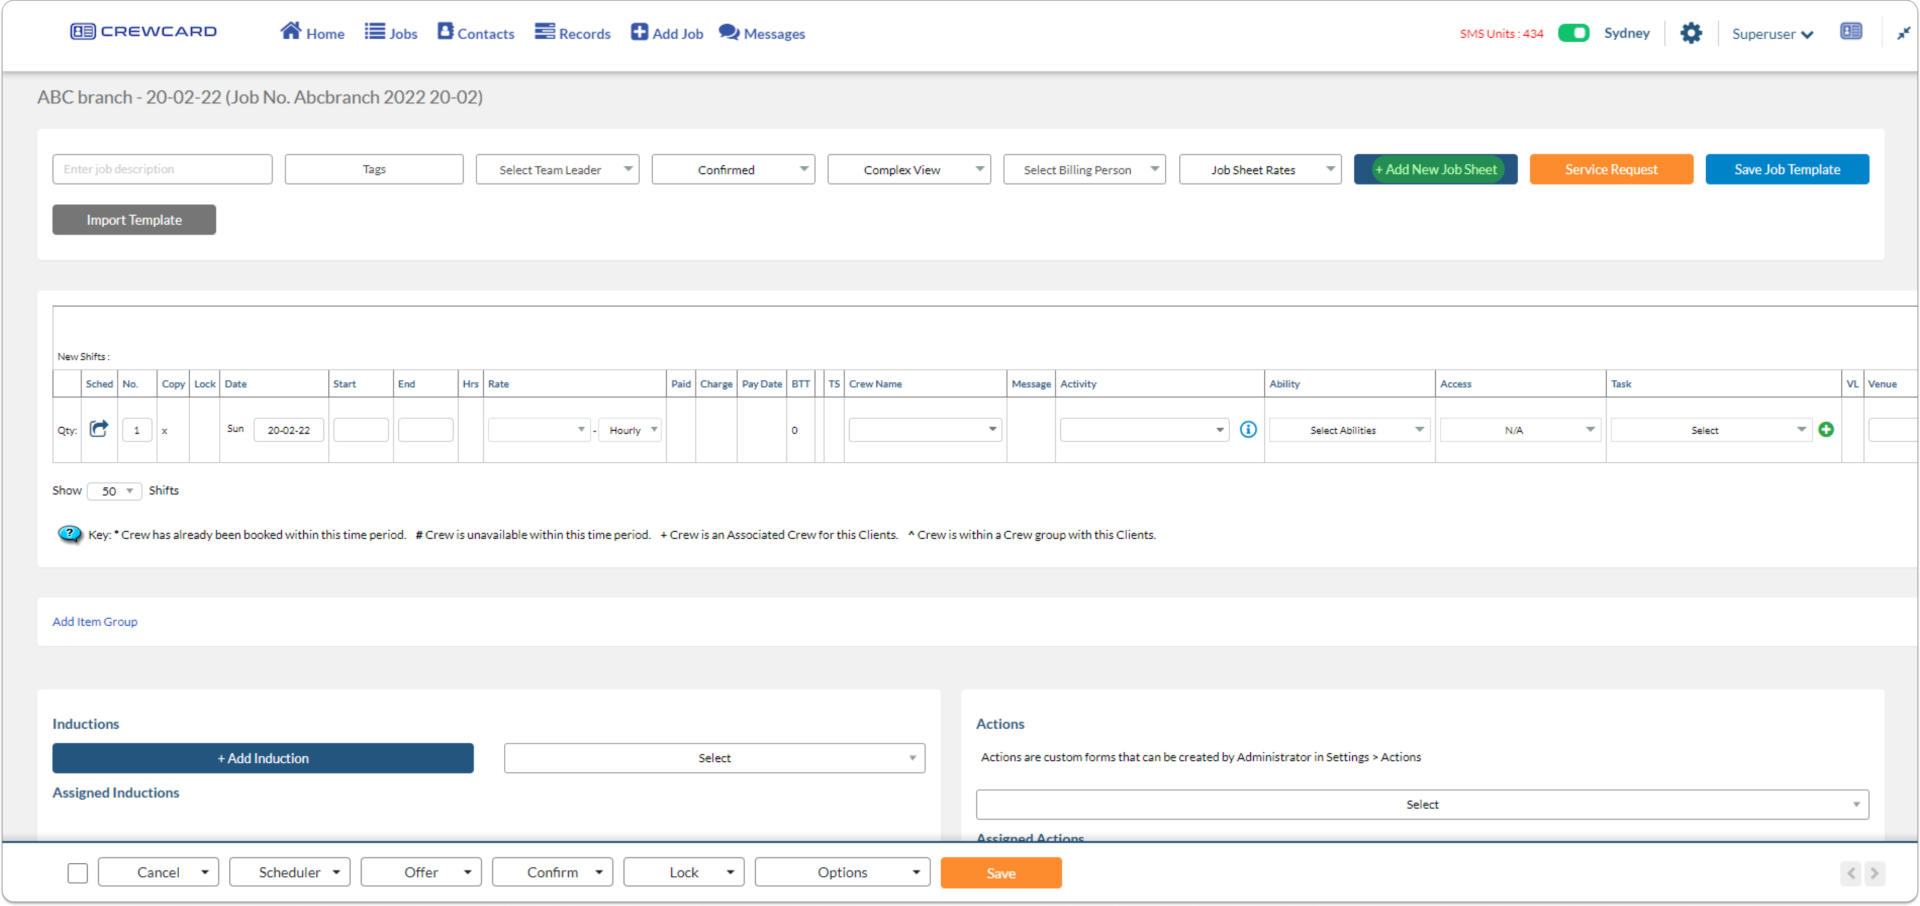

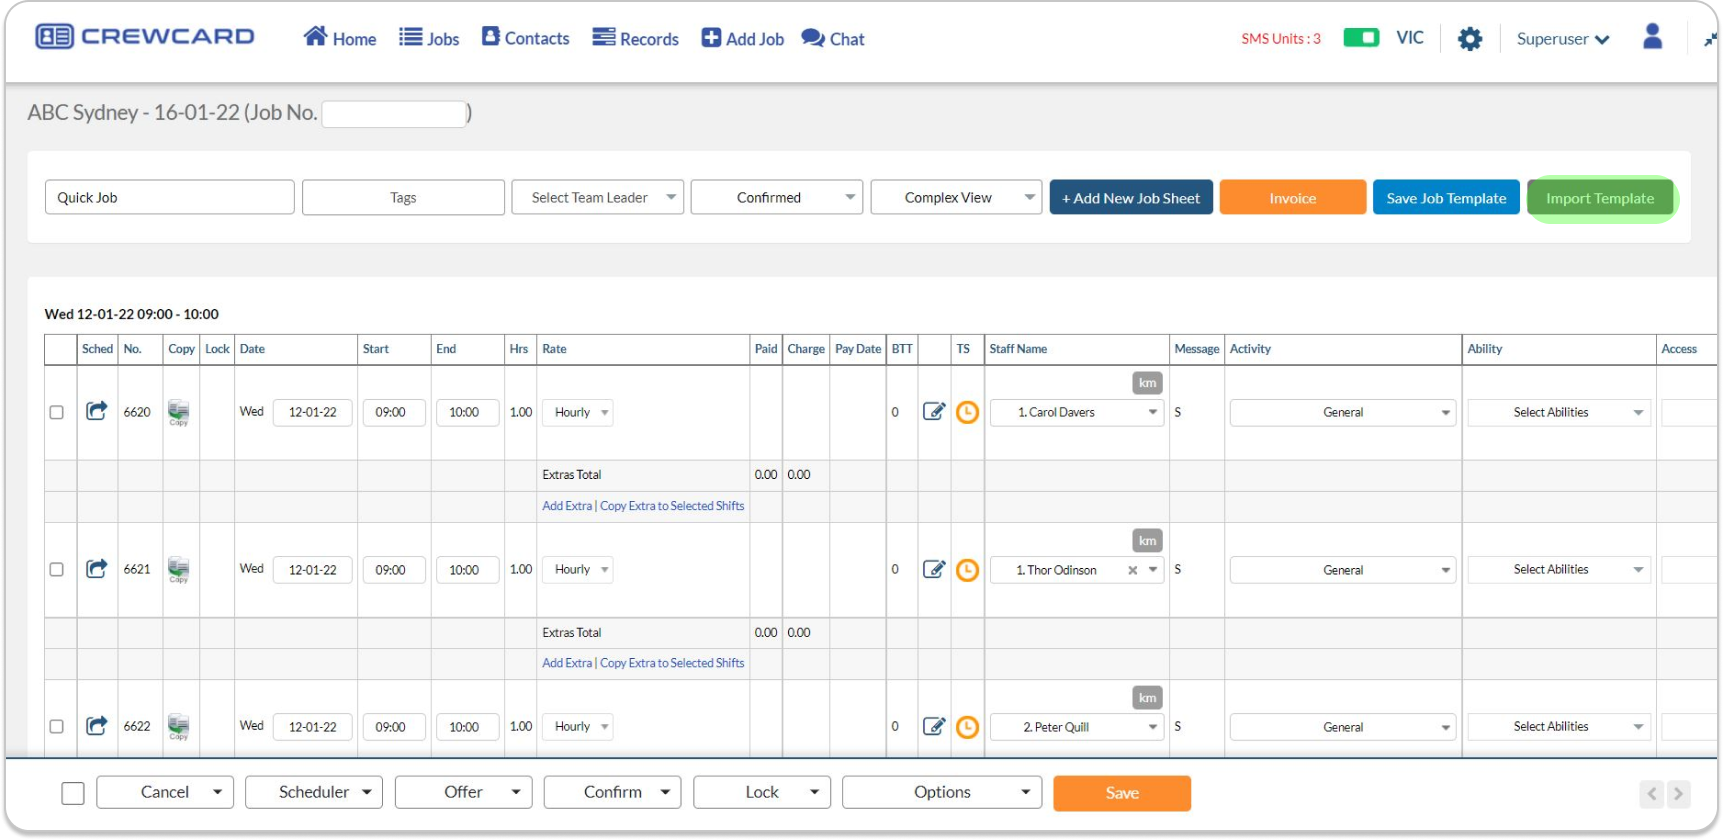
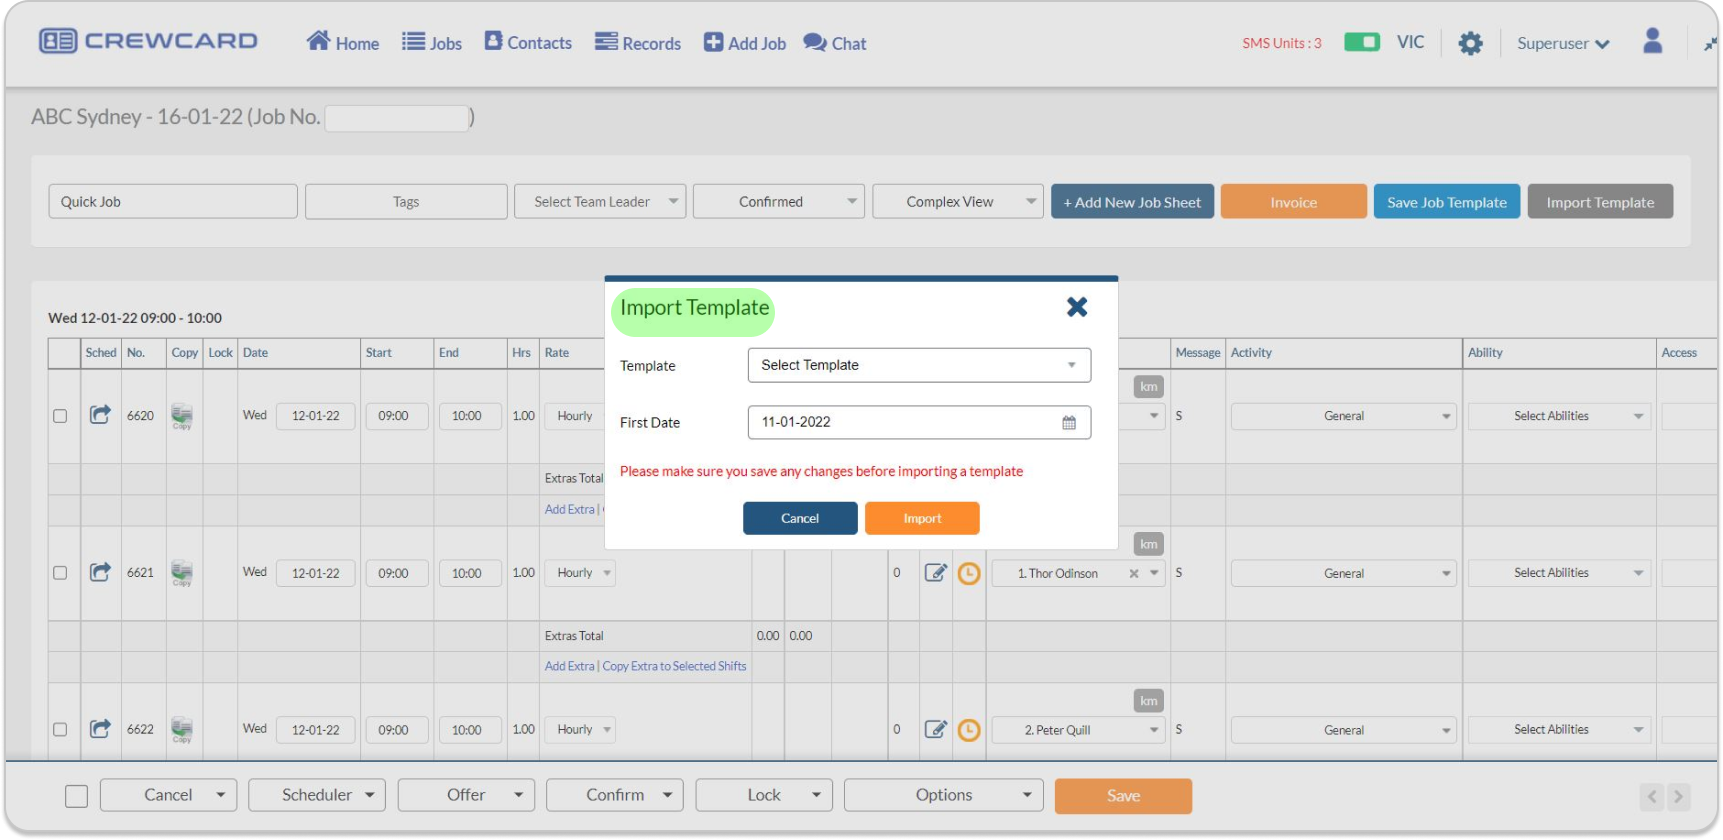
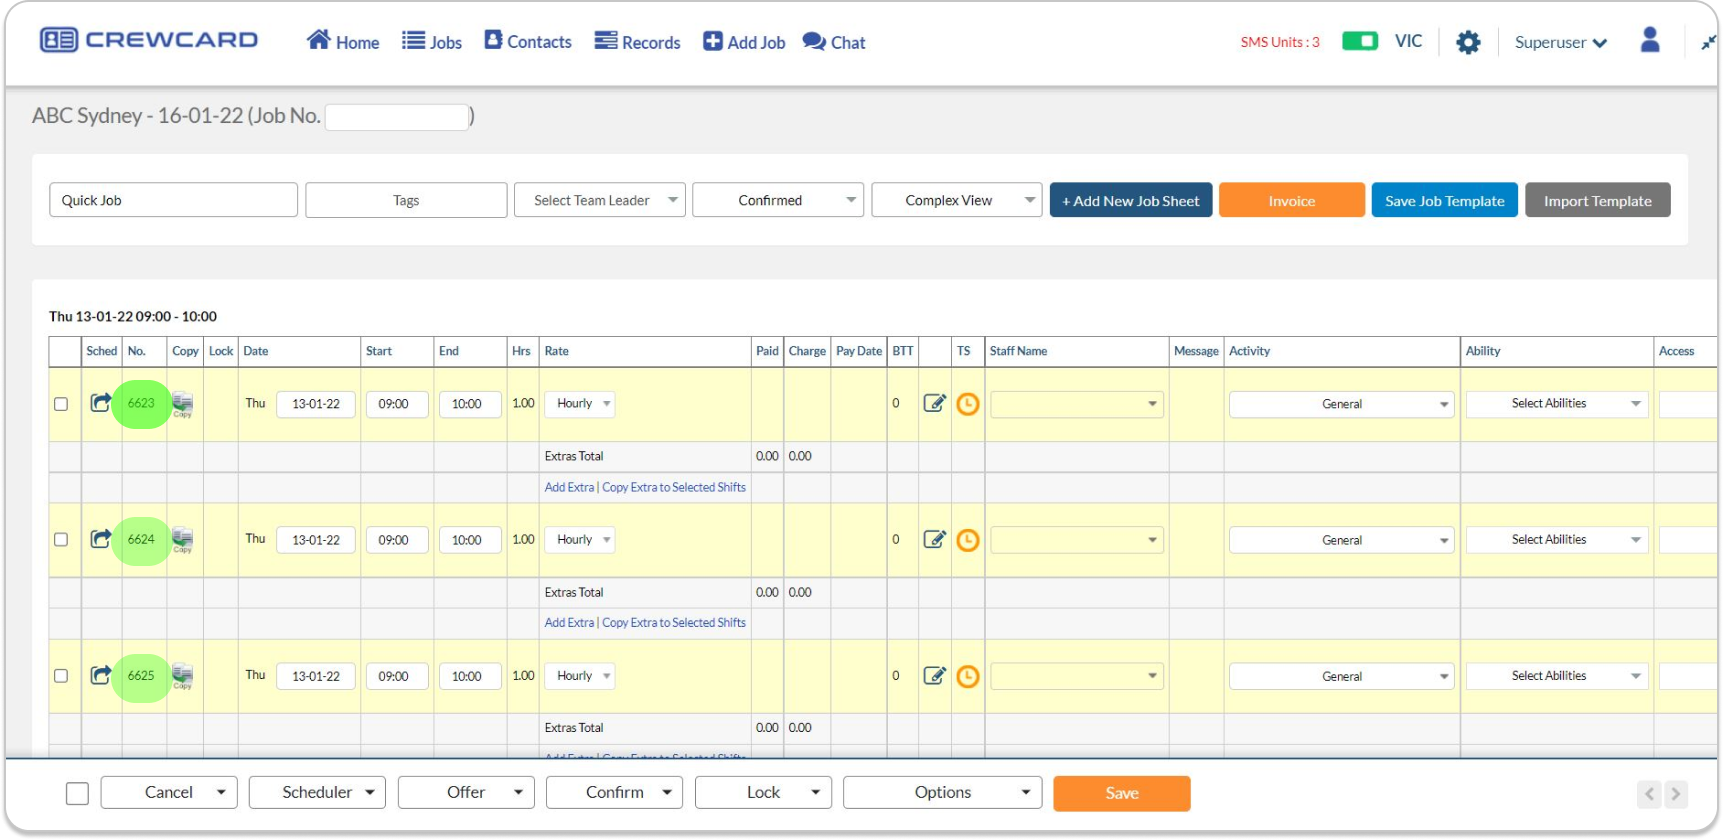


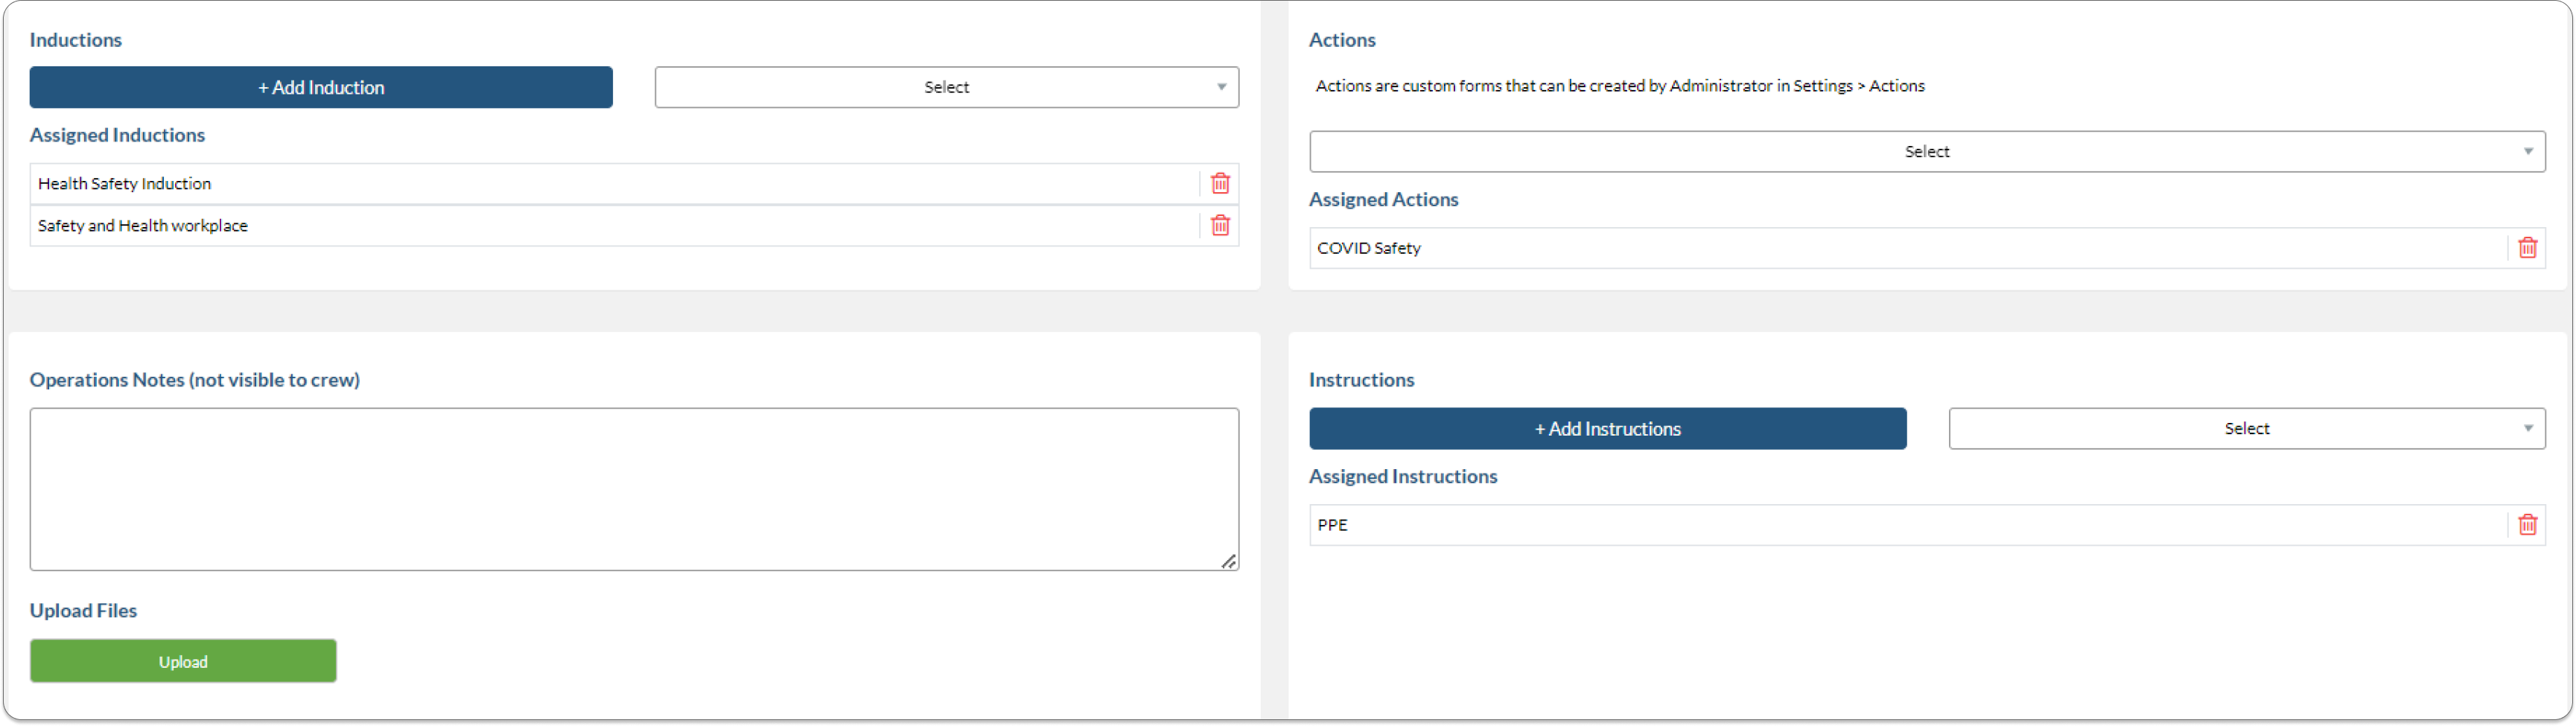
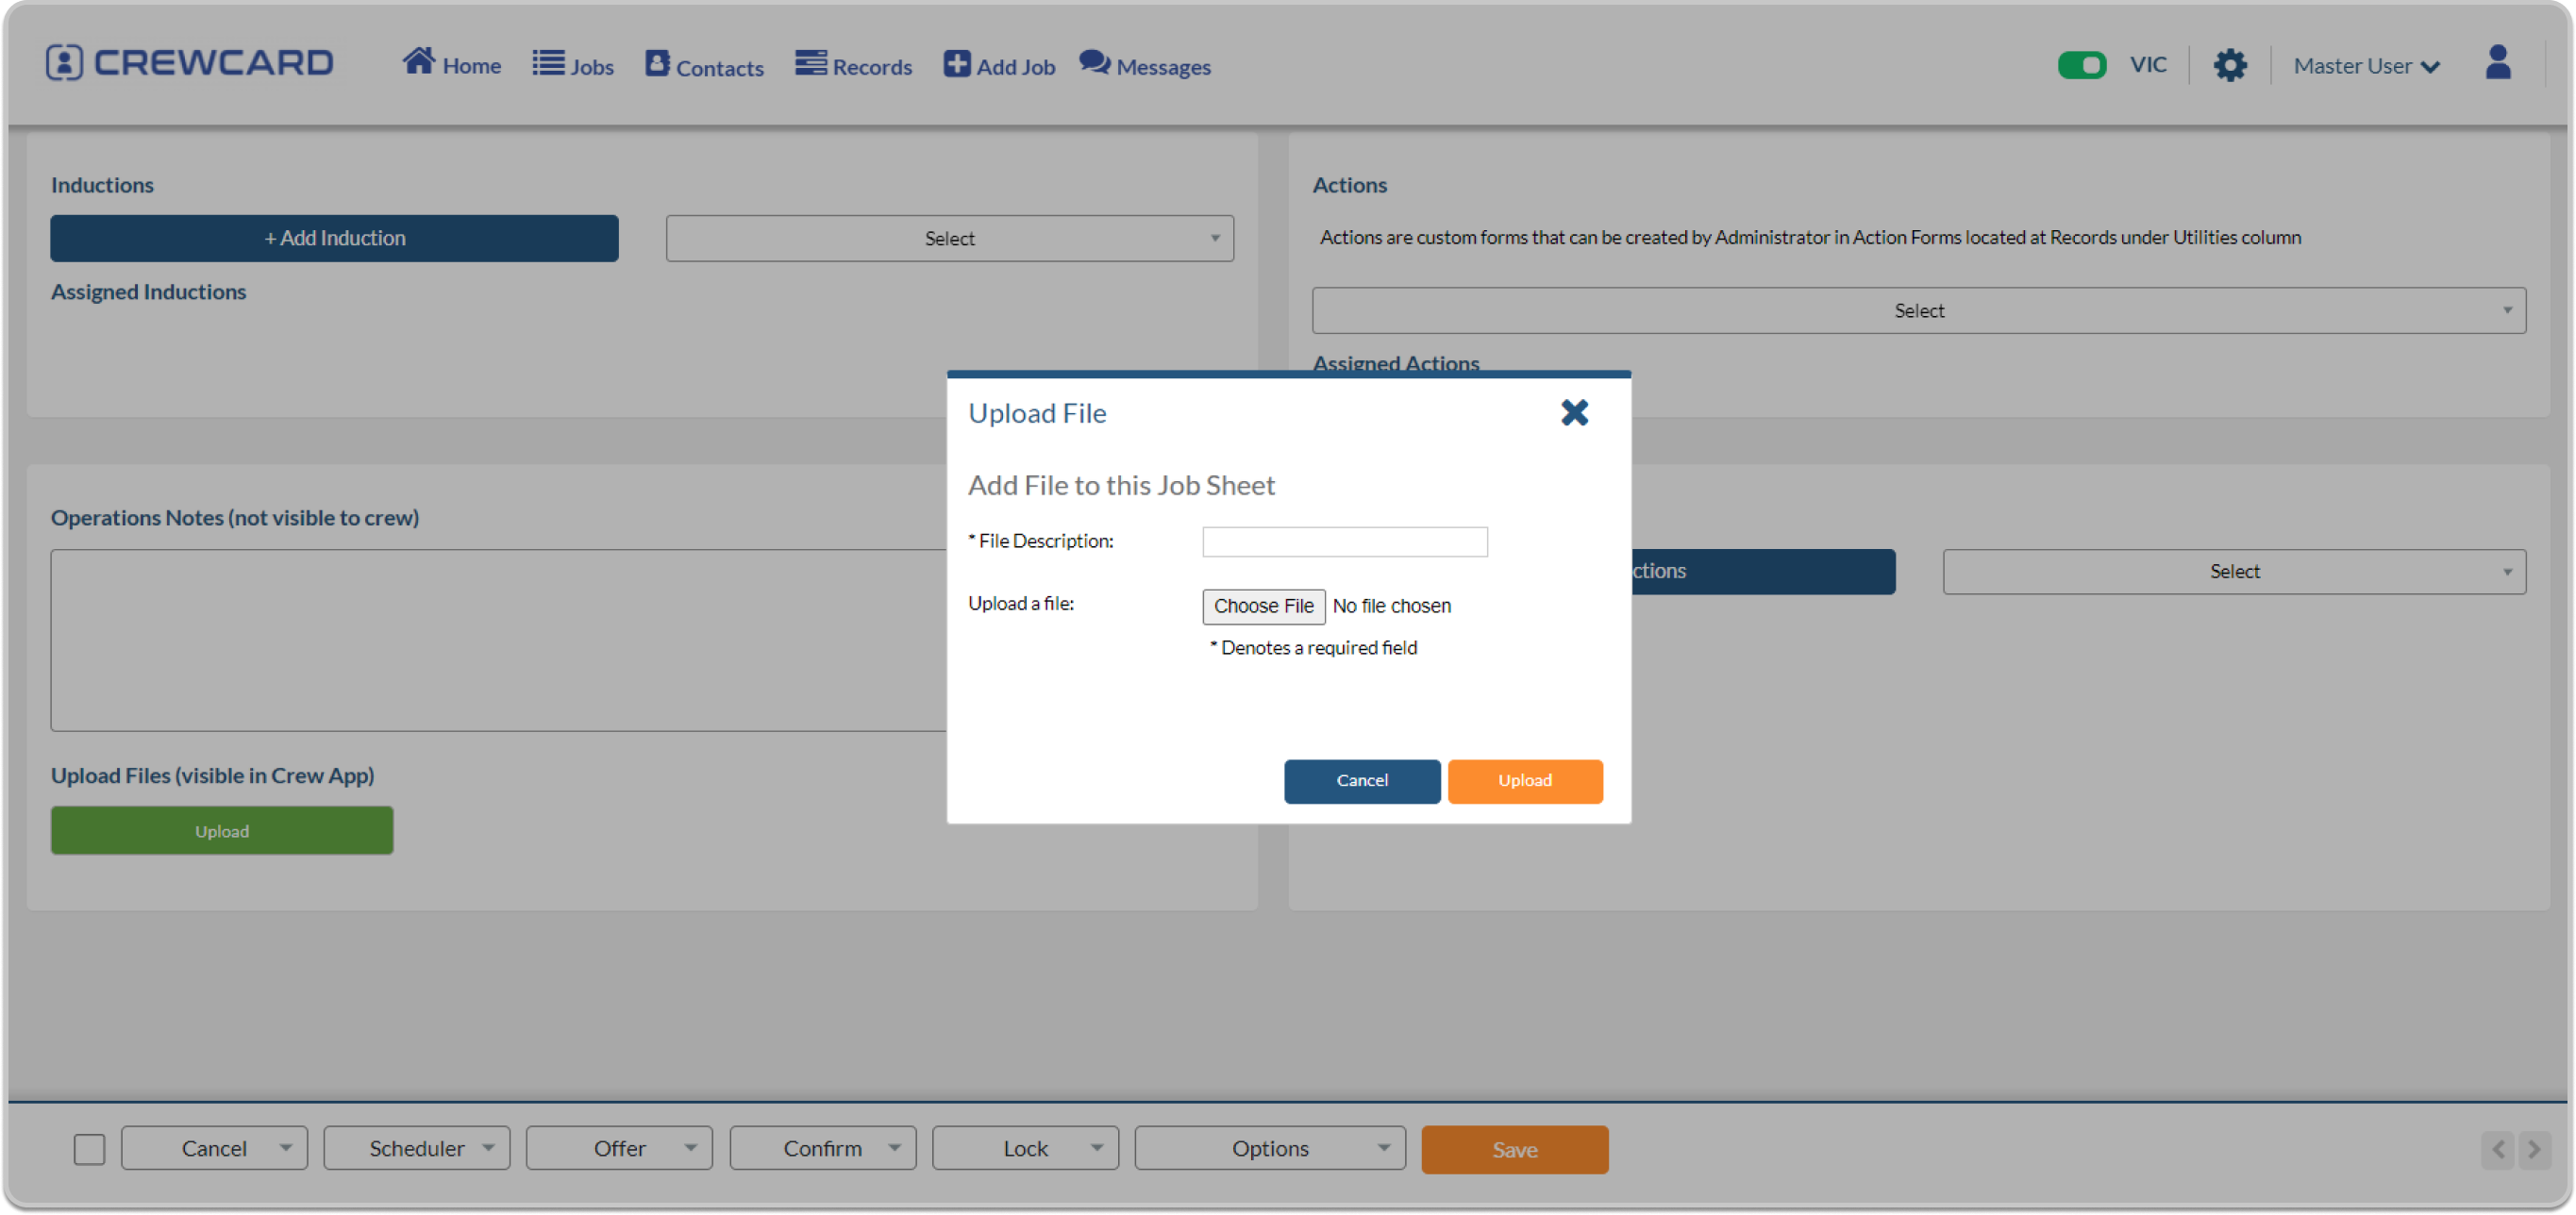


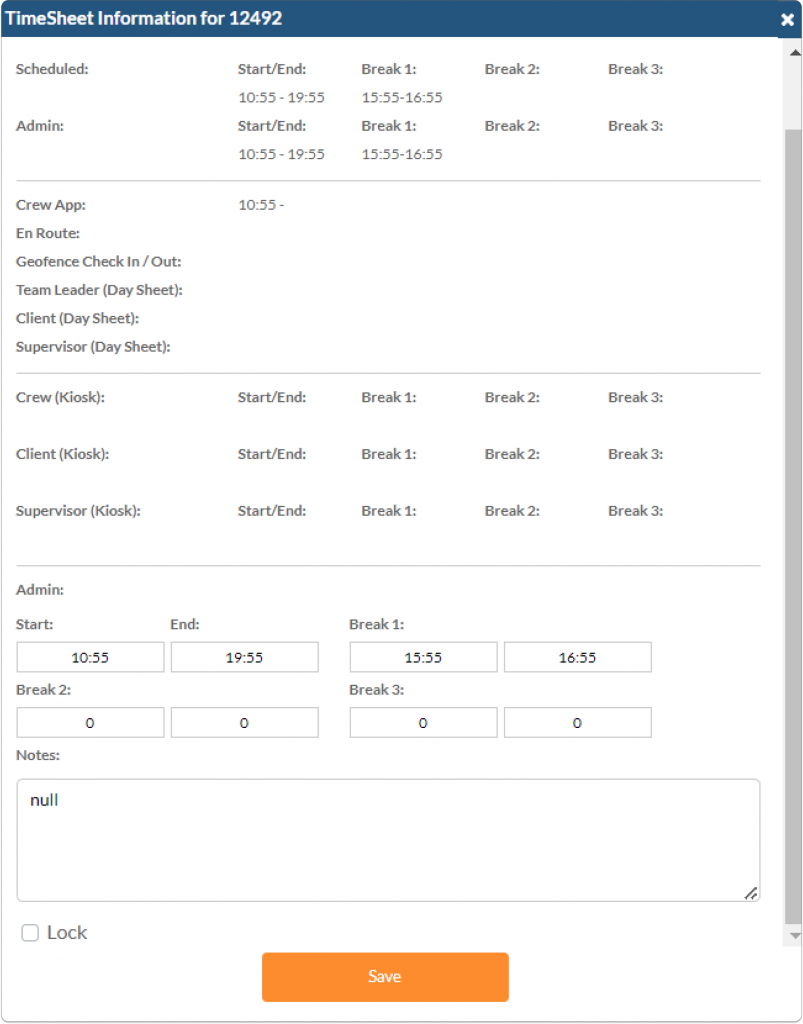


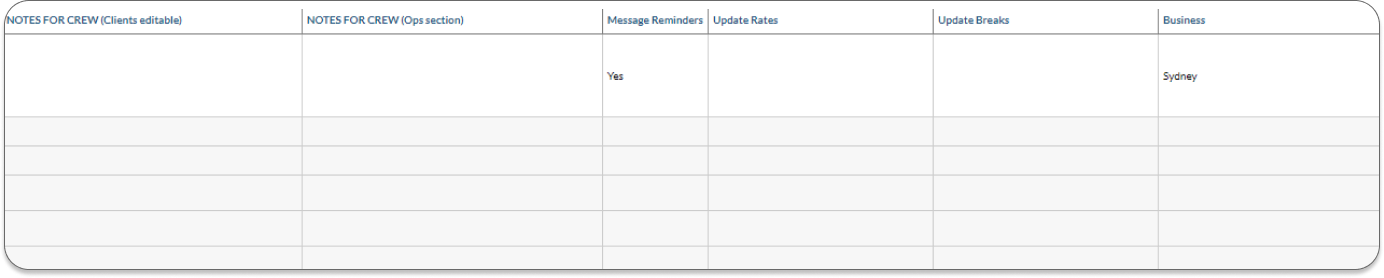
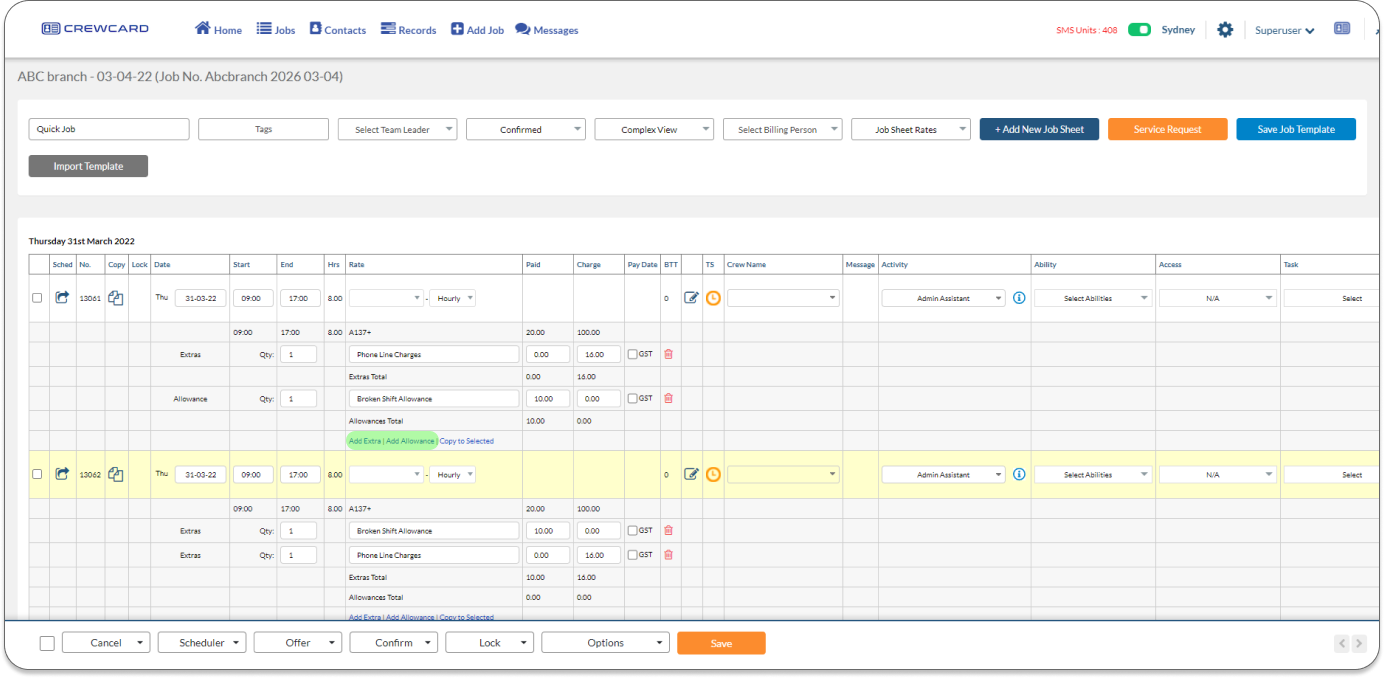
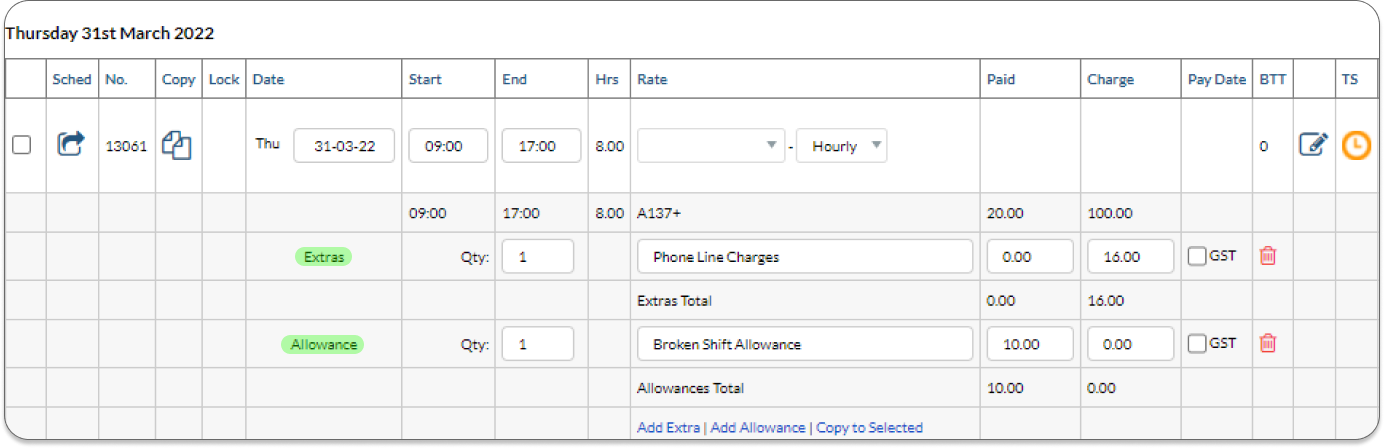

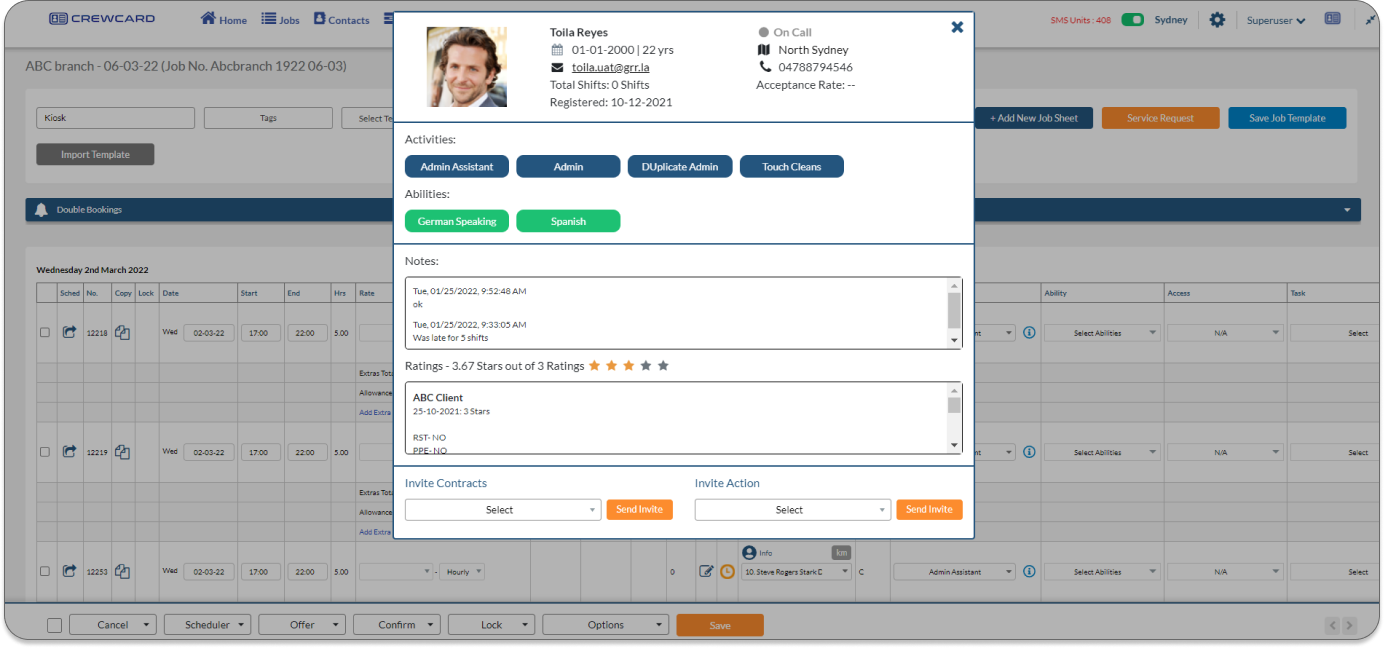
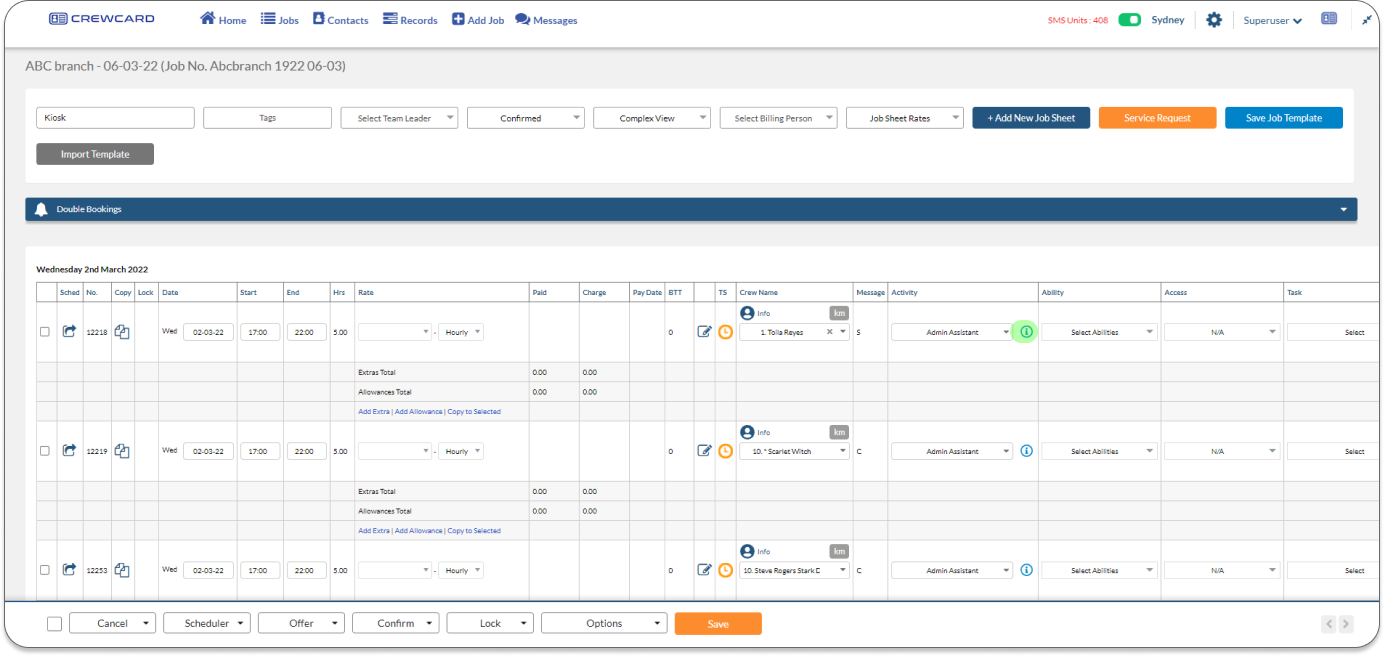
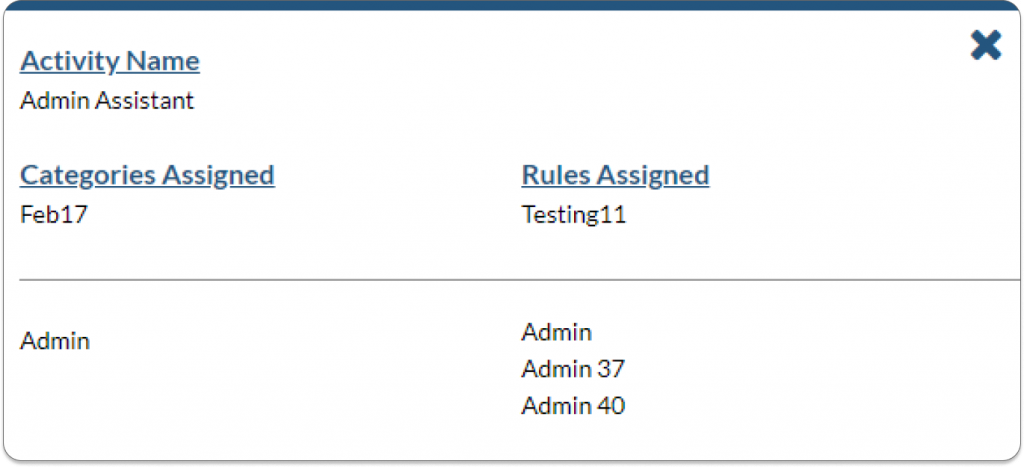
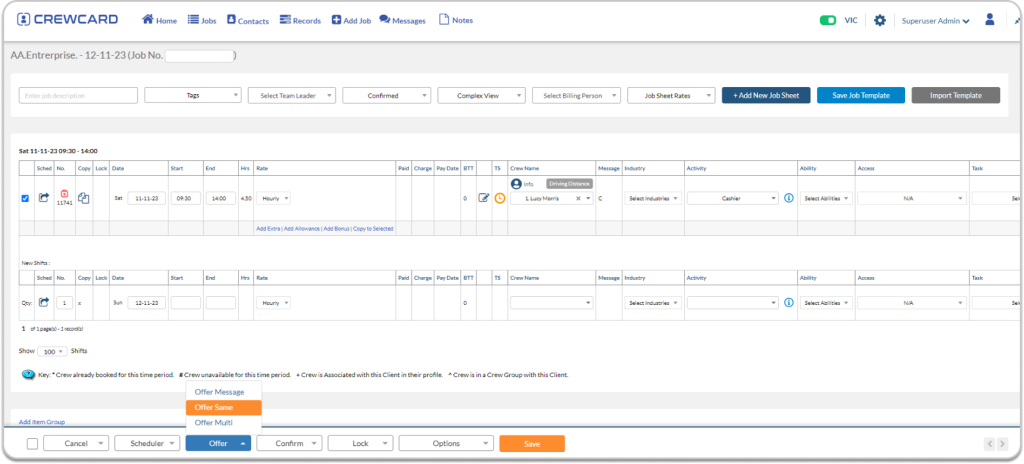
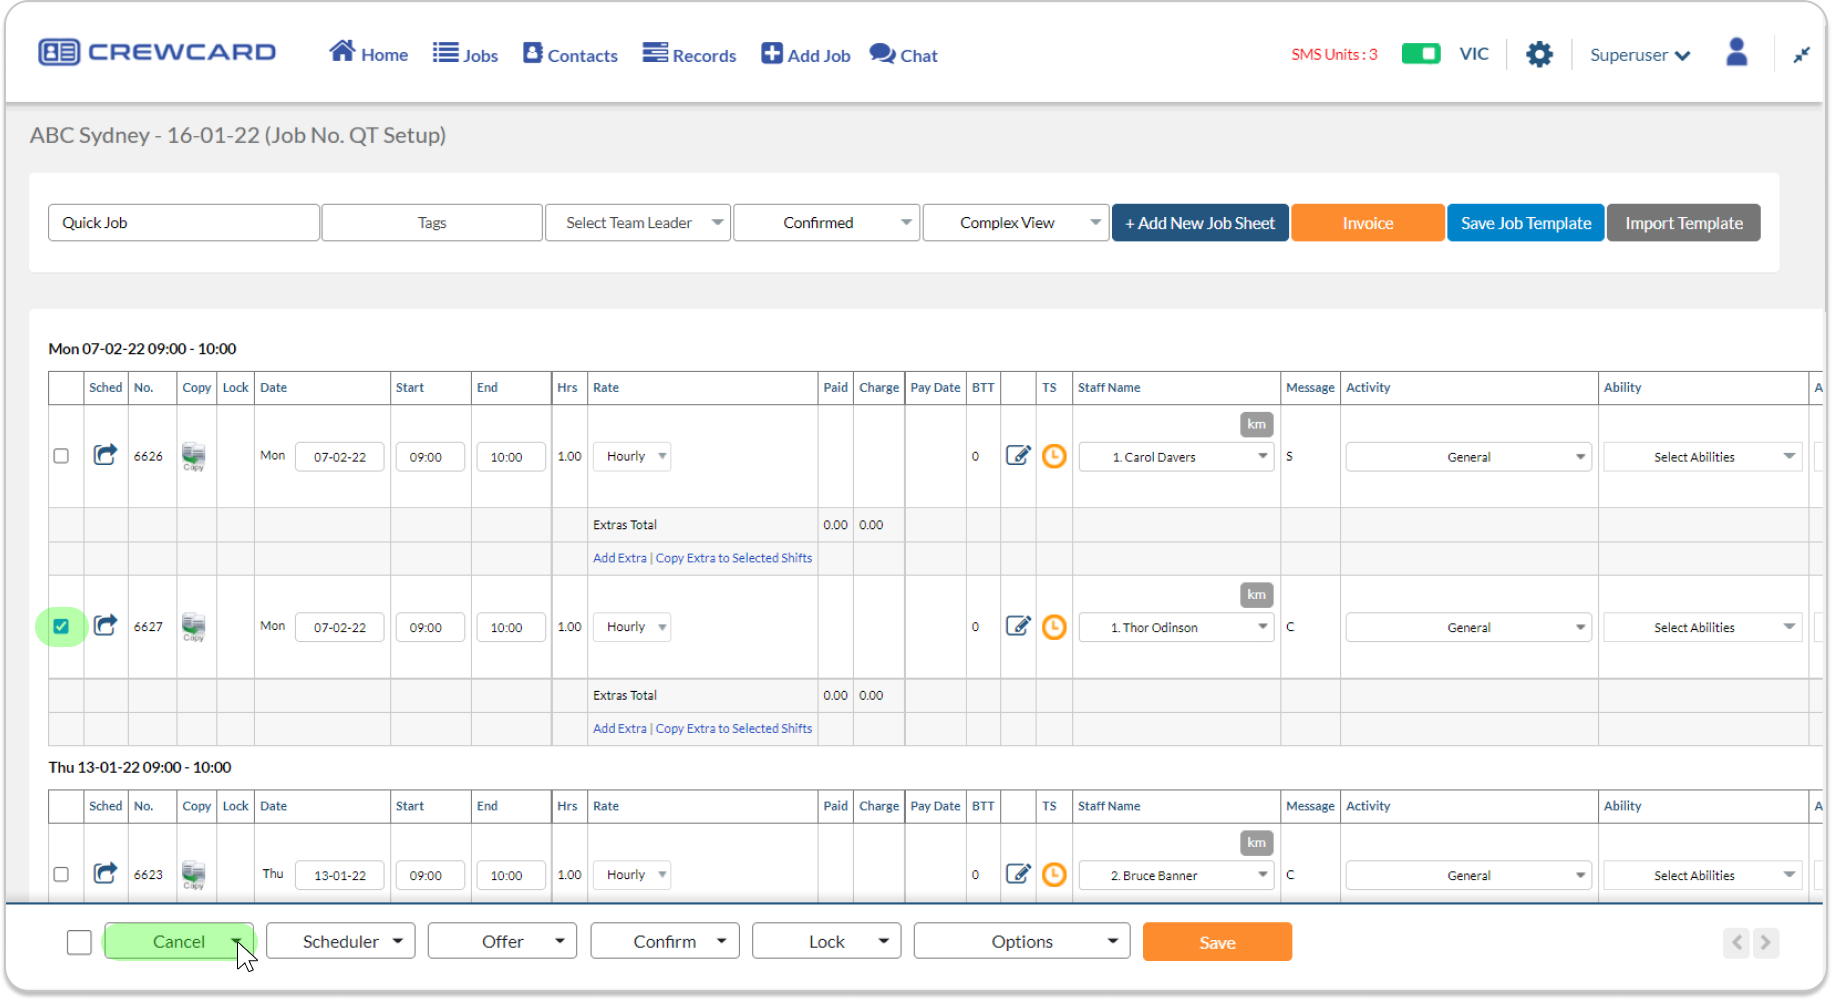
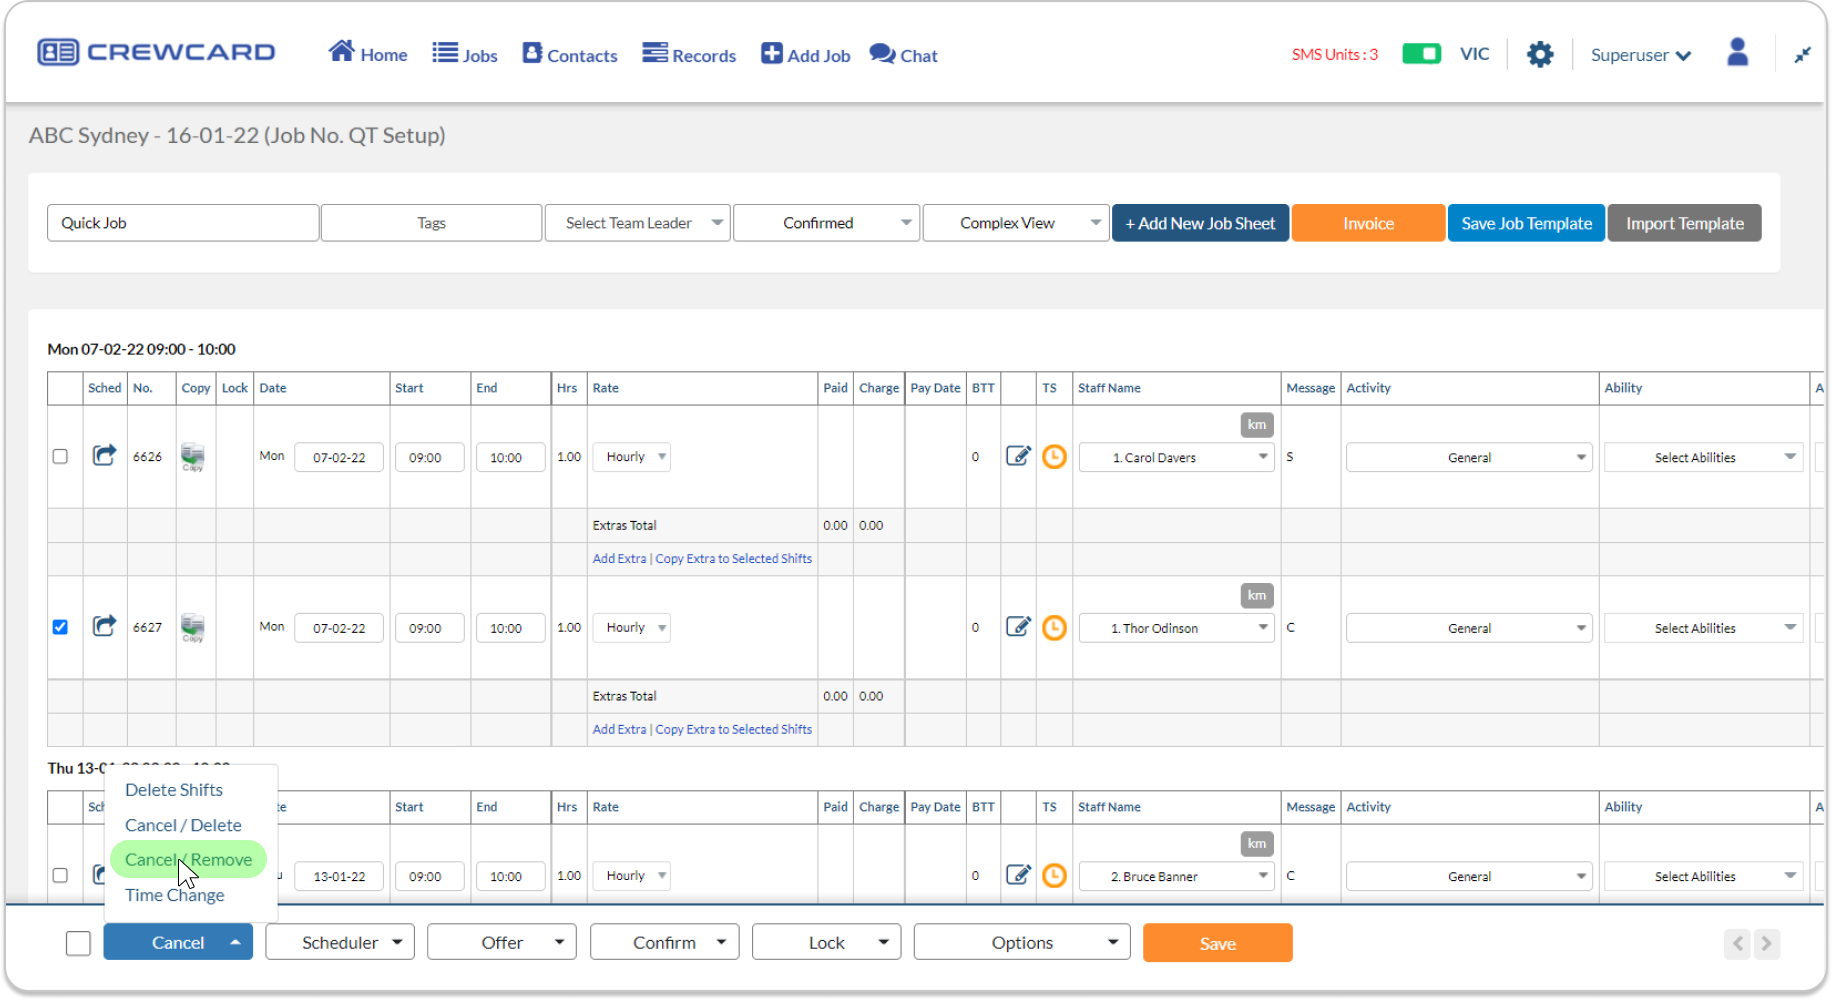
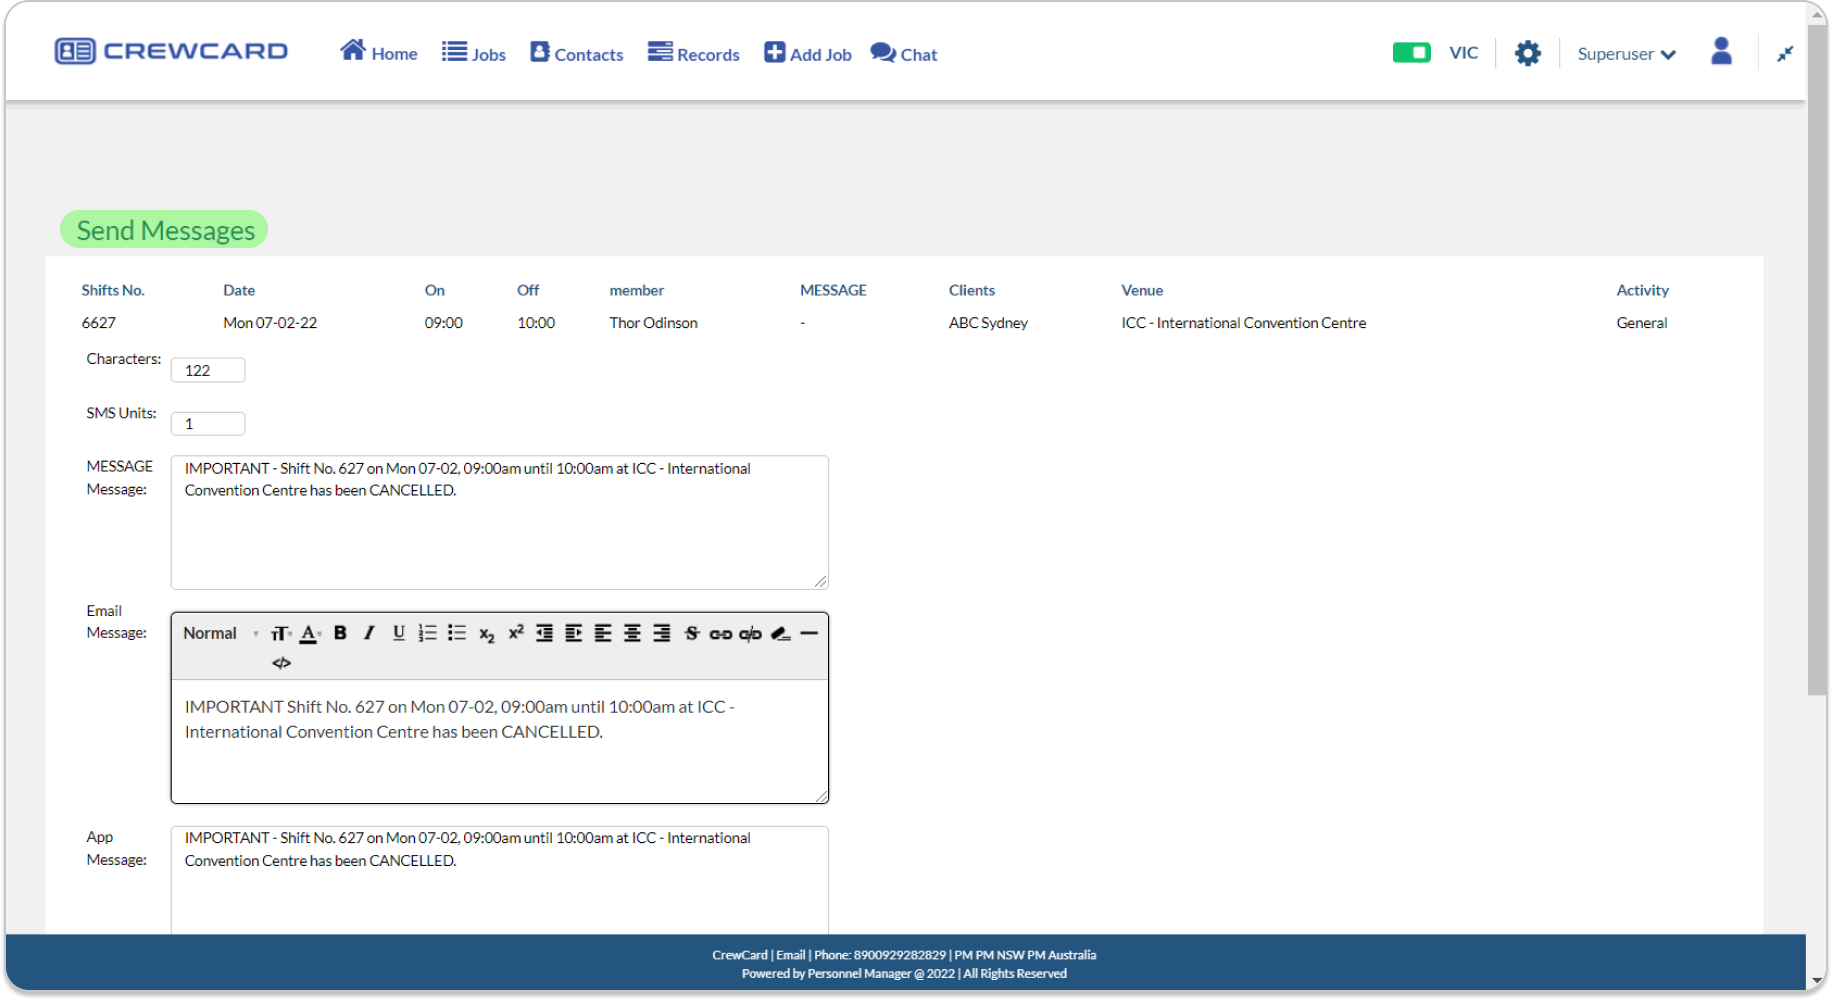
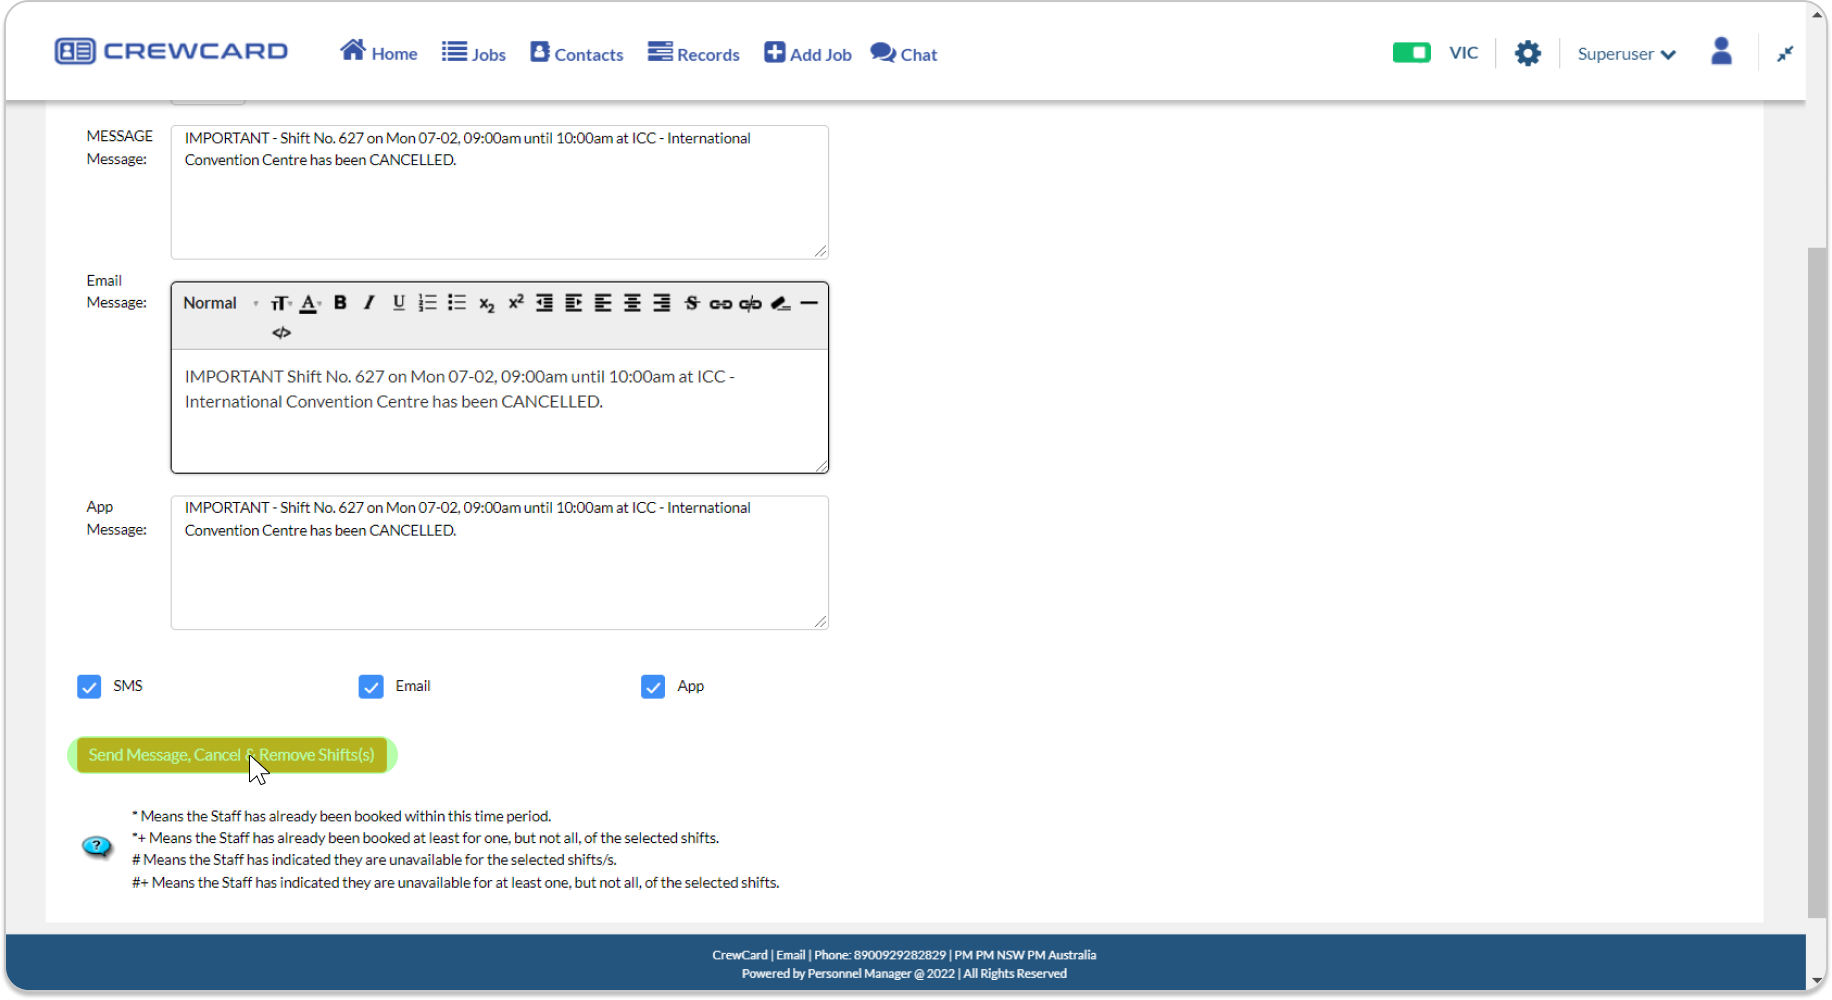
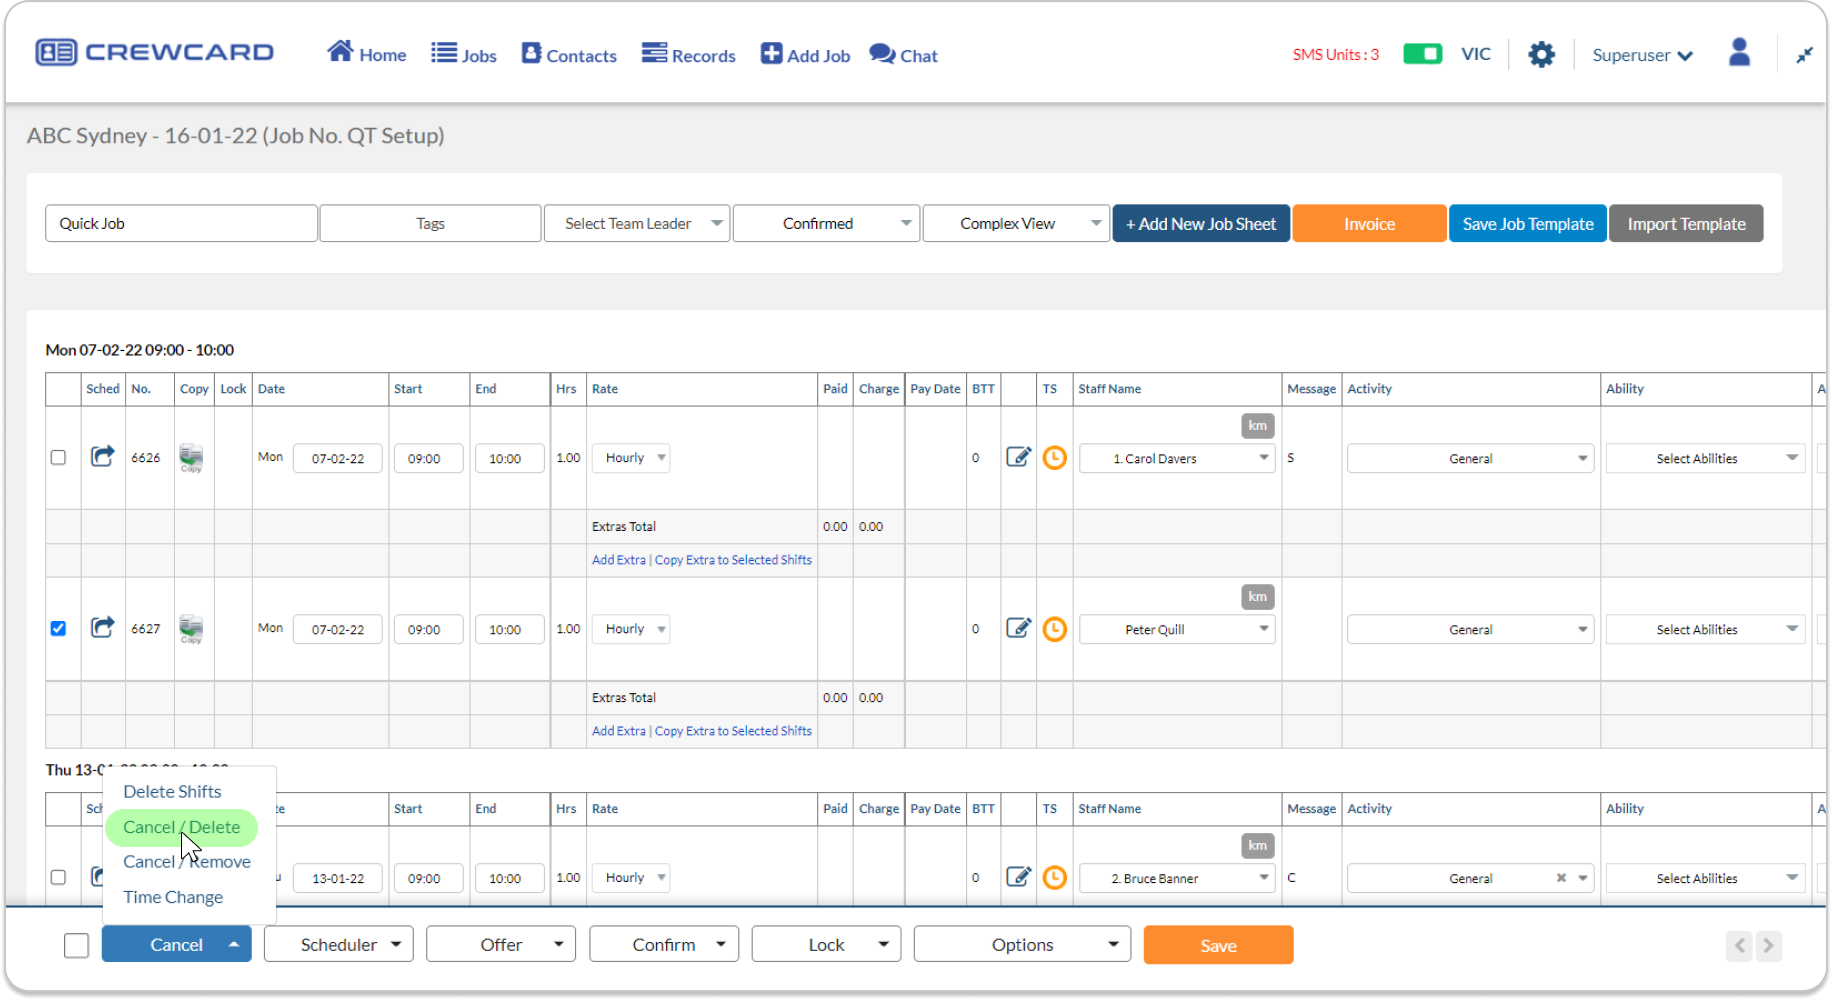
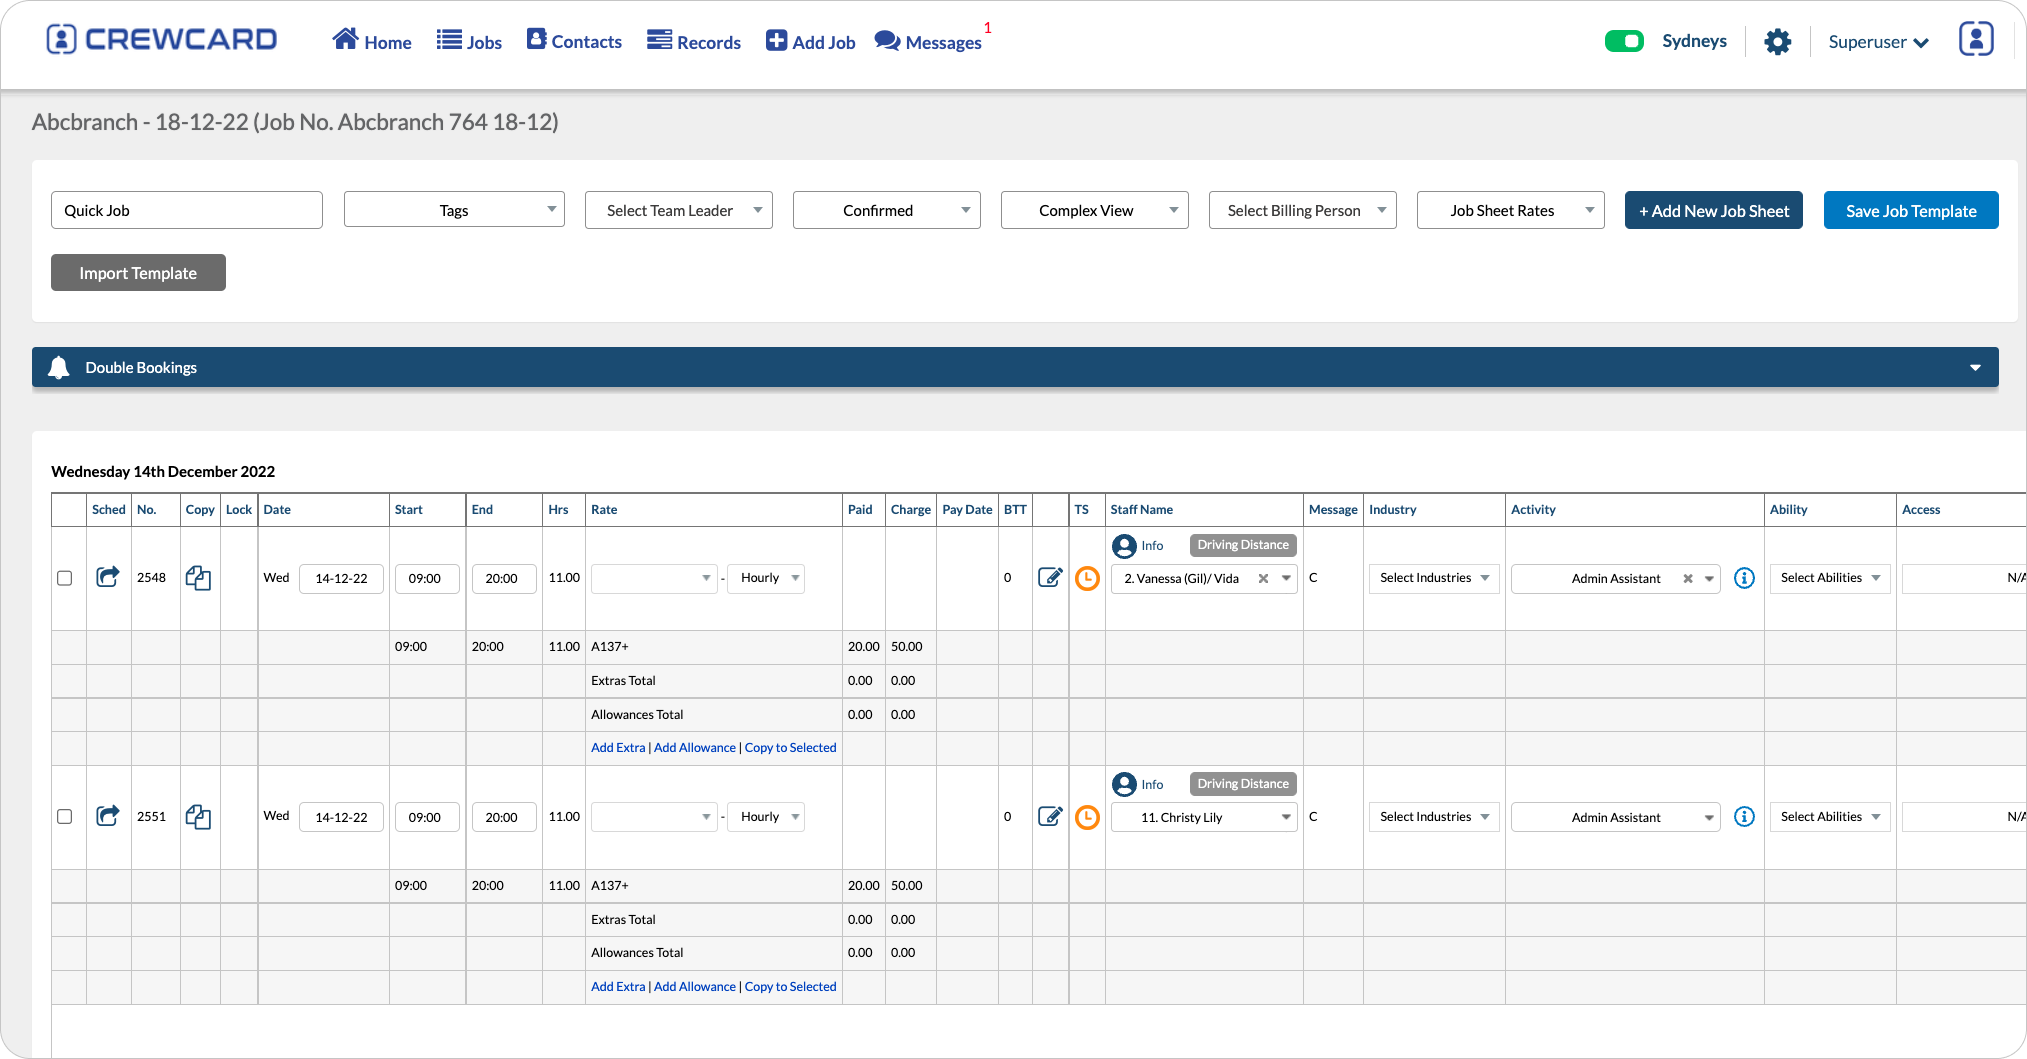
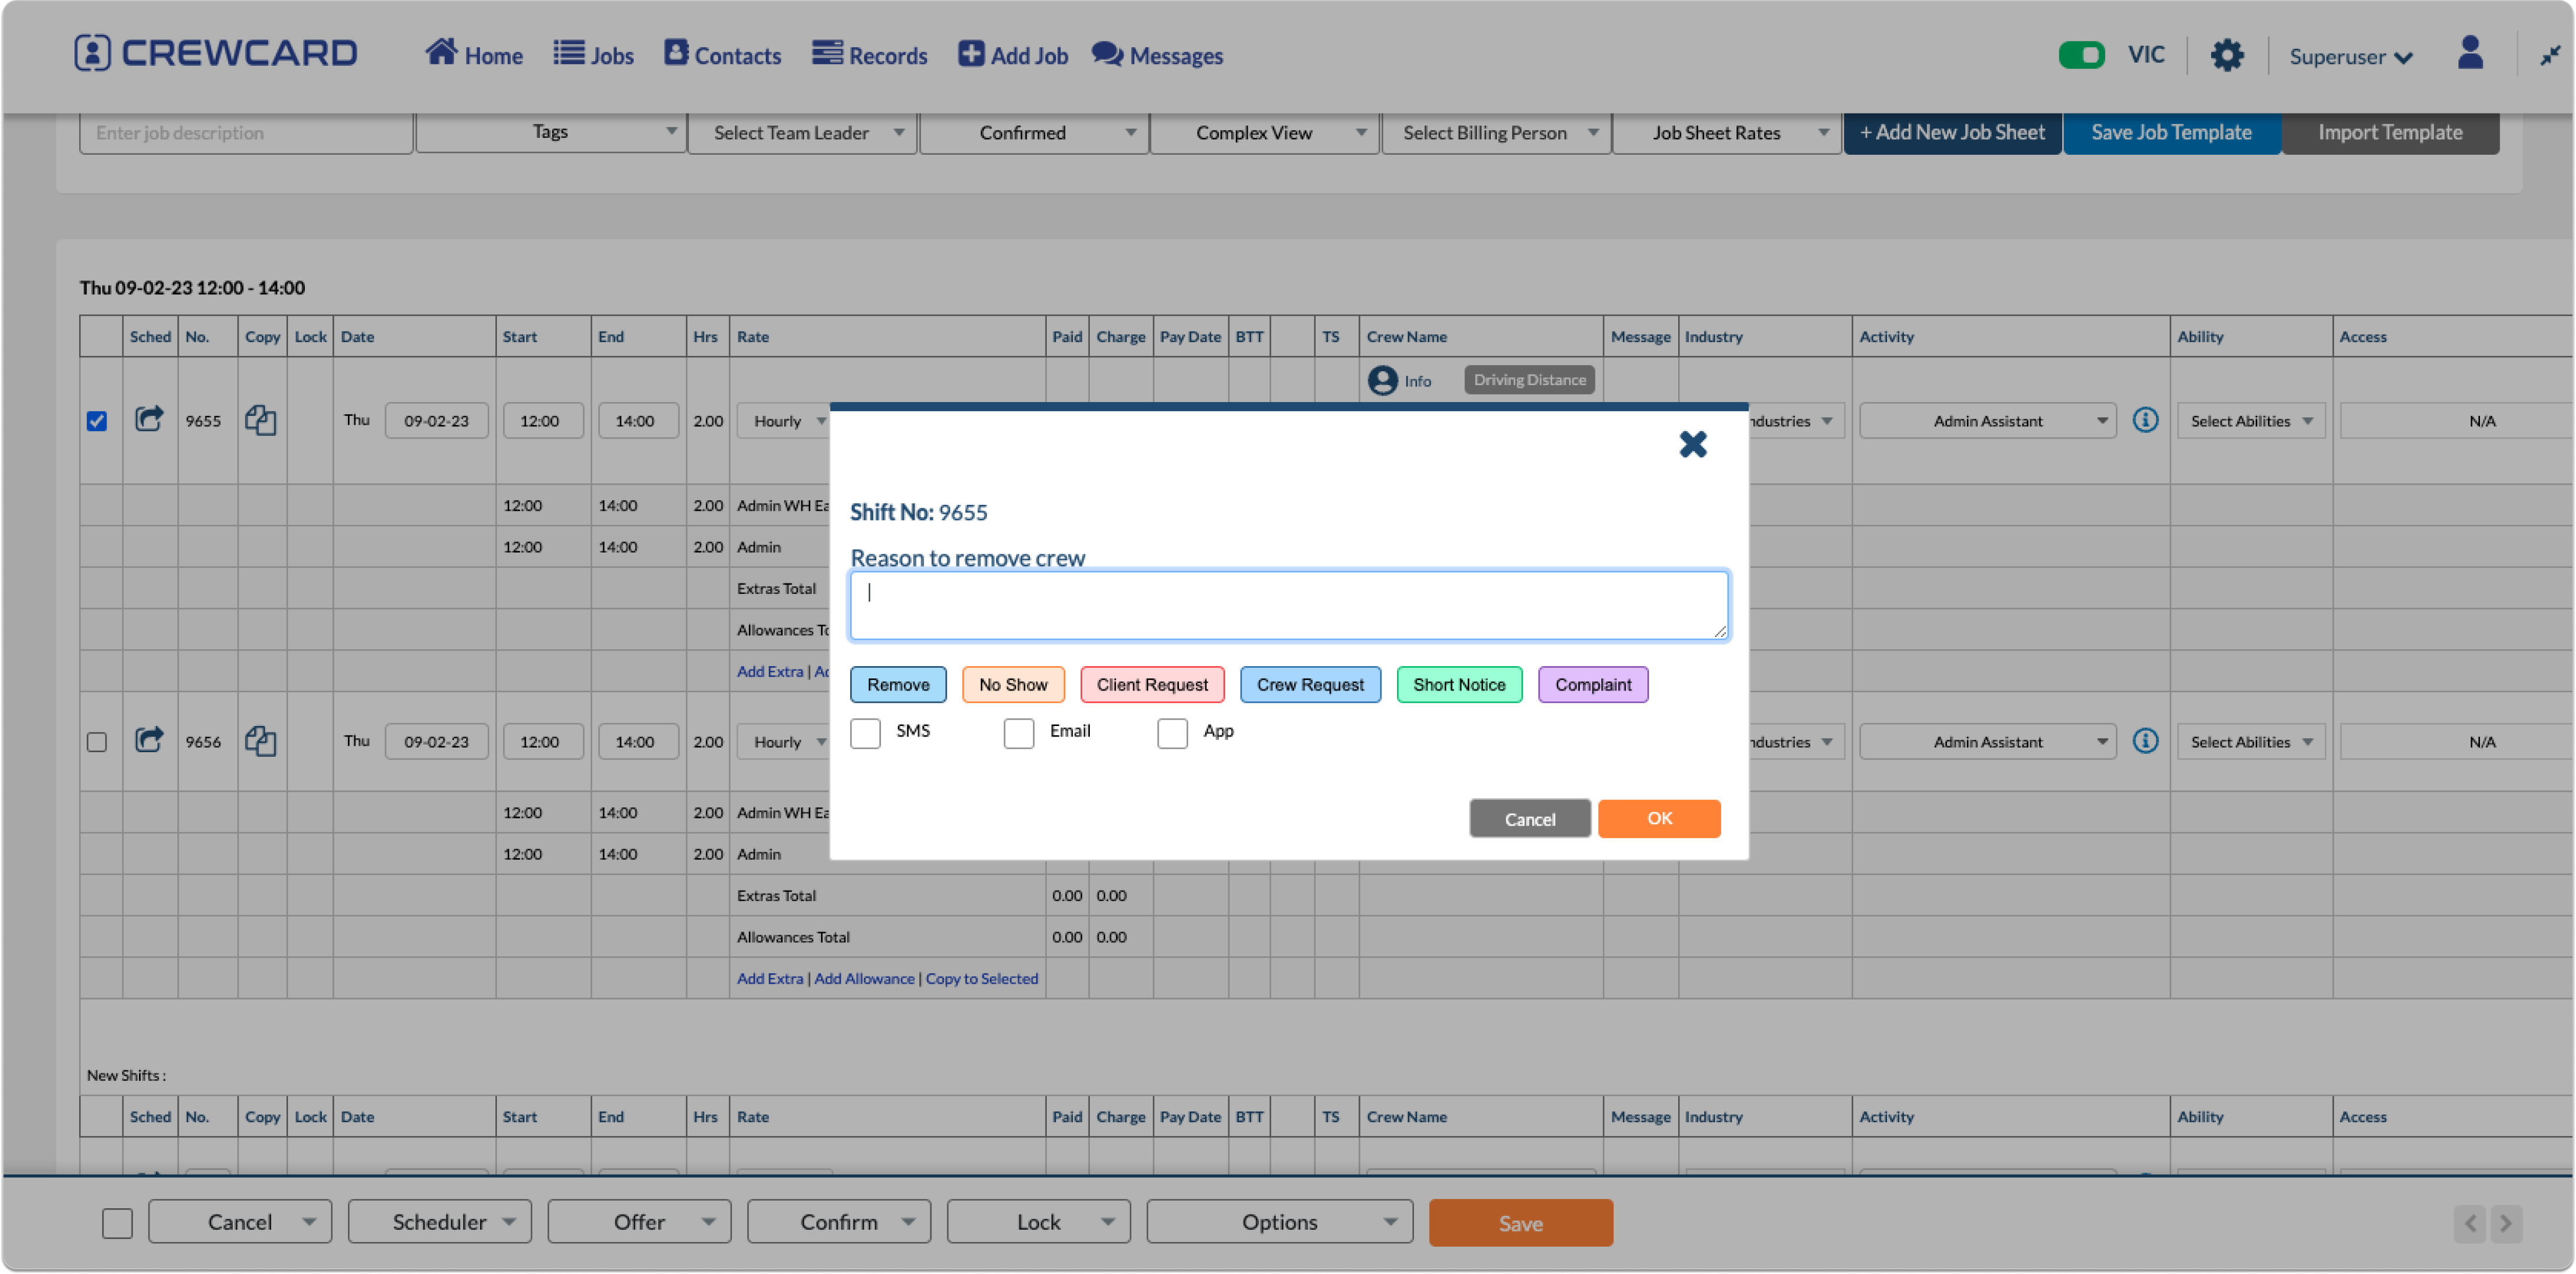
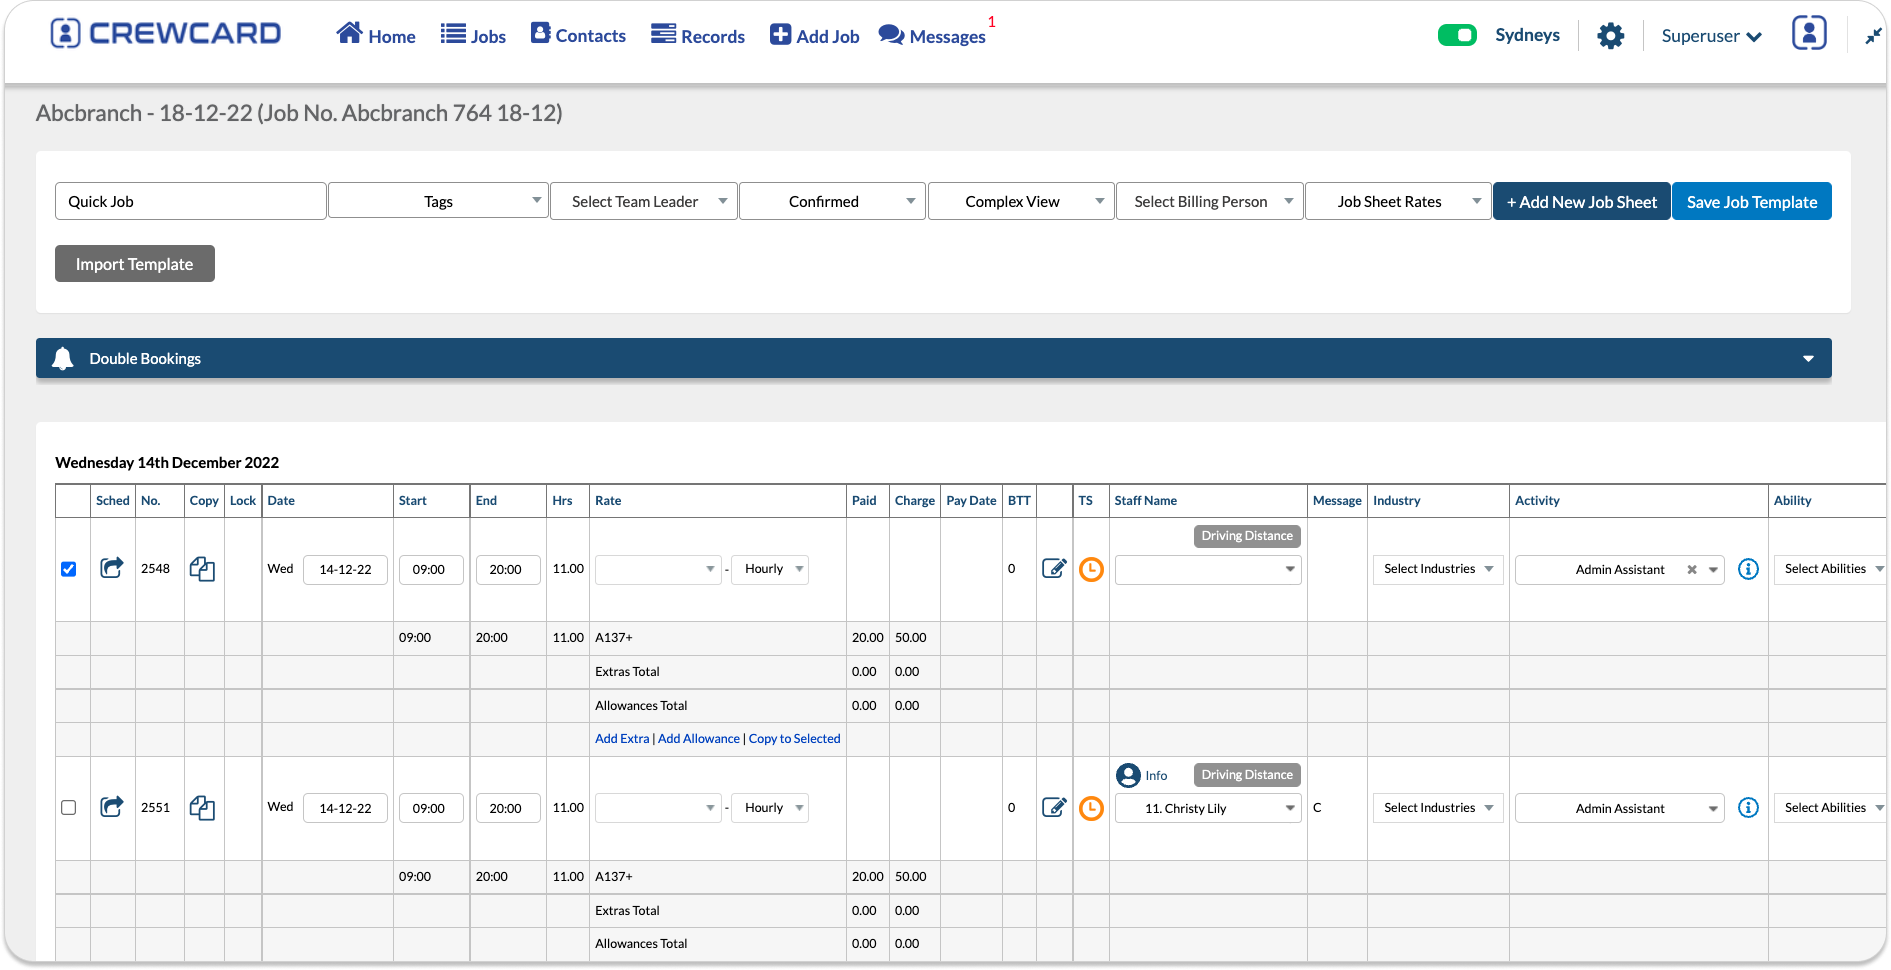
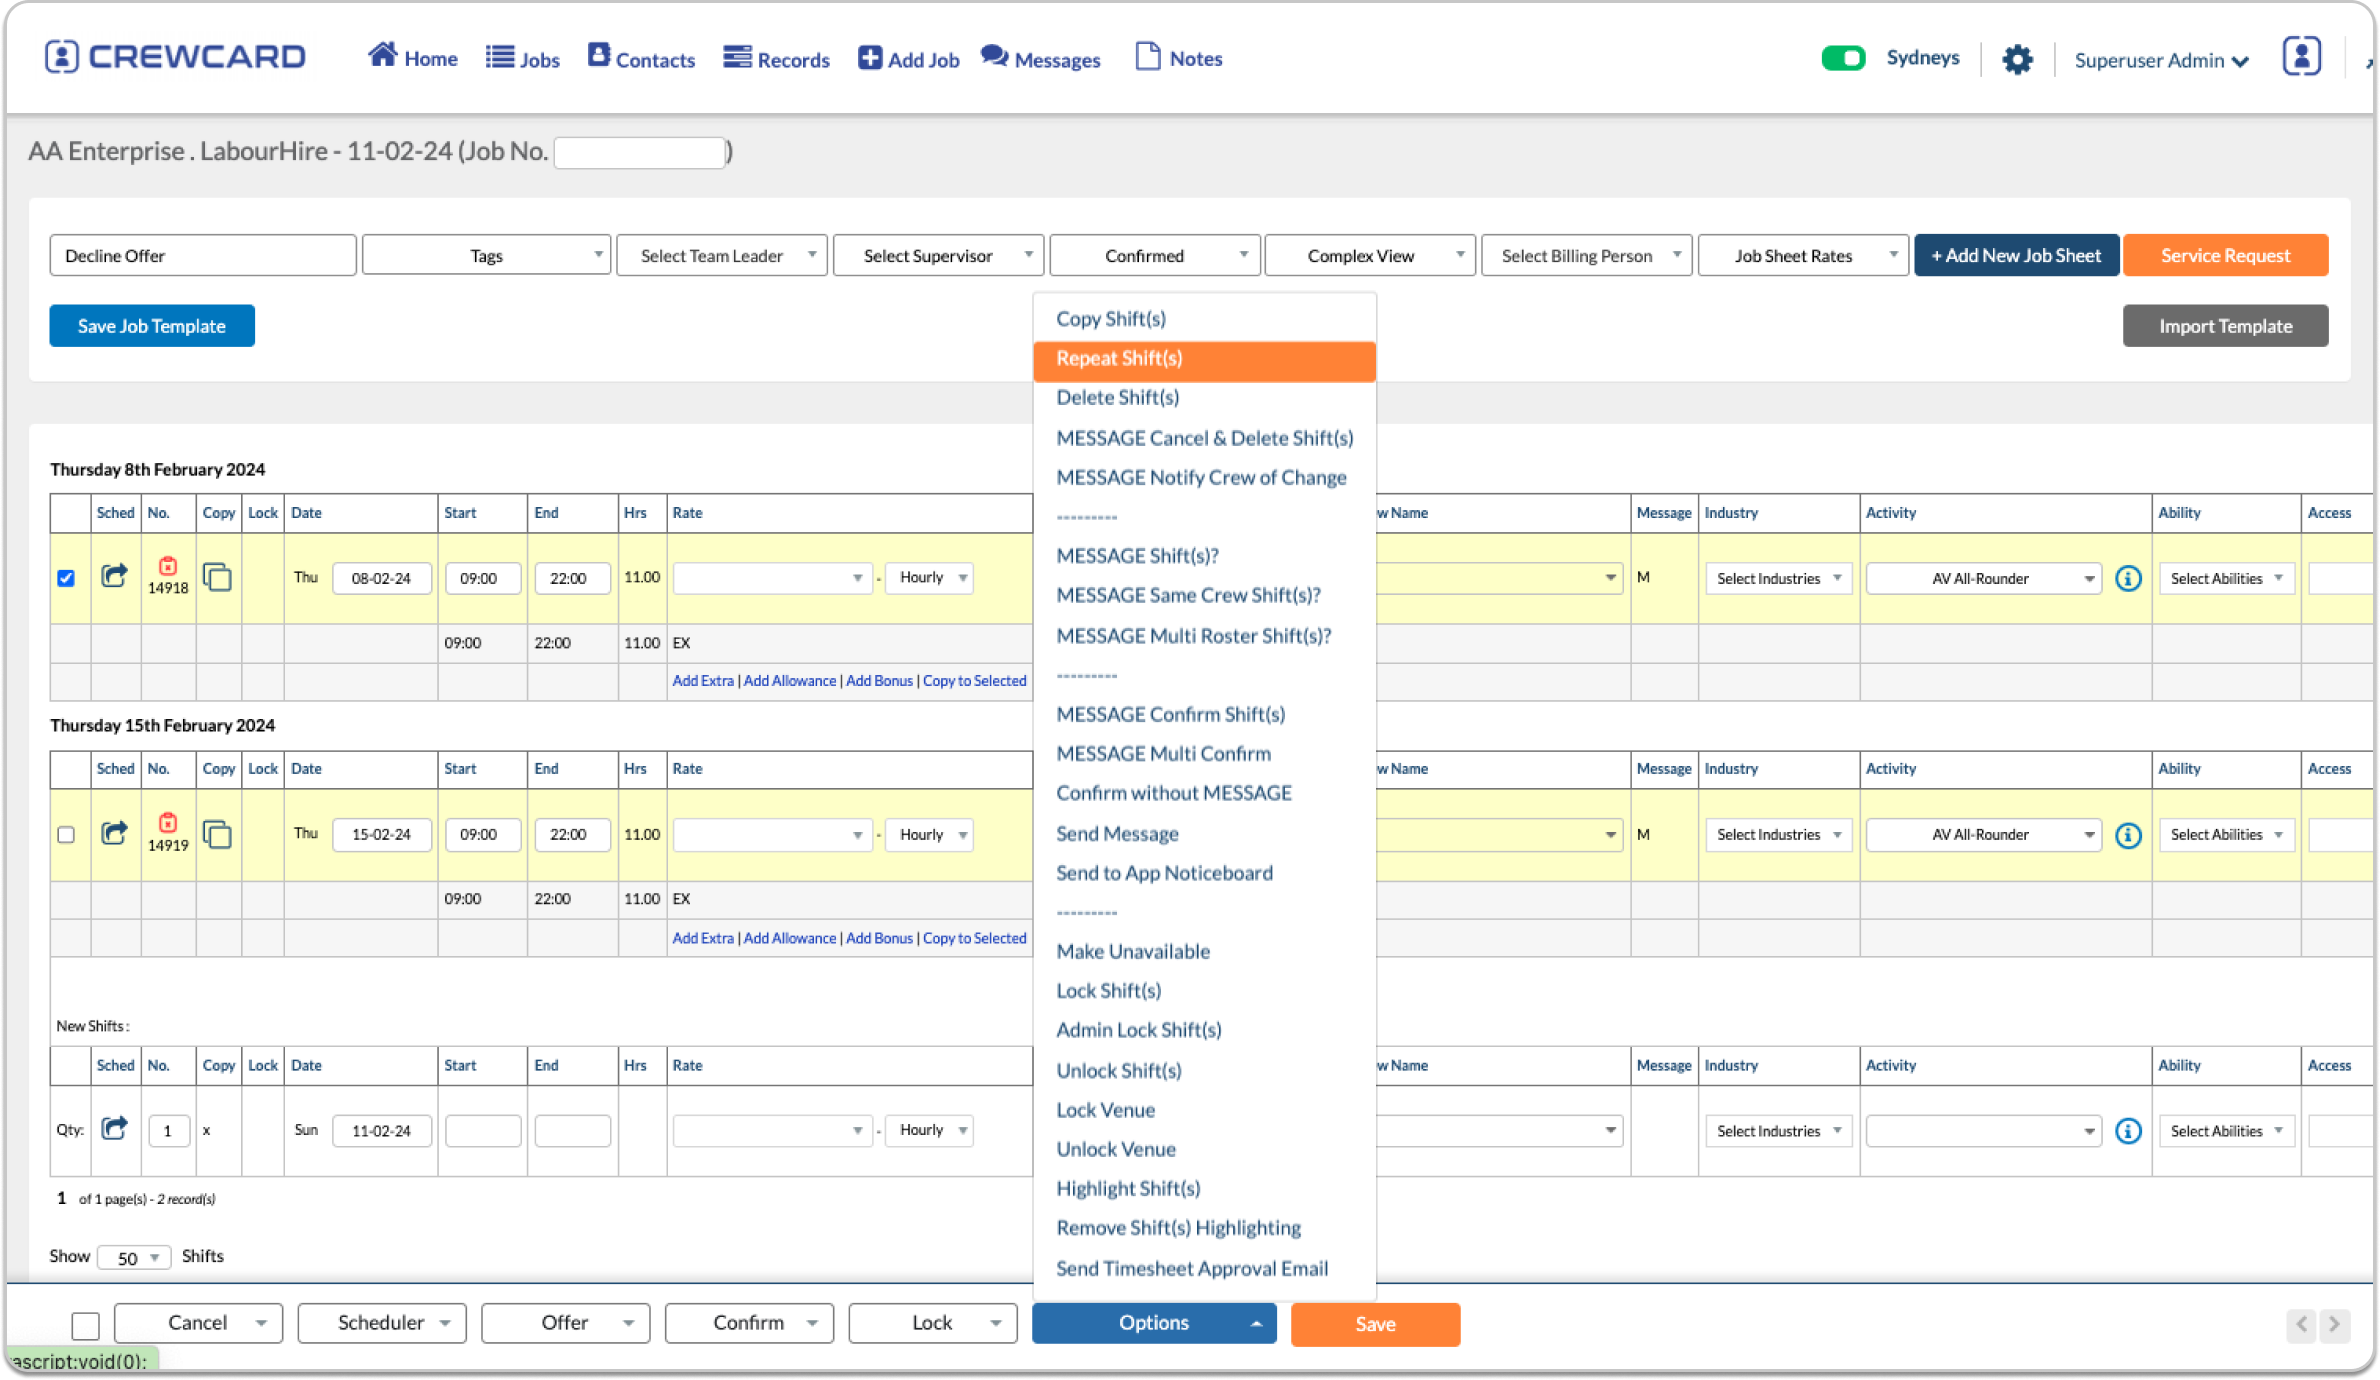
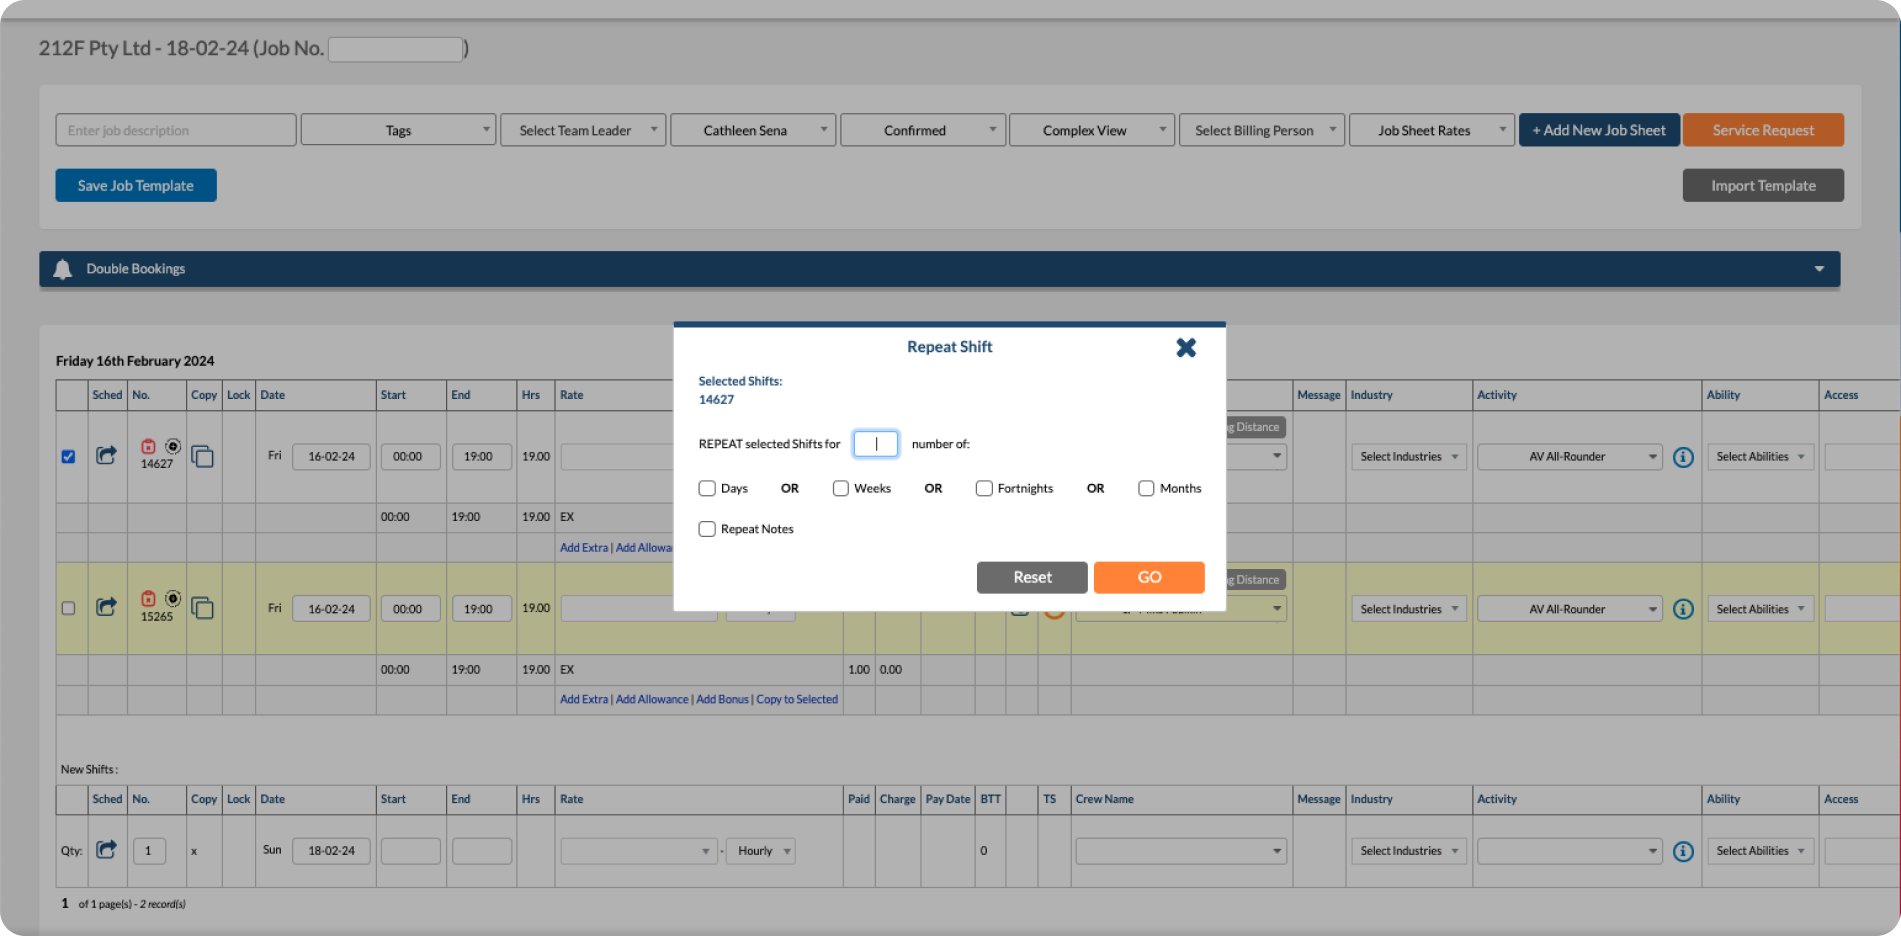


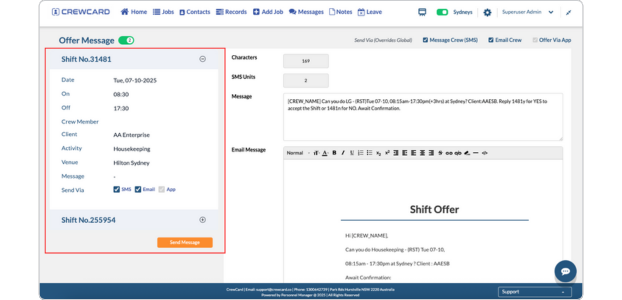
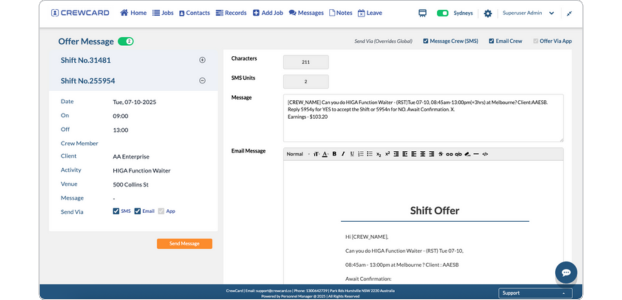
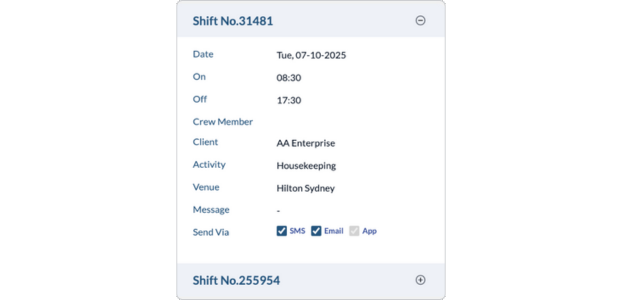

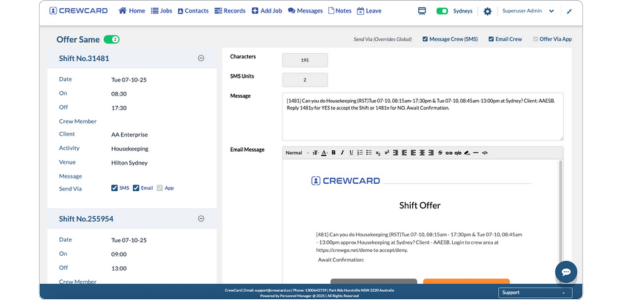
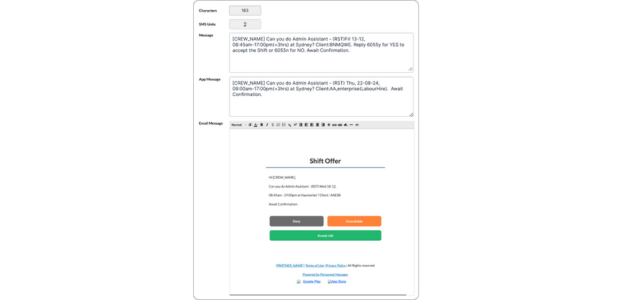
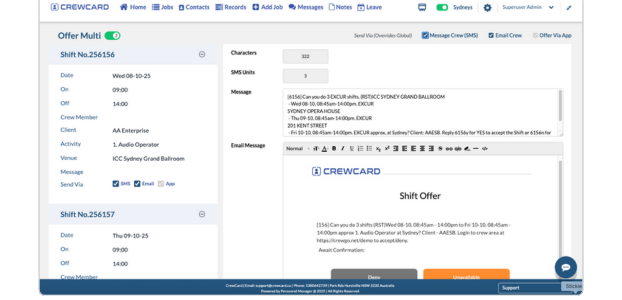

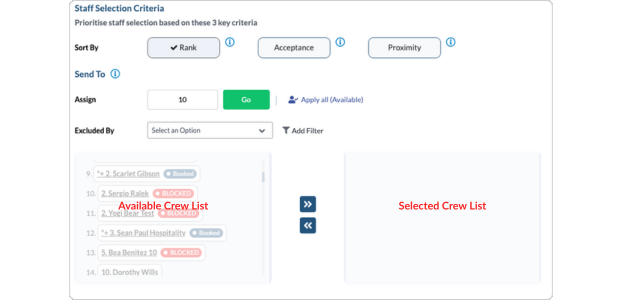
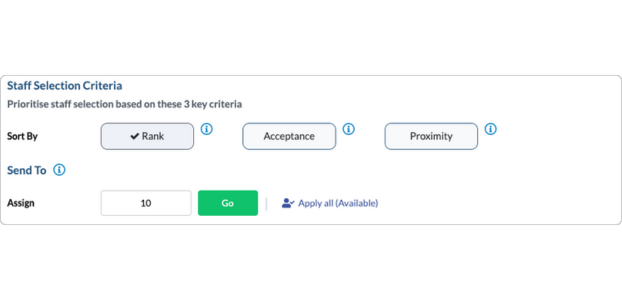
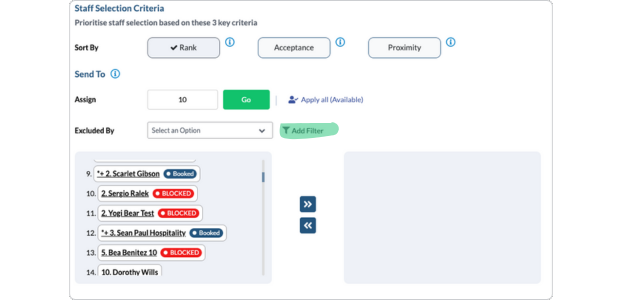
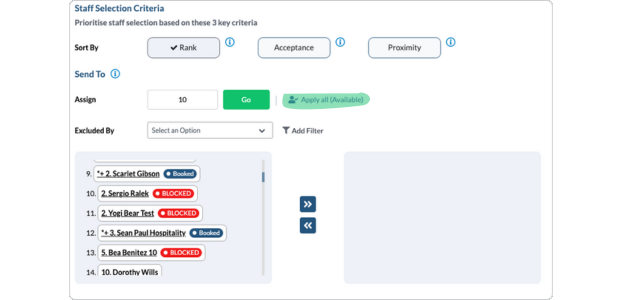
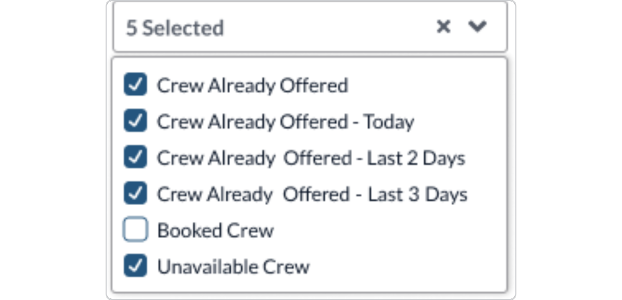


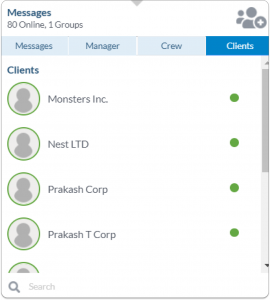
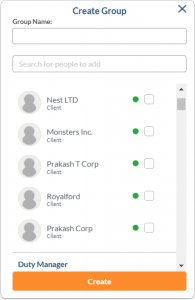
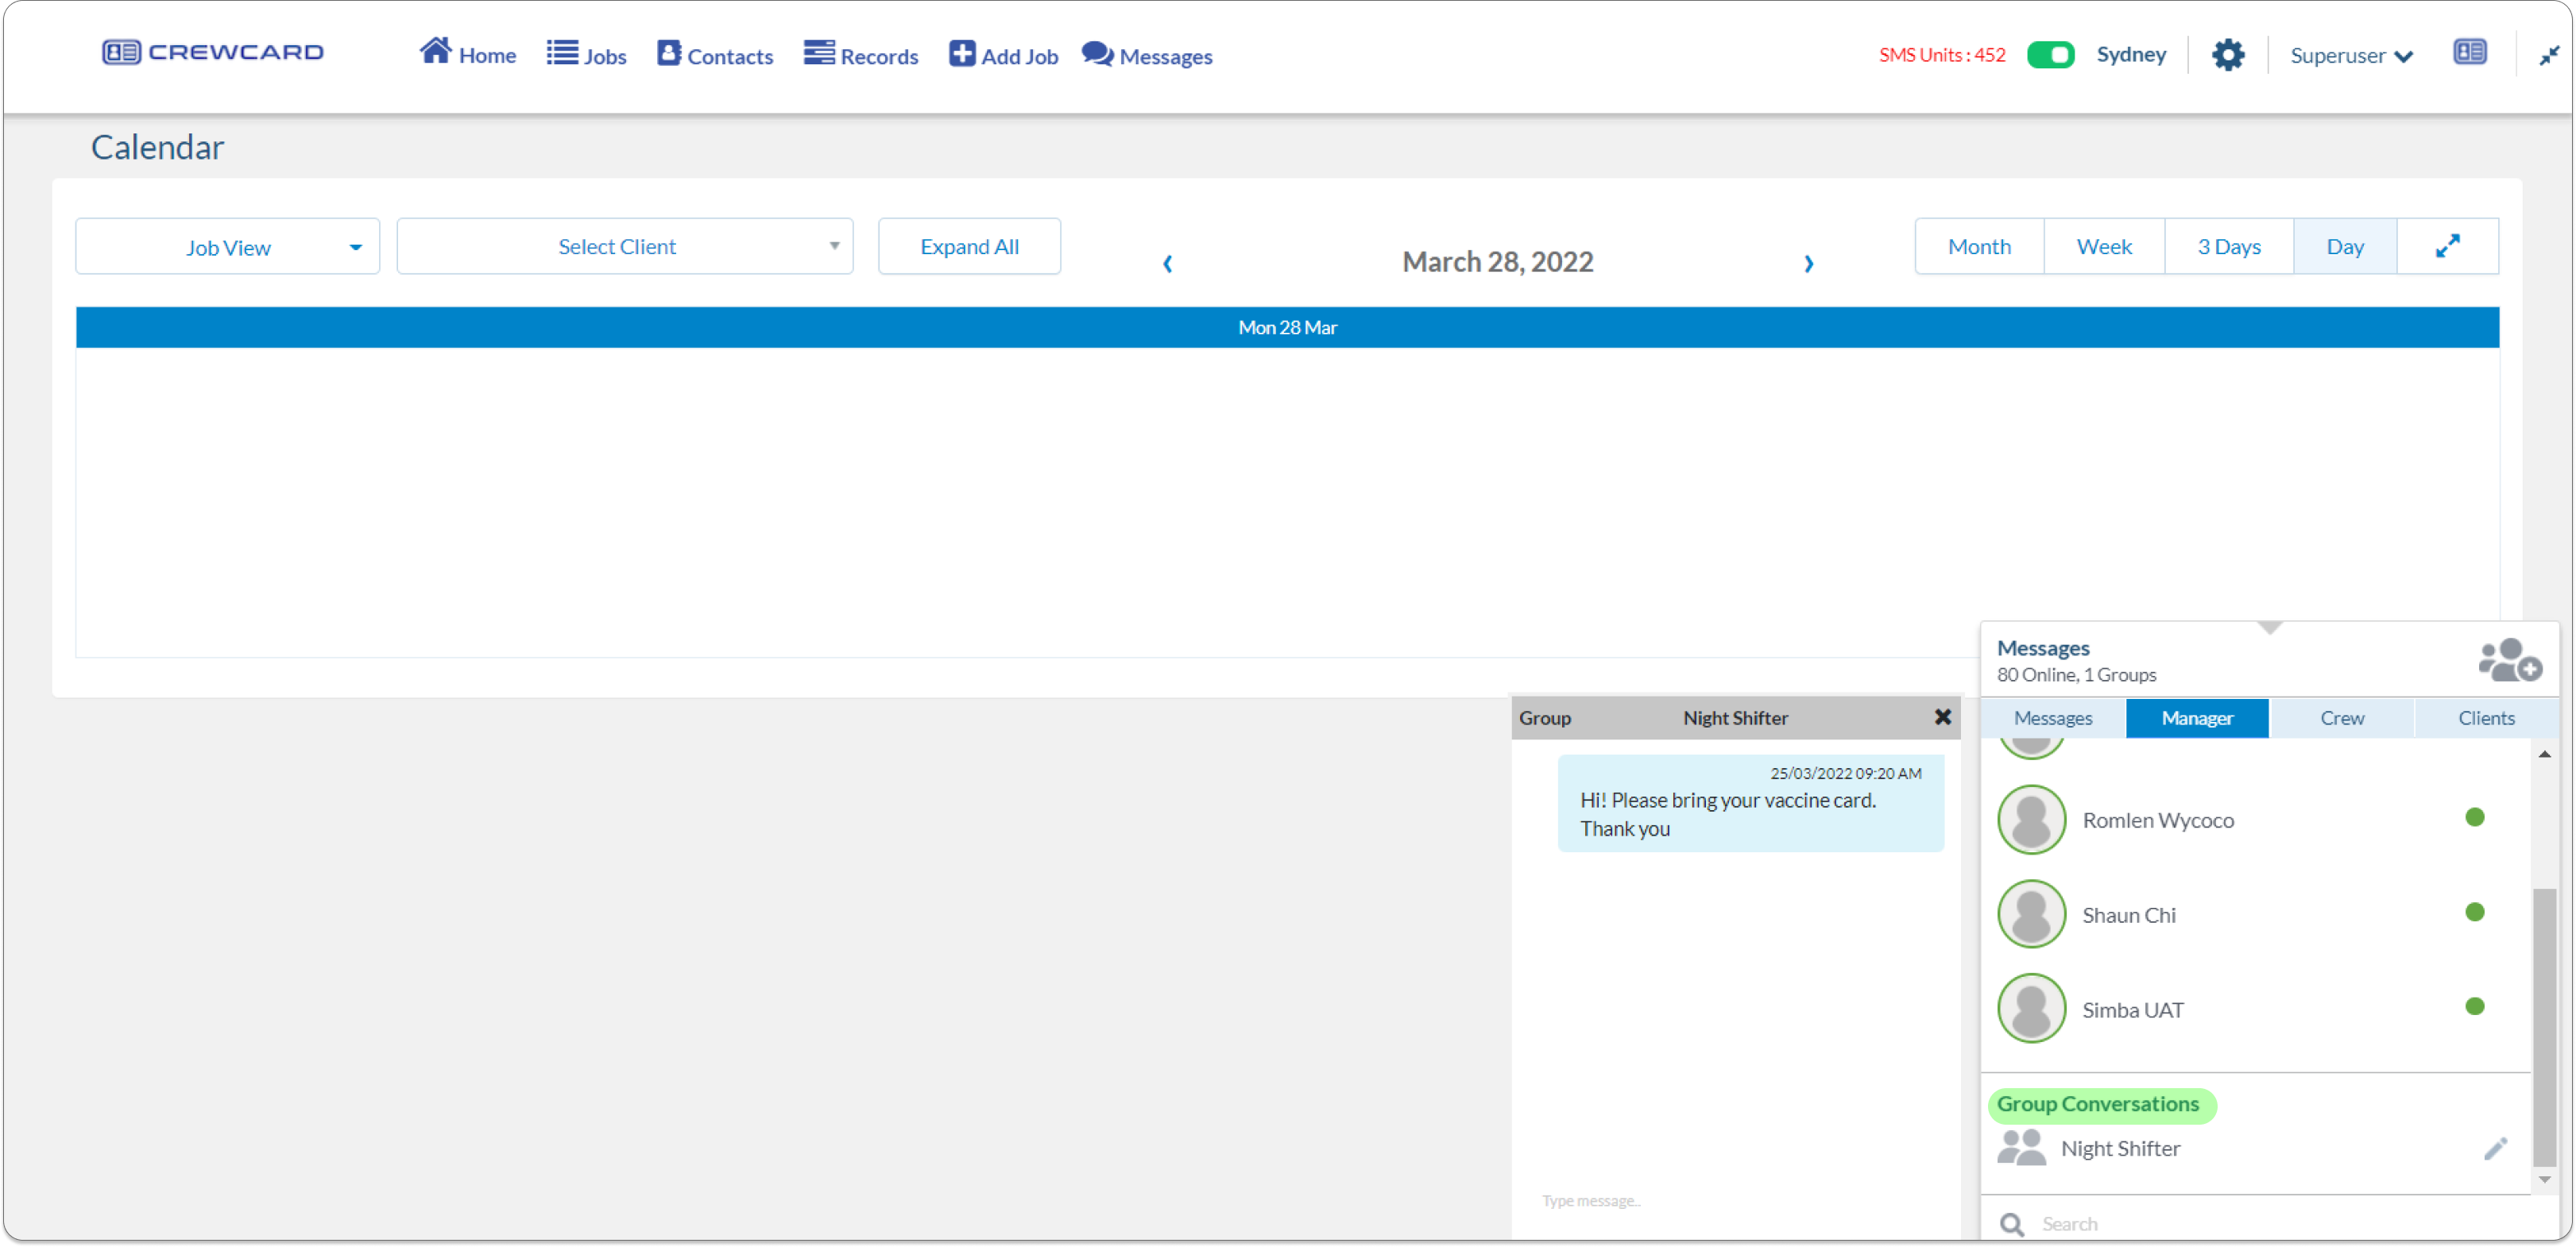
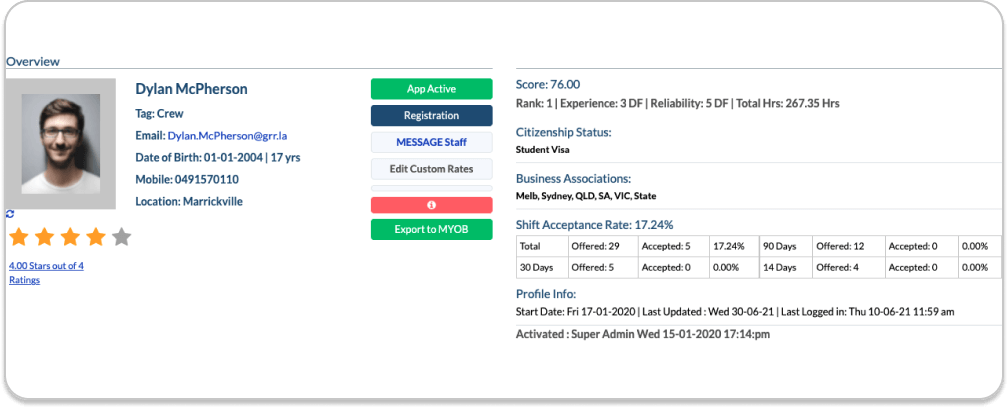
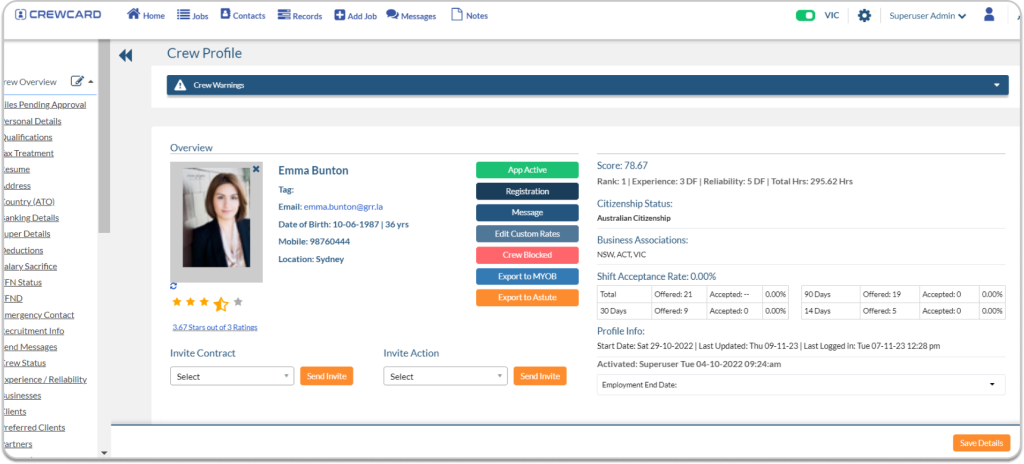

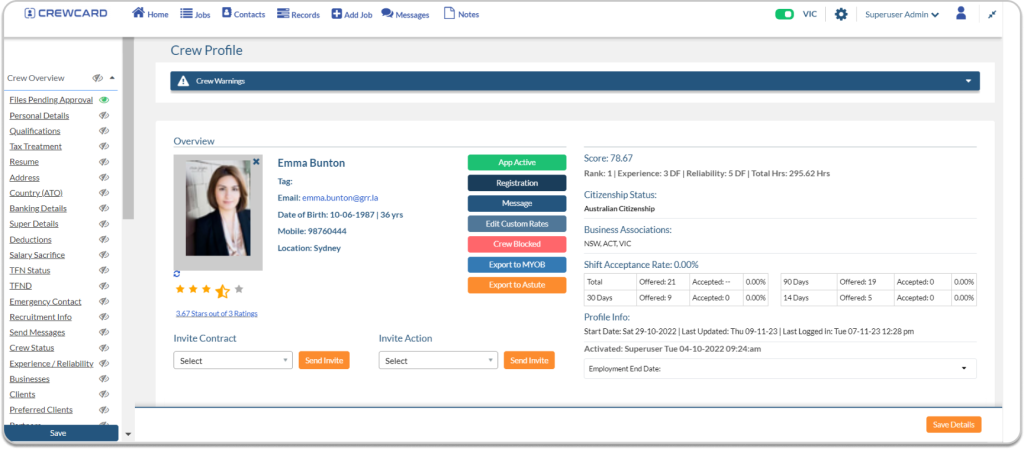
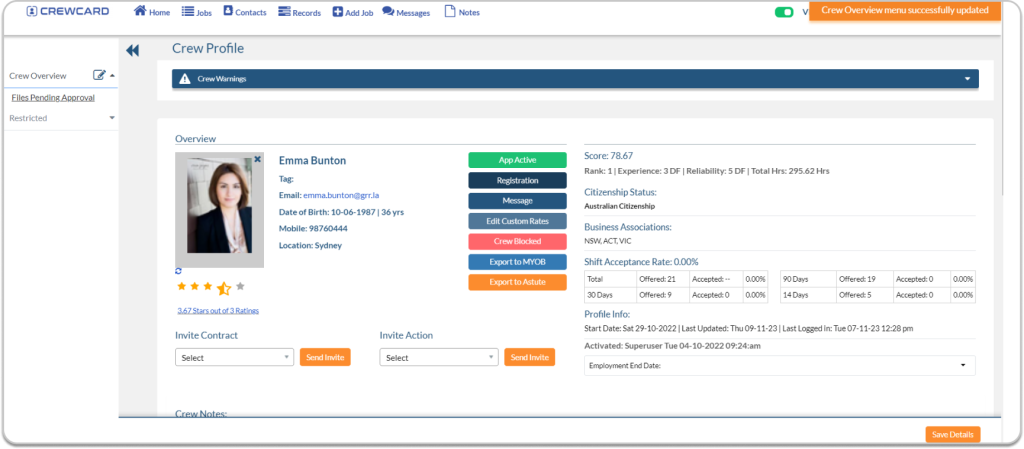


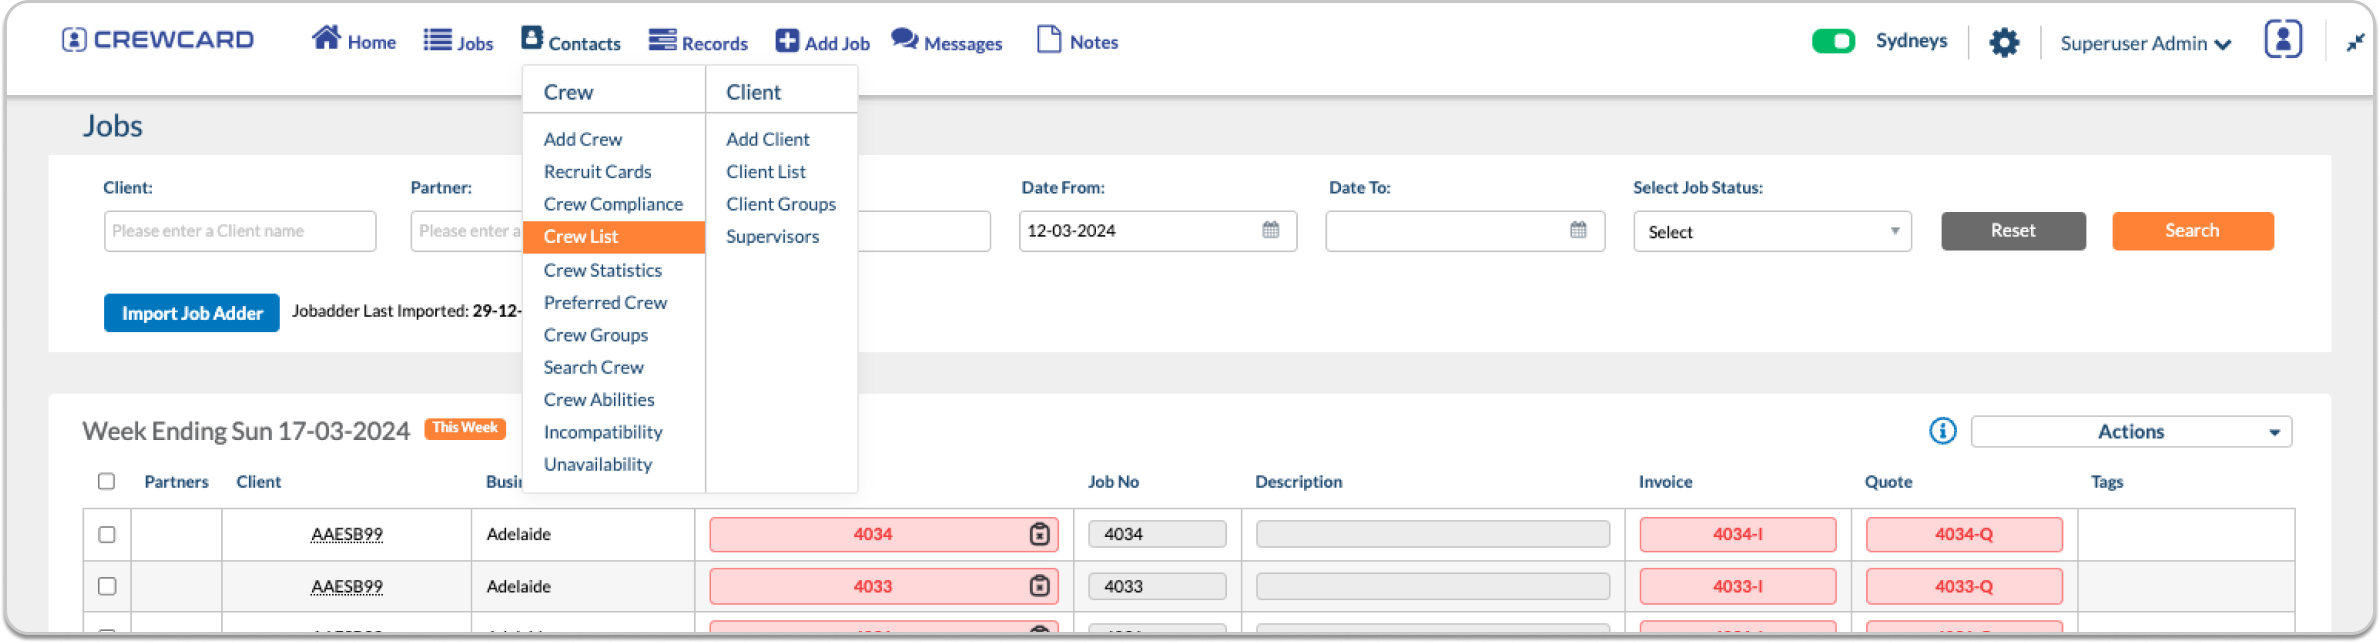
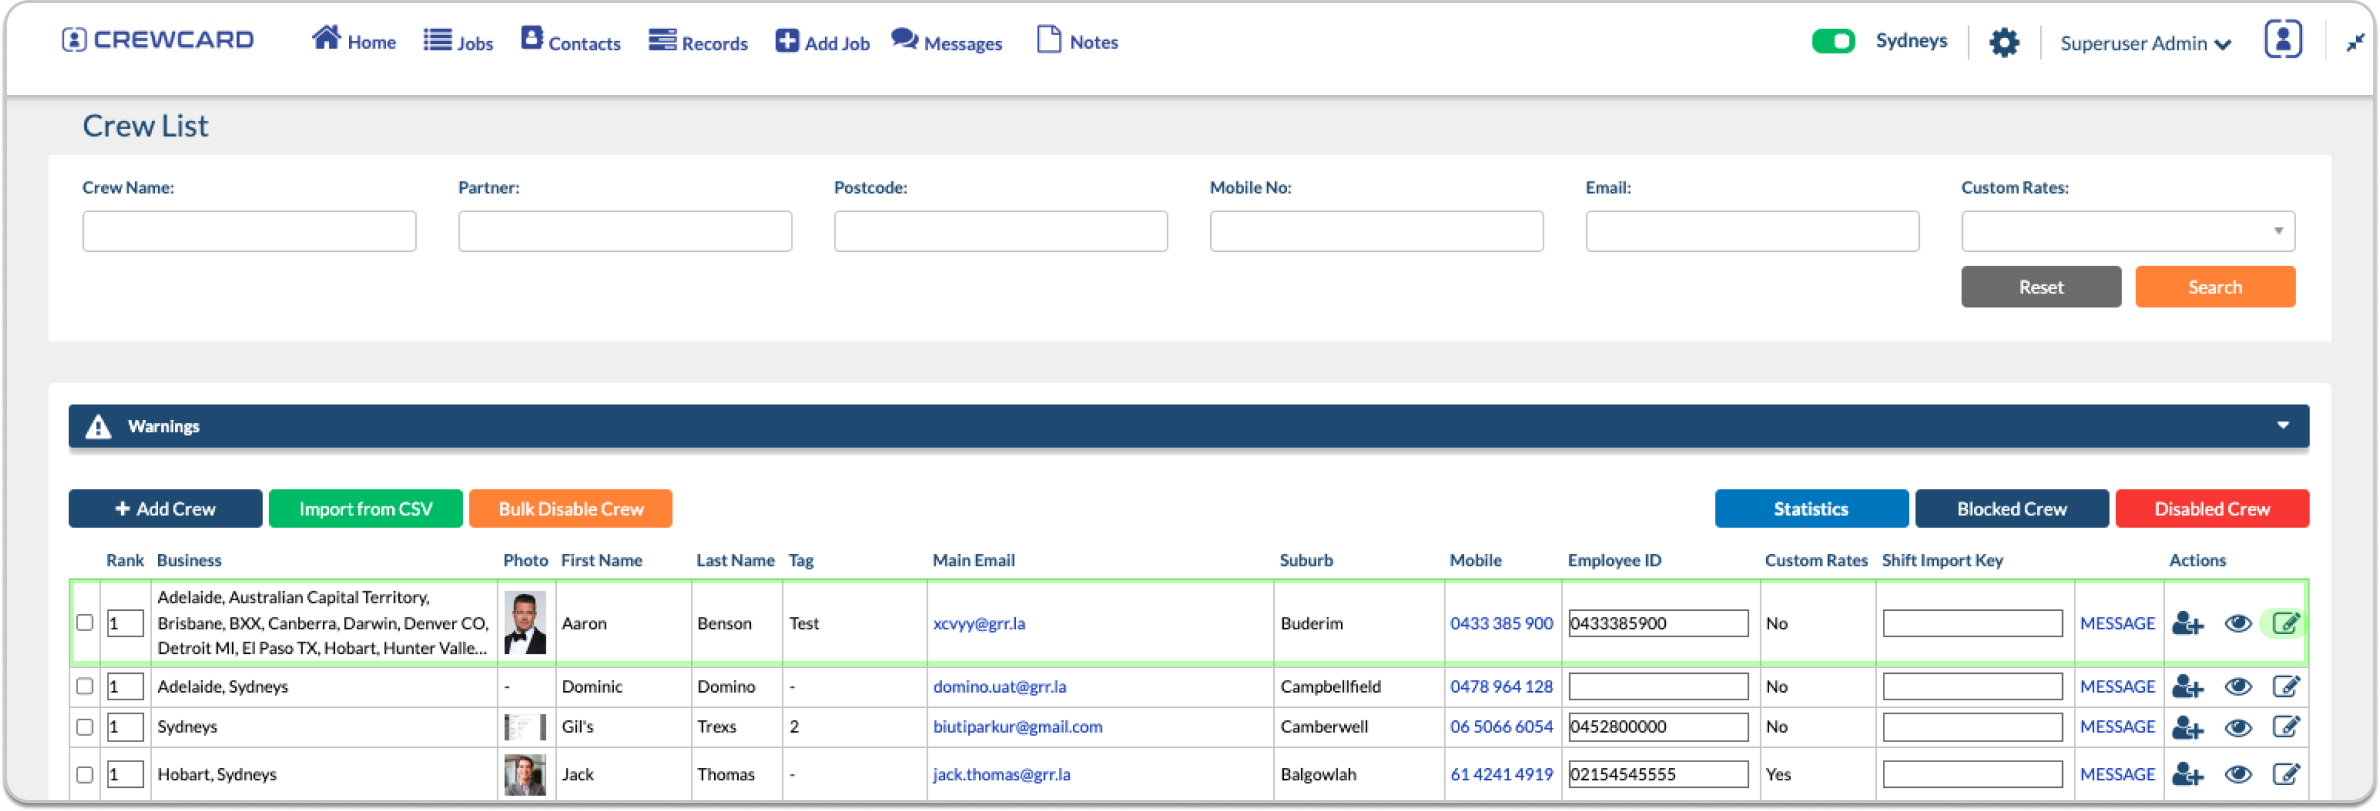
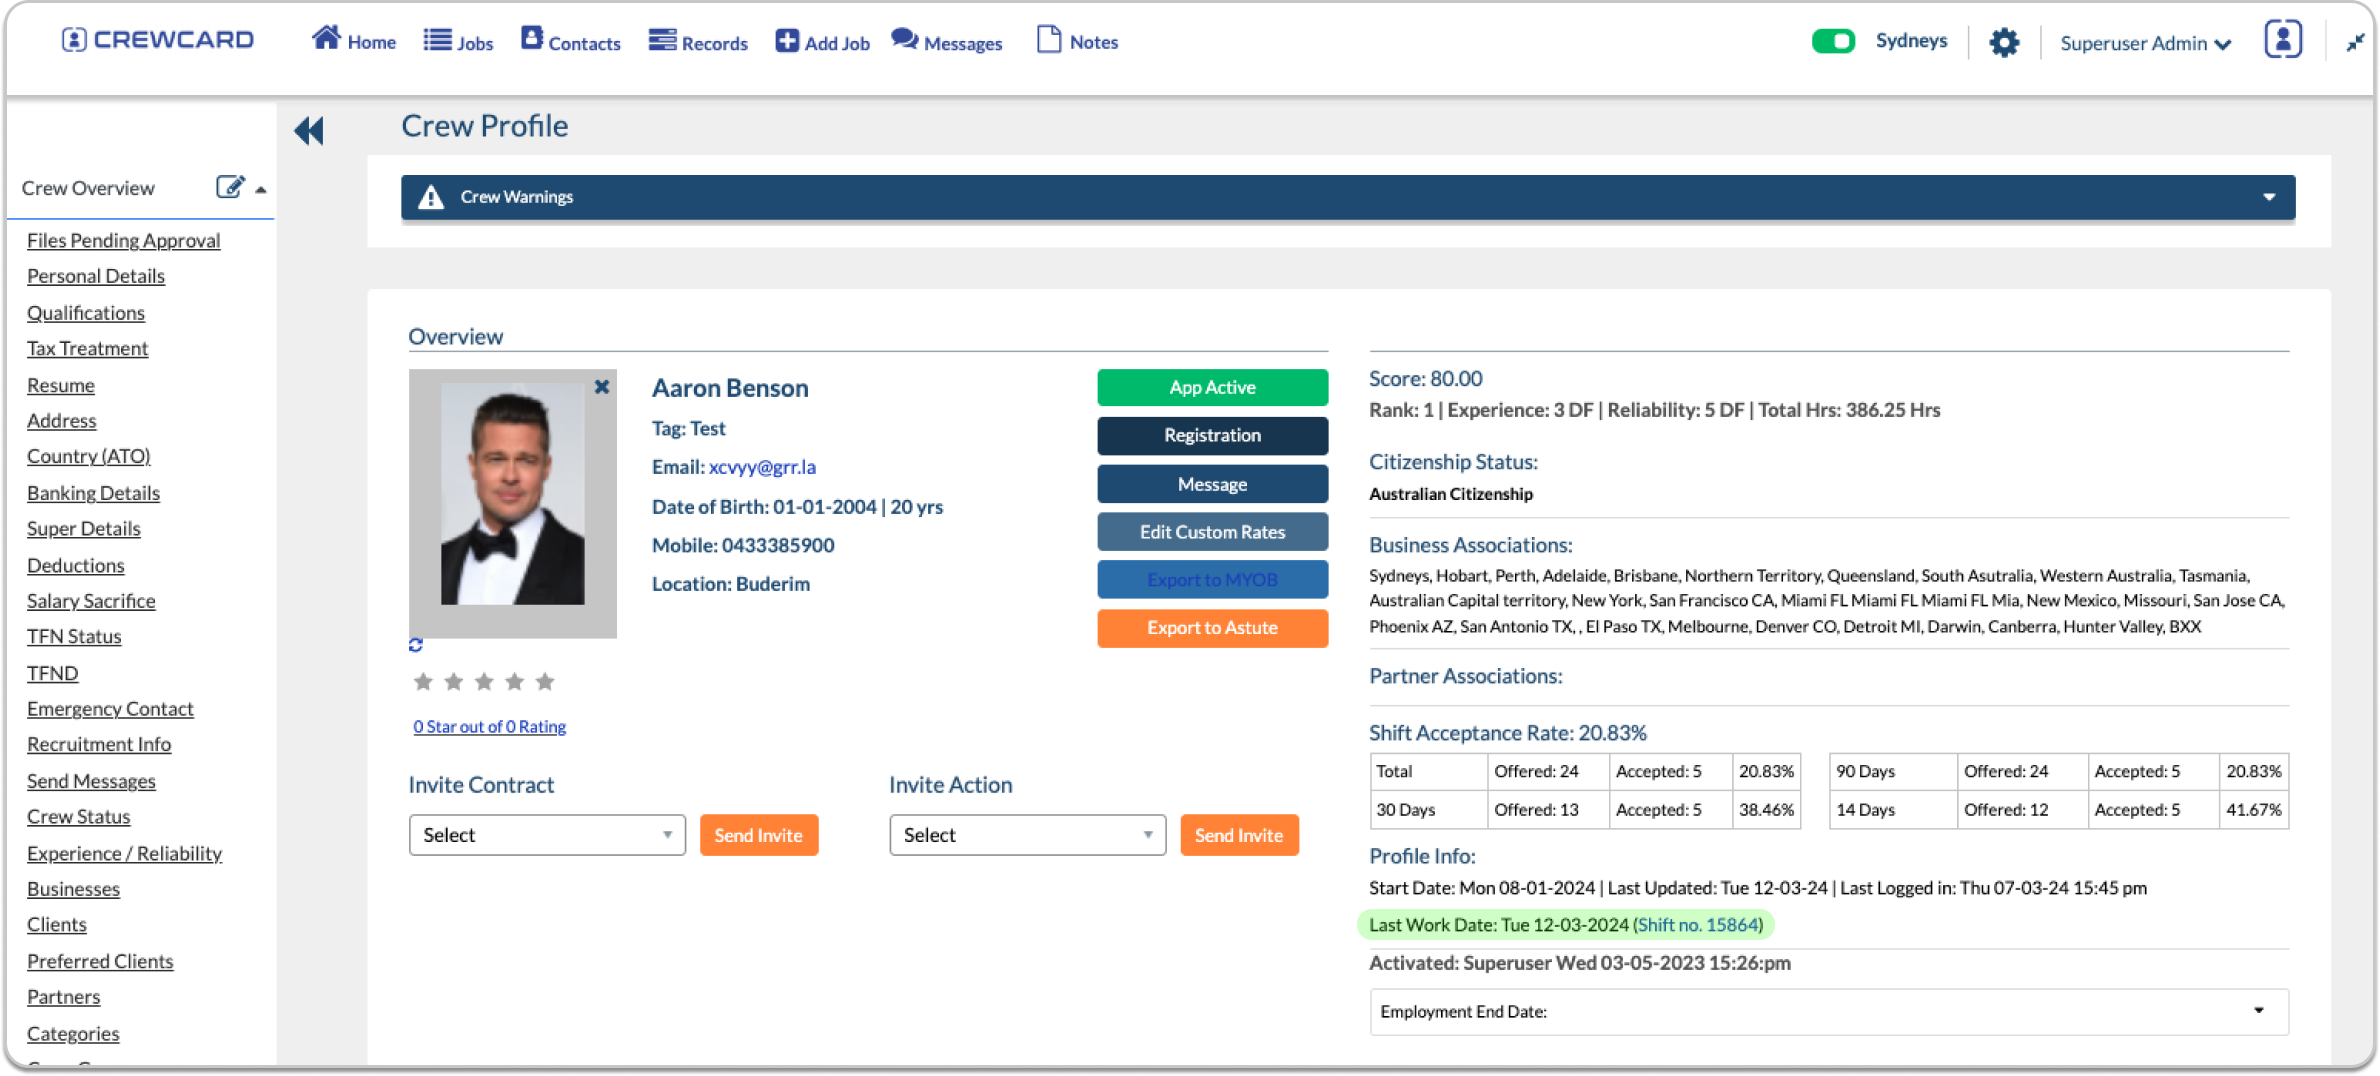

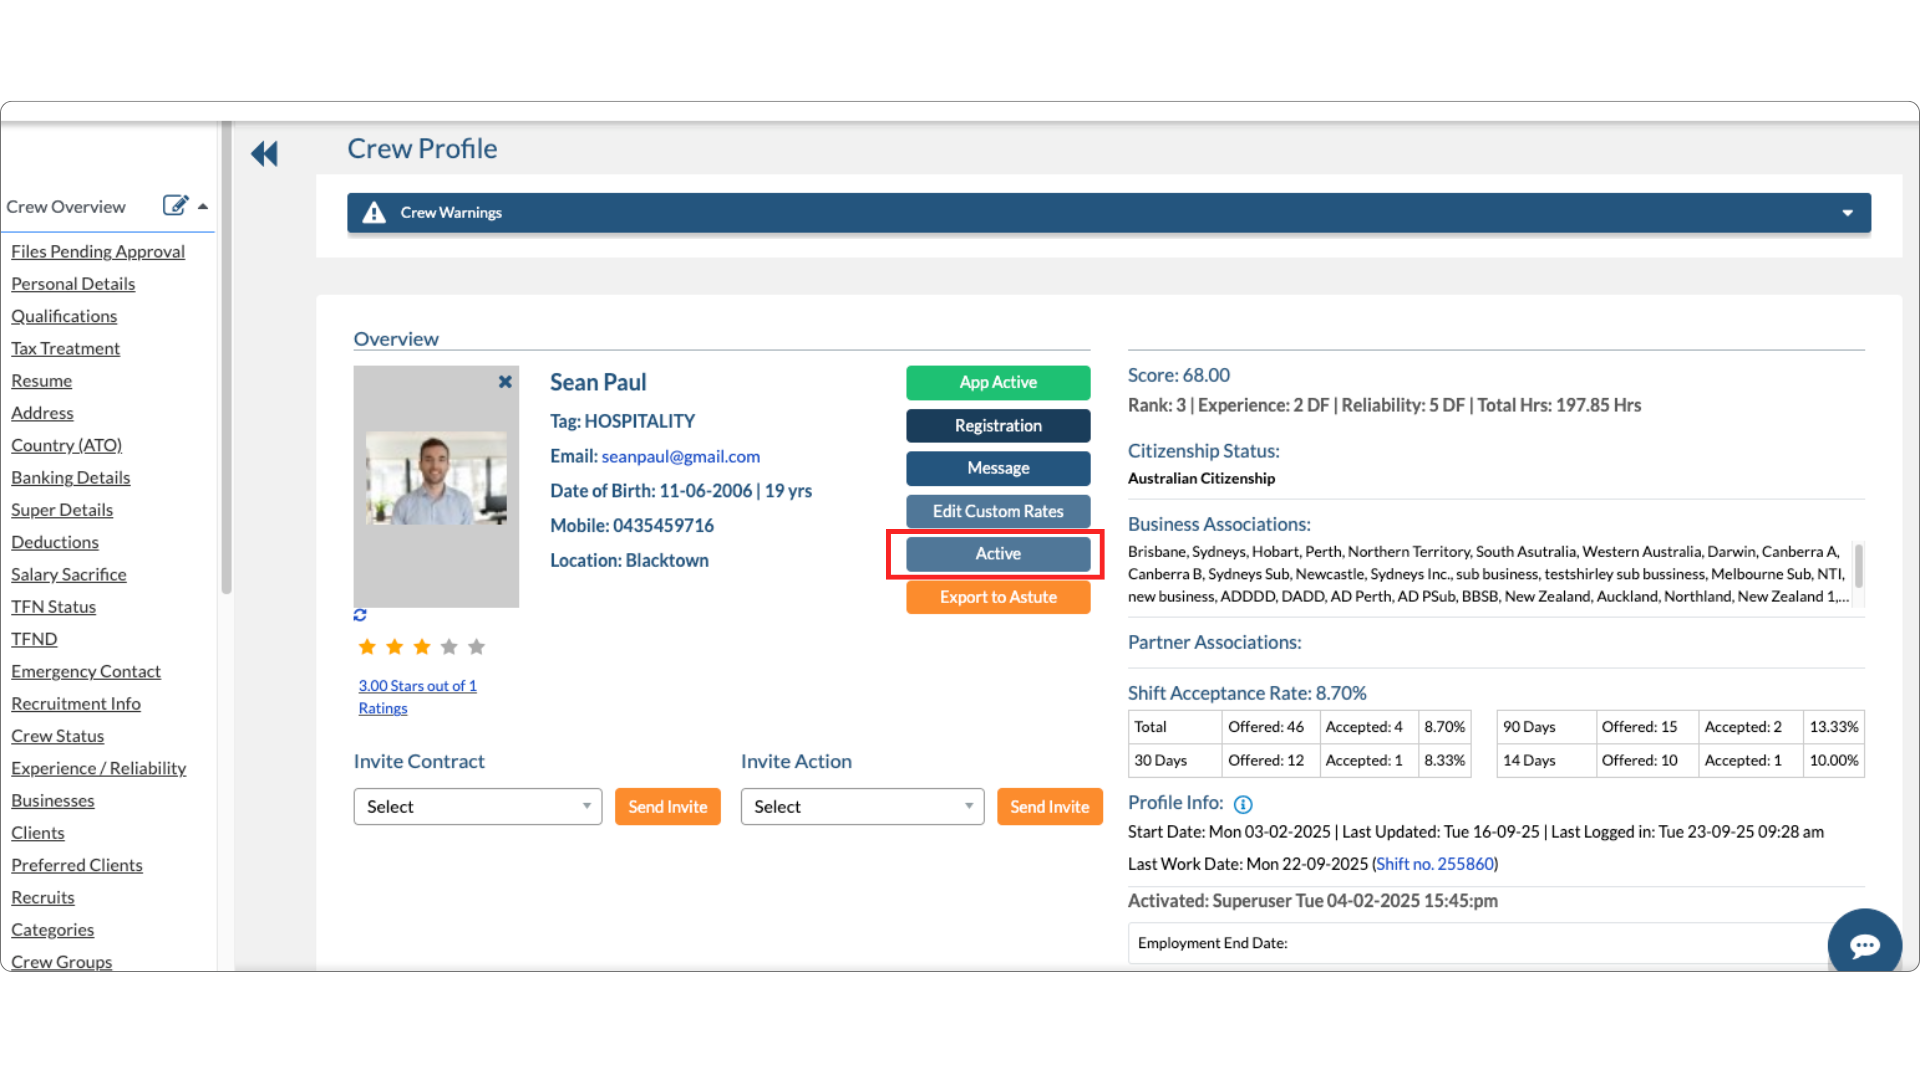
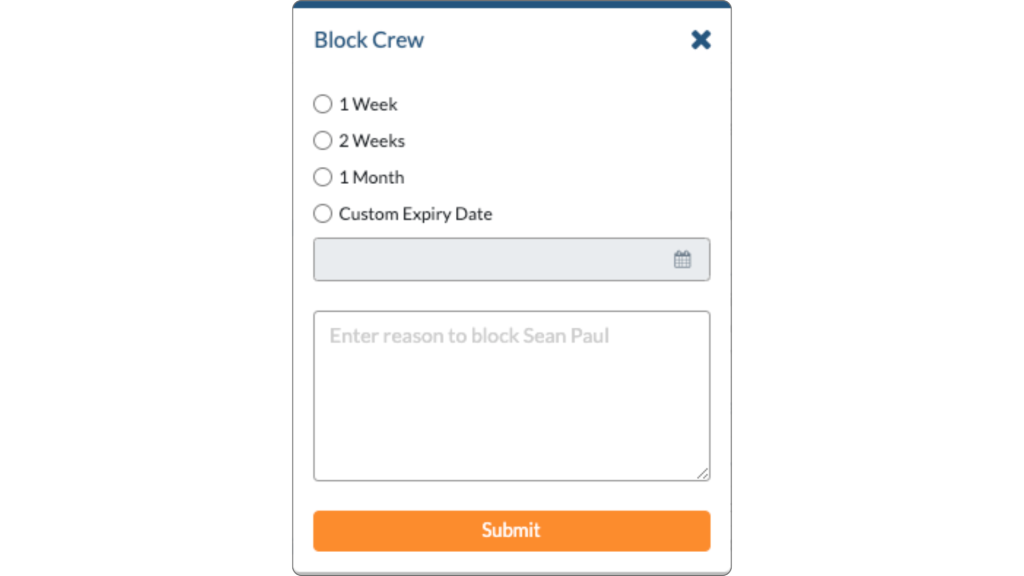
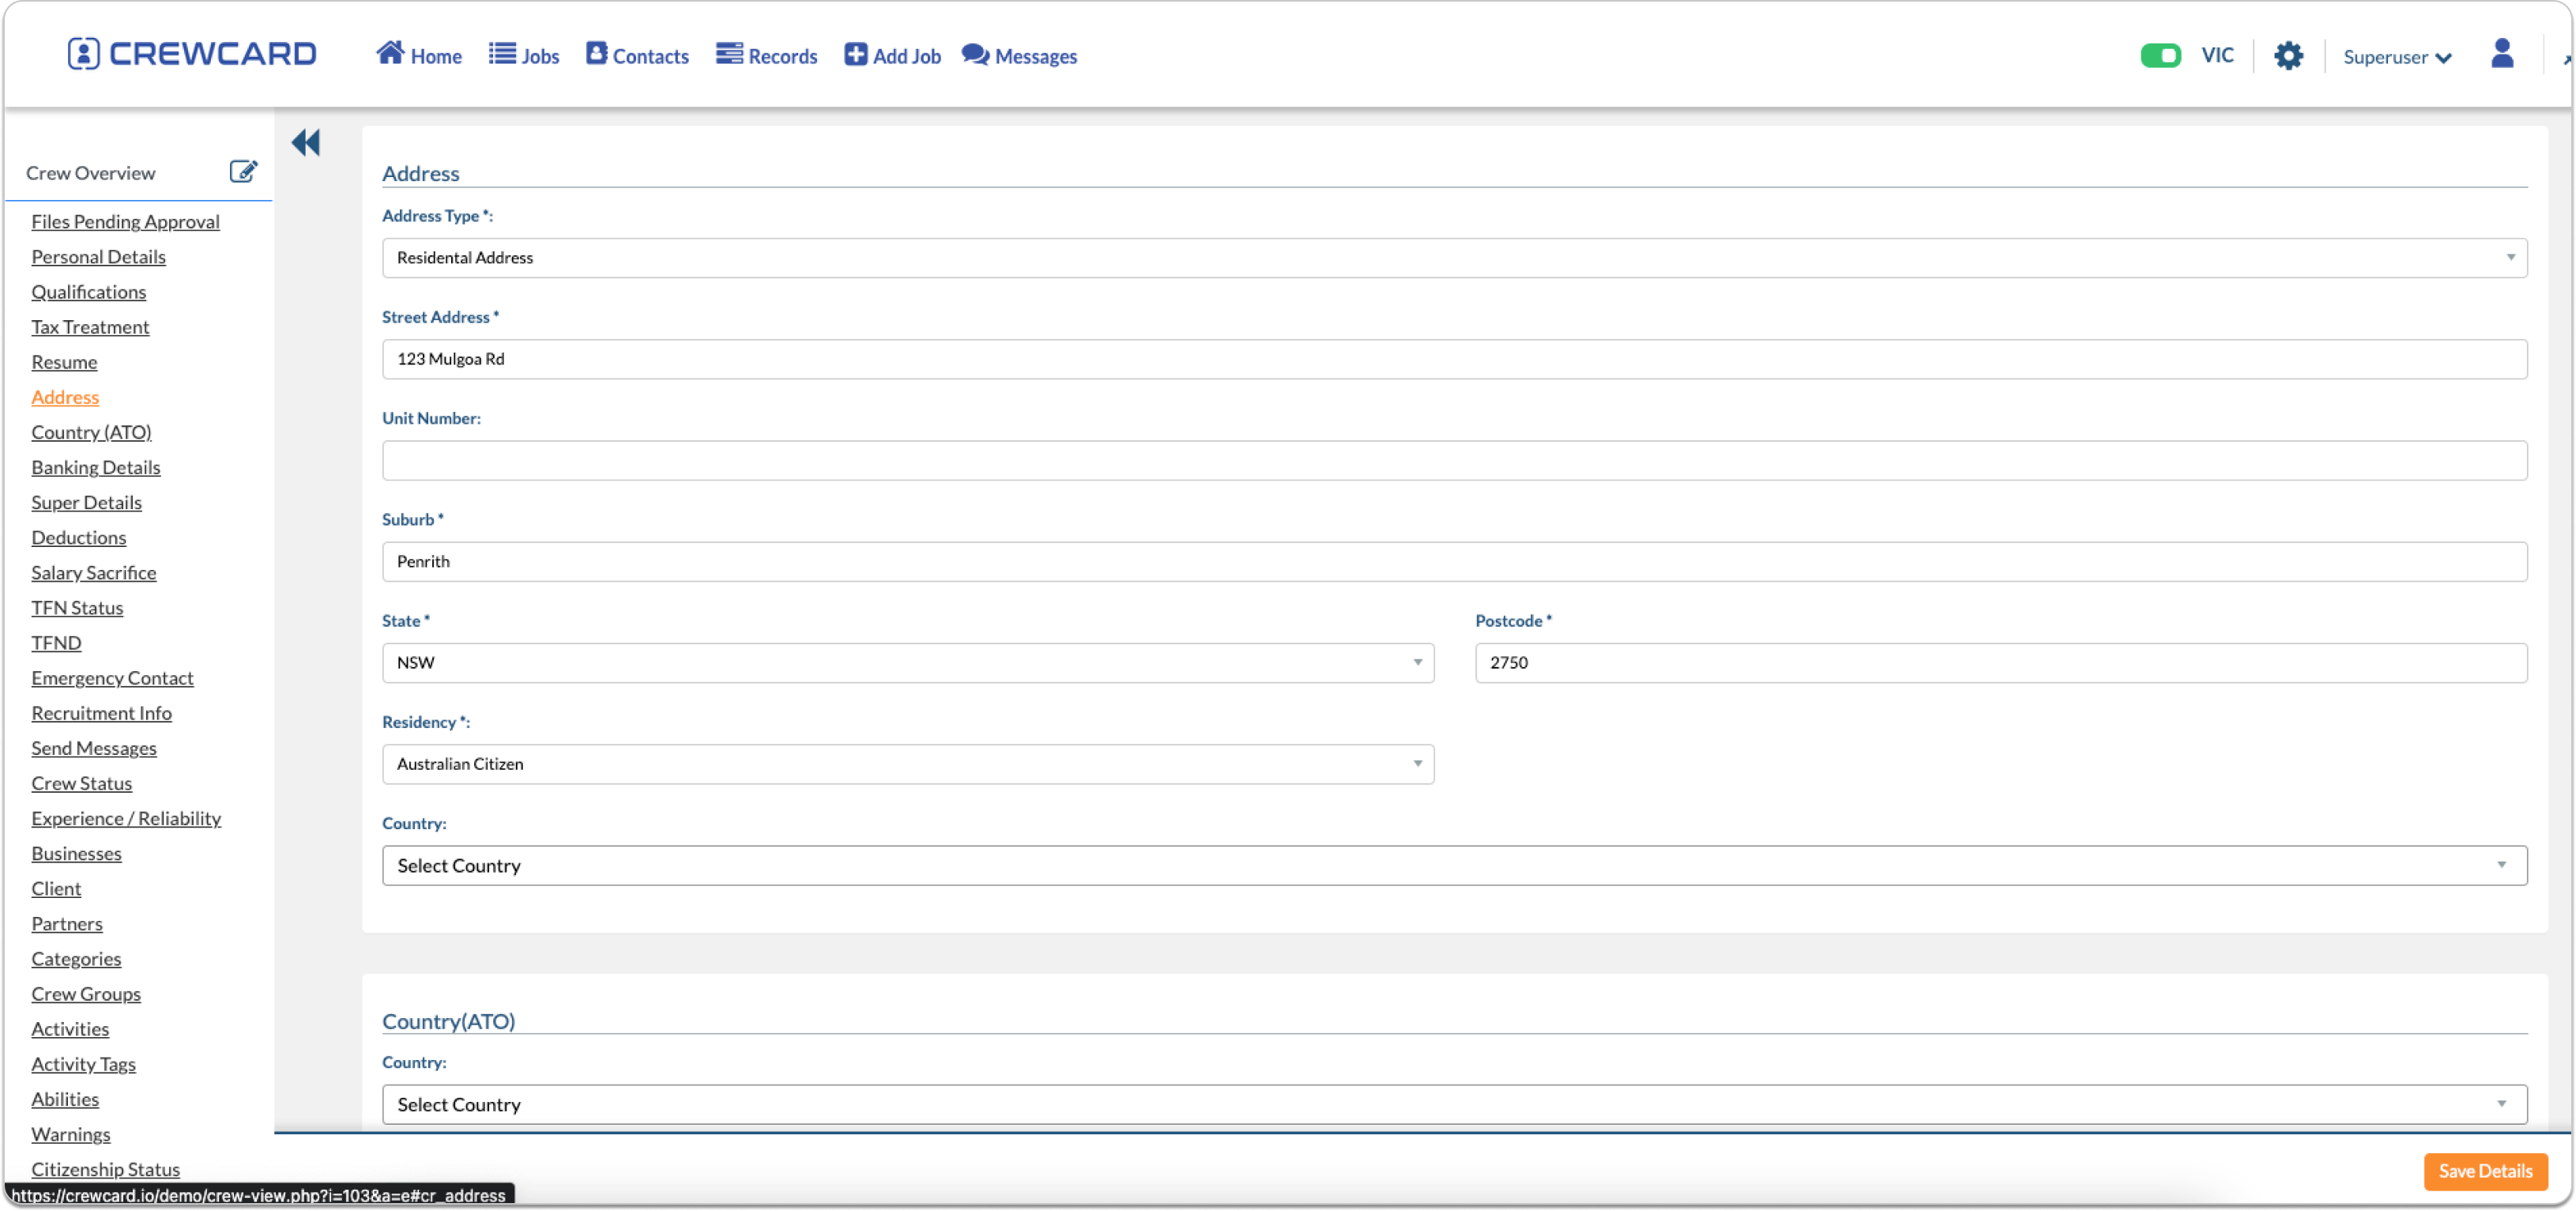
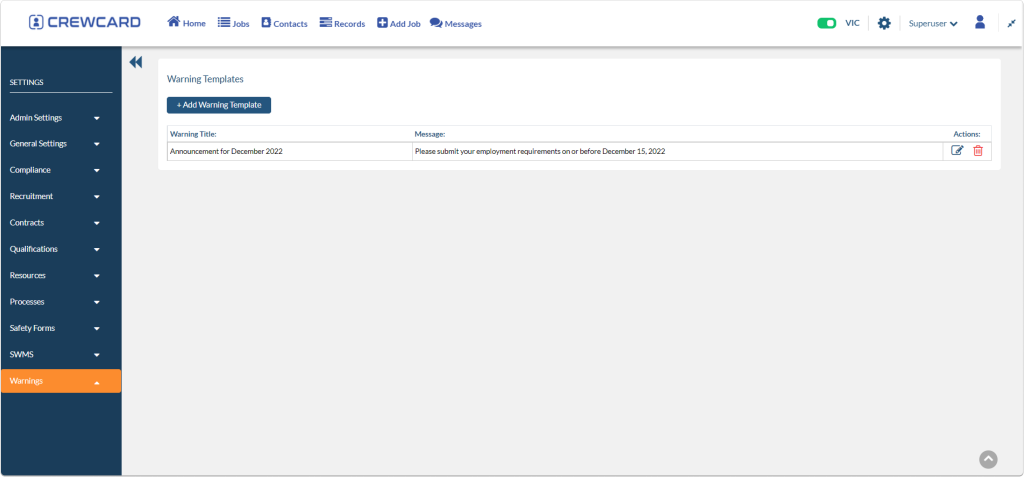
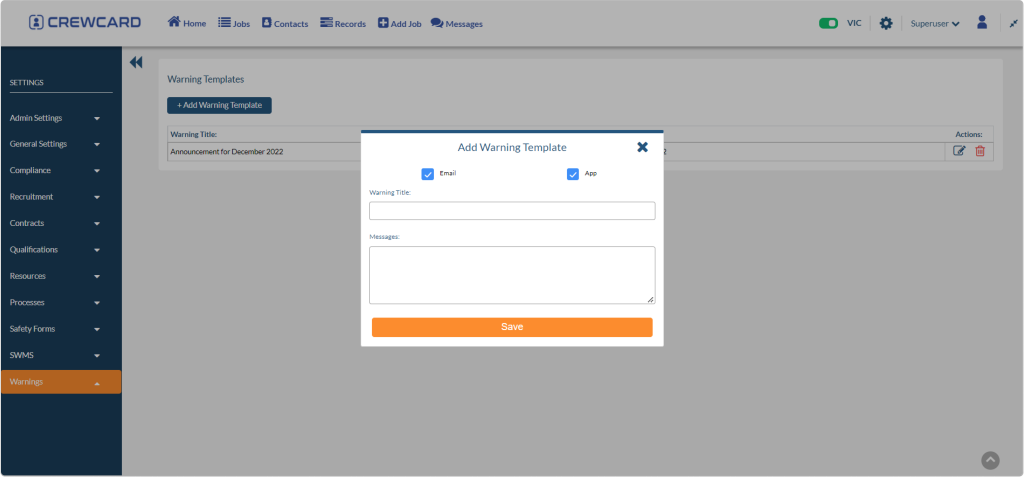
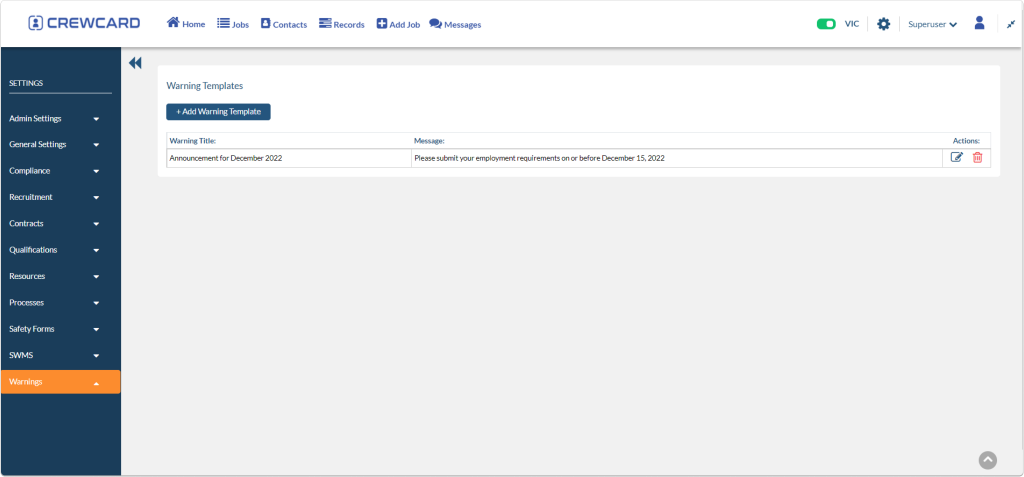
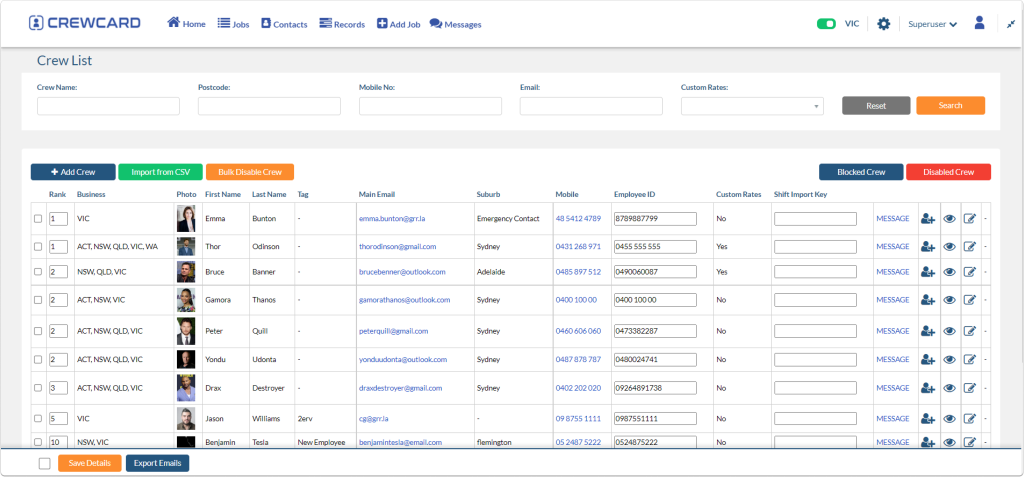
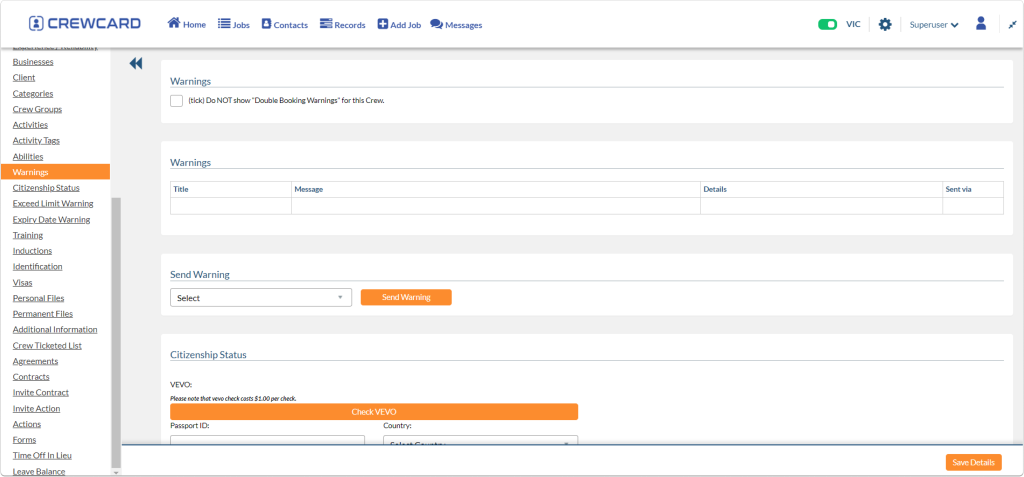
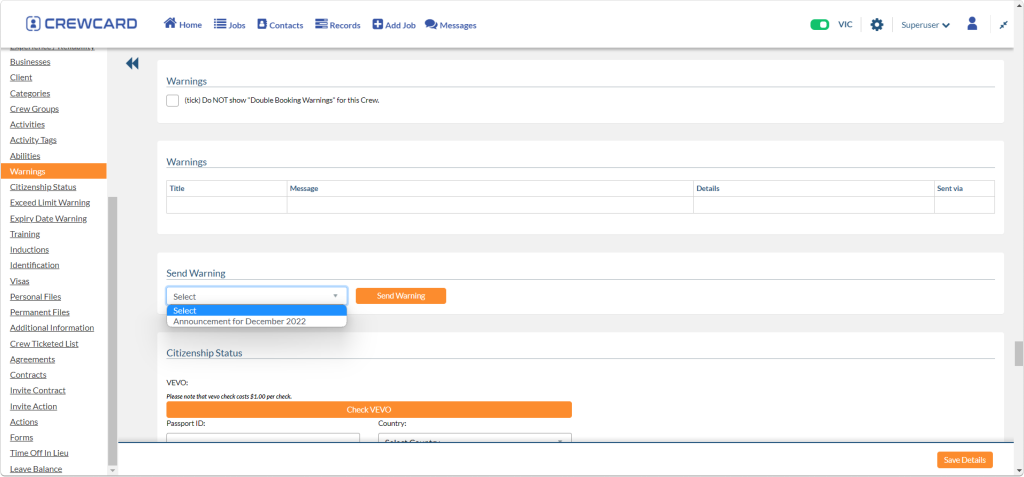
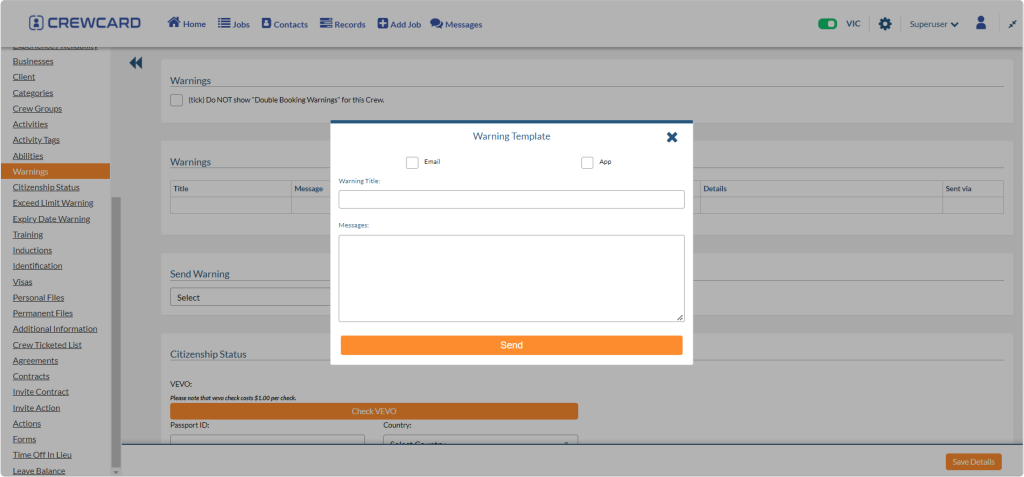
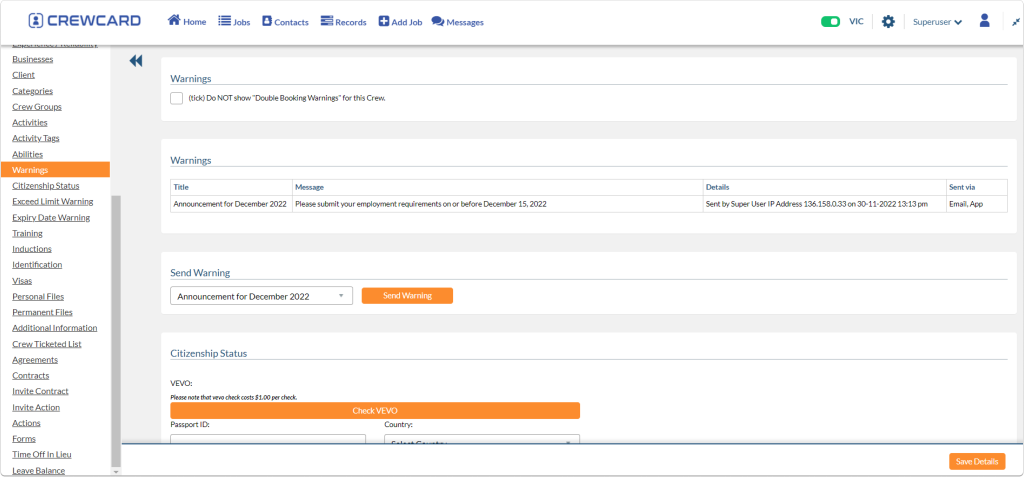
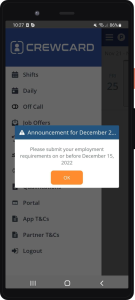
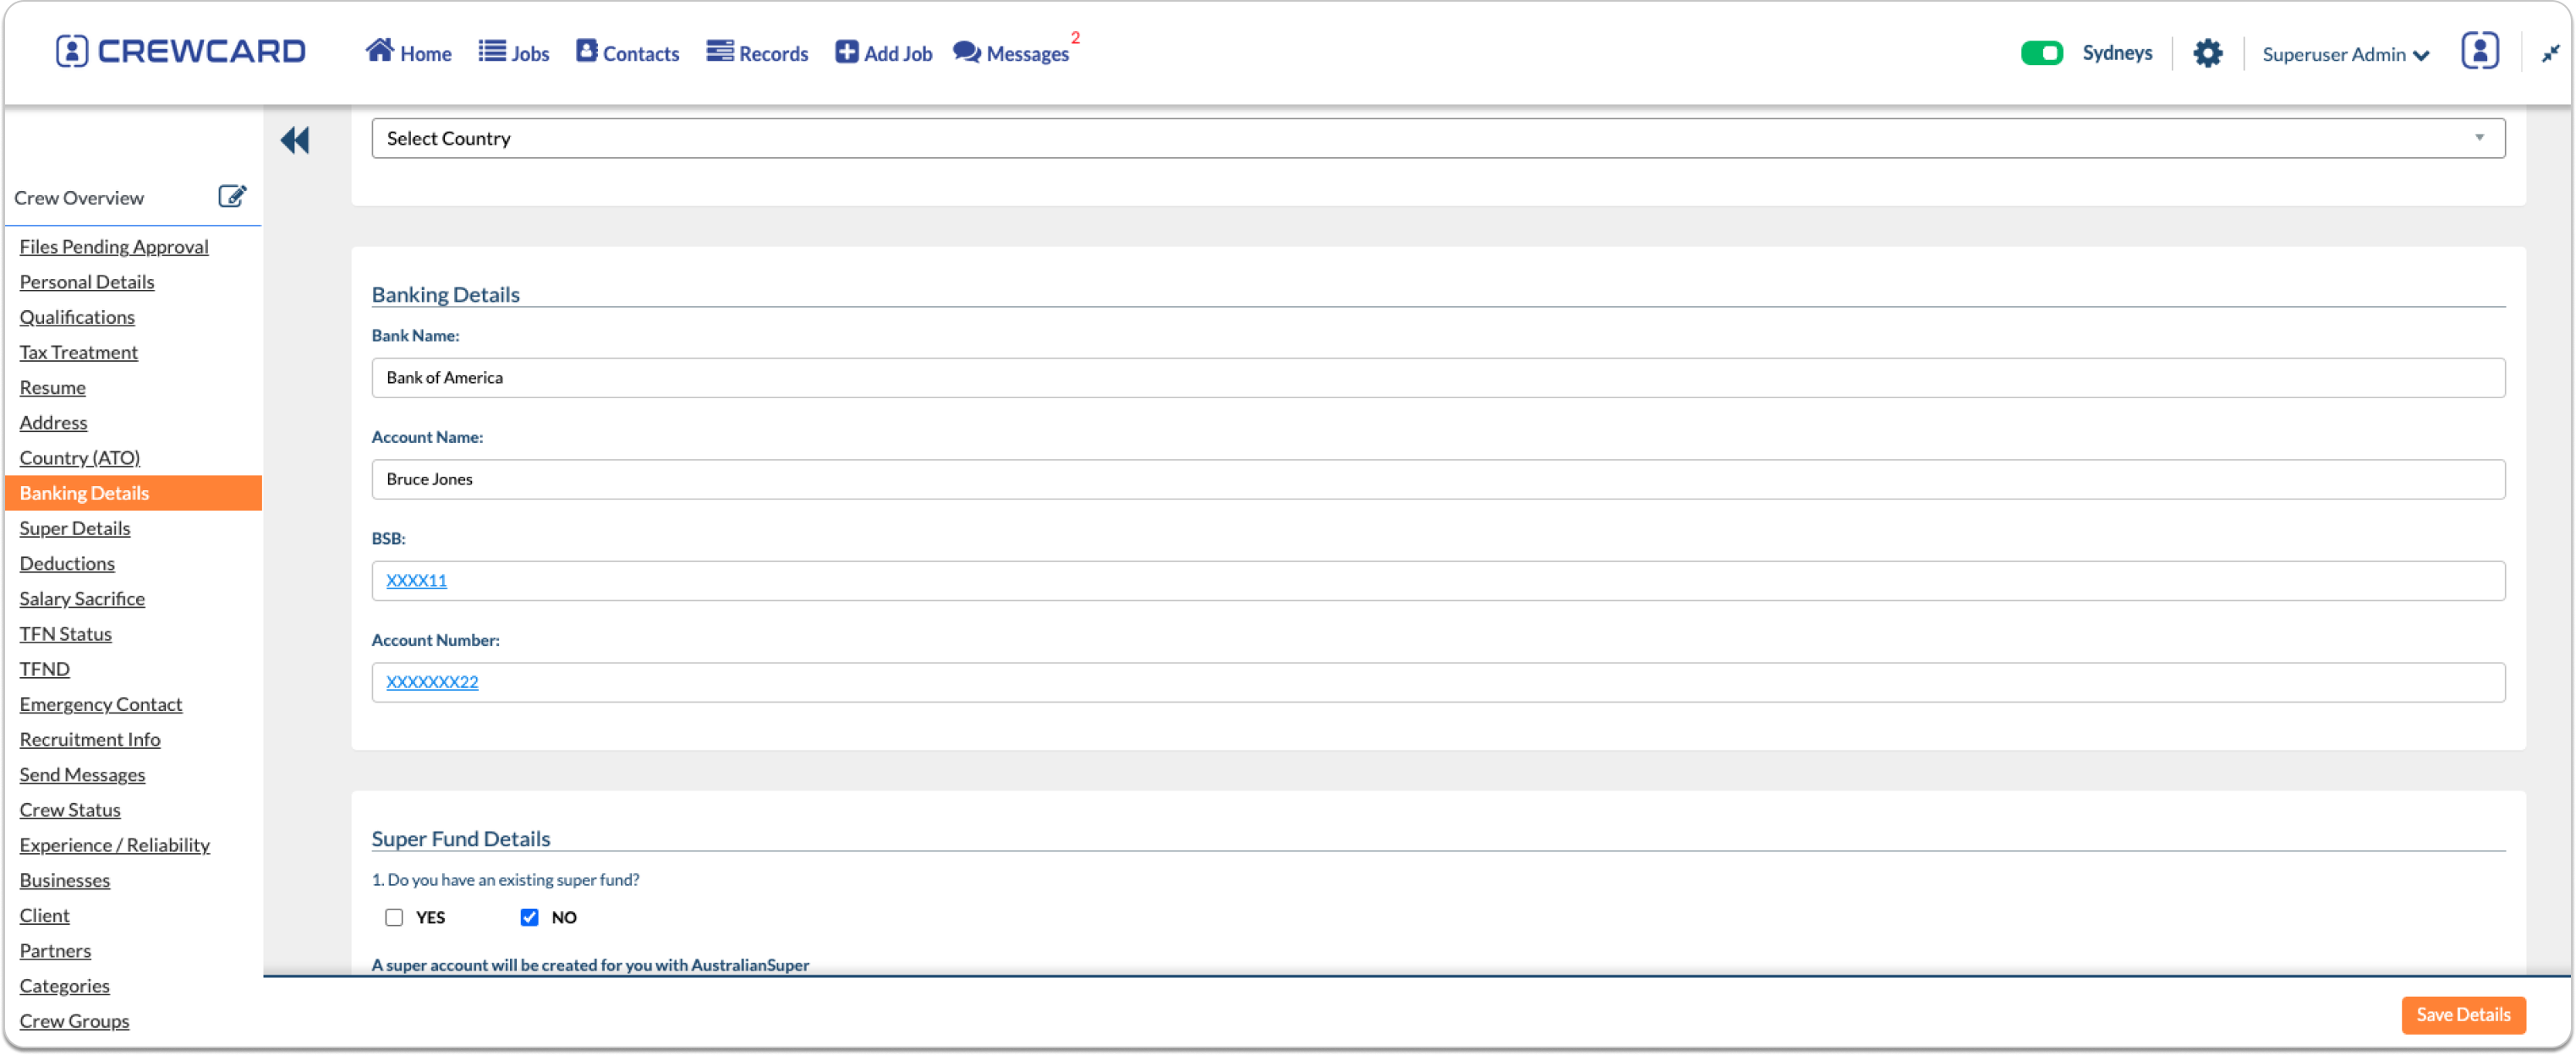
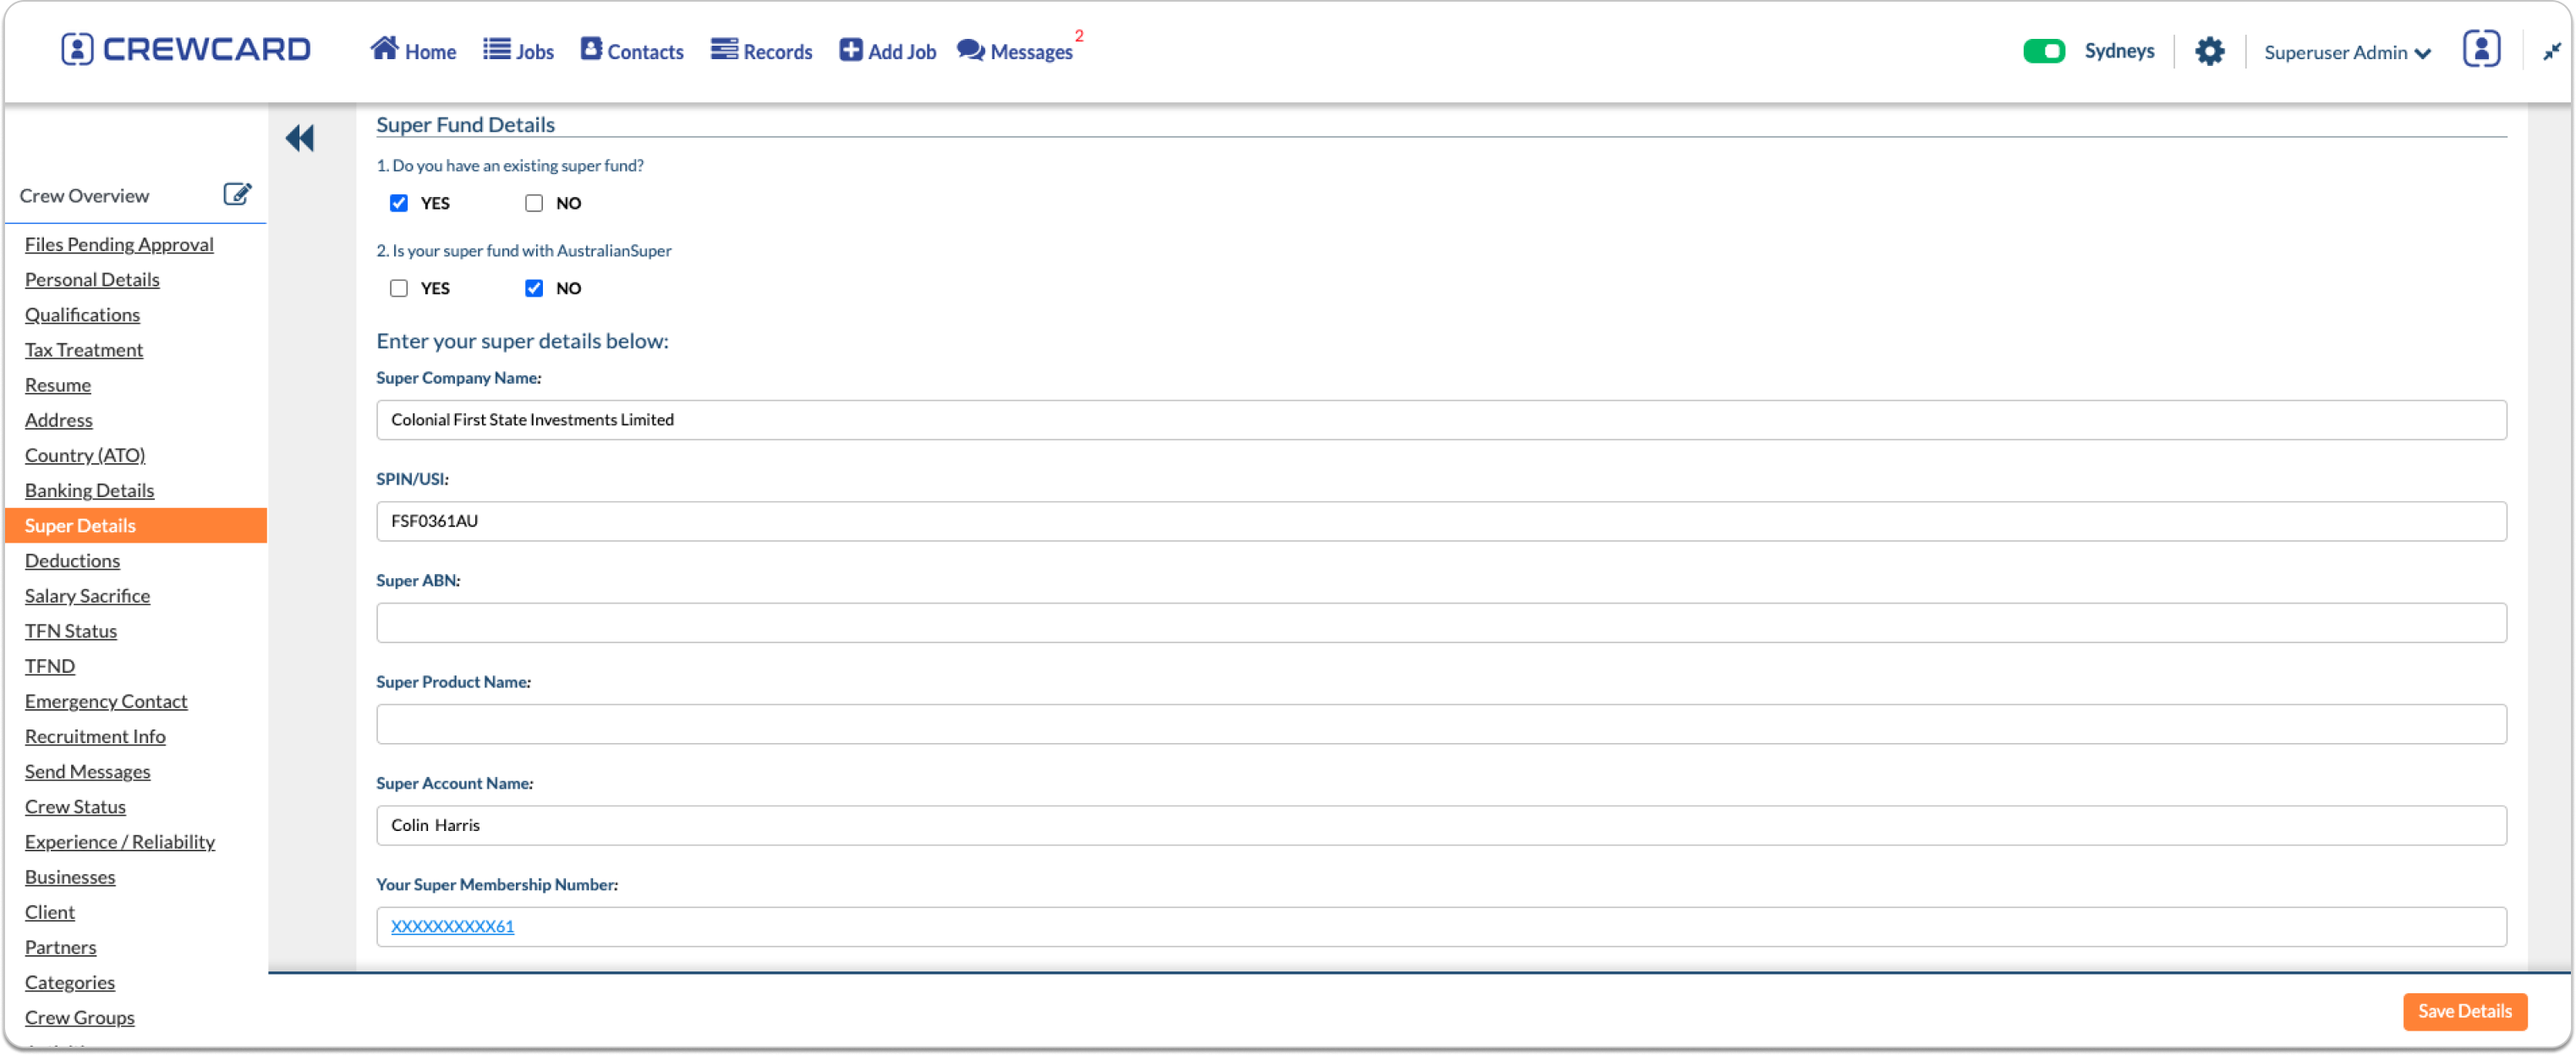

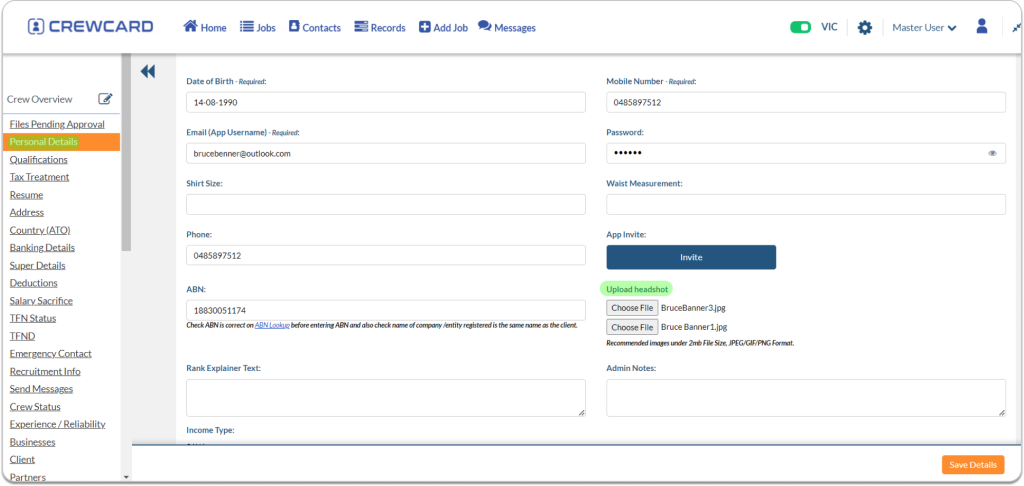
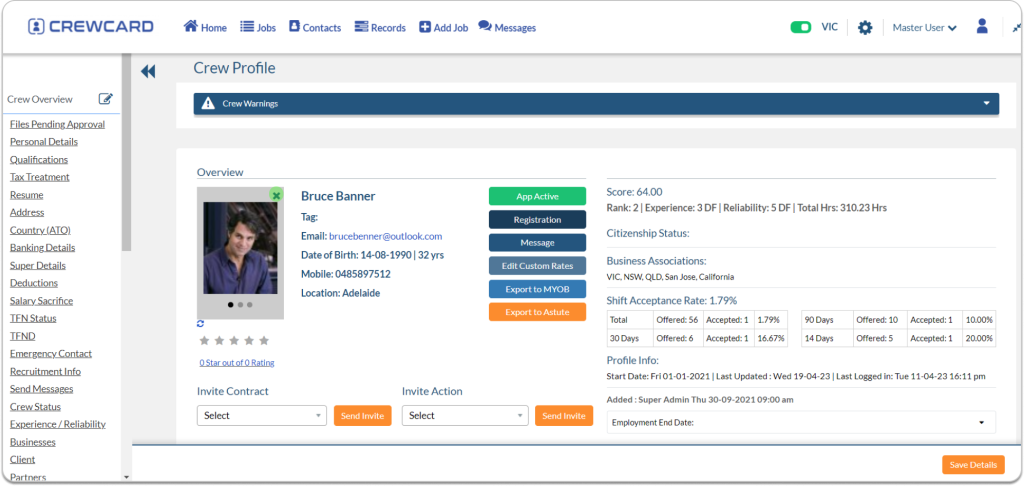
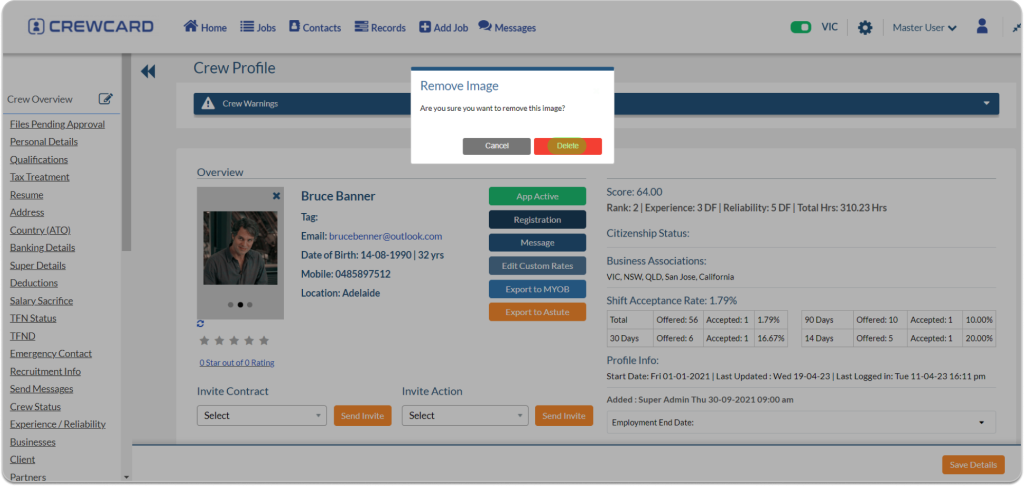
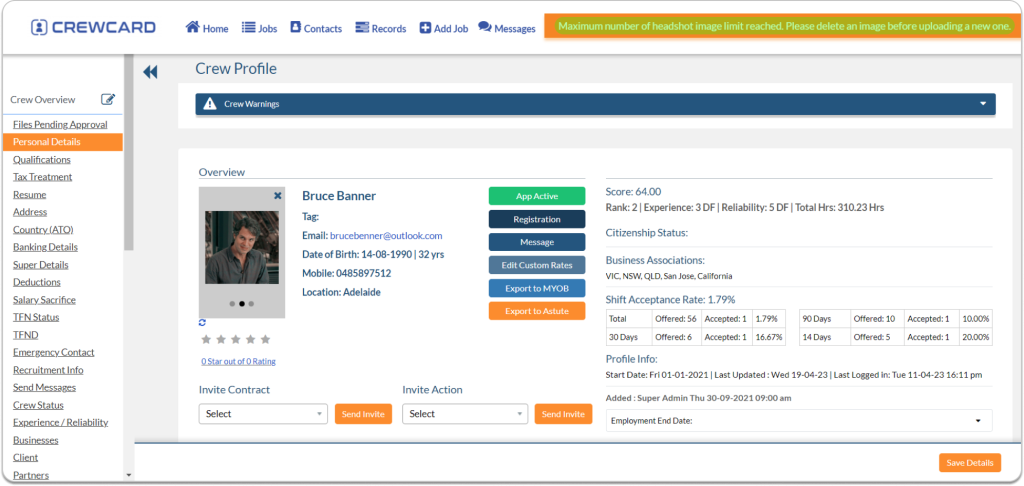
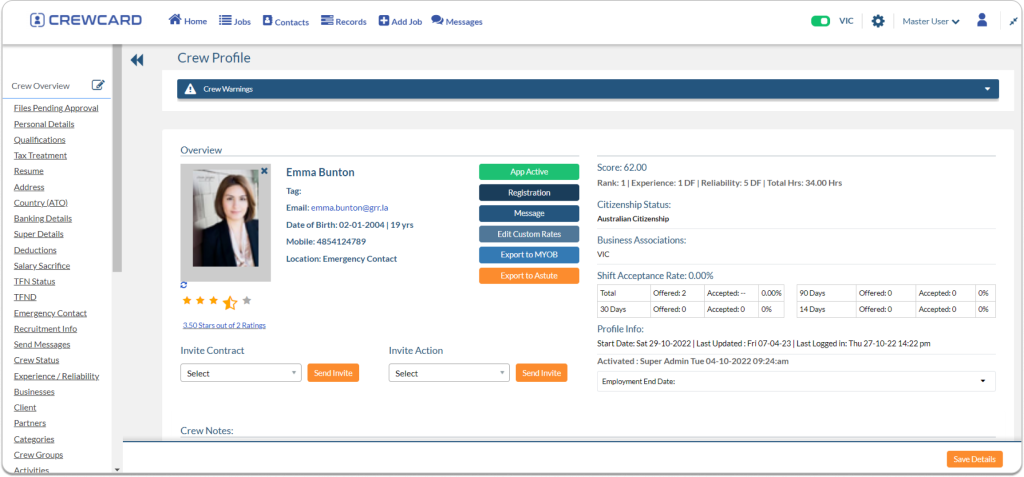
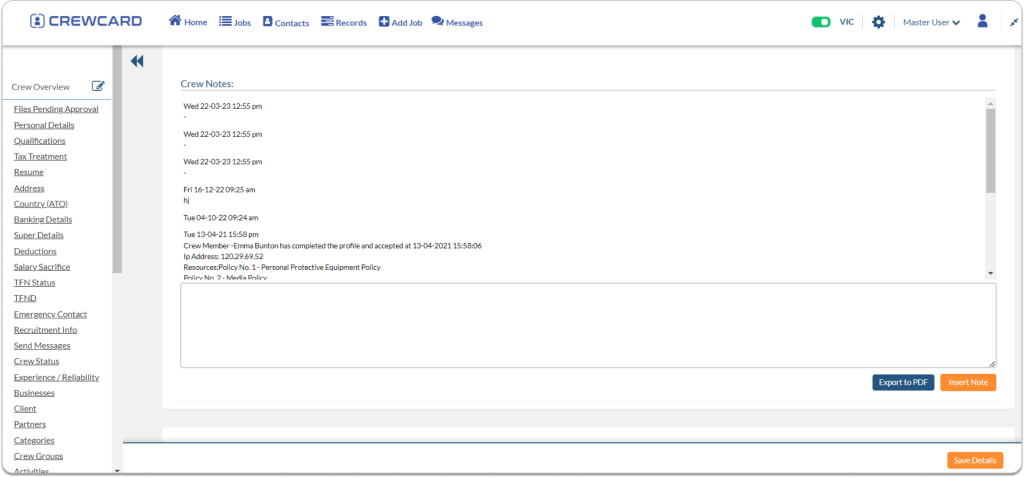

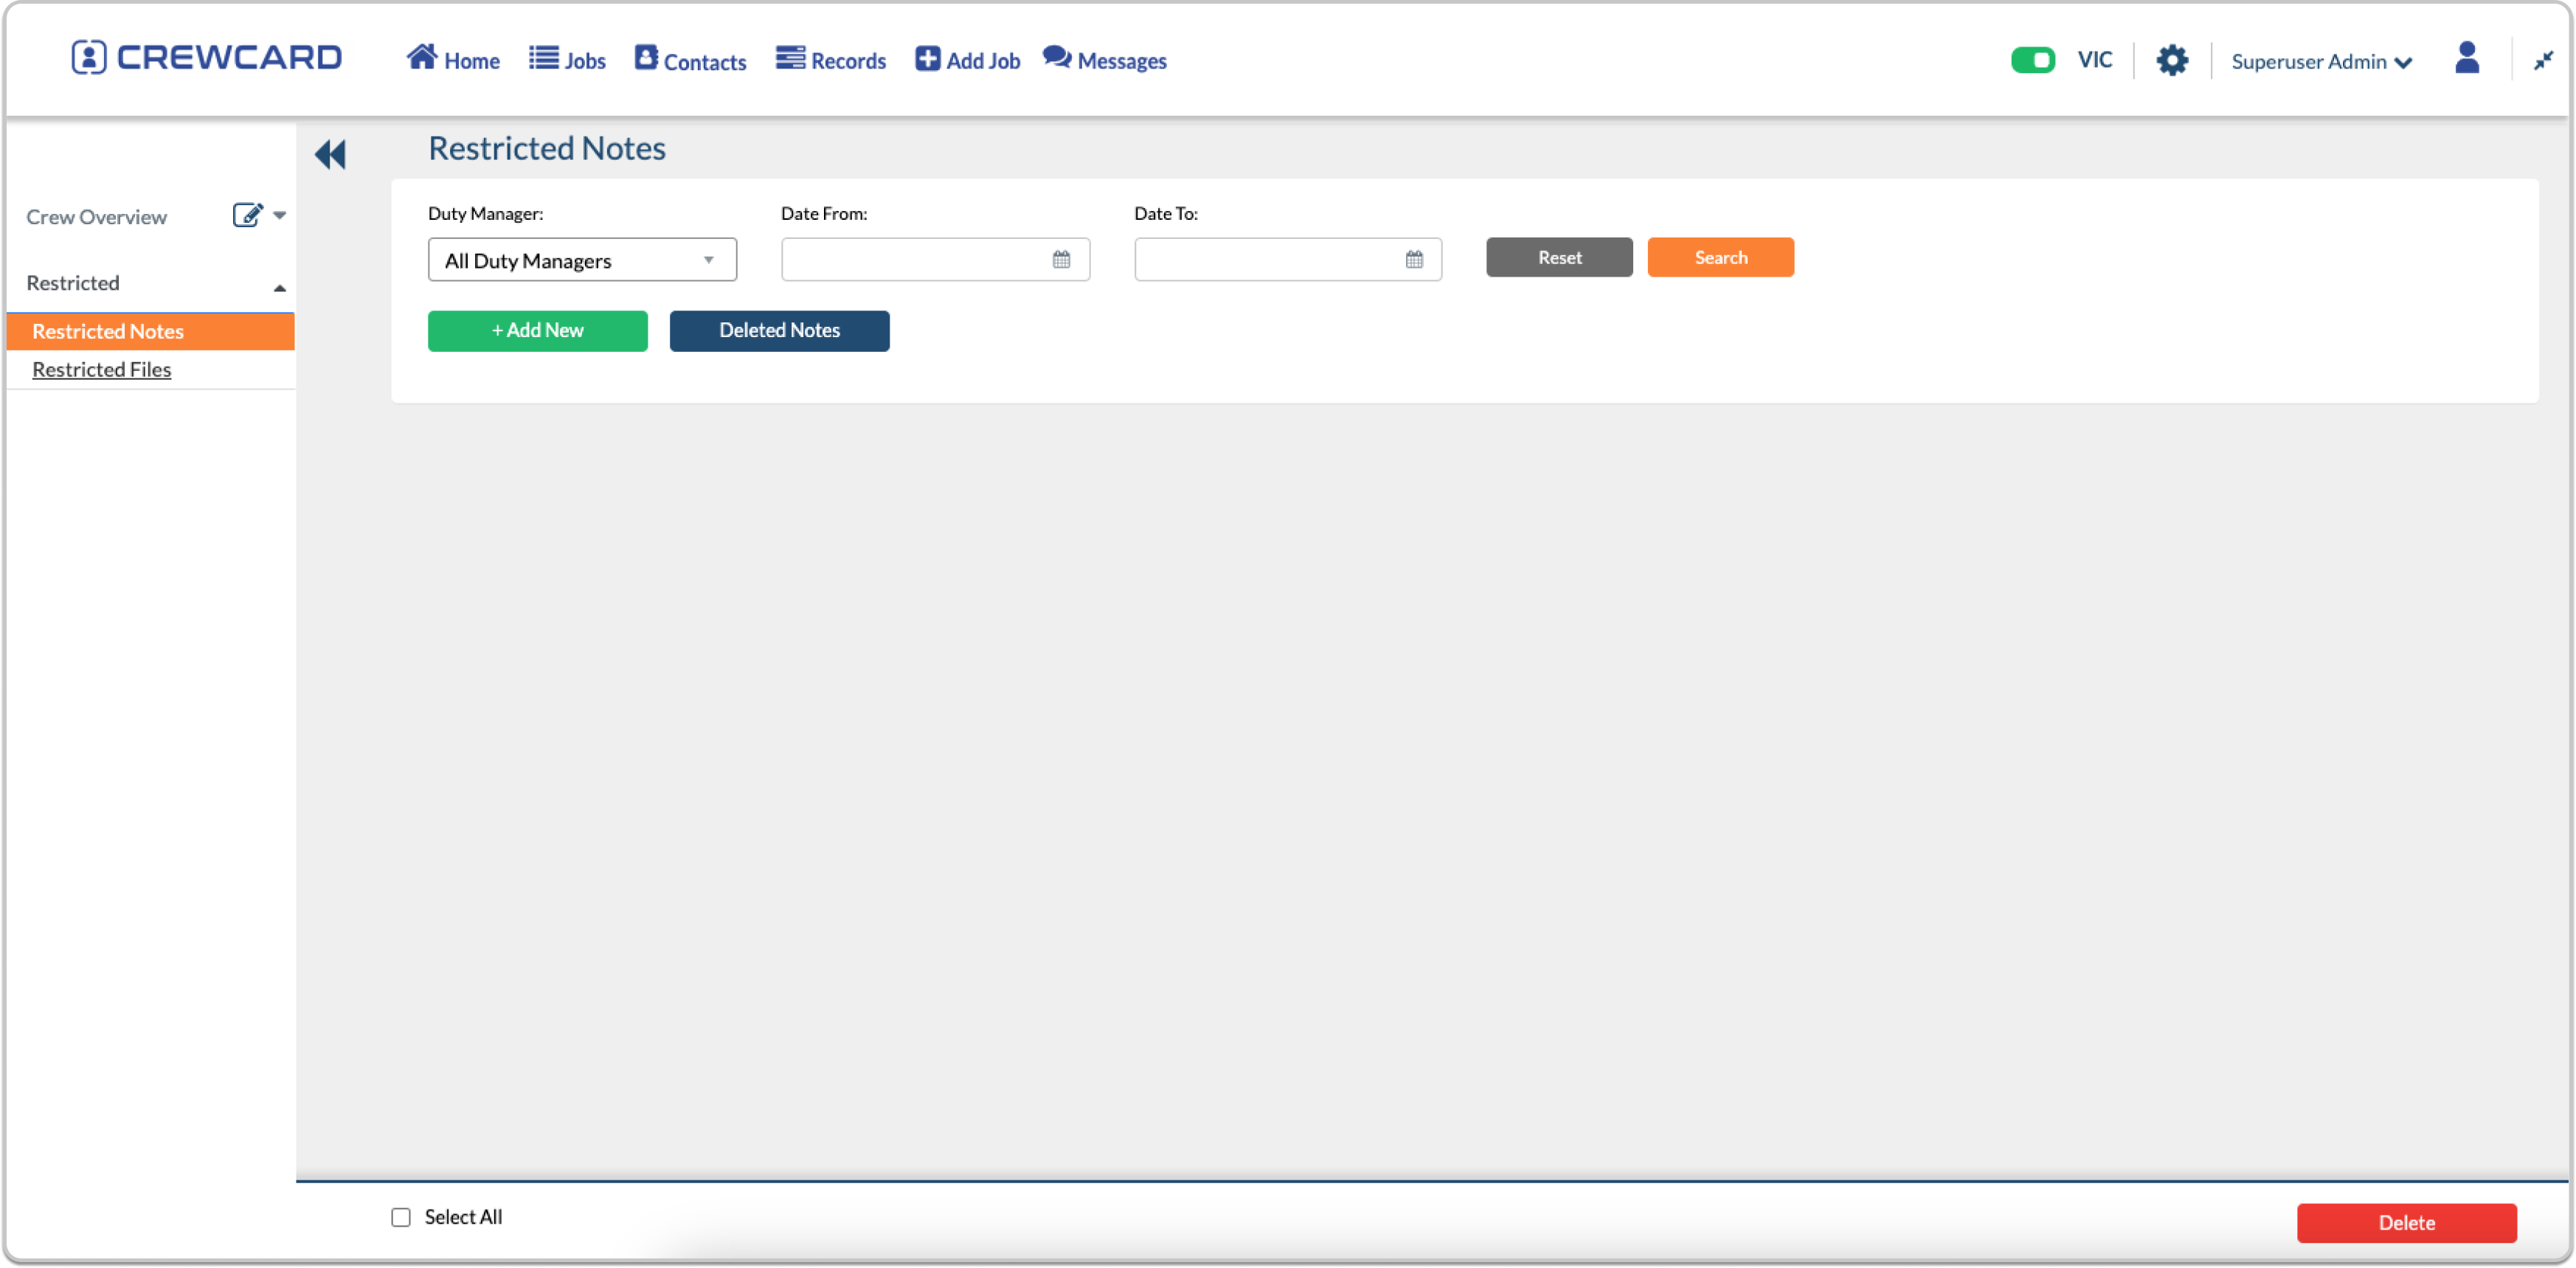
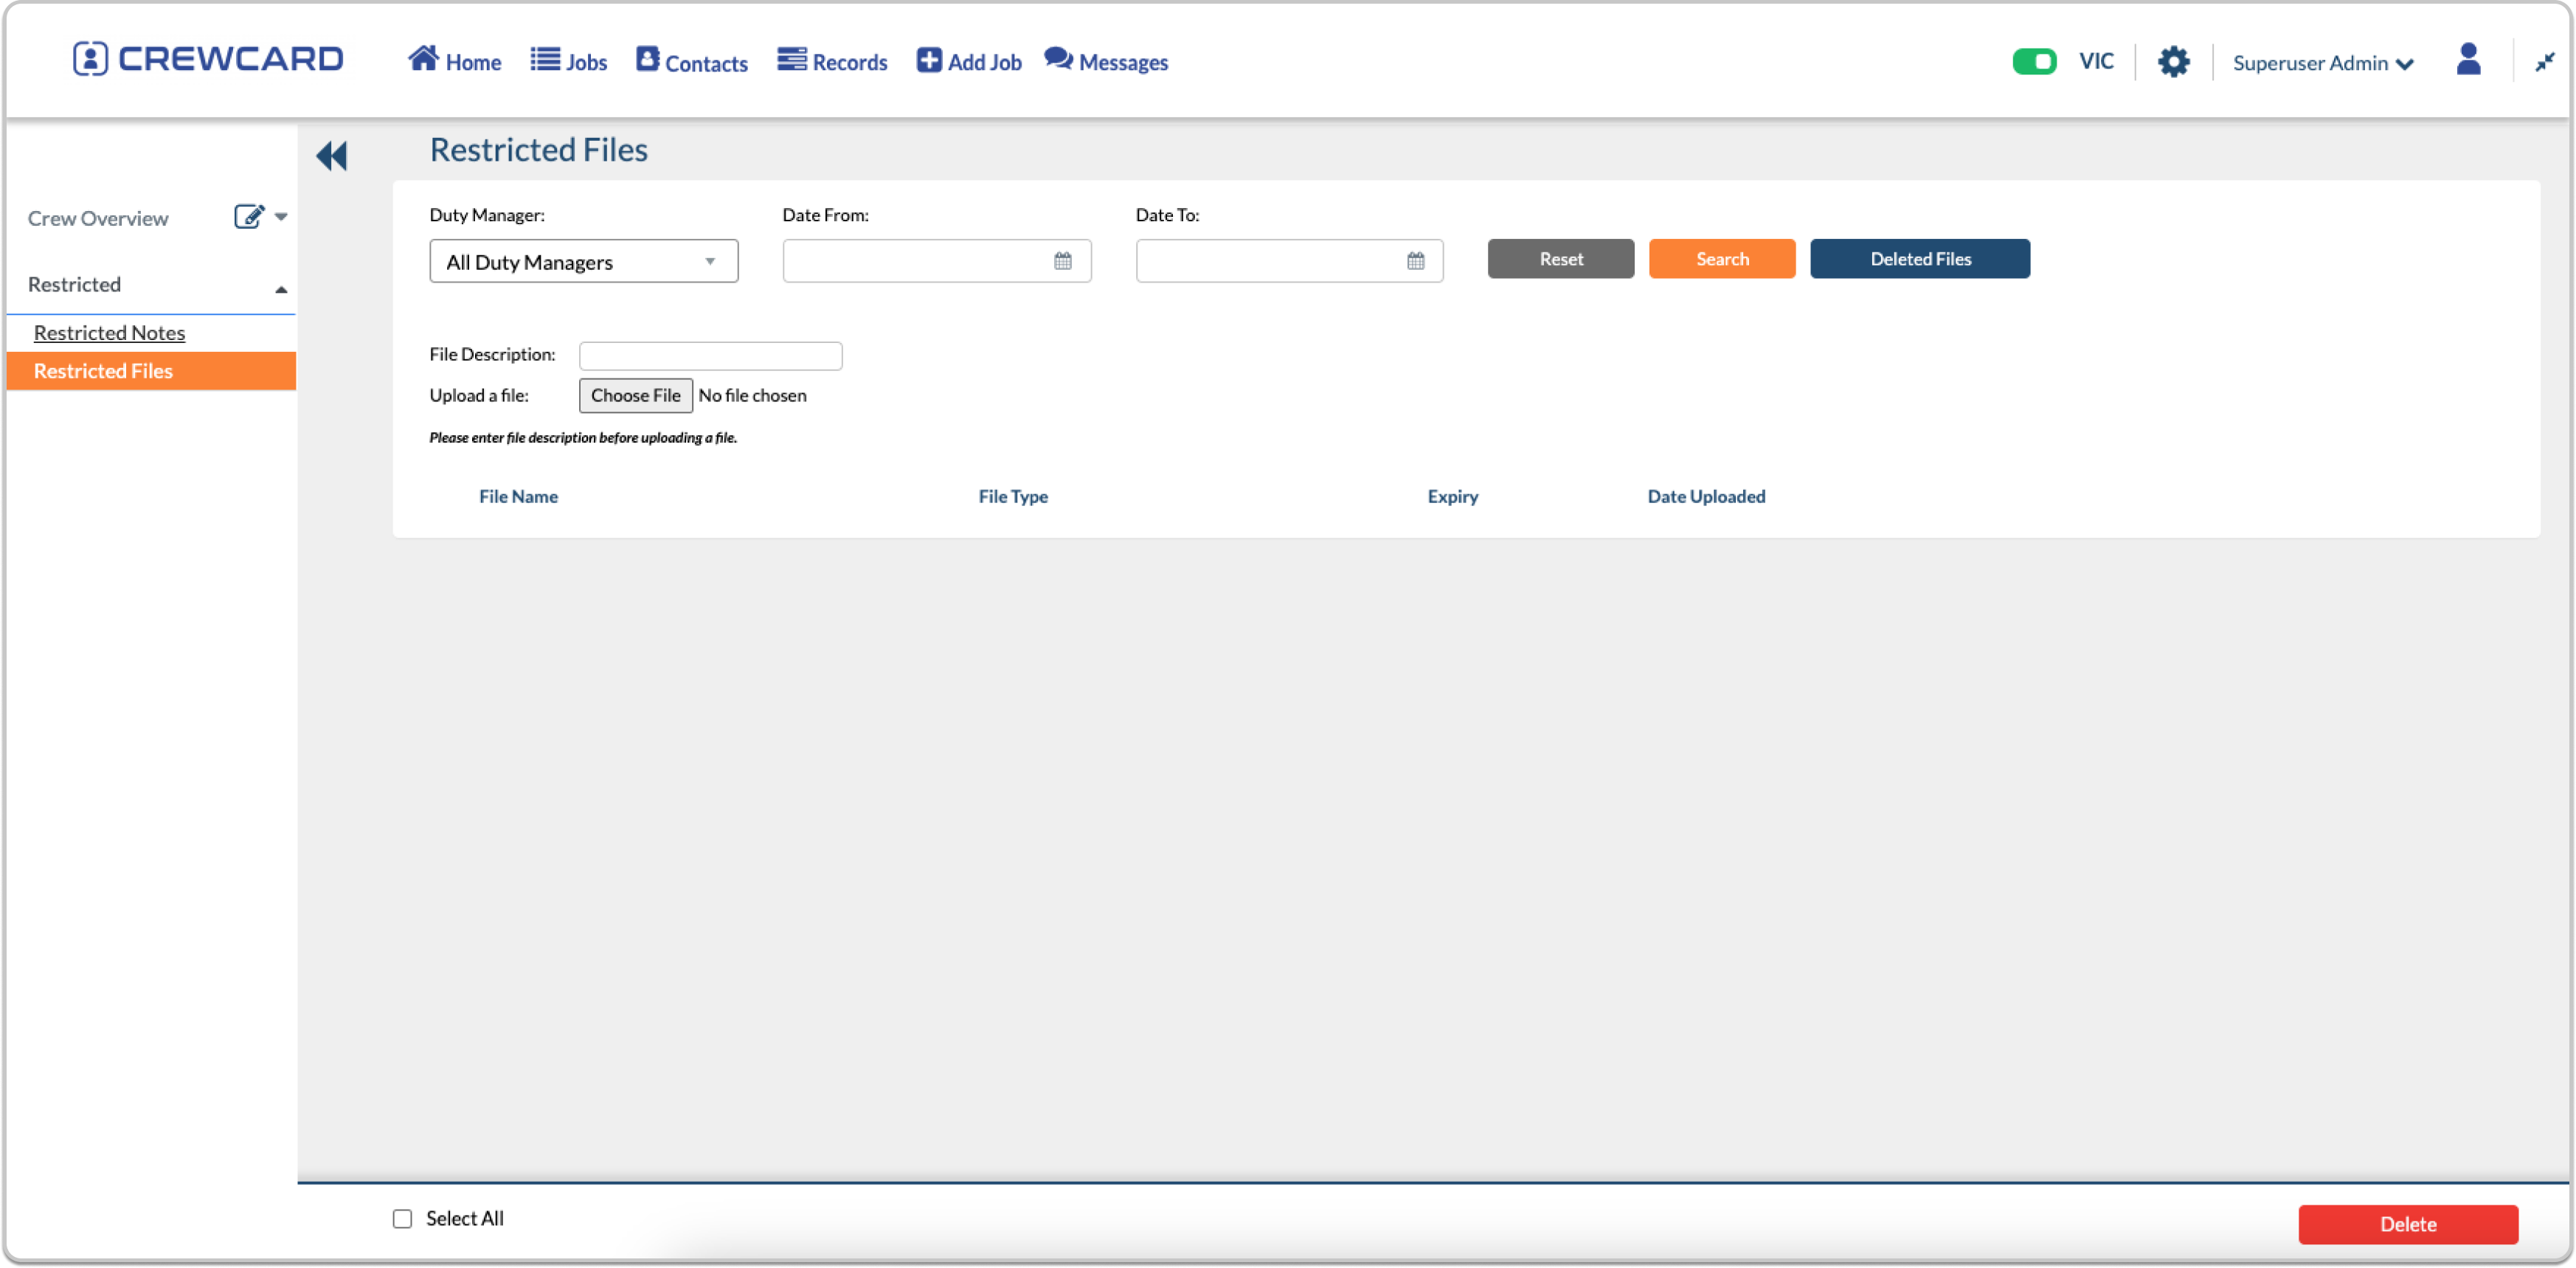
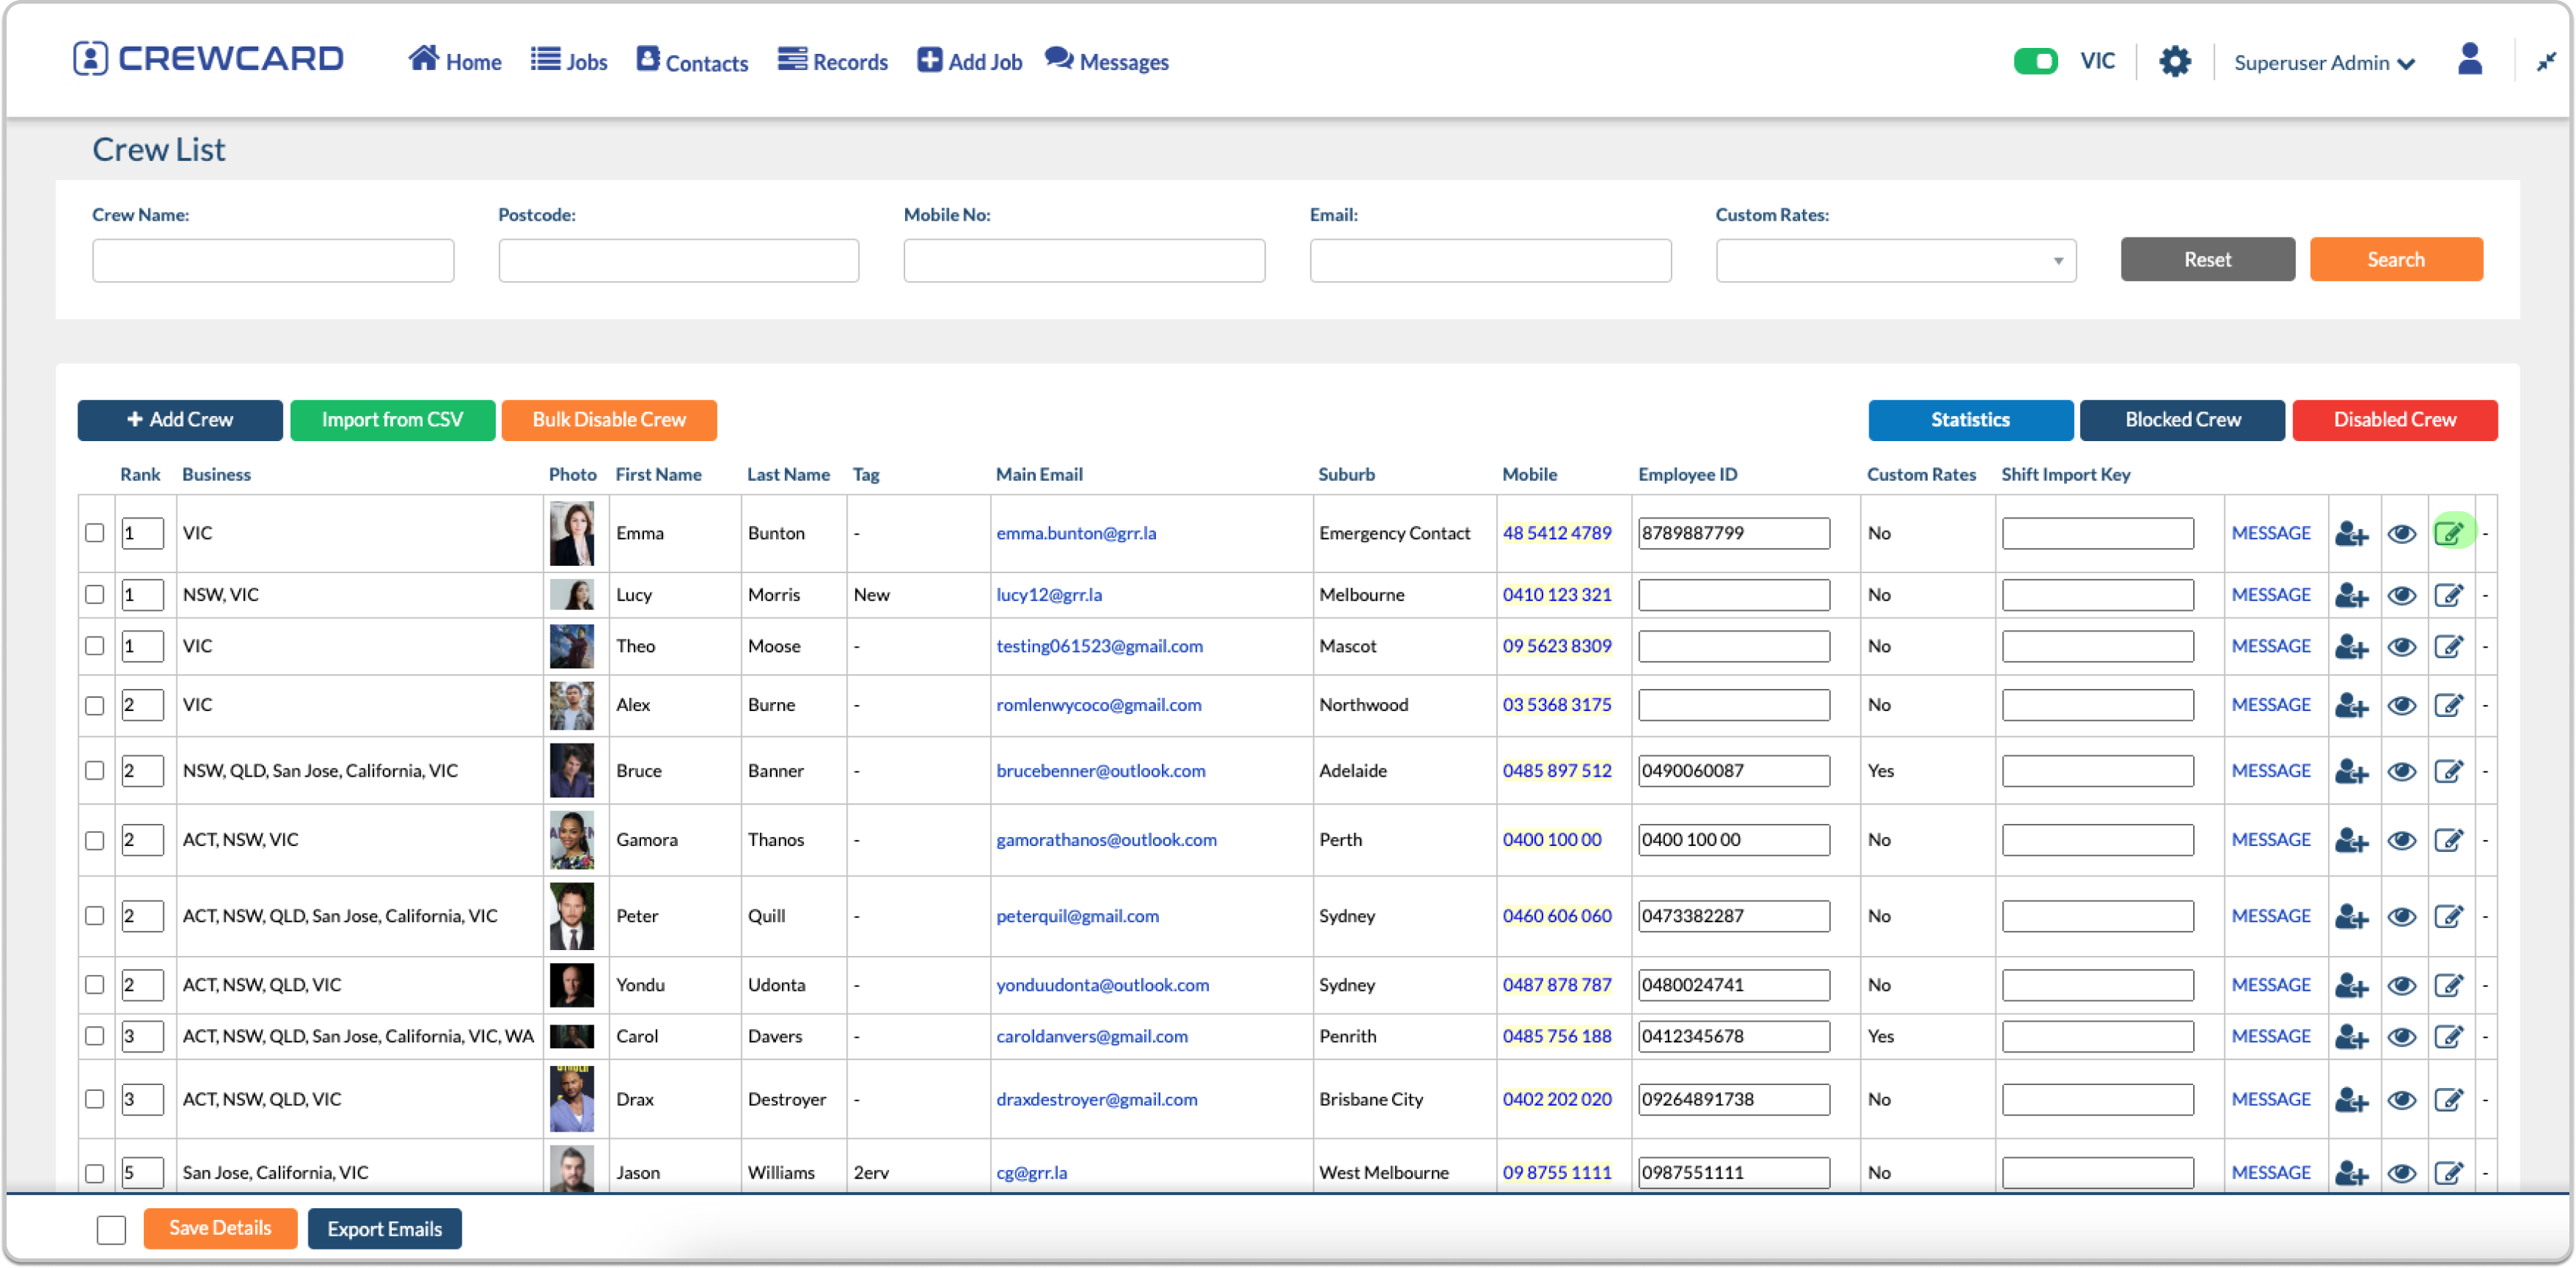
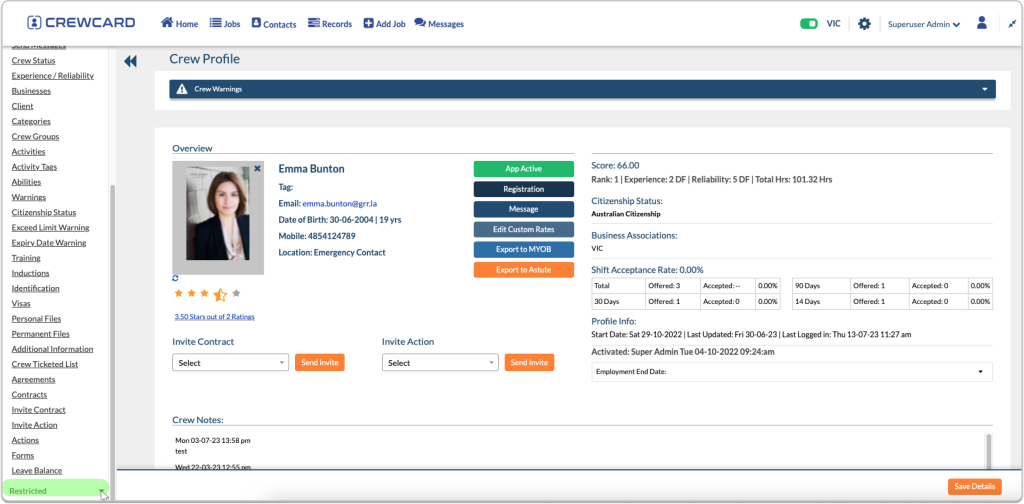
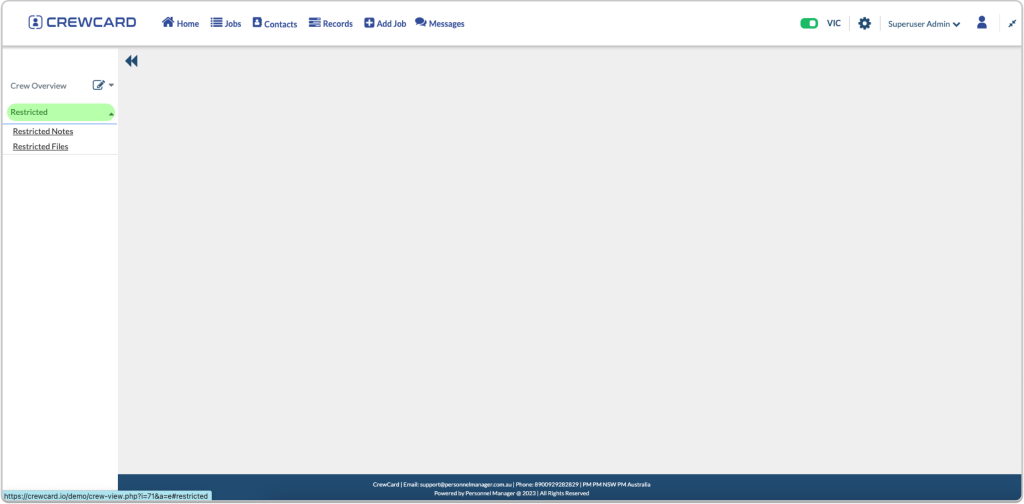


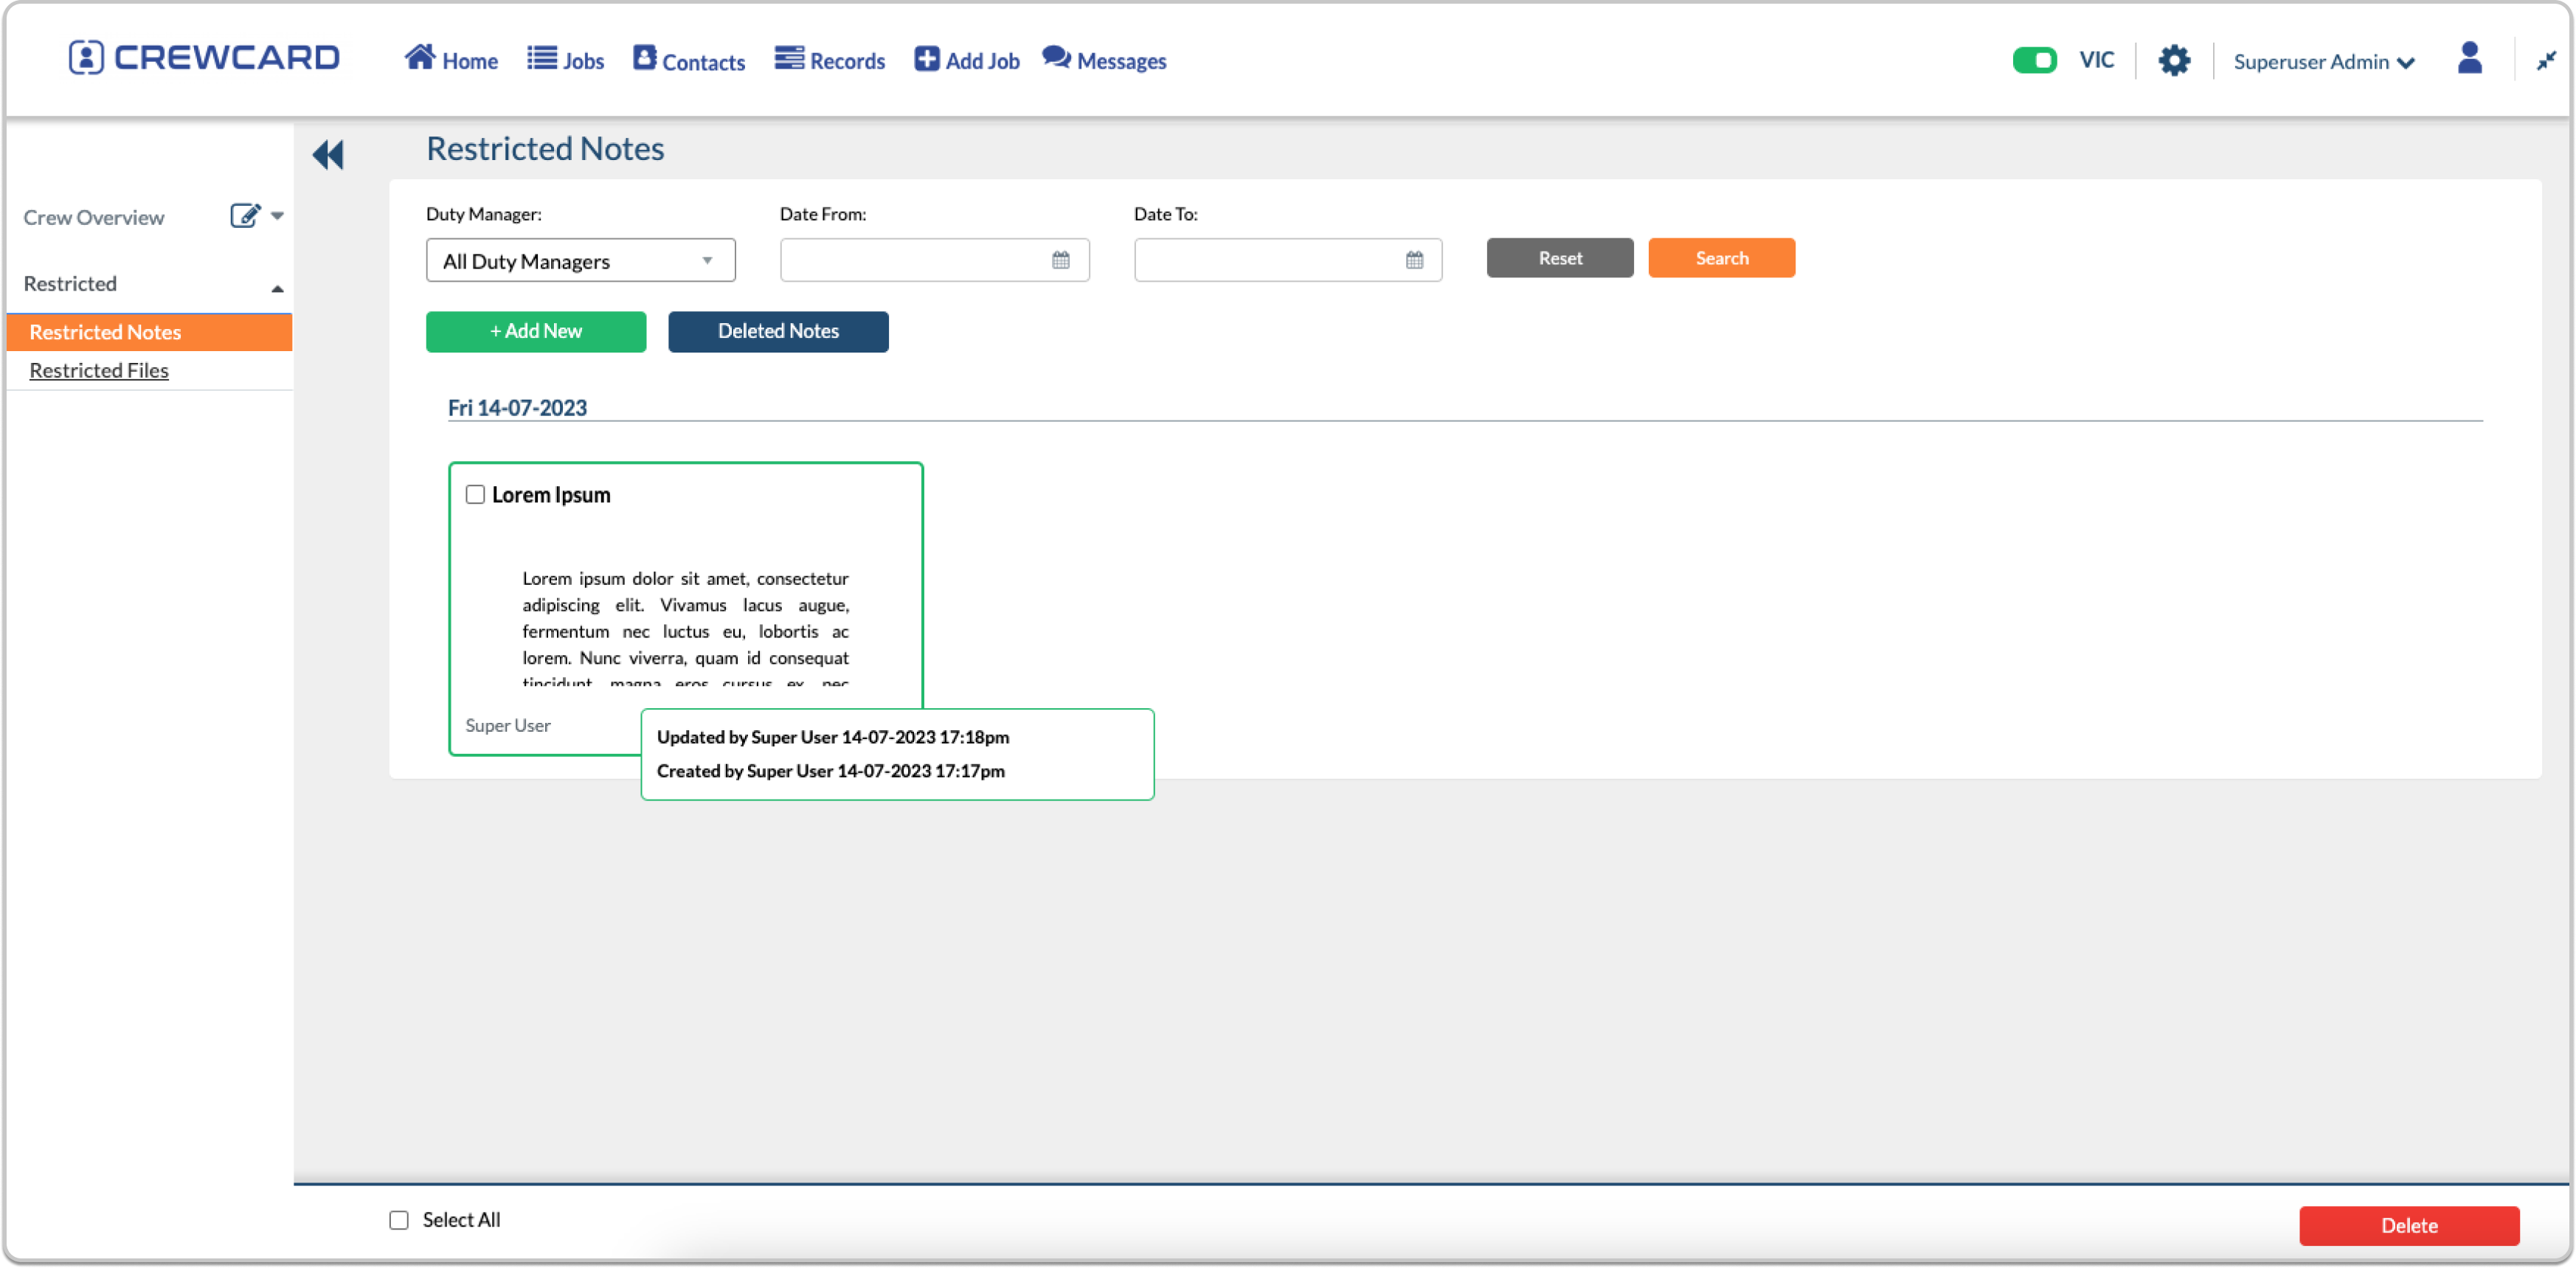
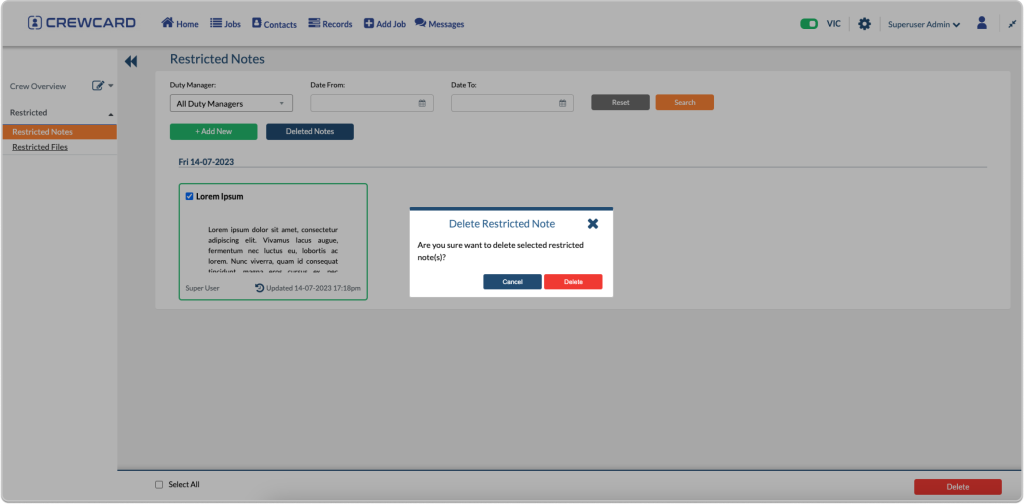
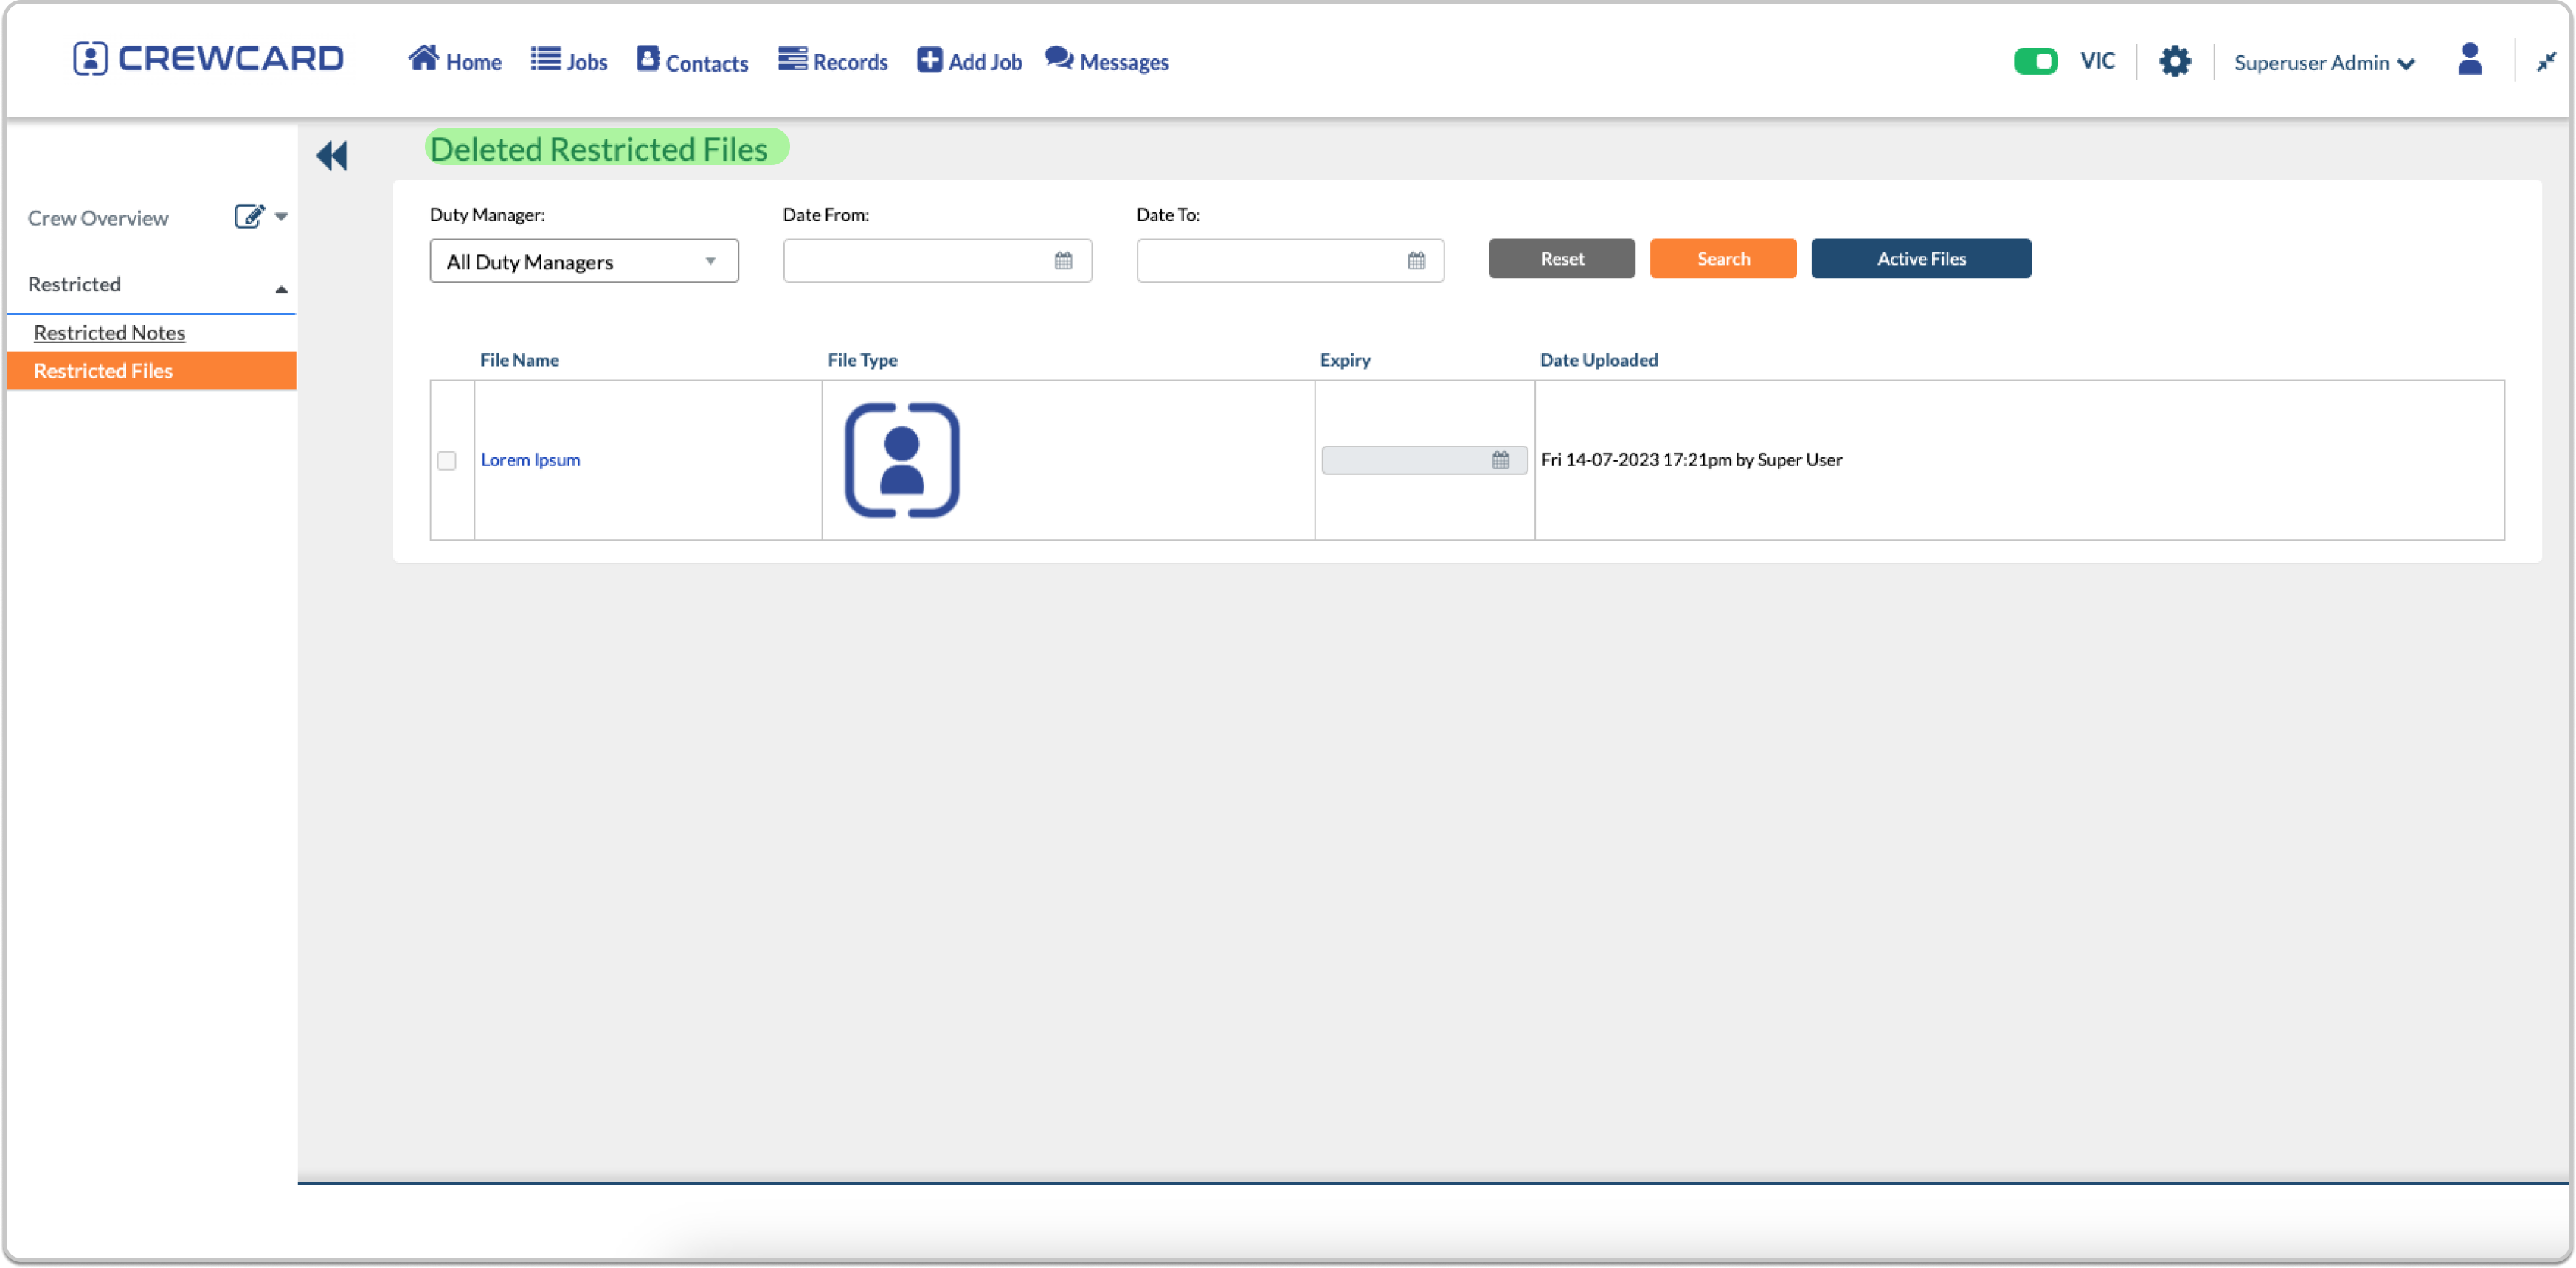
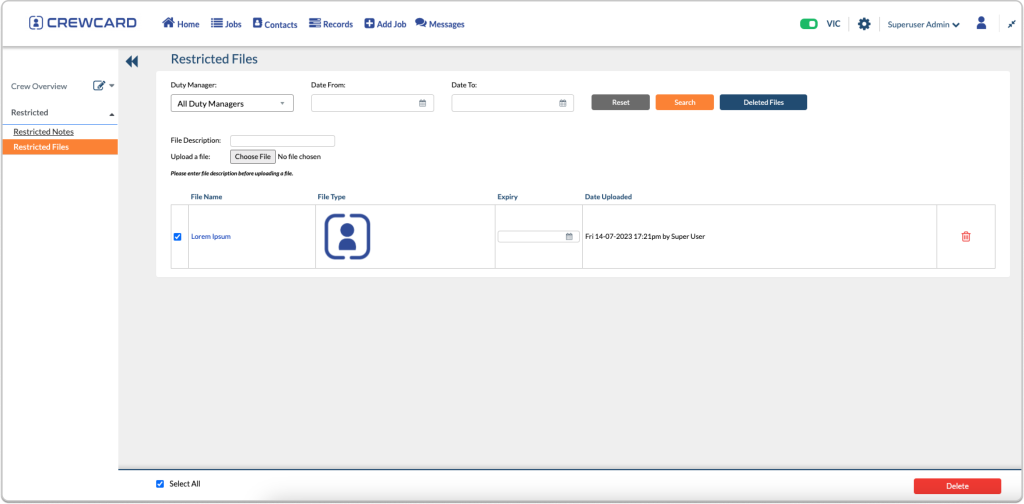
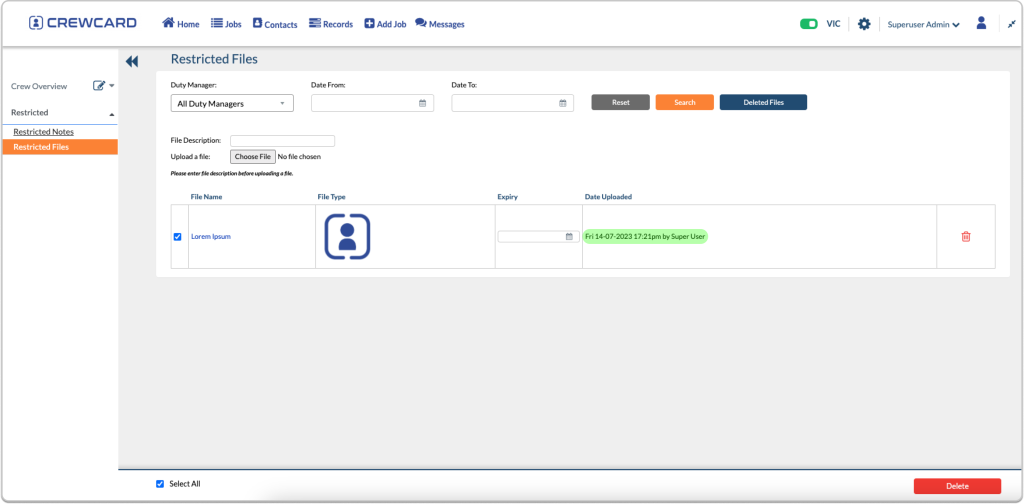
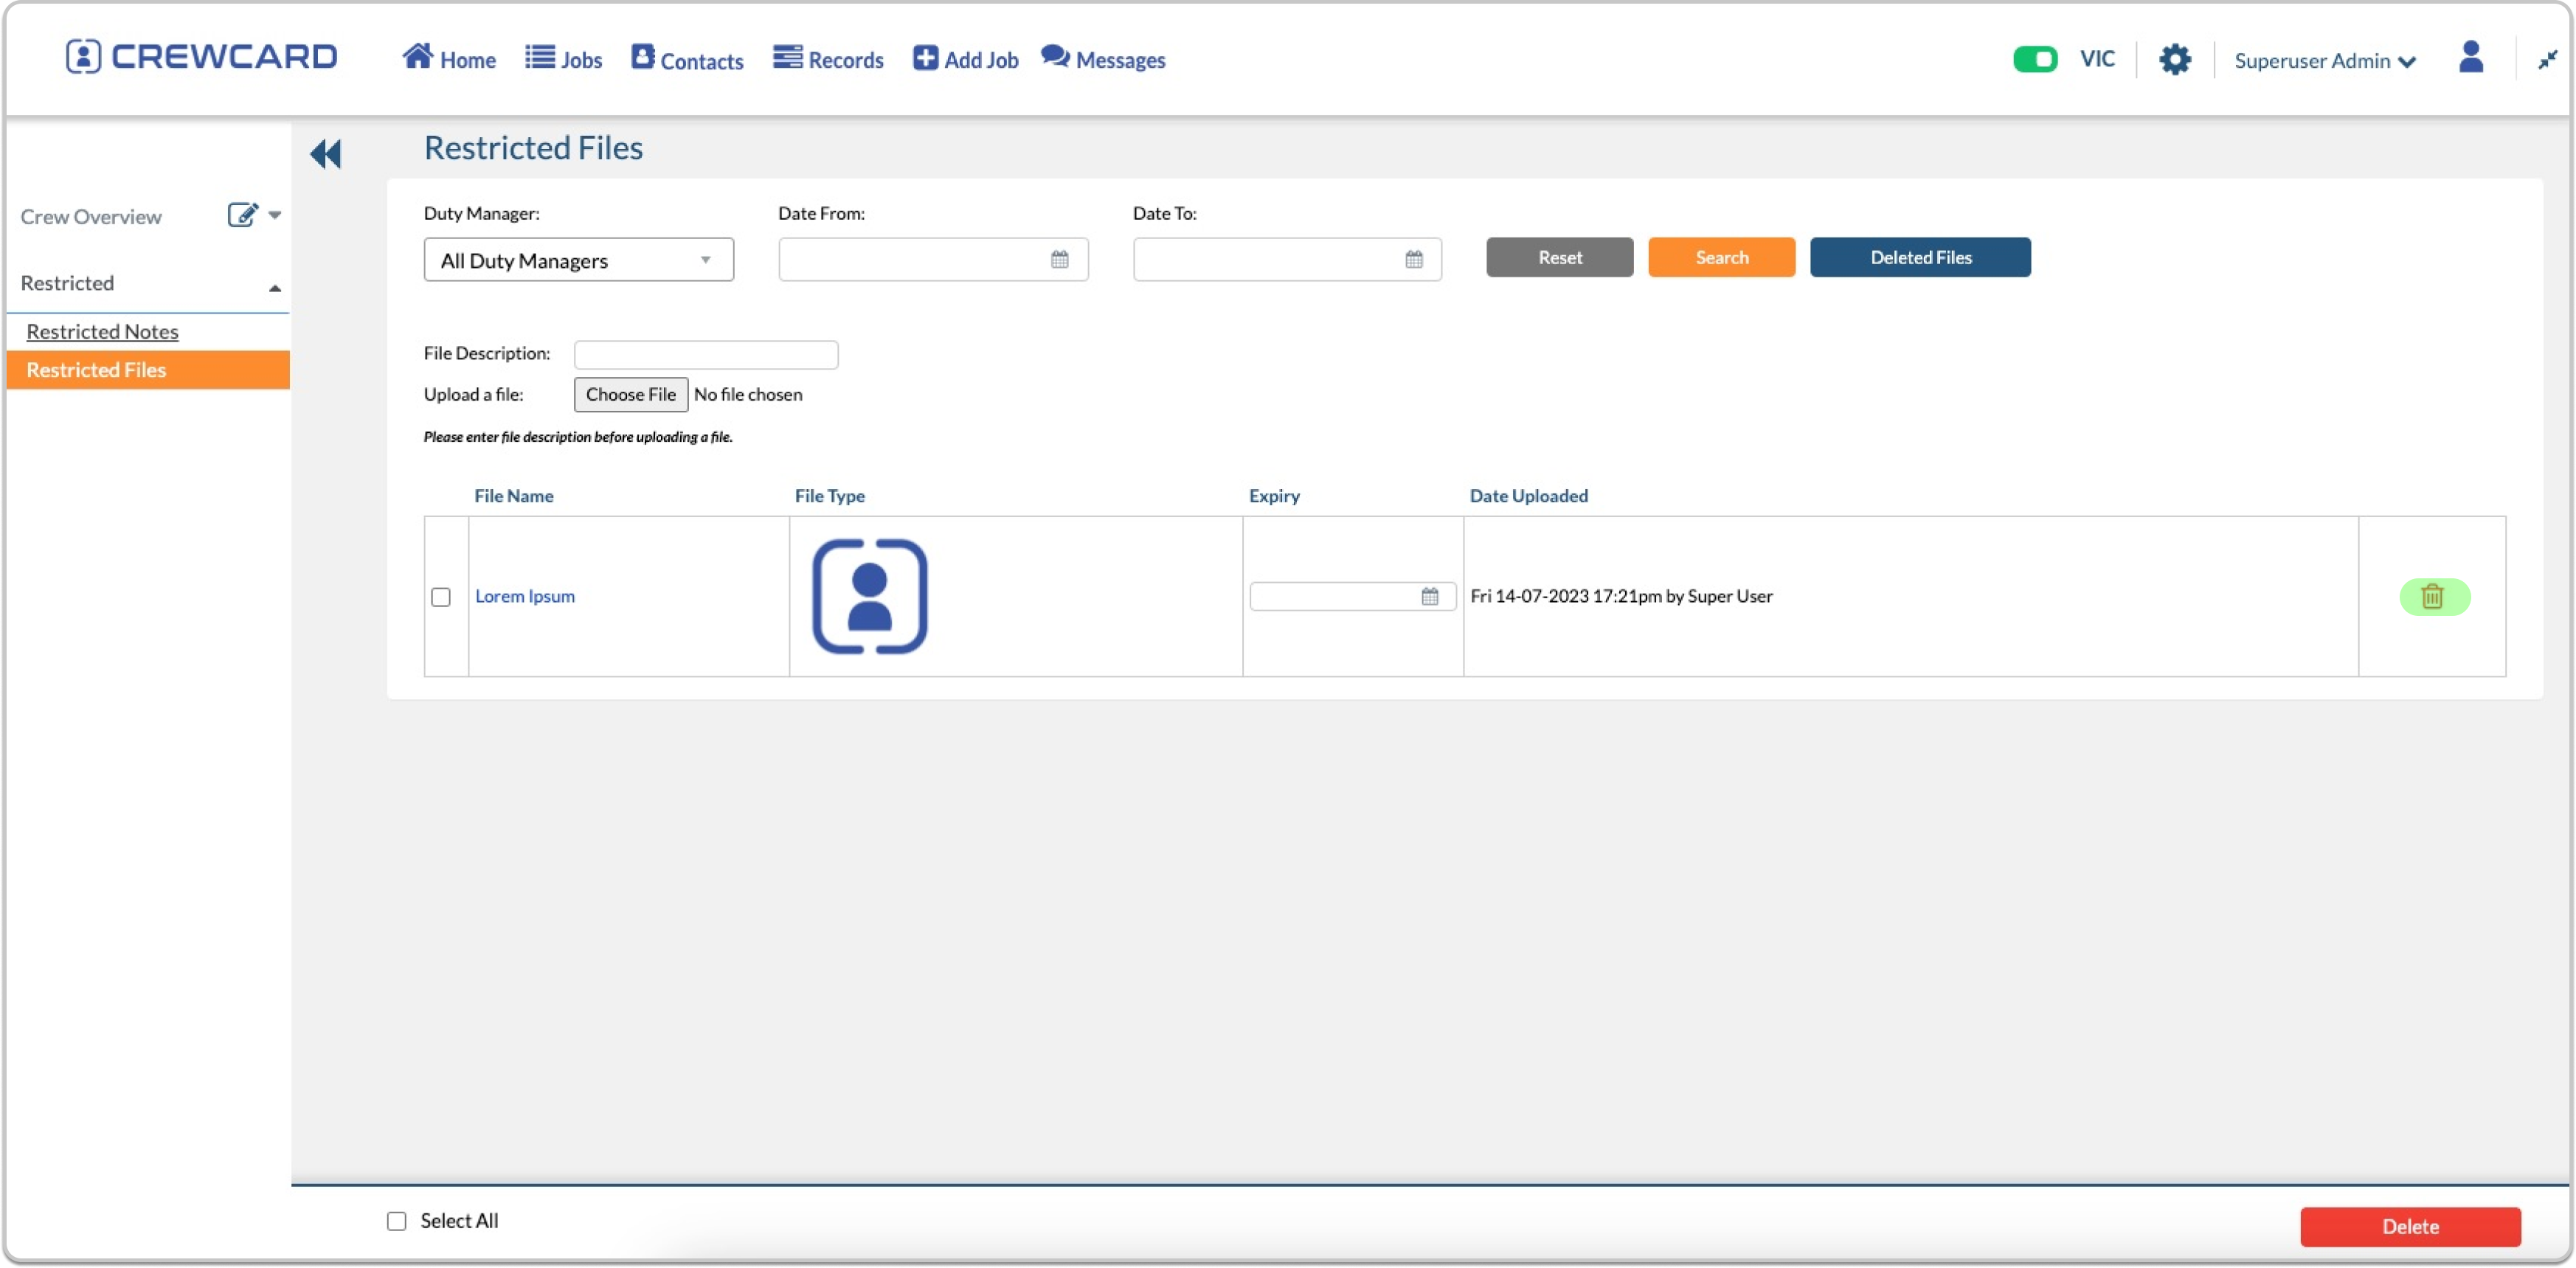
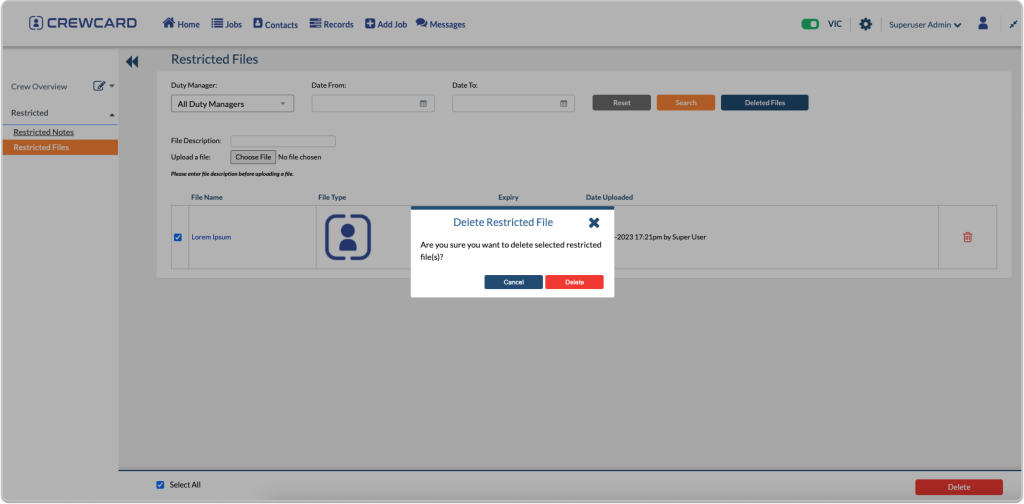
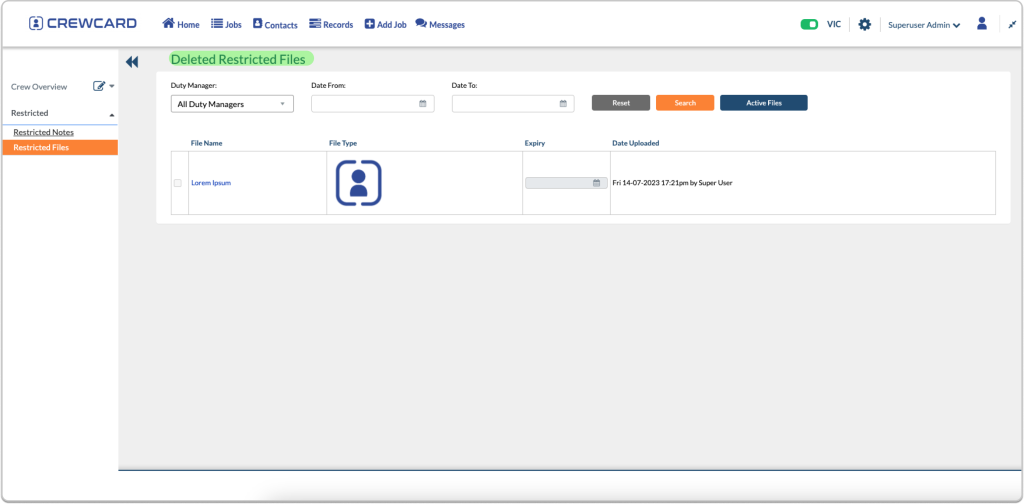
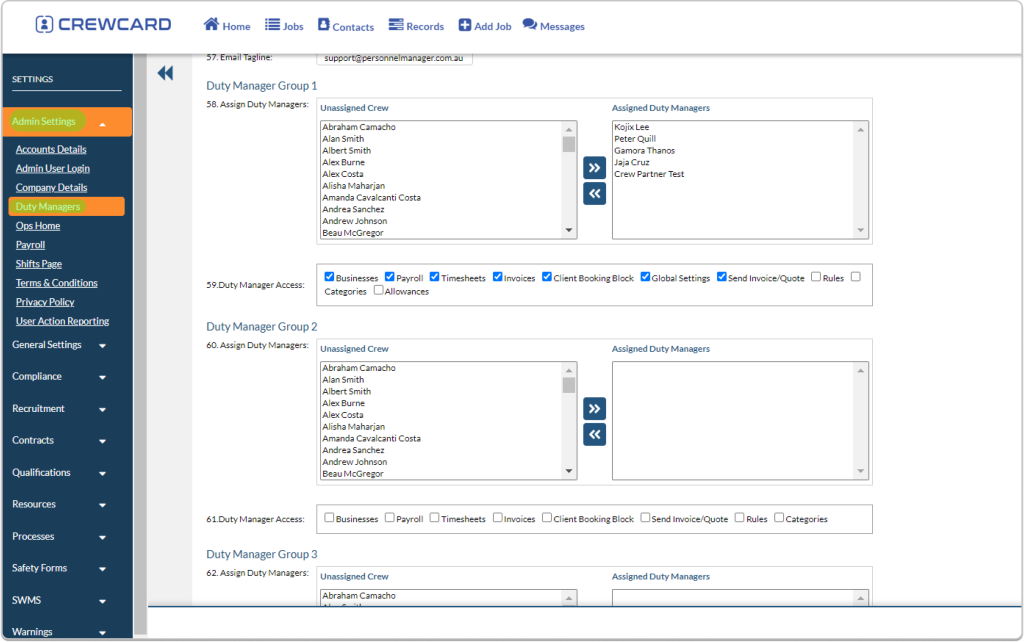
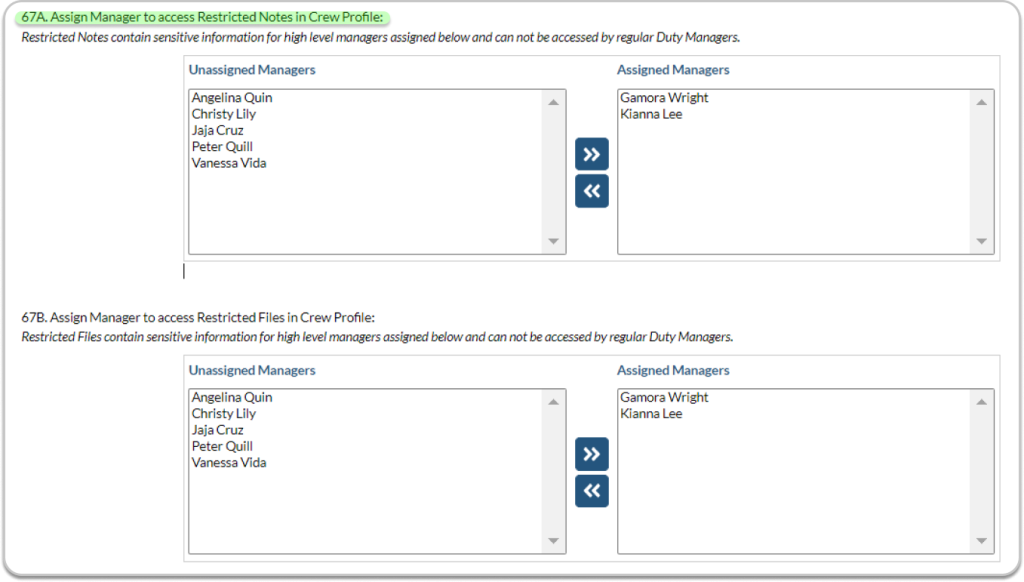
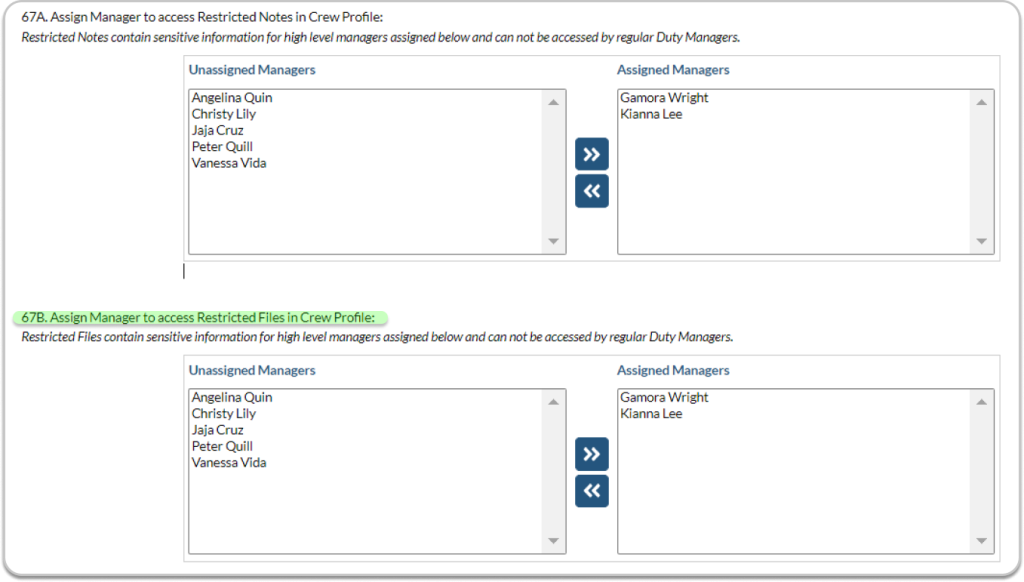


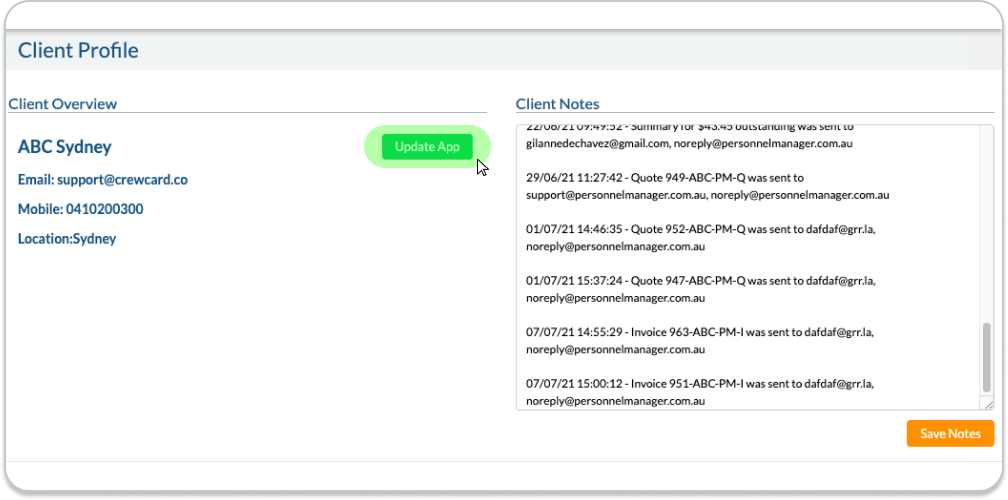
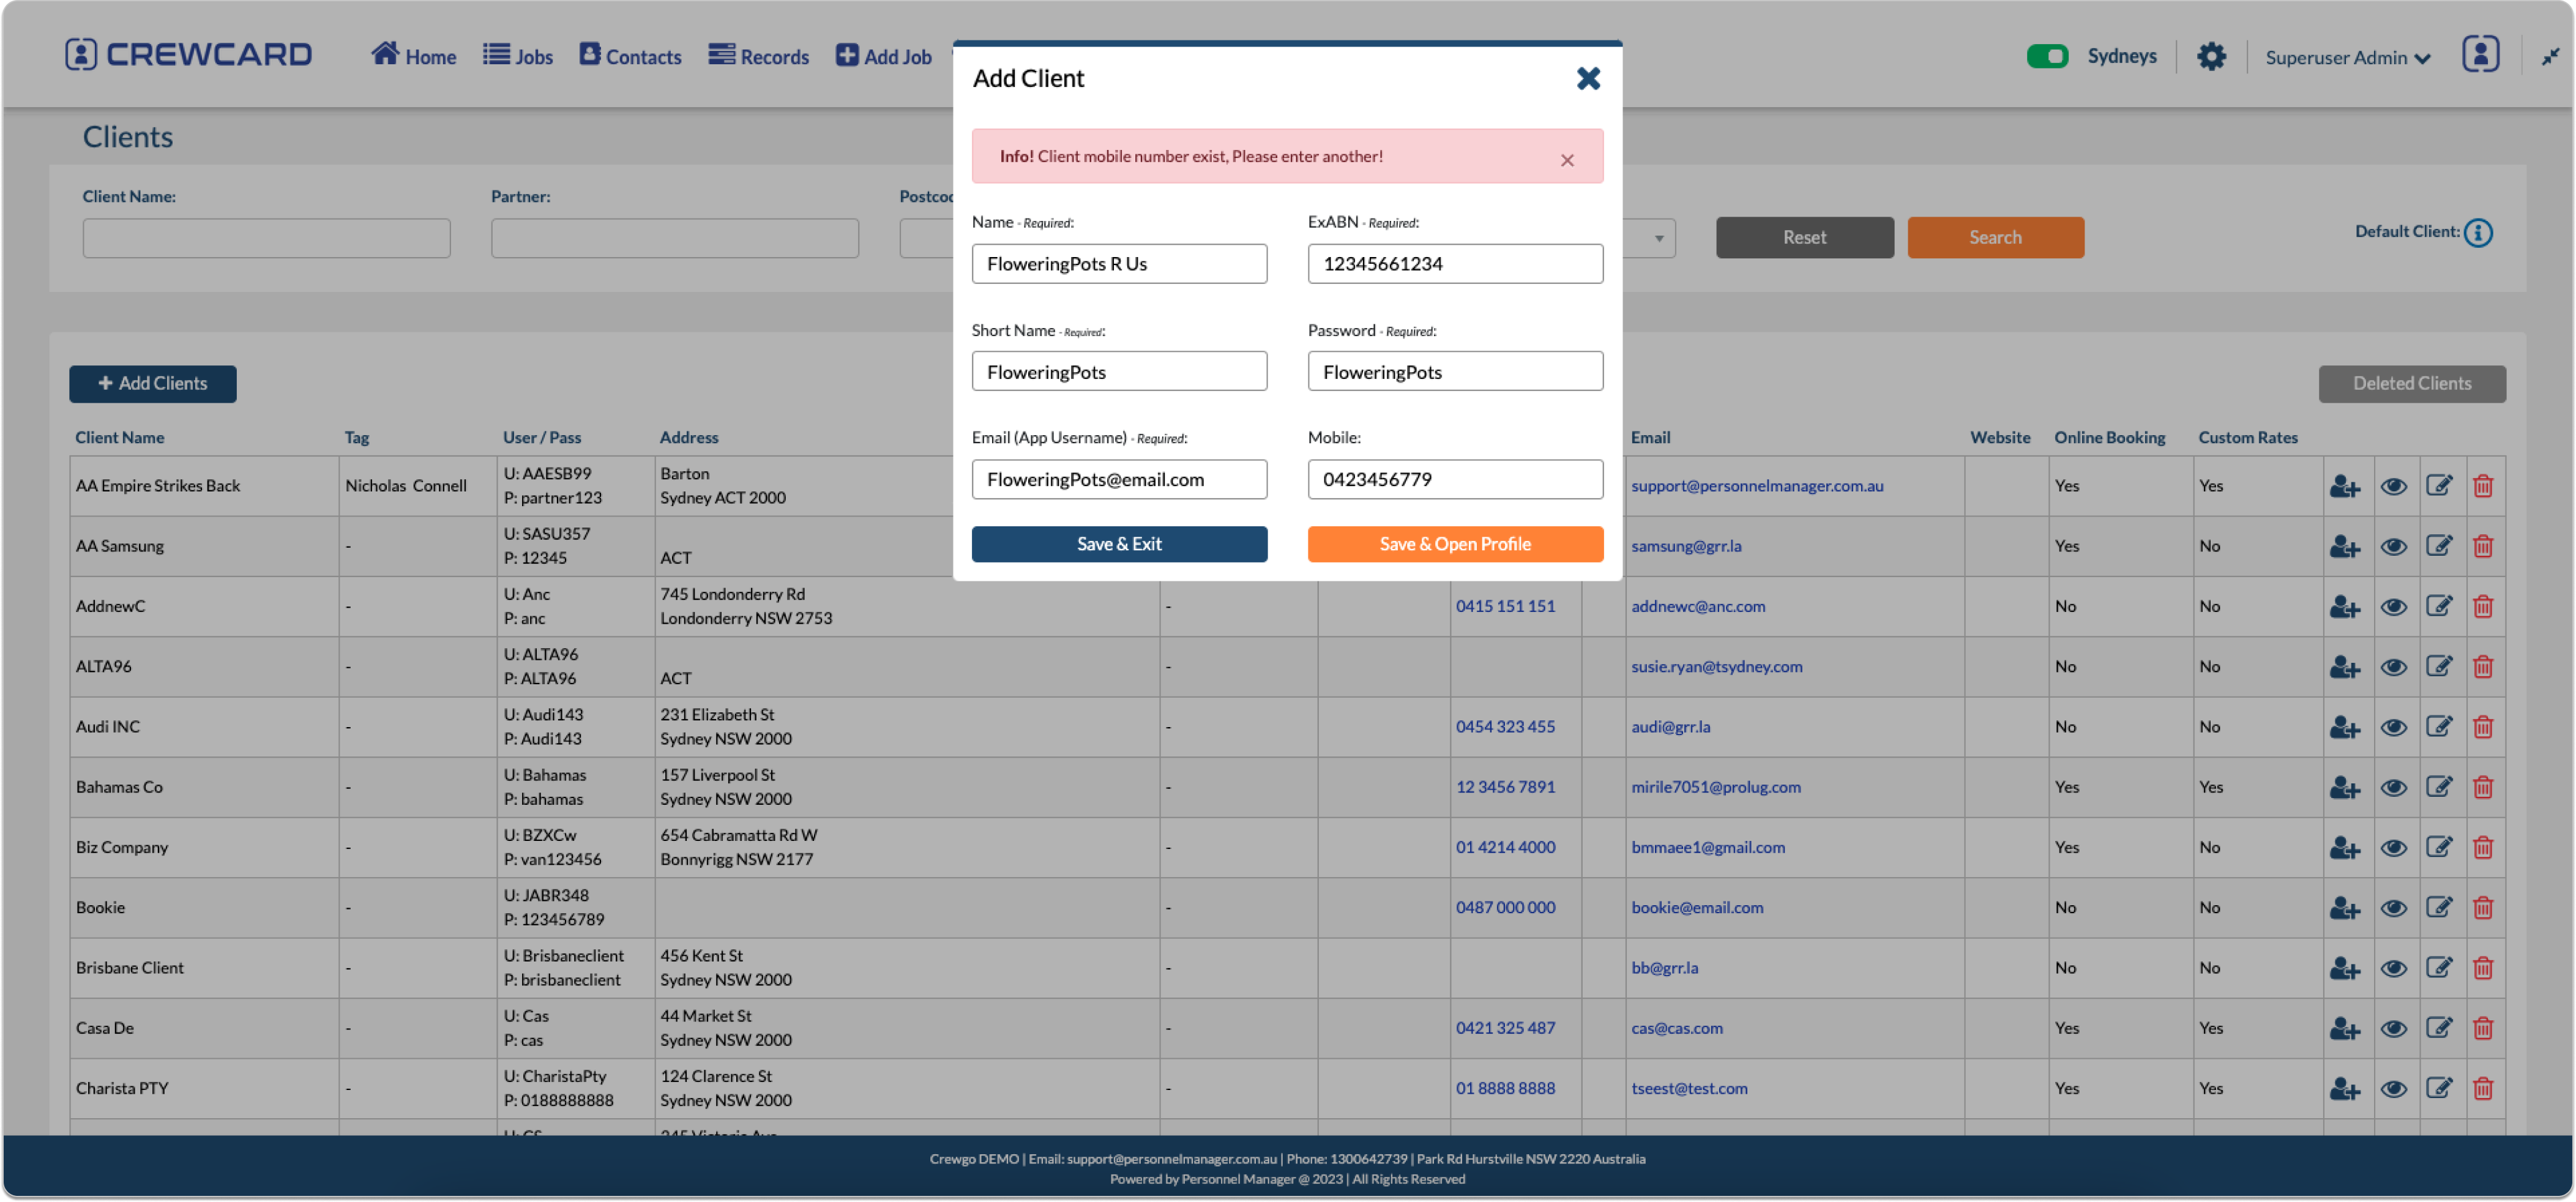
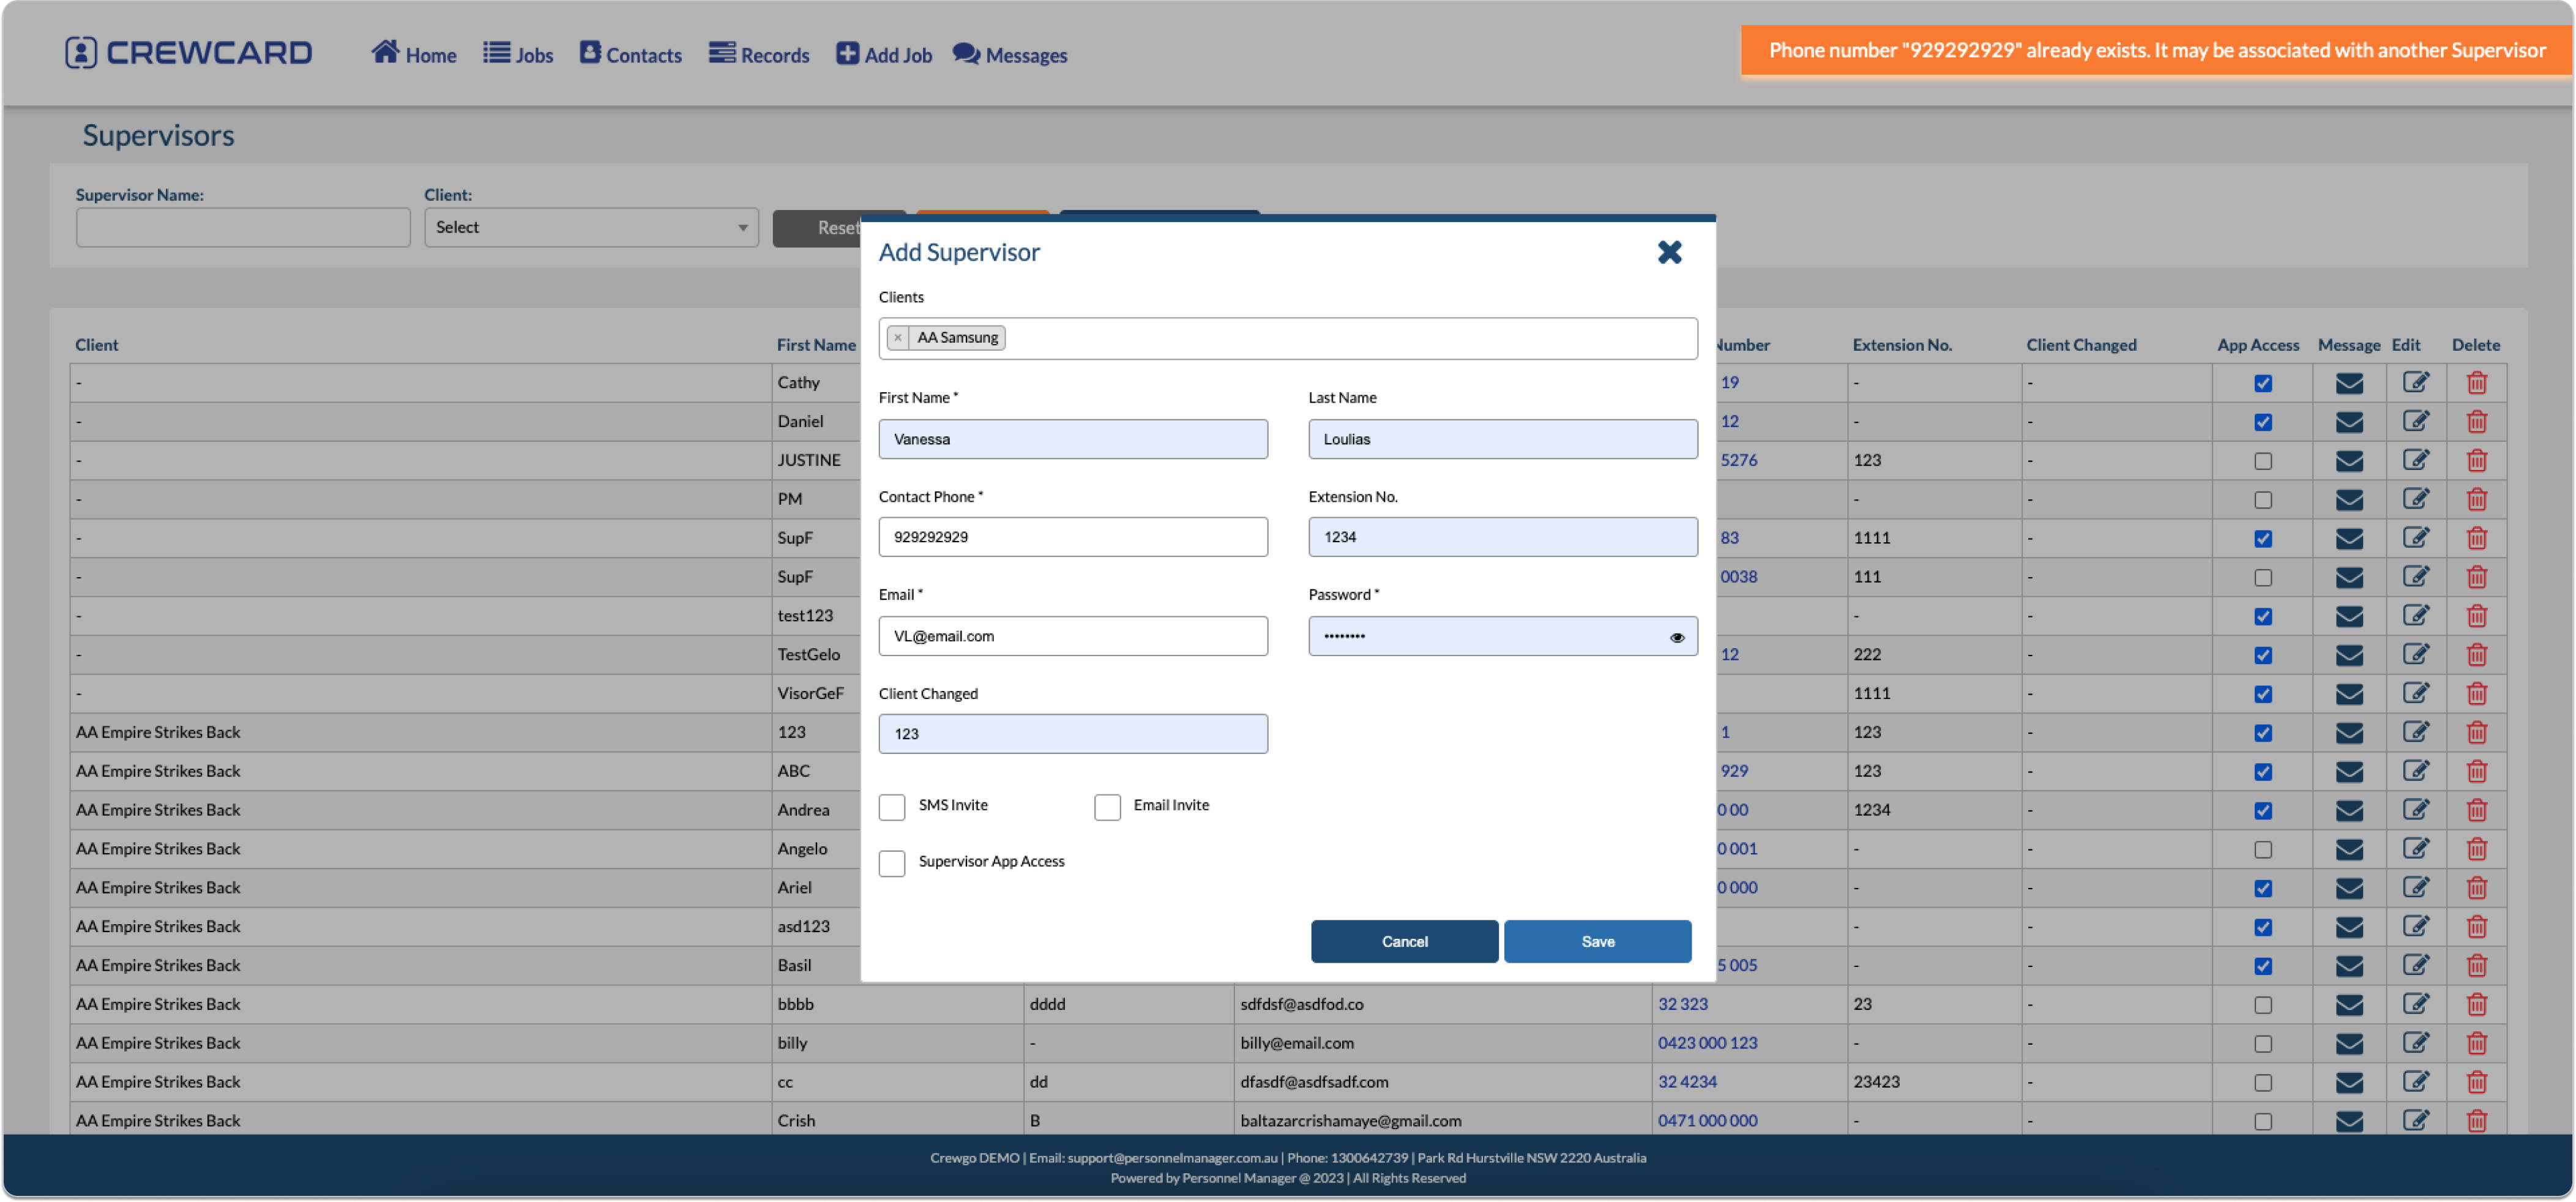


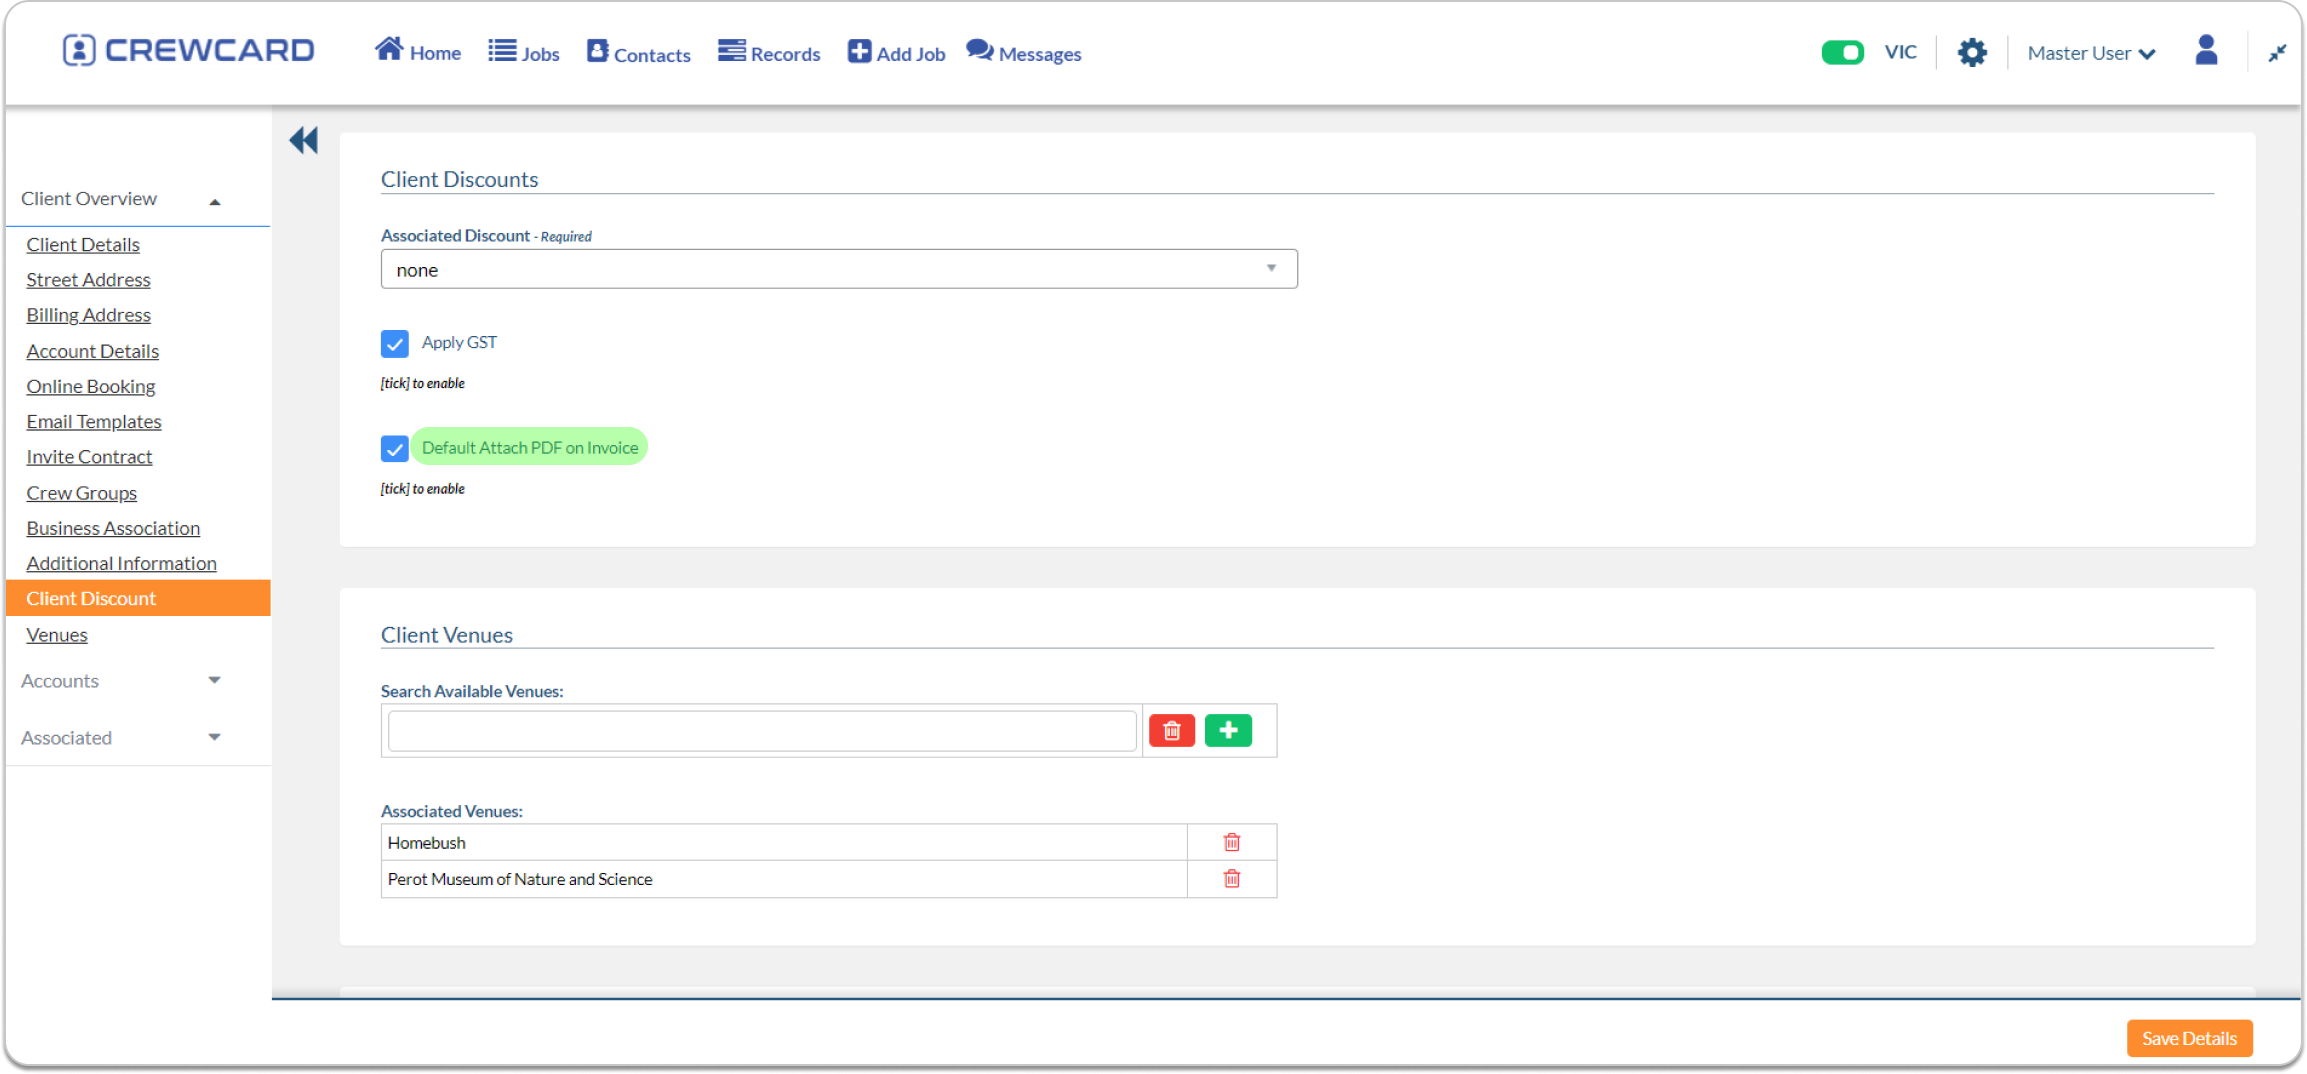
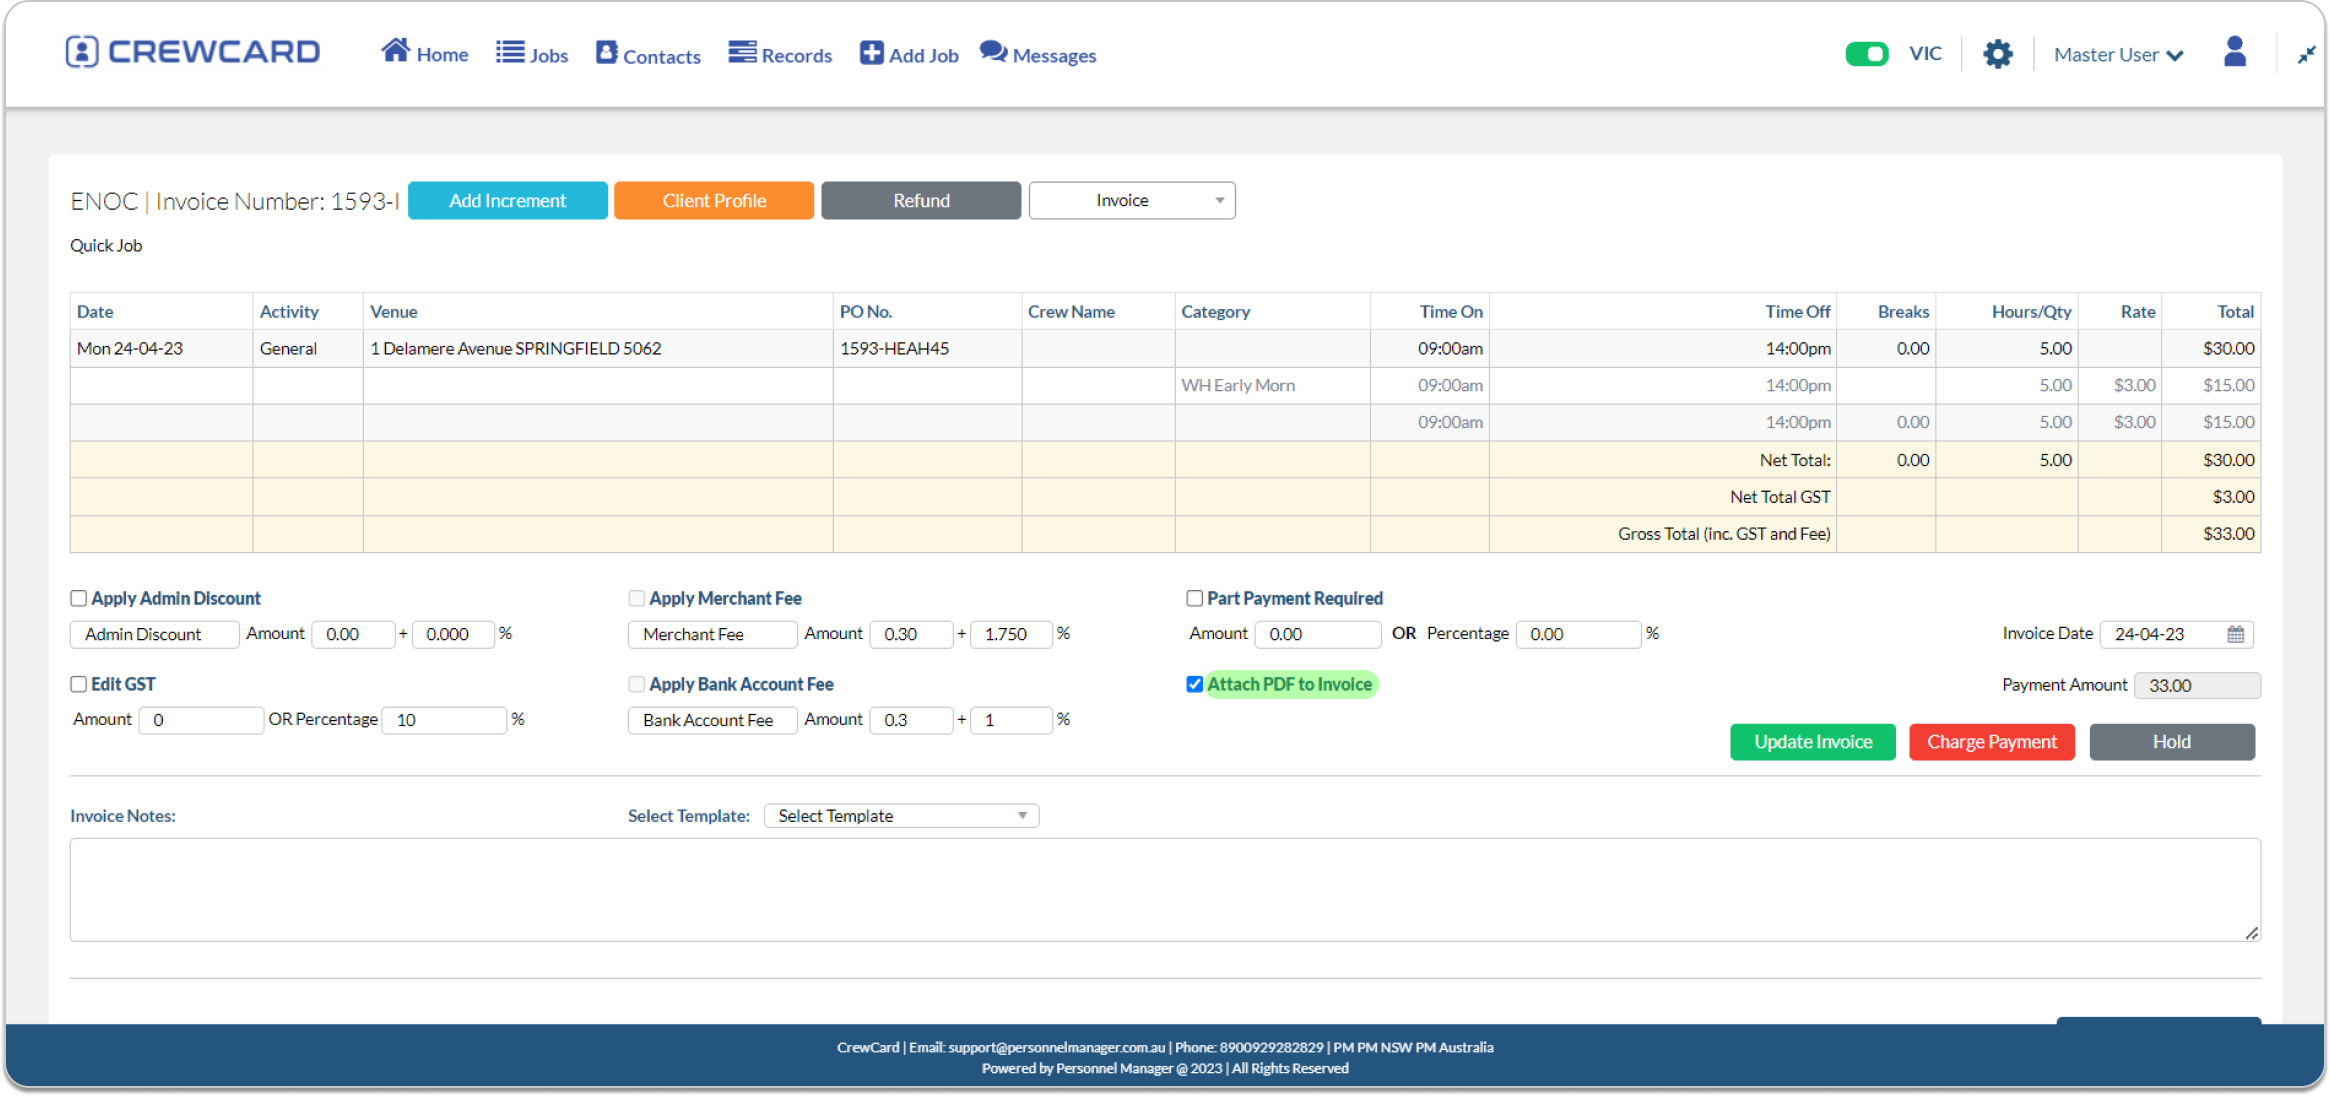


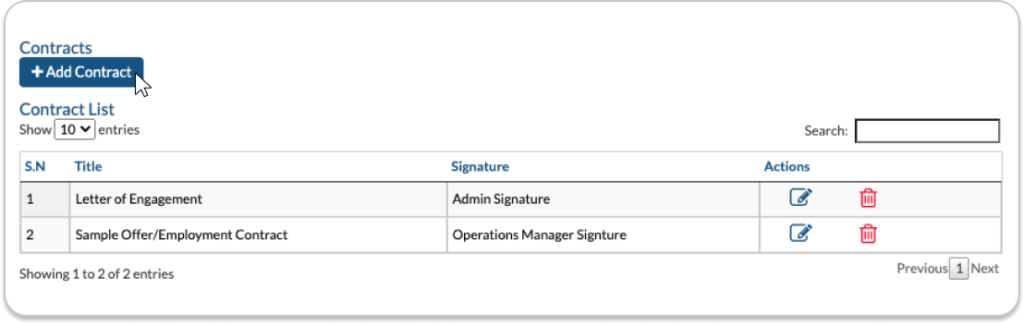

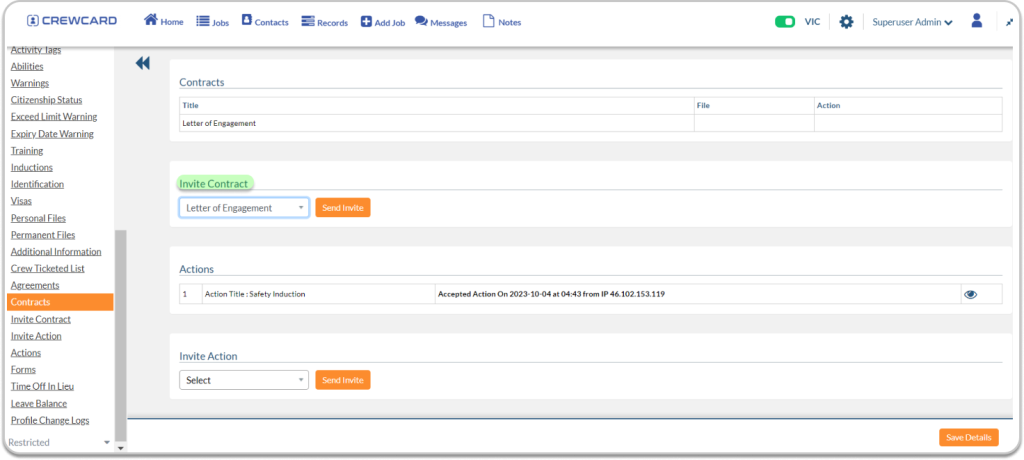
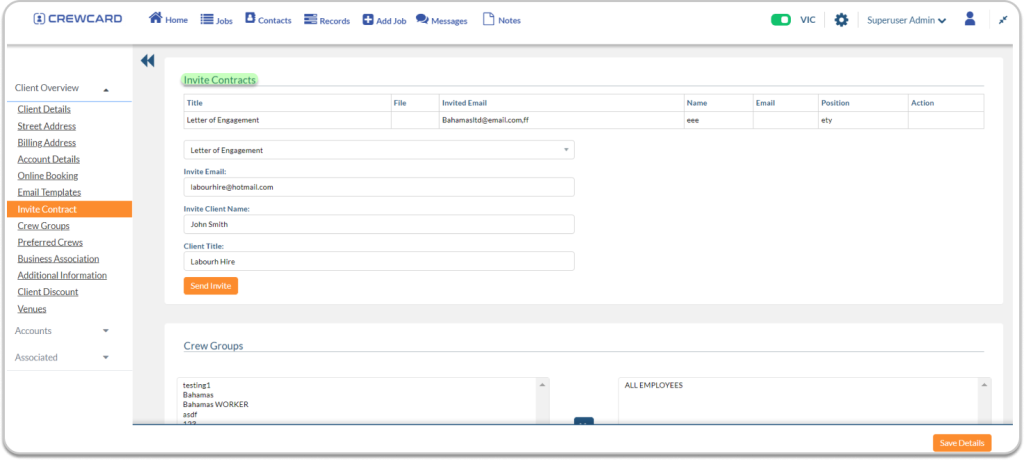
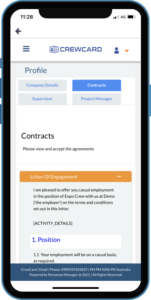
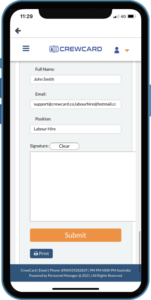
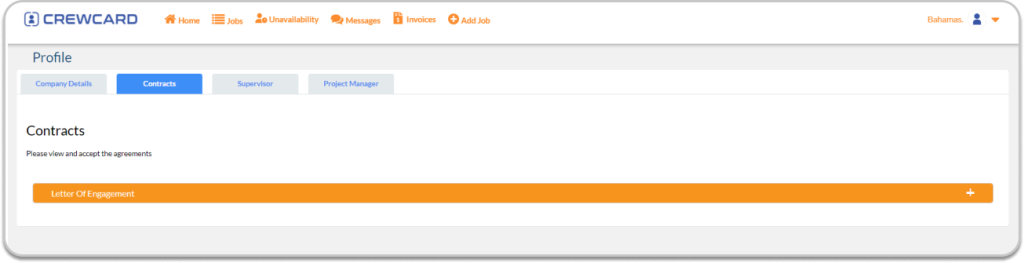
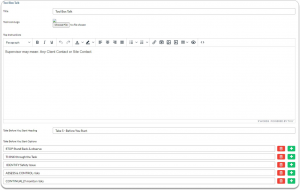
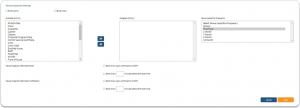
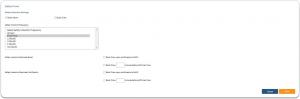
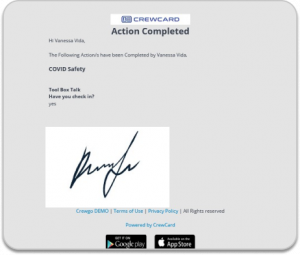
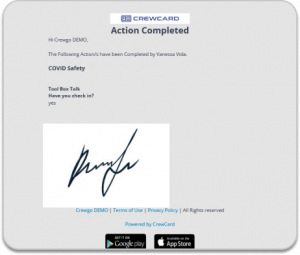
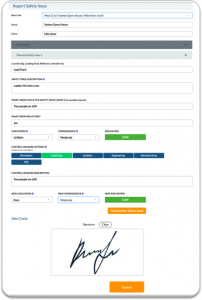
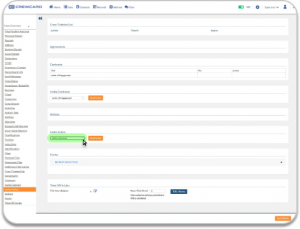
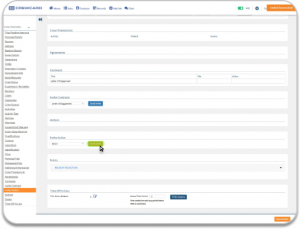


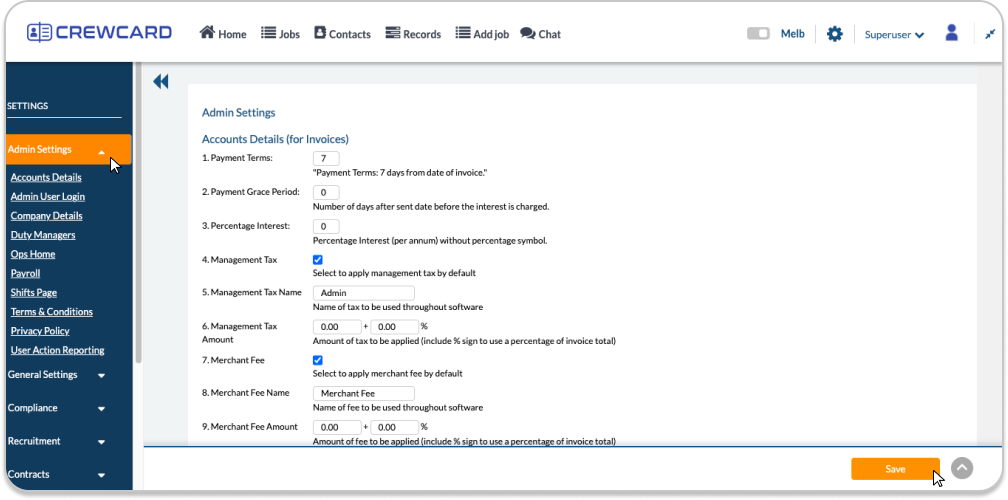
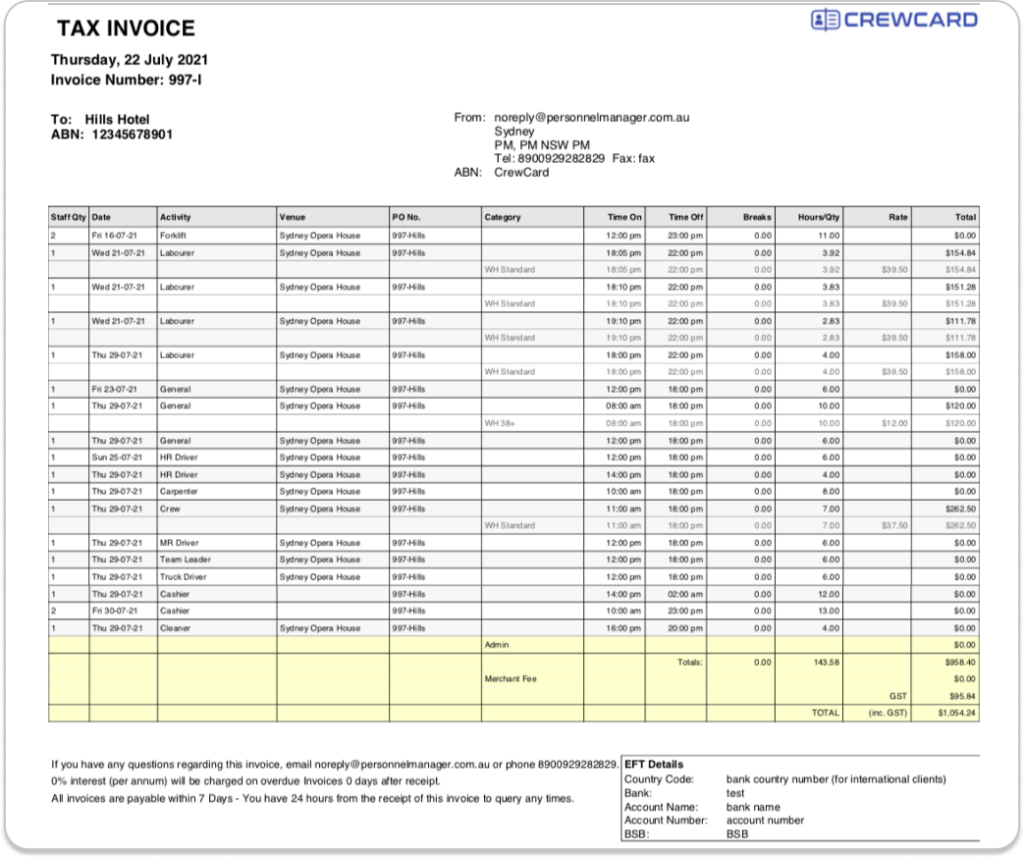
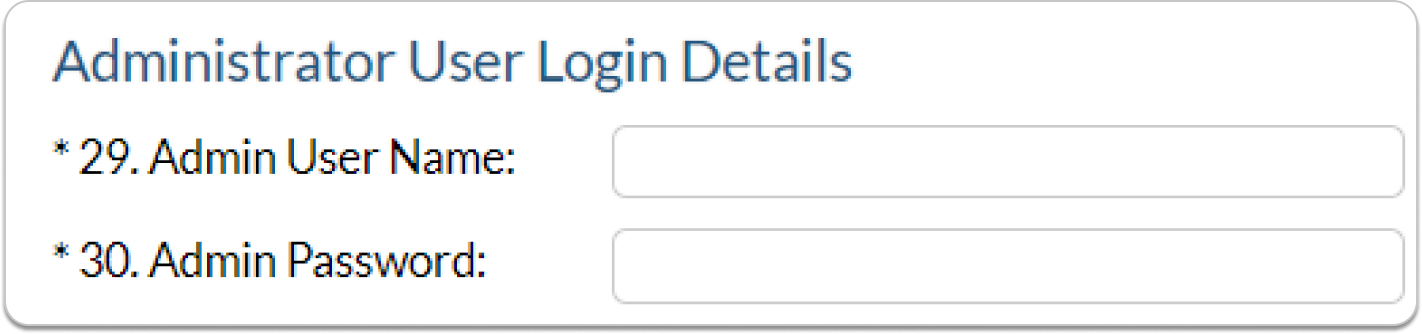
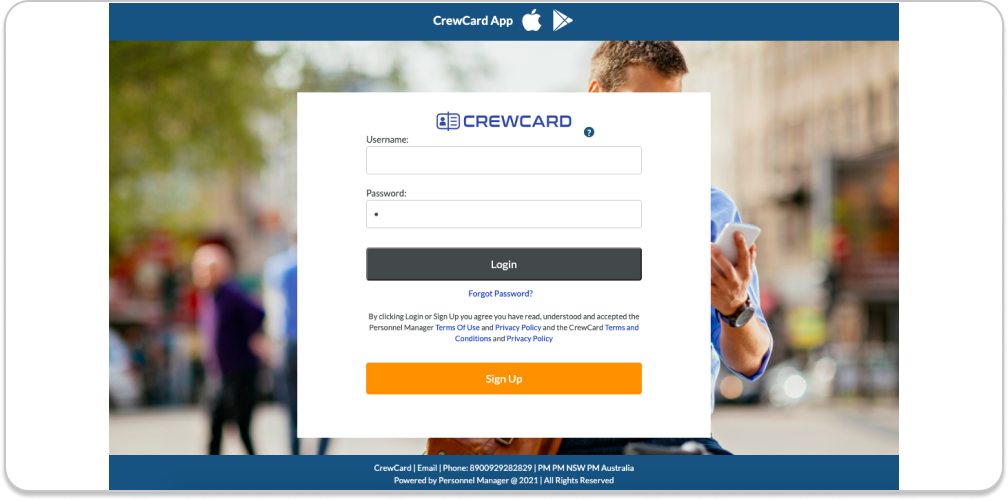


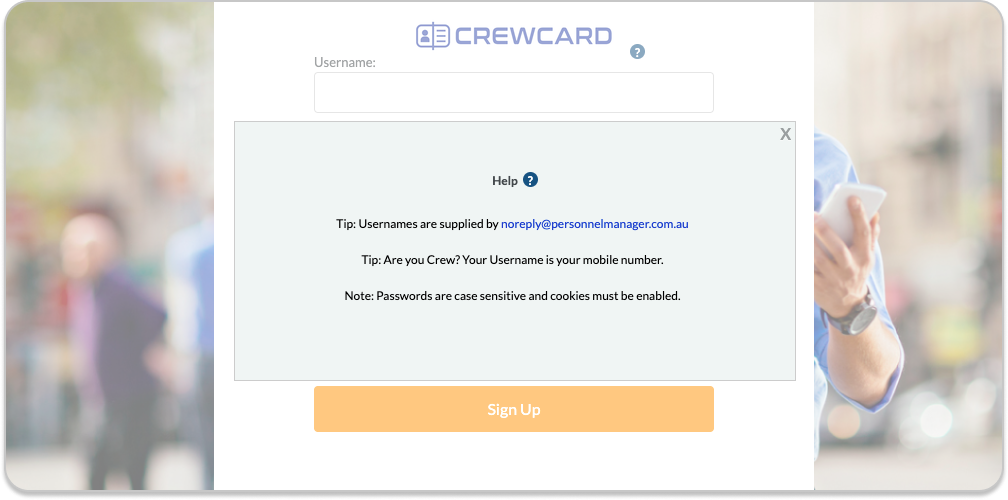 53. Header Colour Code:
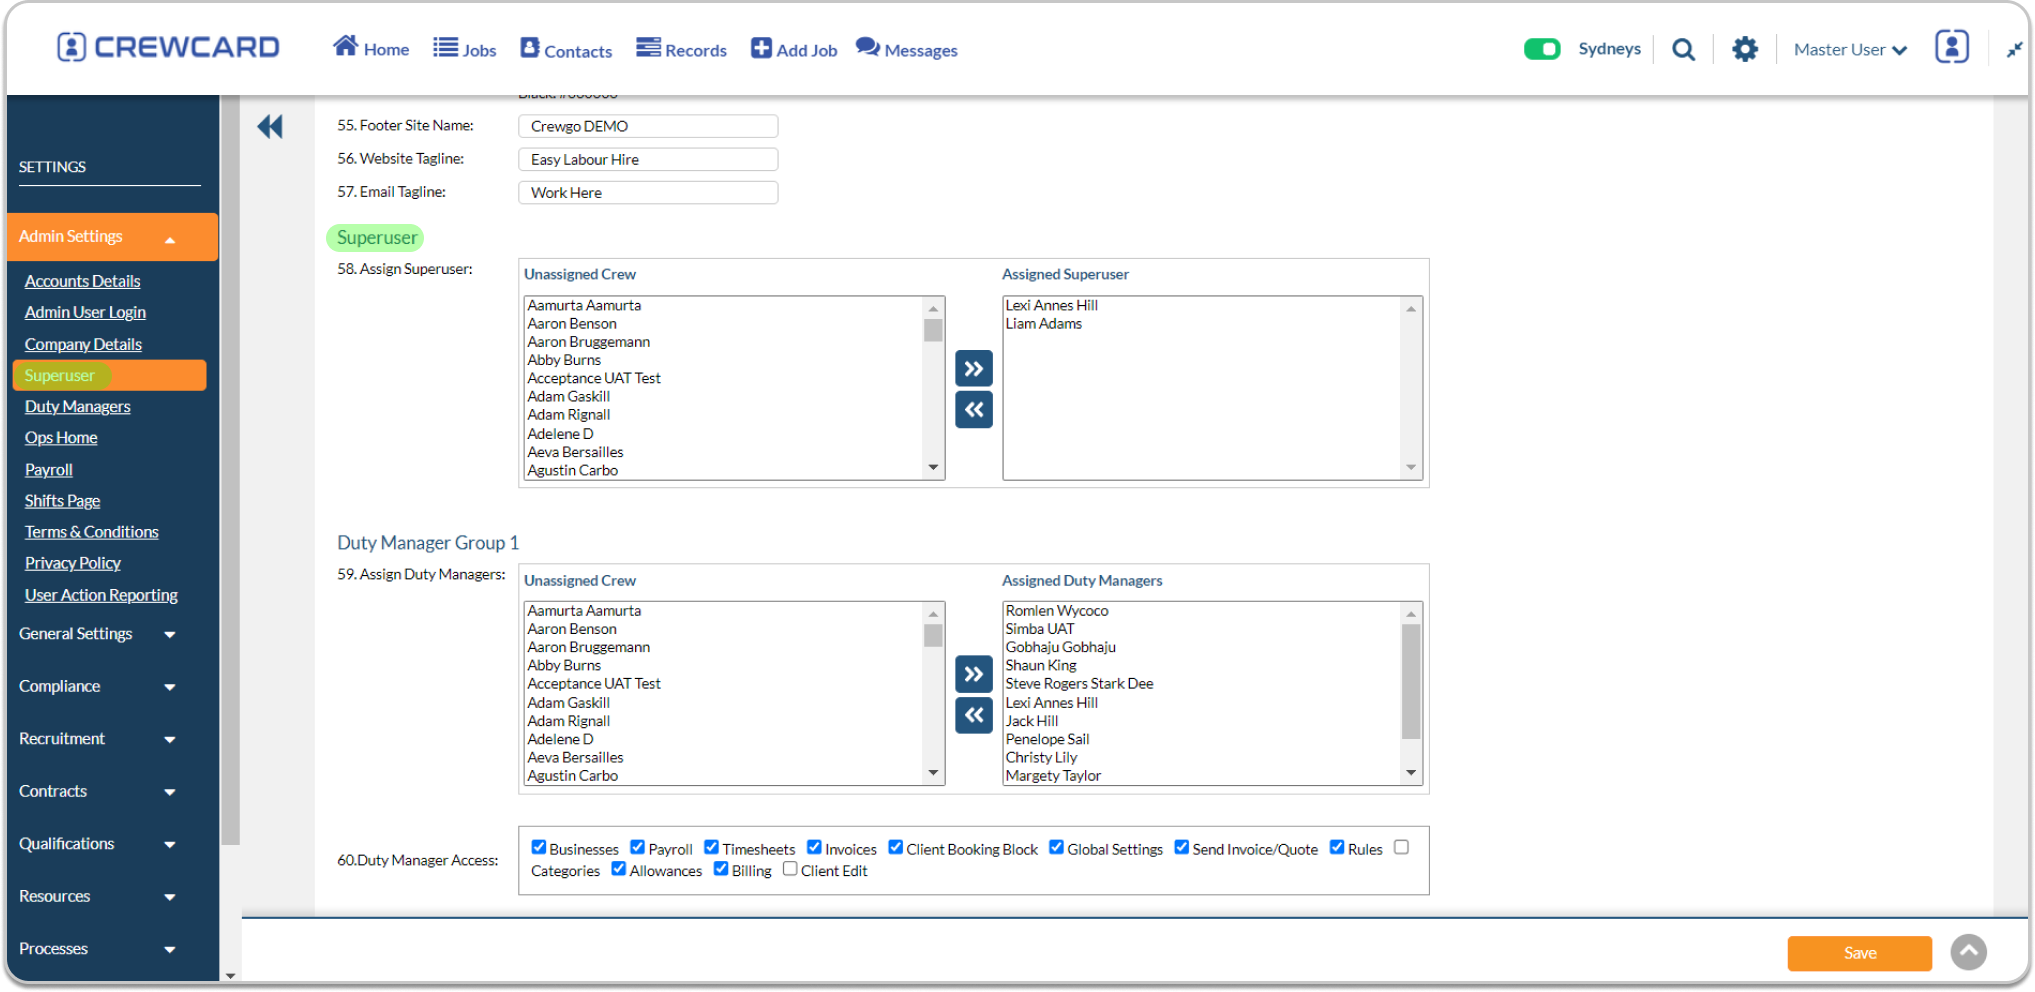


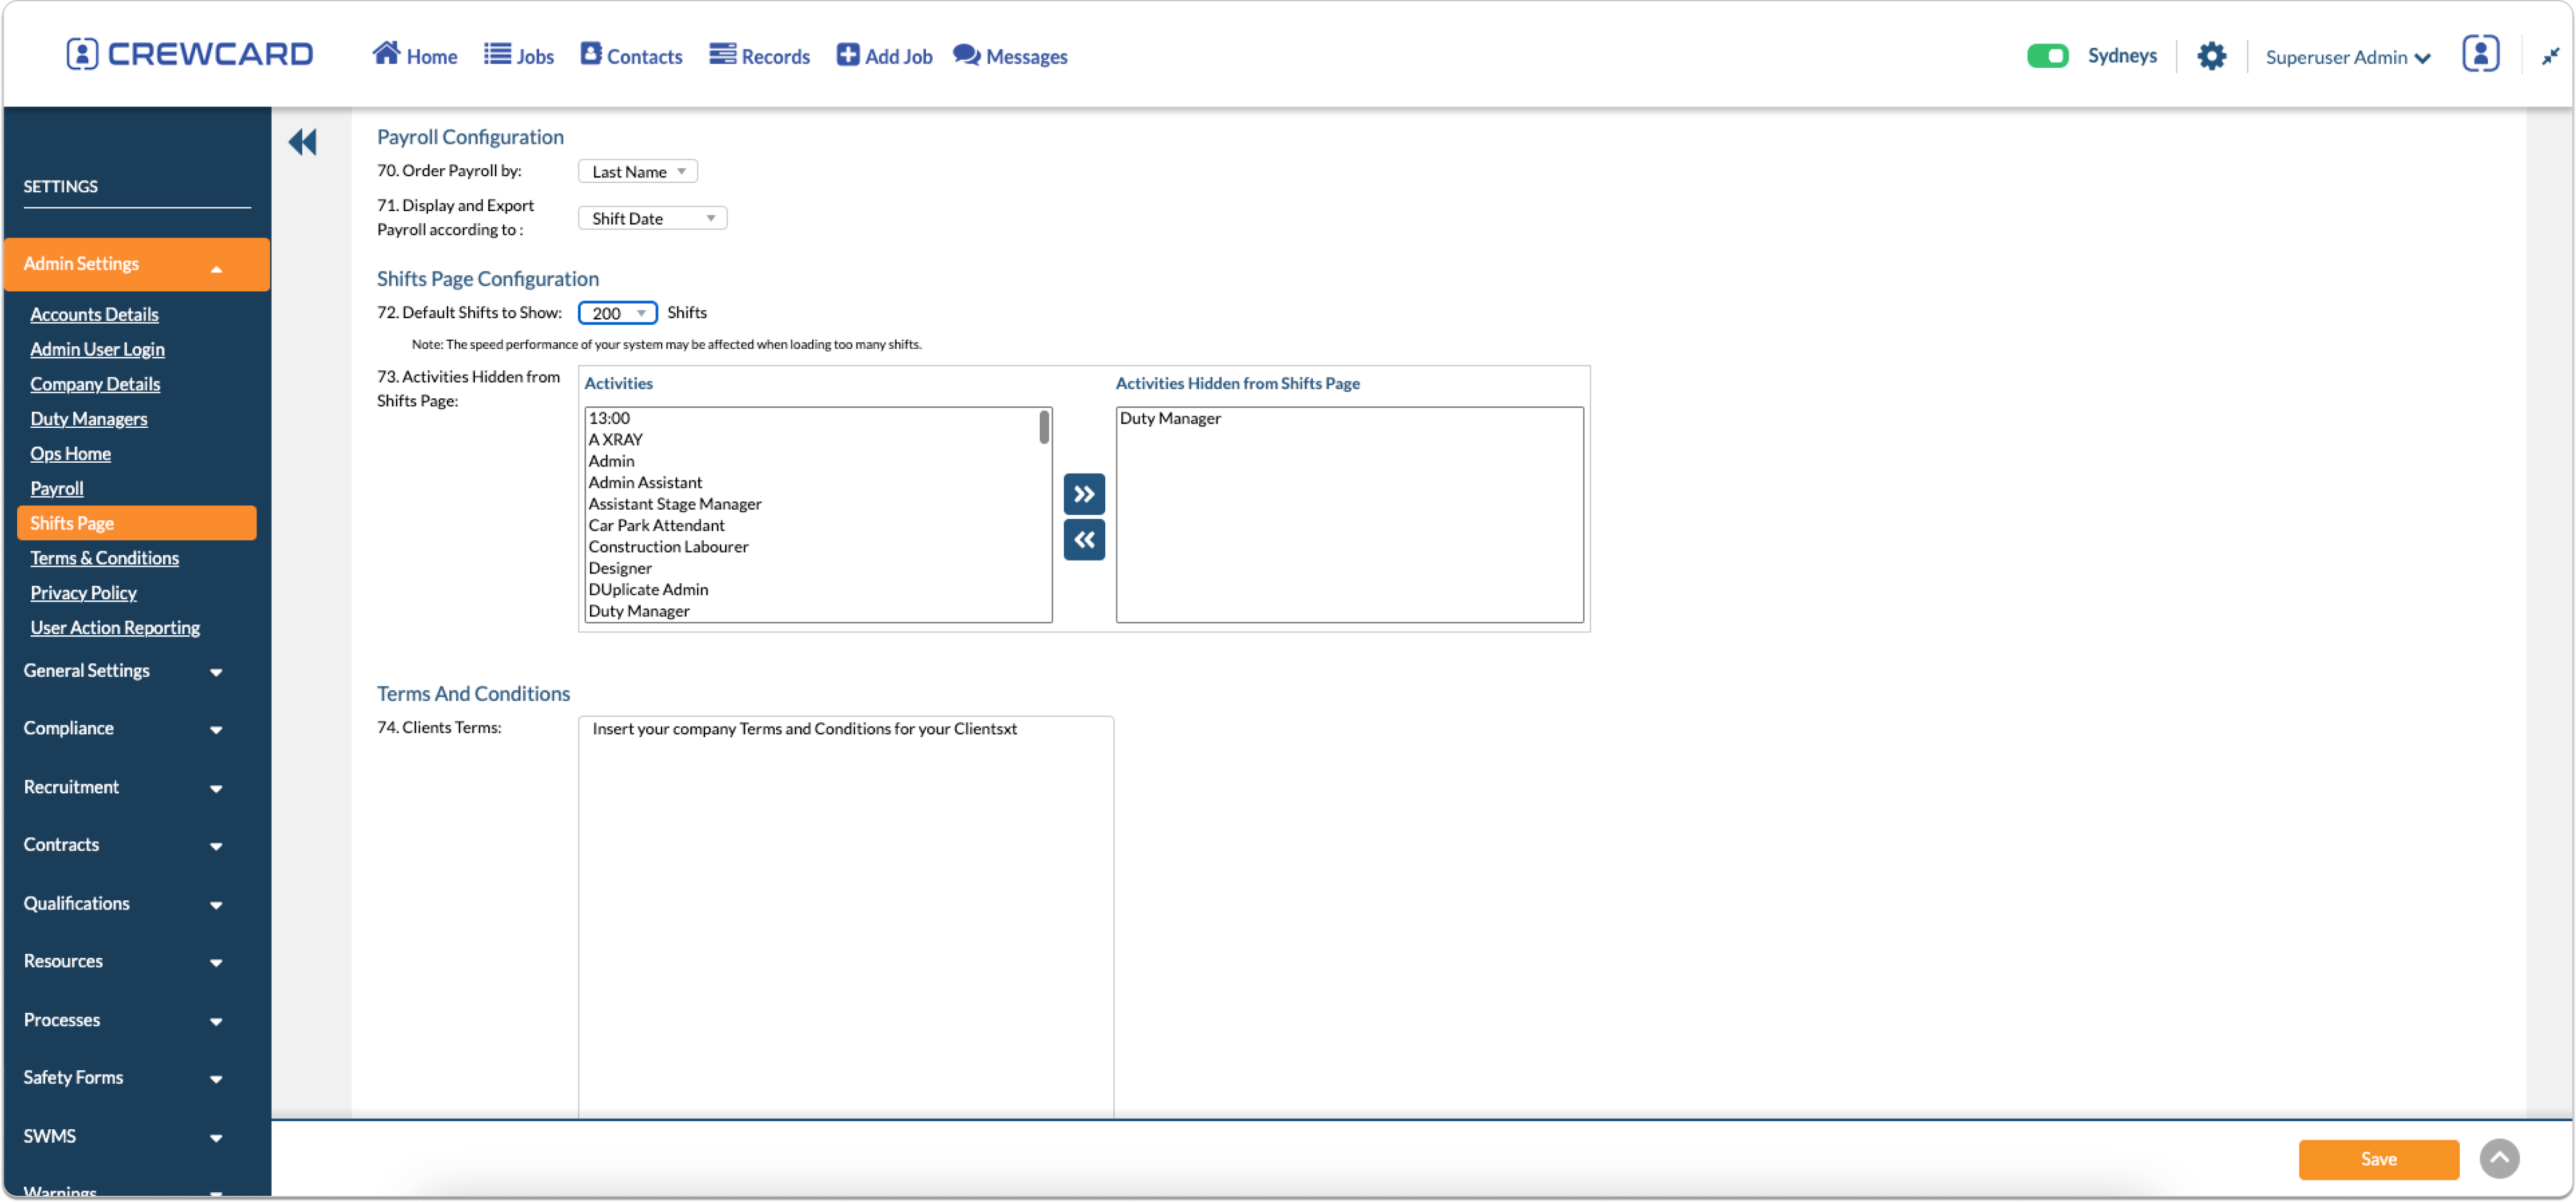
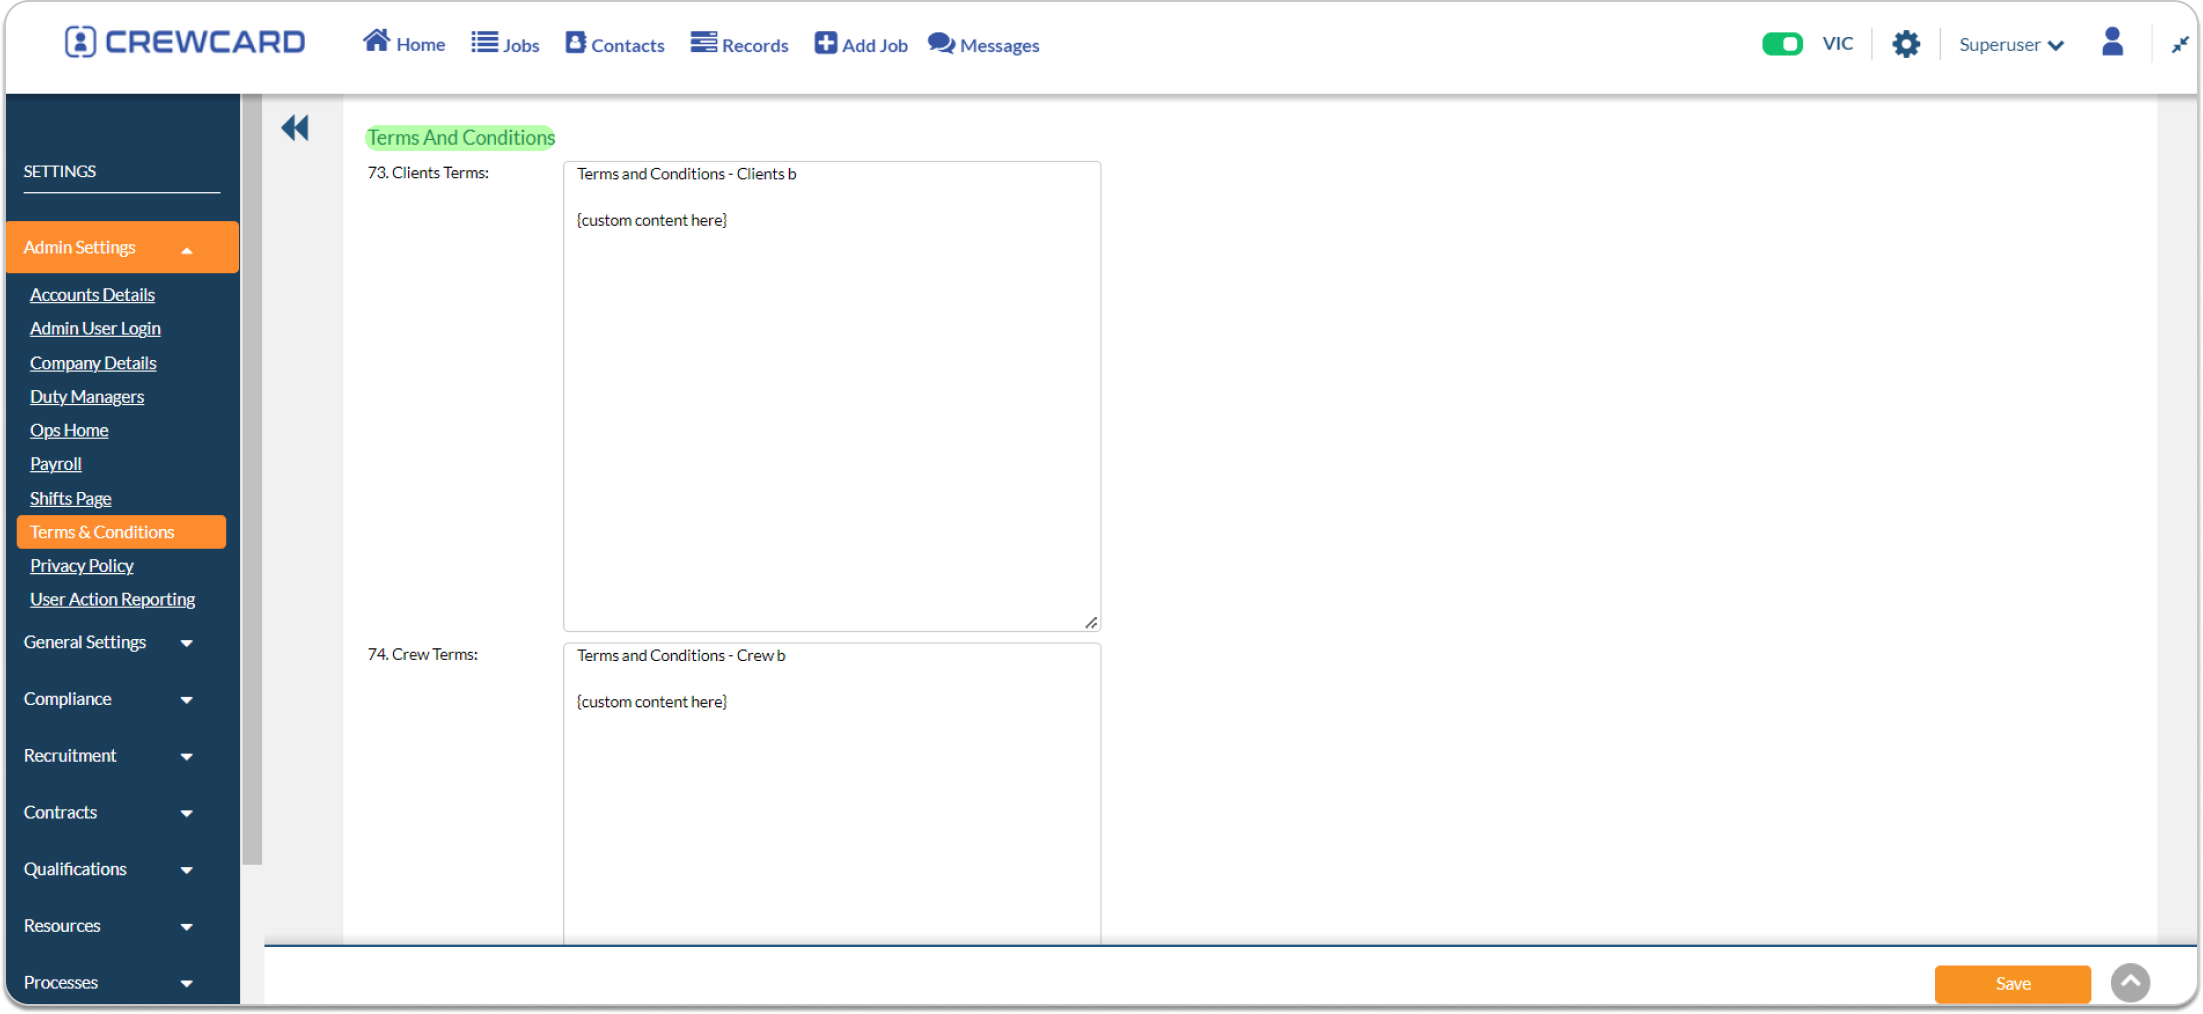

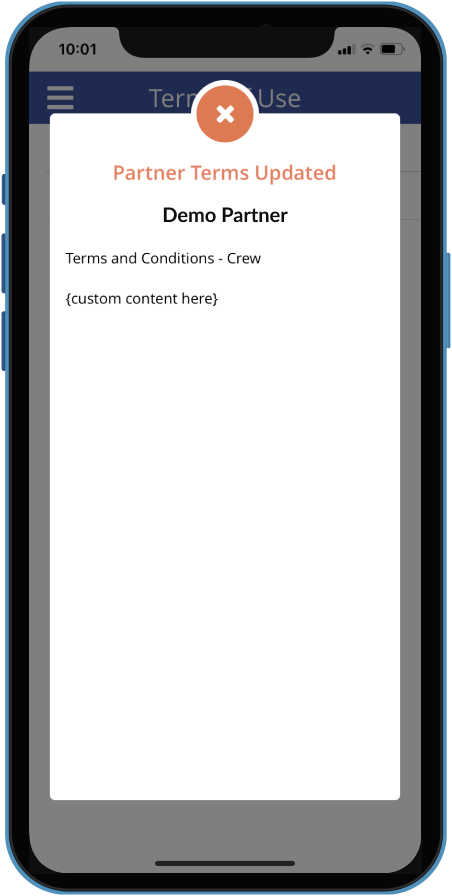
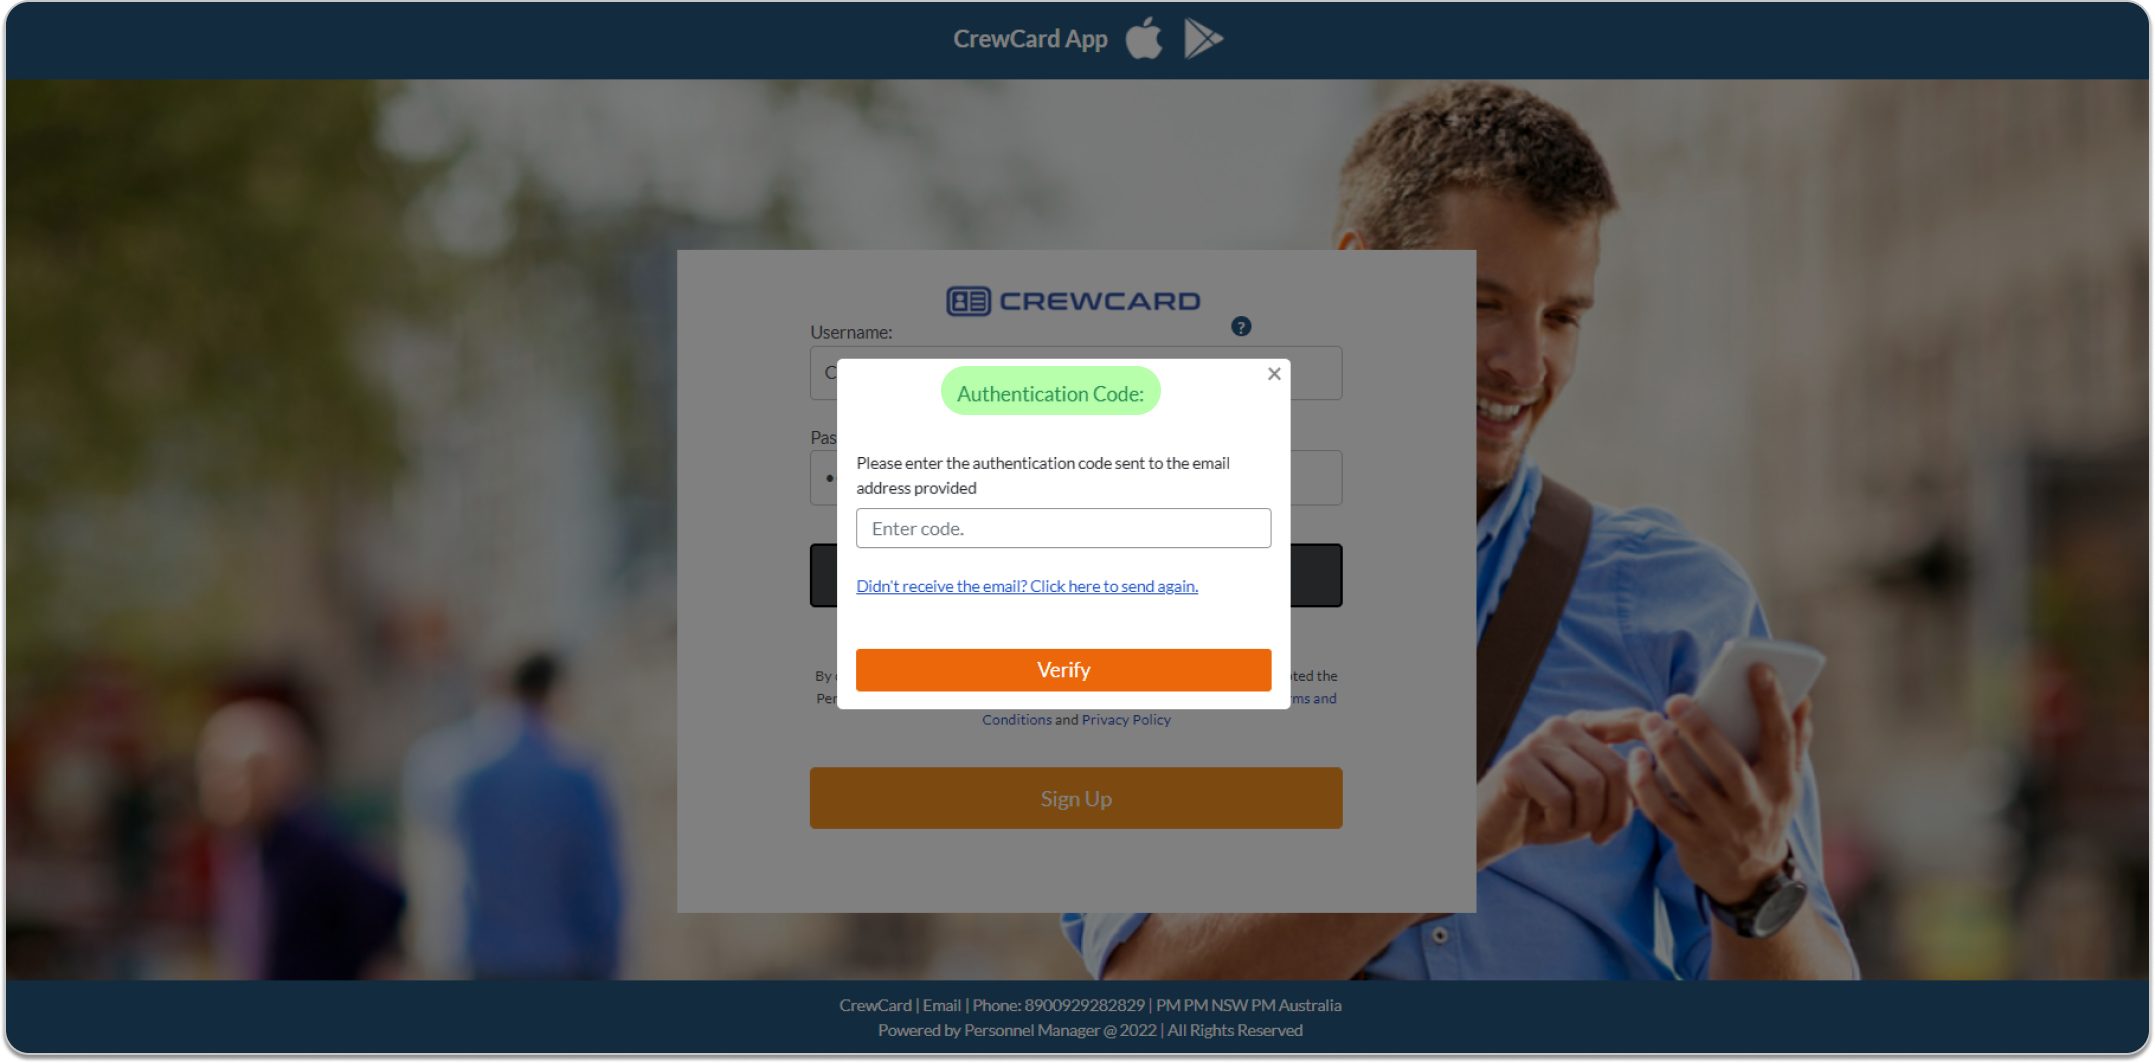
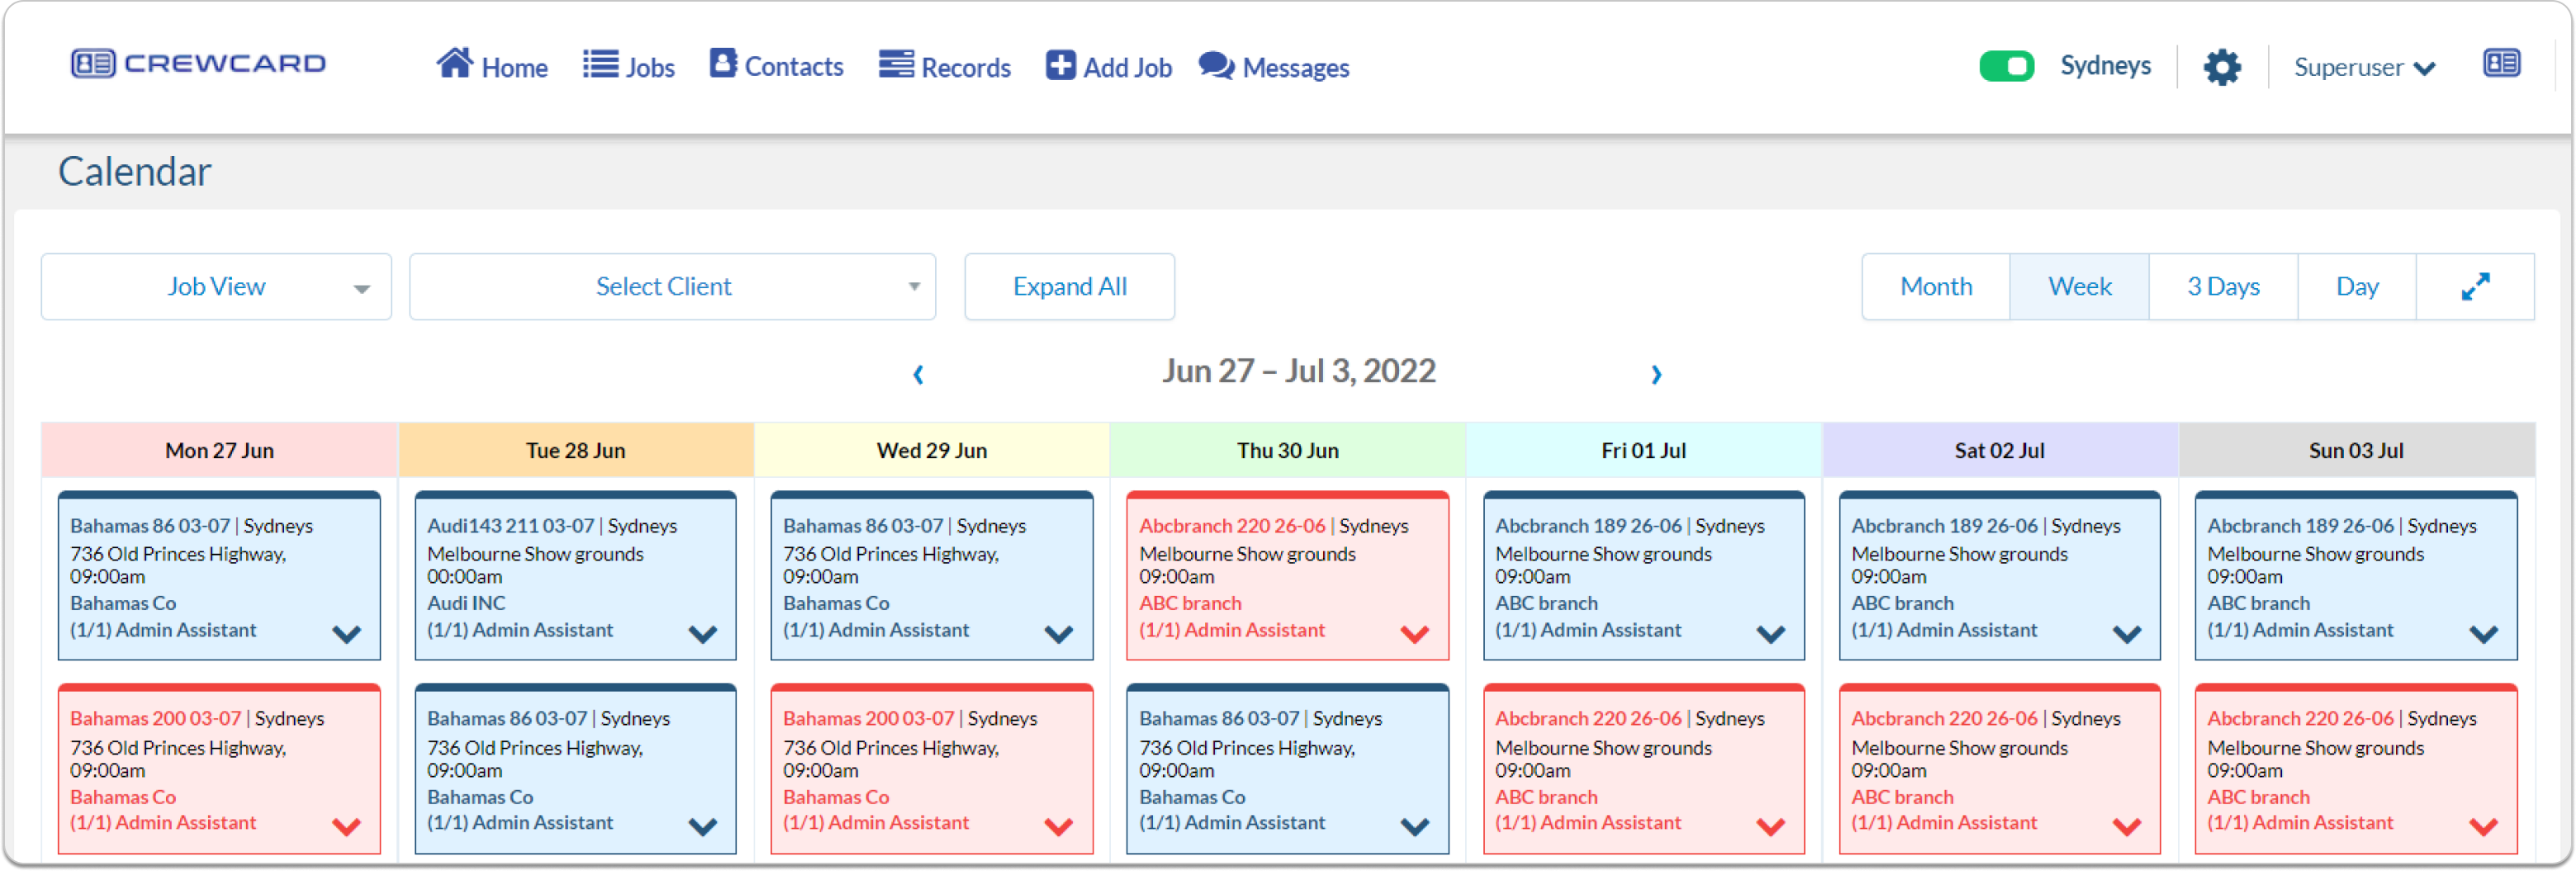
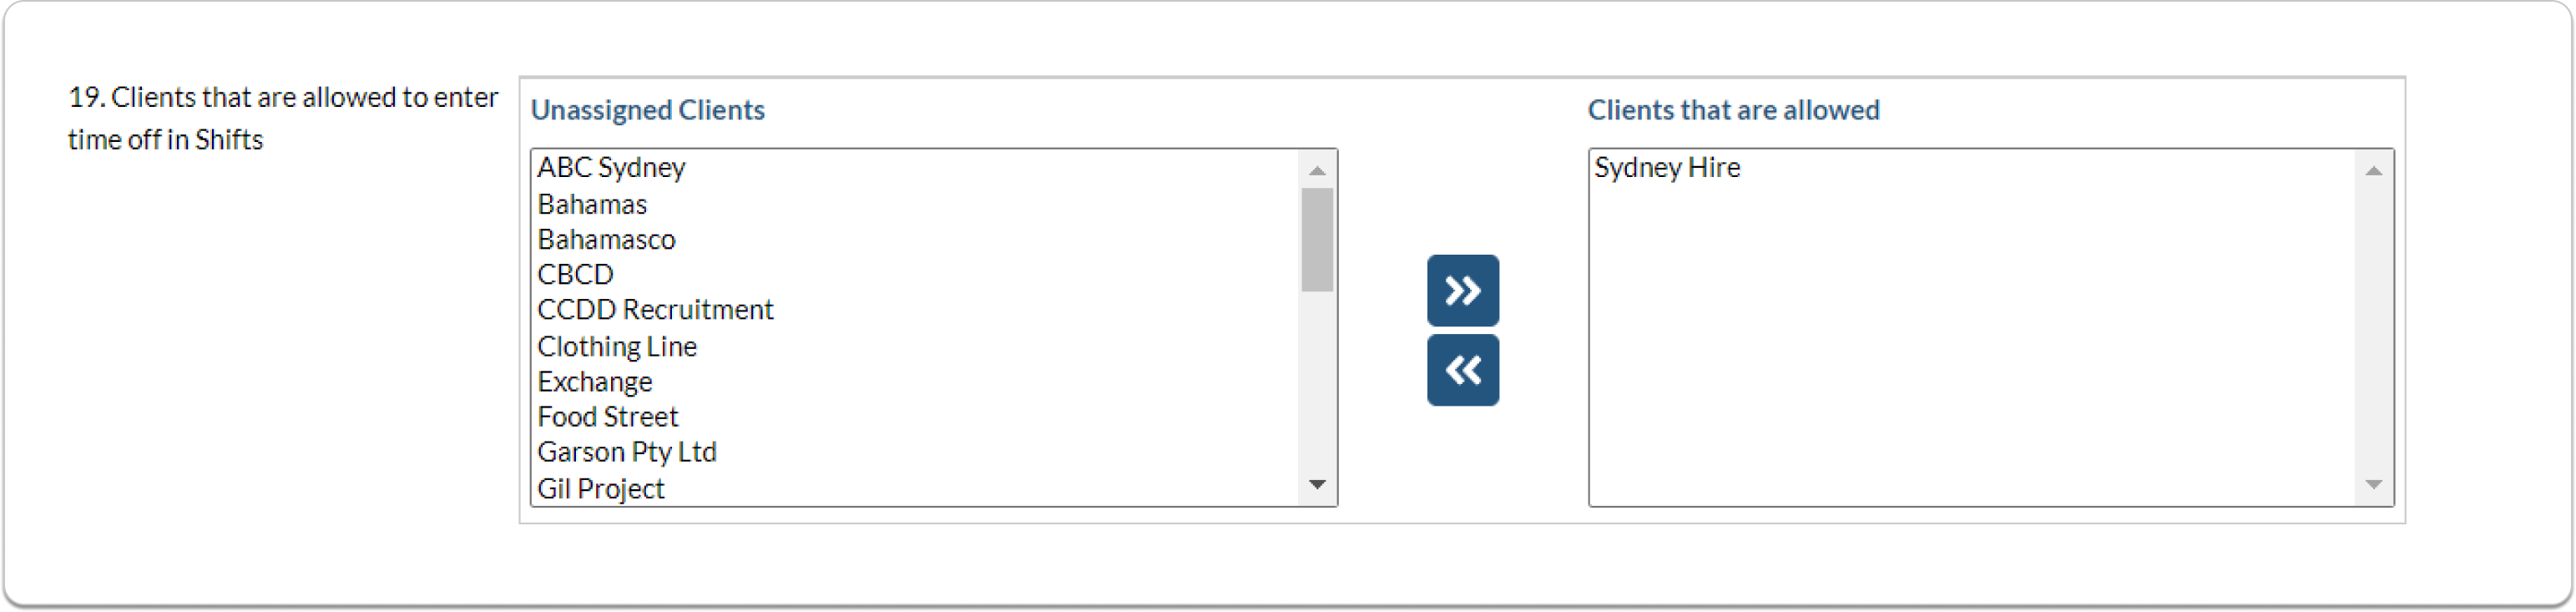
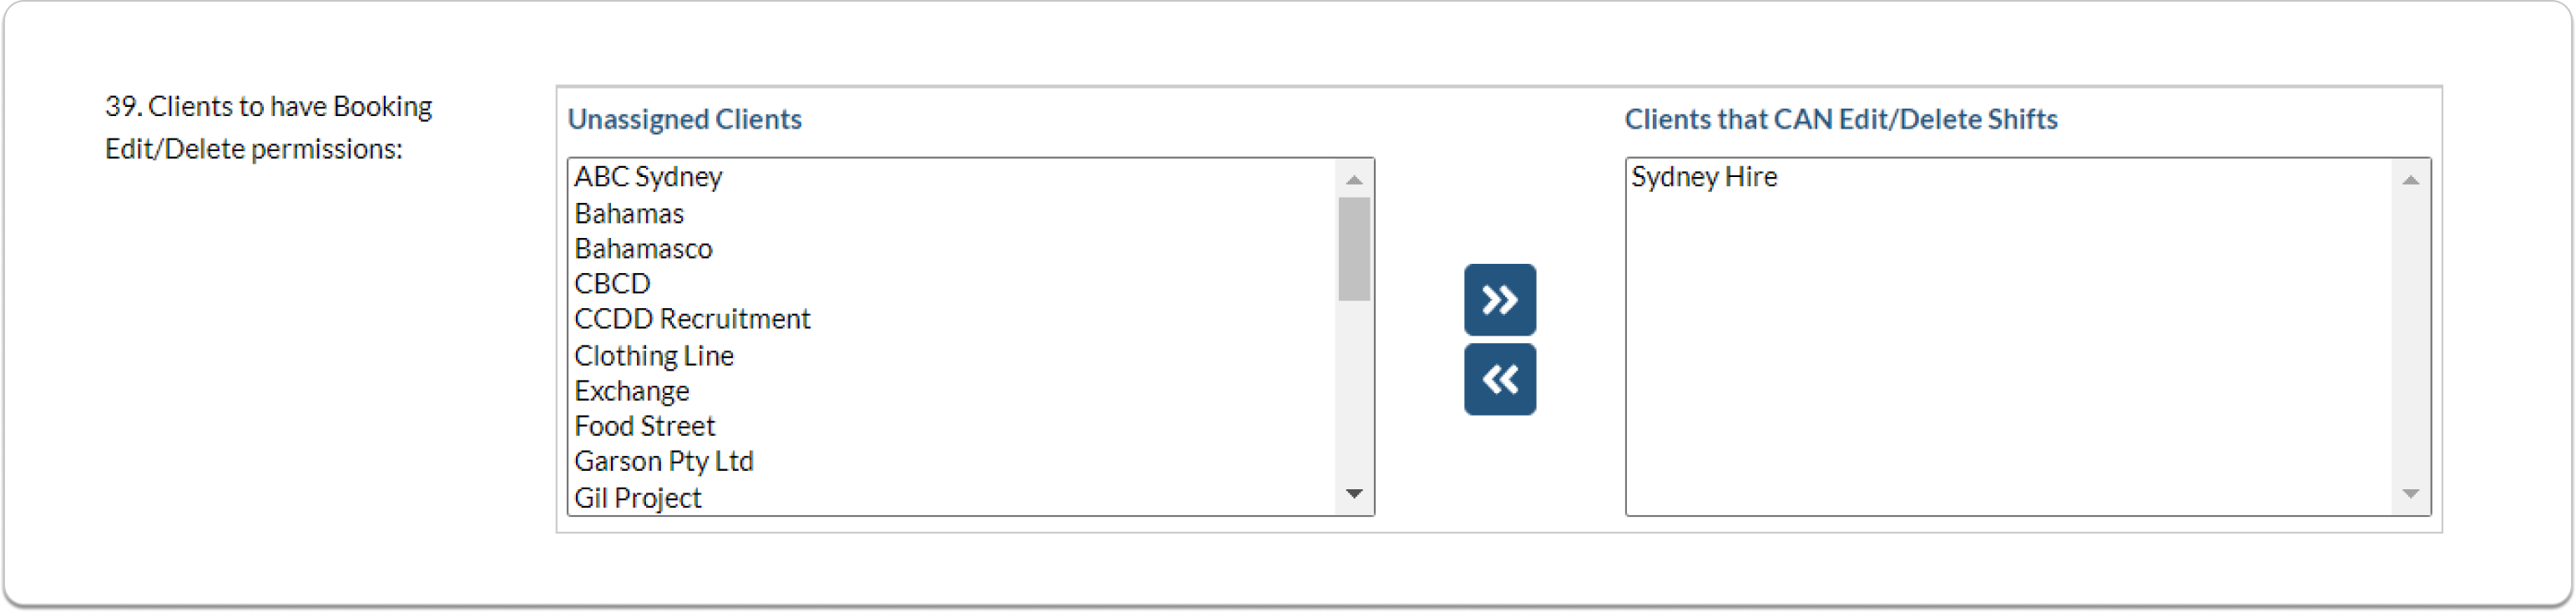
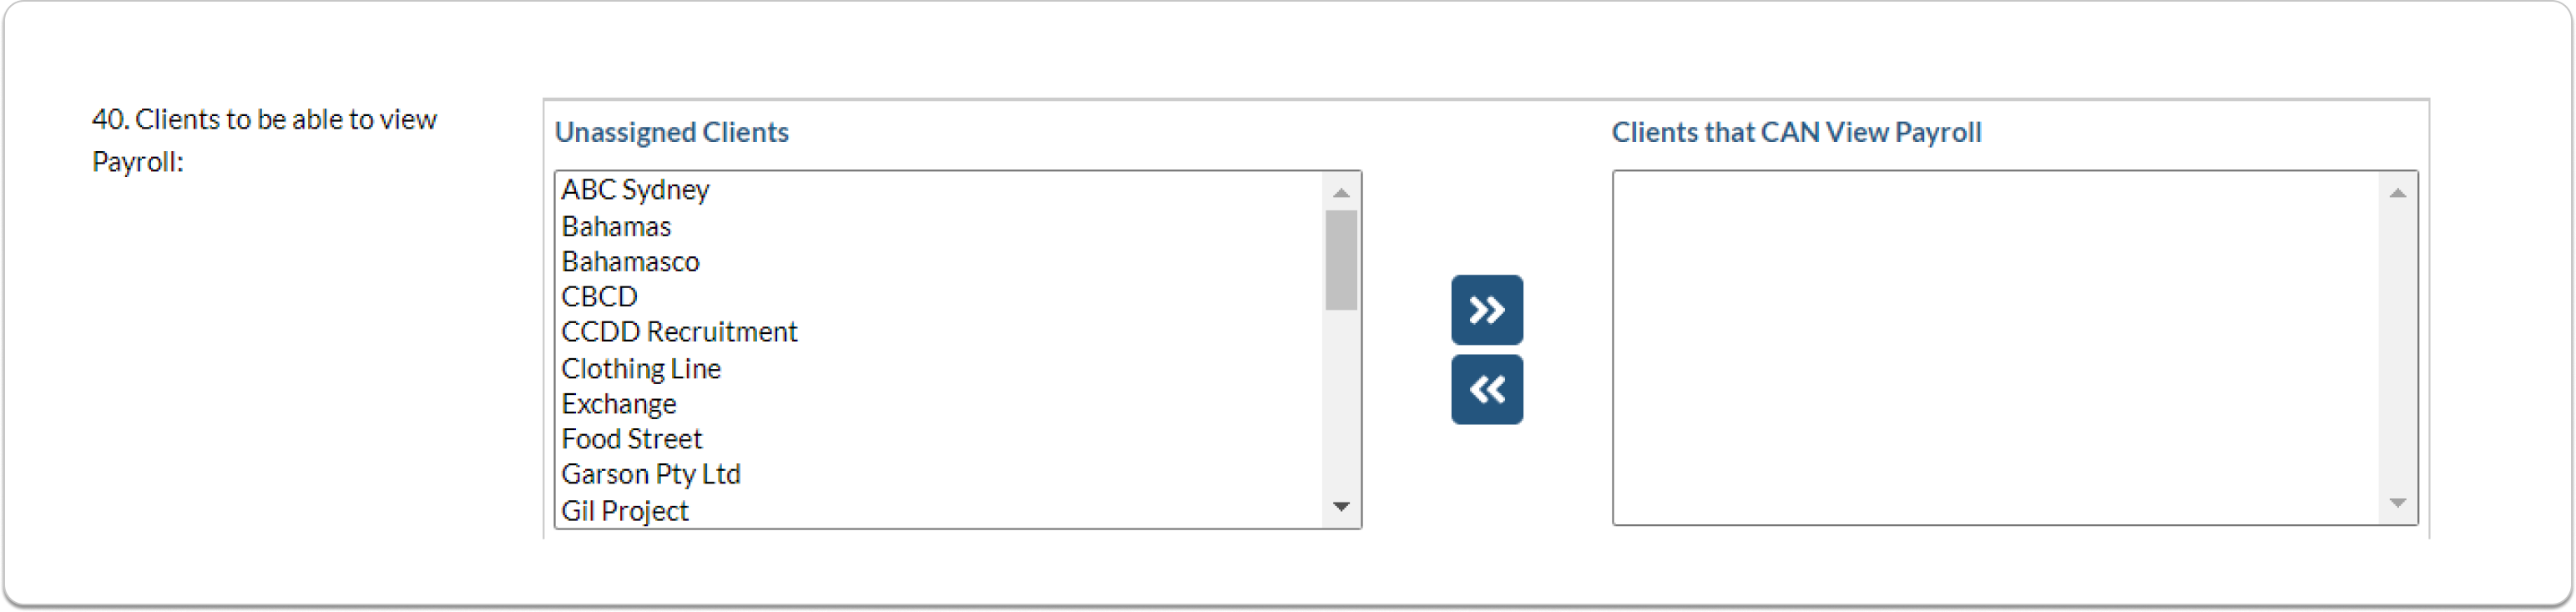
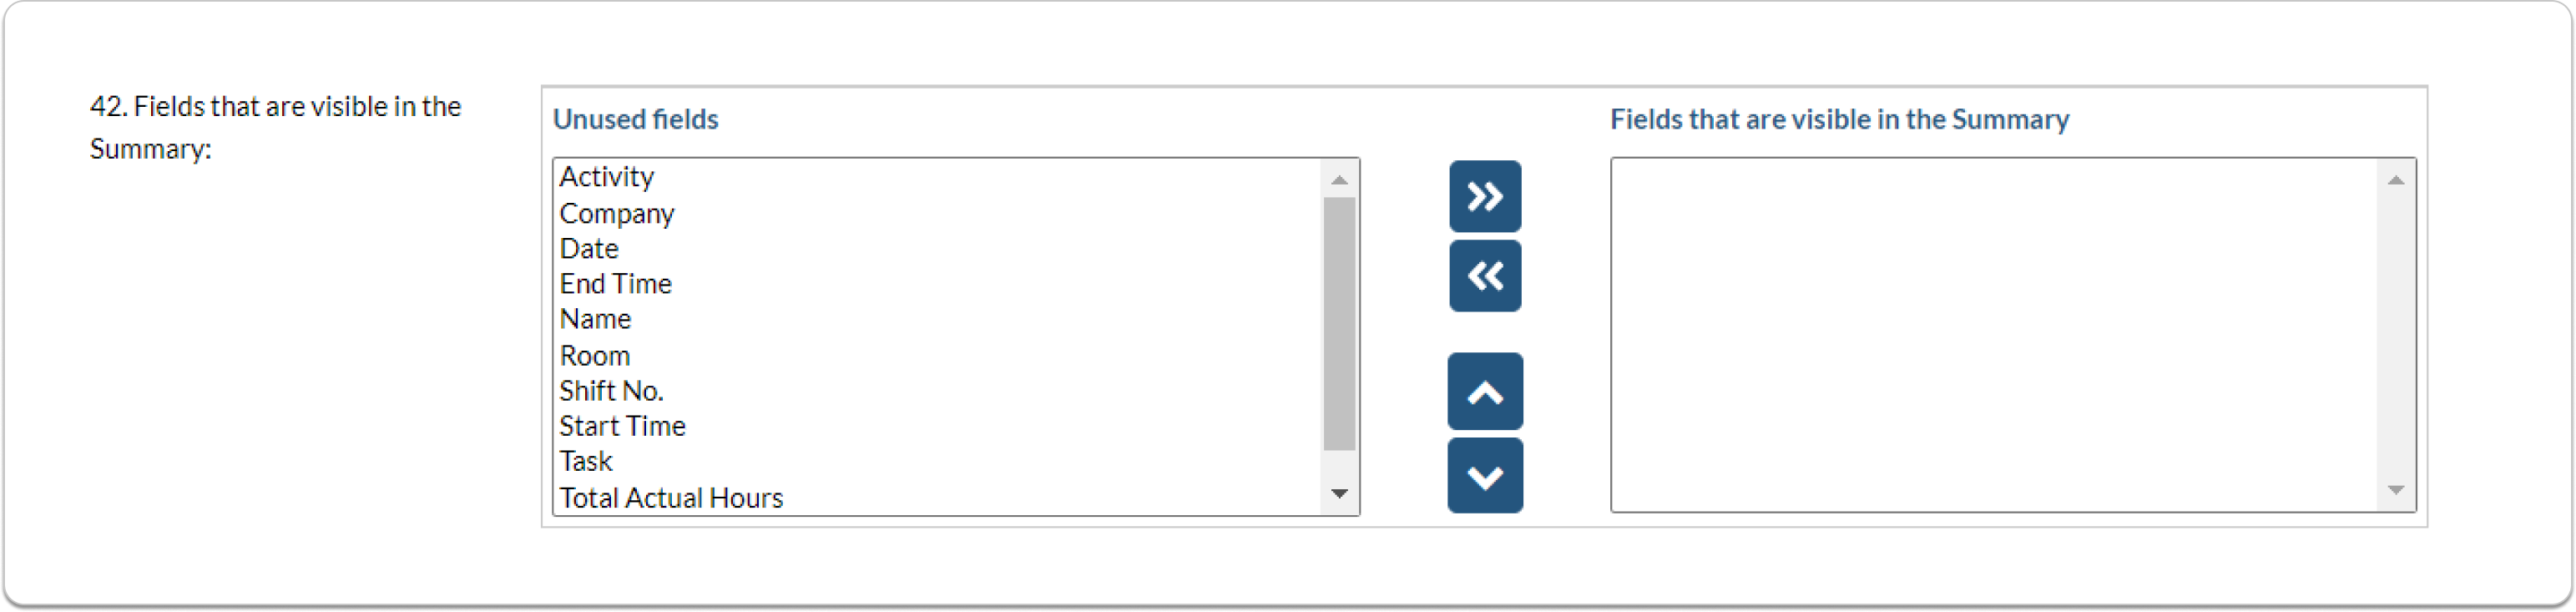
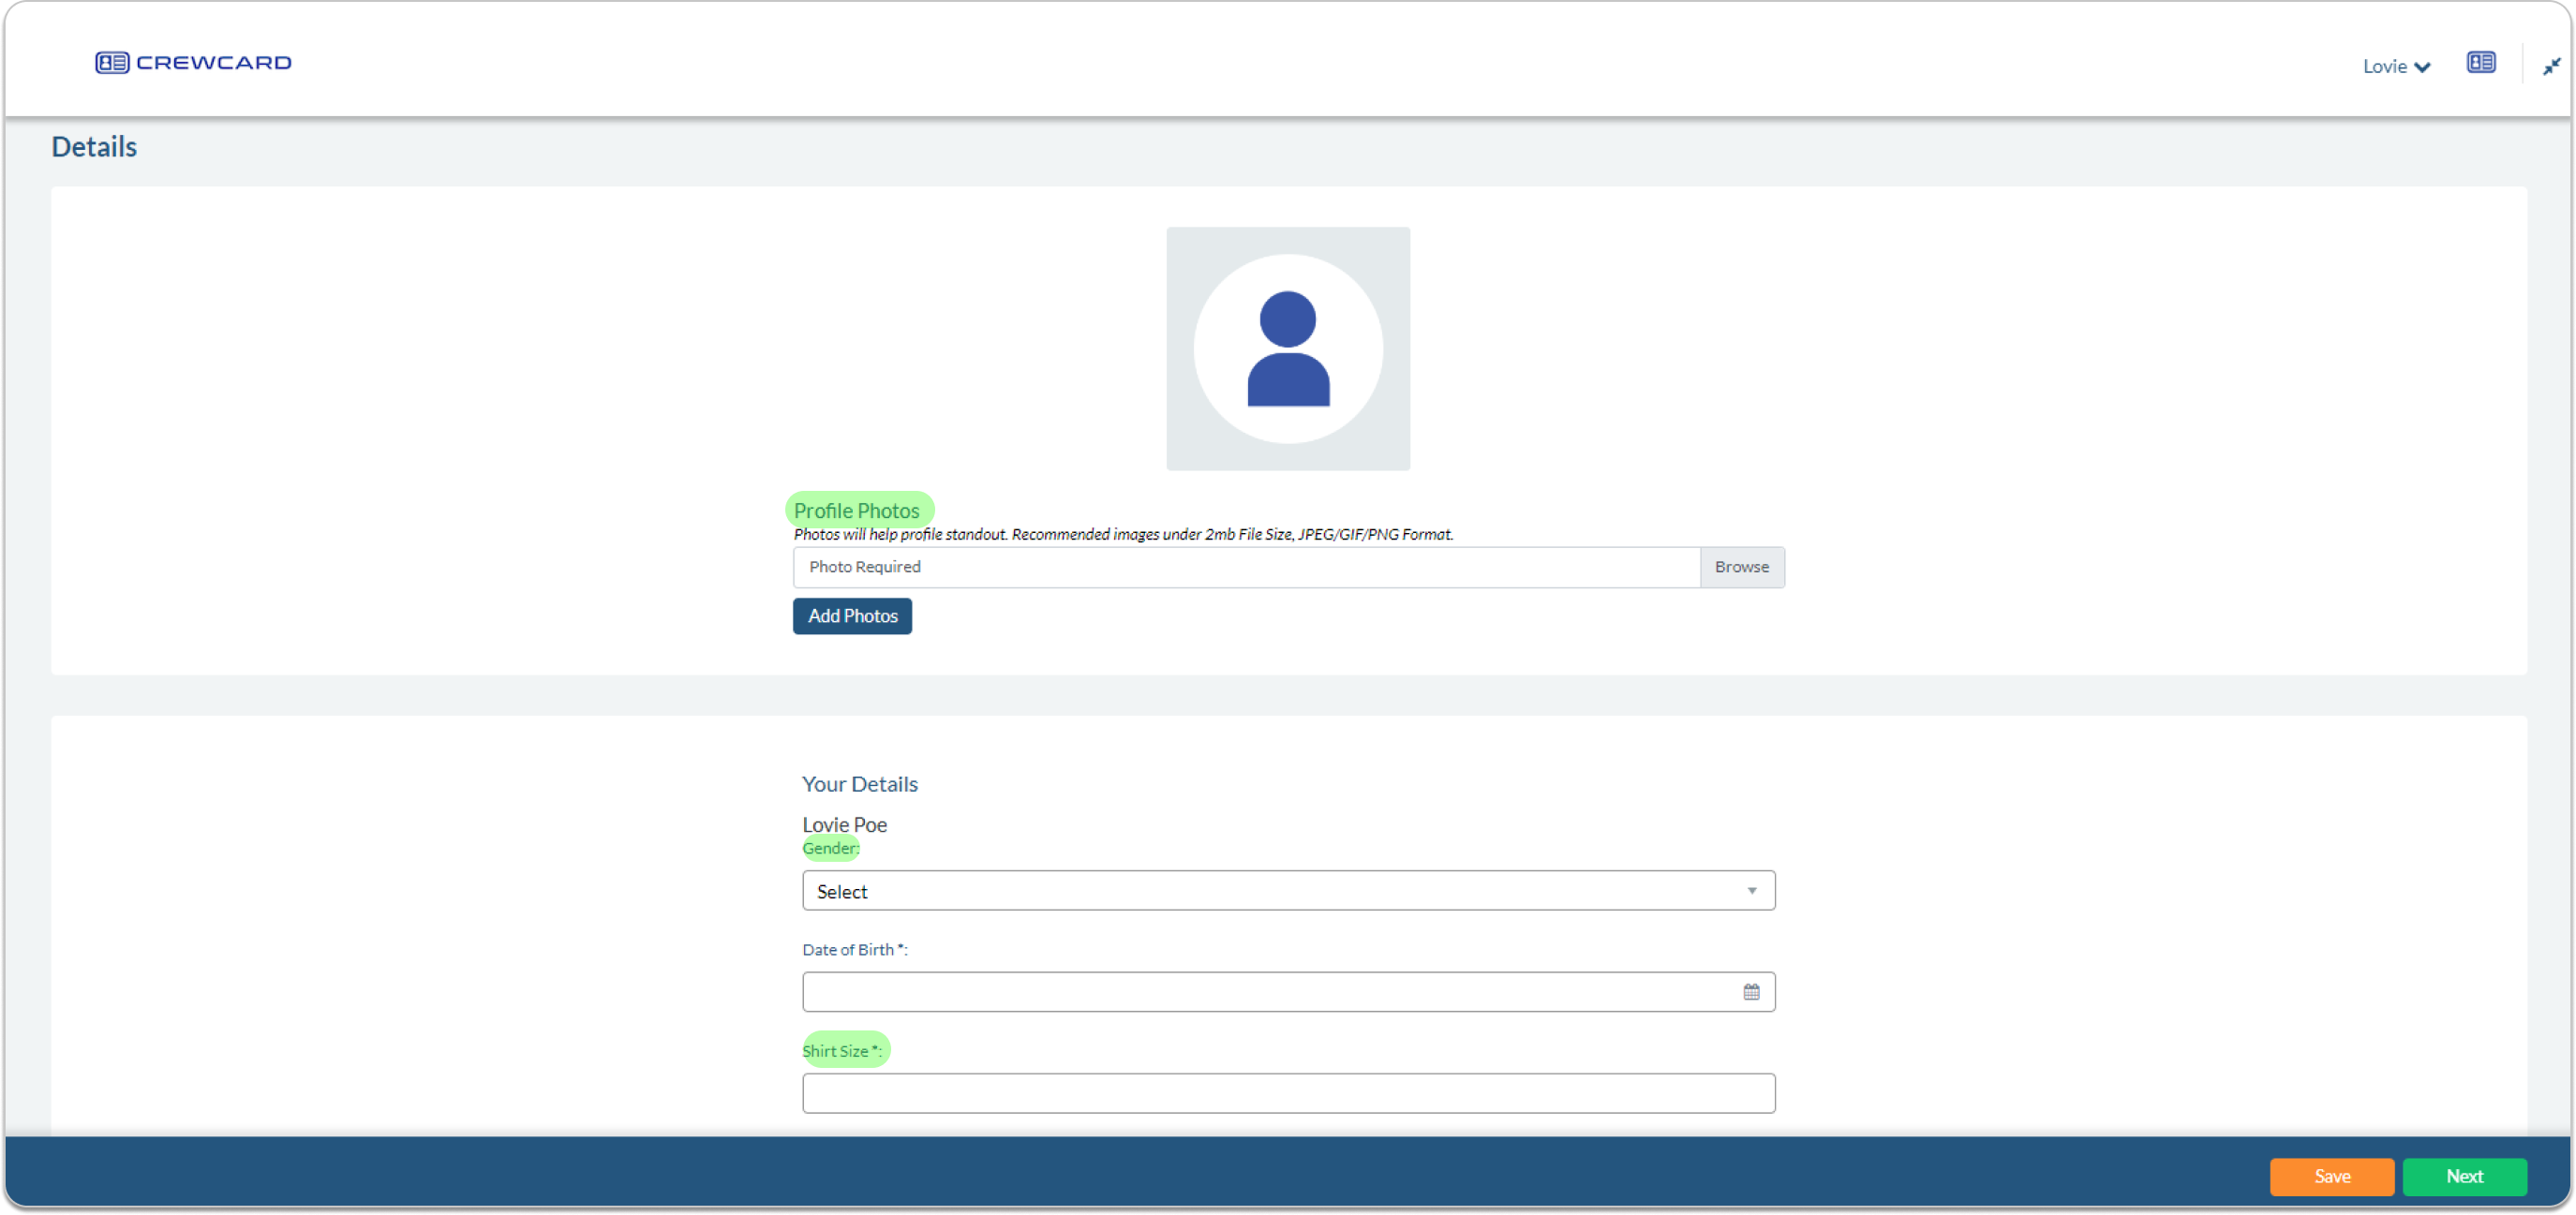
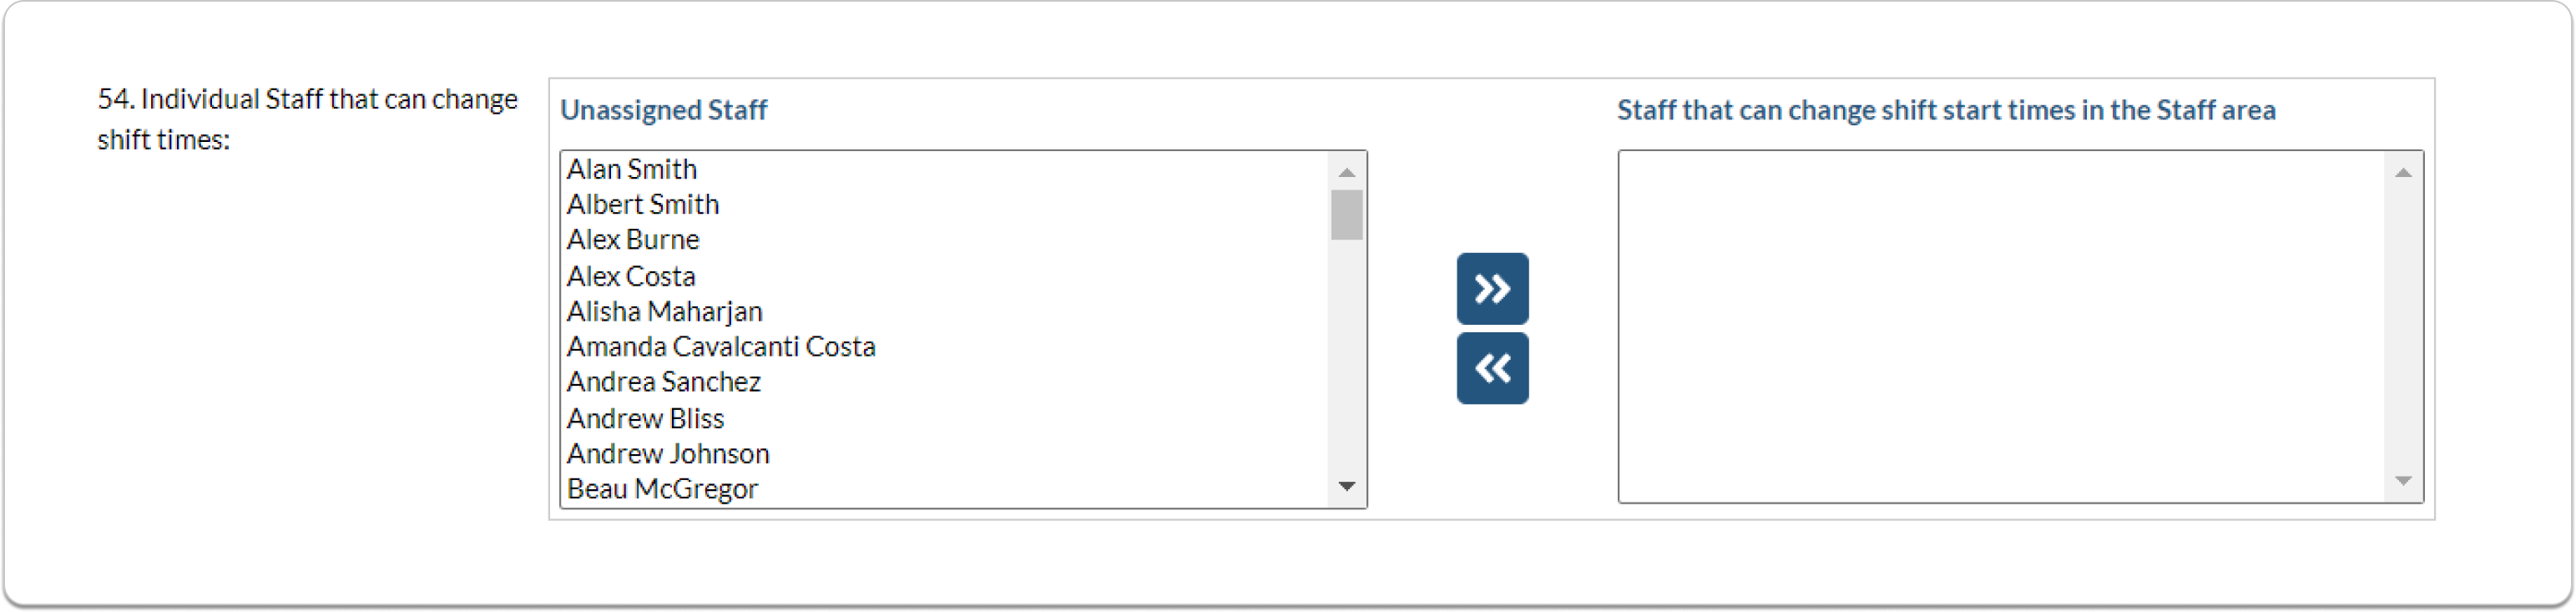
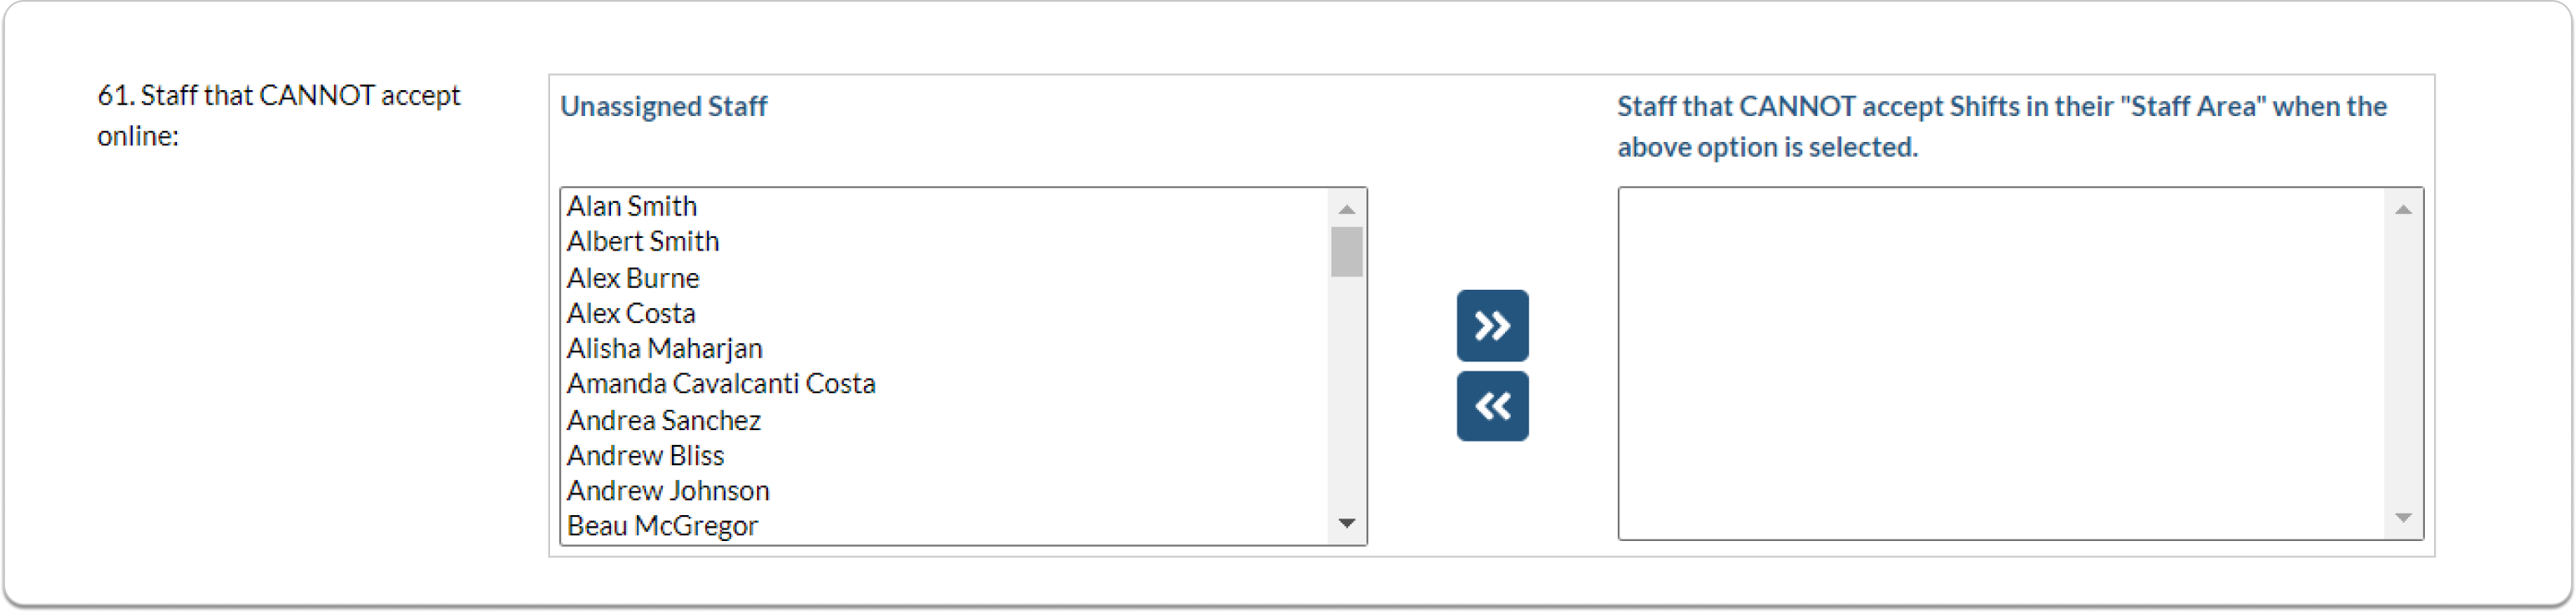
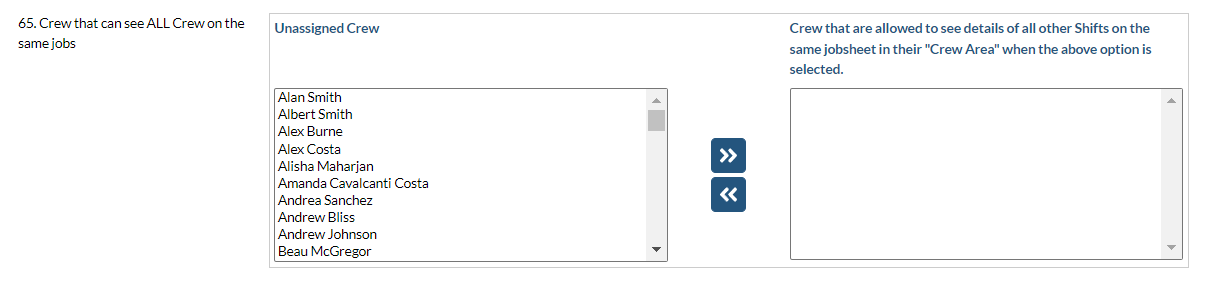
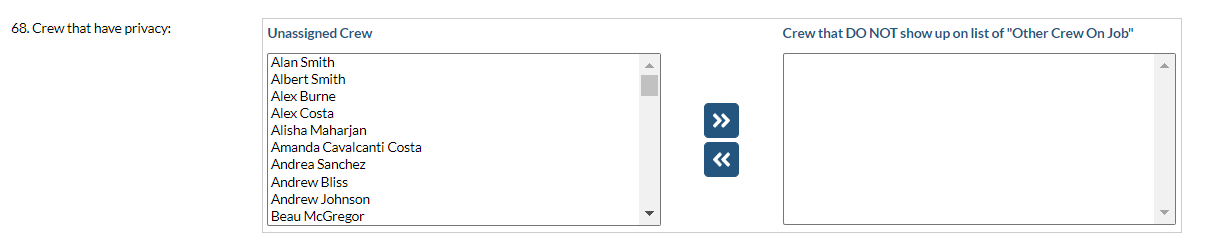
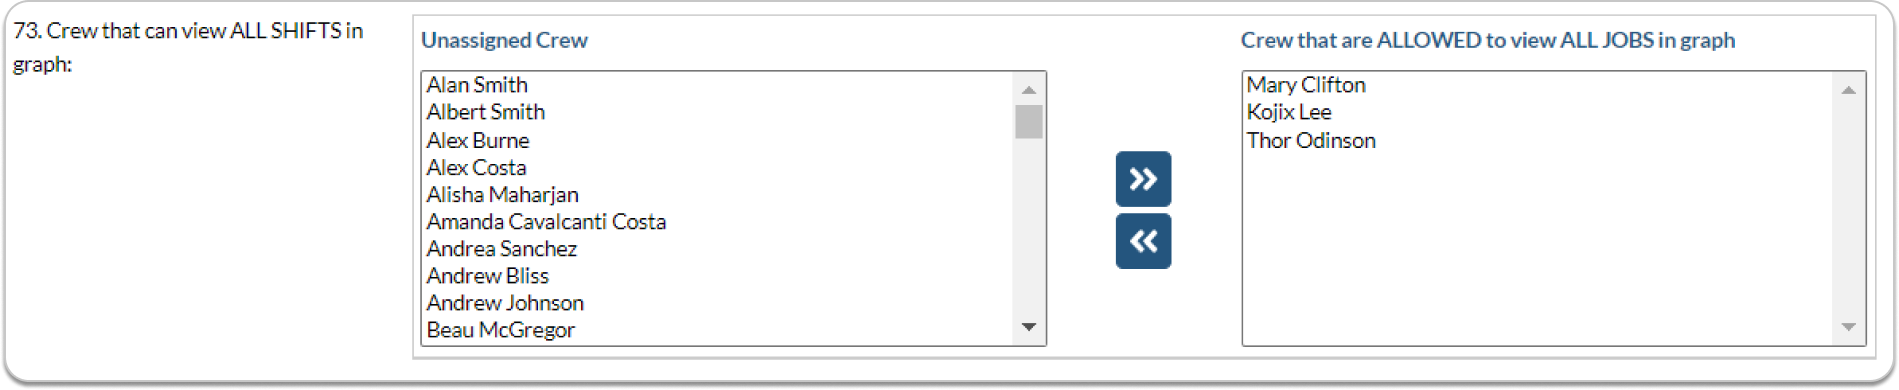
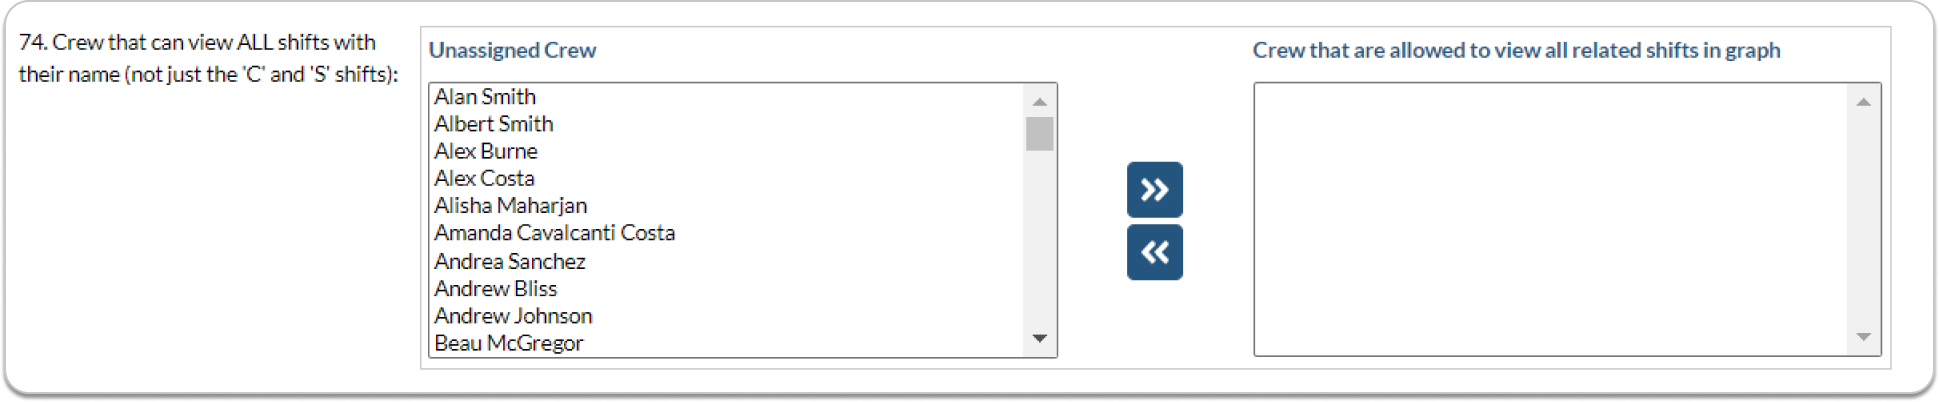
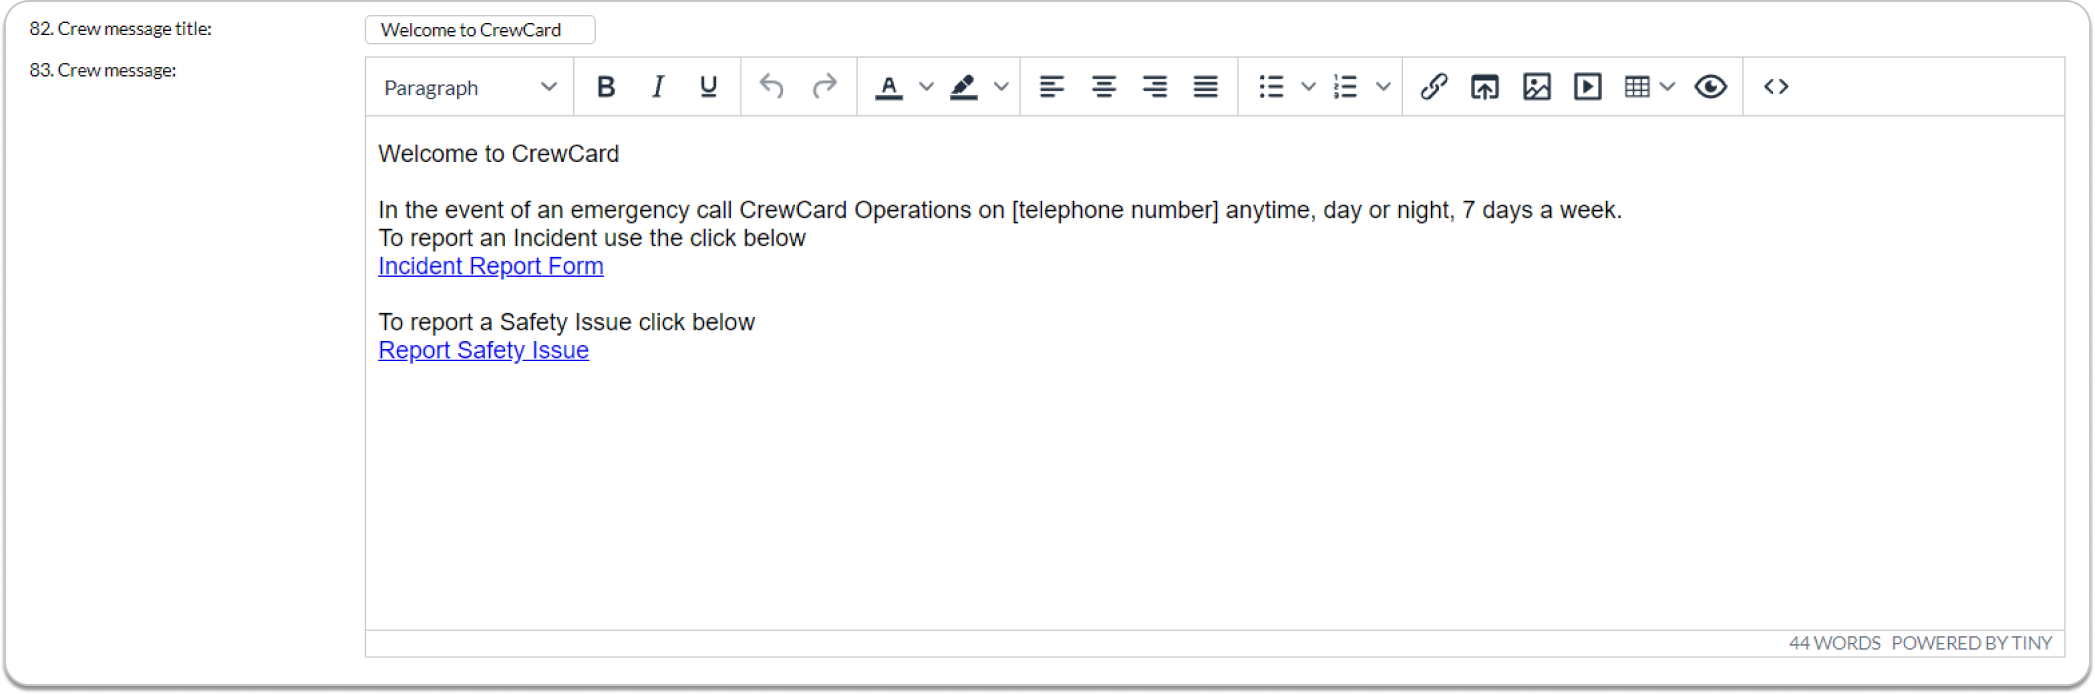 91. Admin will confirm Crew Unavailability: If “No” is selected, then crew’s unavailability requests will be approved immediately. If “Yes” is selected, all unavailability requests need to be approved by office staff/operators.
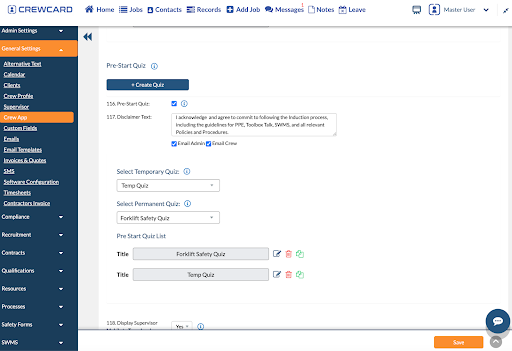
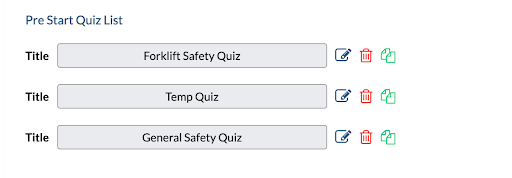


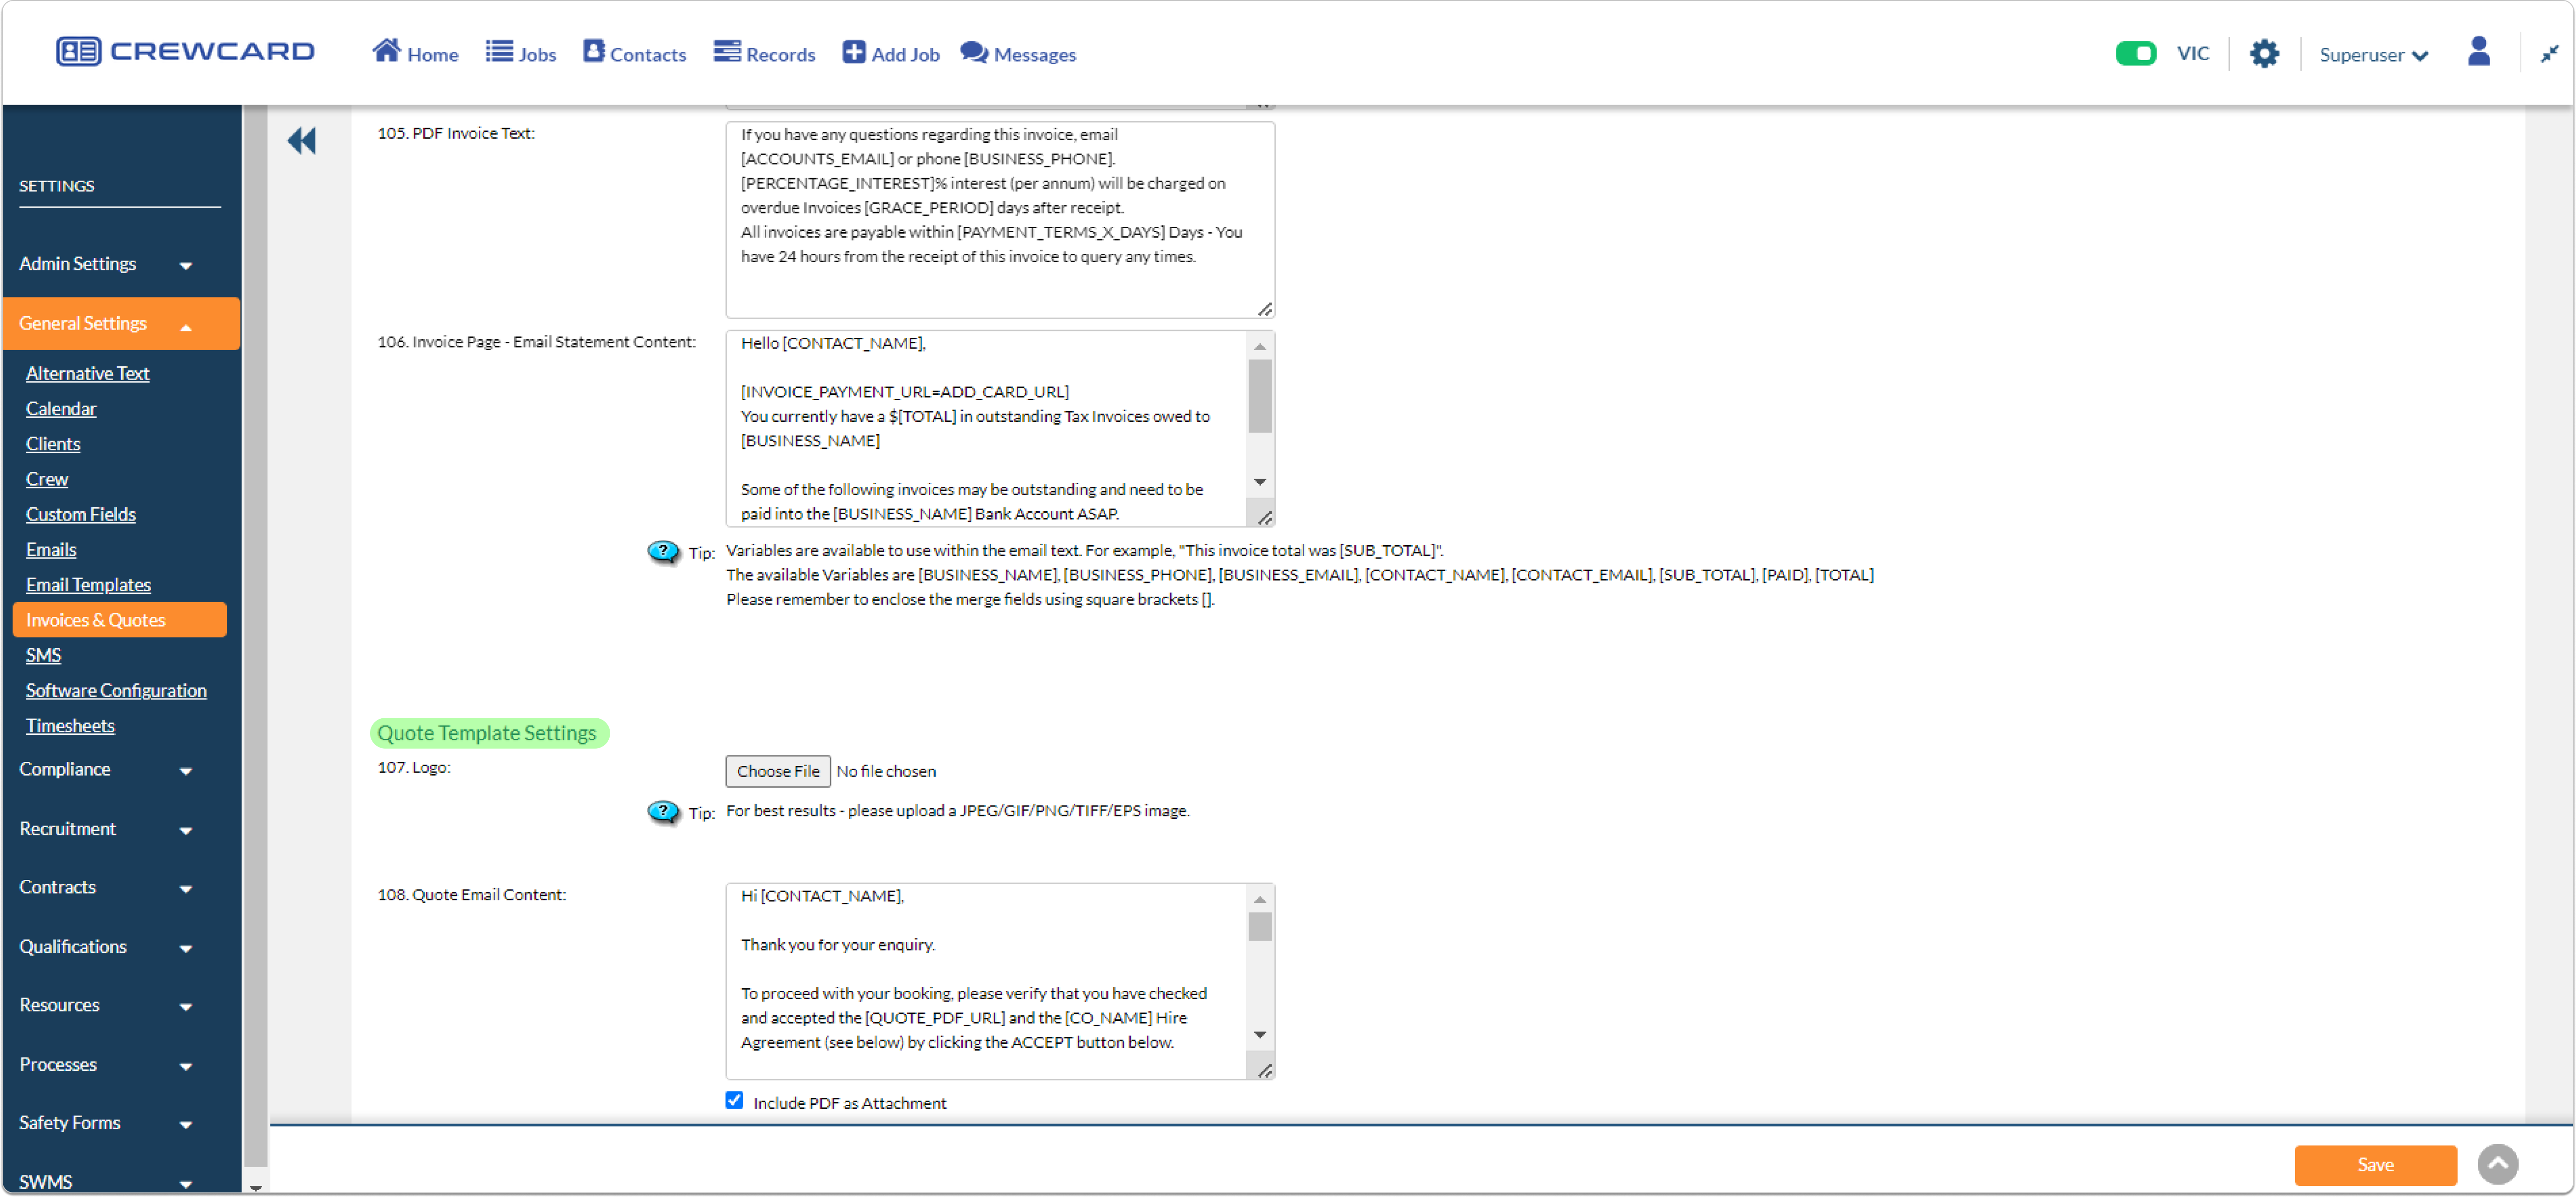


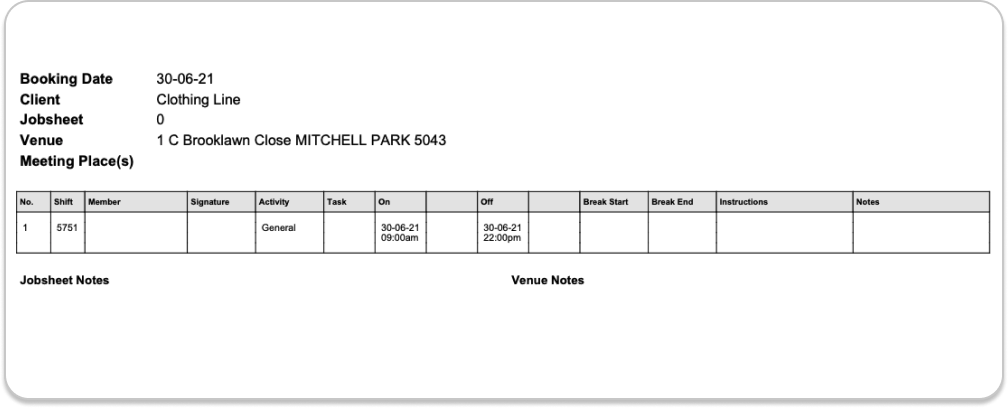
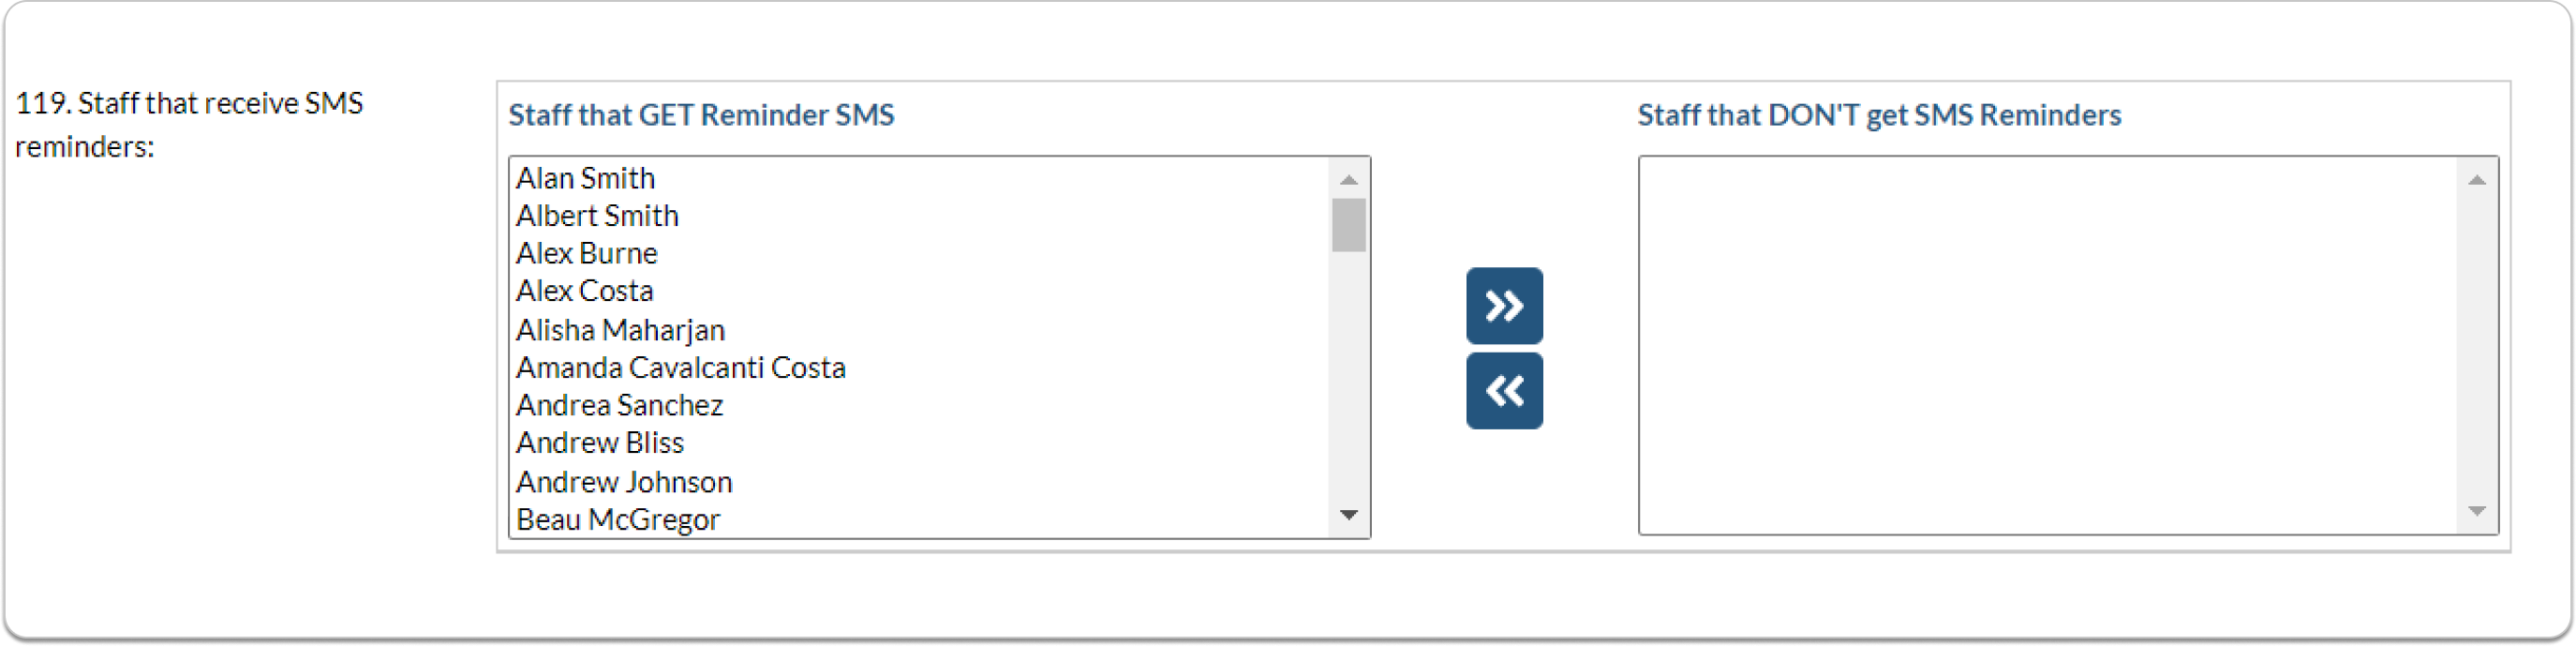
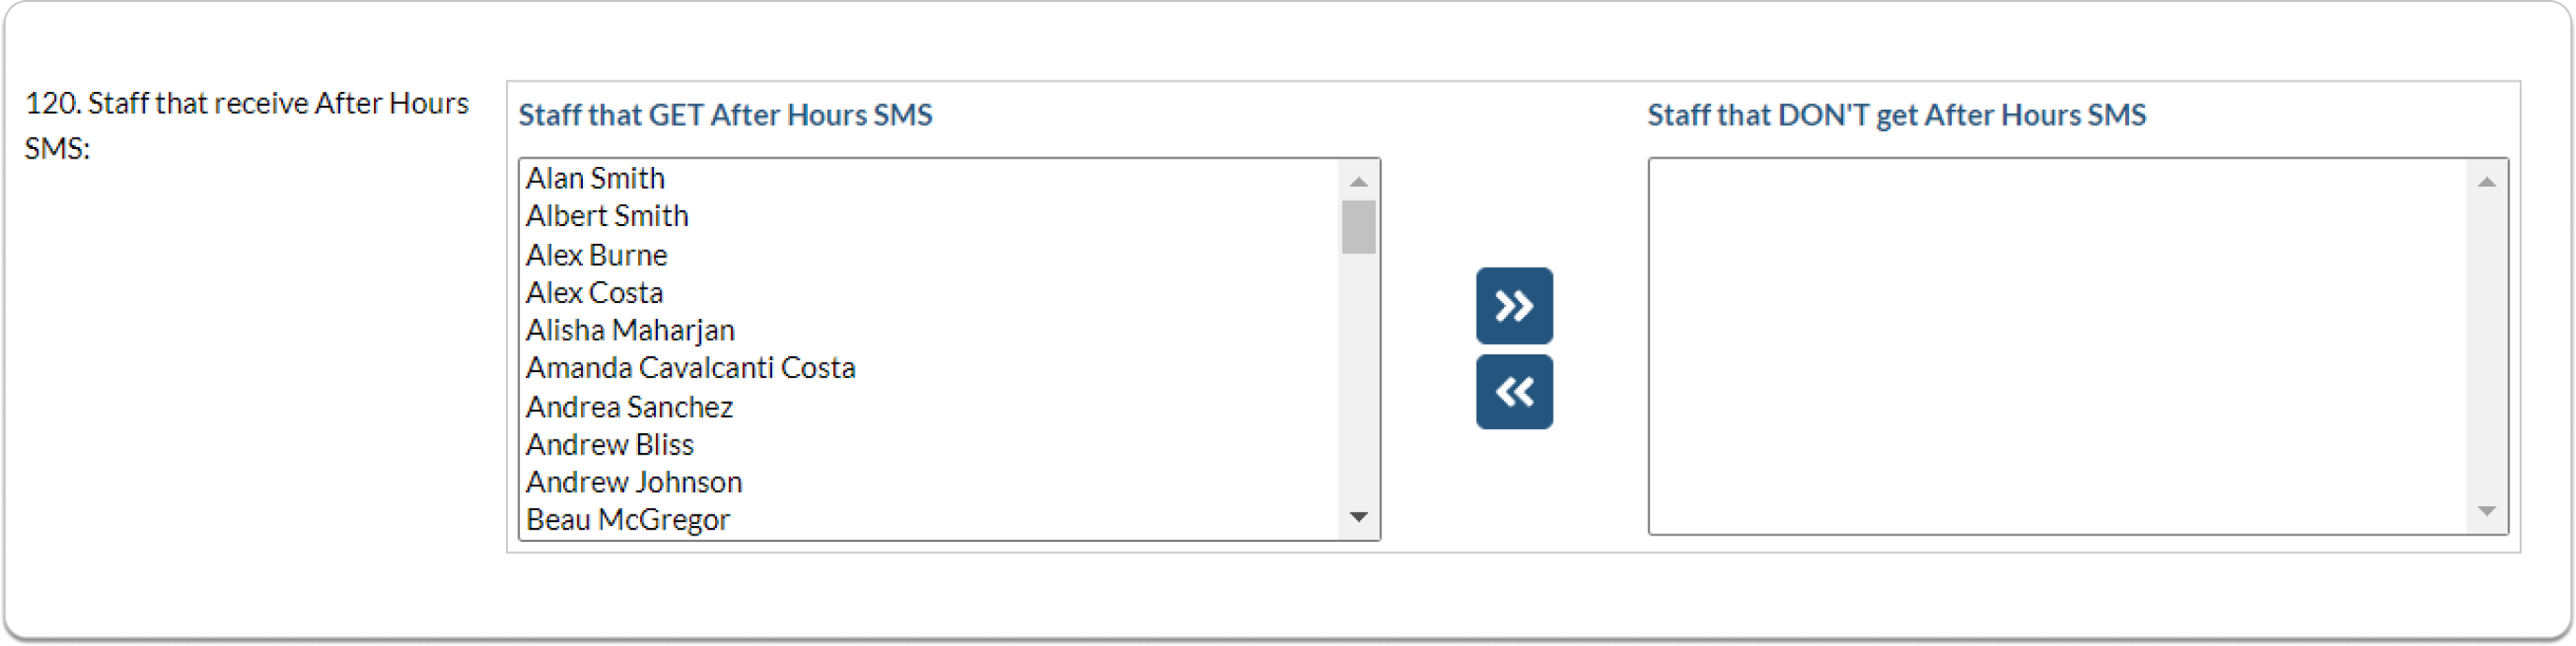
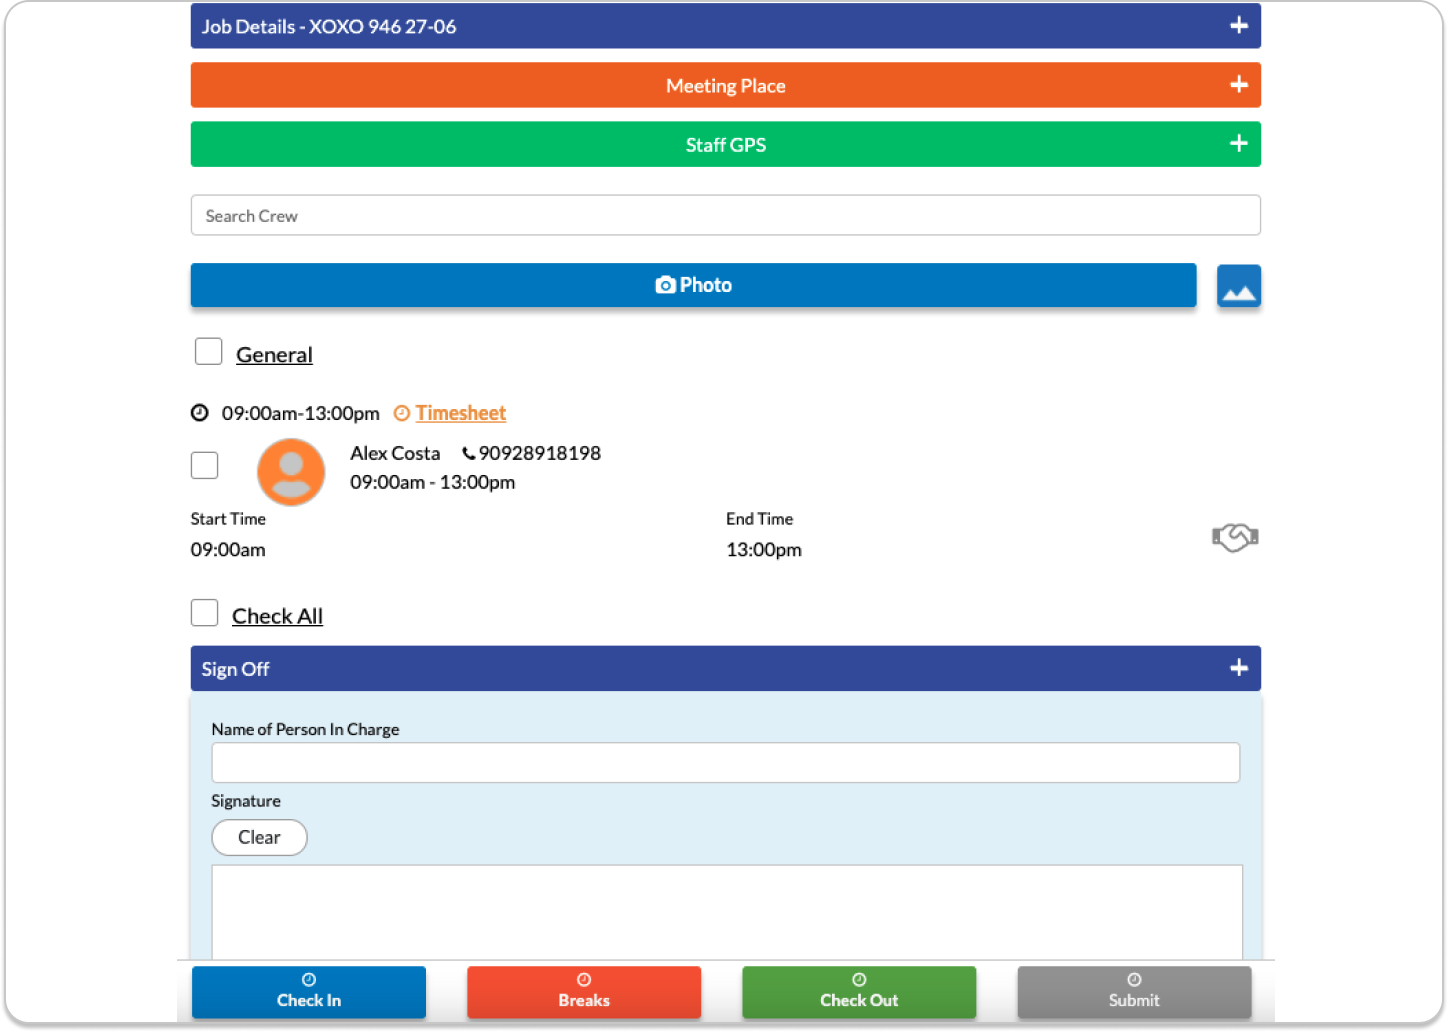
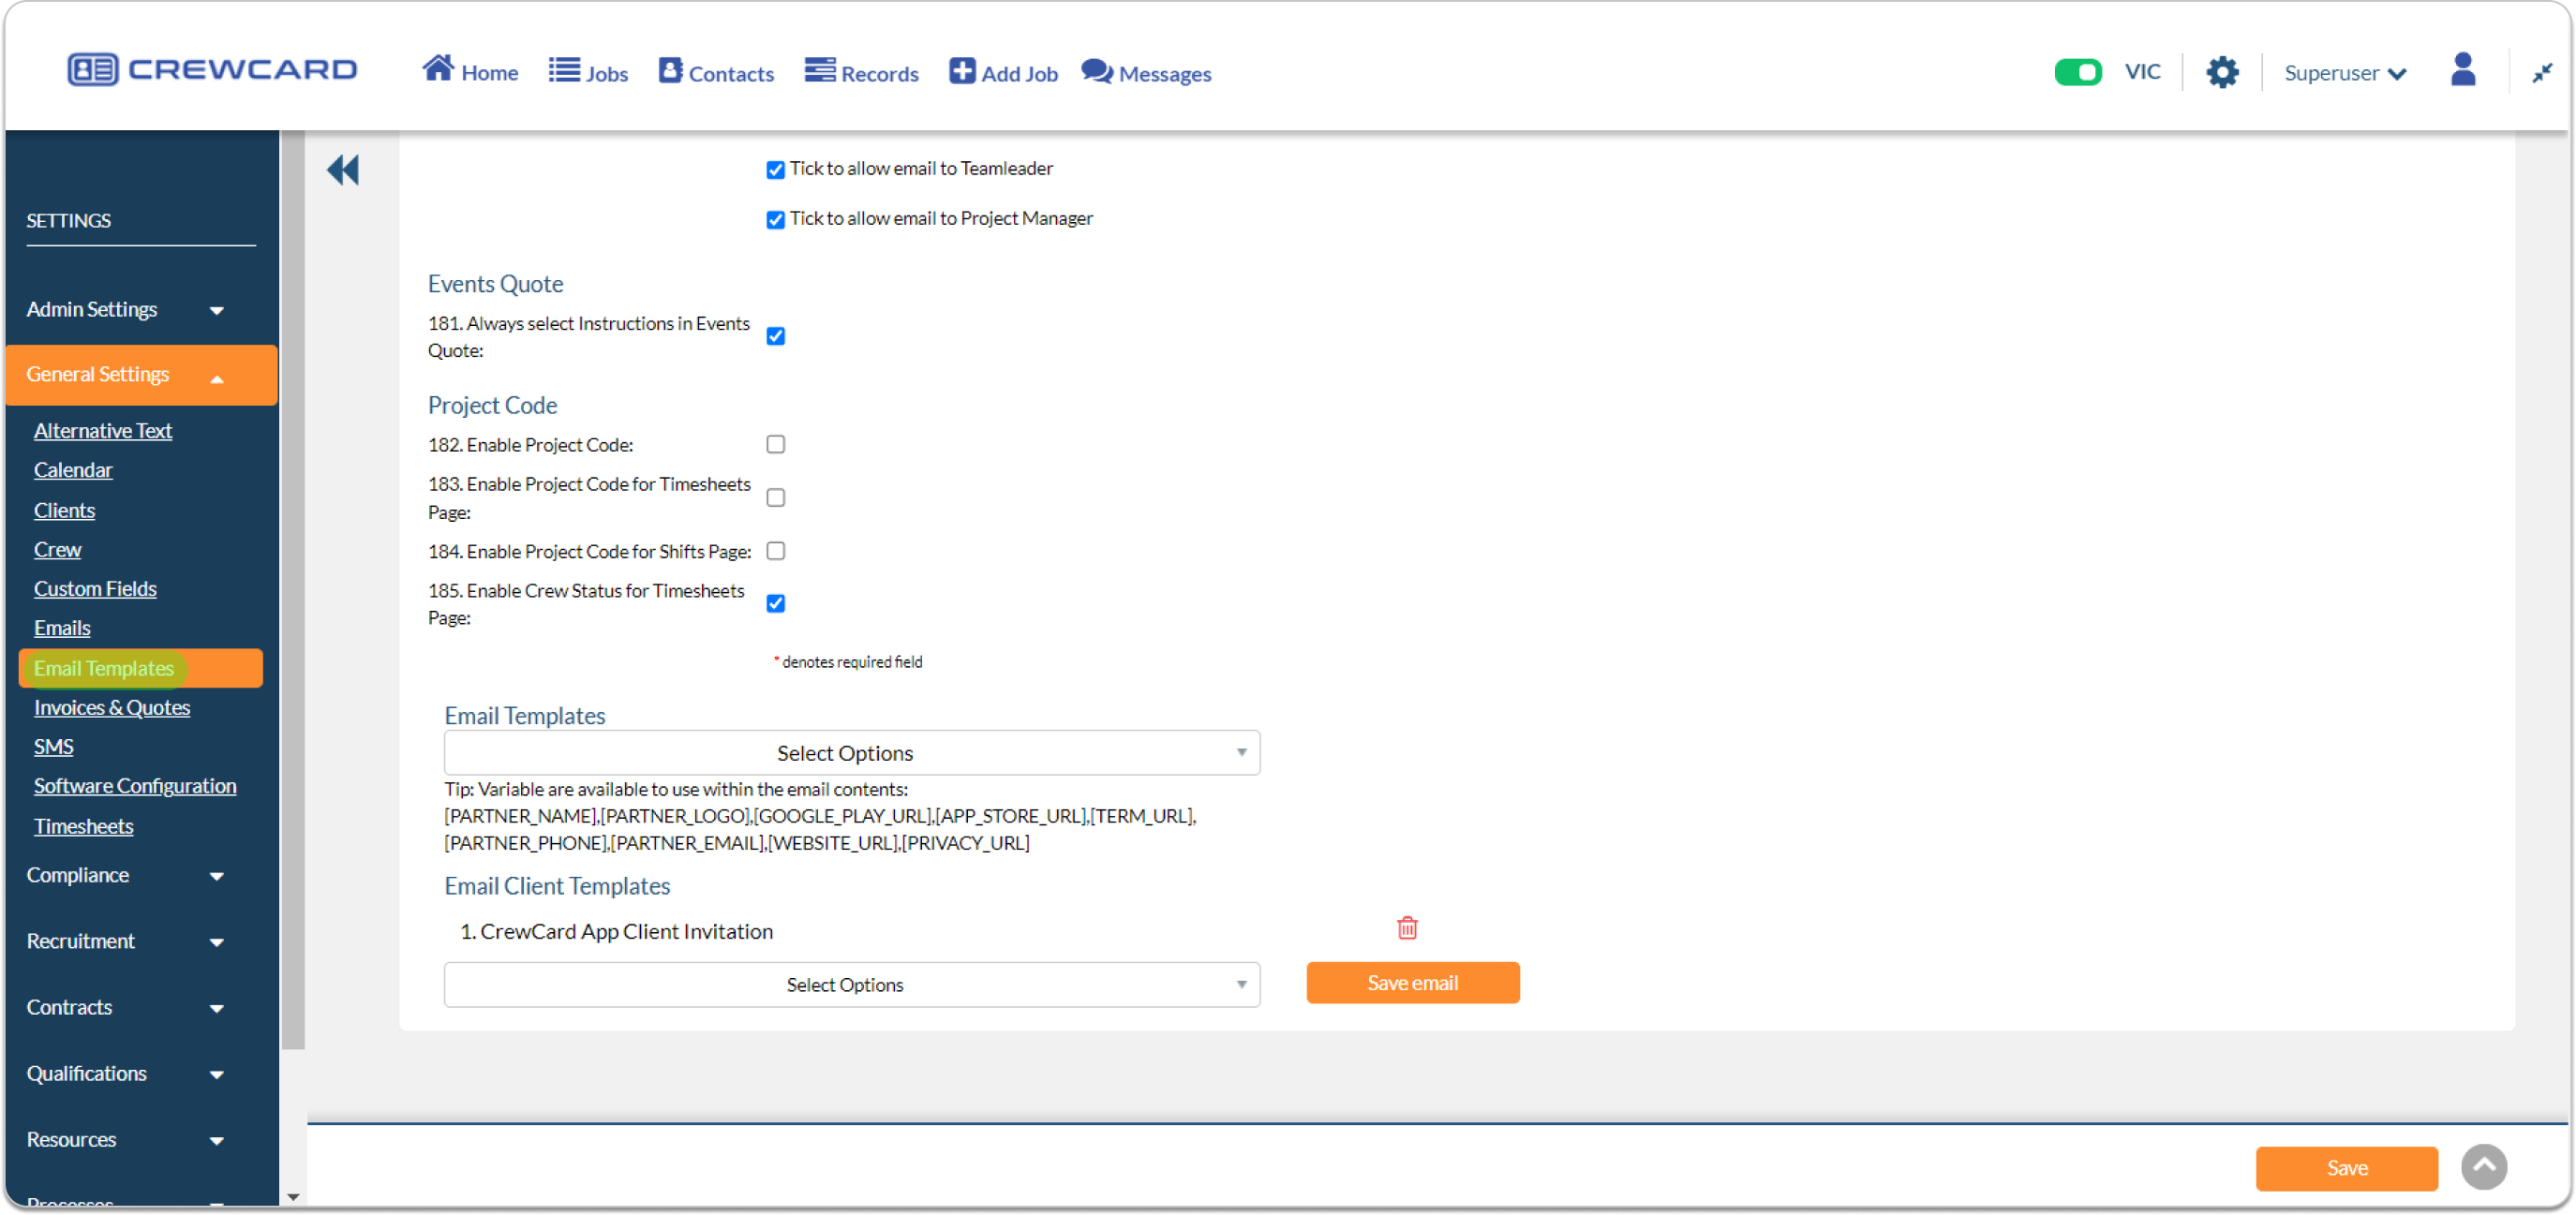

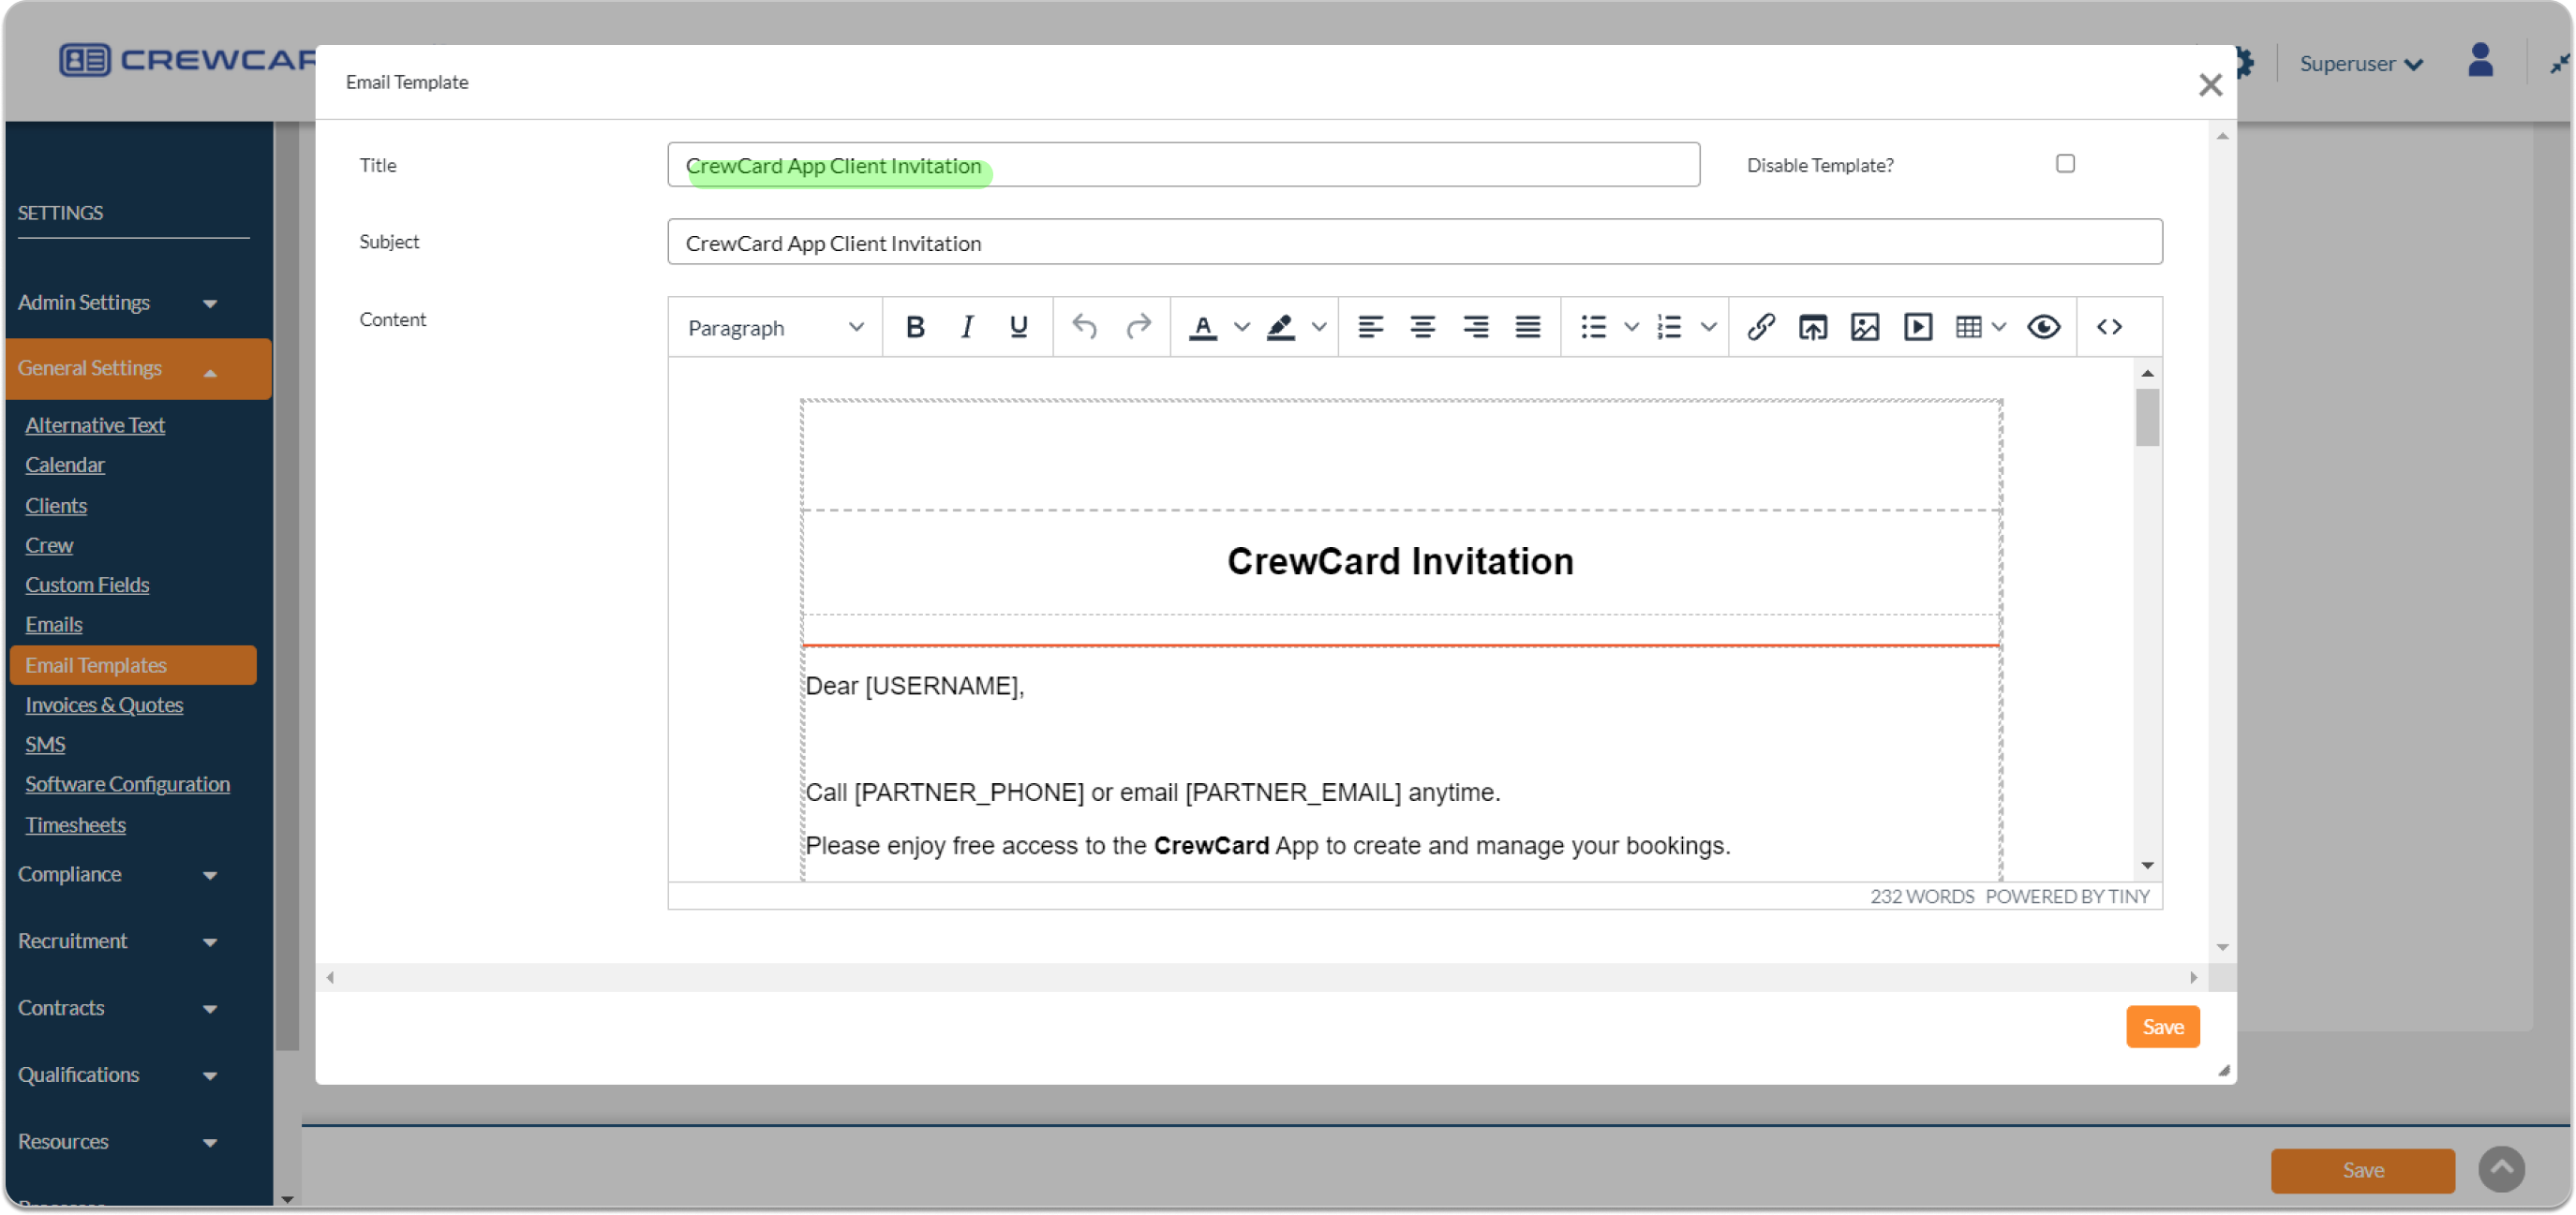
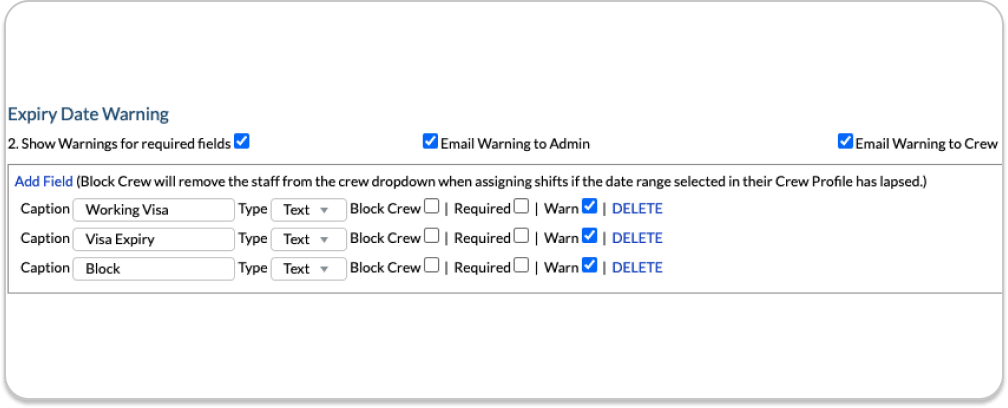
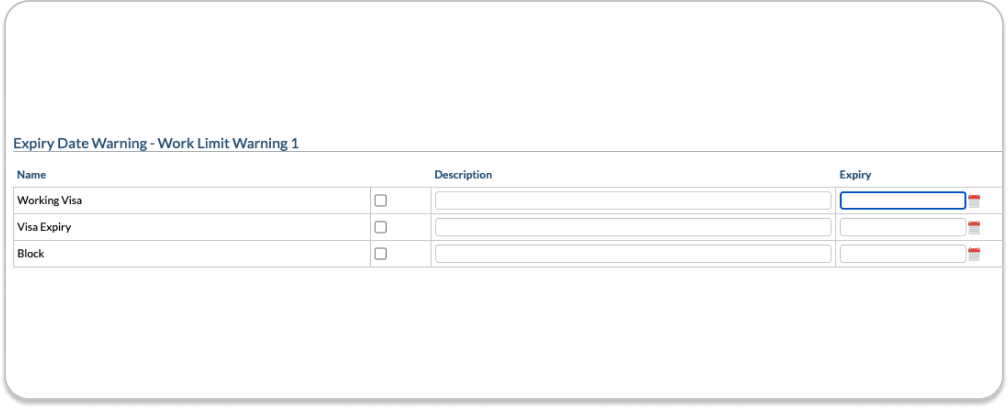
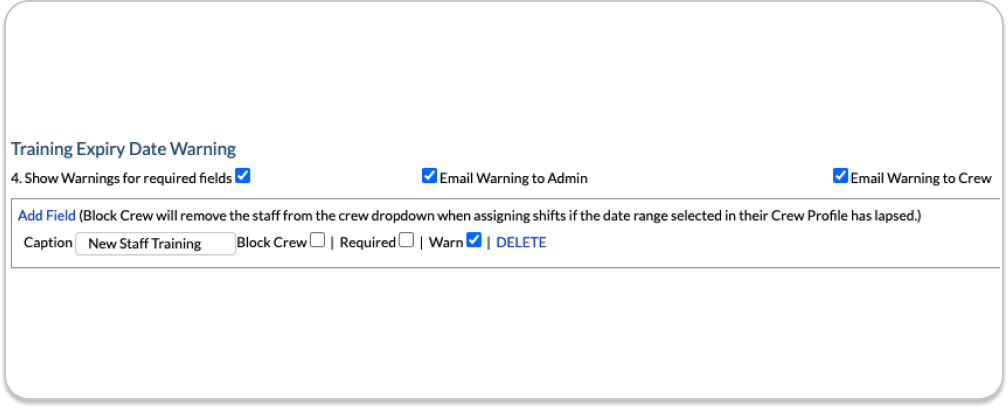
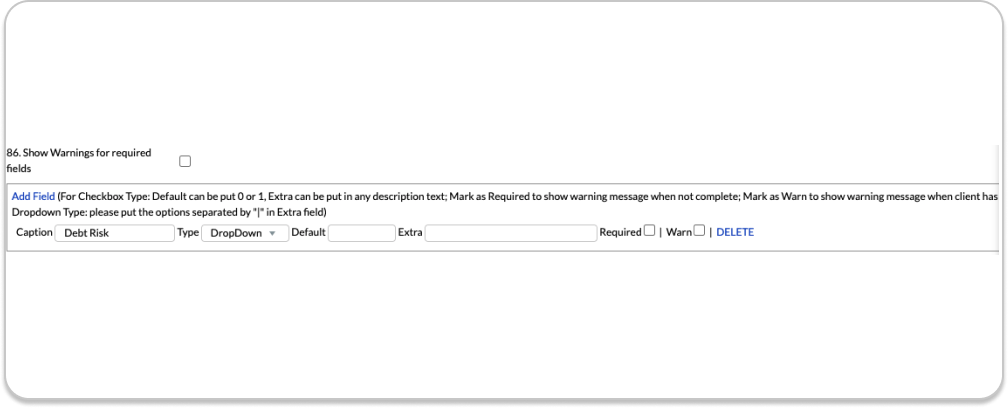
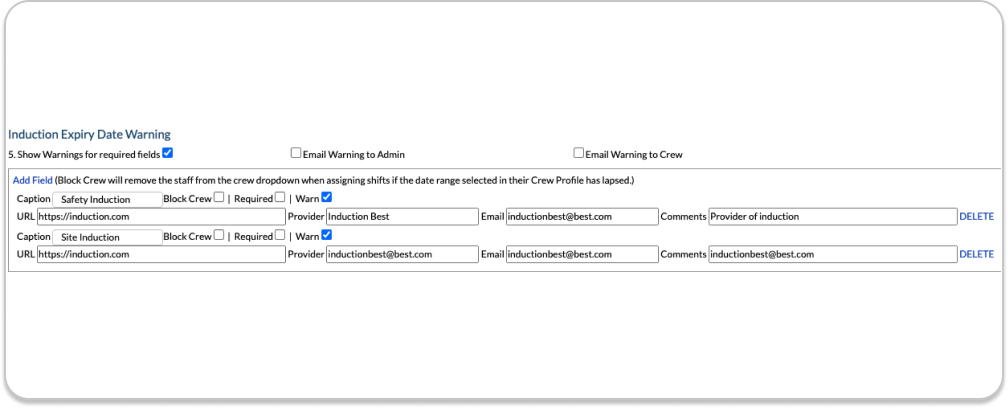
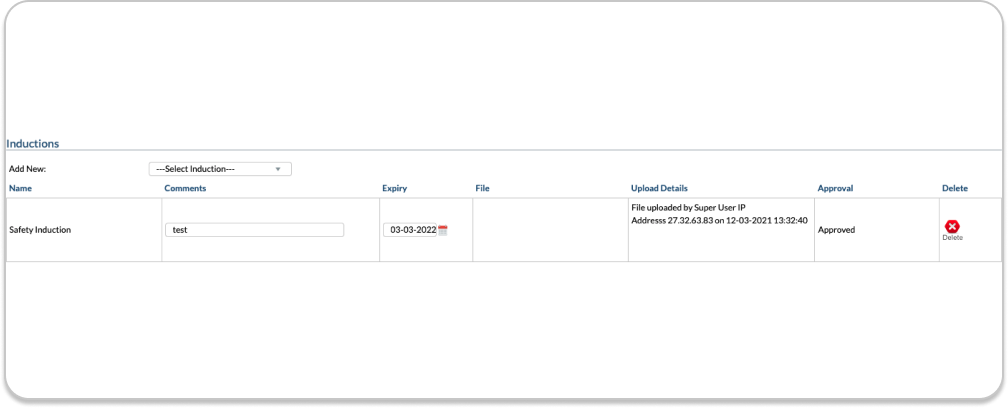
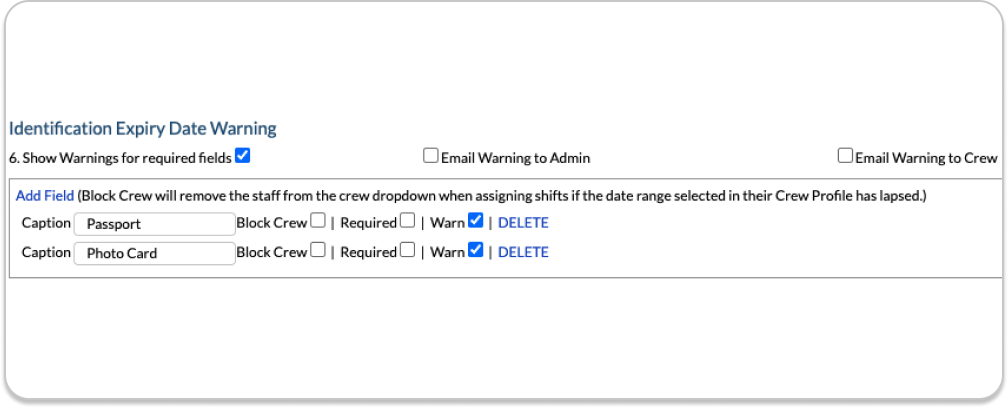
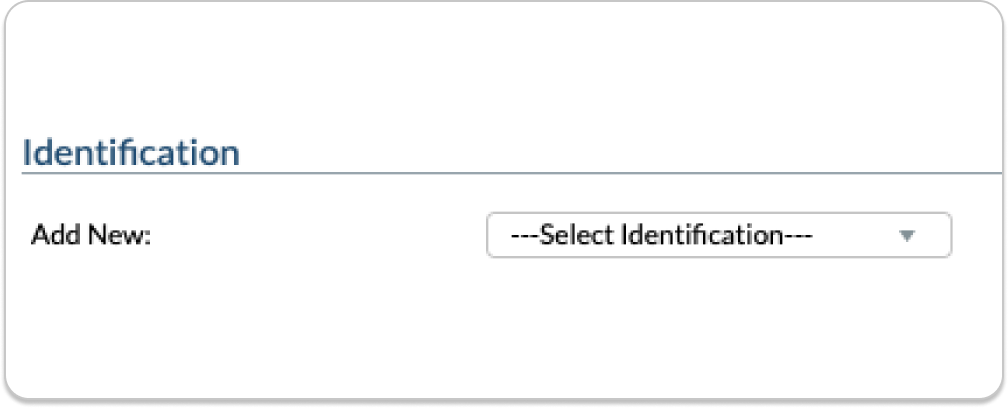
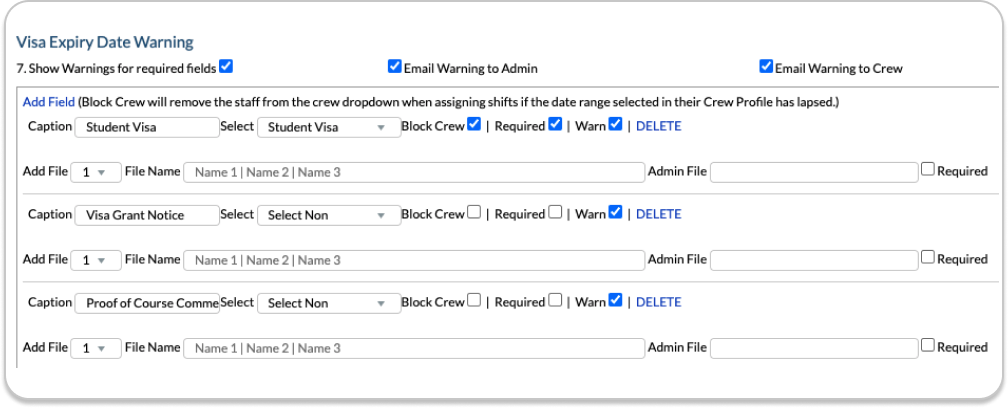
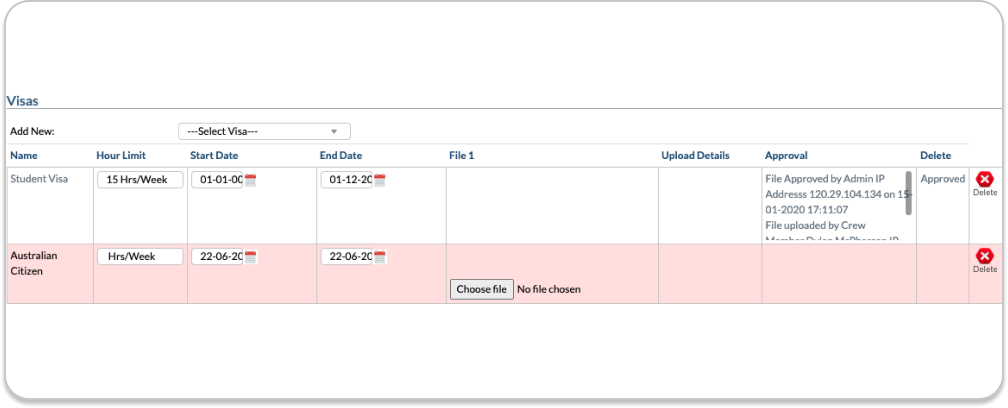
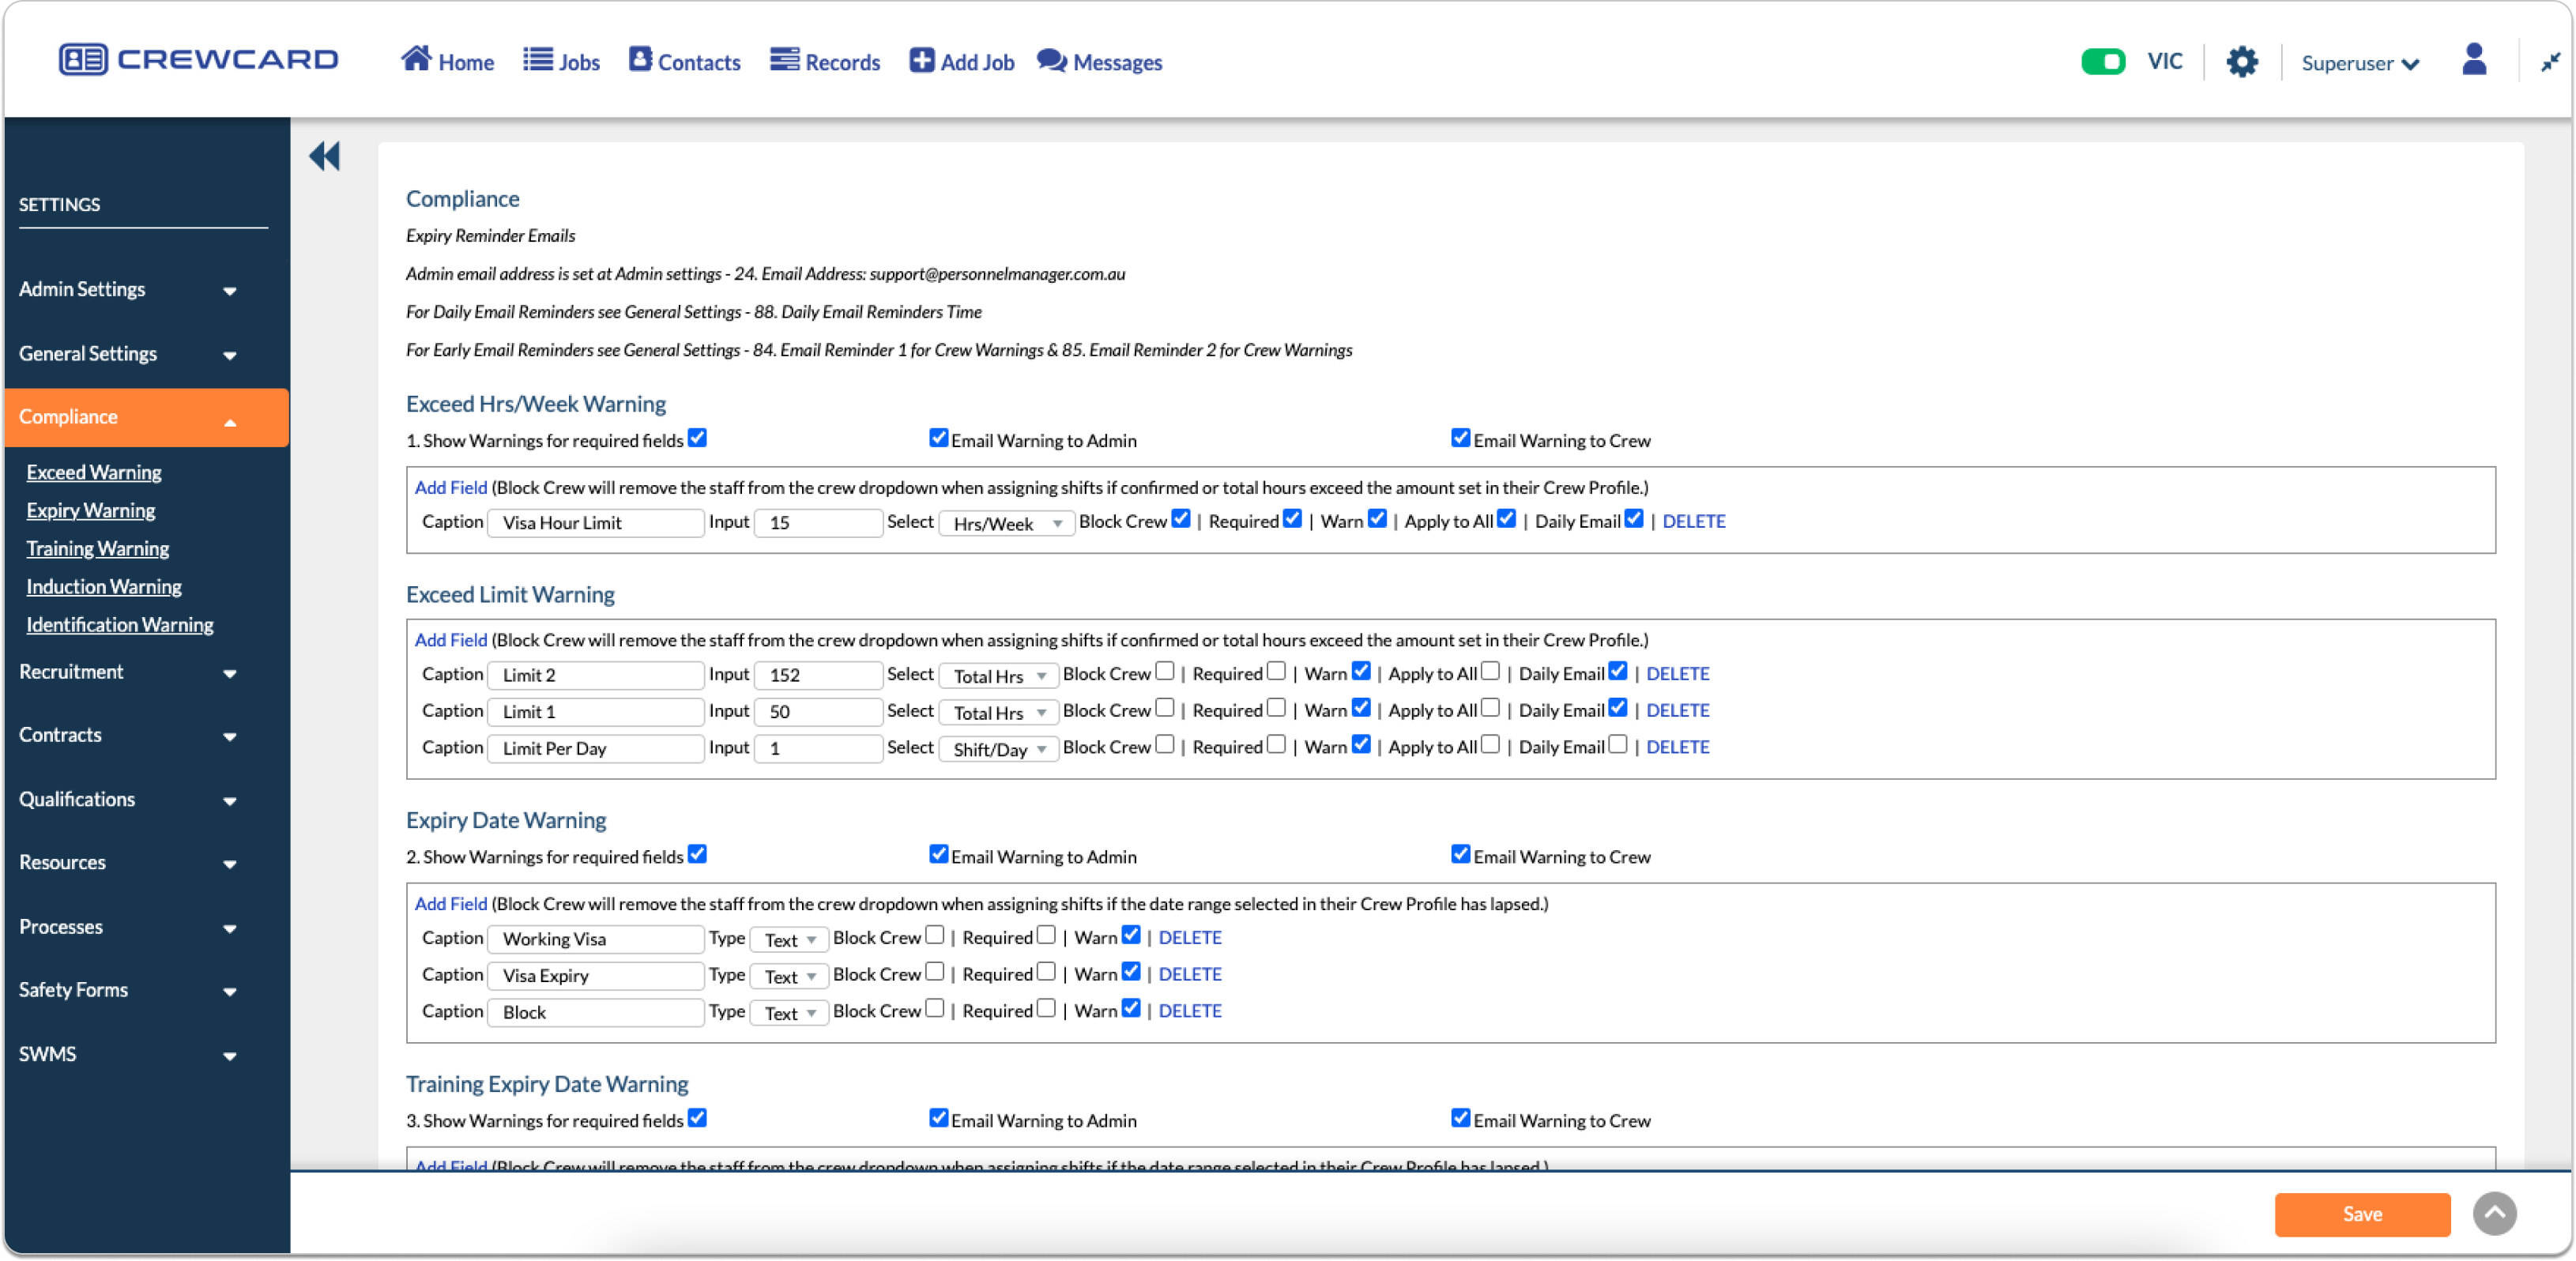
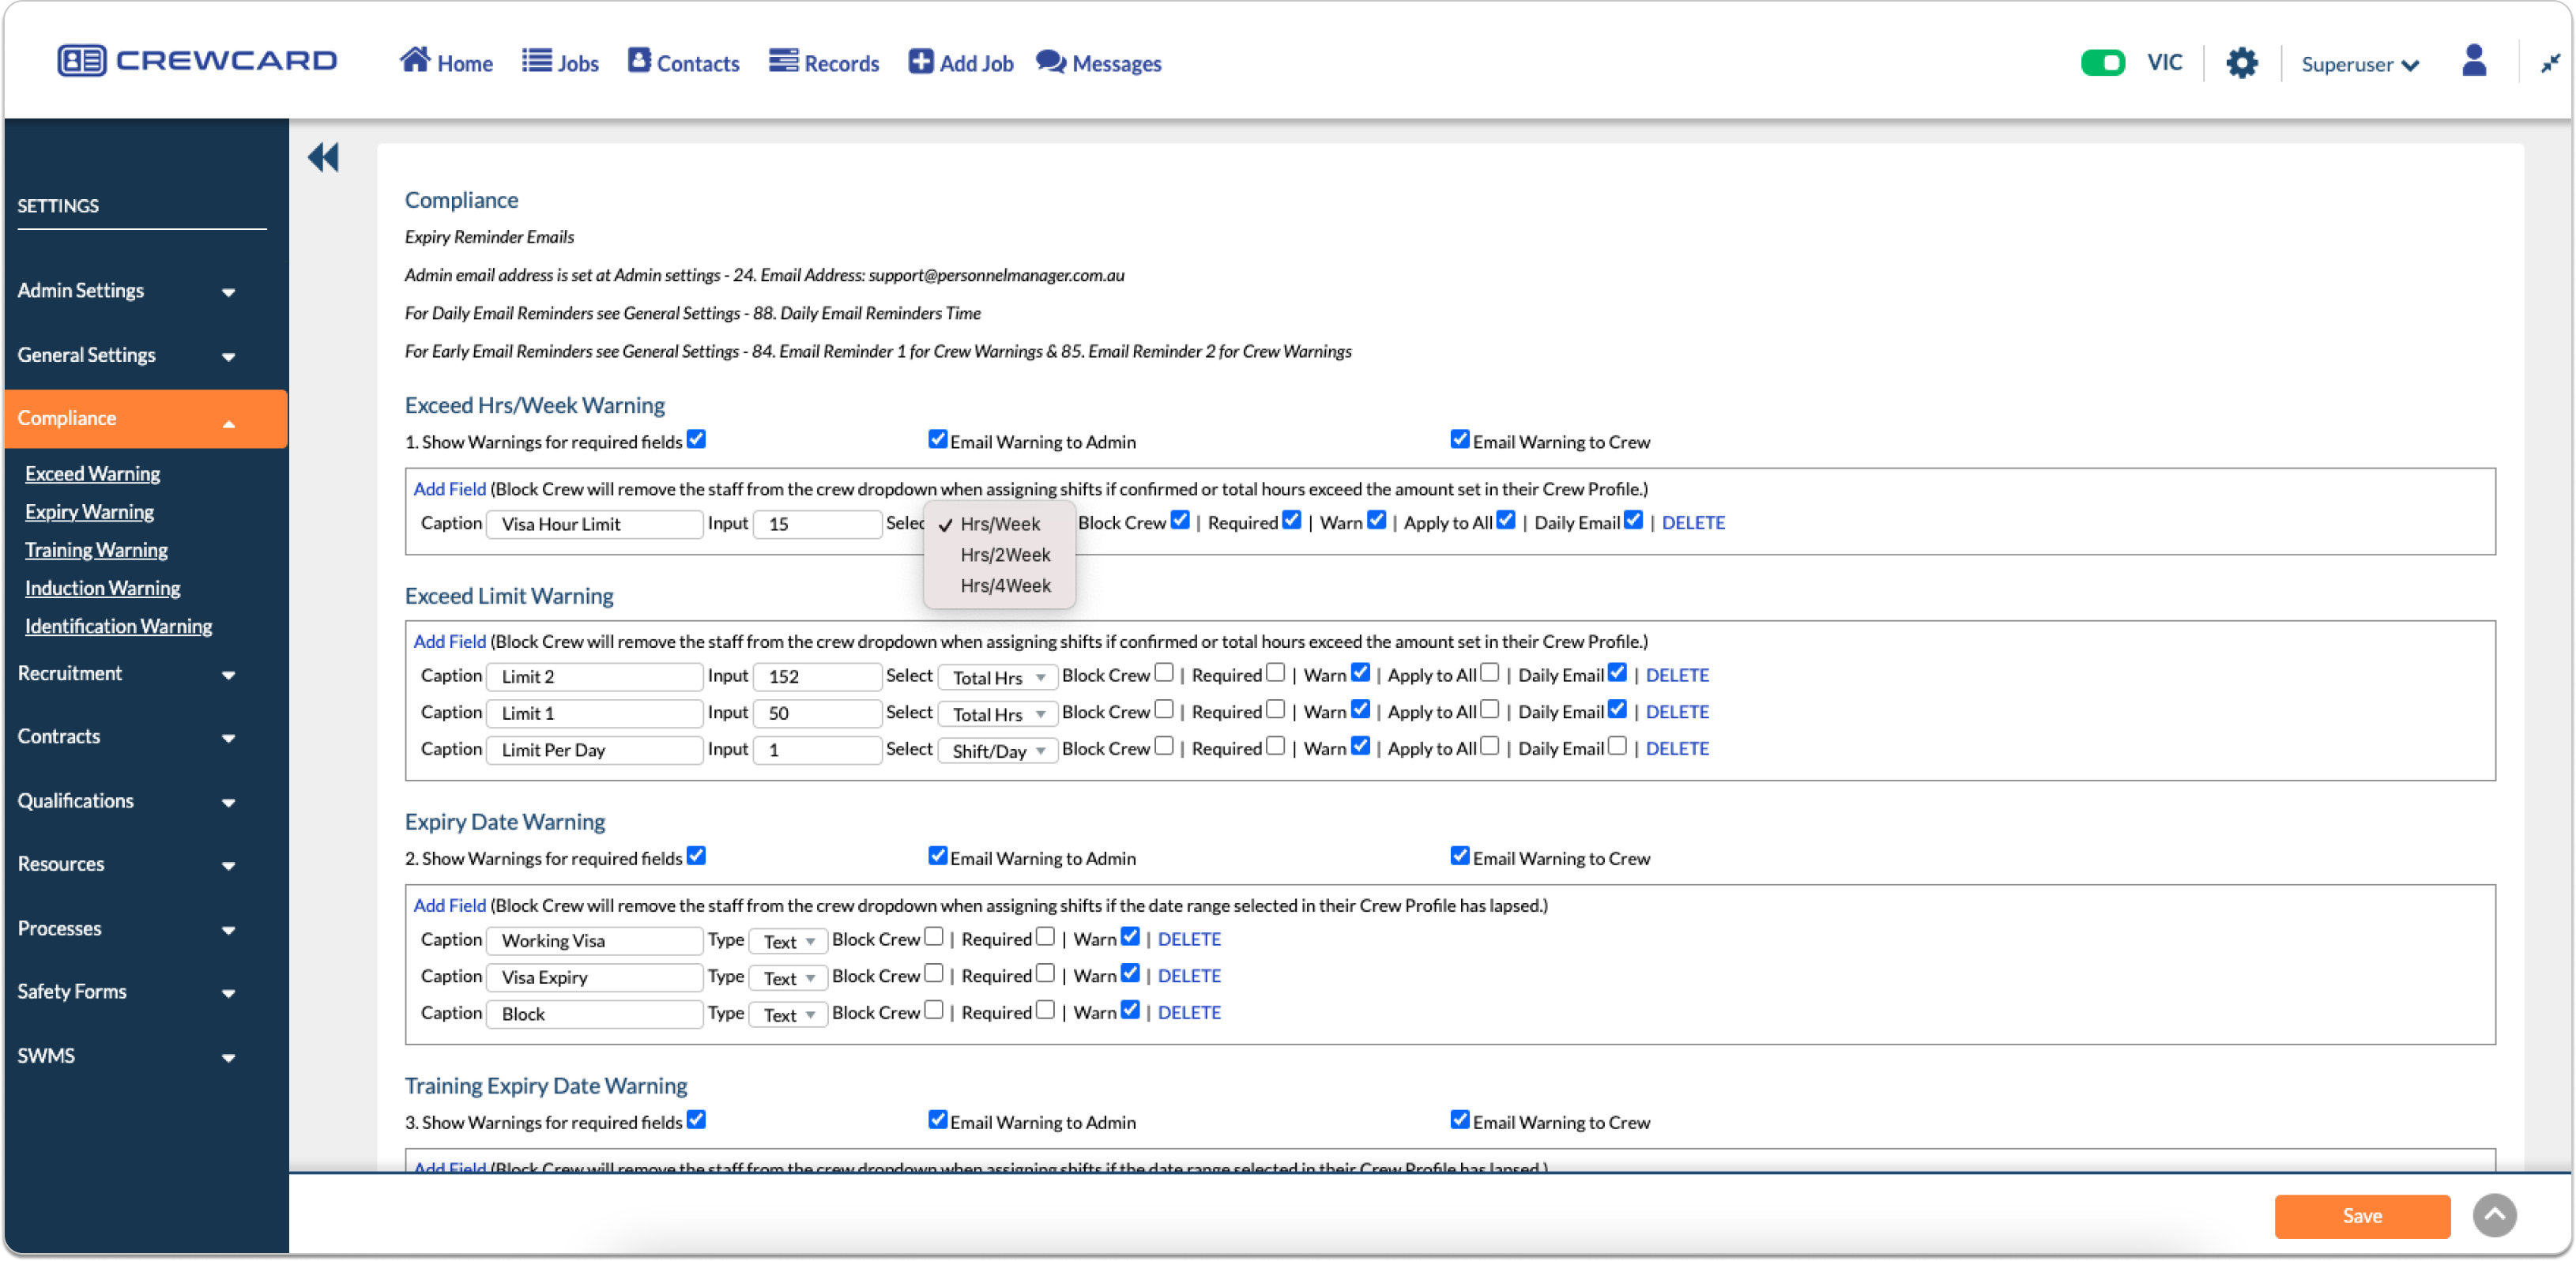
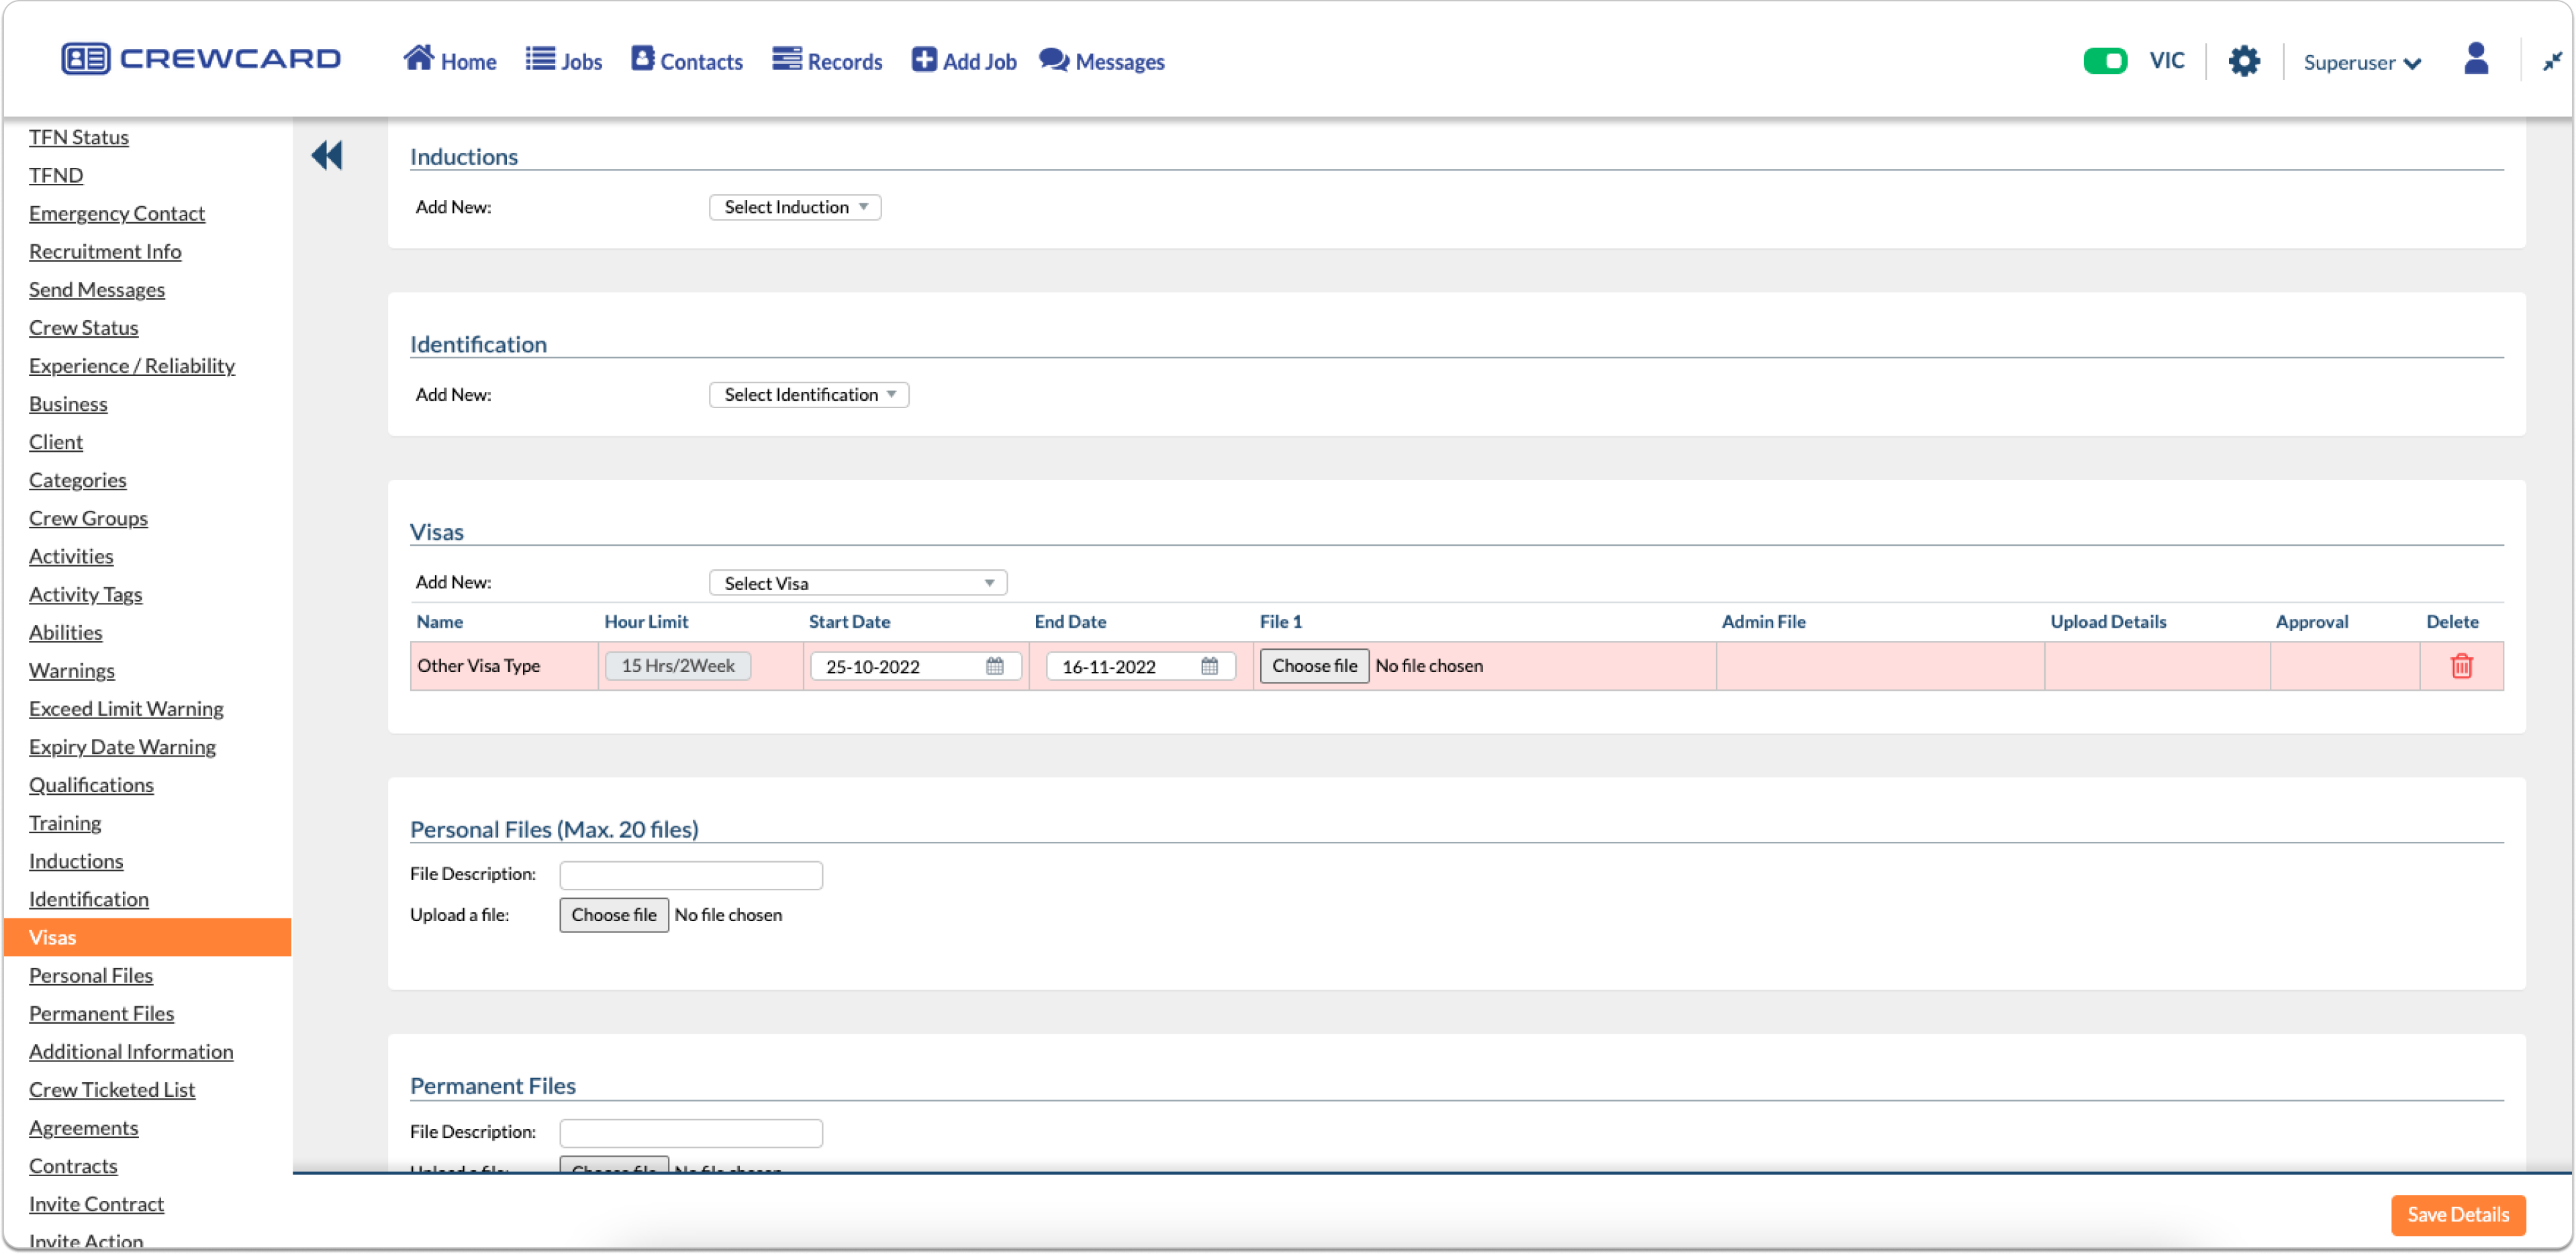
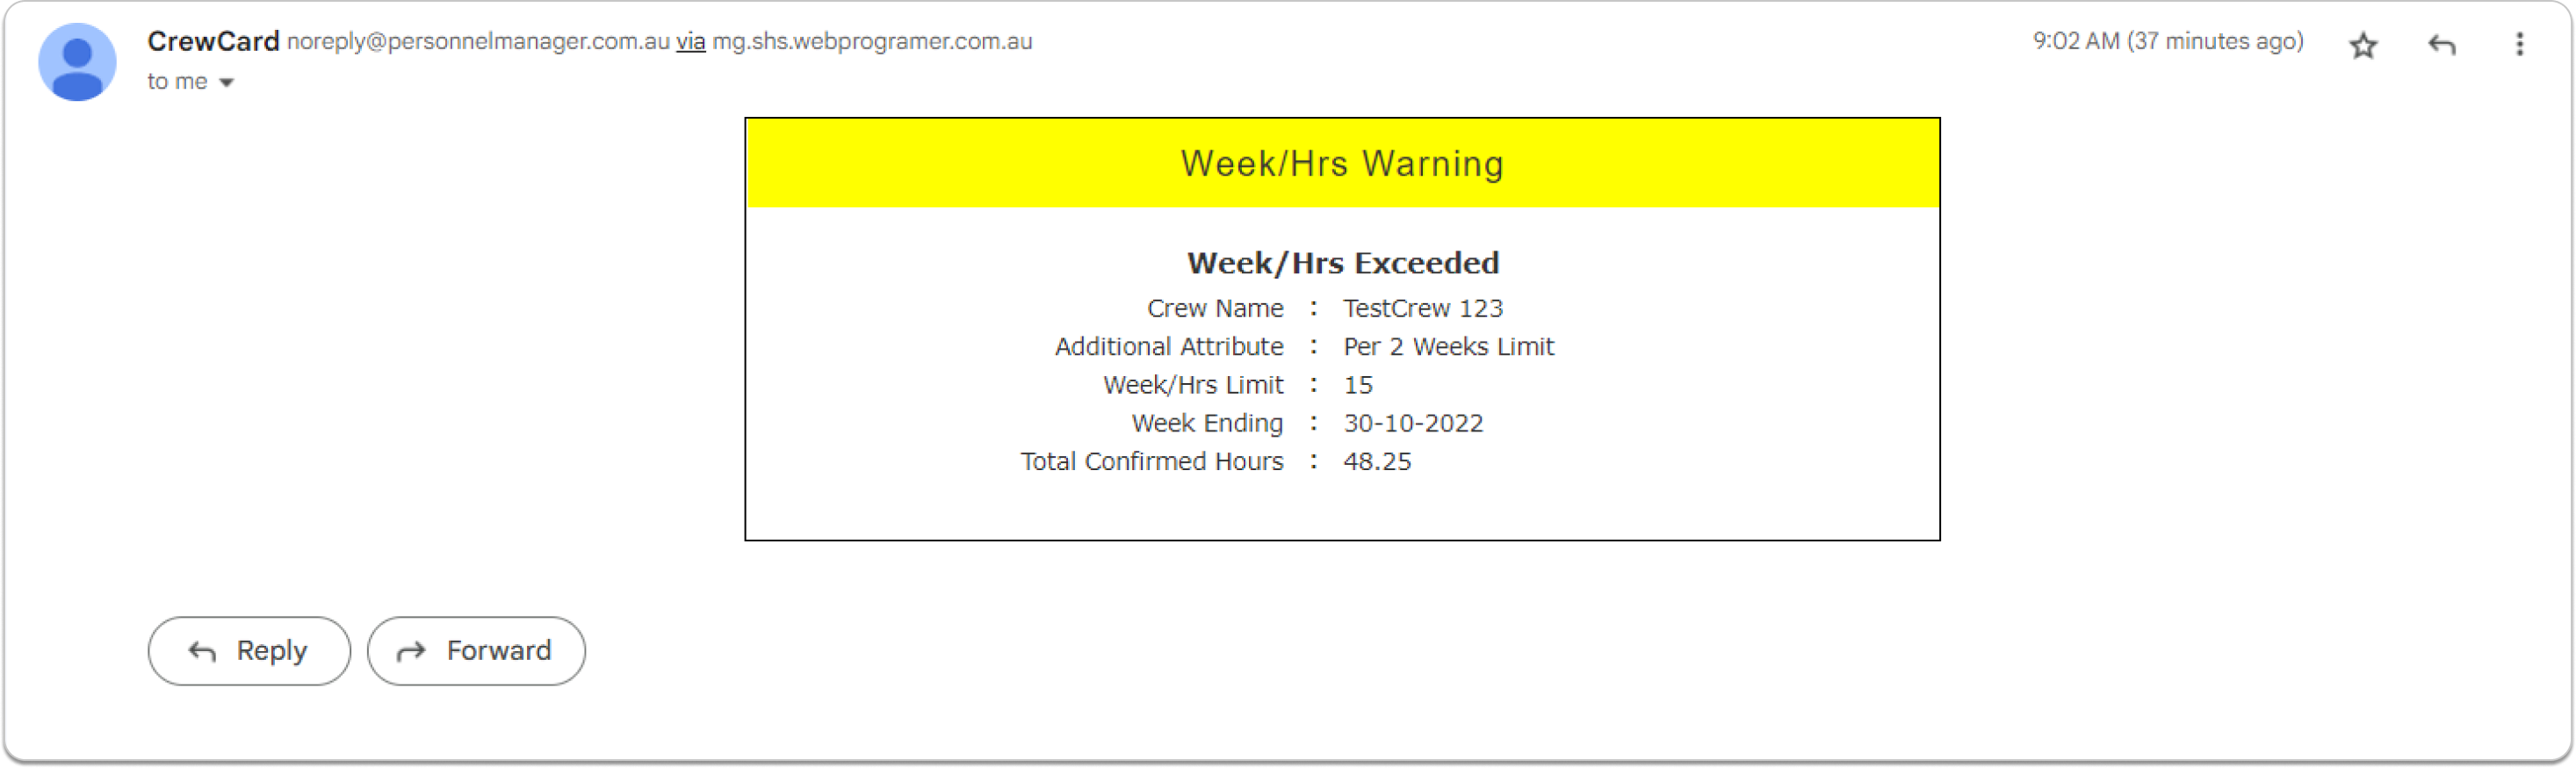
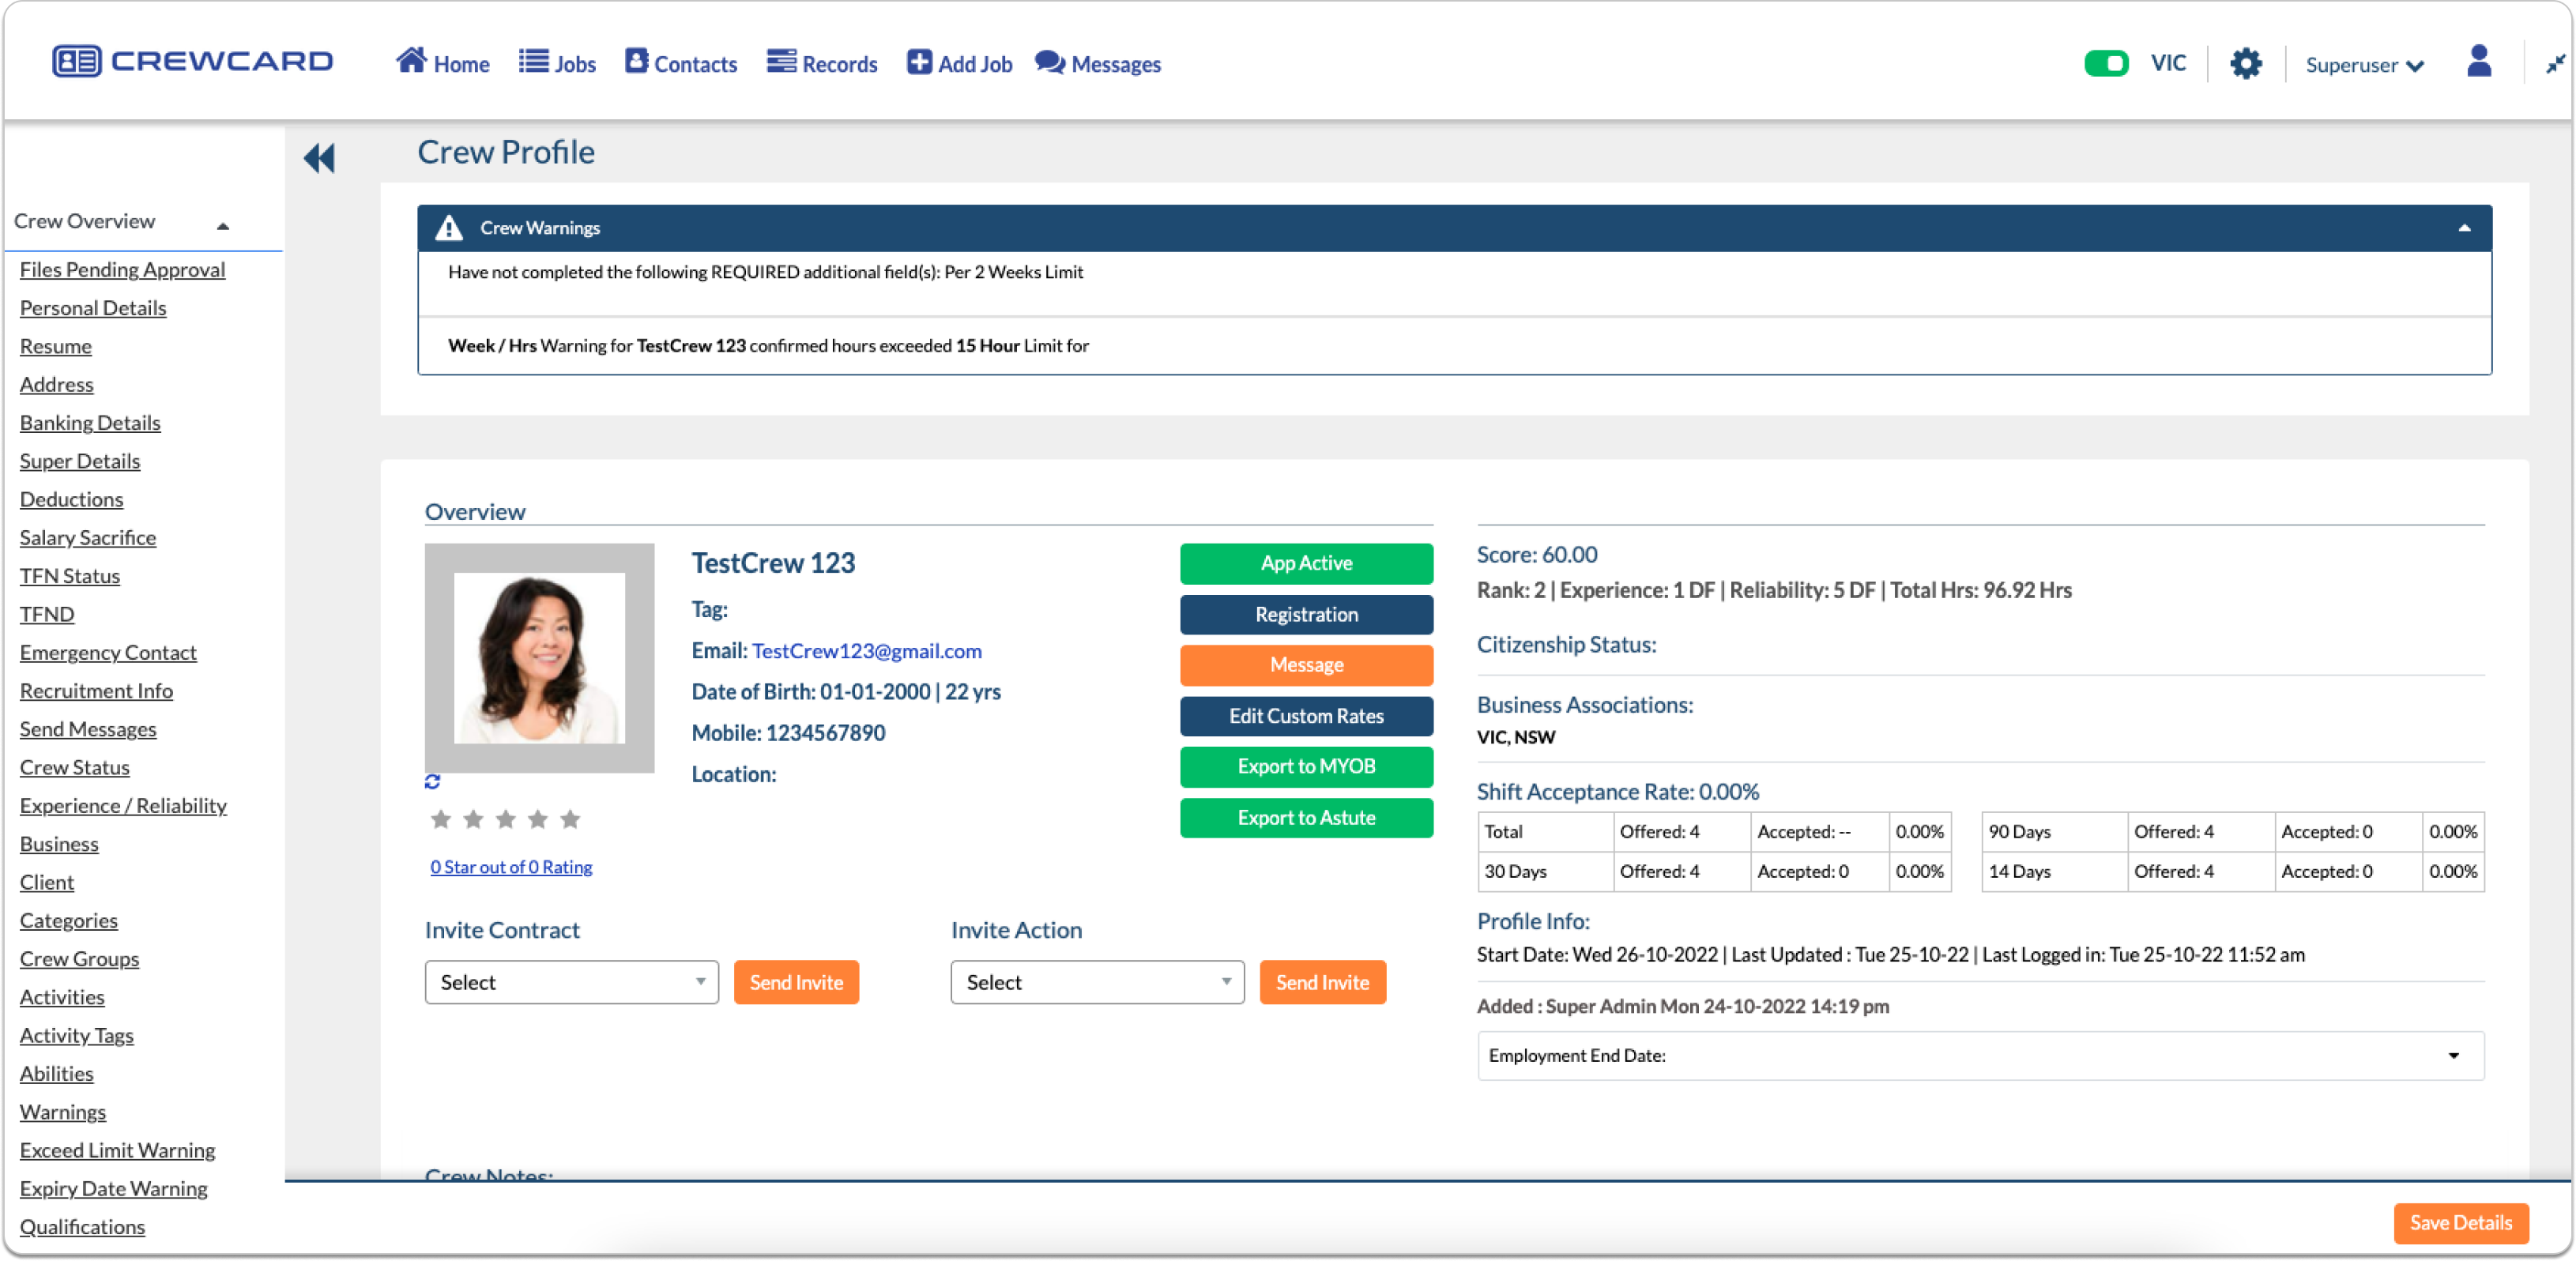
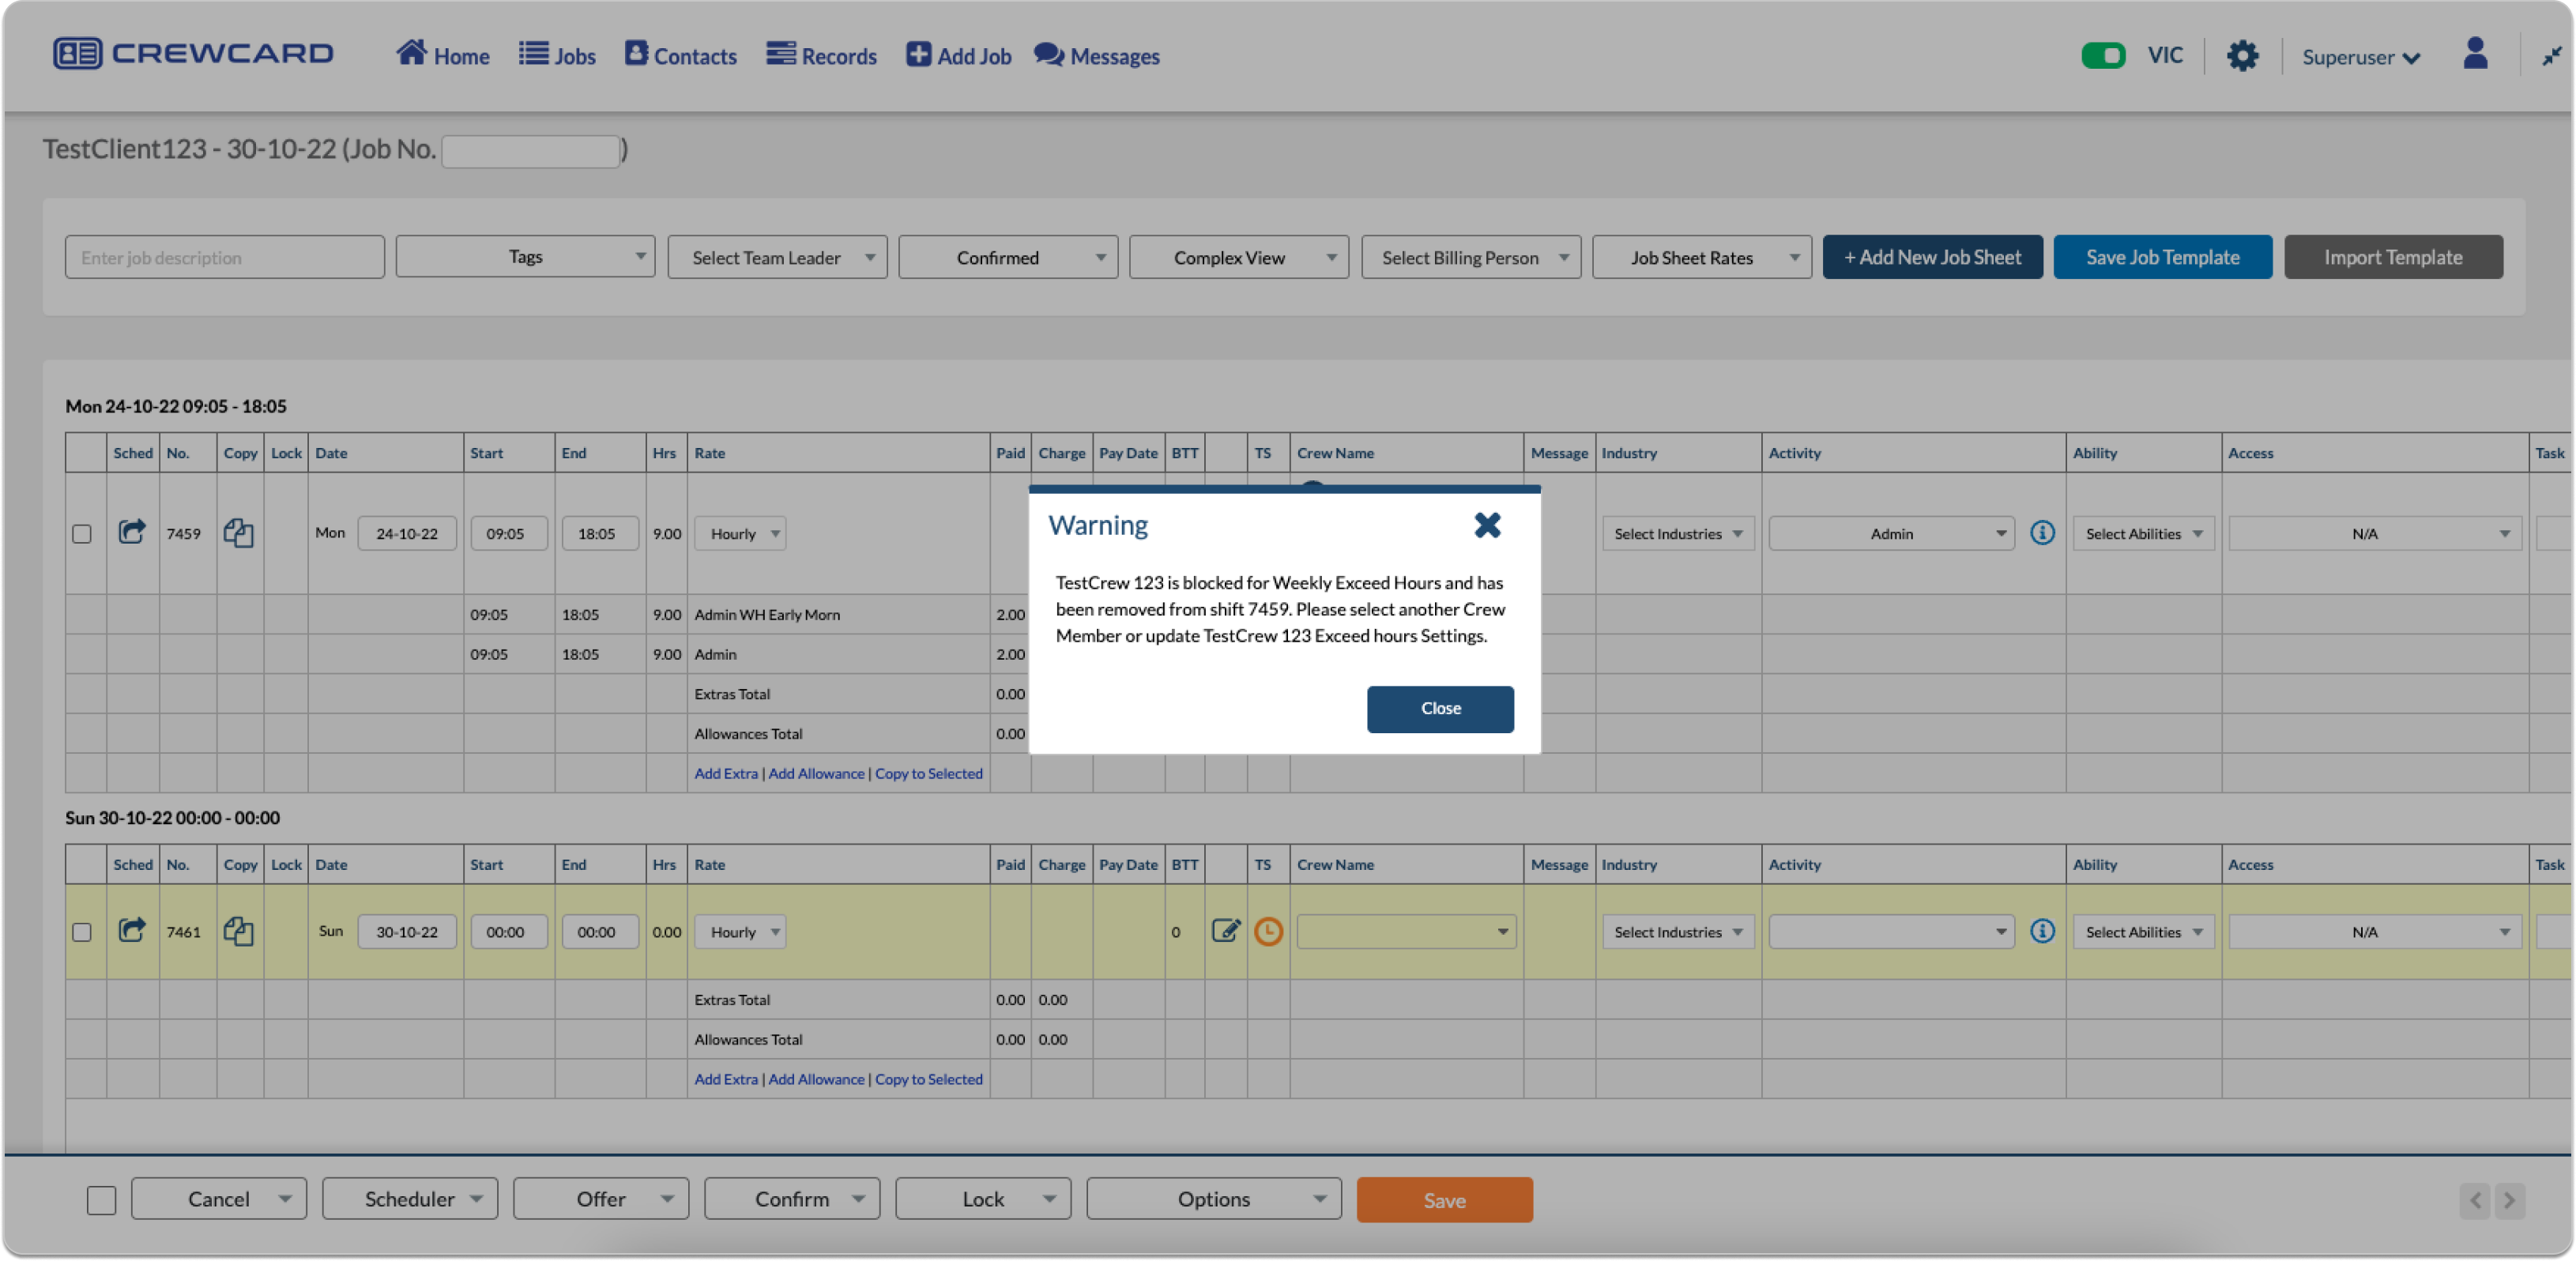
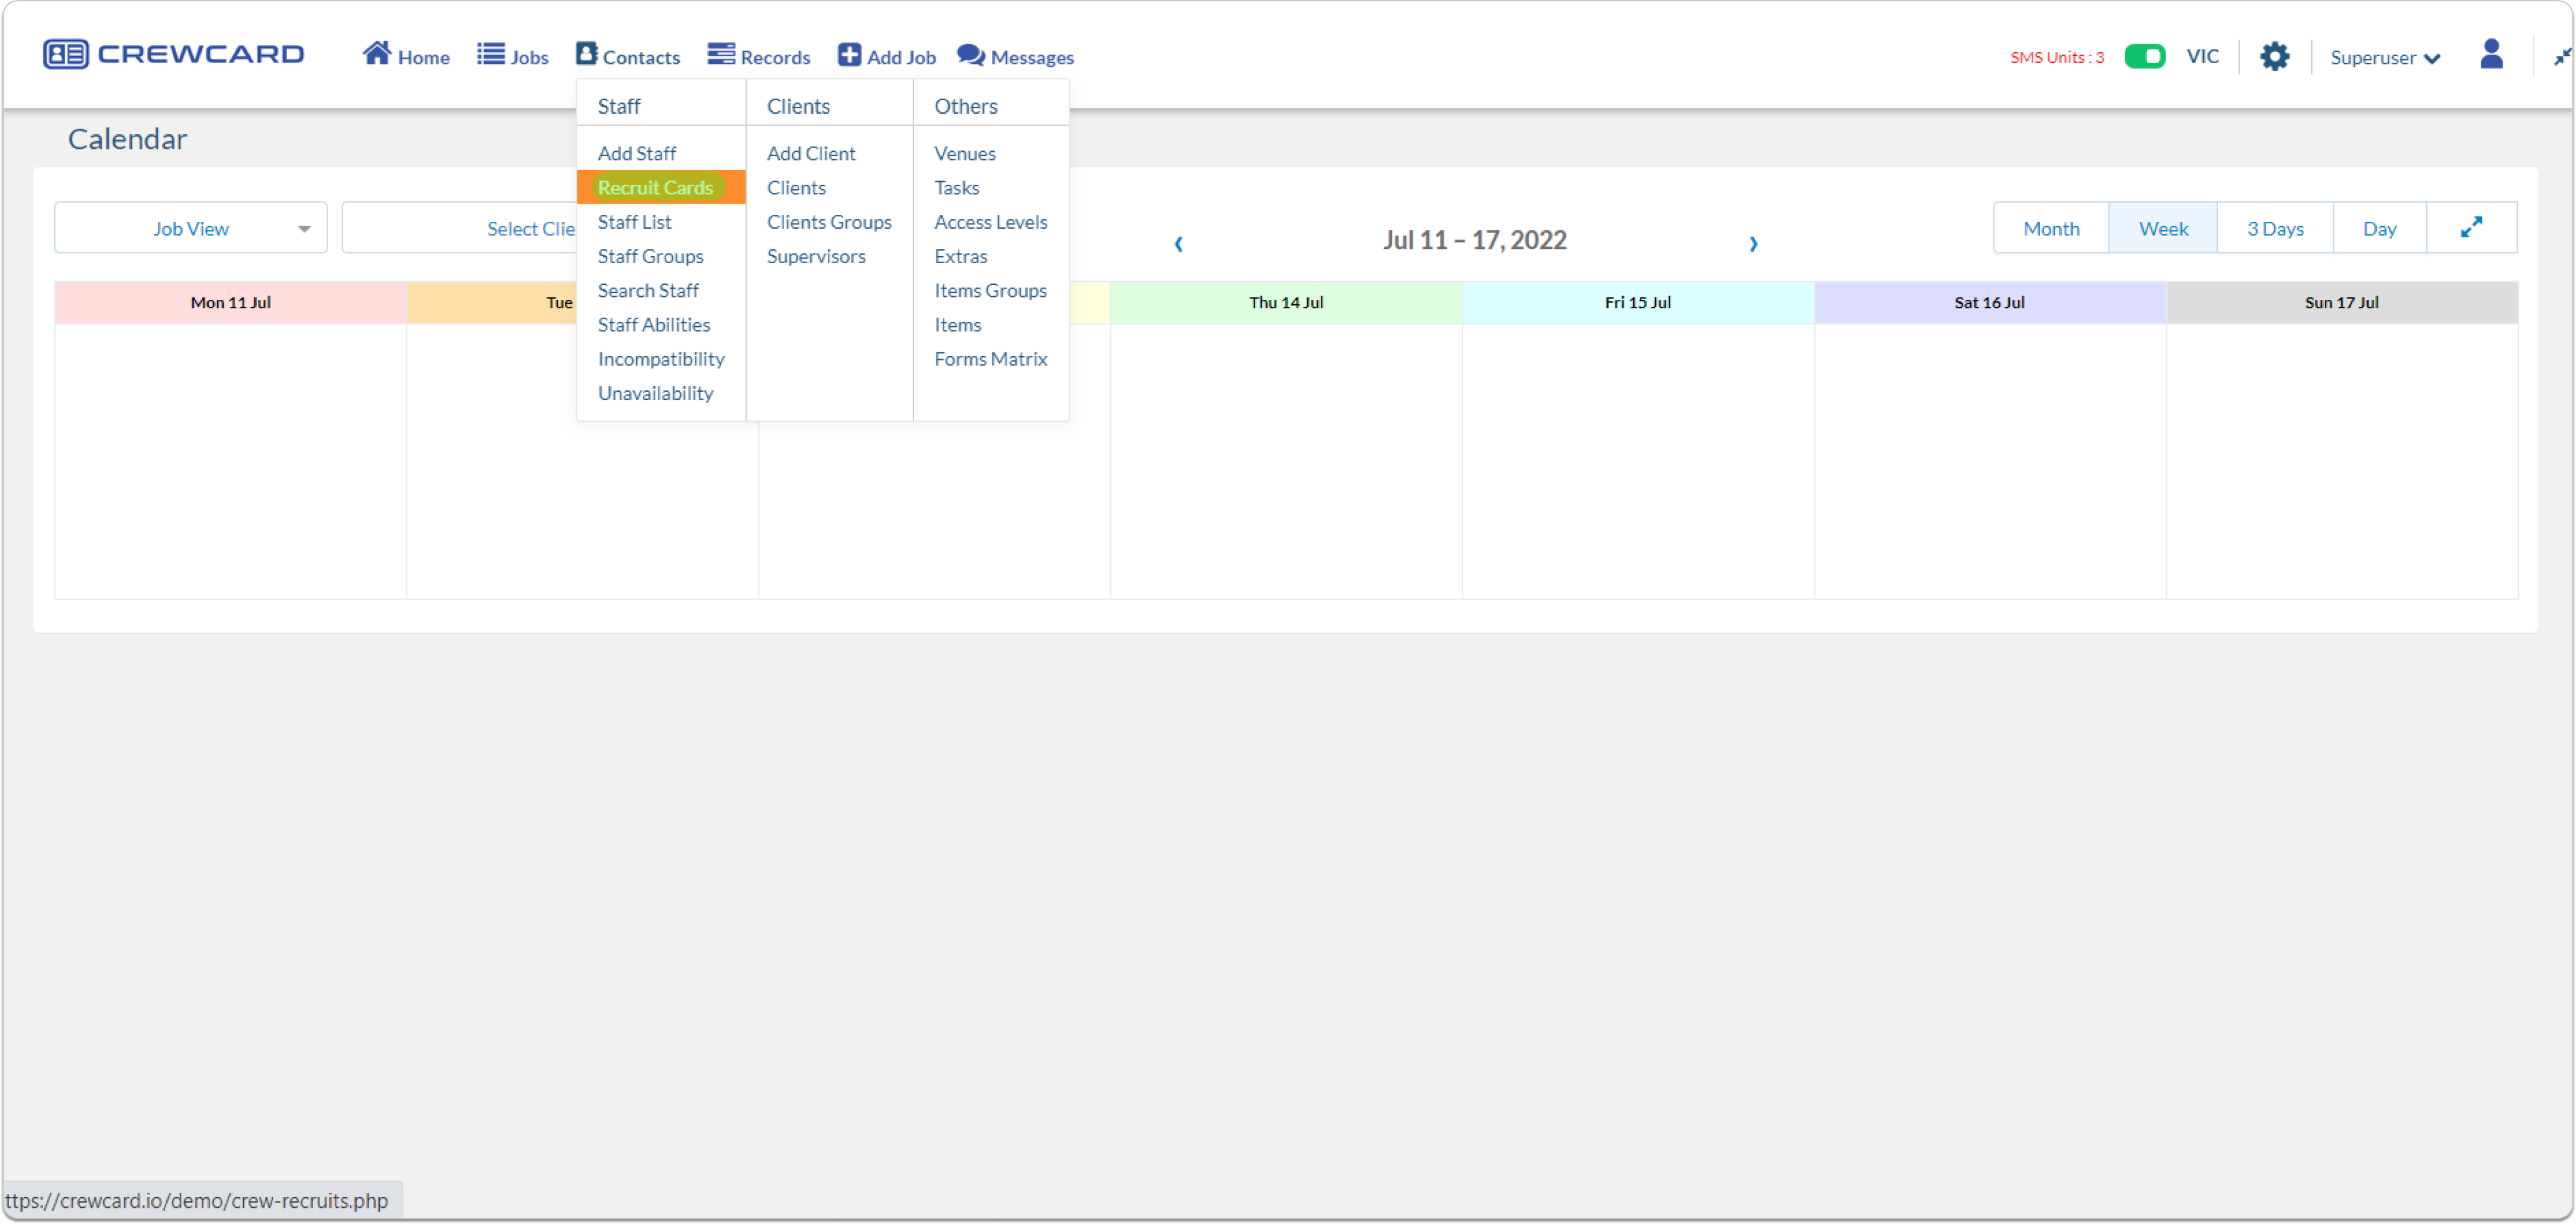
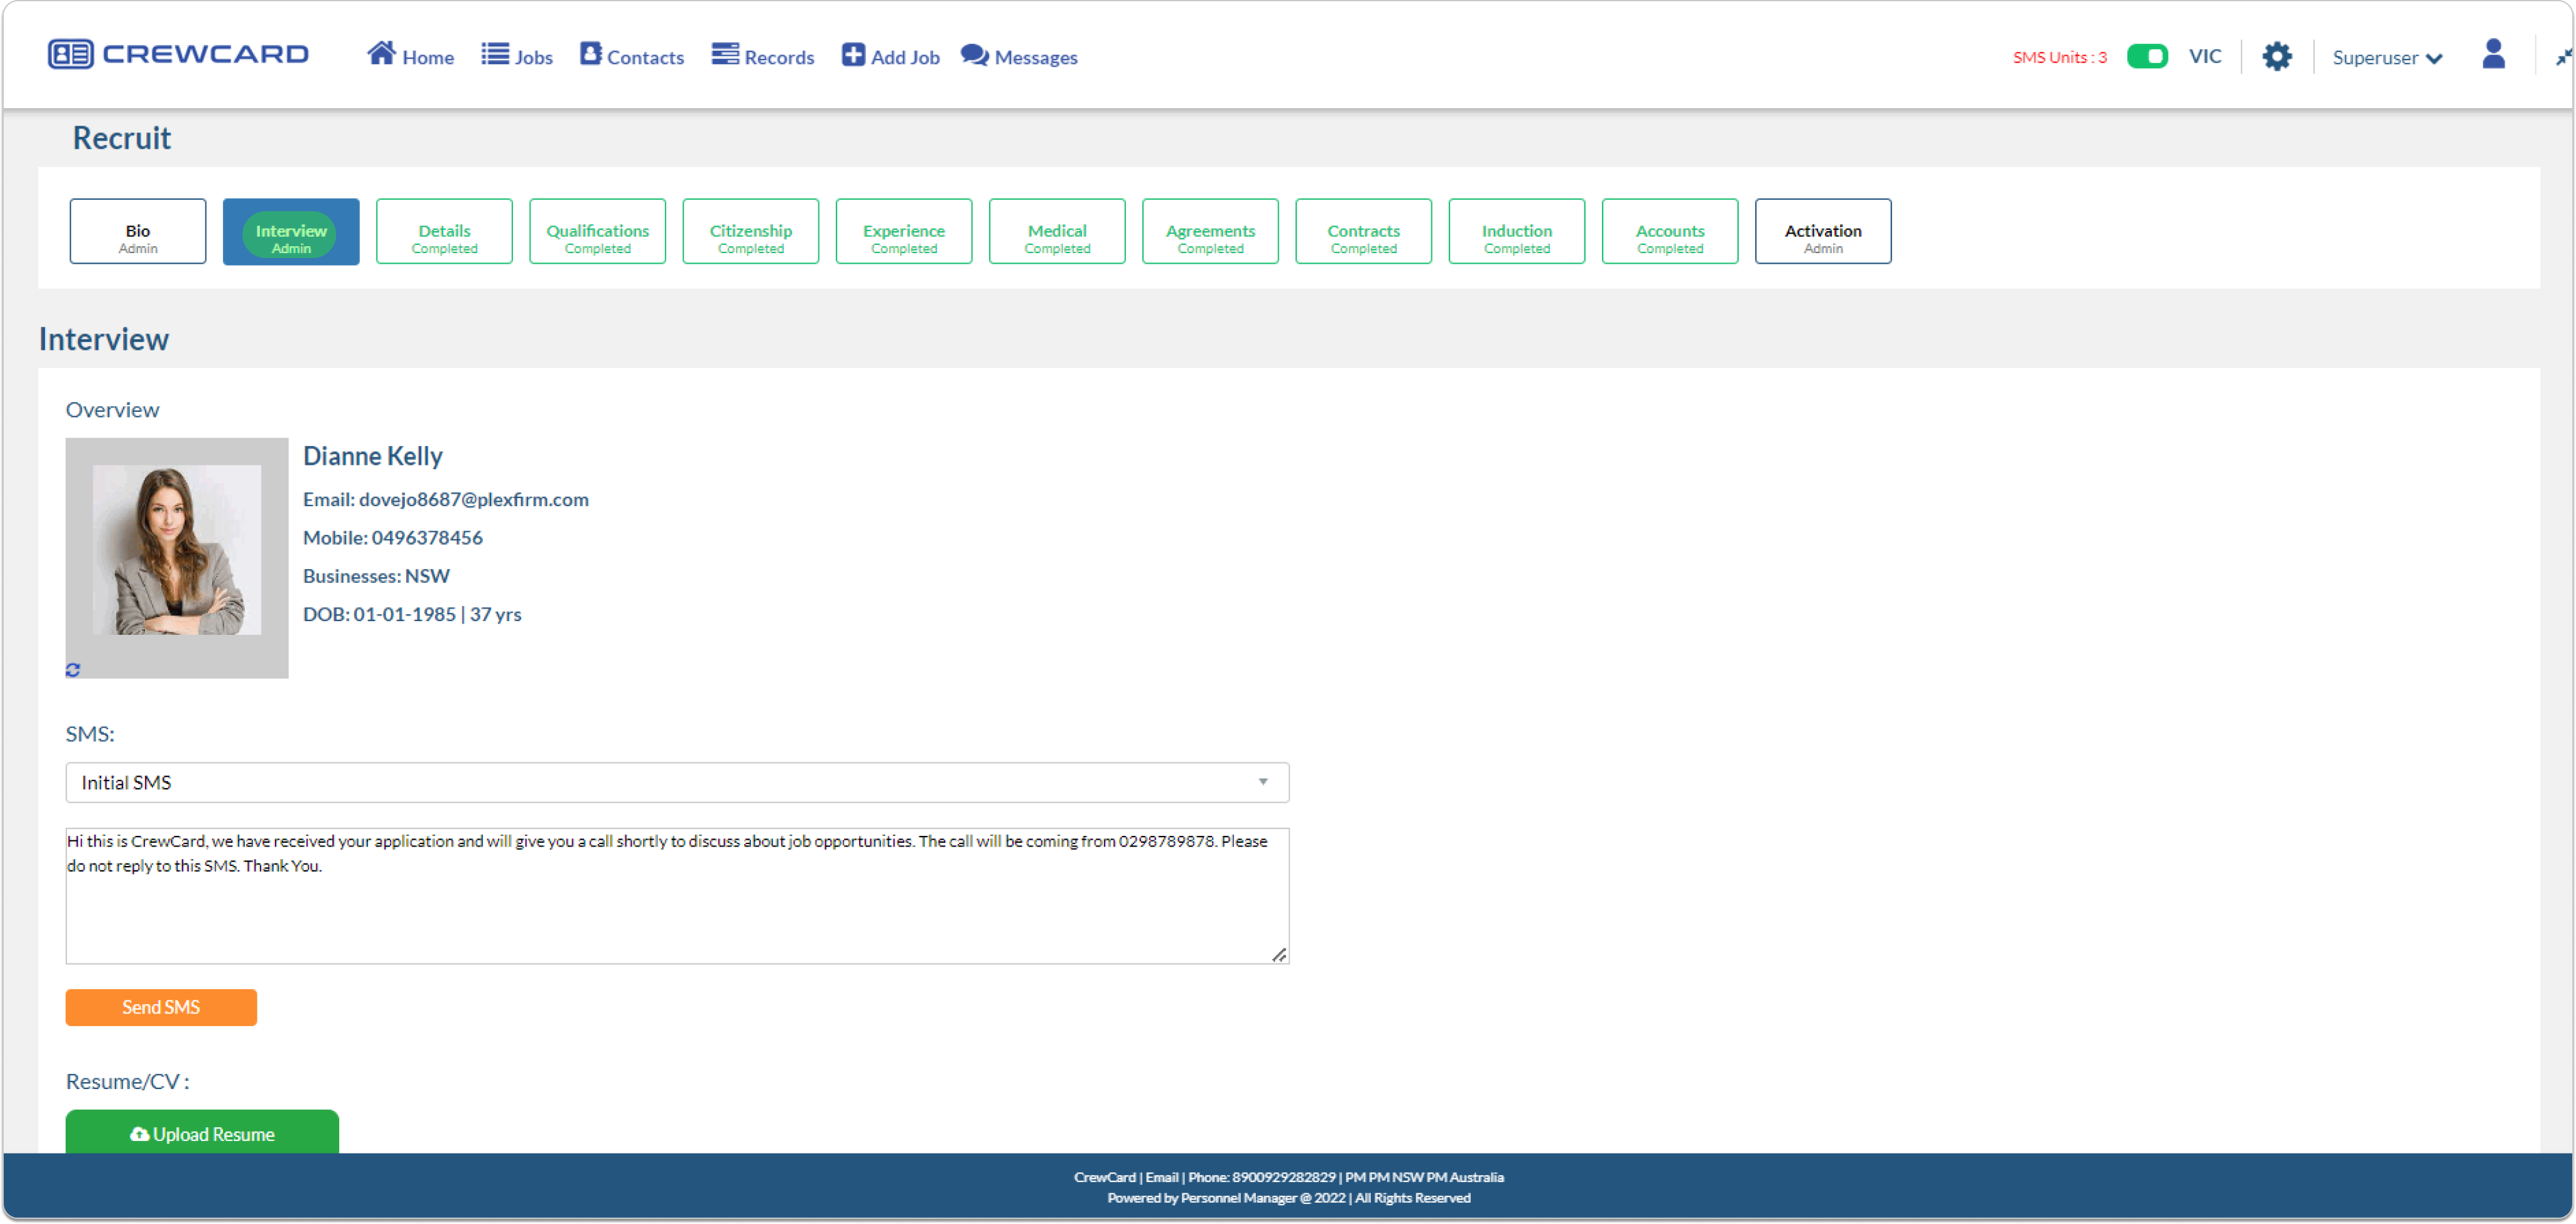
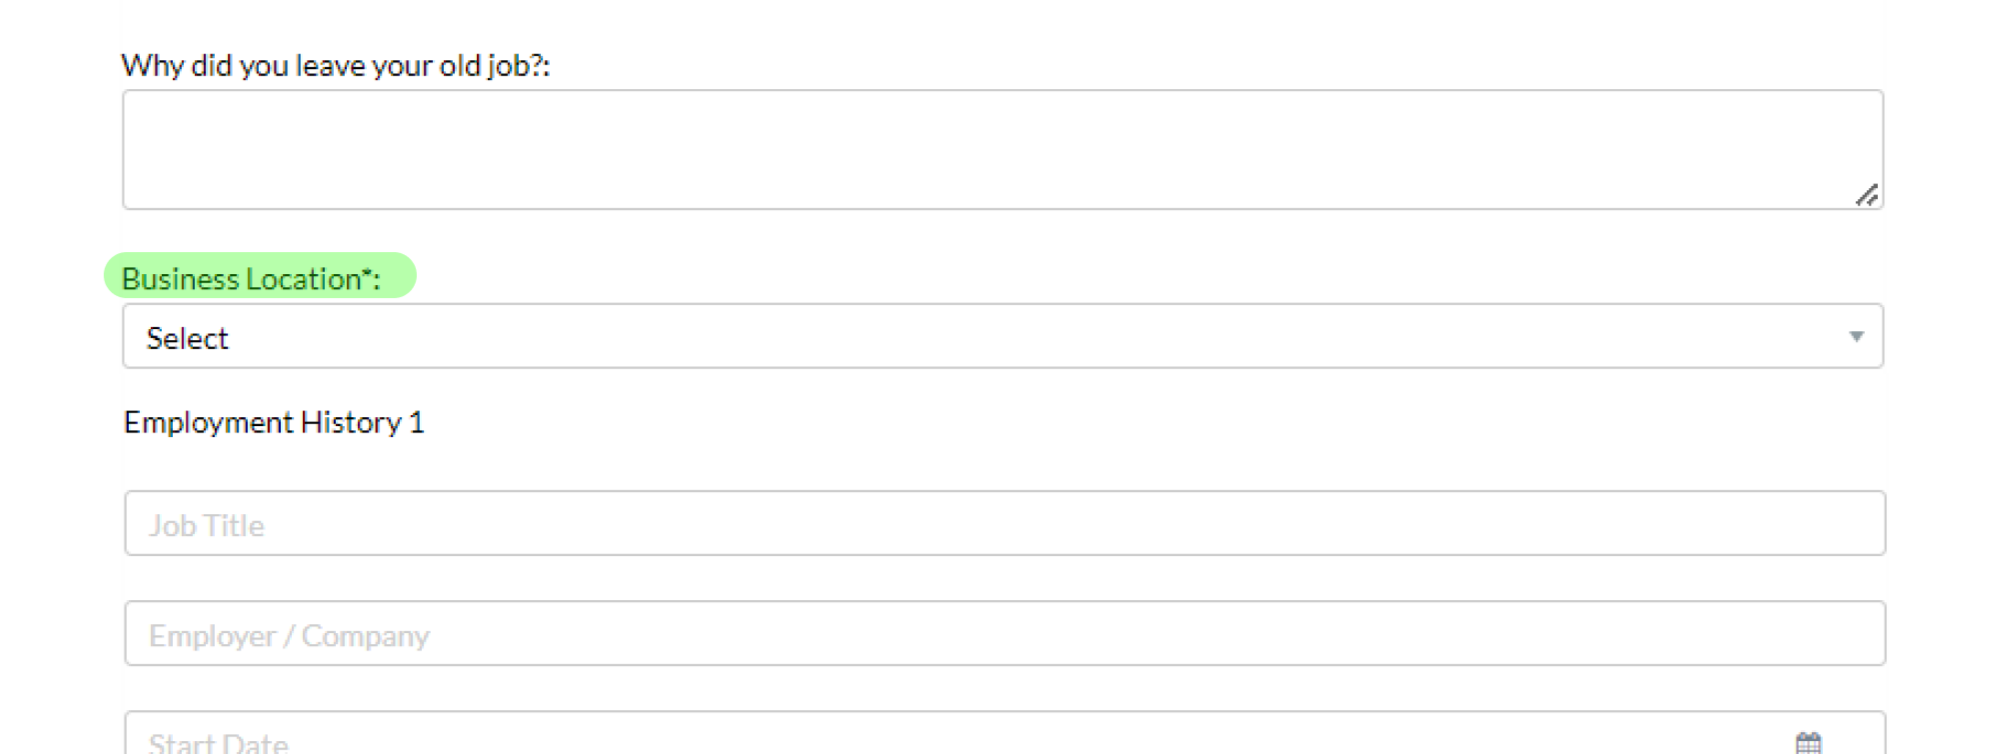
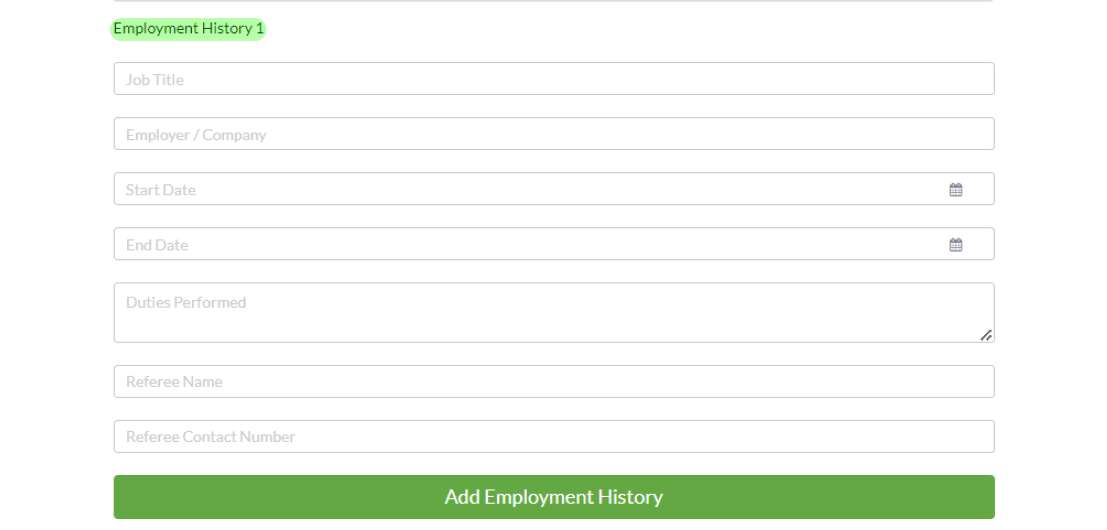
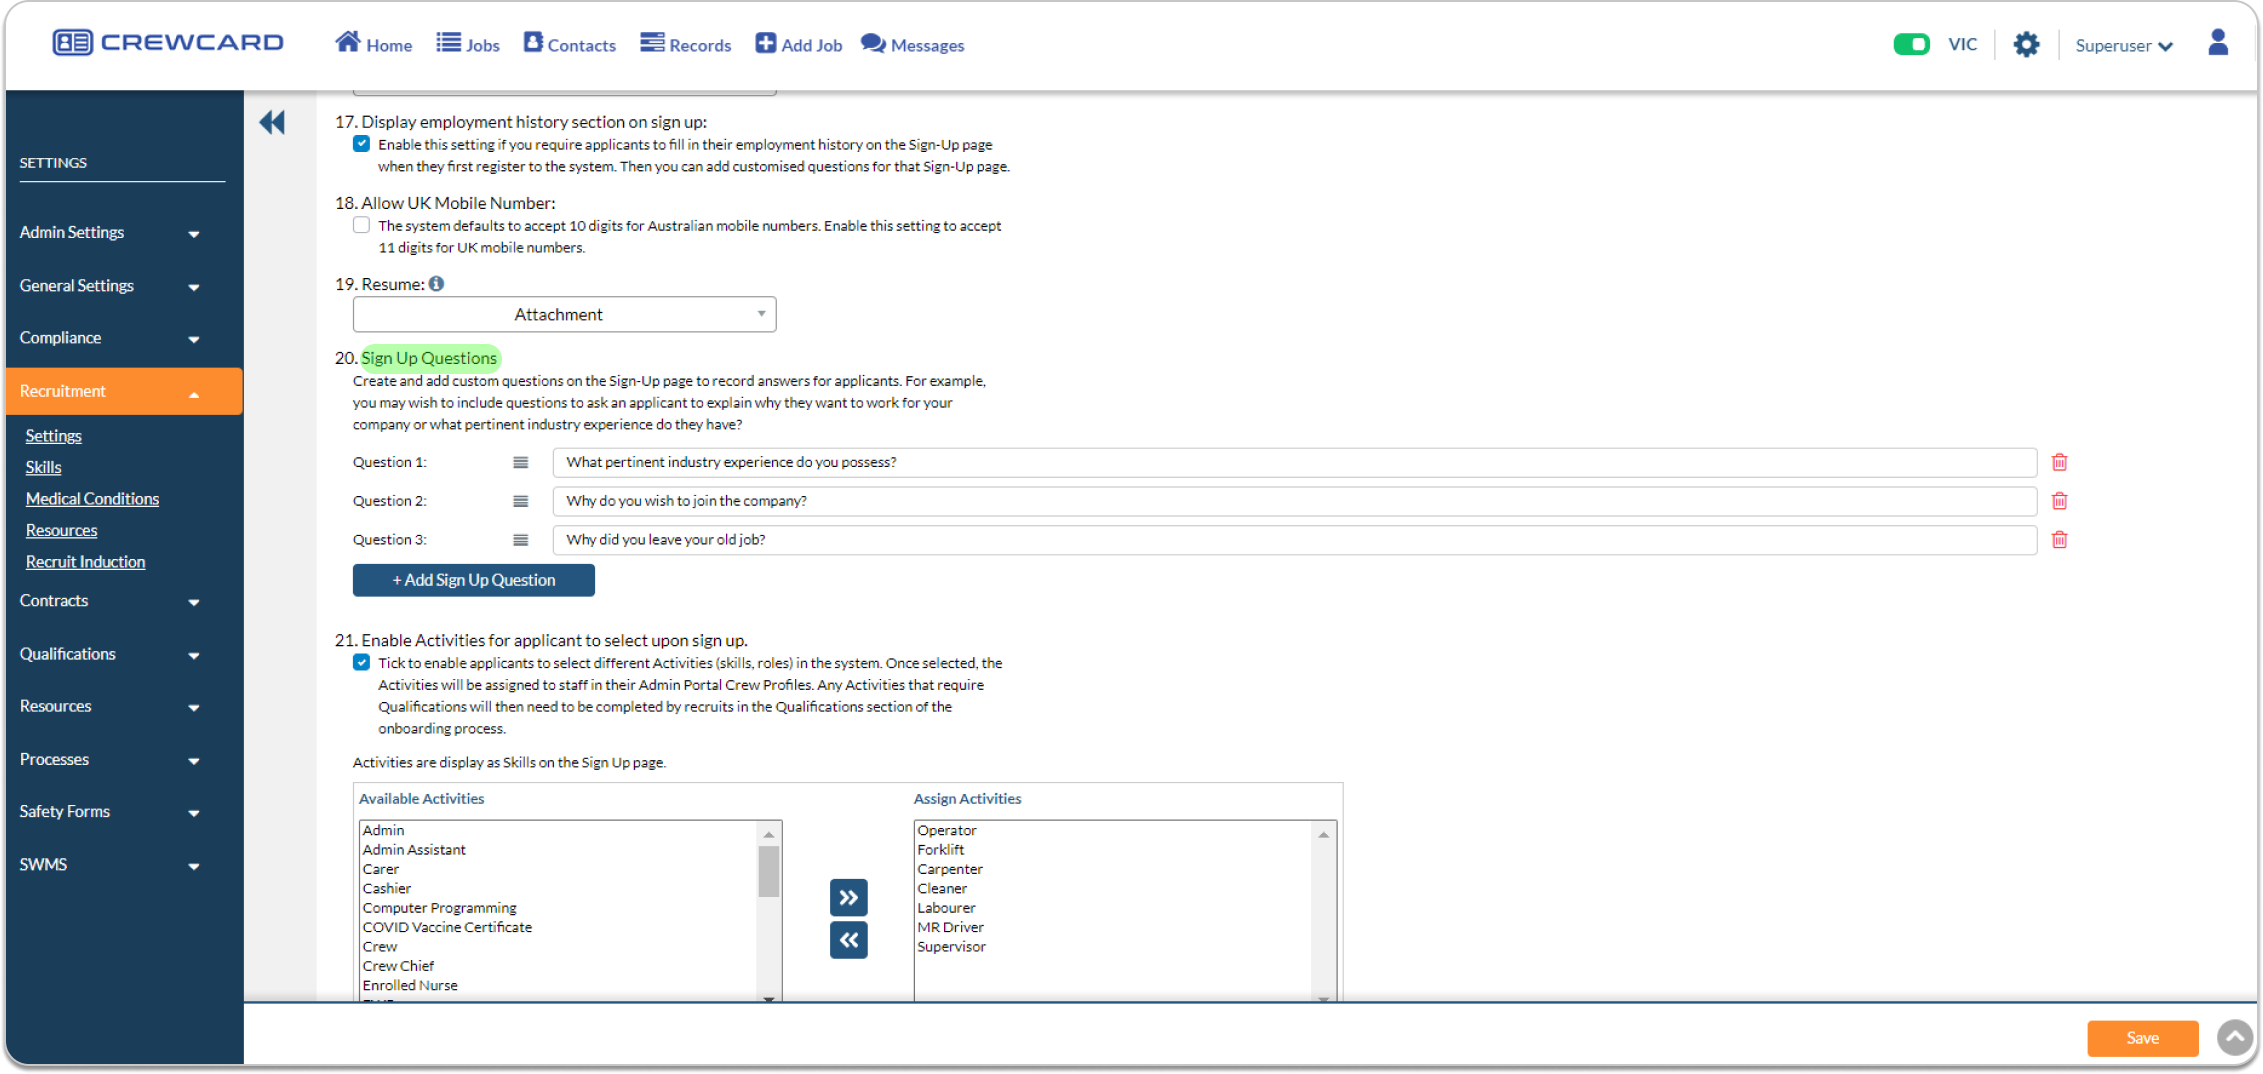
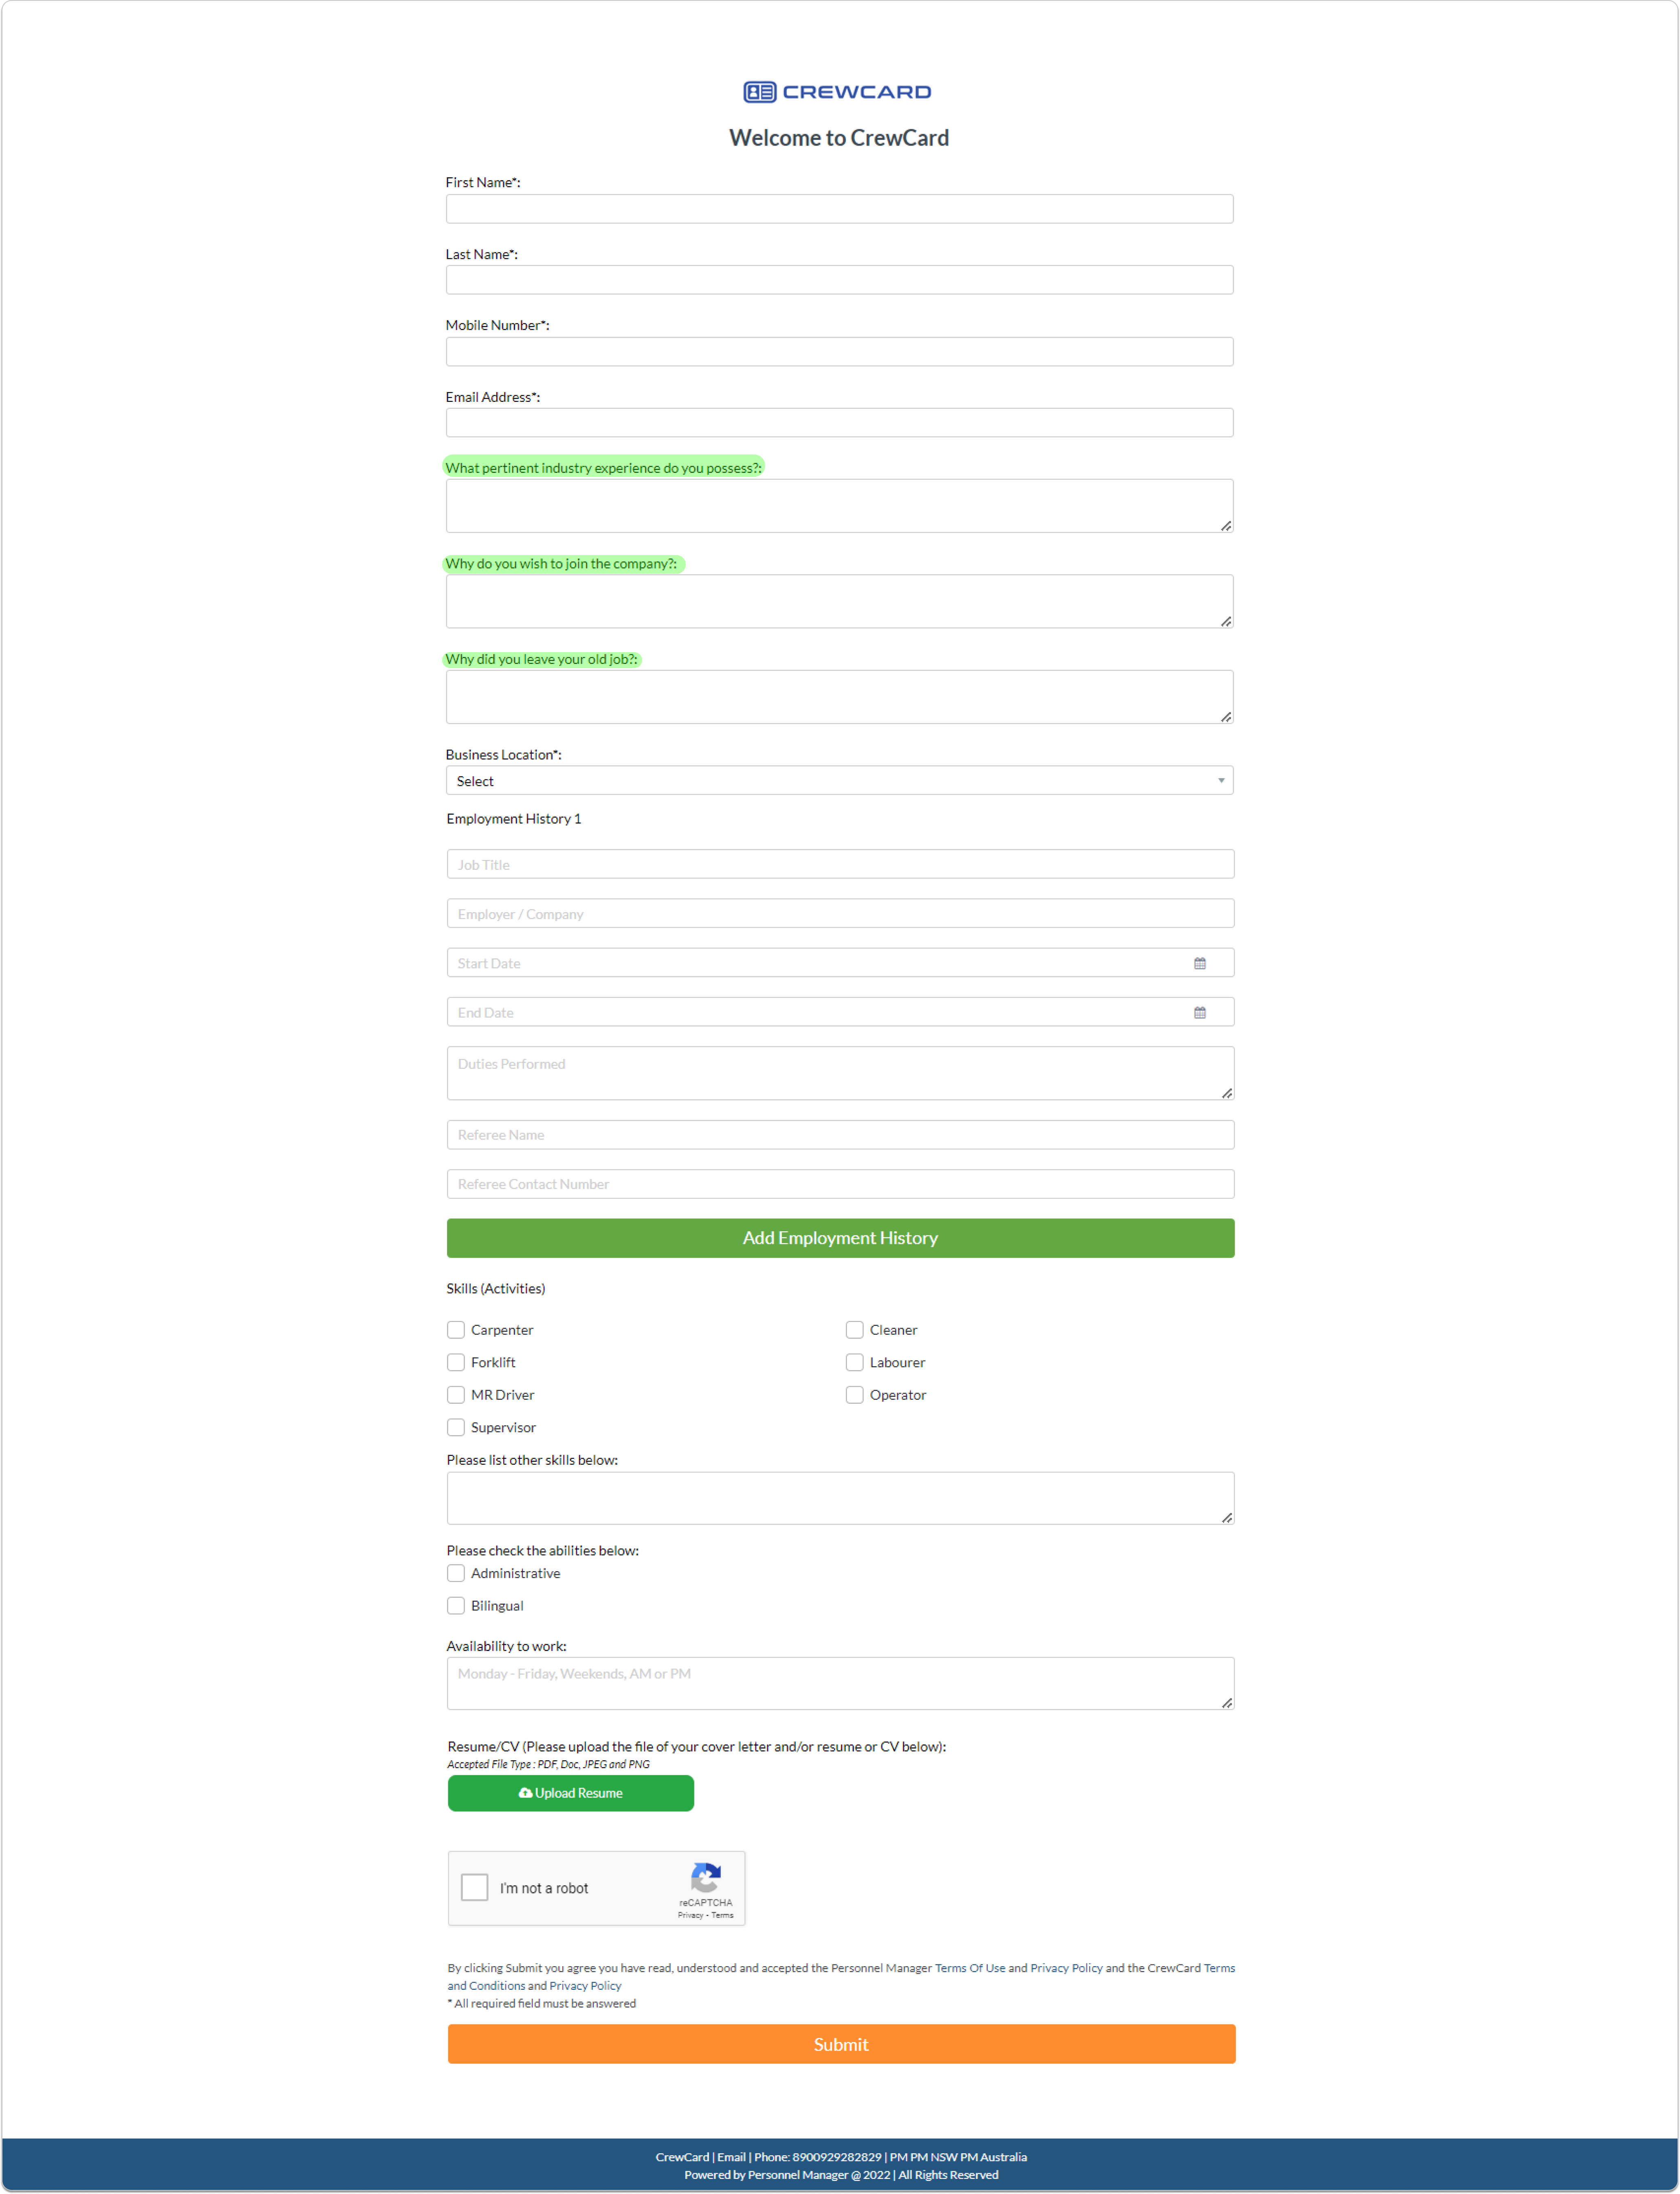
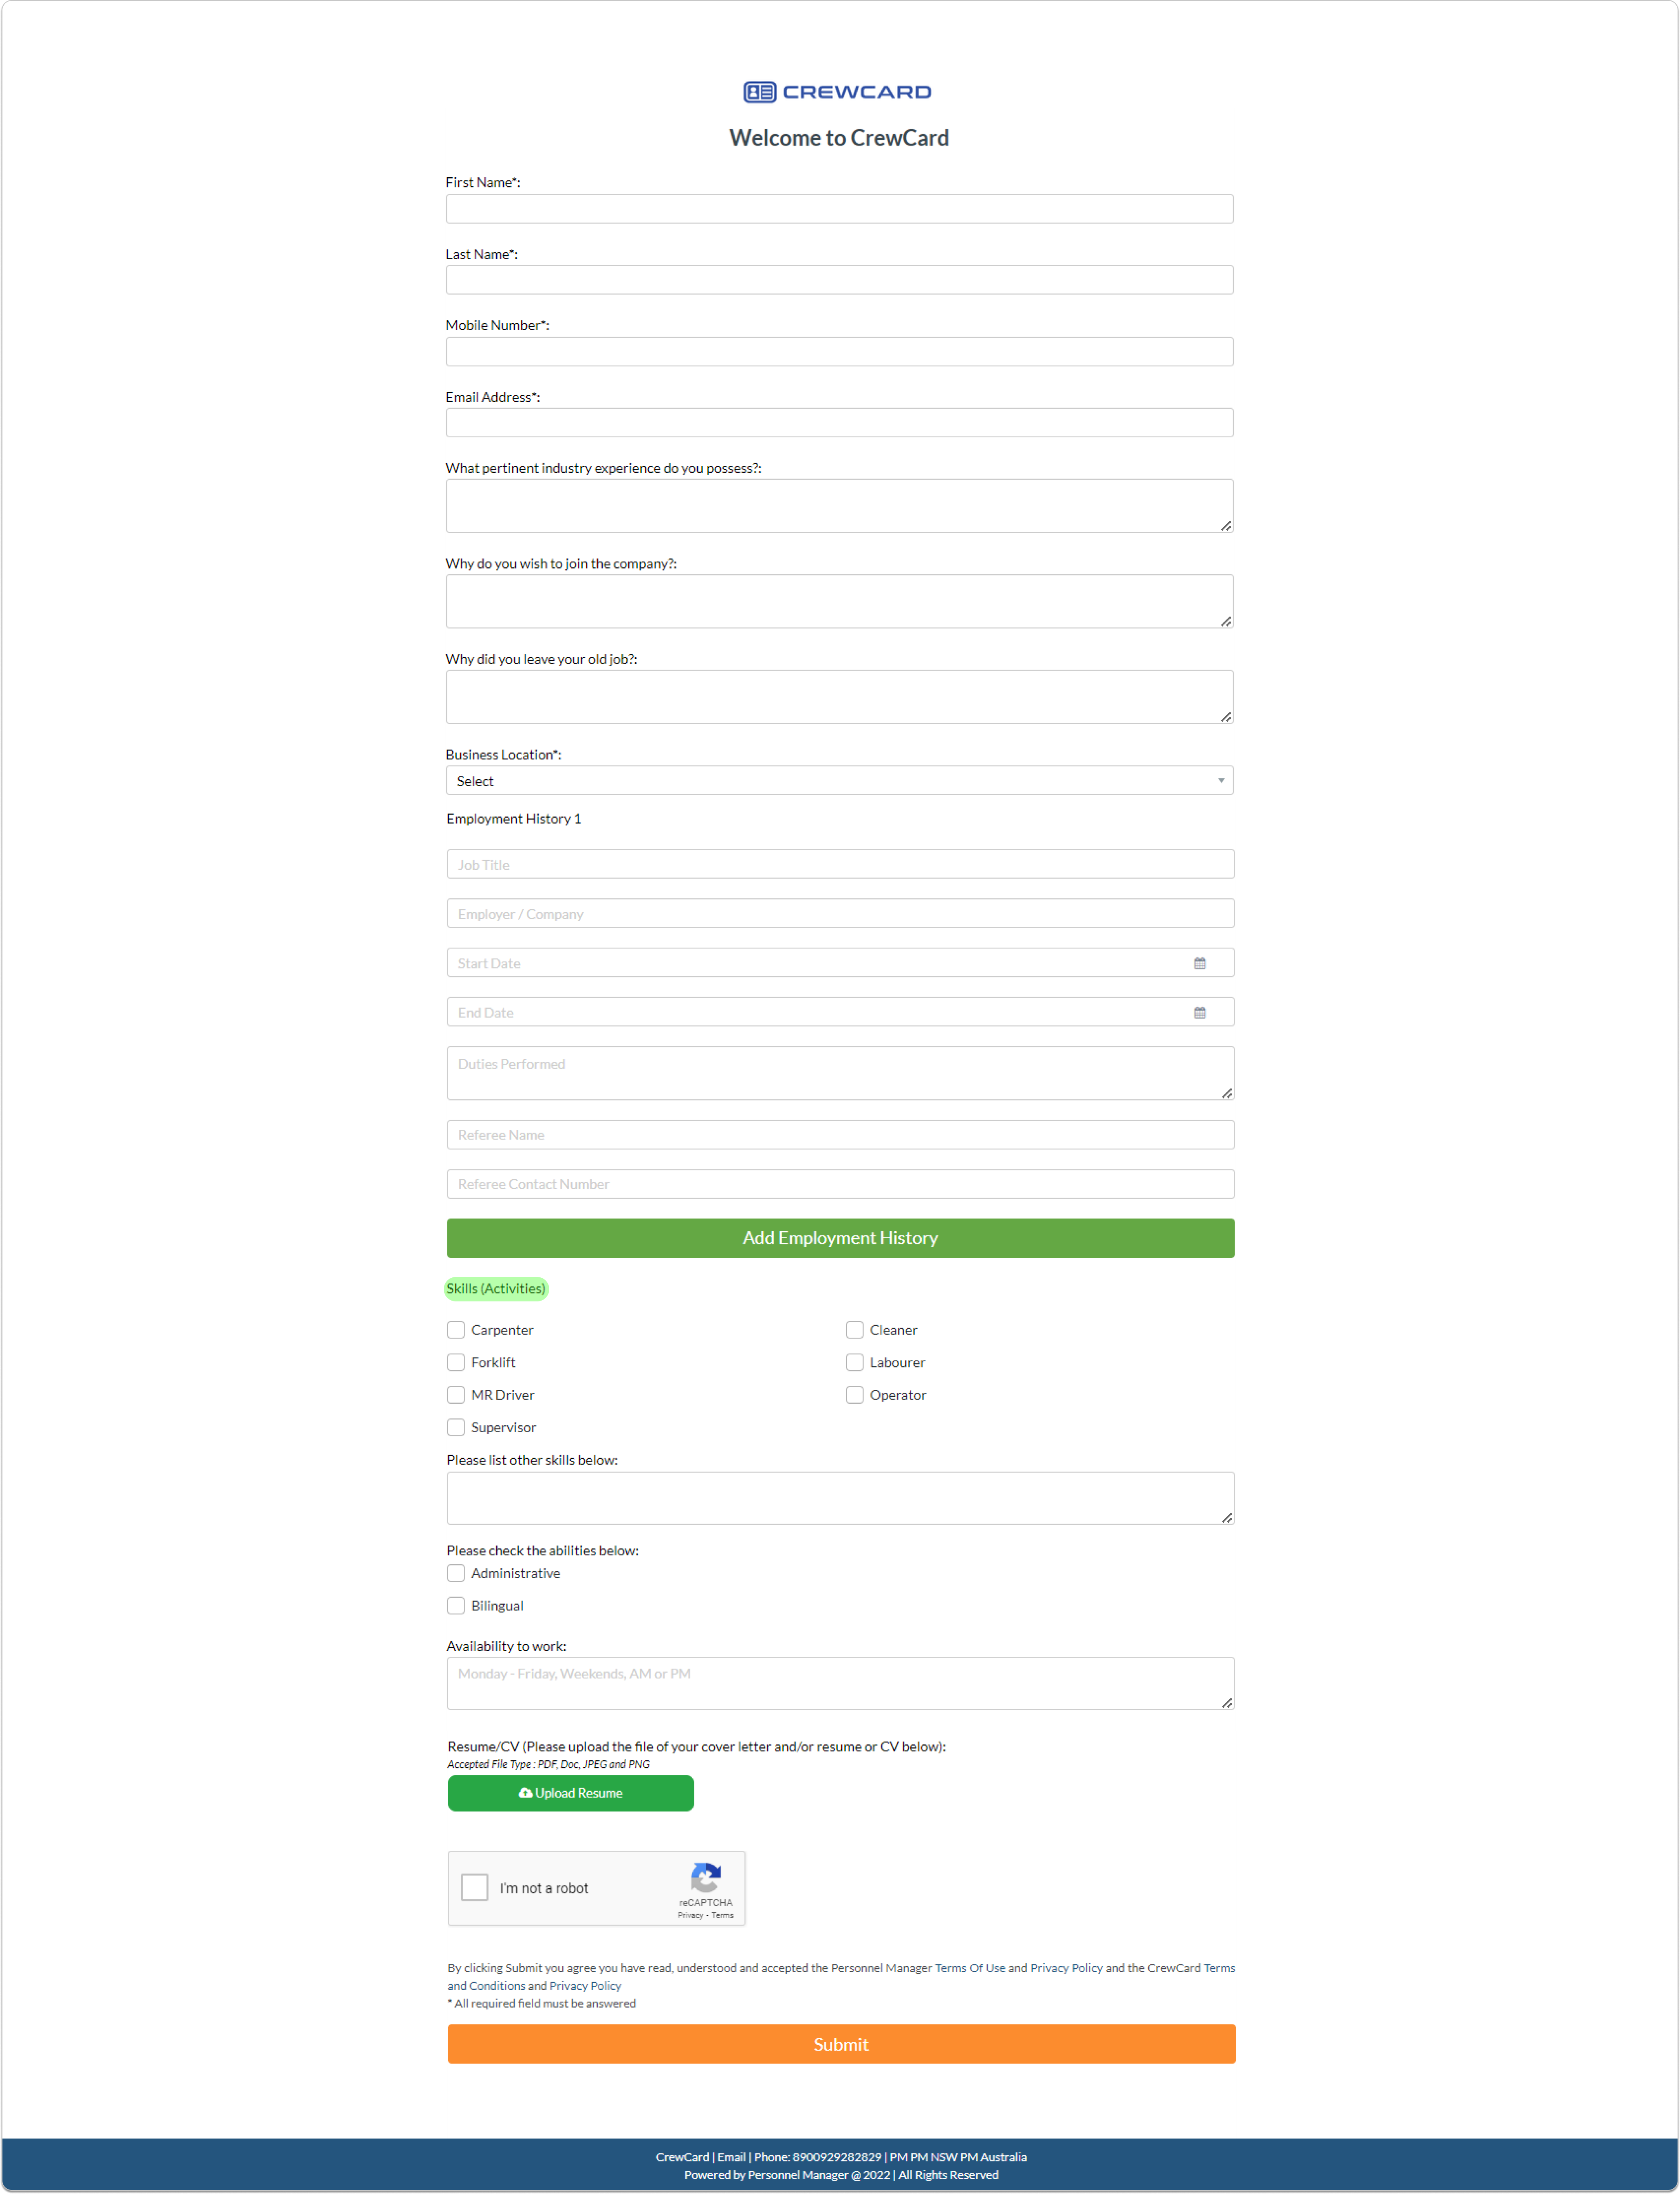
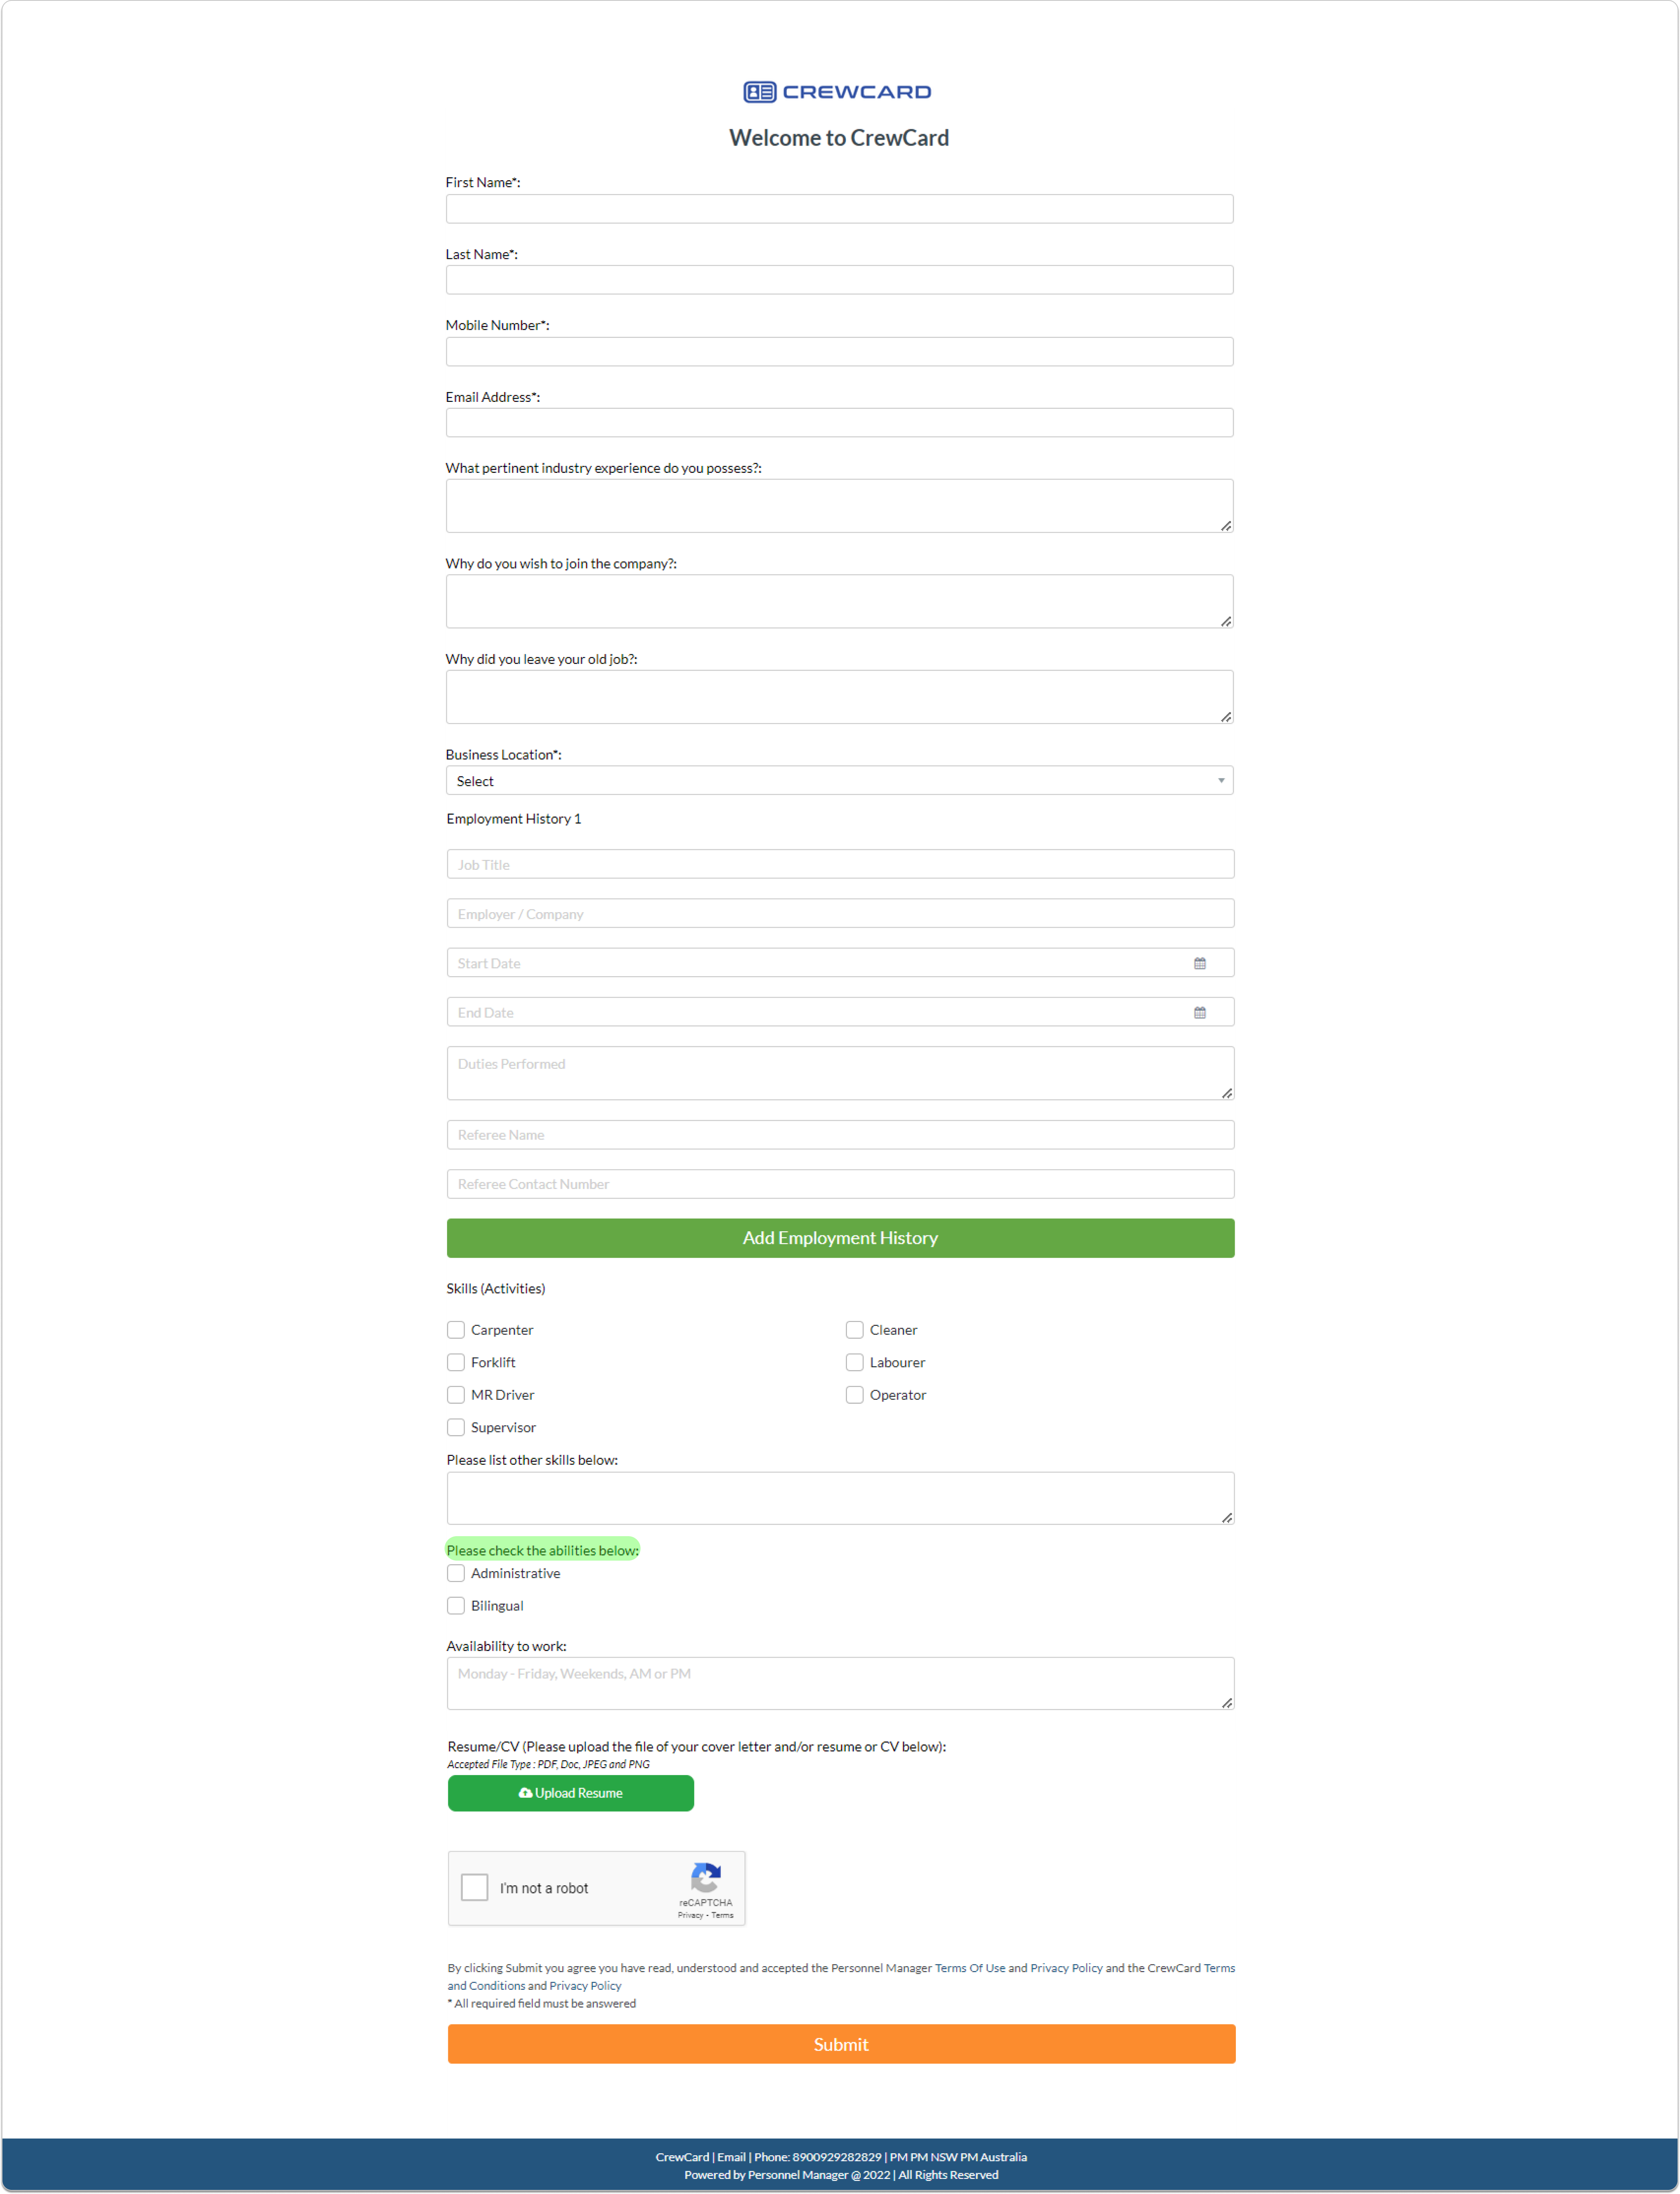
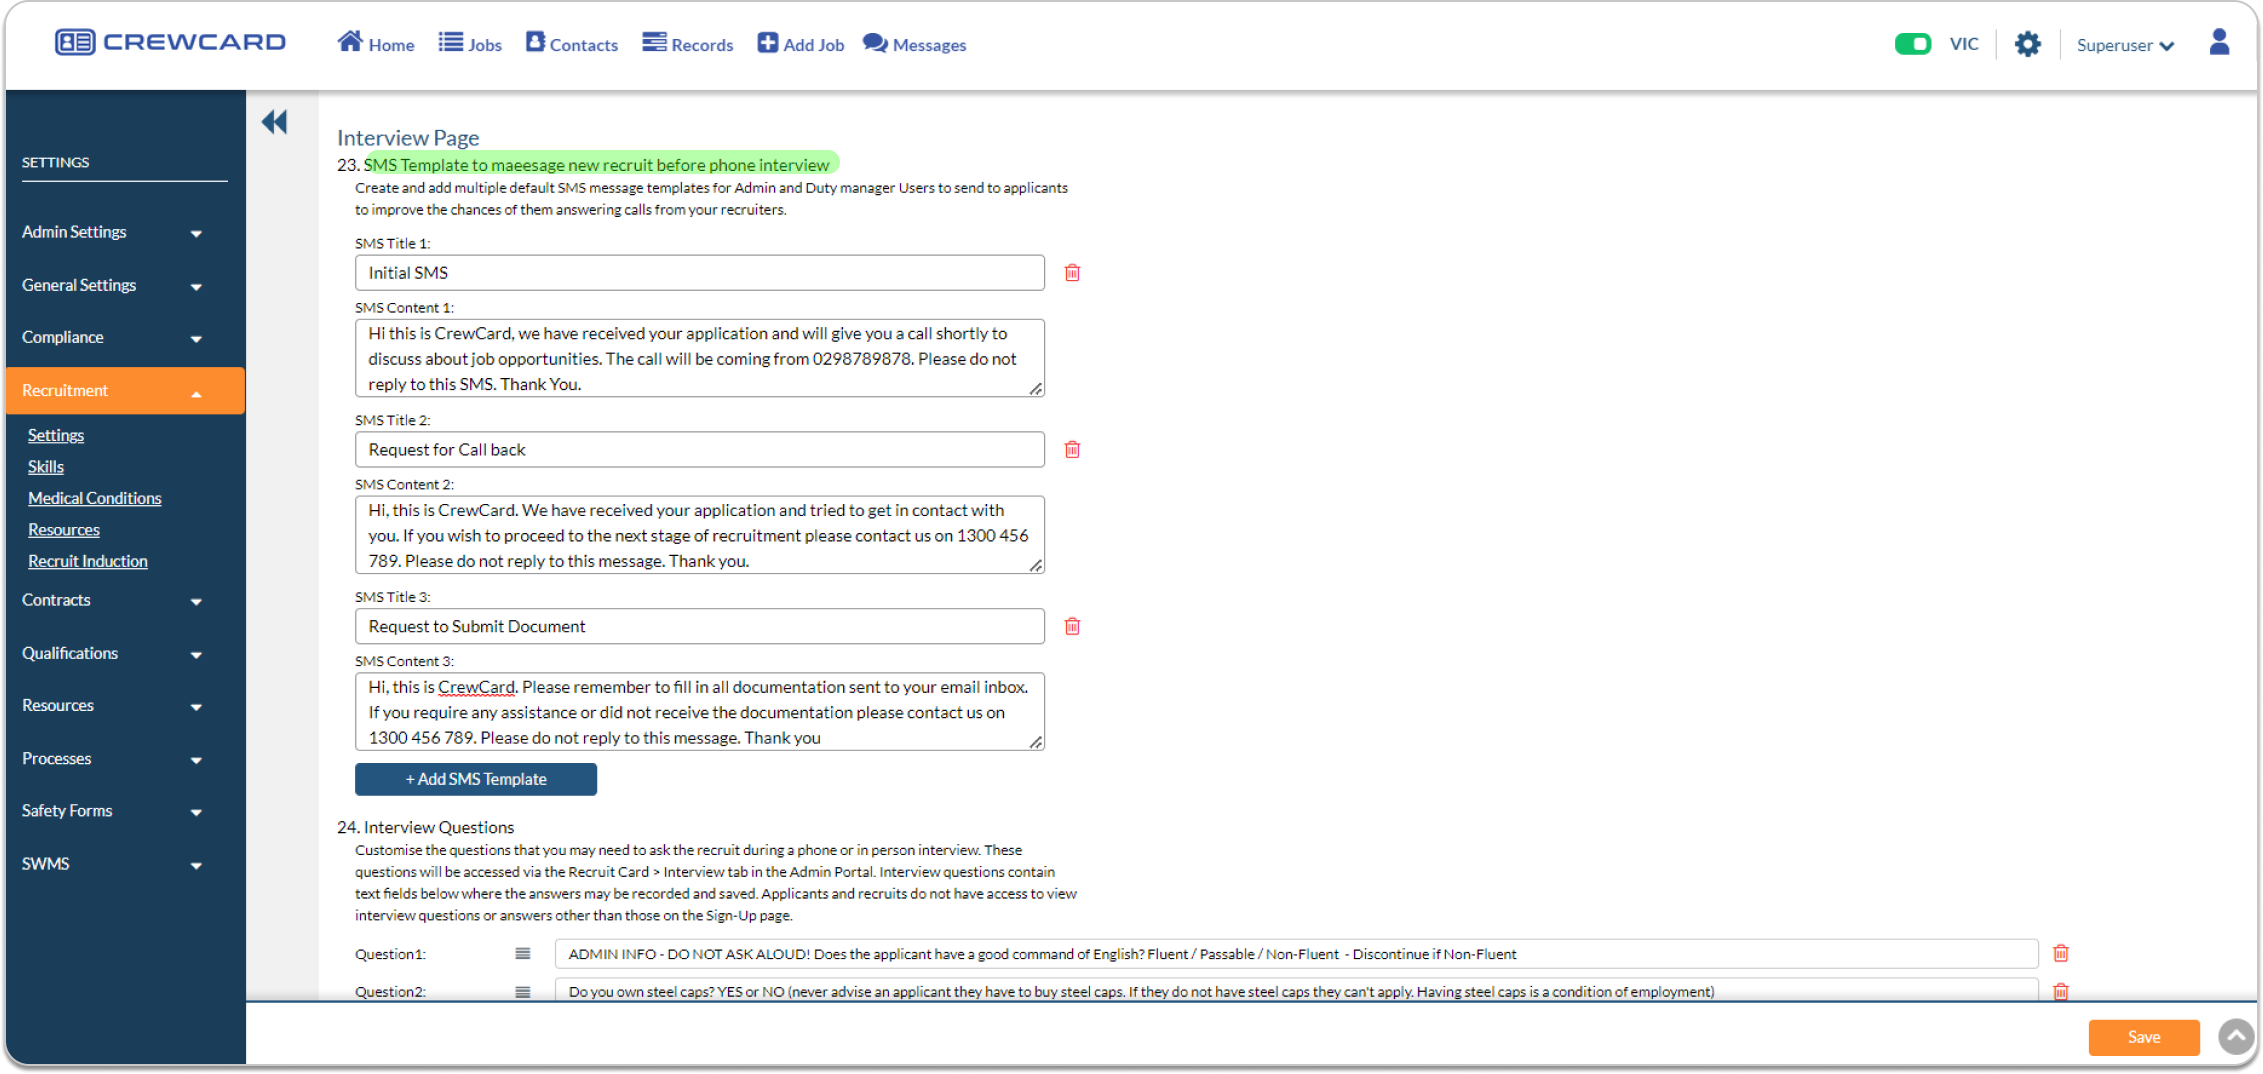
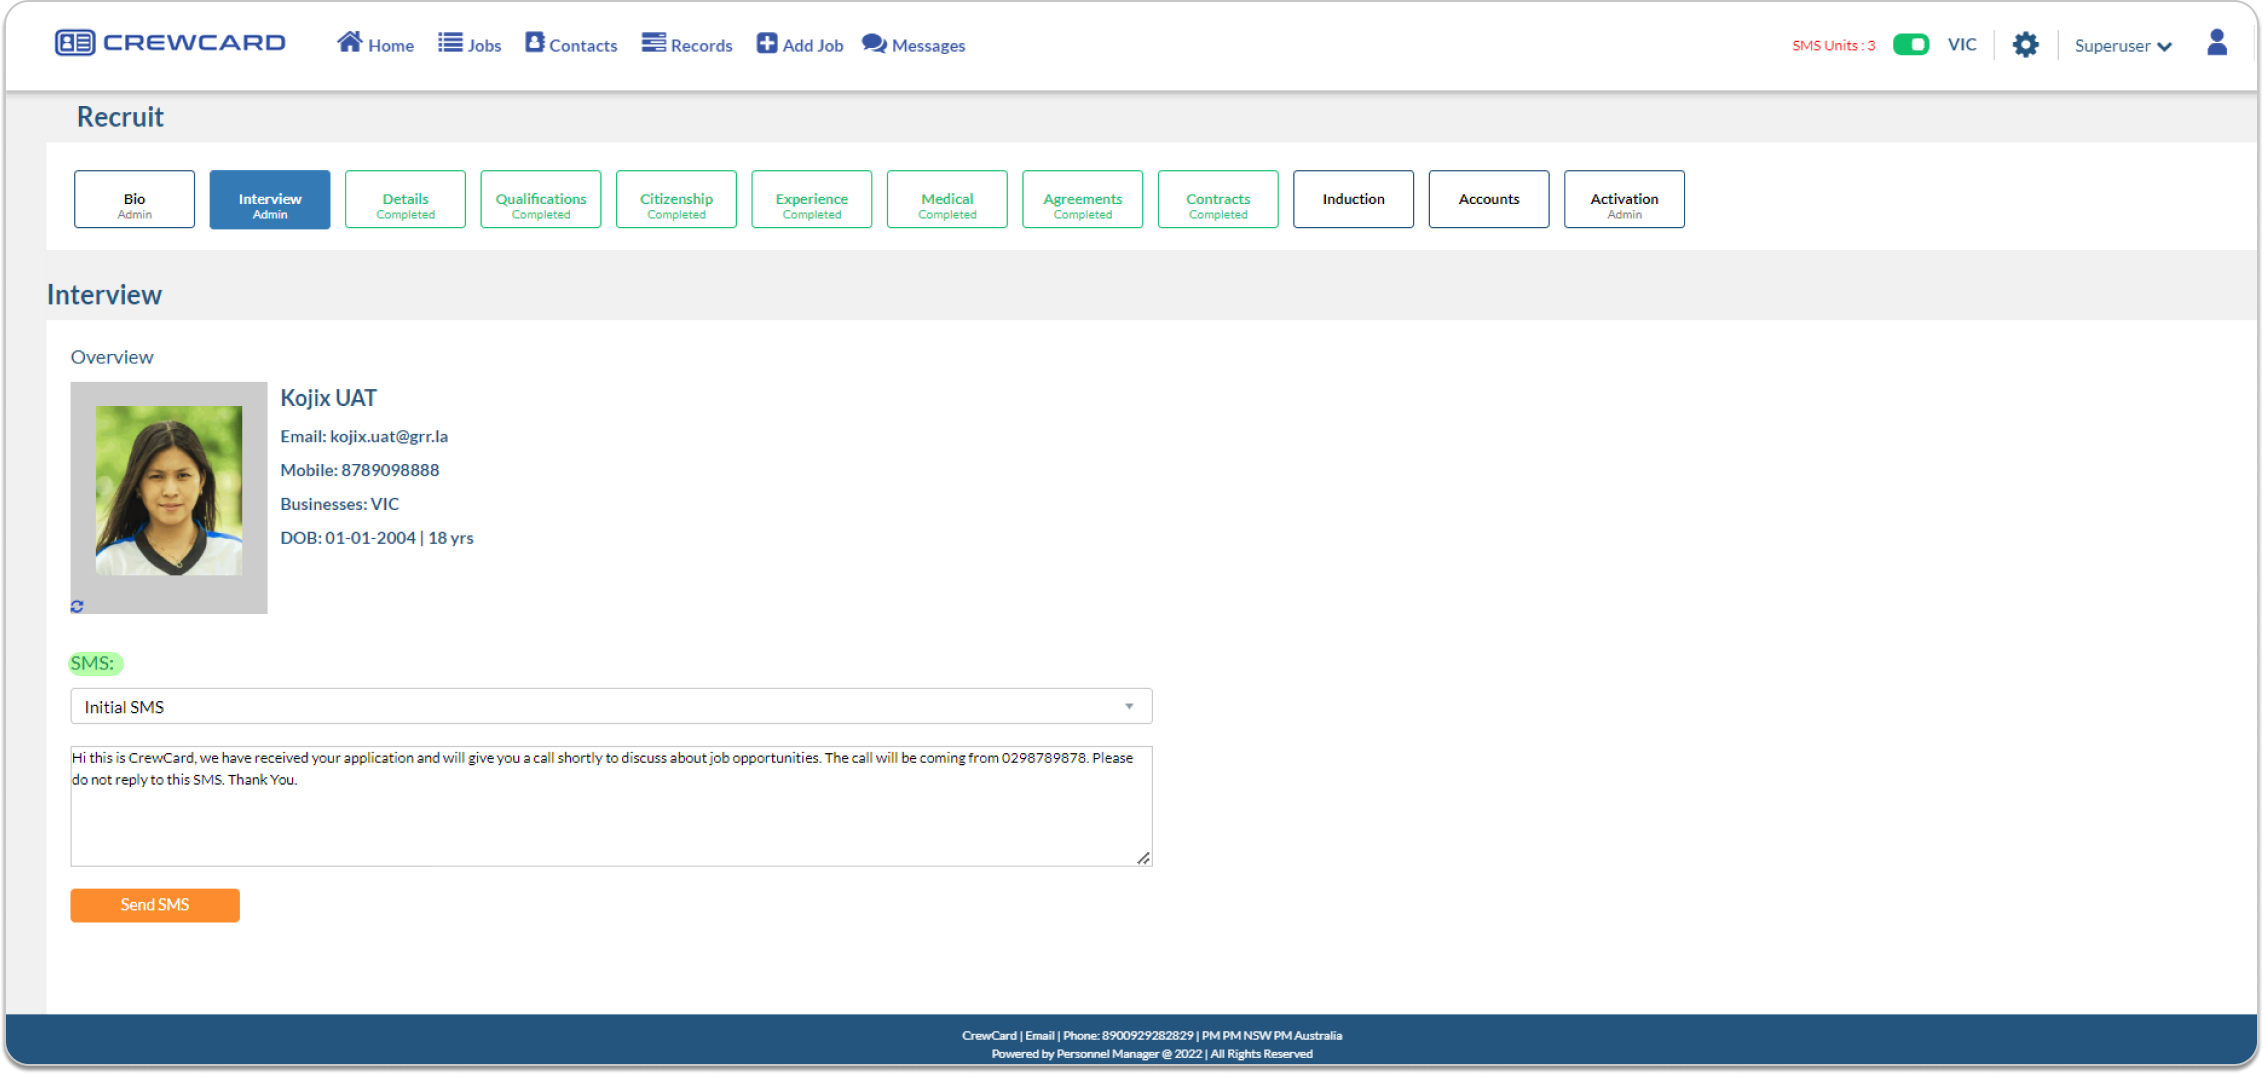
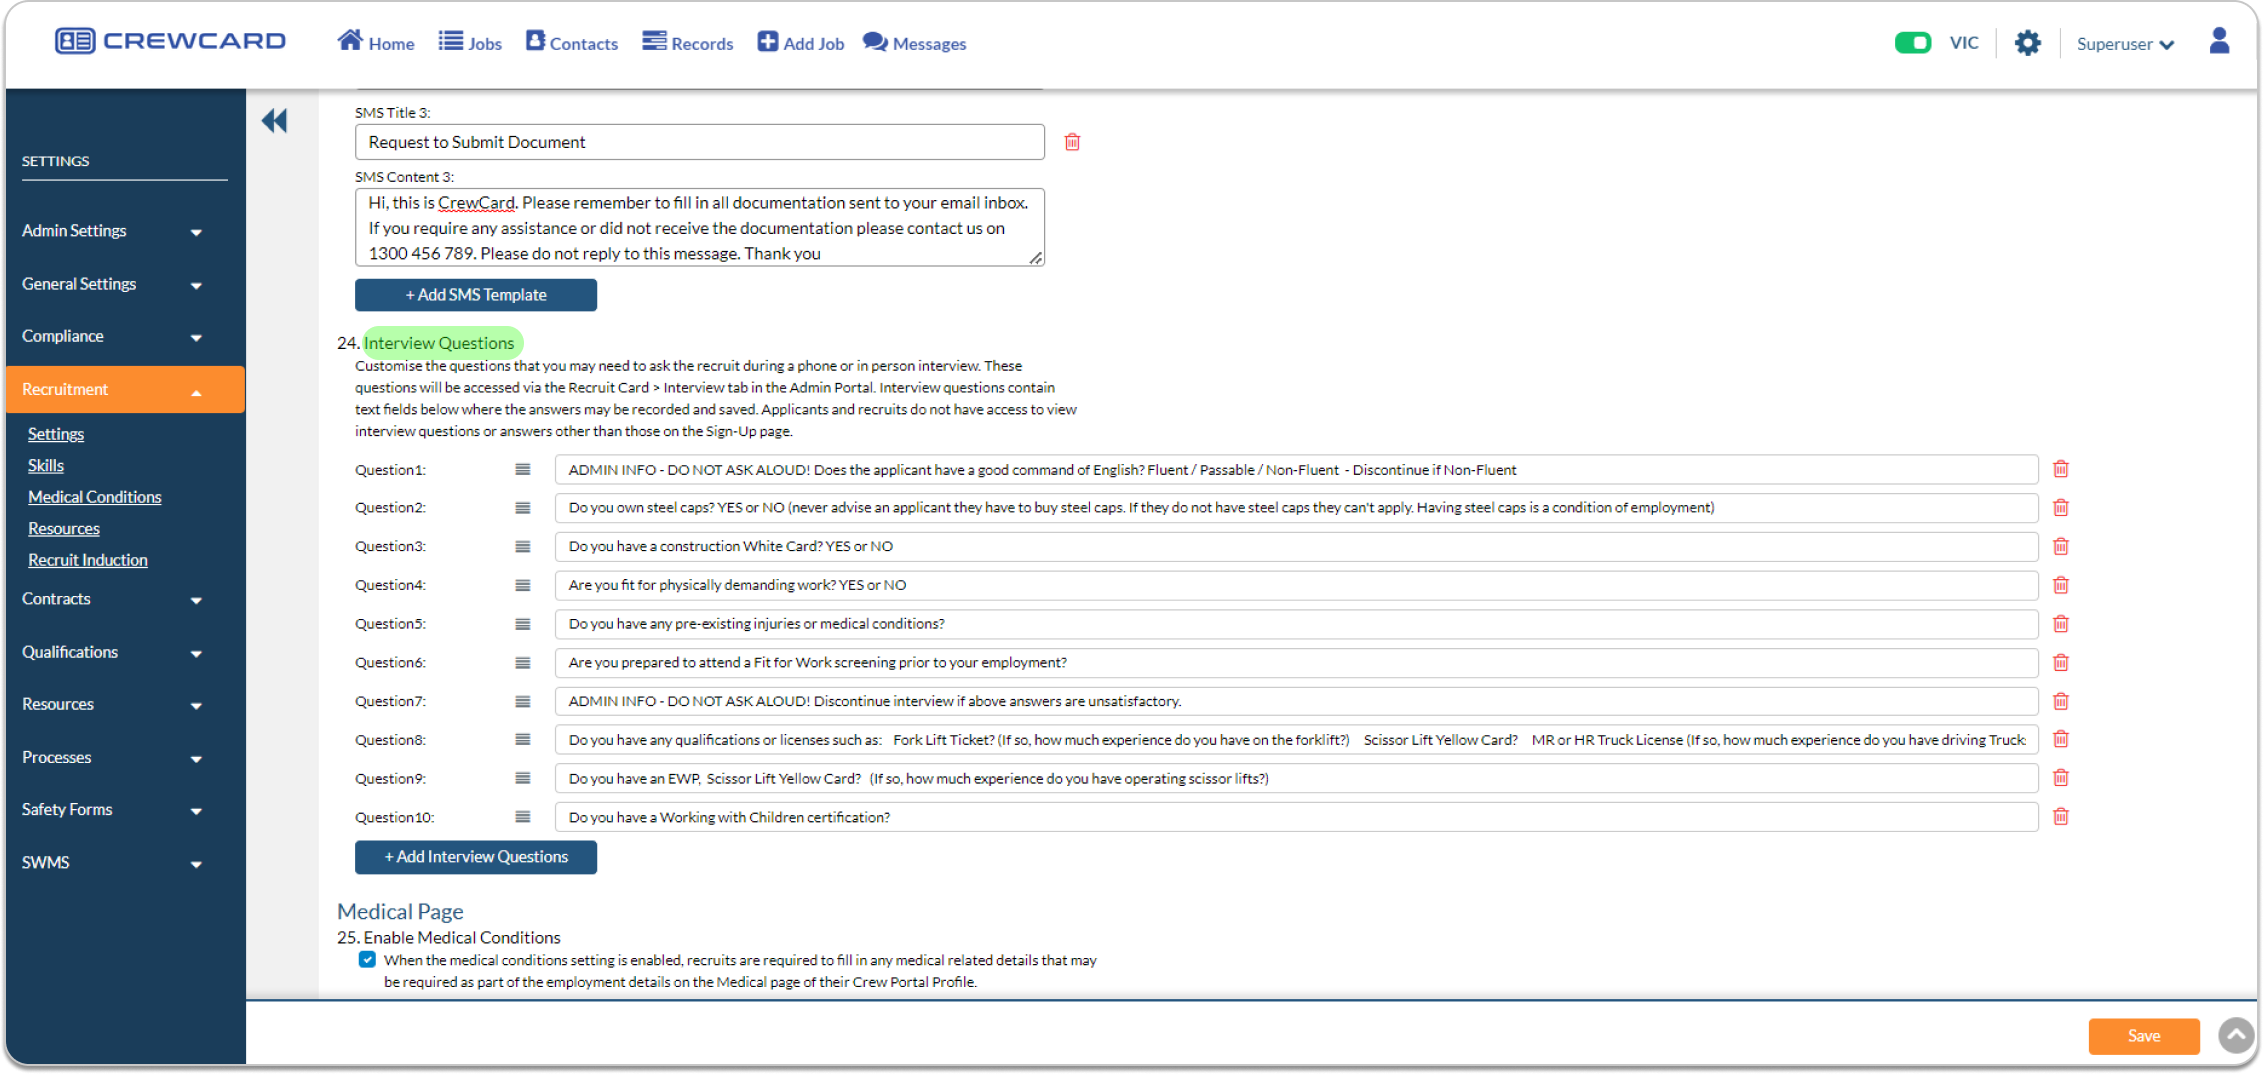
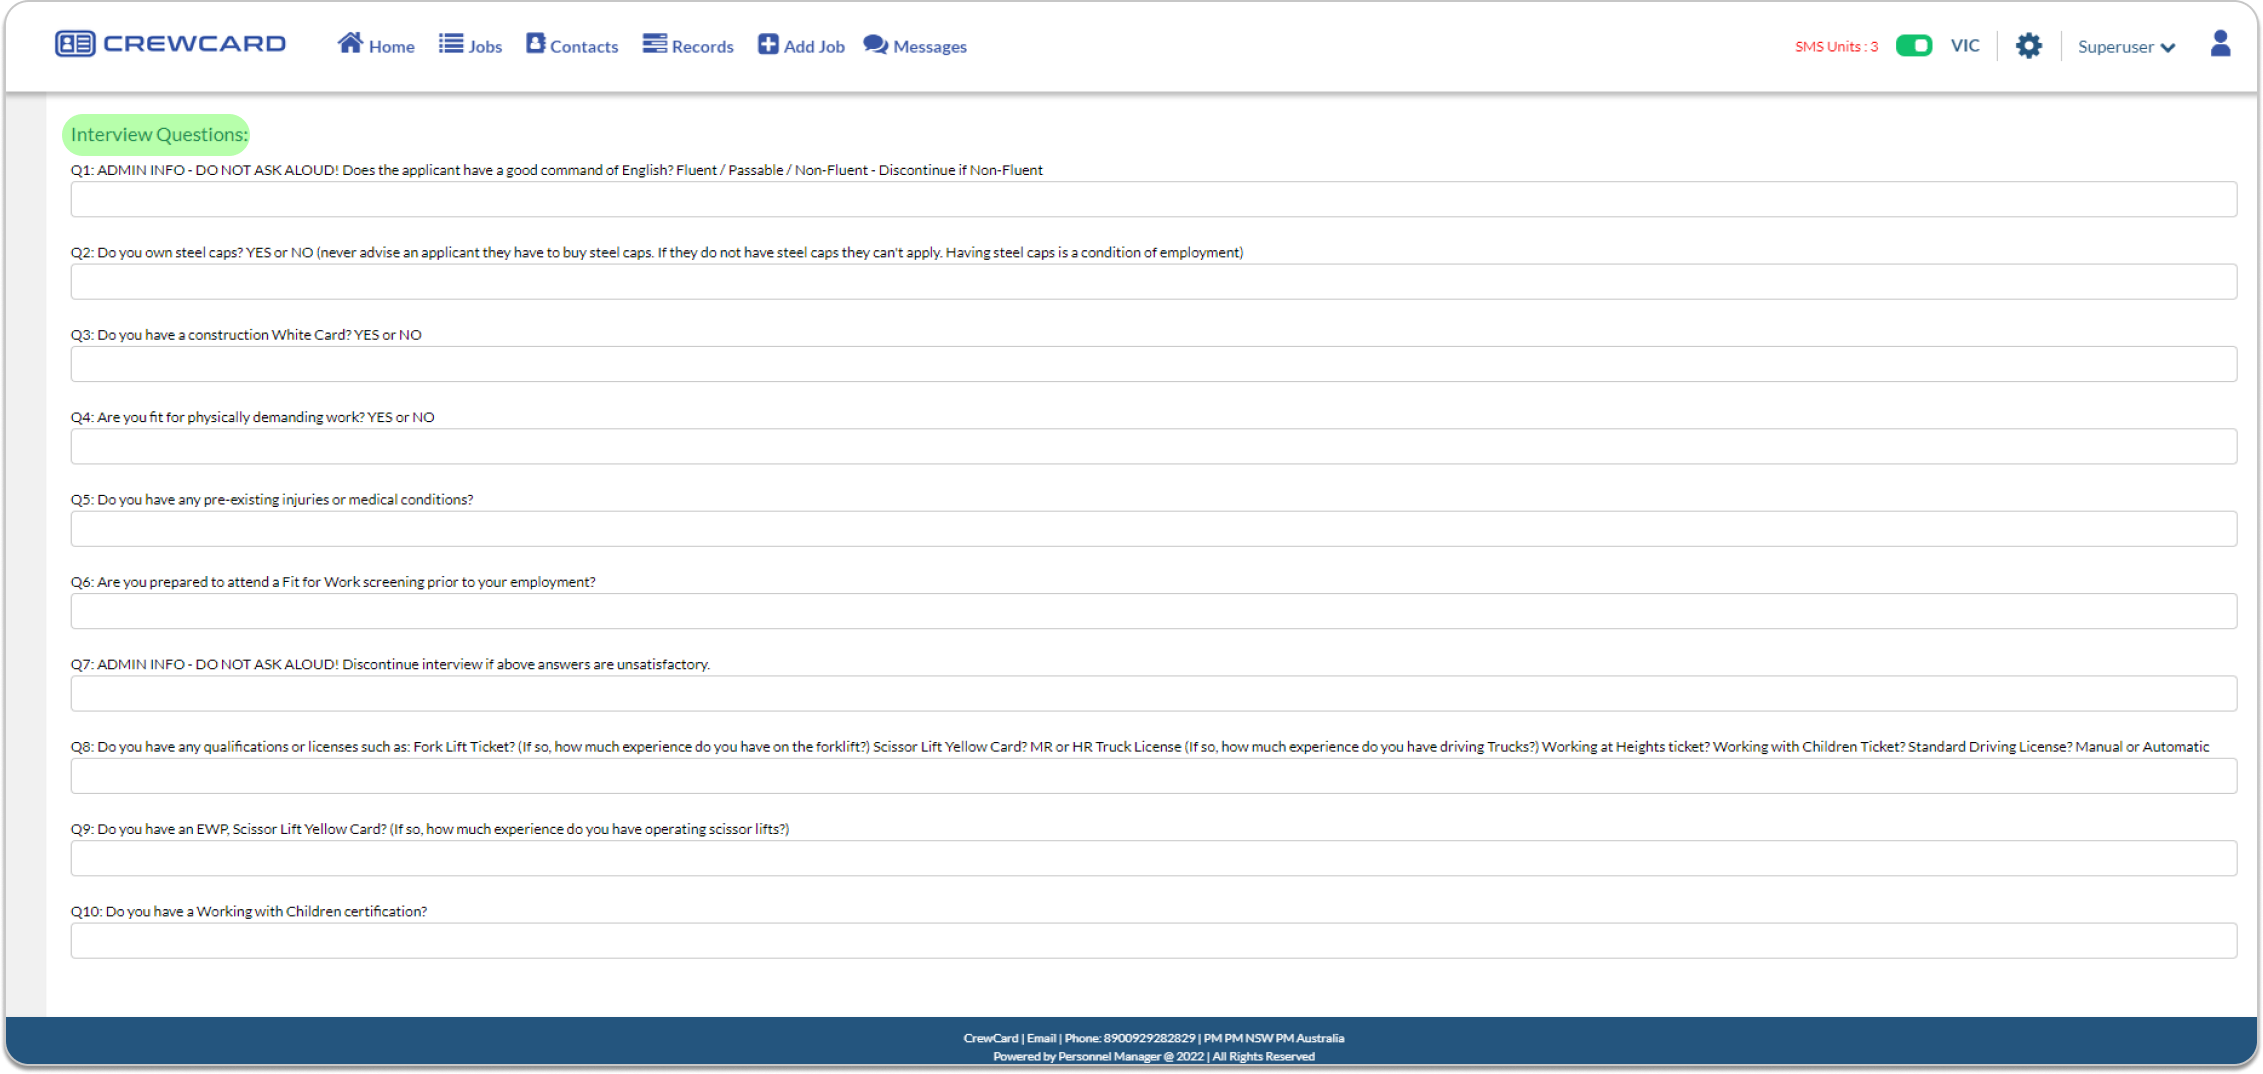


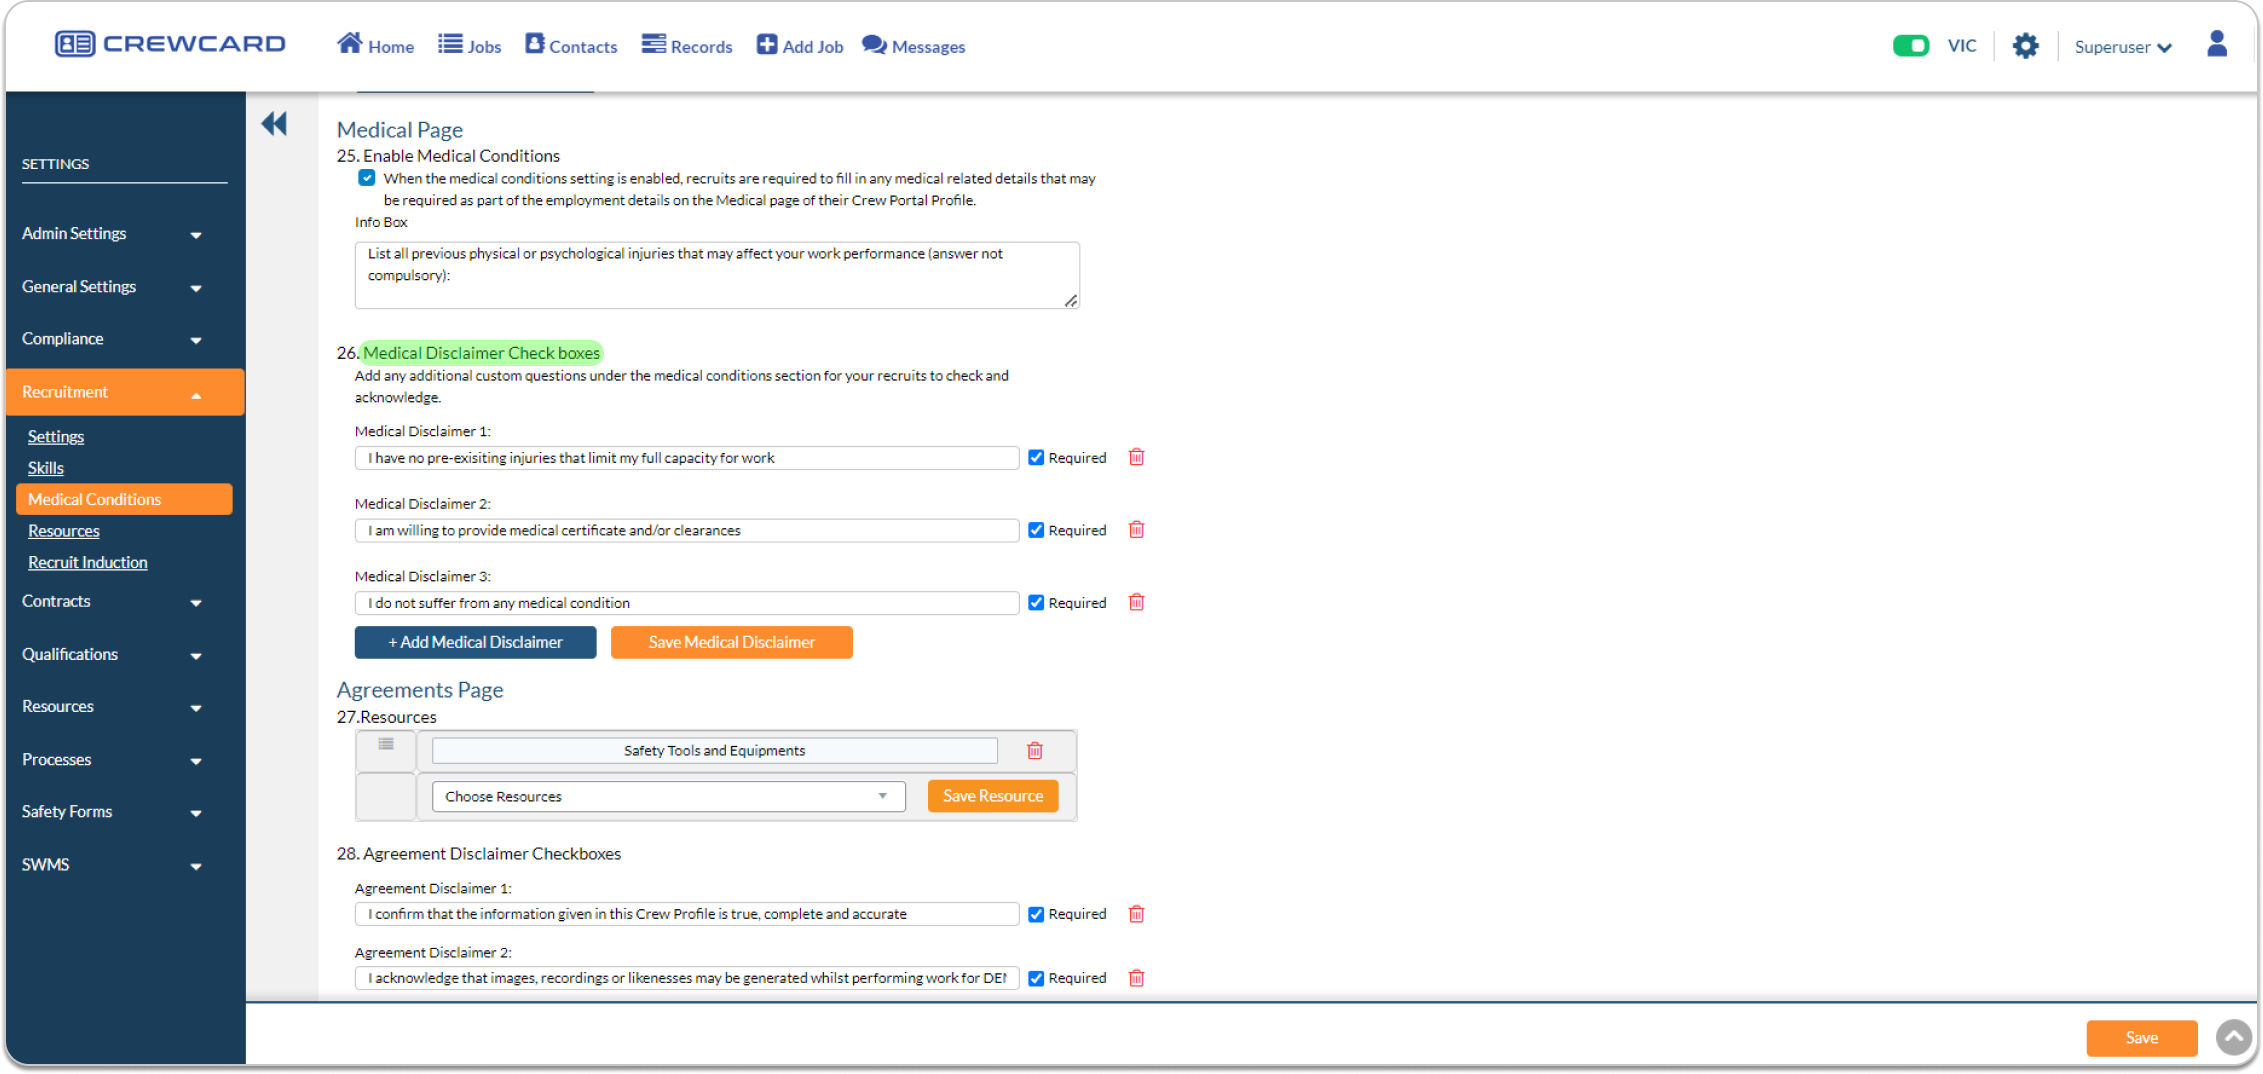
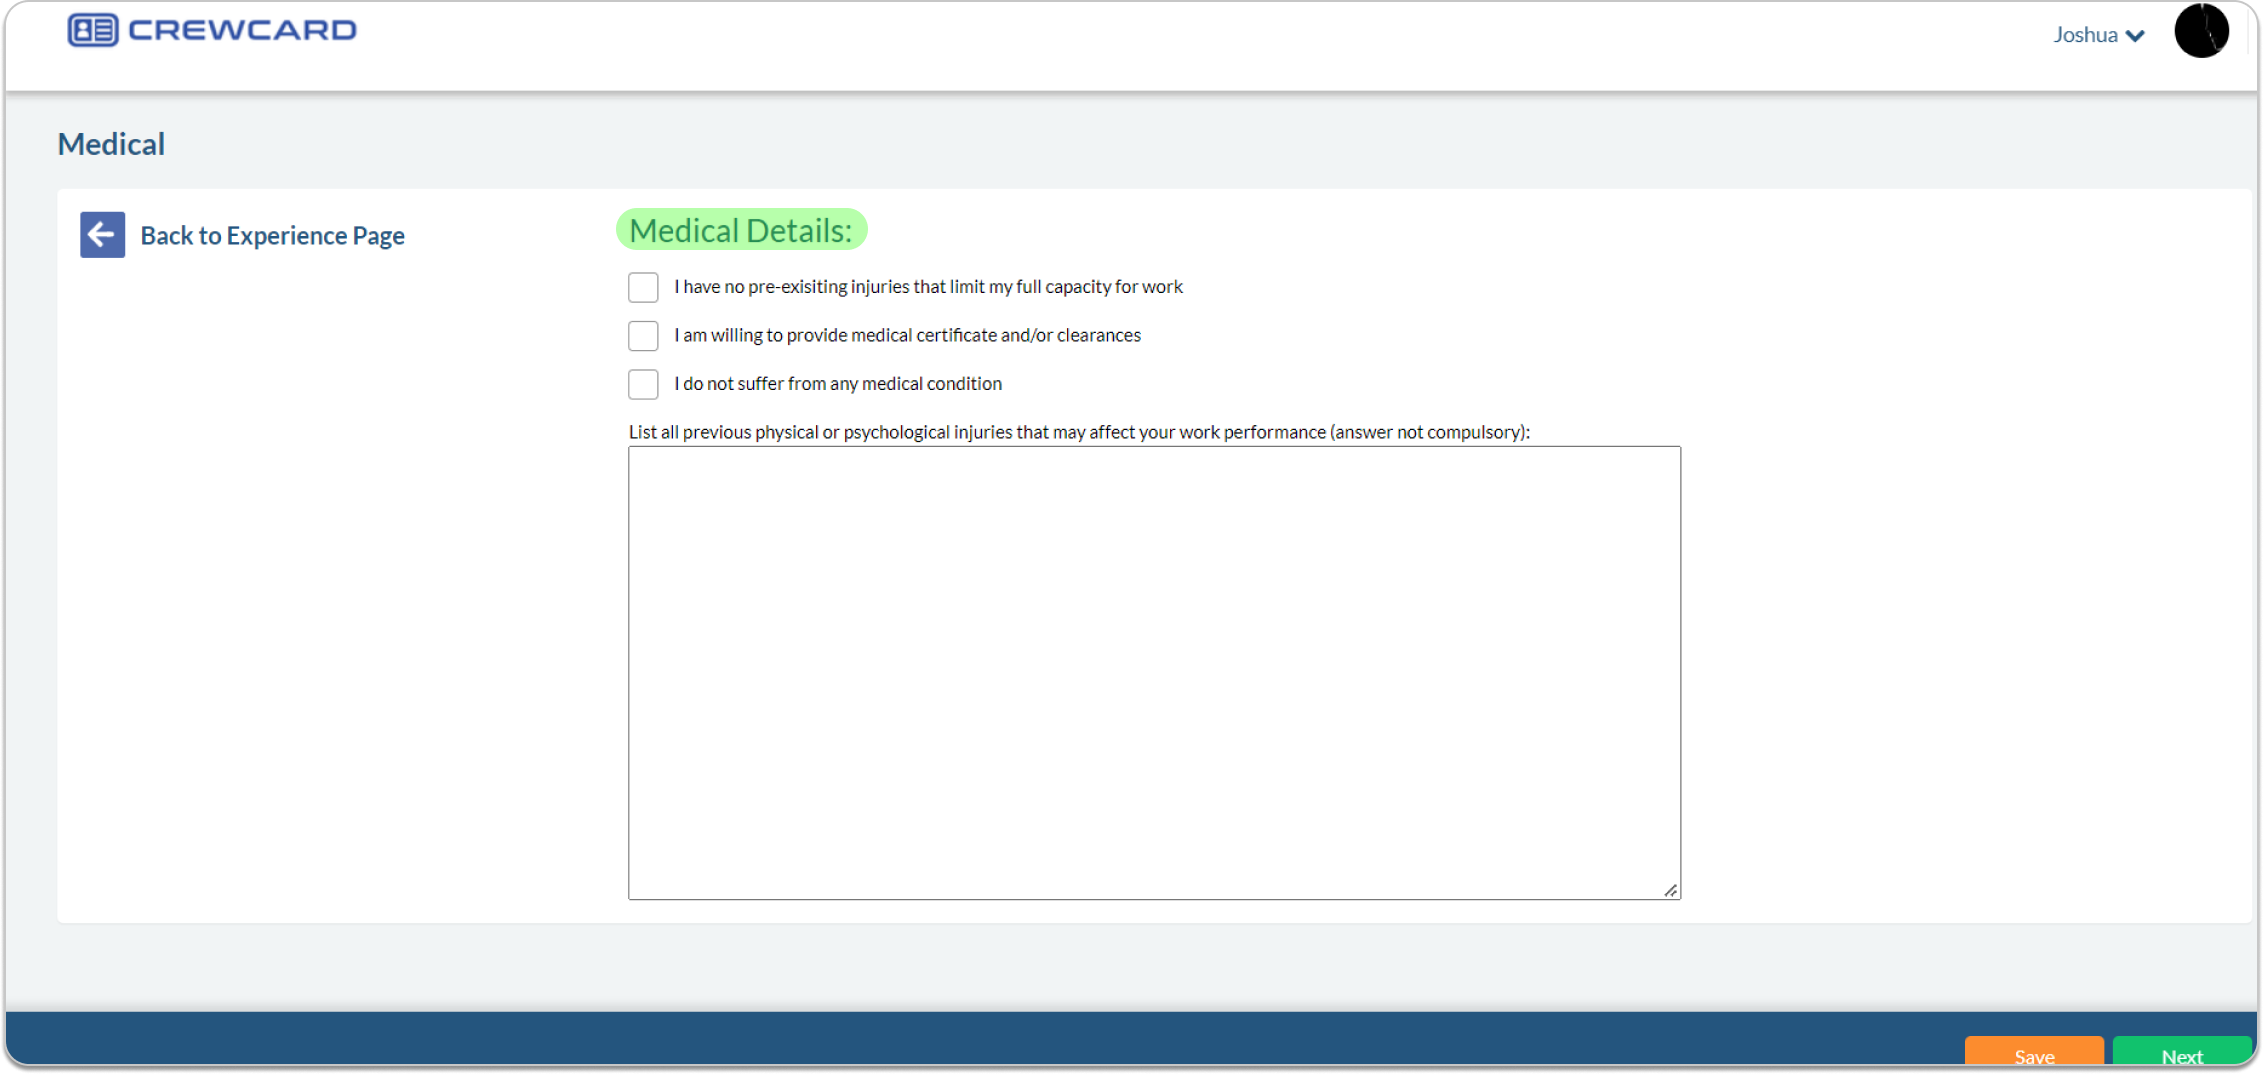

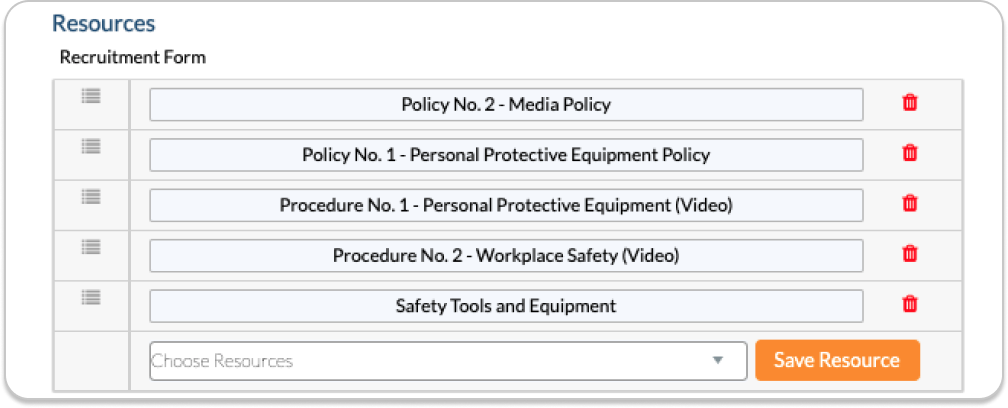

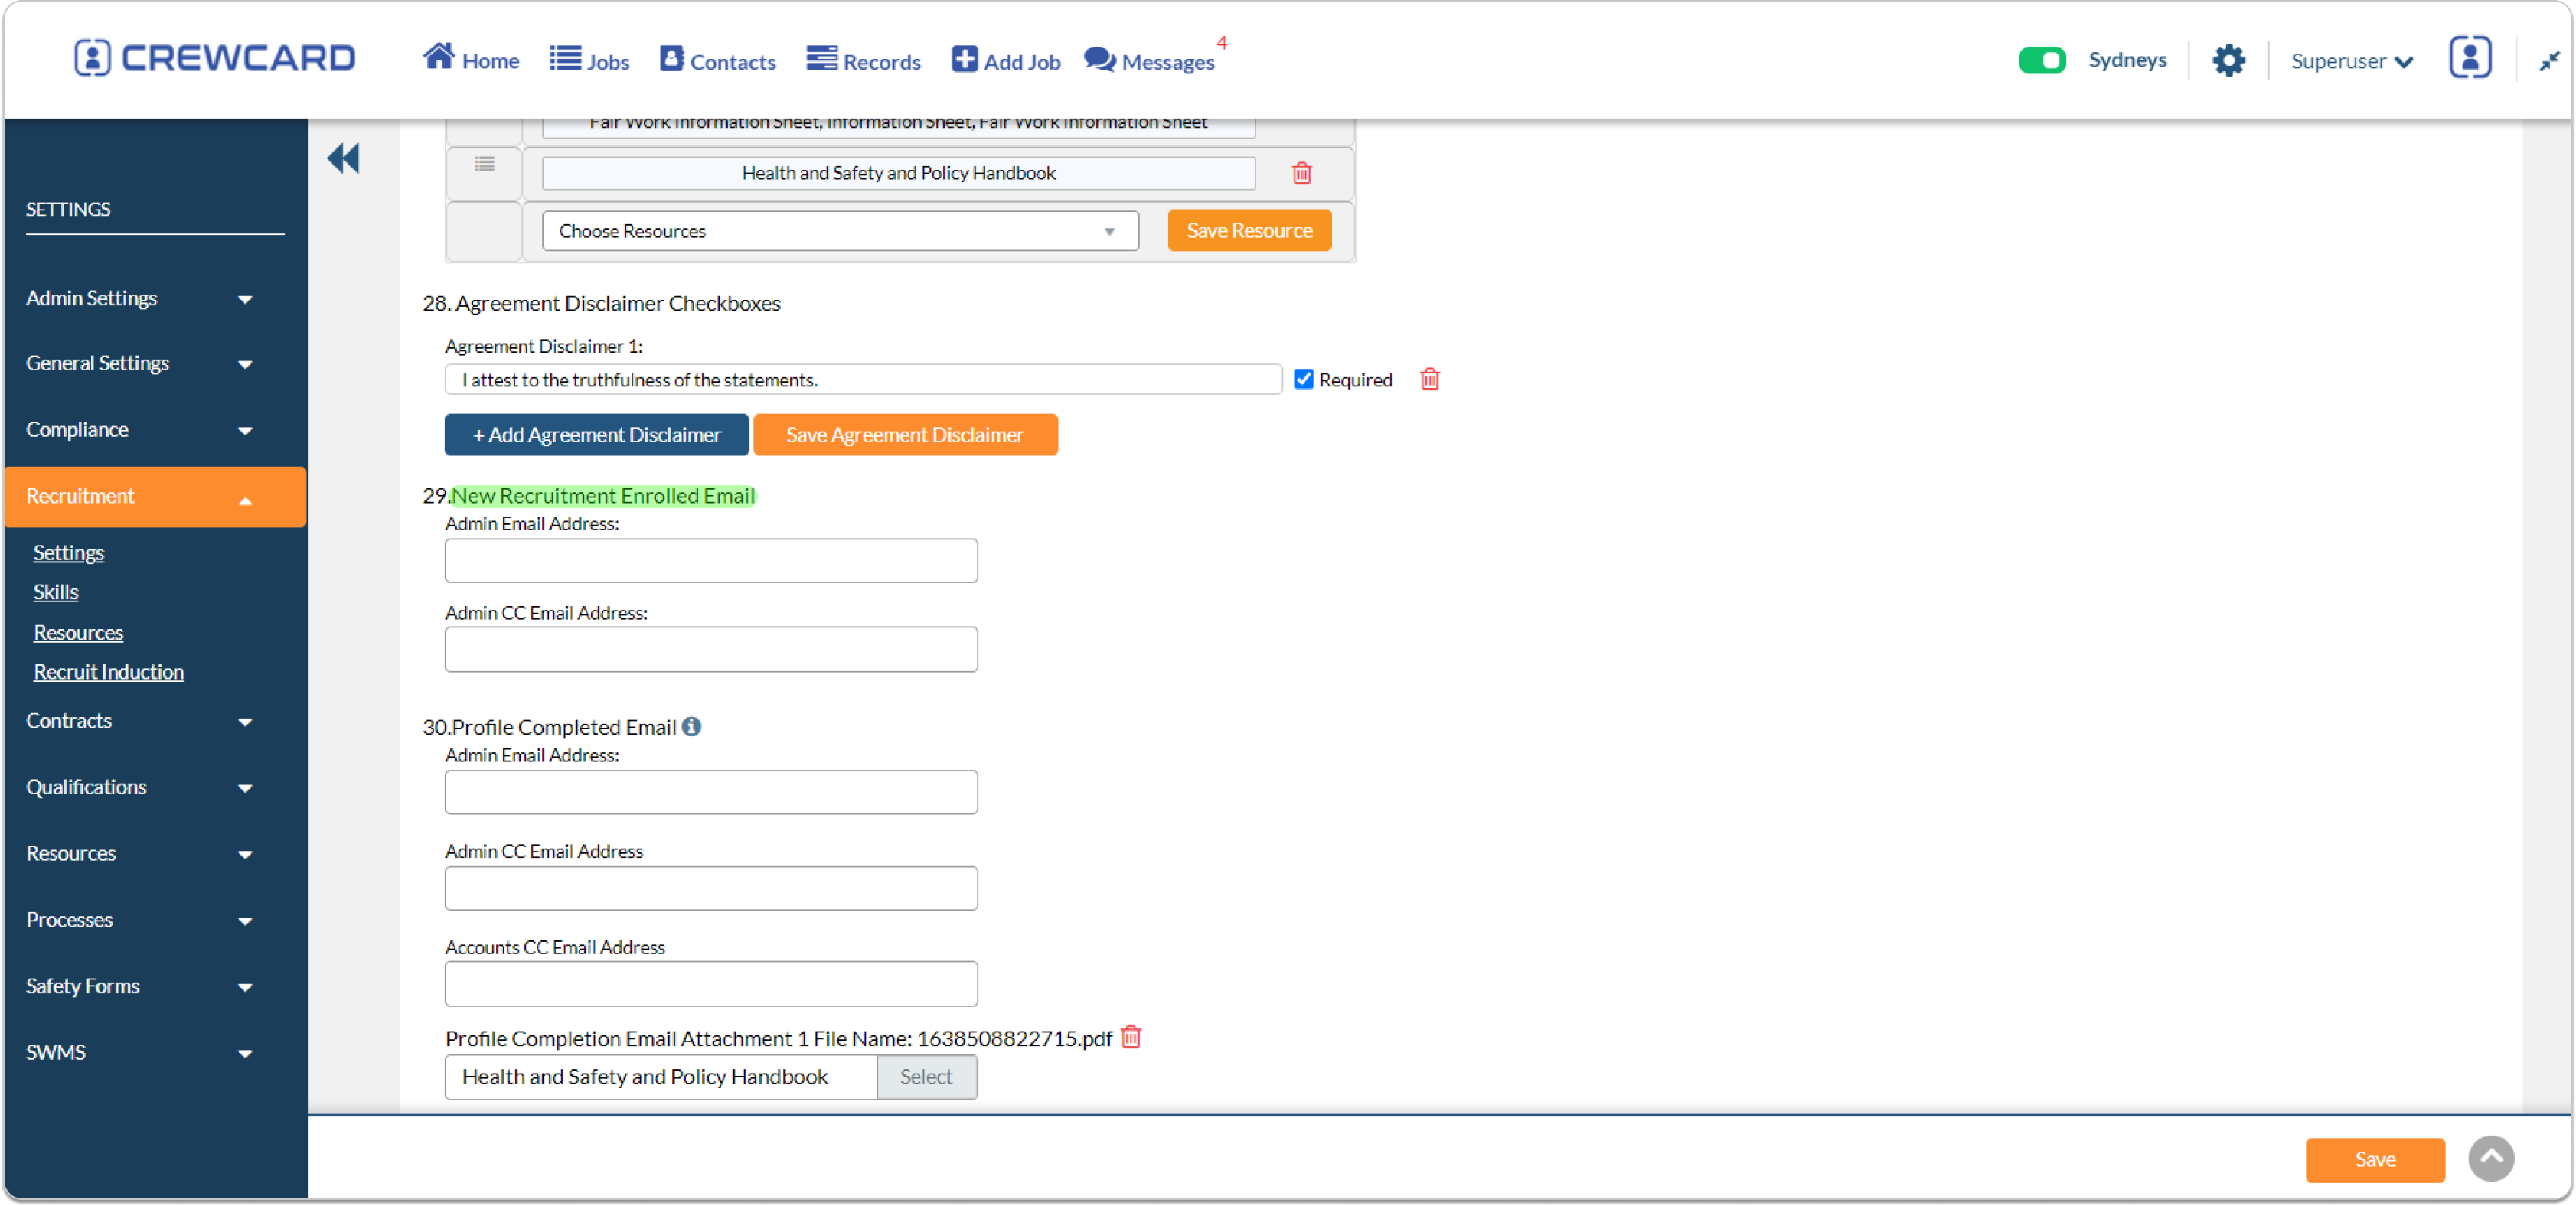
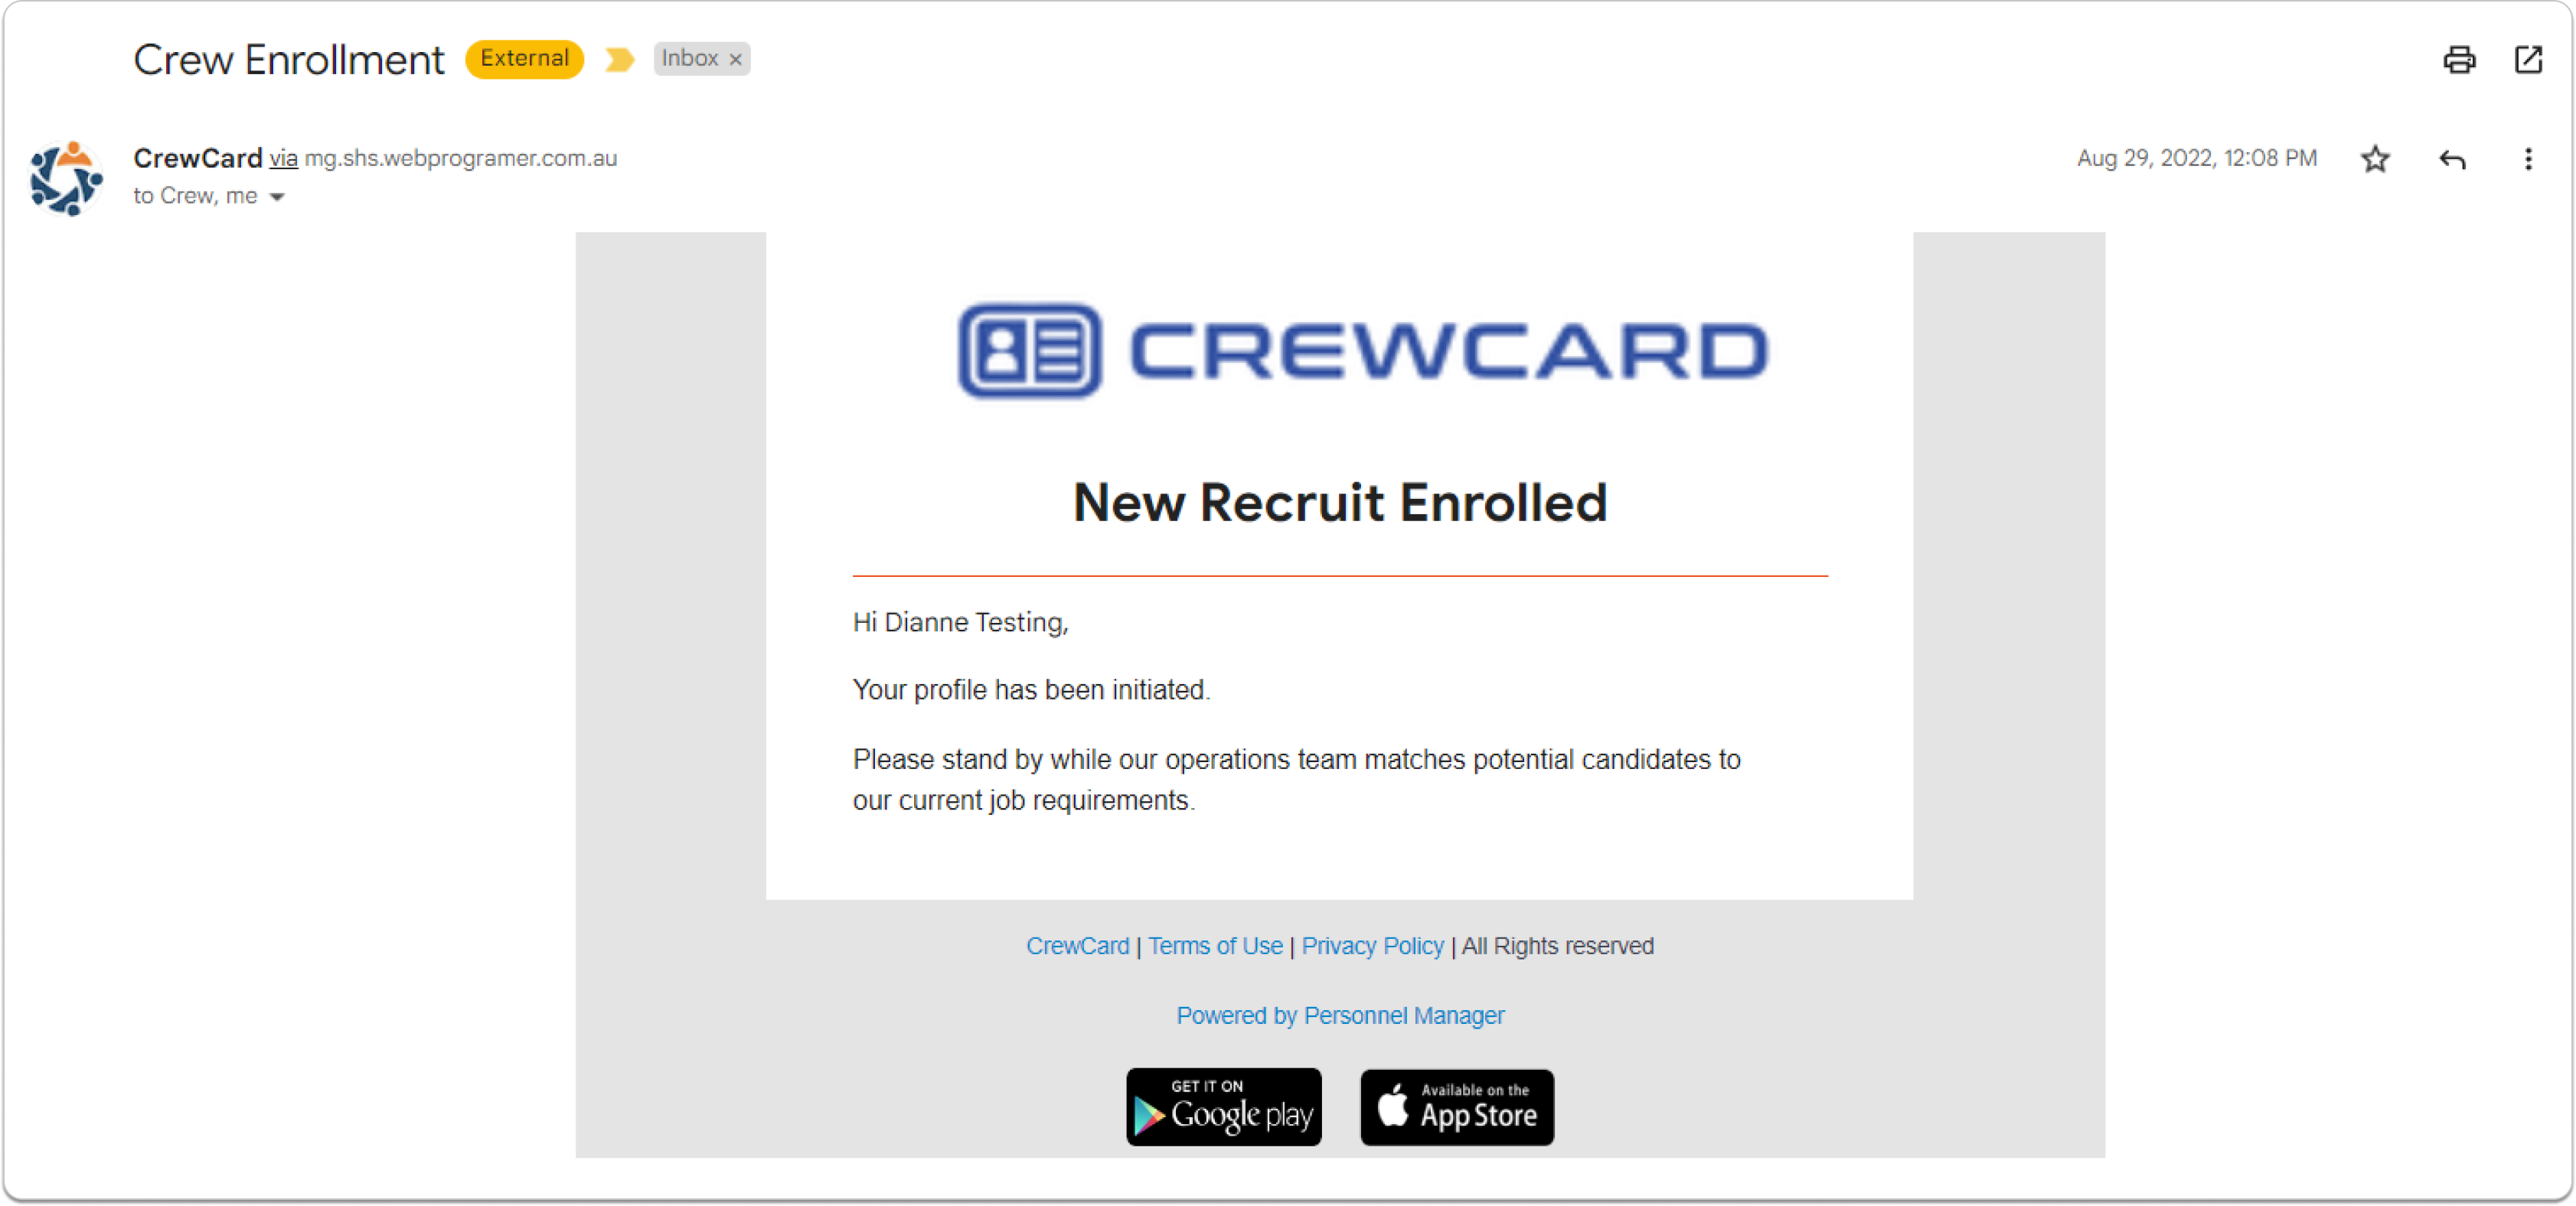
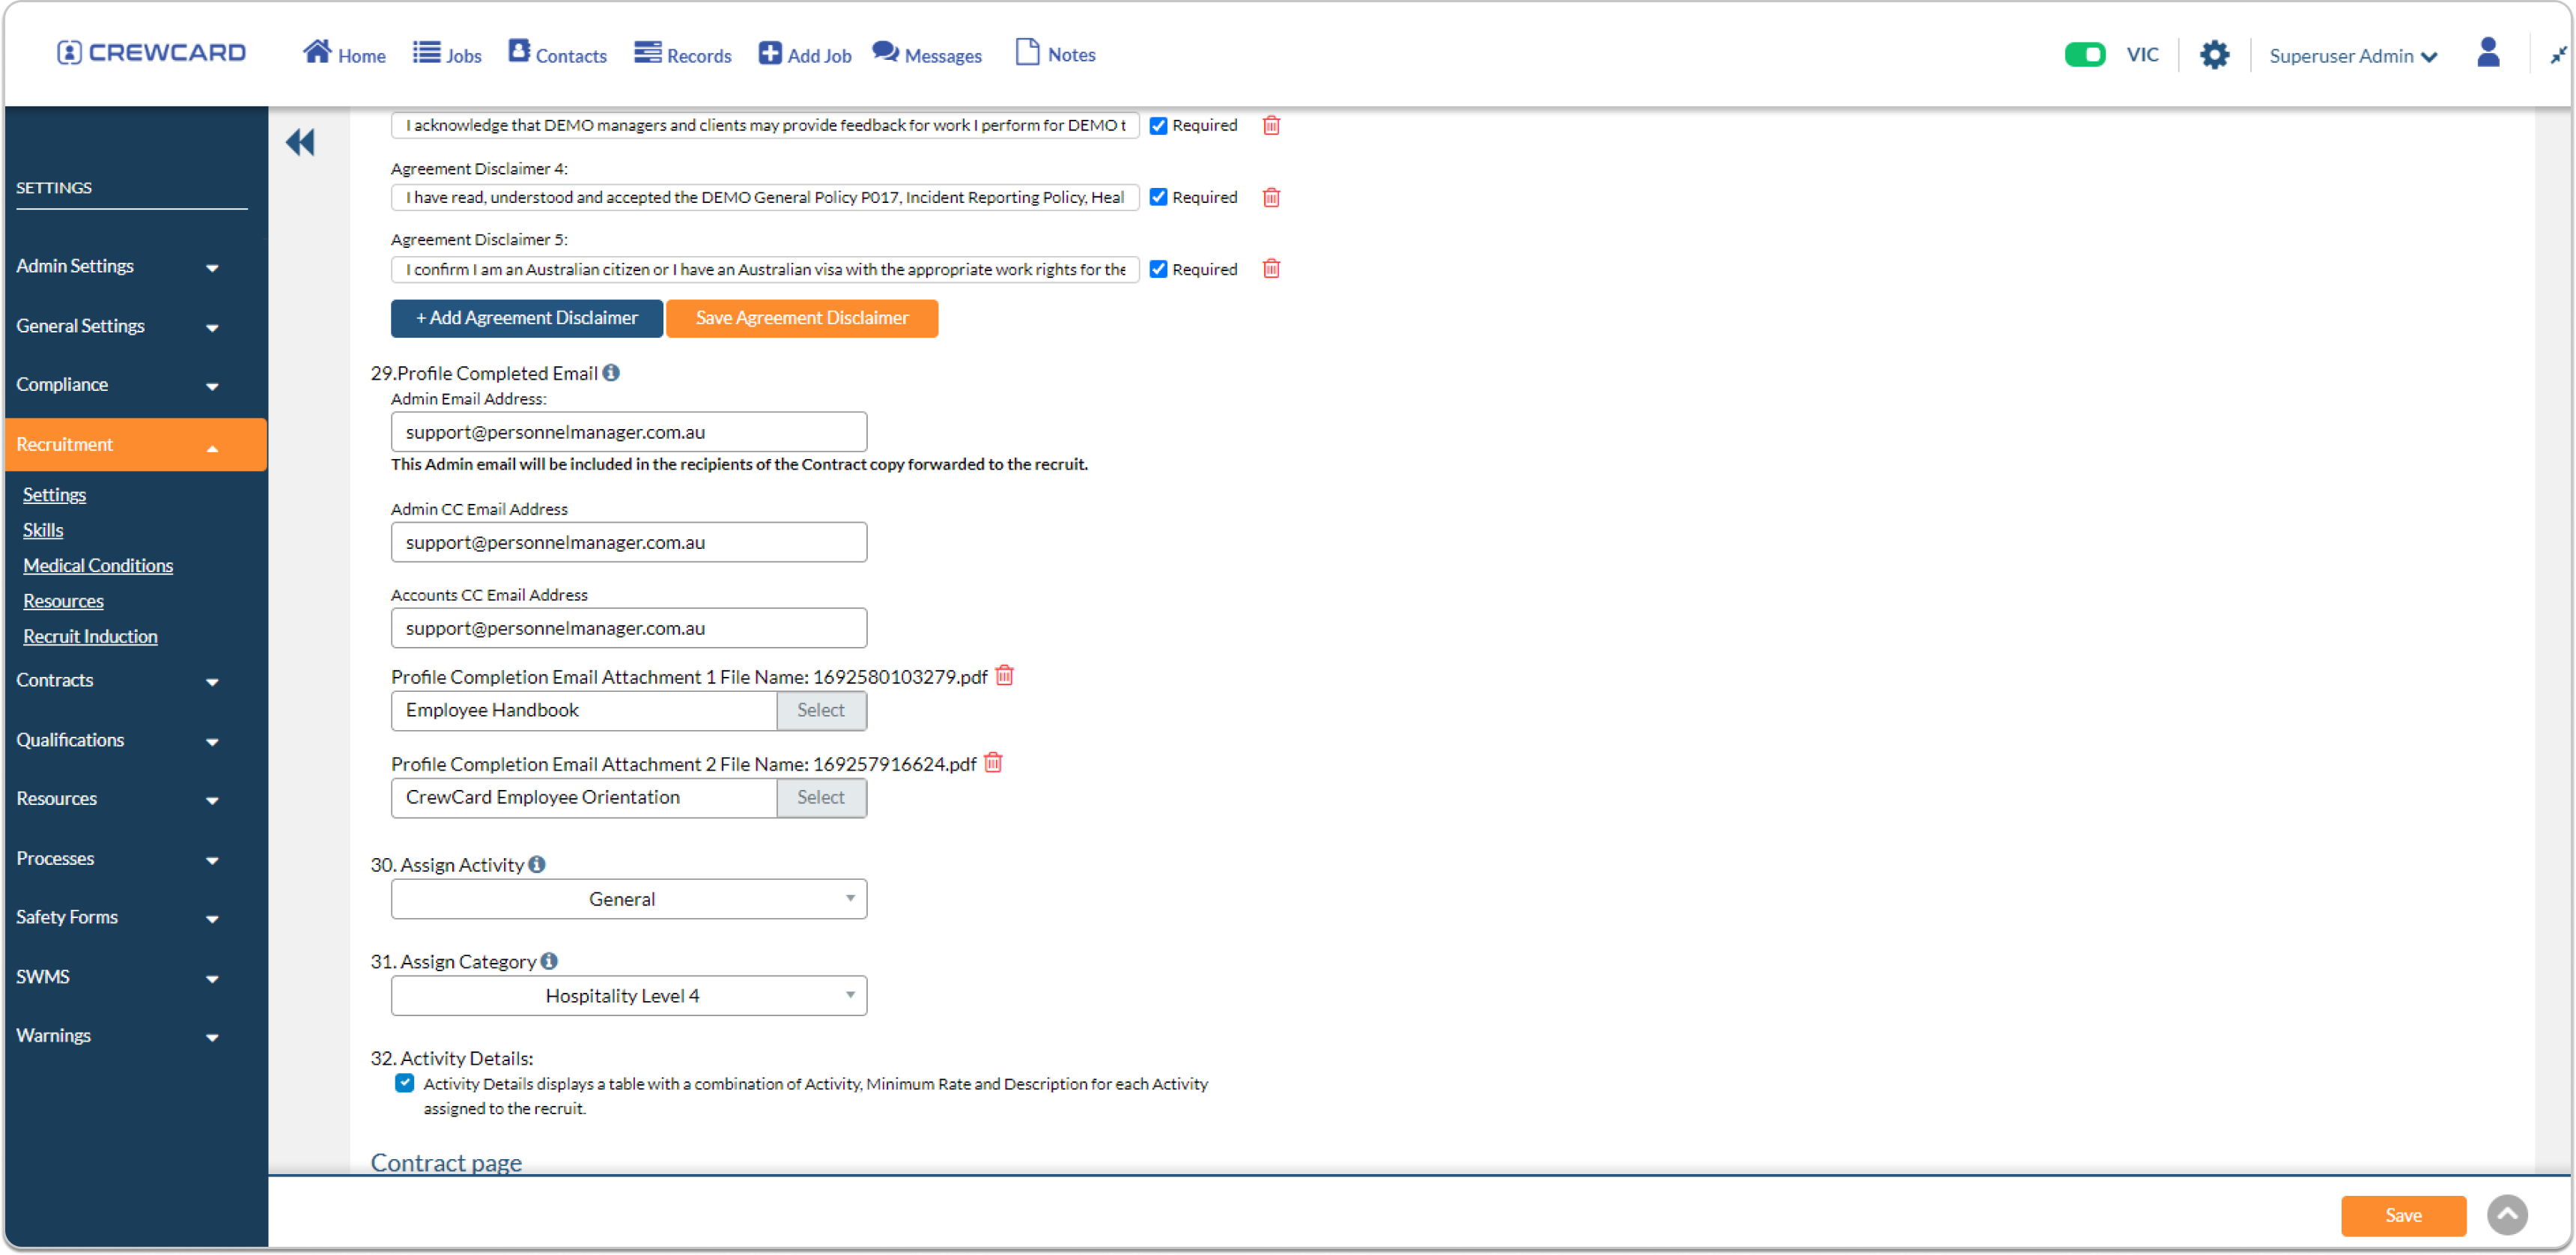
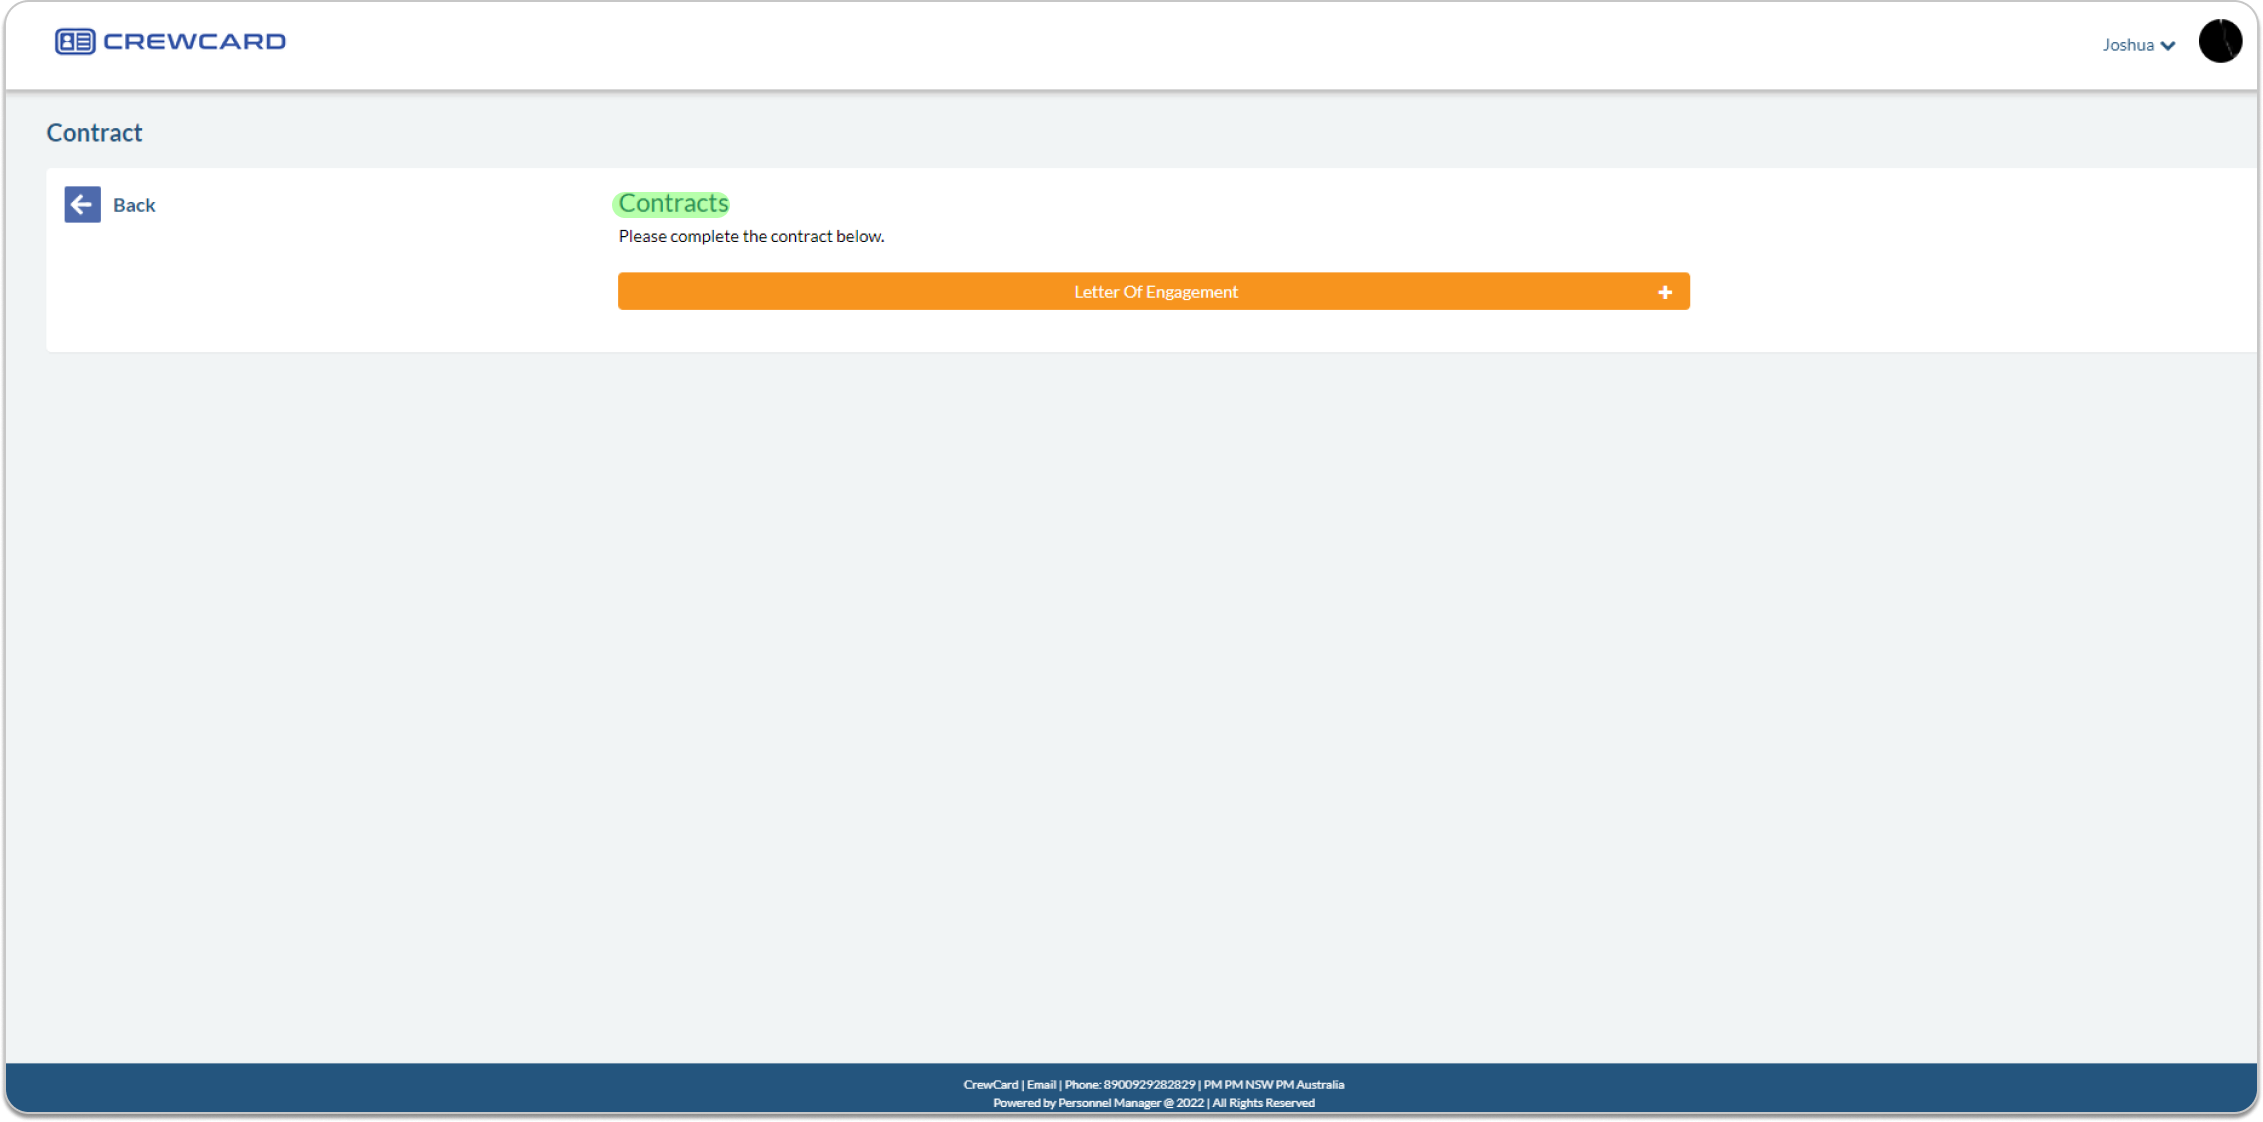
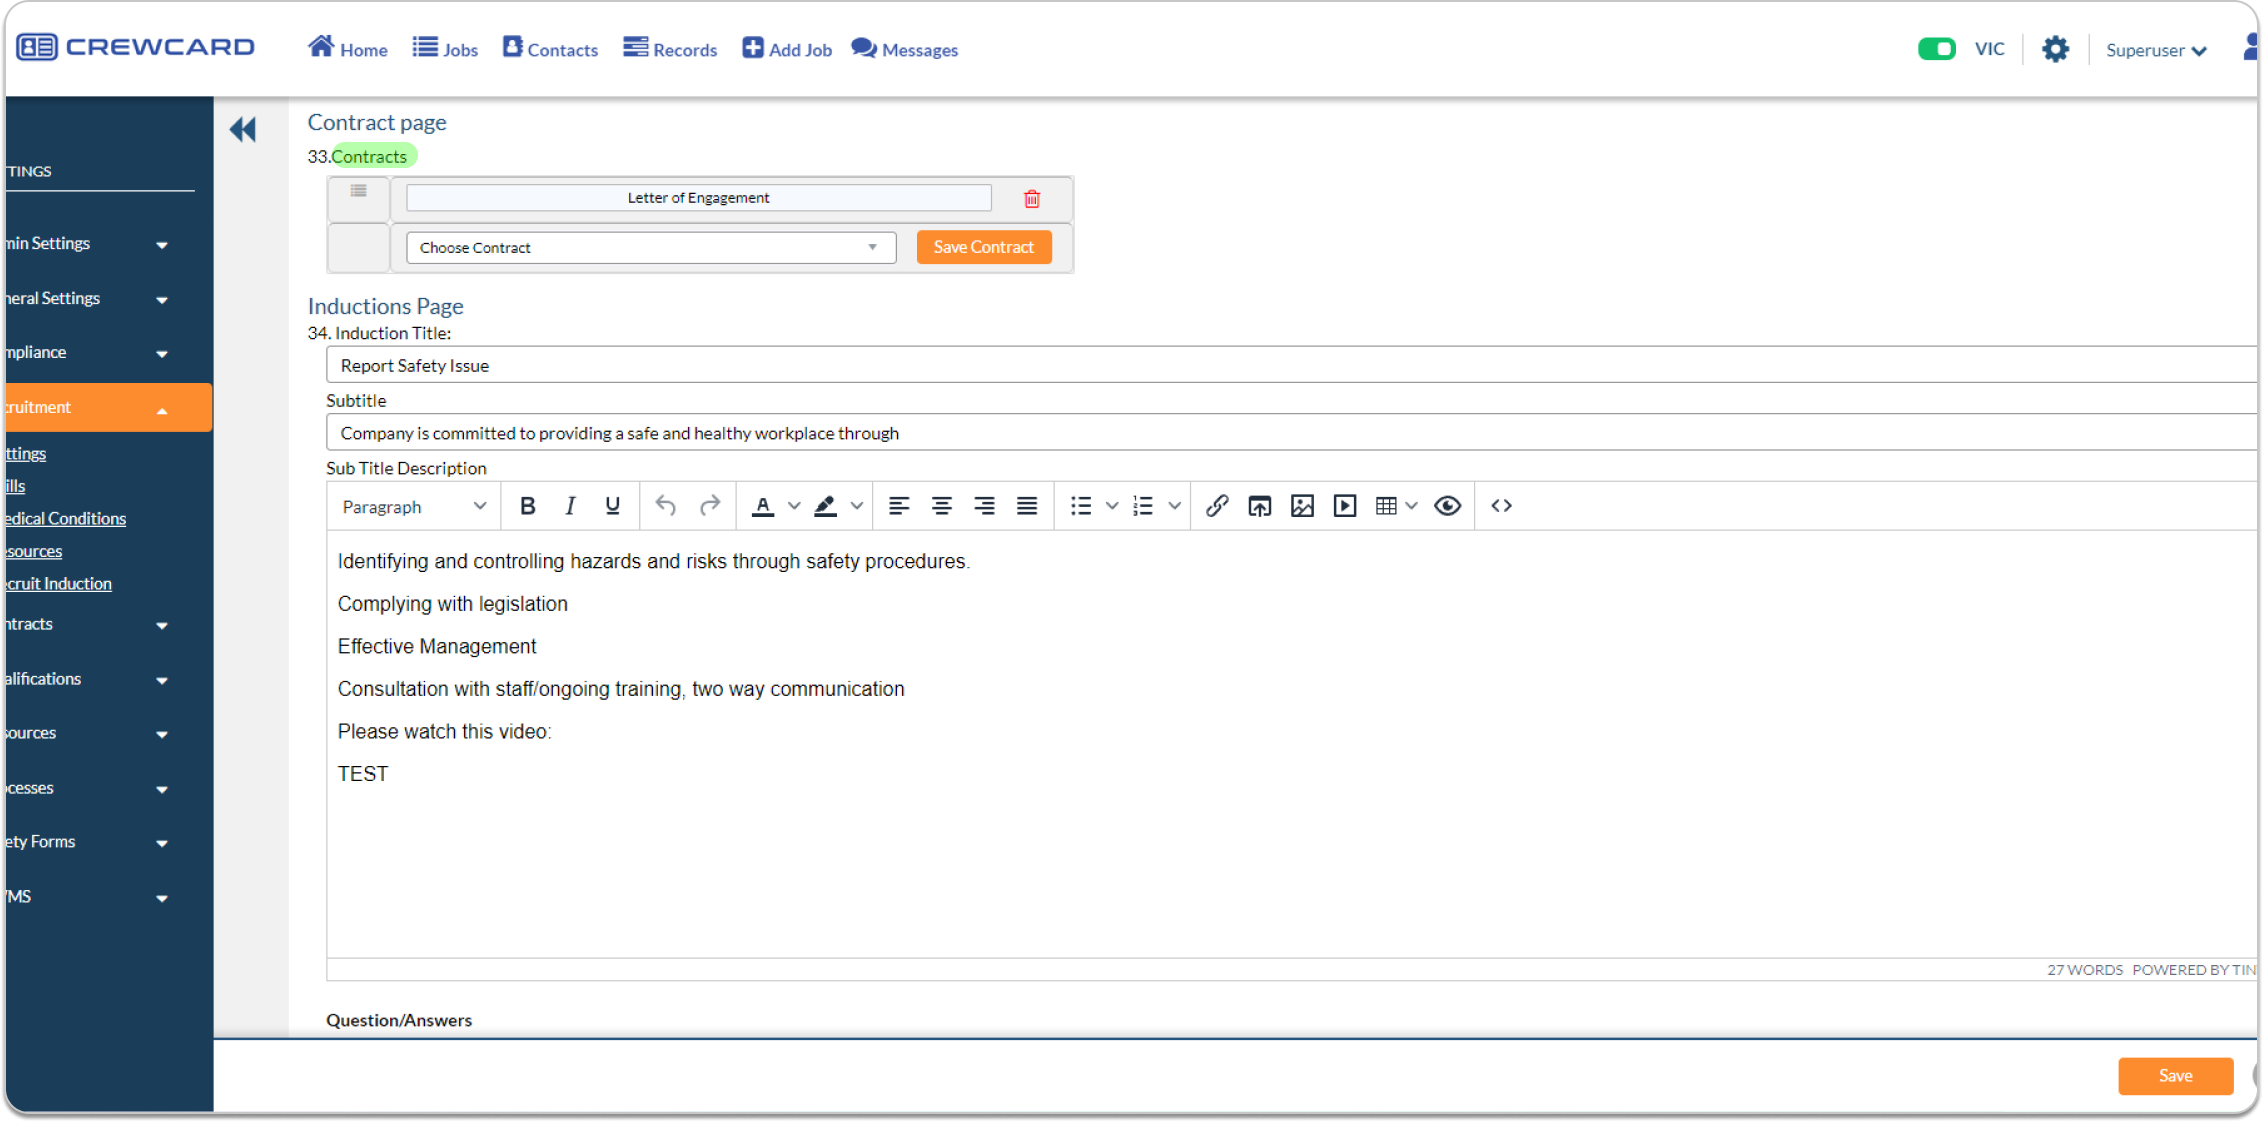
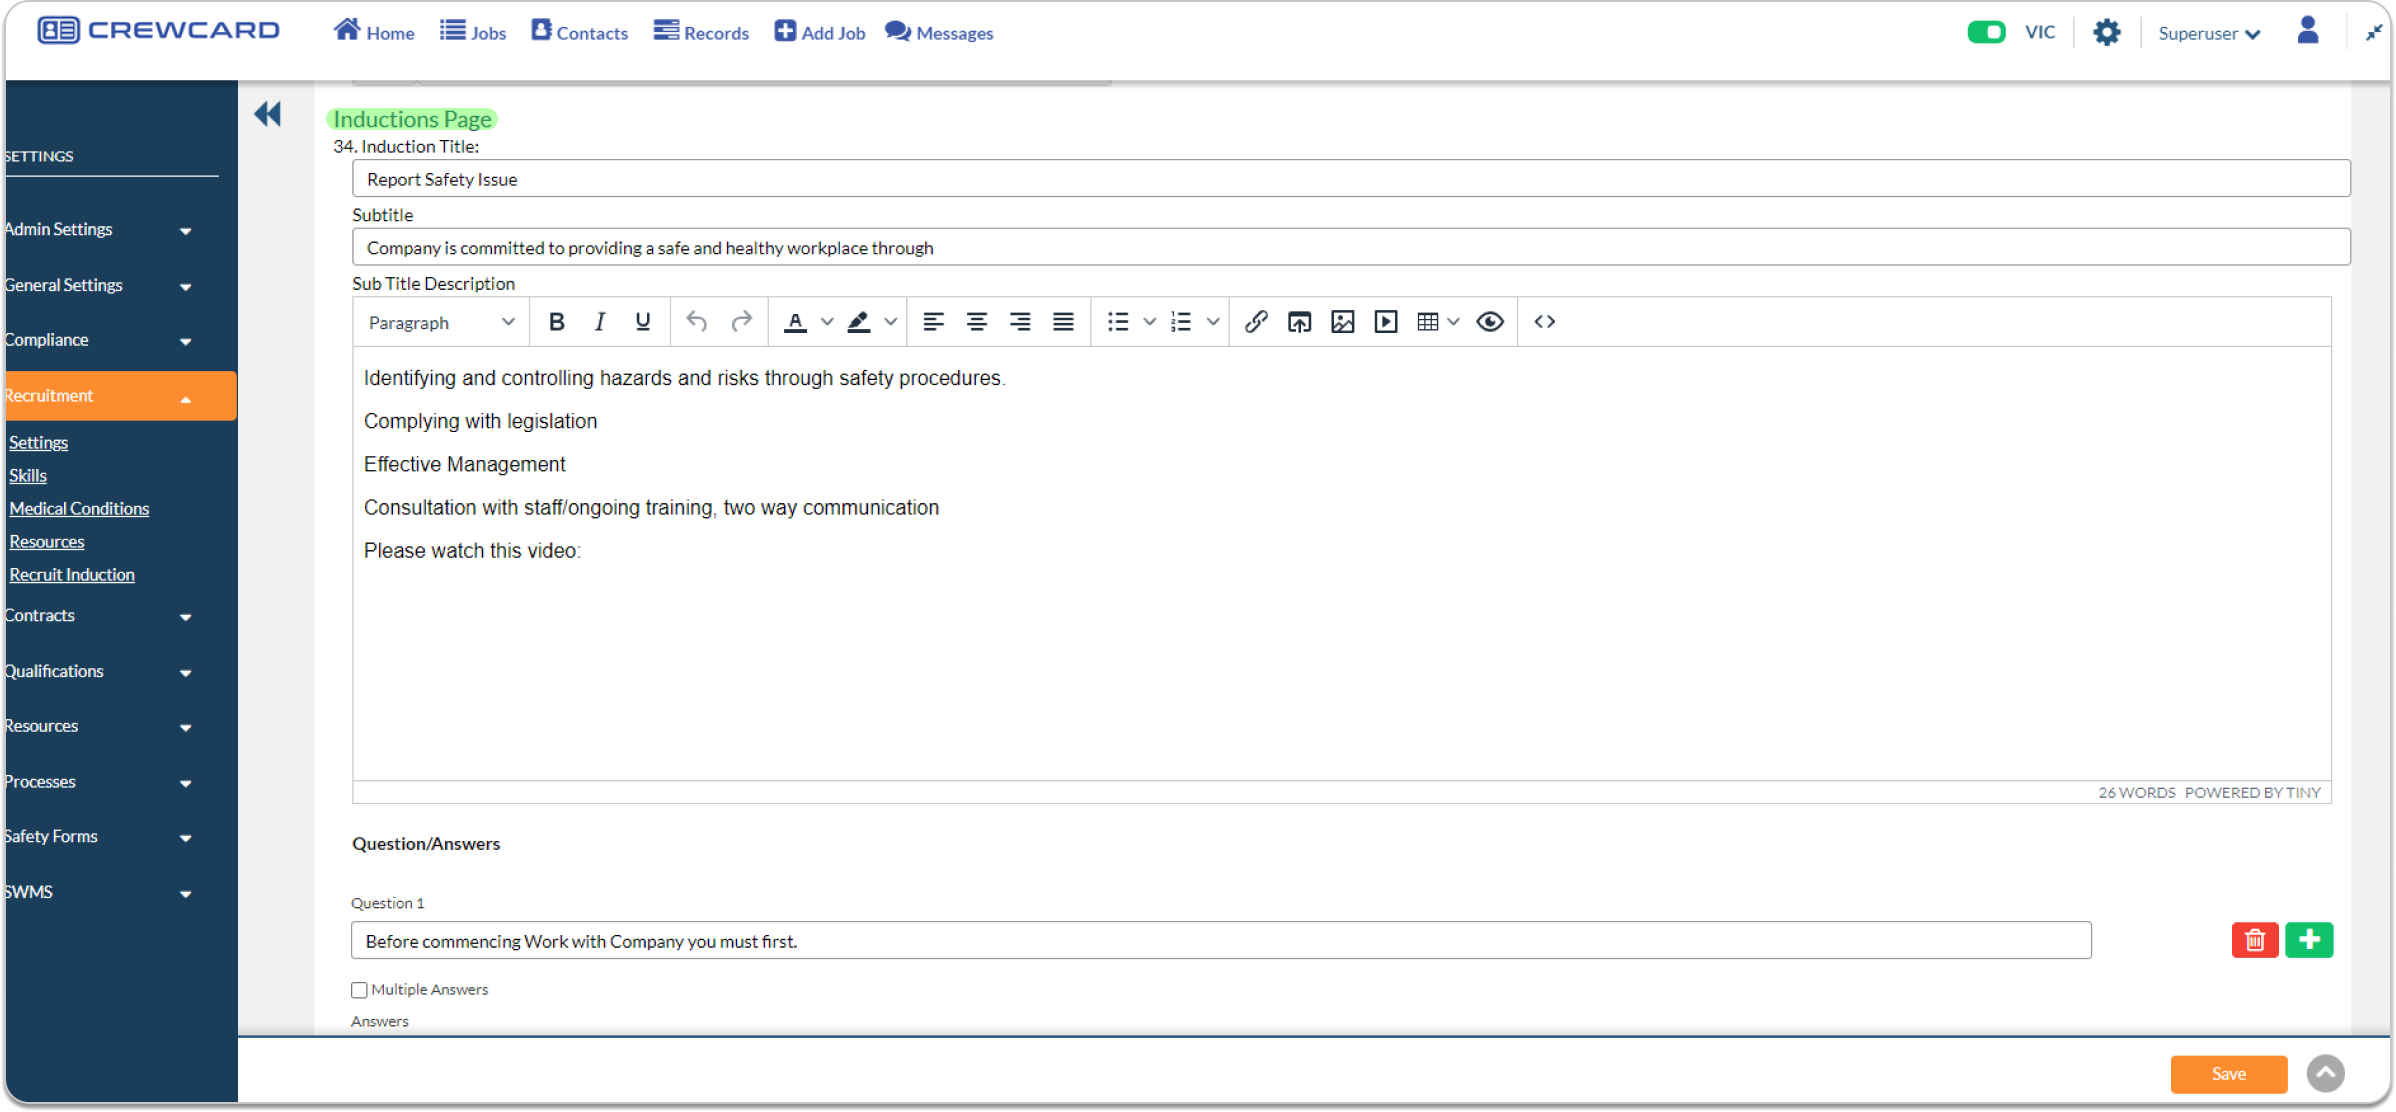
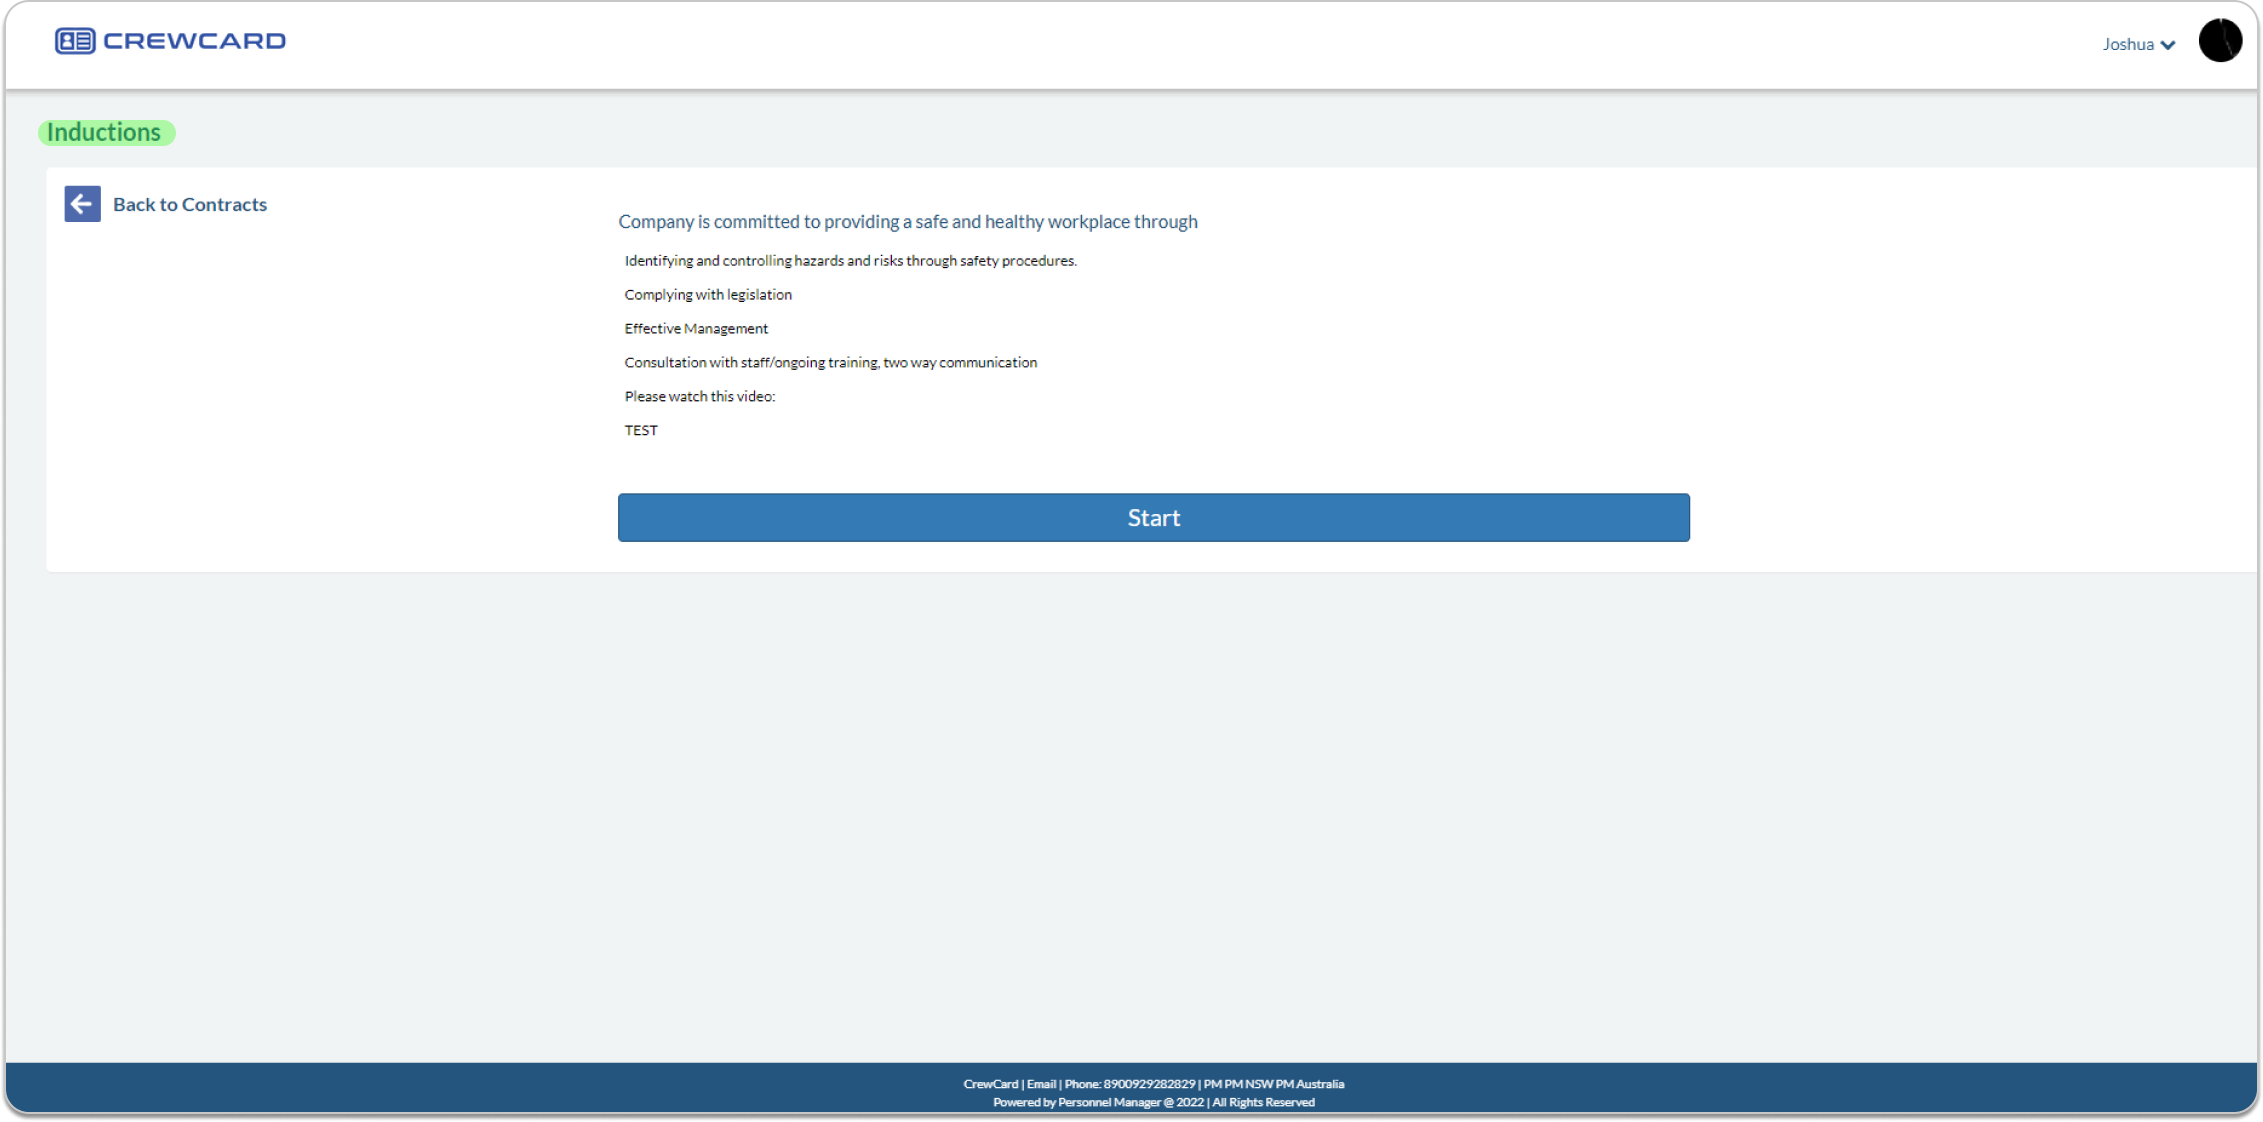
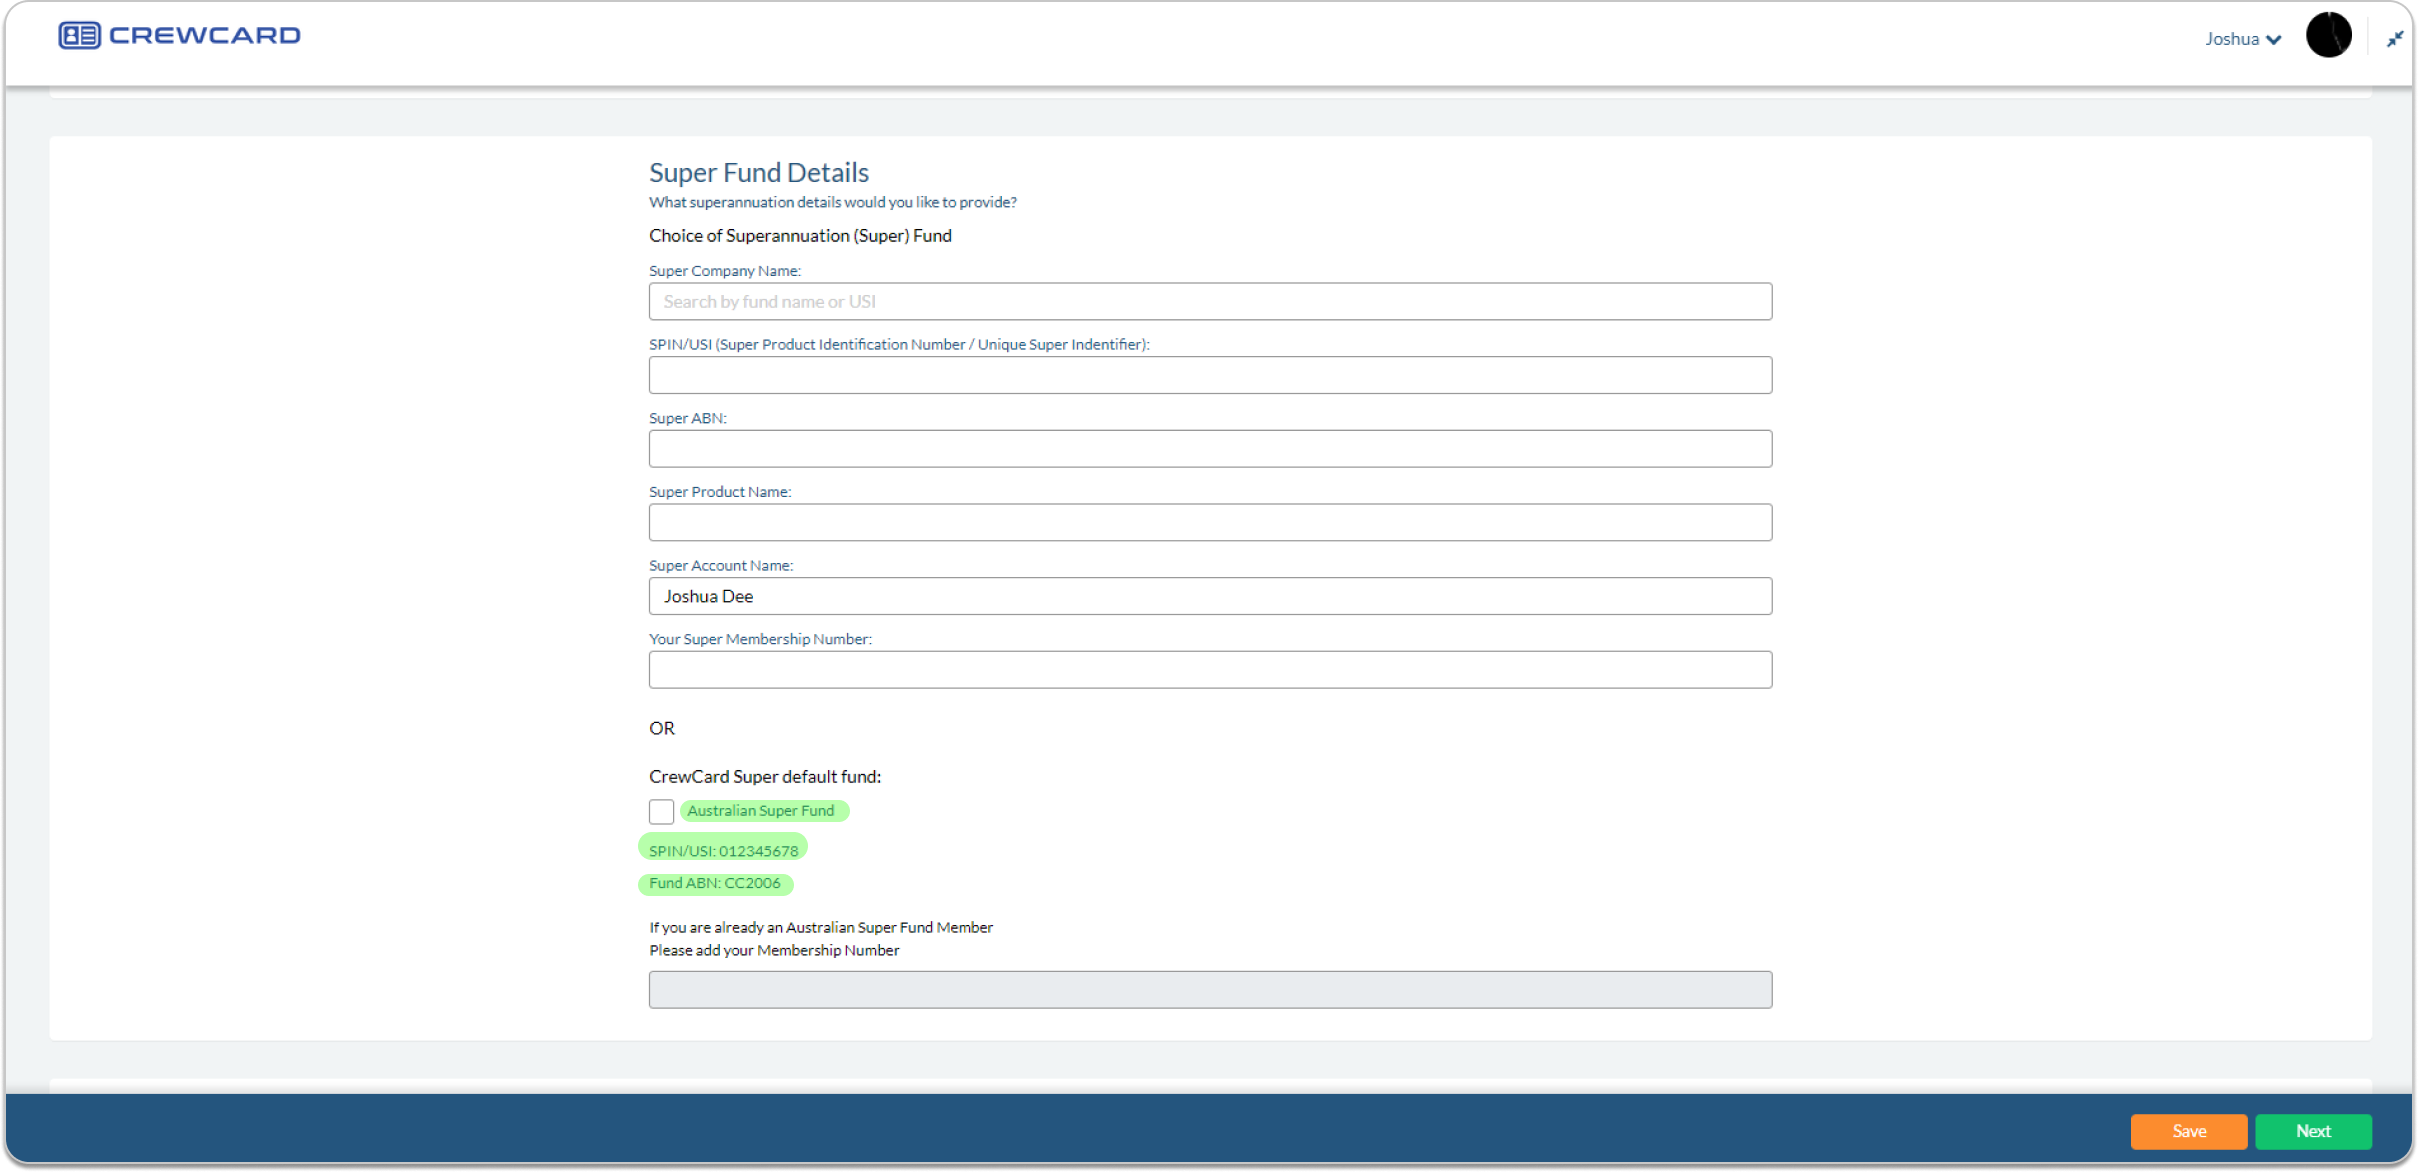
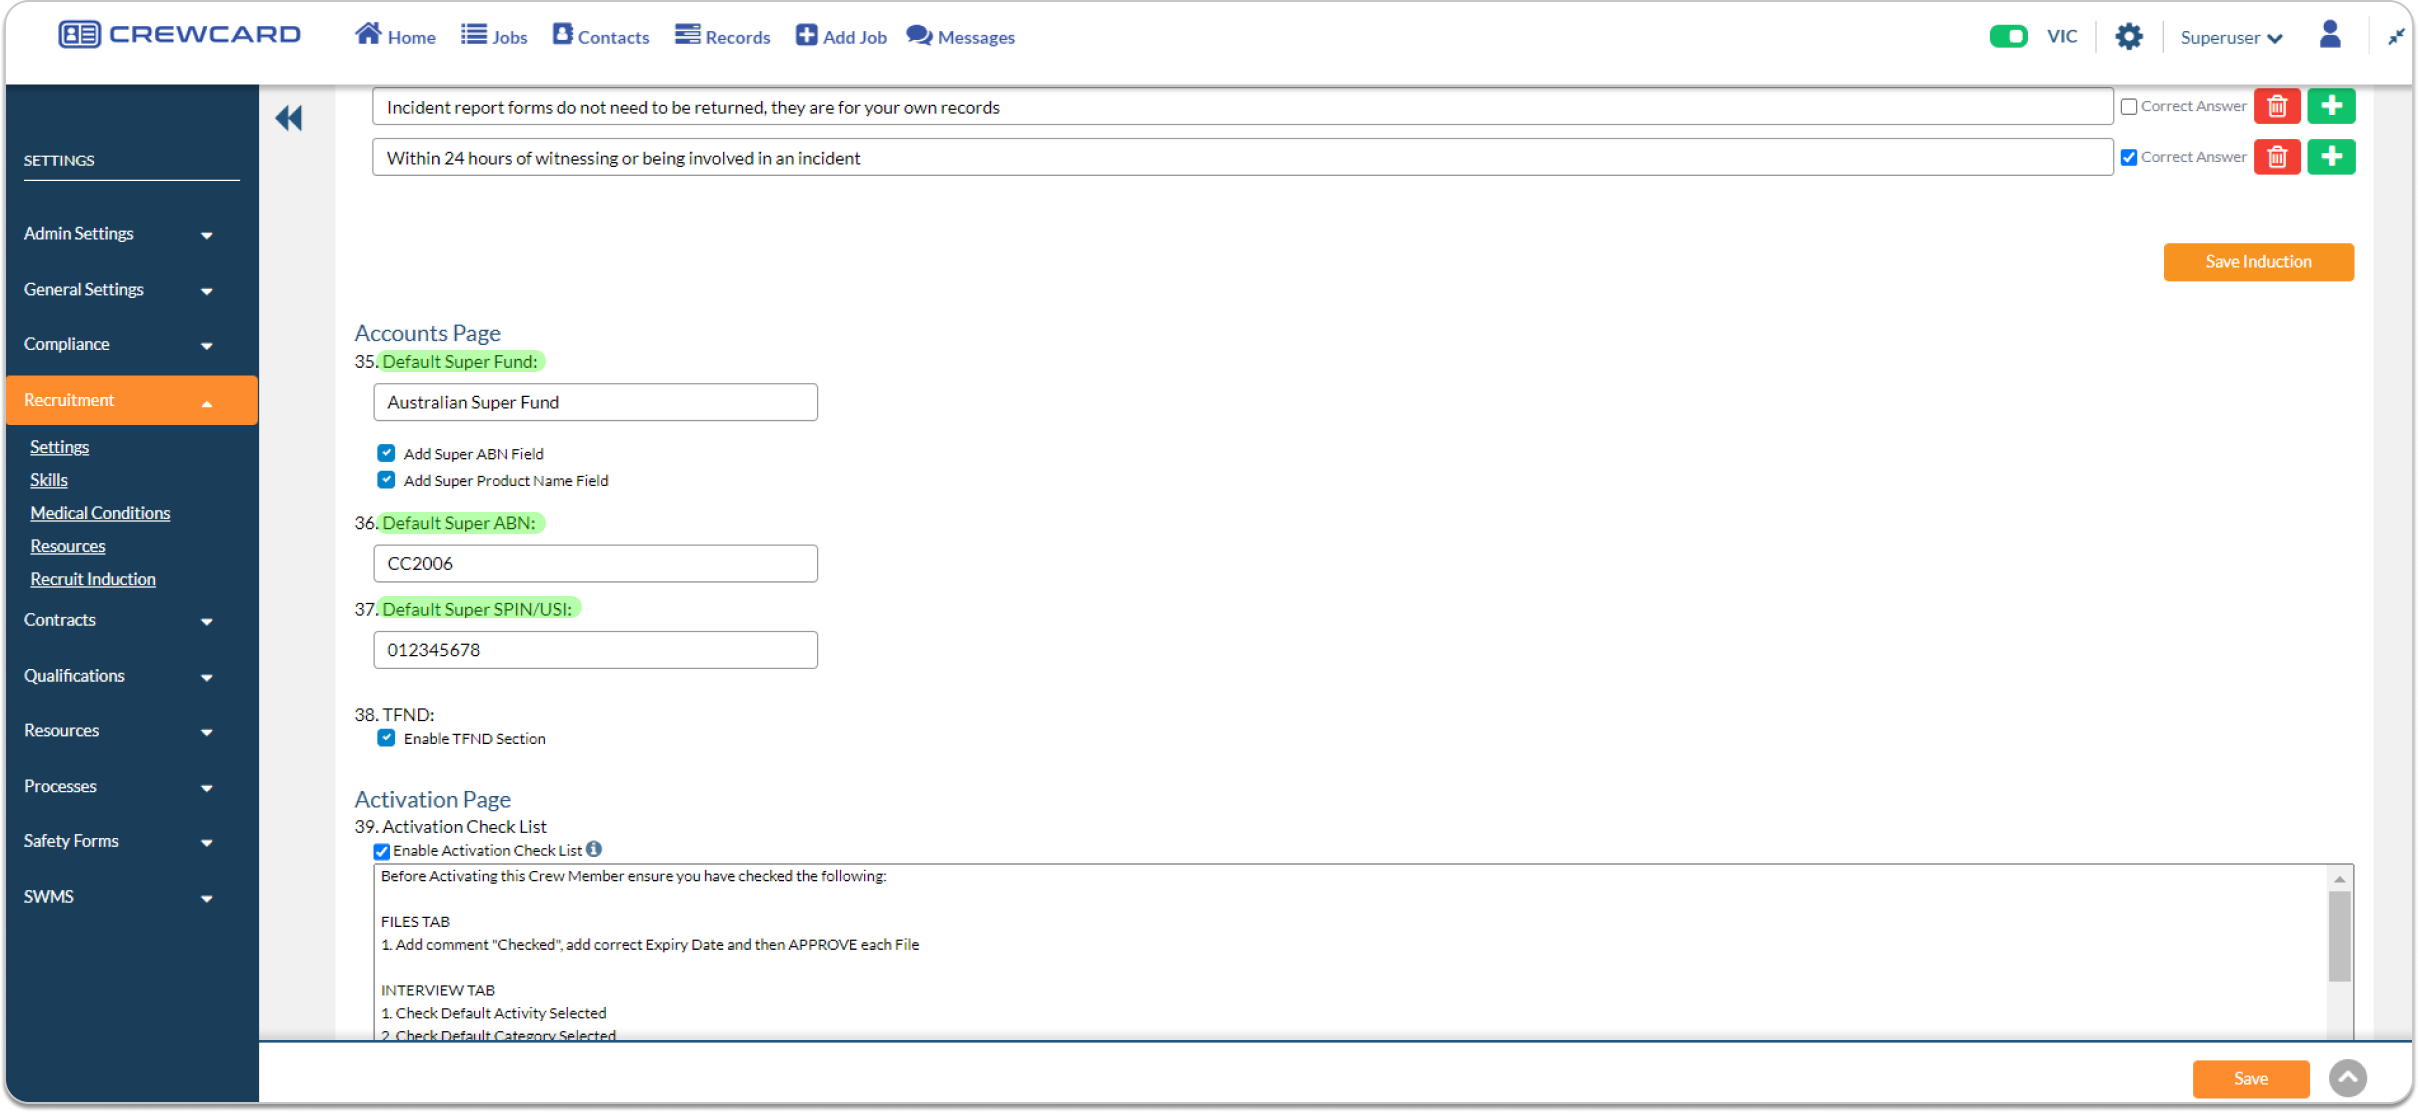

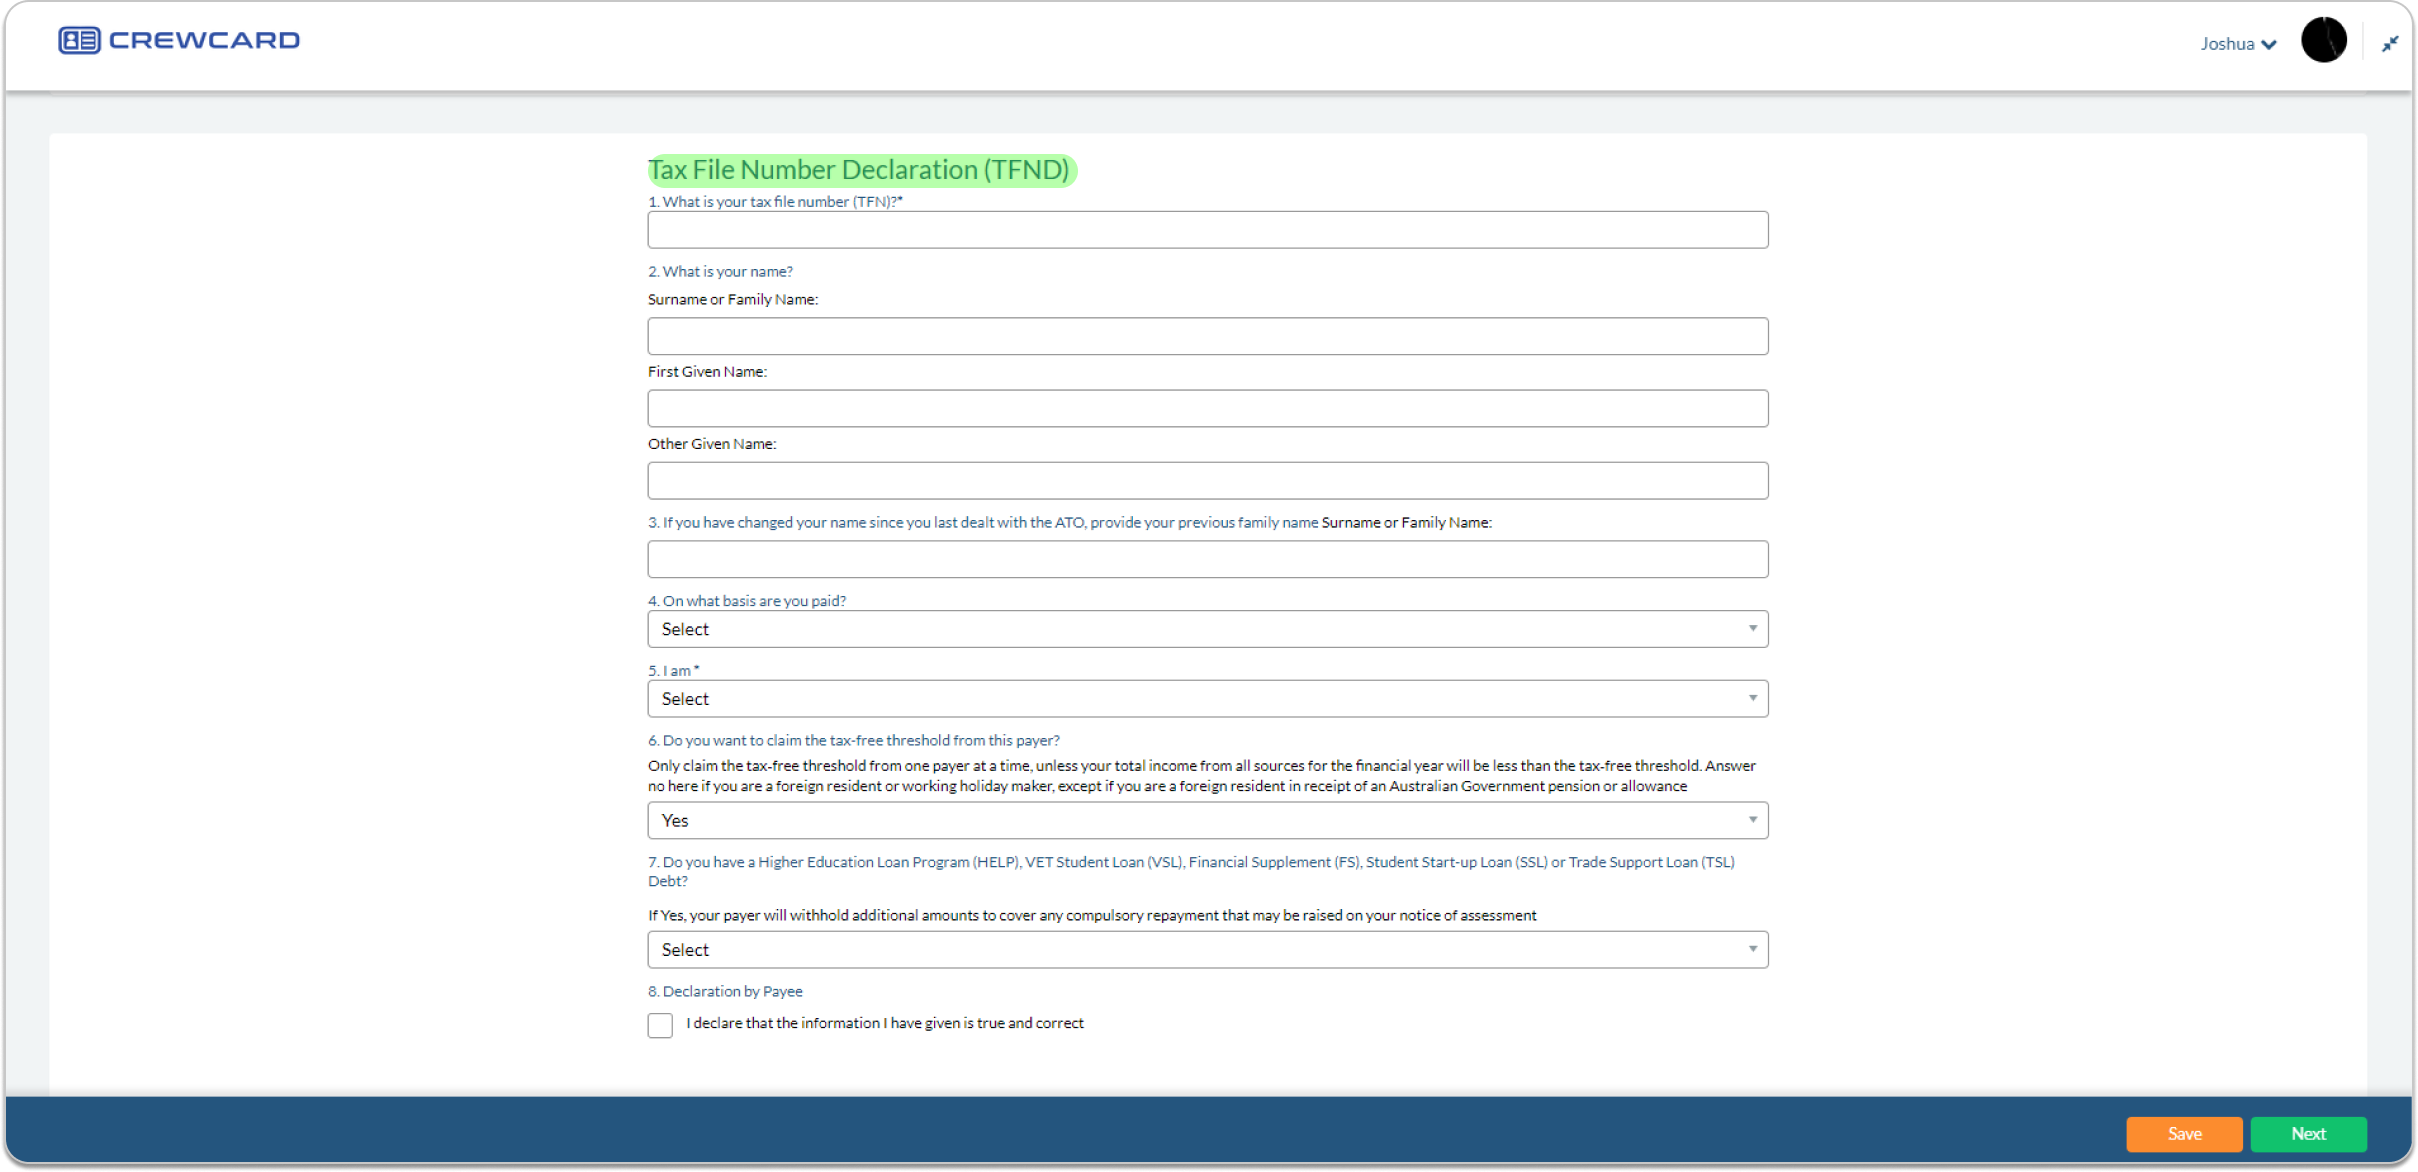
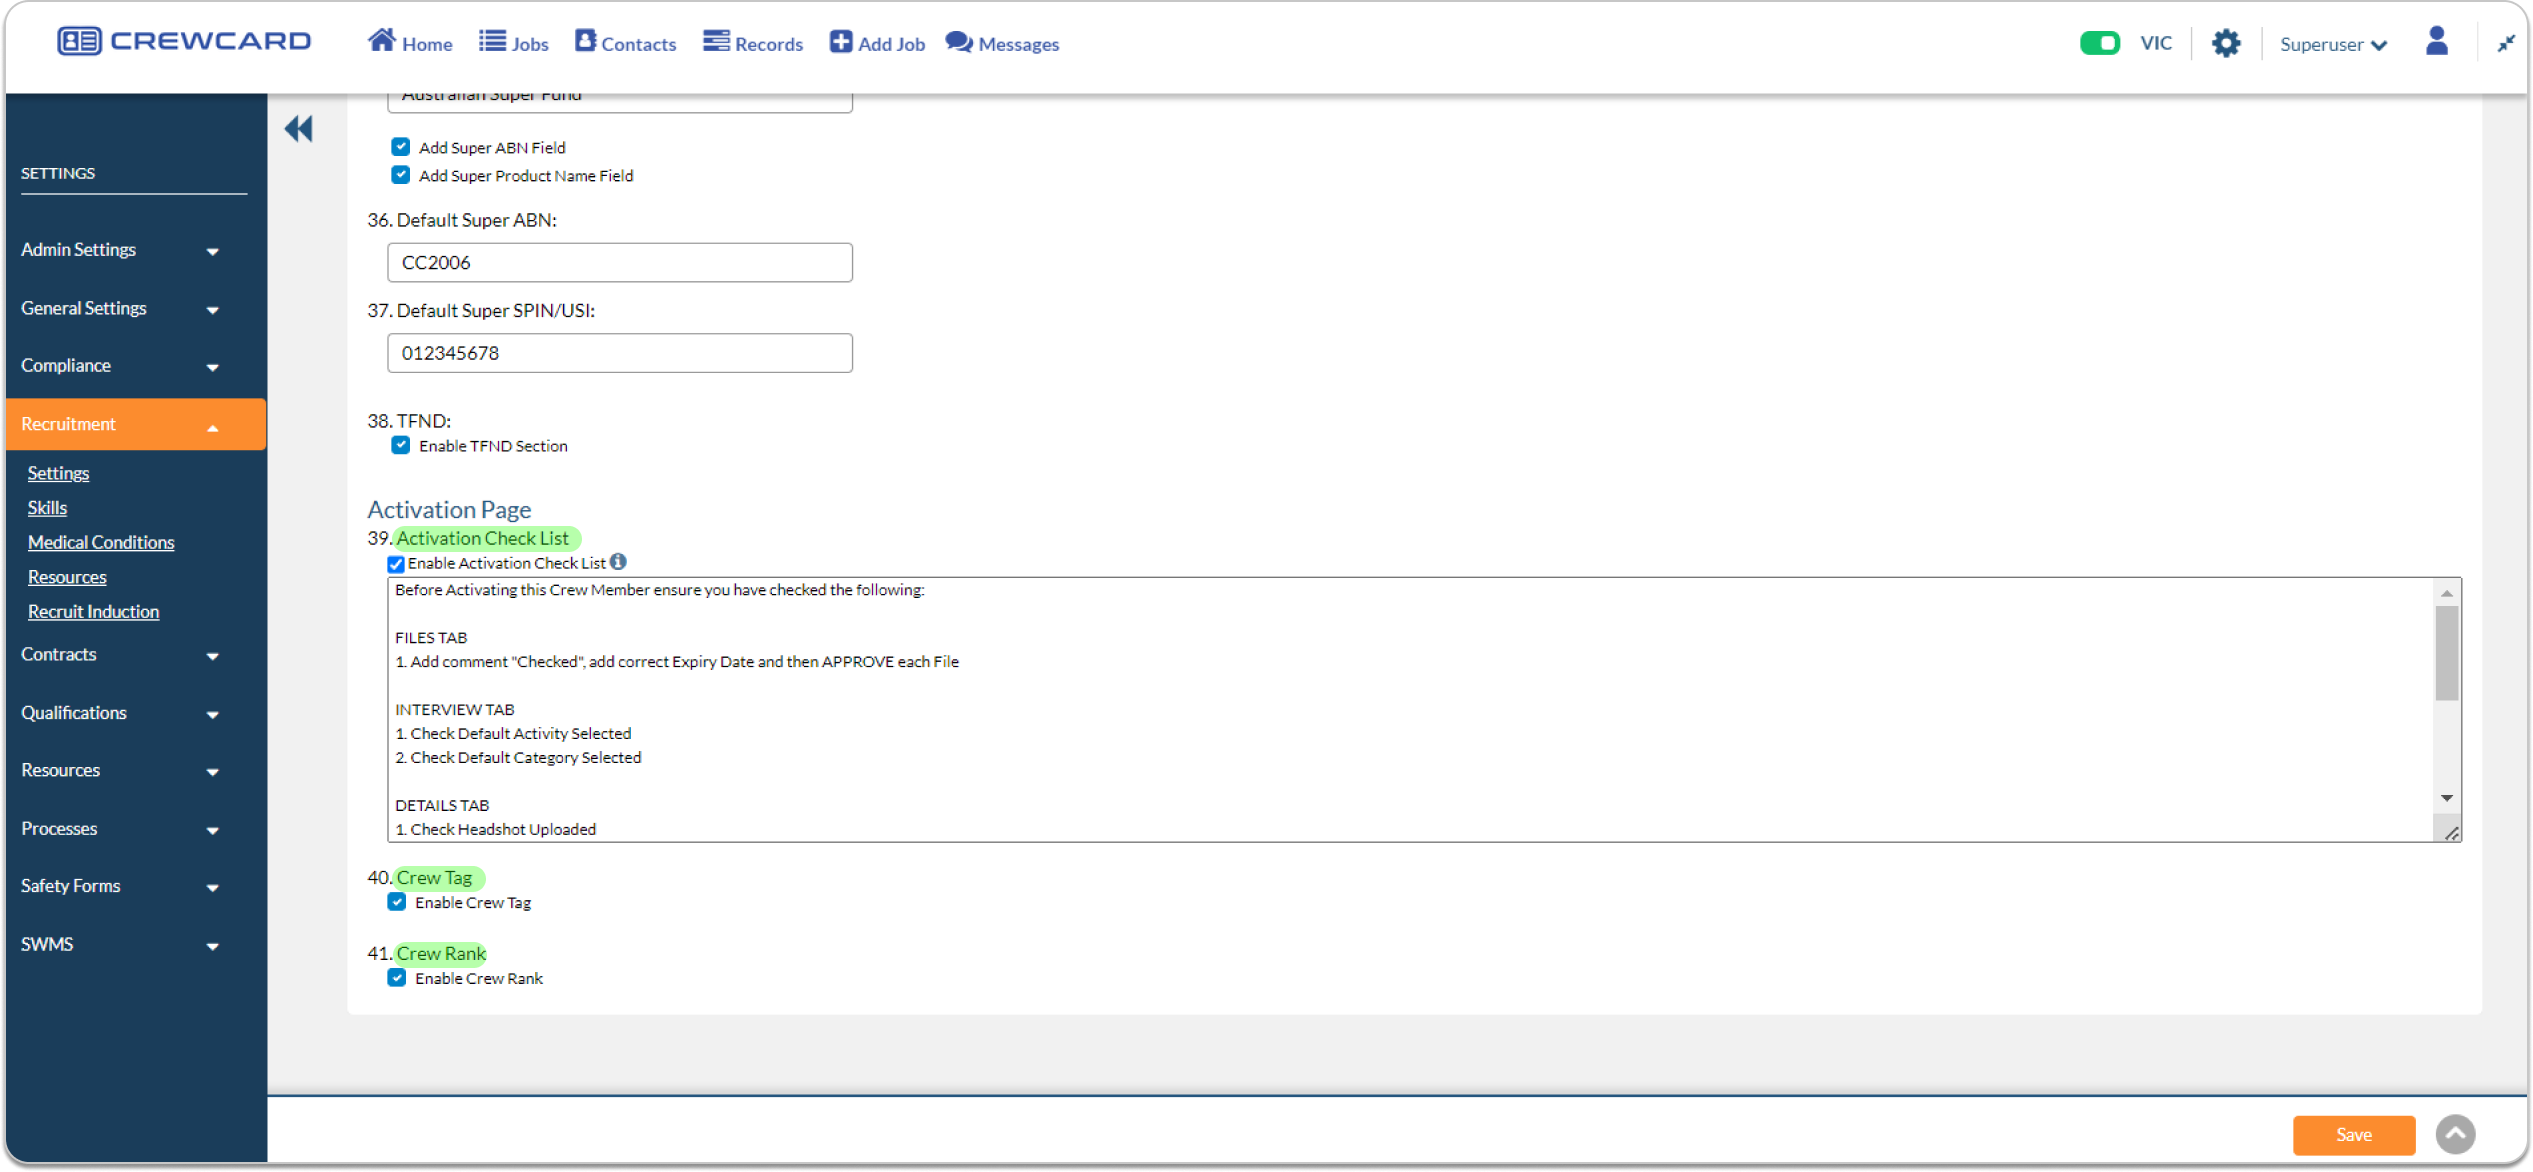
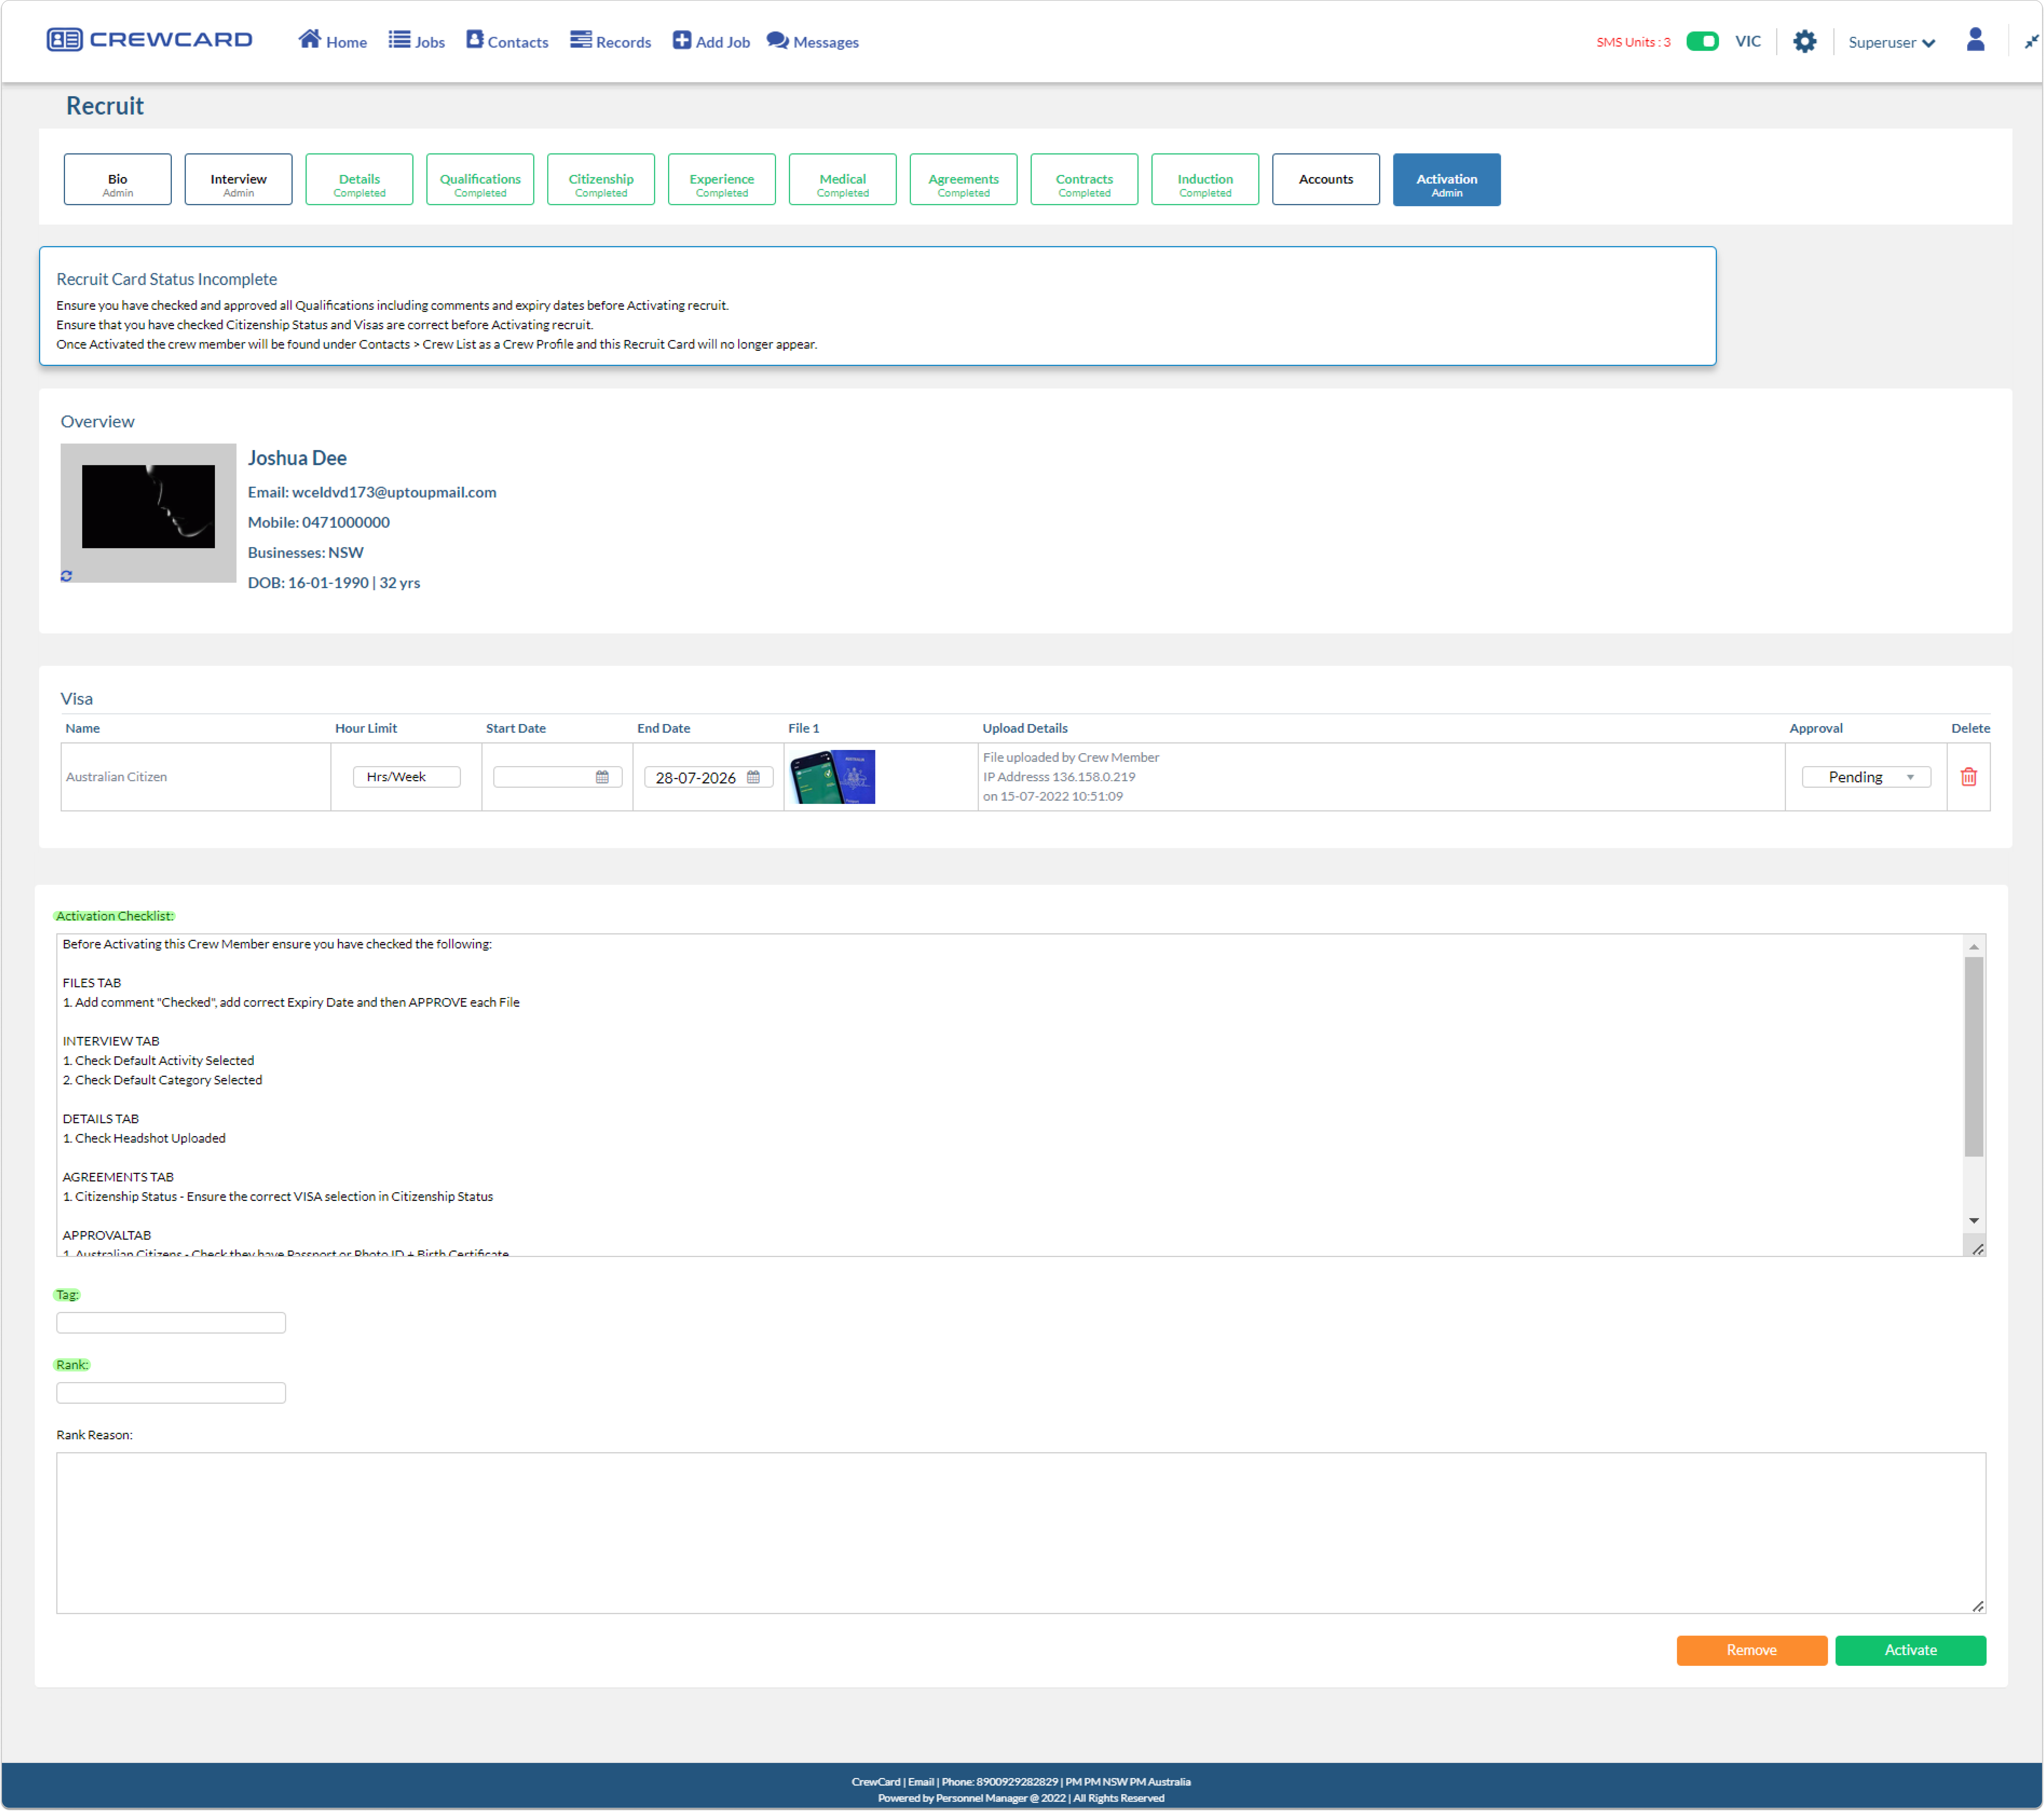
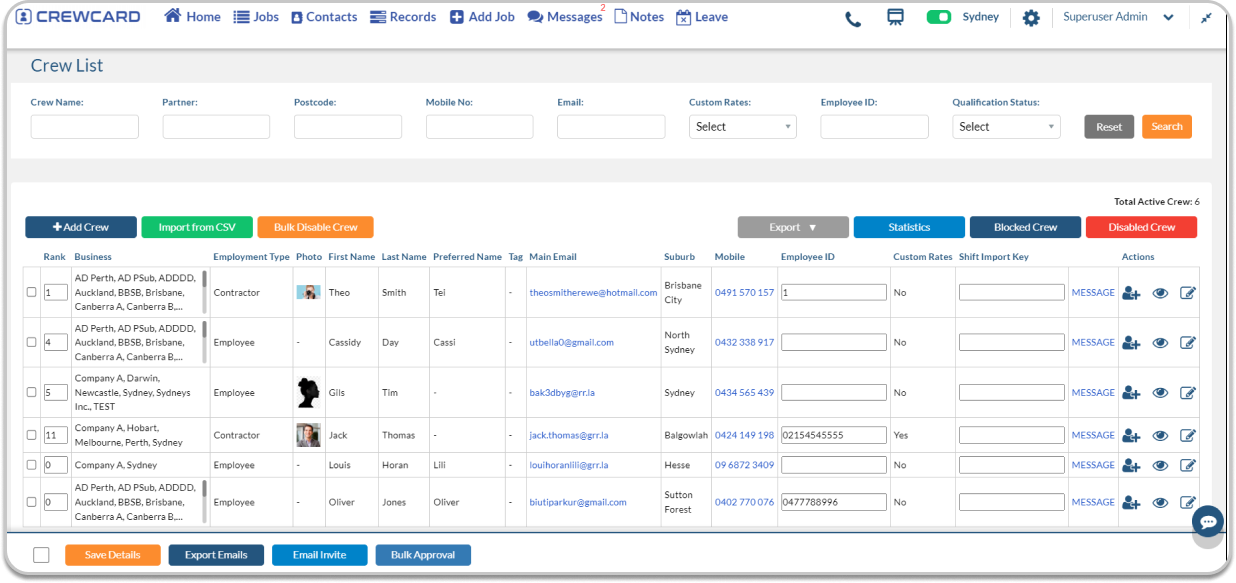
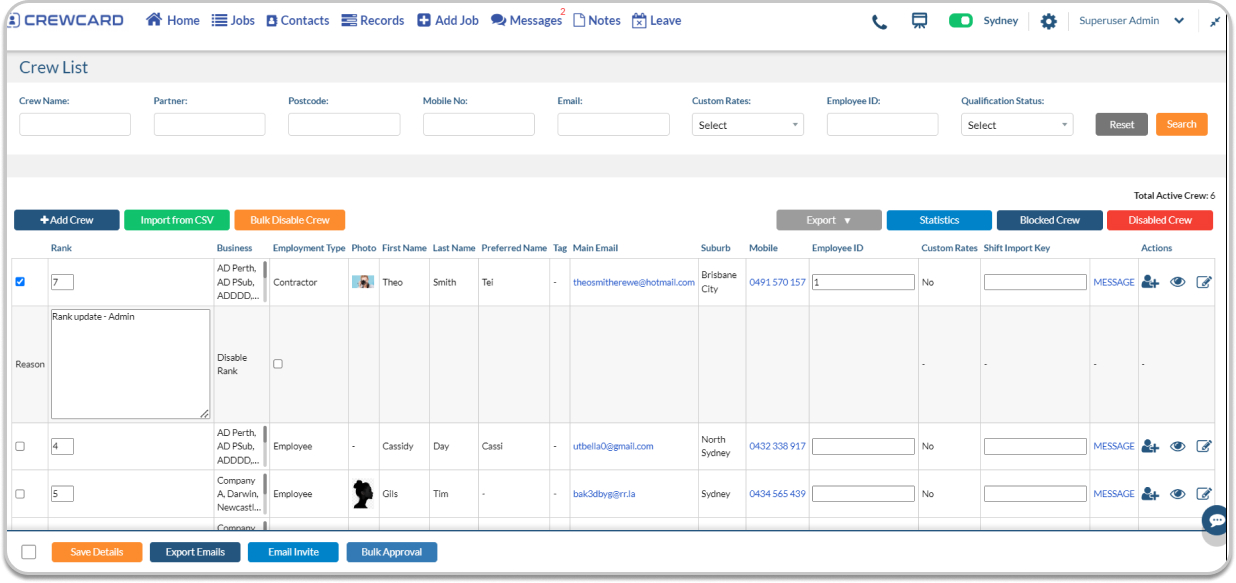
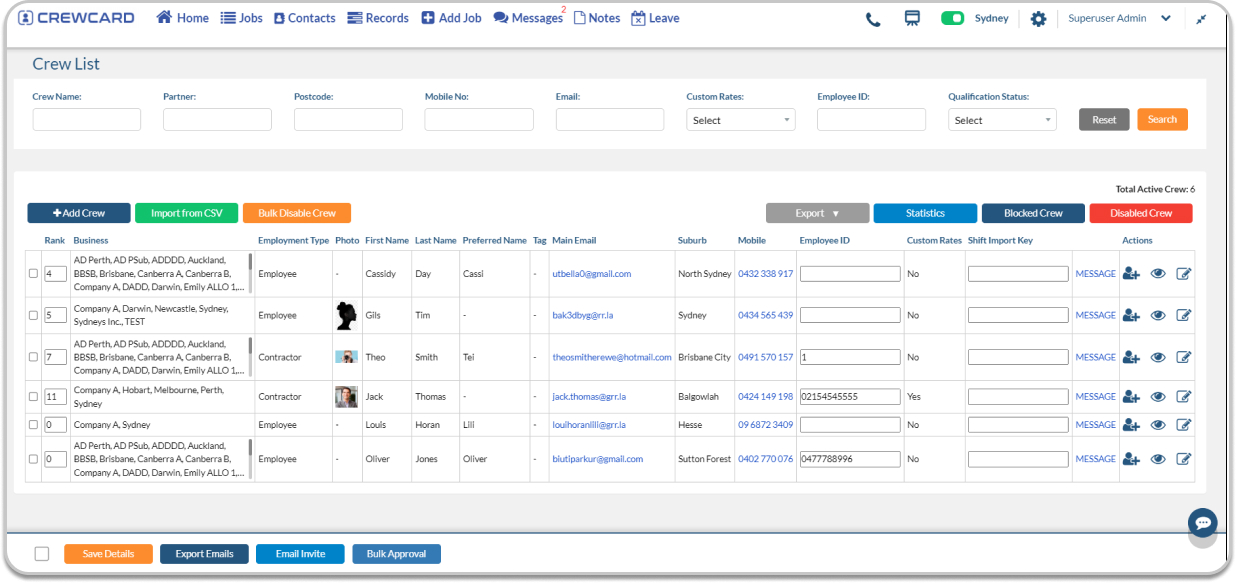
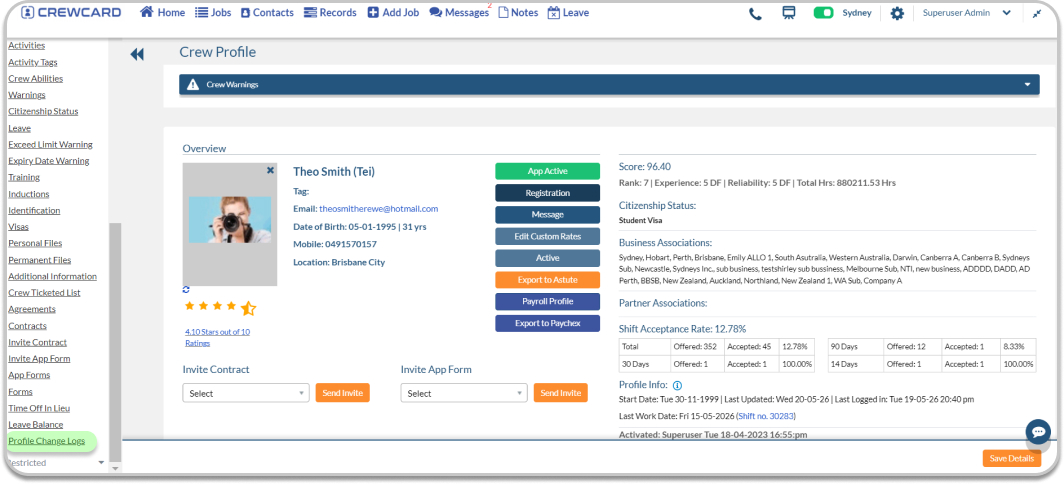

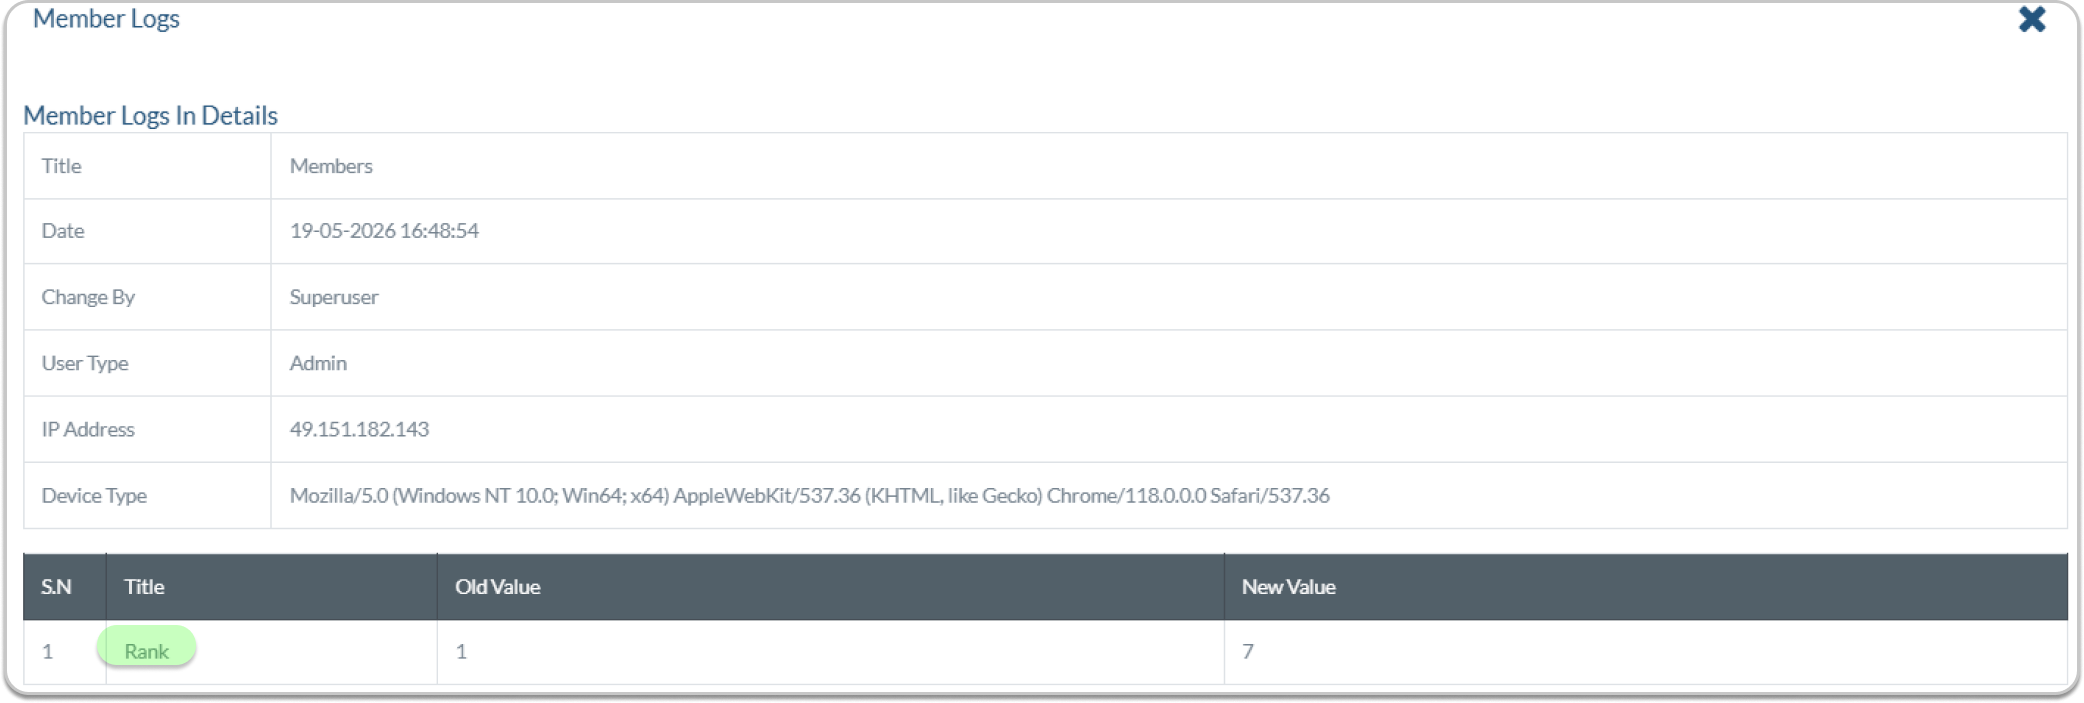


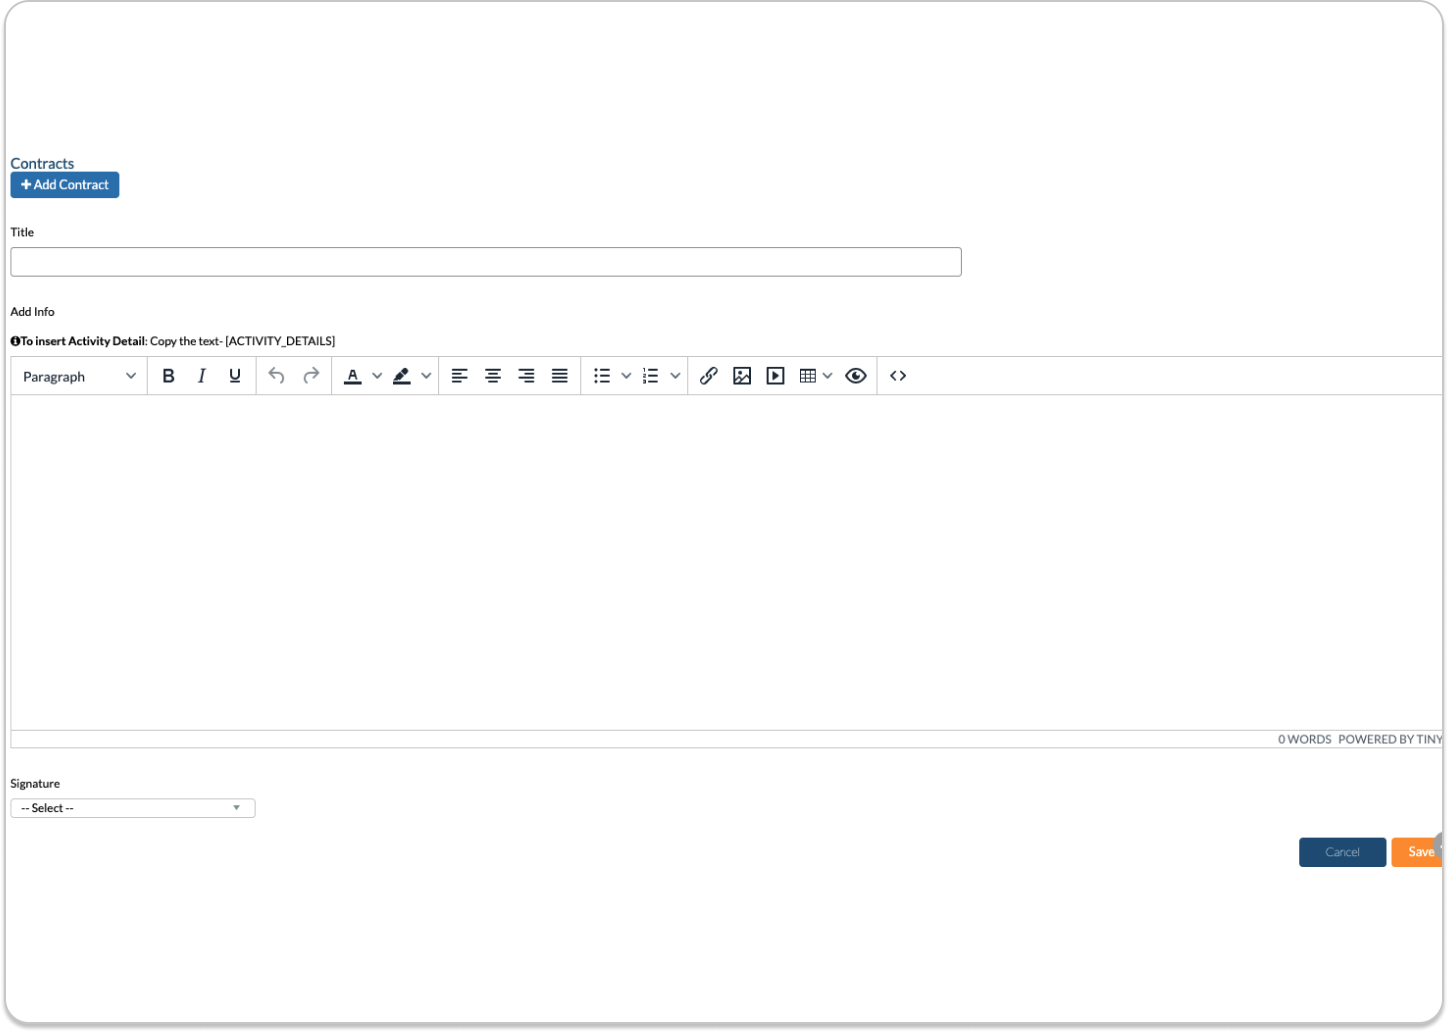


 x`
x`
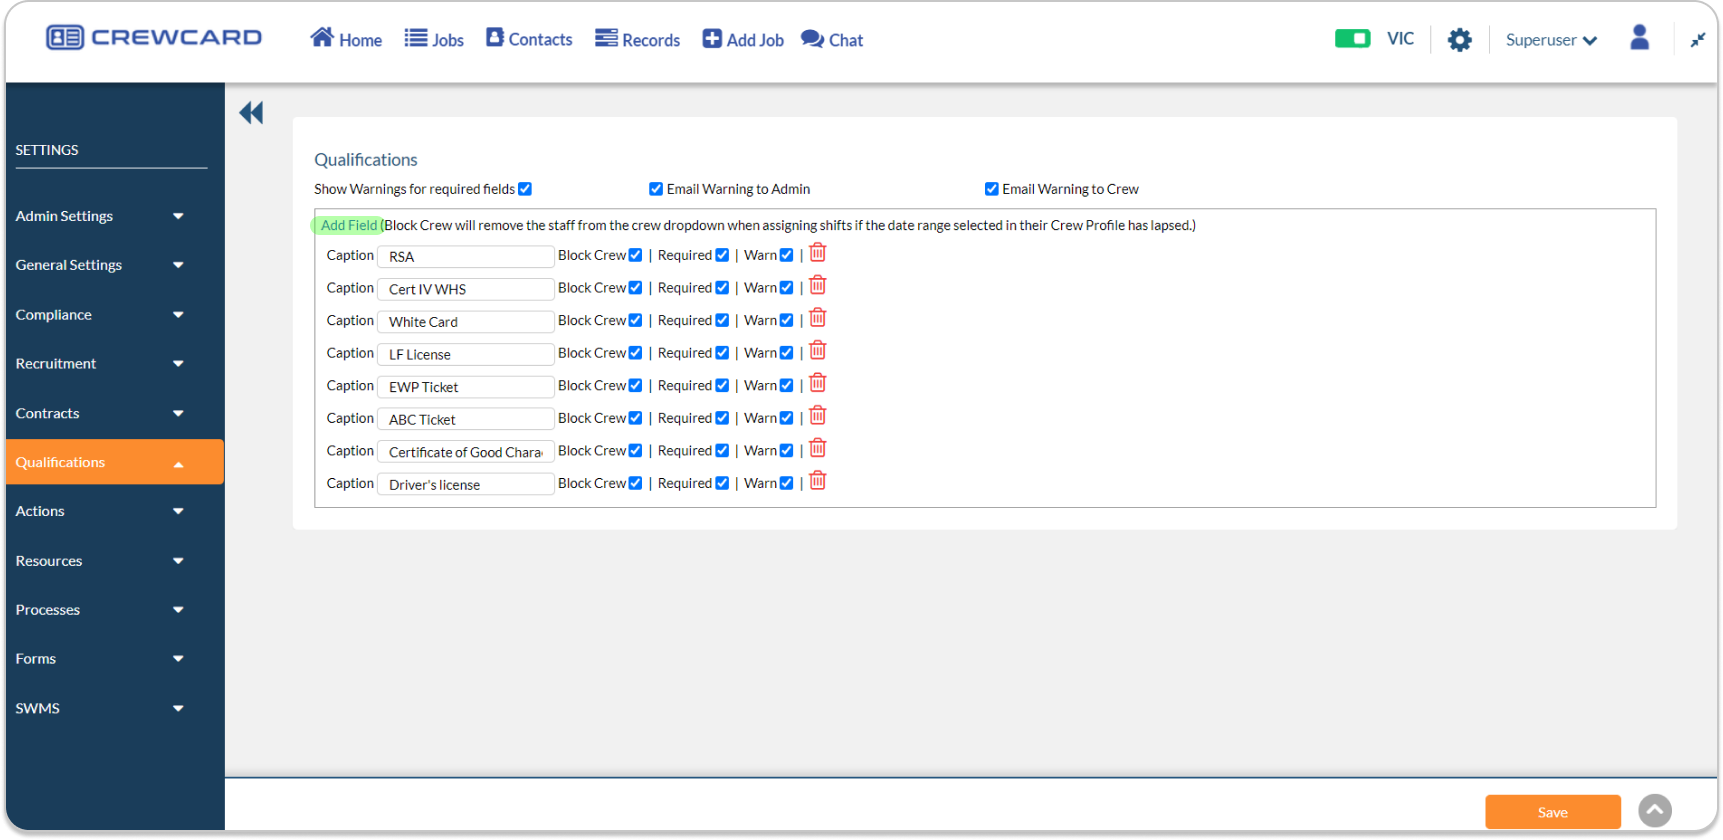
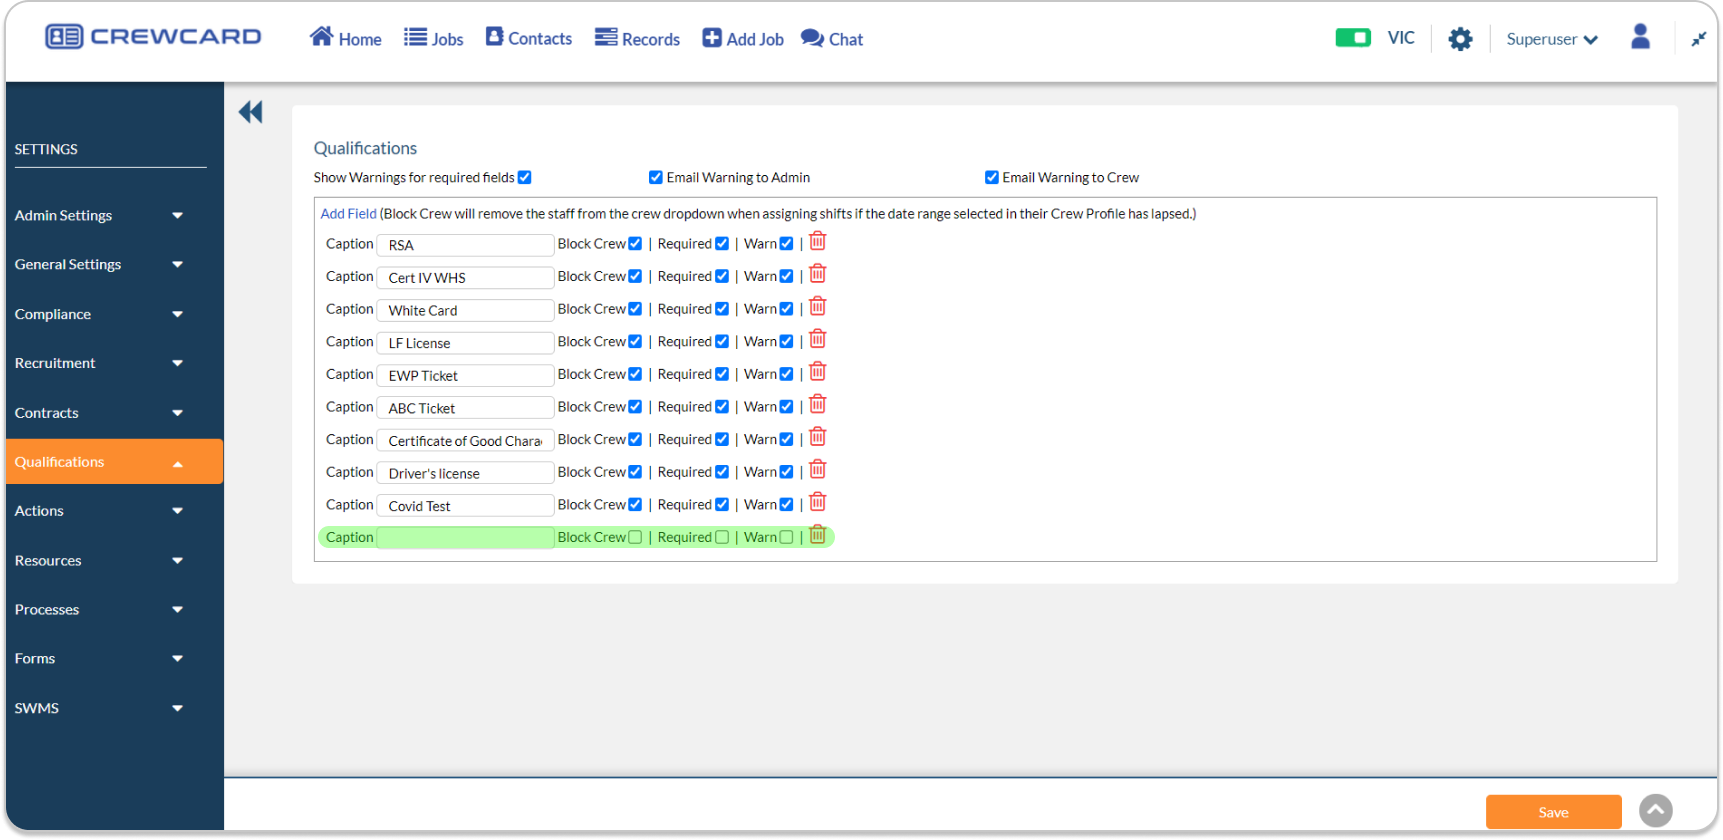
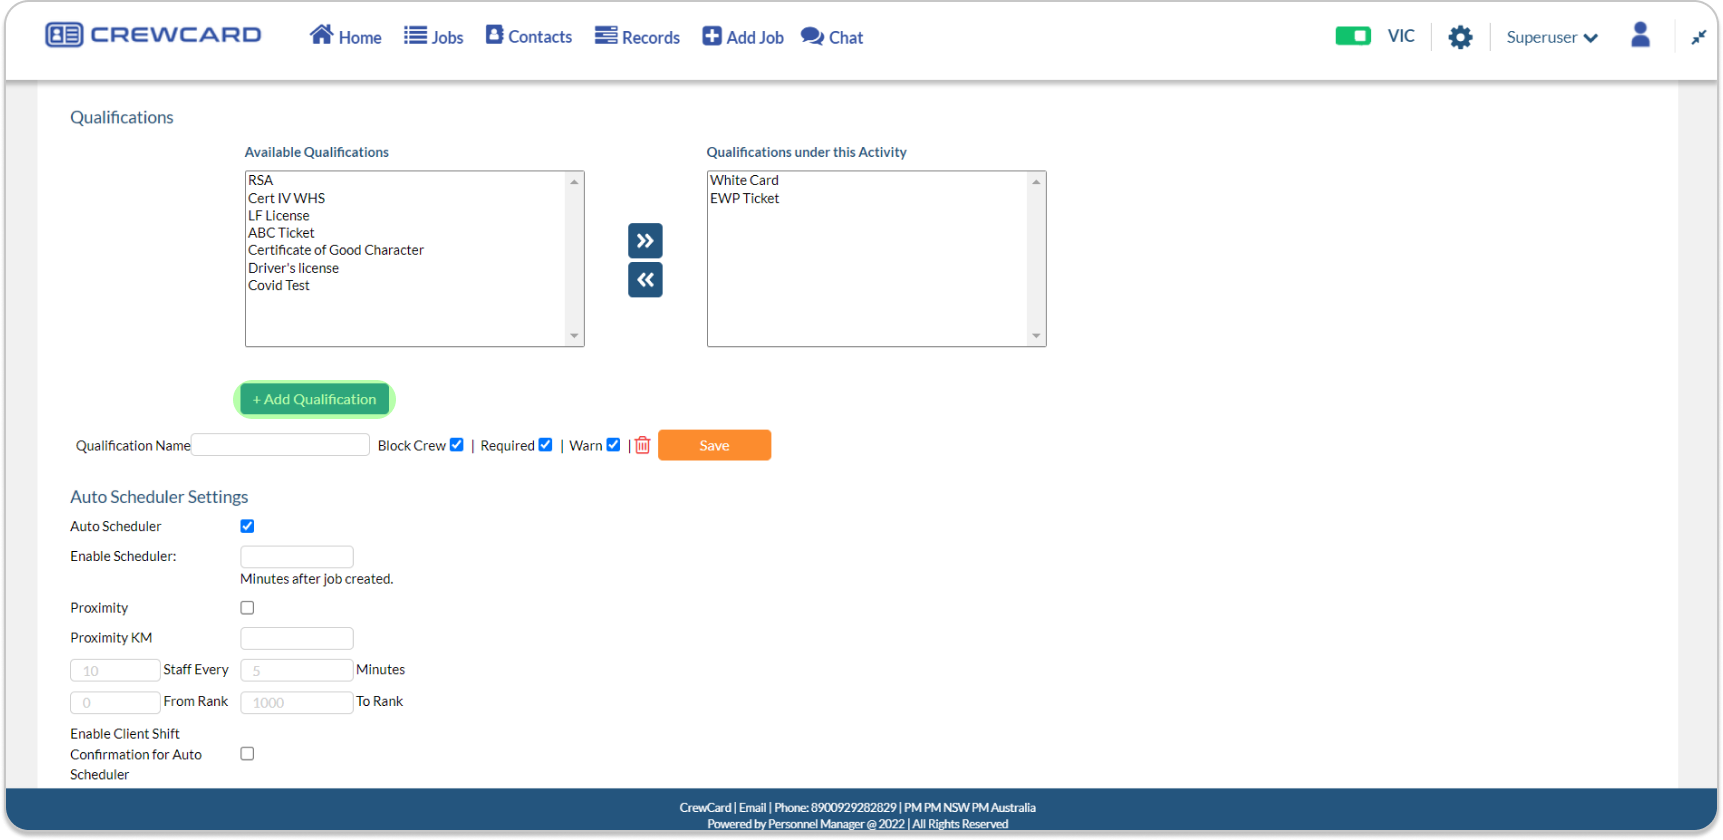
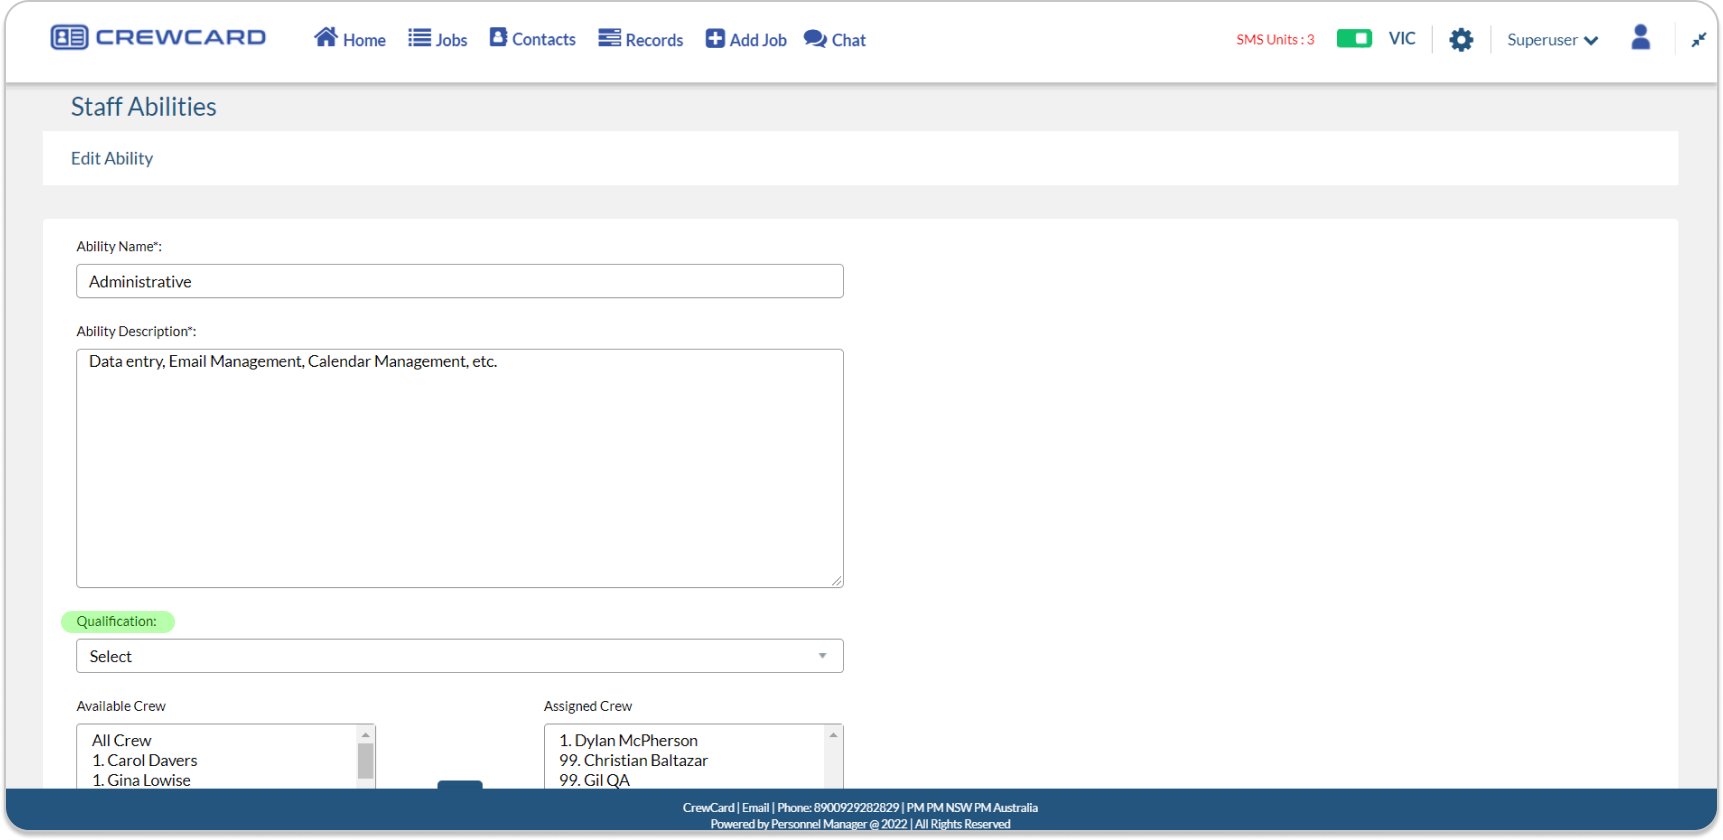


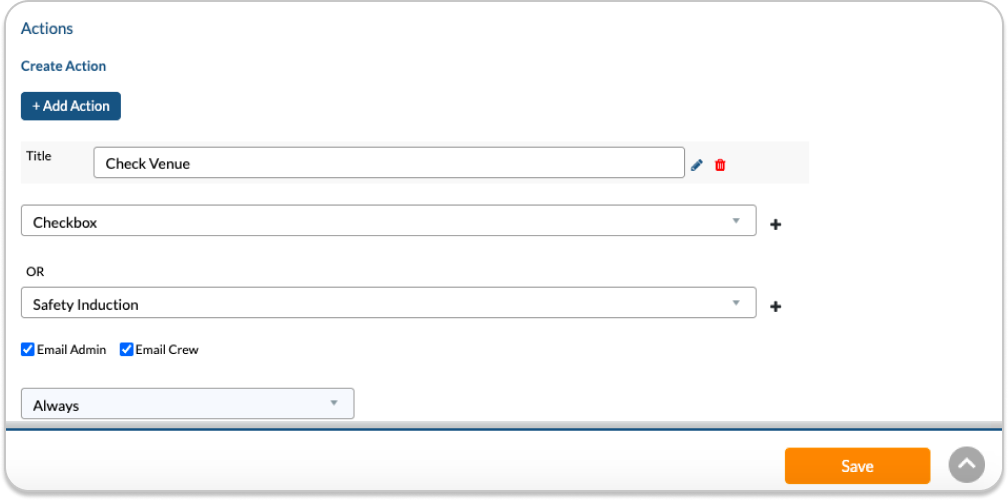
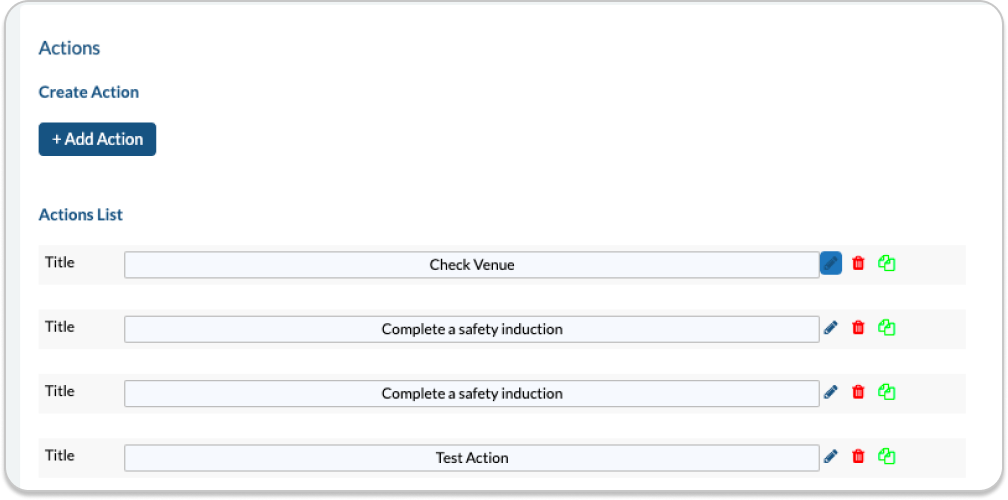
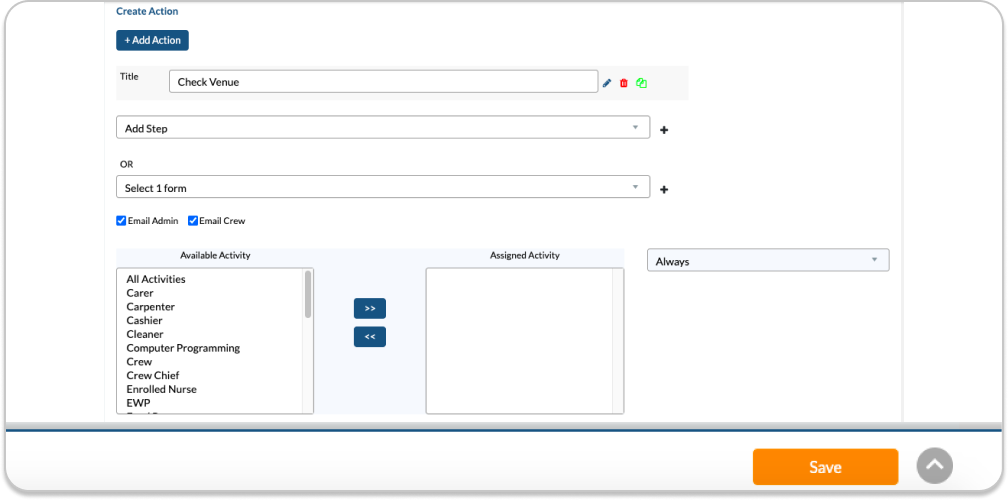

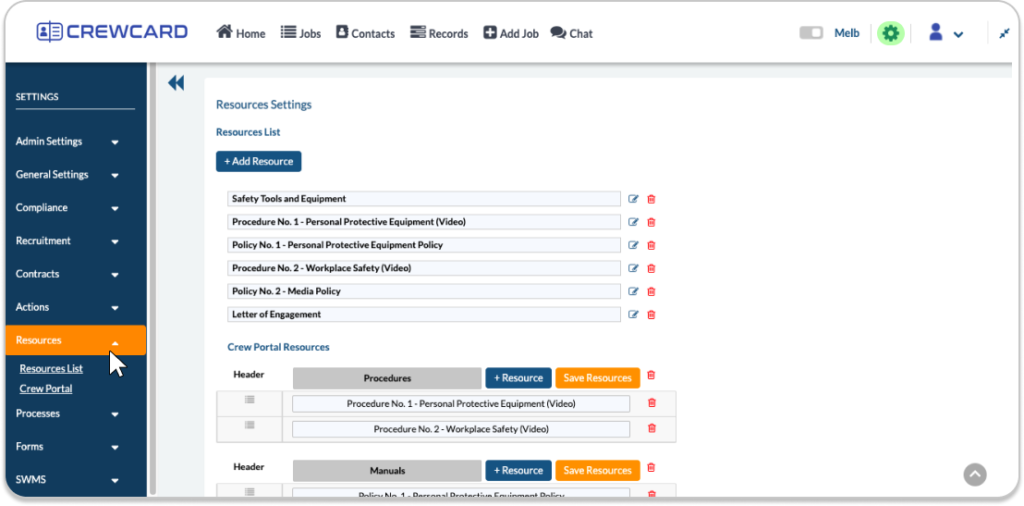


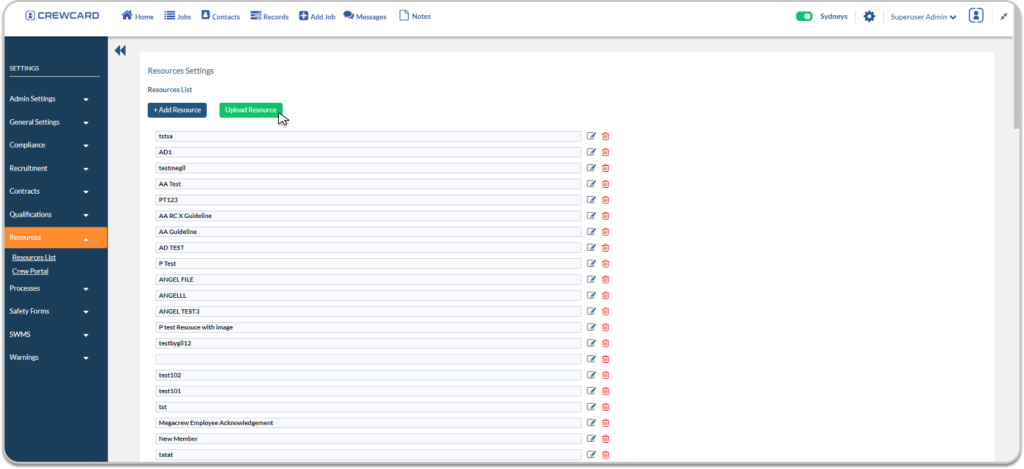
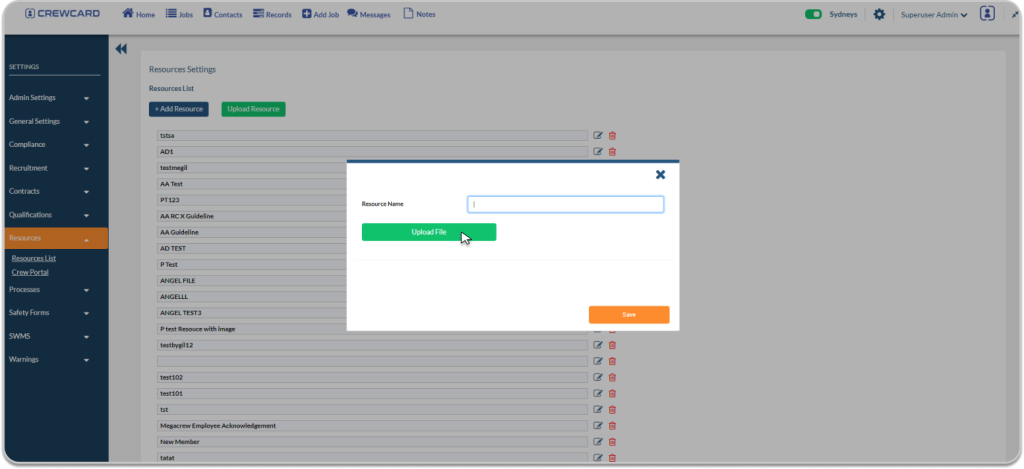
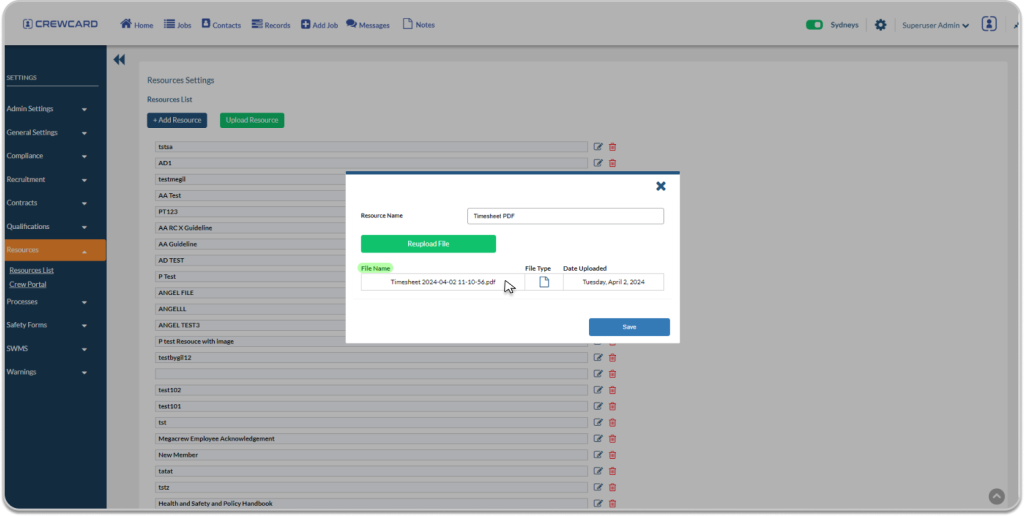
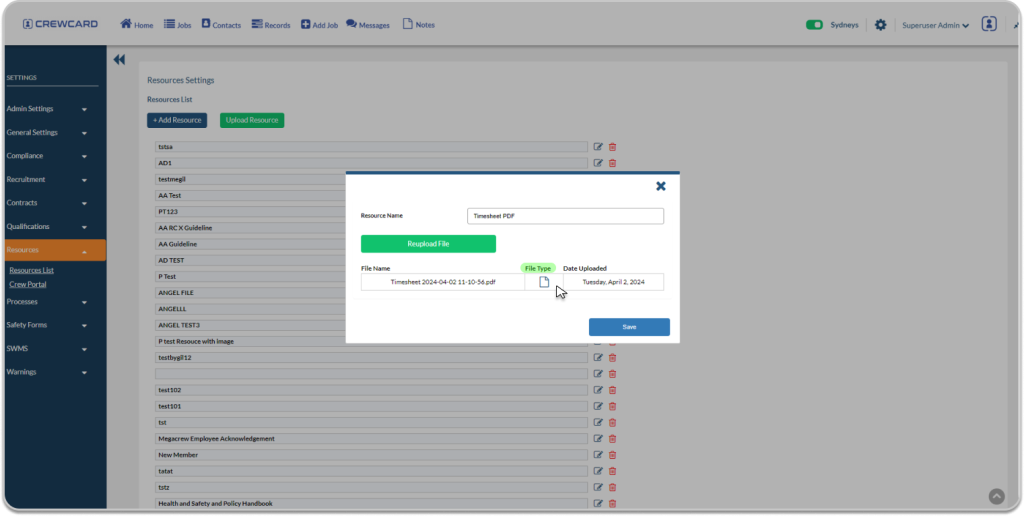

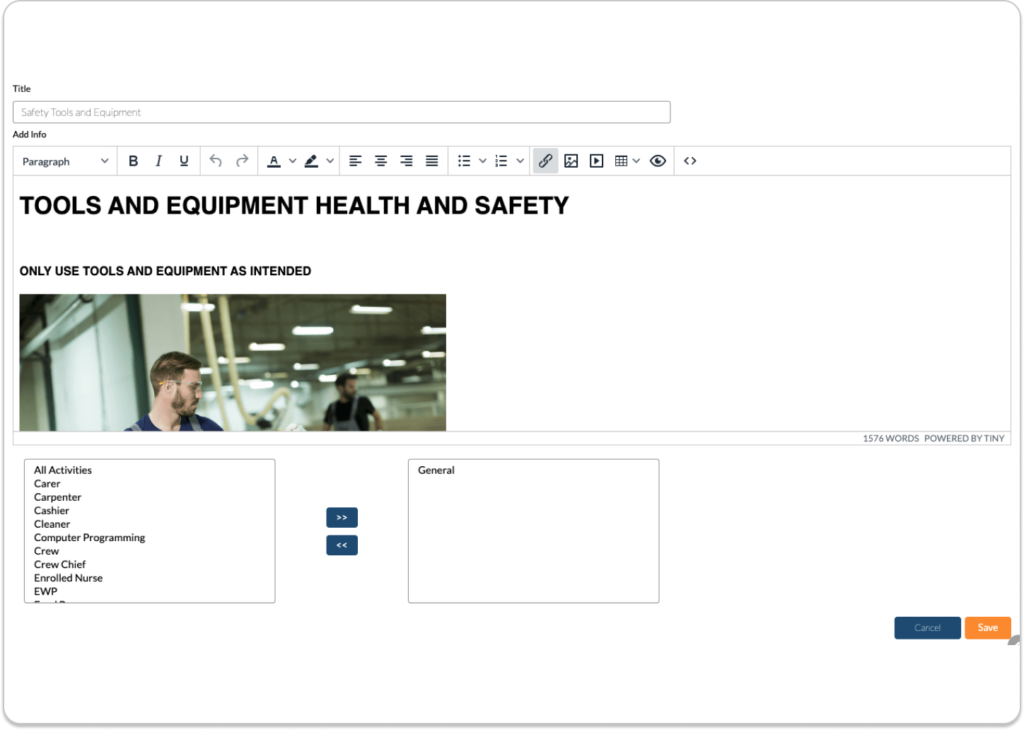

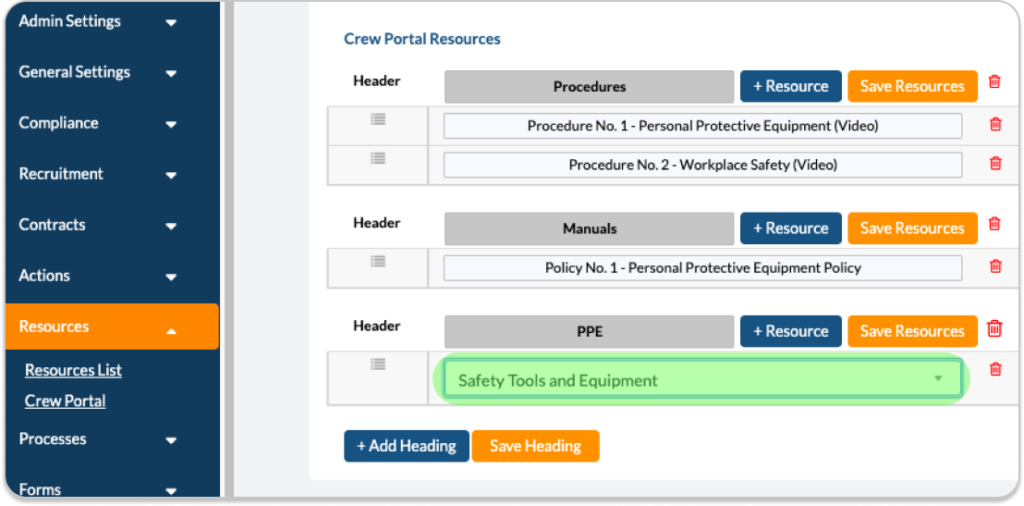
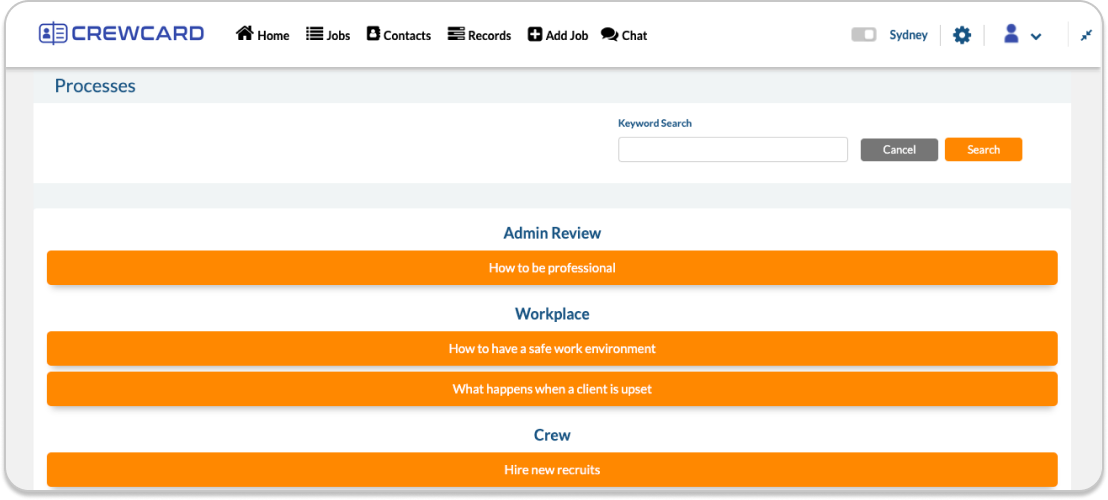
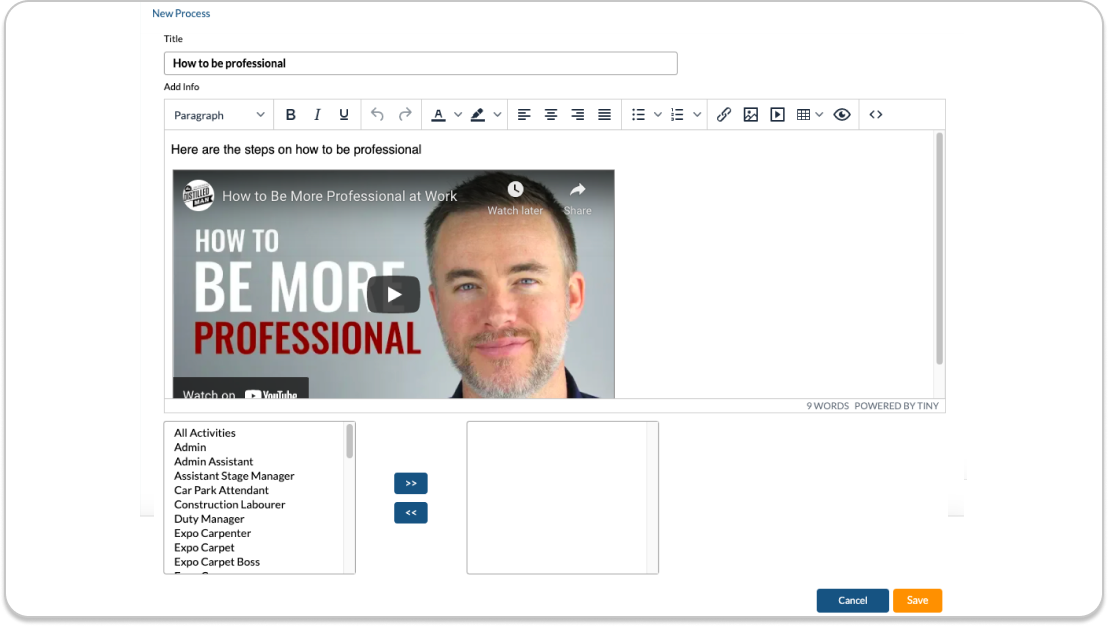
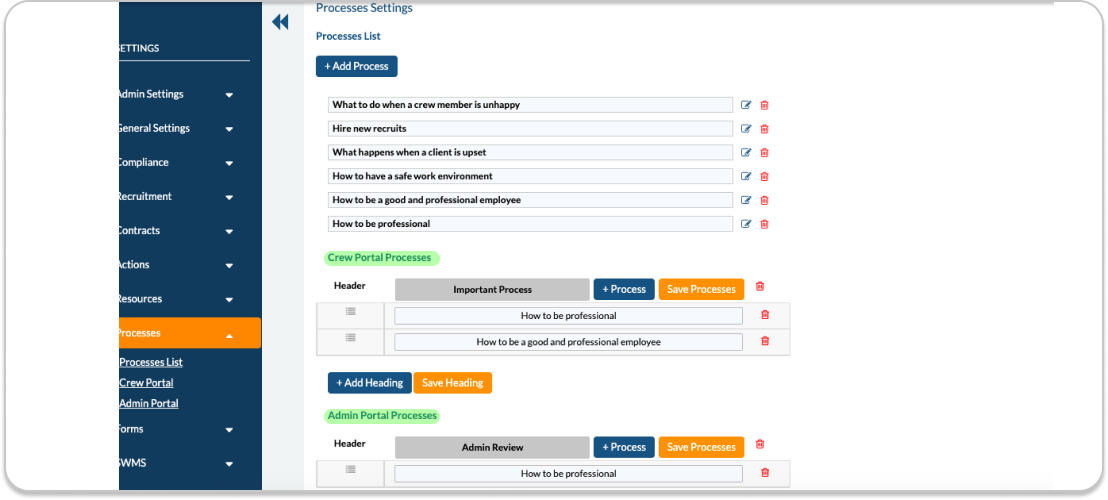

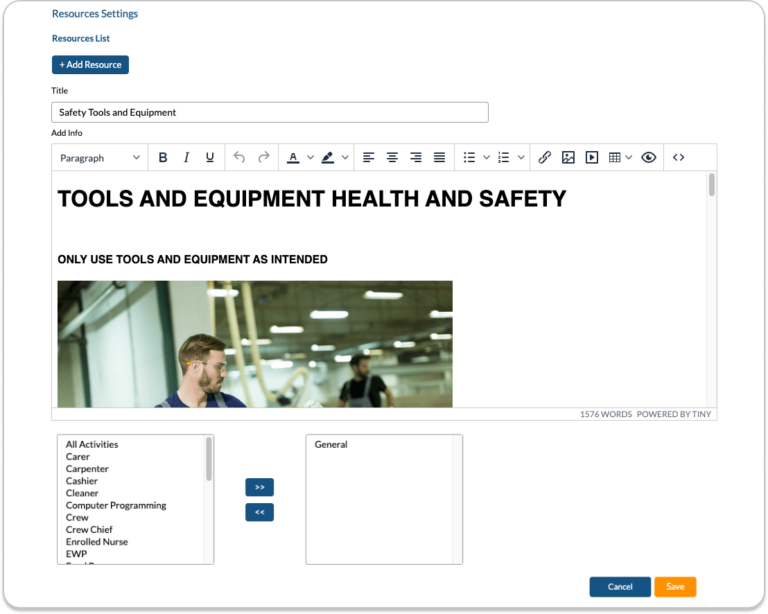
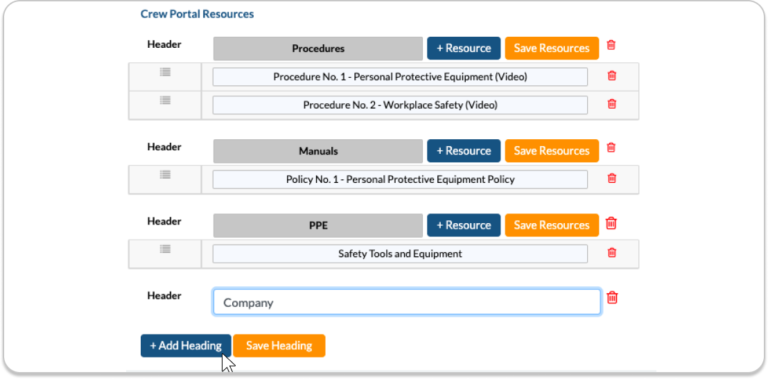

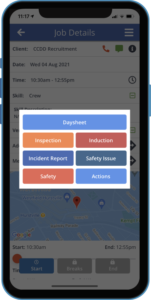


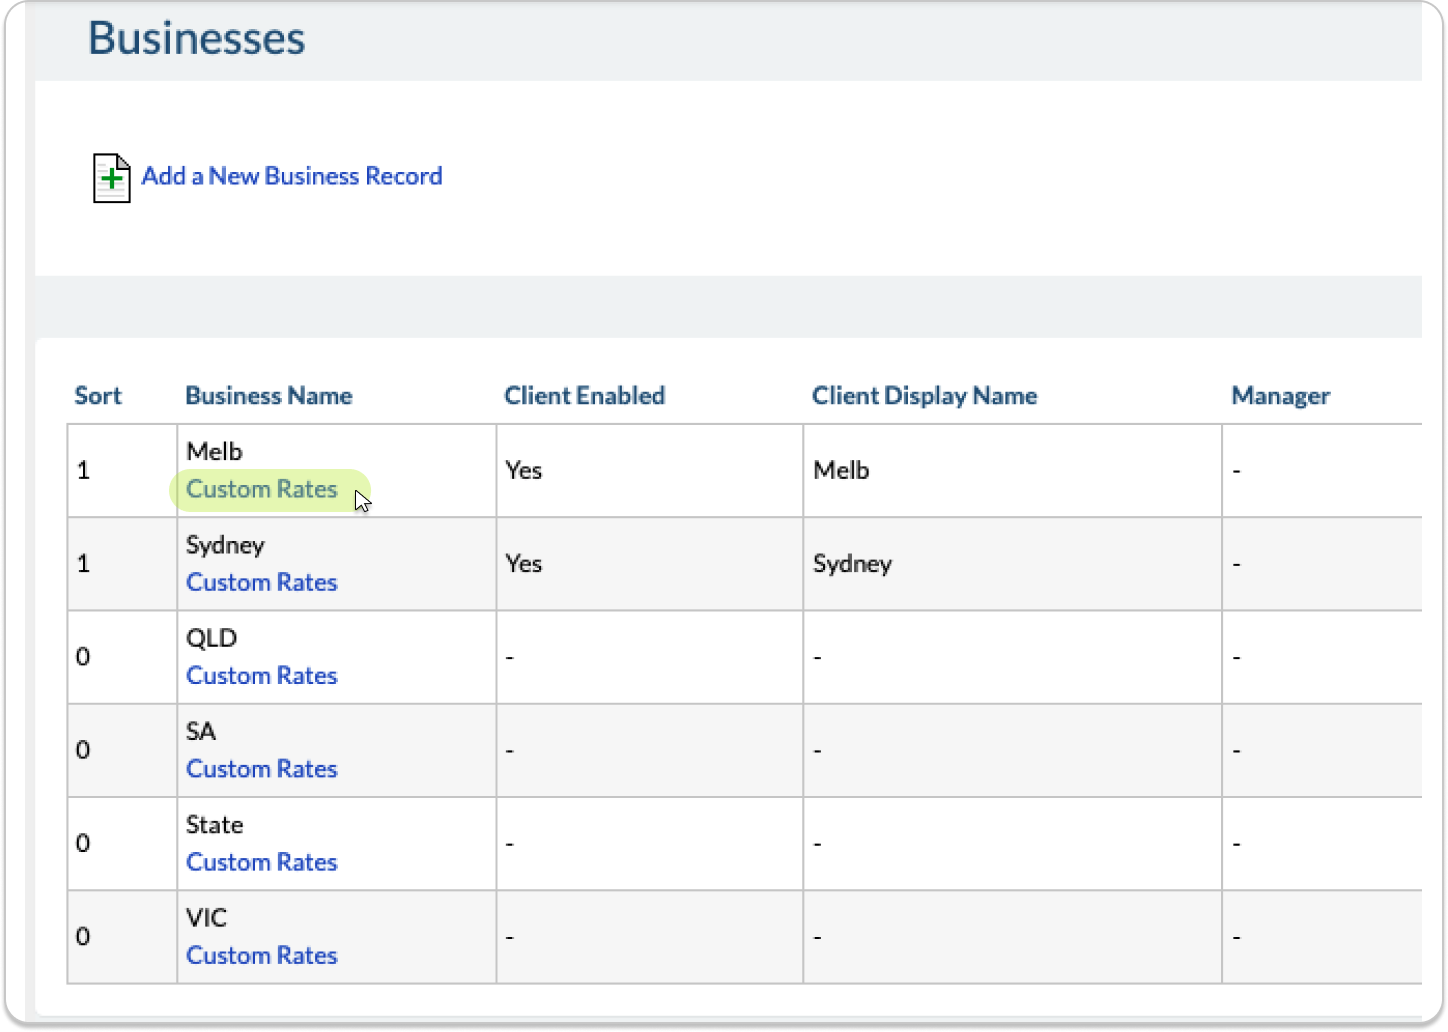
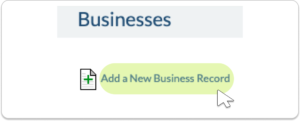


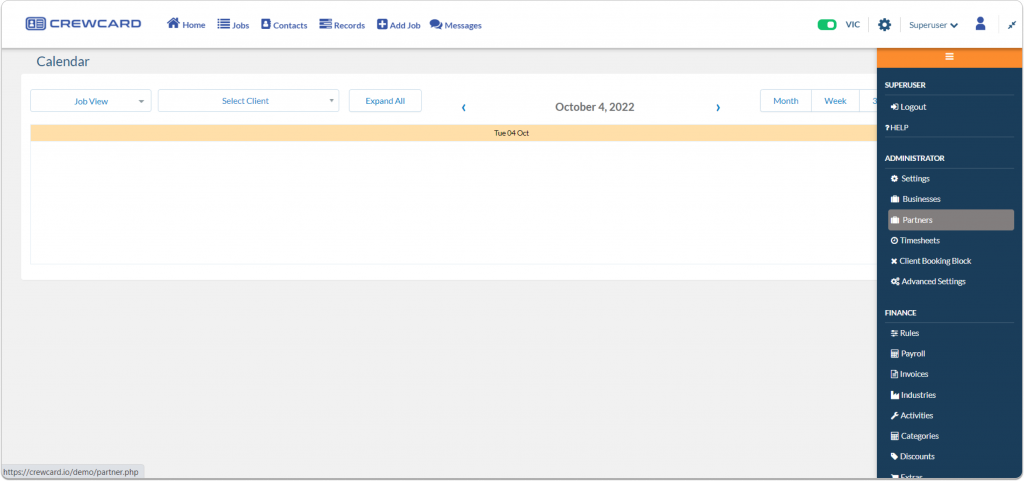
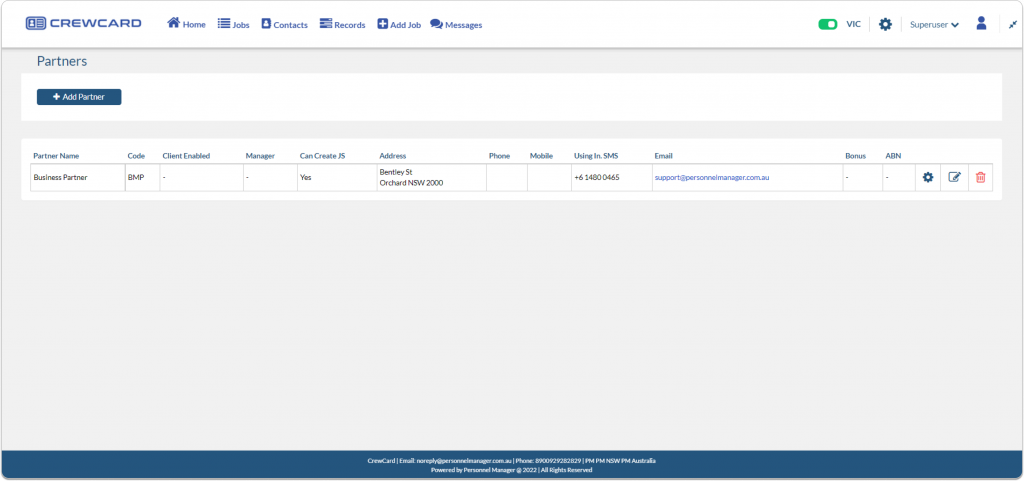
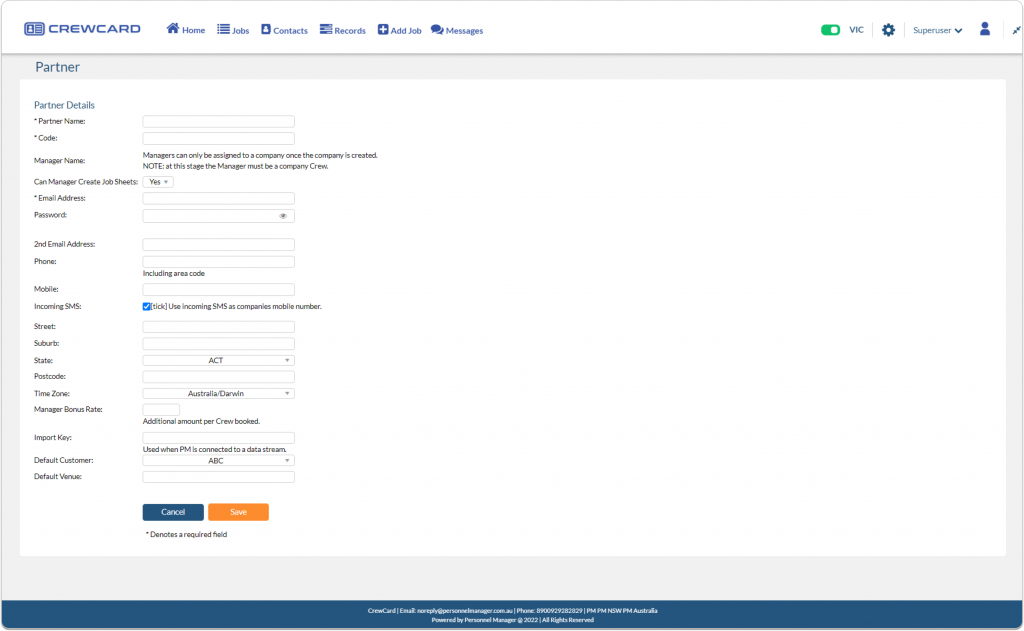
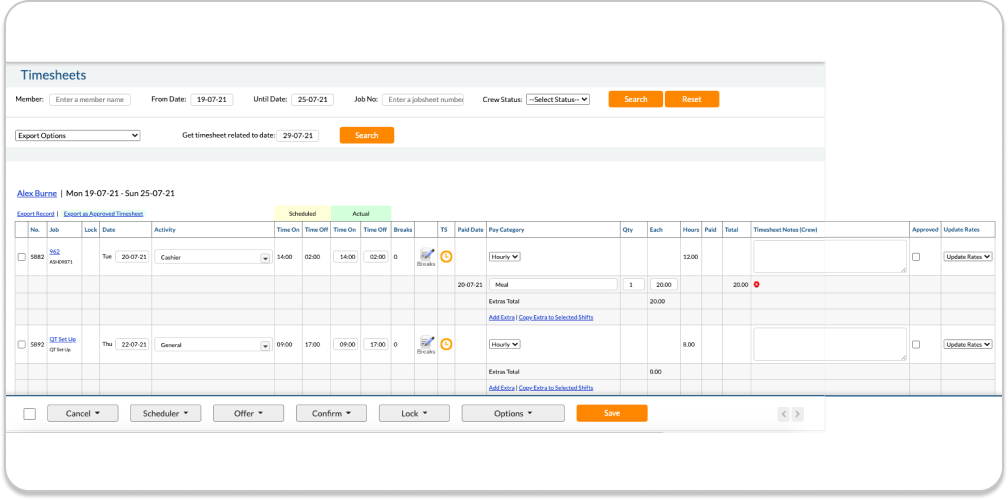

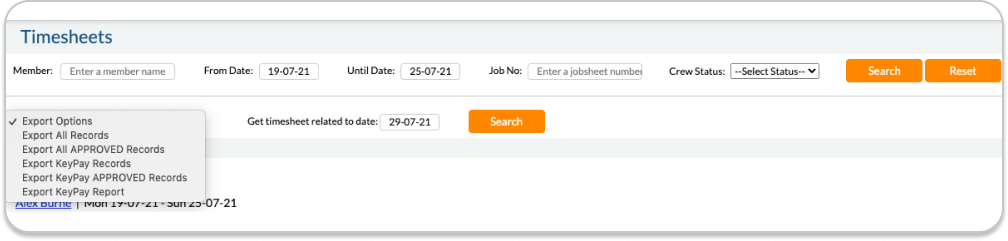
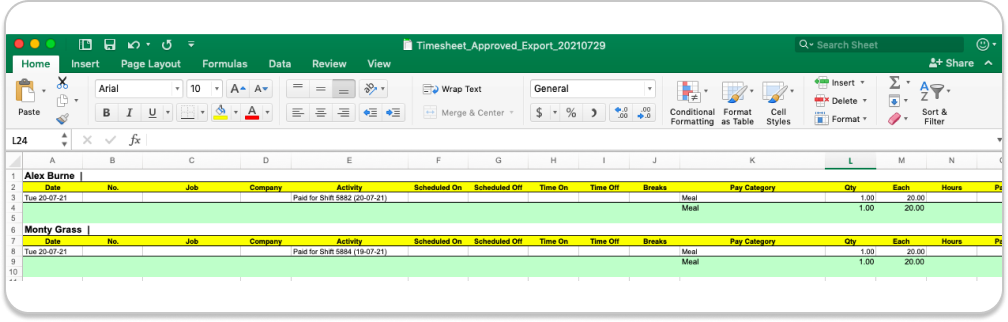
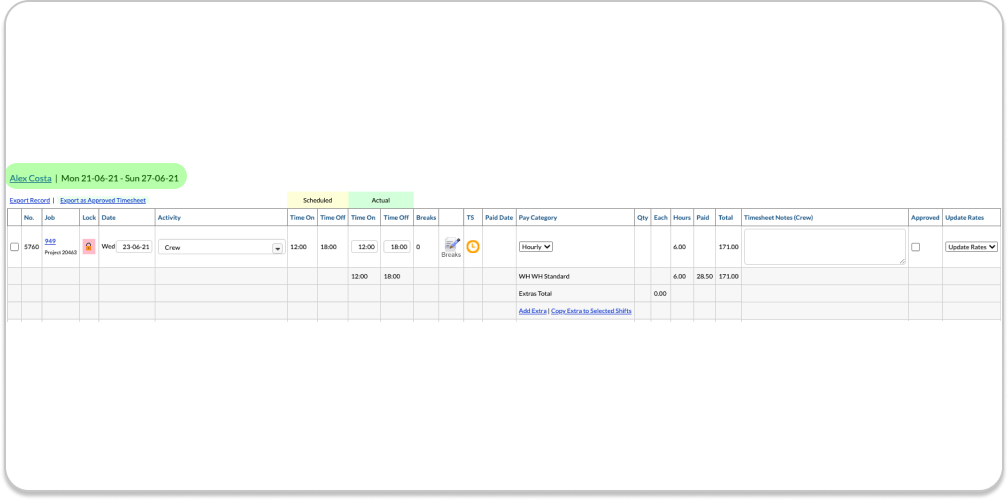
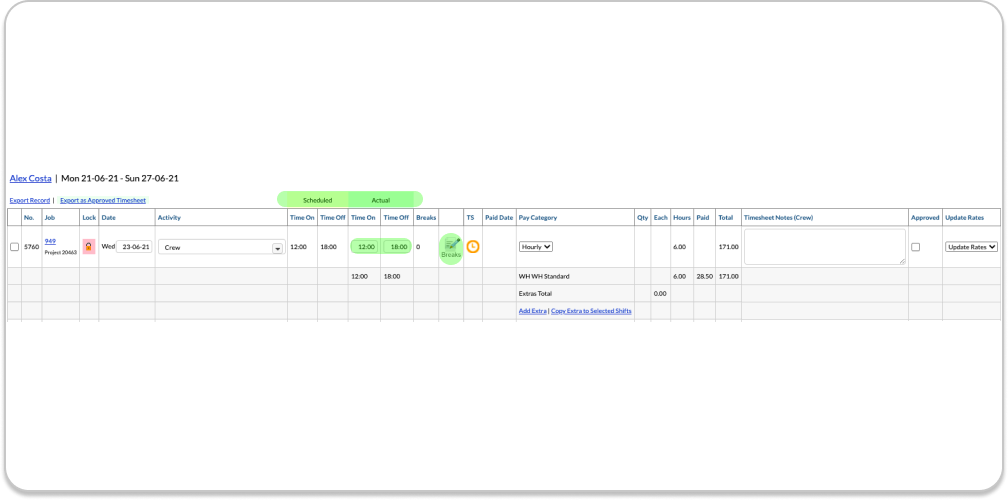
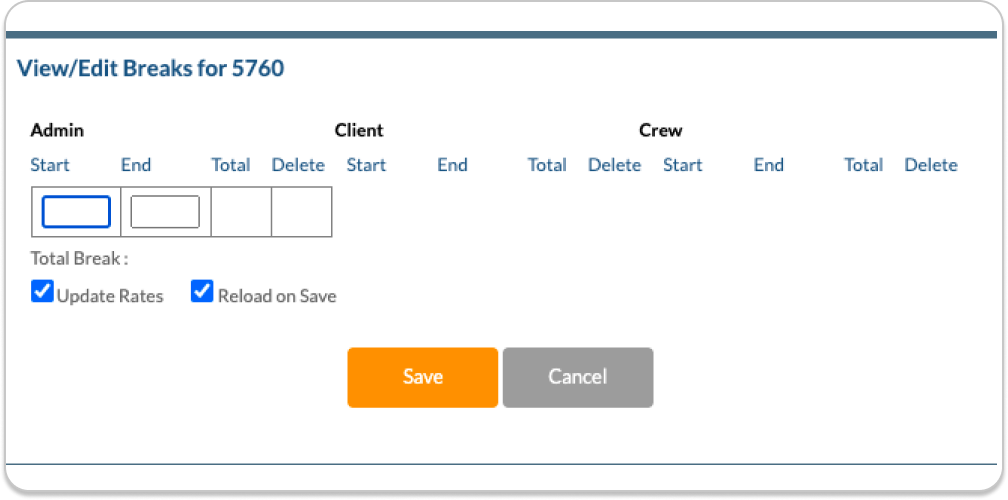
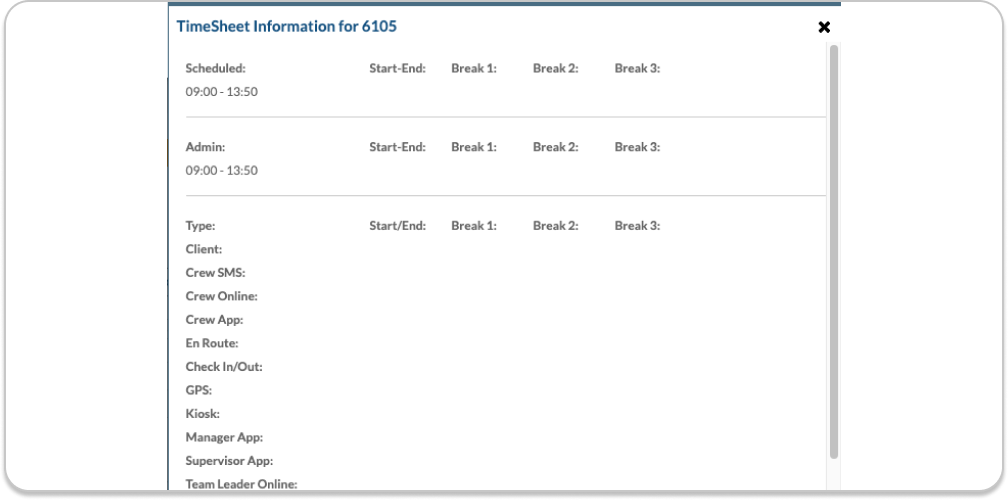
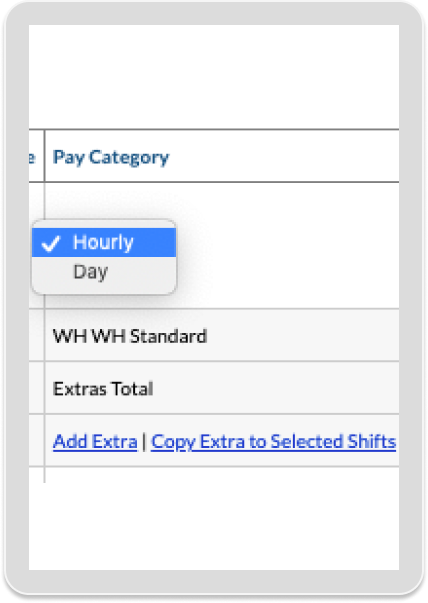
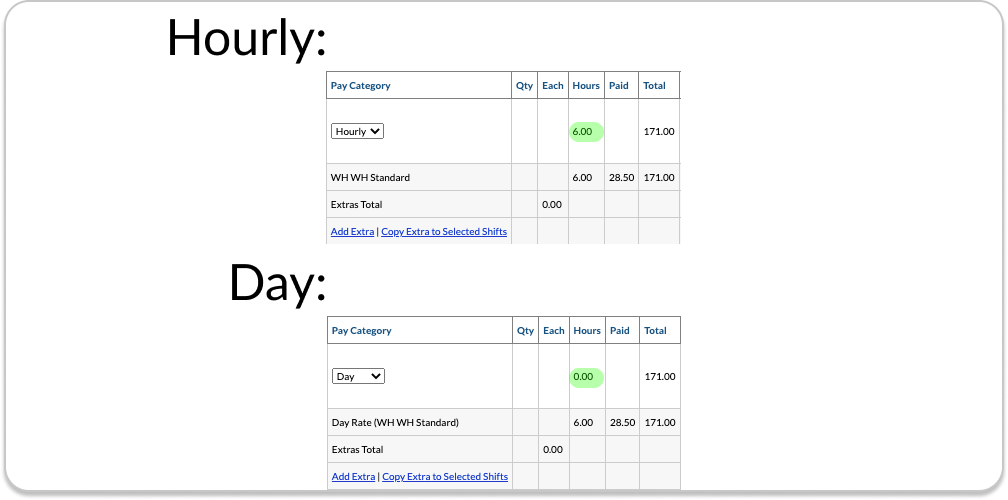
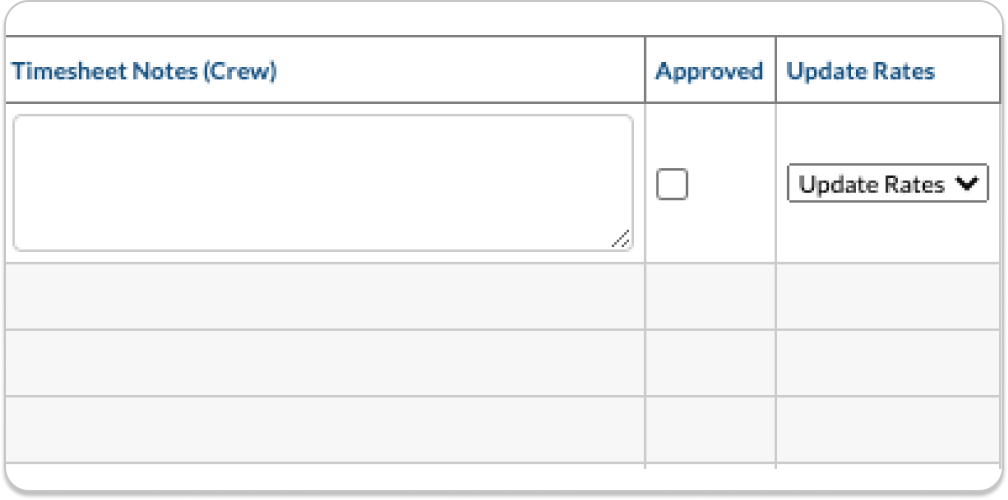
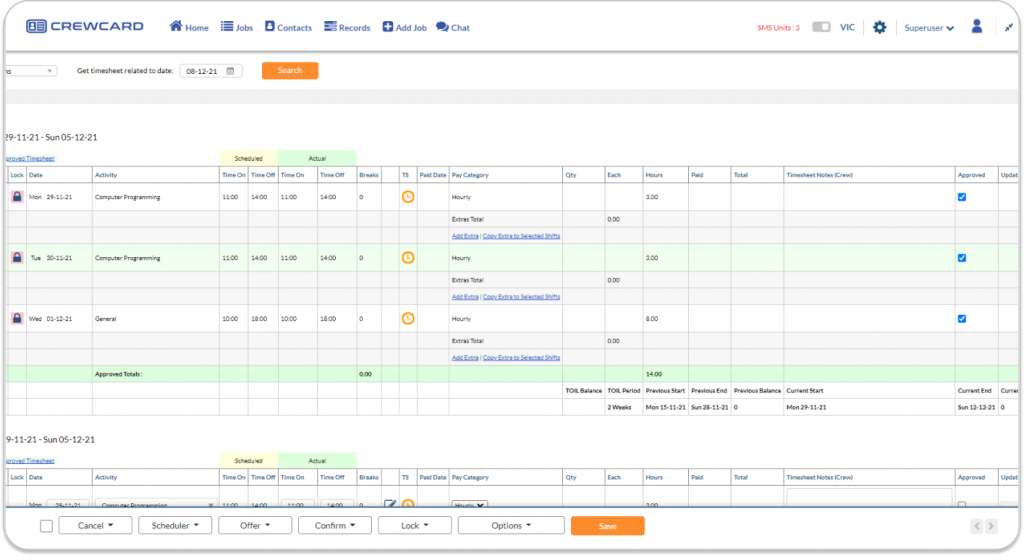
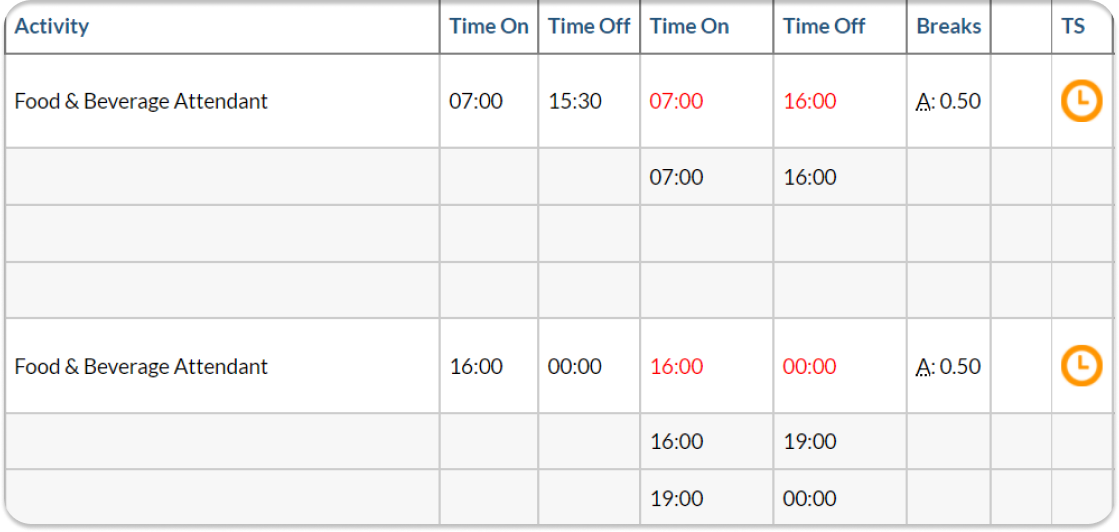
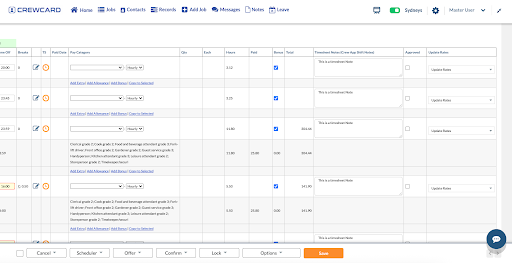 The field label will vary depending on your configuration: