First step is to download the app.
Launch the App Store
Search the app CrewCard by Personnel Manager

Android Download
Launch the Google Play Store.
Type CrewCard in the search bar.

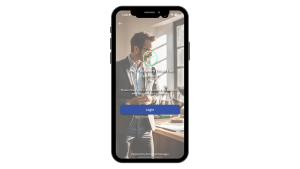
Open the app to the Login Page.

A new biometric login feature has been introduced to the CrewCard app. This feature provides an additional layer of security and convenience, allowing users to quickly and securely access the app using Touch ID or Face ID while maintaining an active login session.
In order to use the biometric login, there are two important requirements that must be enabled on the device settings.
Without these settings enabled, biometric login will not be available for use in the CrewCard app.
How to activate the biometric feature


Biometric login can only be enabled after a successful login.
Once enabled, a Log in with Biometrics option will be available for future use. Users can select this option to authenticate using Face ID or Touch ID.
If the credentials cannot be verified, a warning message will appear:
“Invalid email or password.”
When reopening the app, clicking on the Login with Biometrics option will prompt for Face ID / Touch ID. Upon successful authentication, the user will be redirected to the dashboard.


Login Flow
Users must initially log in using username and password.
After a successful login, they may enable biometric authentication.
If biometric login is enabled, Face ID / Touch ID can be used as an alternative method to sign in when the app is opened. The login session will remain active unless the user logs out.
If biometric login is not enabled, the user will continue using the app with the active session until logout.
Logout Flow
The user selects Logout from the app.
The system clears the current login session.
The next time the app is opened, the user must log in again using username and password unless biometric login was previously enabled in the device, in this case it will continue to be available for future use.
Failed attempts
After two unsuccessful Face ID or Touch ID attempts, the user will be prompted to enter their device passcode.
If authentication still fails, the user will remain logged out and must sign in manually using their credentials.


After downloading and opening the CrewCard application, you will be presented with a login page. The login page requires your email address and password.
Admin of the system will give you access to the app and provide you with a password.

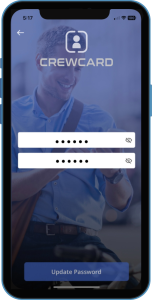
When entering your password, there is an eye icon with a line through it. This indicates that your password characters are hidden. Tap the icon to show your password.
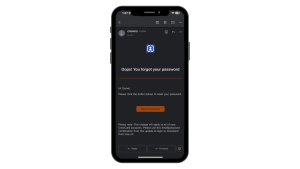
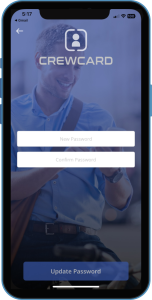
Reset Password
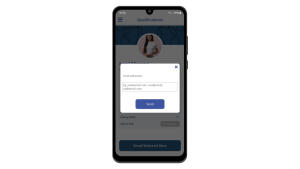
If you have forgotten your password, select the underlined words ‘Forgot Password’ located under settings. This will take you to a new page where you are able to enter the email address that is associated with your account. Once entered, select ‘Reset password’, and you will receive an email to that address with directions on how to reset the password for your account.

Note, if you have any inquiries regarding access to the CrewCard app, select the underlined words ‘Need Help?’, located at the bottom of the login page. This will direct you to contact your system admin, and provide you with a link to the CrewCard website.
Location Service
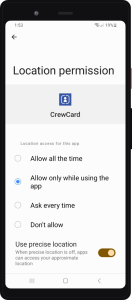
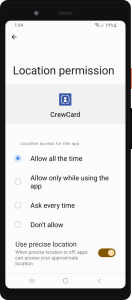
In Android Device, Once you have logged in a pop up will appear “ Location services are required for app check in and check out. Please set Location permission to “Allow all the time” or “ Allow while using the app”. Tap Go to Settings to change the Location settings as instructed.
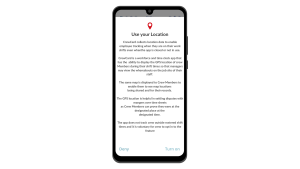
In Location Permission settings, if Don’t allow is selected then a pop up will appear again in the shifts page for you to select the “Allow all the time” or “ Allow while using the app” in the Location permission settings.
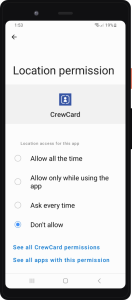
If “Allow all the time” or “ Allow while using the app” is selected in the settings, the pop up to change the settings will not appear.
This will direct you to the Shifts Page.
Read the Terms and Conditions and Agree to continue.
When the Password Reset link is tapped in the Crewcard App, enter the password and we’ll send you a link to set up your new password to get back to your account.

To begin with, Tap the Forgot Password link in the login page of the Crewcard App.
Enter your email address and tap the Reset Password button.
A pop up will prompt that this will apply to all your accounts in apps powered by CrewCard. Tap Reset to confirm.
Pop up will appear that Forgot Password link was sent to the email address you have entered.
Go to your email and open the Forgot password email, tap Reset Password button
This will direct you to set up a new password. Enter the new password and enter the confirm new password. Once done, tap the Reset Password button.
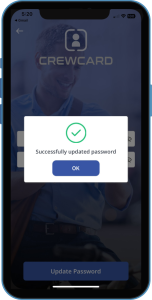
A pop up will appear that “Your Password has been reset Successfully”.
Note that once the CrewCard app detects that the account has multiple accounts this pop up will appear.


The noticeboard is used to share any information about upcoming jobs, changes in shifts and anything else in between.
When the administrator posts a message on the noticeboard, the crew will be notified through a push notification. You can access the message by opening the push notification.
You can access the Noticeboard on the Shifts page via the clipboard icon. A small window will appear listing the most recent message. You can click on the message to view it or tap on “View All” to be directed to the Noticeboard page.

You can also find the Noticeboard on the side menu. Click on Noticeboard to be directed to the Noticeboard page. On this page you will find a list of all Noticeboard Messages that have been sent out, starting from the most recent to the least recent.

click on the blue arrow to expand on the notification.

You can filter the dates of Noticeboard Messages sent by clicking on the filter icon in the top right of the screen. Here you can select the from date and to date to search for specific messages.

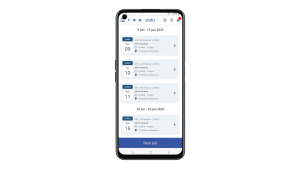
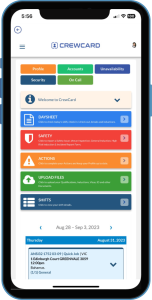
When you first open the app you will be taken to the Shifts Page. This is quick access to your shifts.

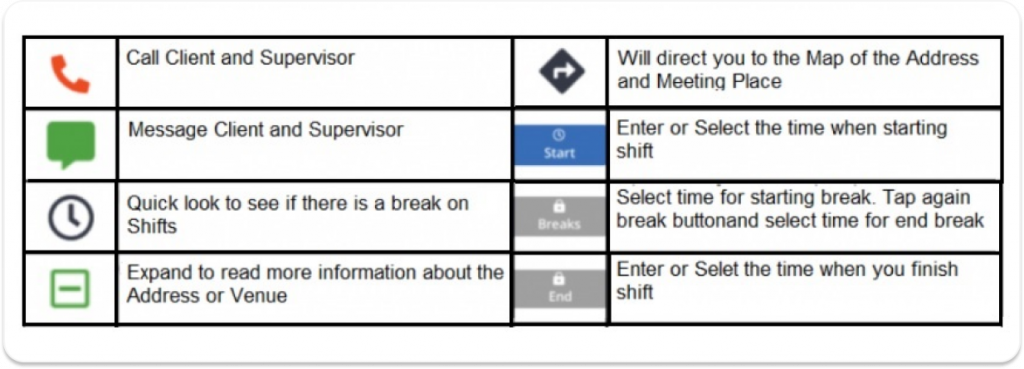
At the bottom of the Shifts page, there is a dynamic action button that adjusts based on your schedule:
There are multiple actions that can be performed on this page.
By default shifts page will only display a week shifts. Tap the filter icon to modify it.

Business: Use this option to filter jobs based on the specific business or company associated with the job.
Client: Filter jobs by the client or customer. This feature helps you find jobs associated with a specific client or customer.
Venue: This filter enables you to narrow down job listings by the venue or location where the job is taking place.
From Date: Filter jobs starting from a specific date.
To Date: Filter jobs ending on a specific date.
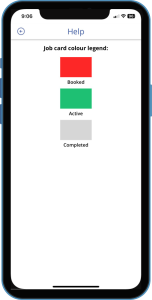
The question mark button opens a colour code.
Message icon will take you to a live chat where you can message crew, team leaders and supervisors about jobs.

Tap Calendar icon to view the shifts via calendar mode alternatively you may tap the Portal icon.

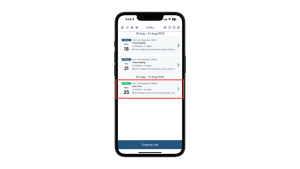
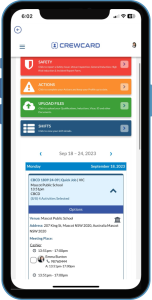
Each shift is shown on individual cards featuring a calendar-like date, job details, and clear status indicators such as “Active”, “Booked”, or “Locked”.
The job card will have the following details:
Each cards directs you to their respective job details.


Crew members can upload a maximum of five photos and have the option to delete them by tapping the bin icon located on the photo. All uploaded photos will appear in the admin portal under the jobsheet.
This screen will present you with buttons:
Check List: When the shift is booked, they can create a check list that must be done at shift
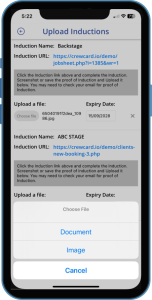
Photos: If a photo from the job needs to be upload press choose files and allow access to your photos
On the top right corner of the job details press the three lines. The screen below will pop out.

Day Sheet is only be available to Team Leaders, Supervisor, Client and Duty Managers. To assign a Team leader, please refer to https://www.crewcard.co/crewcard-user-guide/ >>7.1 Job Sheets.
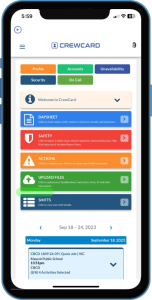
Day sheet:
Team Leaders, Supervisor, Client and Duty Managers can enter times directly into the system and to report the performance of a crew. They can also process safety inspection and induction.

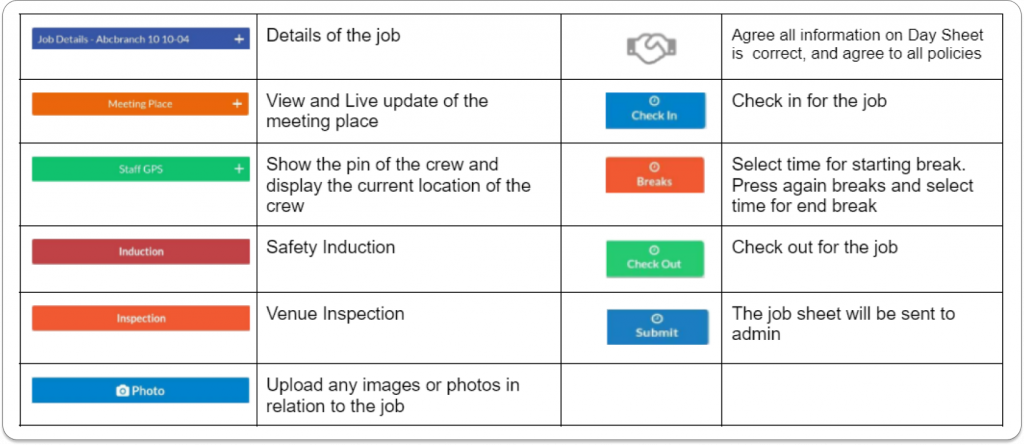
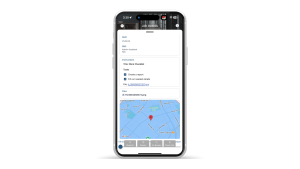
Job Details: Similar with the crew member, you also have the Job Details section on the Day Sheet. The only difference is that you have the Supervisor section. As Team Leader, you will be able to enter the details of the Supervisor on this field if it’s available.
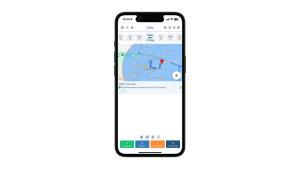
Staff GPS: You can drag the slider to show the pin of
the crew on each given time. You can also click Refresh Map to display the most current location of the crew.
Check in/out and breaks: With the Crewcard App, effortlessly manage your shifts and focus on tasks. Your Check In time is highlighted in green, and Team Leaders are marked ‘TL’.
“No Break” feature in CrewCard: Disables scheduled breaks when active, ensuring continuous work without interruptions for specified periods or situations. Ideal for uninterrupted work or coverage, preventing users from taking breaks during the designated timeframe. If you would like to alter the settings for the no break, please contact support@personnelmanager.com.
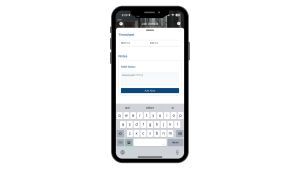
Timesheet: Click the Timesheet link on the Day Sheet to view the time entered by Crew, Supervisor, Team Leaders, Admin and Duty Managers. See below for an example:


Sign Off: Affix your signature on this field if you are satisfied with the job rendered by the crew.
Day Sheet Submission Click the Submit button to submit the Day Sheet. A checklist of requirements will appear for your review before submitting the Day Sheet. Once you are certain that everything is in order, click Yes. Click OK. Day Sheet is now submitted and lock icon will appear.
Safety Forms
If you tap on any of these options, it will open the safety forms for you fill out.
Inspection:
This is the Venue Inspection Form. When you tap on this option, it will open the Venue Inspection Form where you will be able to enter information about the venue.
Workplace inspections help prevent incidents, injuries and illnesses. Through a critical examination of the workplace, inspections help to identify and record hazards for corrective action.
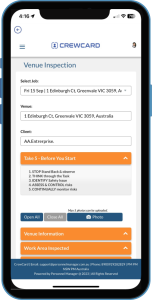
The content of the Venue Inspection Form may vary from one client to another. The contents of the form are set via the Admin Portal.
You can click on the arrow buttons to display the fields where you can enter data and information.
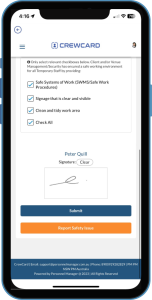
Once you have completed filling out the forms, affix your signature and click Submit.
After you have submitted it, the form will ask you if you want to submit a Report Safety Issue. Click Yes if you want to report a safety issue, otherwise click No.
Induction:
A safety induction is conducted to welcome new employees to the company and prepare them for their new role. It ensures workers are fully informed about the organisation and are aware of their work and responsibilities. It serves as a starting point for an organisation to introduce a culture of safety in the workplace.
This is the Safety Induction Form for Team Leader. For other crews, it will show as General Activity Induction.
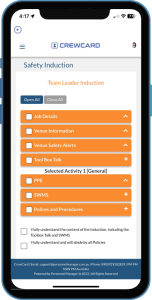
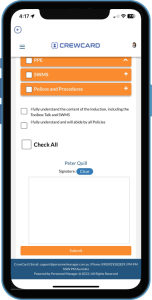
Note: The contents of the Safety Induction Form may vary depending on how it was configured from the Admin Portal.
Use the arrows to expand the information:
Job Details: The current job
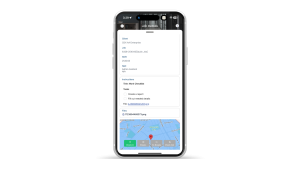
Venue Information: Staff entry, security location, first aid location, emergency meeting point, restrooms location
Venue Safety Alerts: If there are reported safety issues on this venue, it will show up here.
Tool Box Talk: Click on the plus icon to display the content for Tool Box discussion.
If a selected Activity is mapped to SWMS/PPE and Policies, it will appear on the Safety Induction. Click on PPE to display the required PPE for the job.
Incident Report:
An incident report is a tool that documents any injuries and accidents, near misses, property and equipment damage, health and safety issues, security breaches and workplace misconduct.
An incident report can be used in the investigation and analysis of an event. It includes the root cause and corrective actions to eliminate the risks involved and prevent similar future occurrences. Incident reports can also be used as safety documents that indicate potential risks and uncontrolled hazards found in the workplace.
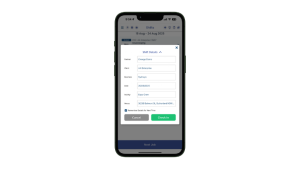
When you tap Incident Report from the Job Options, it will open a form that you can fill out with information.
Similar with the other forms, you need to select the job from the dropdown menu that is applicable to the incident. The Client and Venue will be automatically entered.
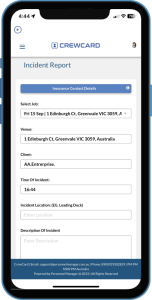
Click the “i” icon to view the details of the insurance company.
You can now start filling out the Incident Report Form:
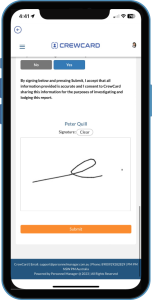
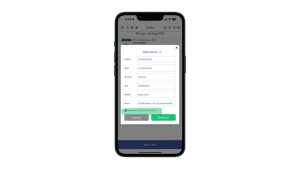
For the question, “Have you ever received medical care for this incident?”, you can select Yes or No.
If you received a Medical Certificate, you need to upload it to the system. Select Yes or No to answer if you have lodge a Workers Compensation claim.
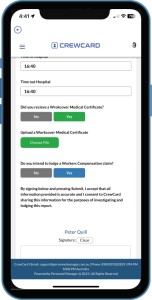
Affix your signature and click Submit once completed.
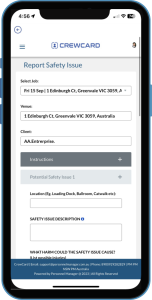
Safety Issue:
This Report Safety Issue Form will identify health and safety problems in the workplace.
Fill out the safety form, select the job from the dropdown menu. This will automatically fill out the Venue and Client information.
Click the plus sign if will show you instructions on how to use the Risk Matrix.
Fill out the Potential Issue by clicking the plus icon:
Location: Identify the location of the safety issue and enter on this field
Safety Issue Description: Describe the safety issue and provide more details as needed
What harm could be the safety issue cause: Identify what harm it can cause to employees, clients and other stakeholders
What crew at risk: Identify which crew are at risk
Likelihood: Select from the dropdown menu
Consequence: Select from the dropdown menu
Risk Rating: Depending on your choice on the Likelihood and Consequence, the Risk Rating is calculated automatically.
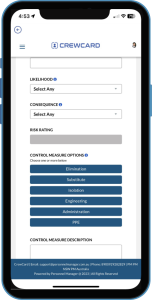
Now select the Control Measure that can be used to mitigate the Safety Issue.
Based on the selected ControlMeasure, select the New Likelihood and New Consequence. This will calculate a new Risk Rating.
Sign the form and press Submit.
Offline Functionality
The offline functionality acts as a backup for data in situations where the CrewCard system experiences downtime or loss of internet connection. Once the job list page, job details page and daily job page have been loaded while online, users will still have access to them, even when offline.
Accessing PSA in the CrewCard App
Proceed to the Main Menu and choose the ‘Shifts’ option.
Please select the desired shift, Find the Shift you wish to check in for and click on it.
You will be prompted to complete the Pre-Start Acceptance (PSA) process, which requires you to ‘Accept’ the terms and conditions if PSA is required ( Check General Settings>> Pre-Start Acceptance Page is enabled).


If you have not yet completed the Pre-Start Quiz, it will be immediately accessible. Crew members can answer each Quiz once.
Note: If the PSA and PSQ are enabled, crew members must complete them; otherwise, they cannot check-in for their shift.
Click the ‘OK’ button on the Pre-Start Quiz prompt to initiate the Quiz.

First Quiz Page: You will be directed to the first quiz page, which includes the title, instructions, and available resources. Click ‘Start Quiz’ to begin the Quiz.

Read the instructions carefully and utilize any provided resources to answer the quiz questions.
Complete all the questions and submit your answers.

After you finish the Quiz, it will no longer appear on the Shifts page. Additionally, if the “Email Admin” and “Email Crew” options are selected in the PSQ settings, an email alert will be dispatched to both the administrator and the crew.
Crew App Notes
When crew members check in or out through the app, a pop-up will prompt them to add notes.
These notes, once added, will appear on the Job Details page under the Notes field.
Additionally, the notes entered by the crew will be displayed on the Timesheets page under the Timesheets Note (Crew App Shift Notes) column, offering managers and admins additional context for each shift.

Induction is important to a job as it educates you about important information about a job that you may not be aware of, to upload or access your inductions on the app, follow the steps below.
On the Job Details page, please select Required button below induction (should the job require induction it will show a Required button else, it will show a Not Required button)
Once redirected to the Upload Induction Page wherein you may do the following.
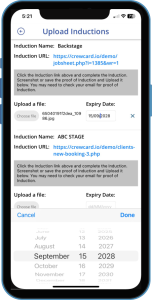
To check the status of the Induction, On the Job Details page click on View crew pass
The bottom of the page shows the Induction completed.

Furthermore, If you need to view the uploaded inductions, you may tap on the document and a window will pop out showing a preview of the document.
To view the status of the Crew Pass, please follow the instructions below:
On the Shifts page, please select a shift.
Once on the Job Details page, you will be able to see if the pass status would be either Completed/Required. To further check please tap on the status.
On the Crew Pass page, you will be able to view the following:
If clients or users wish to enable or disable the Crew Pass feature, please contact support@crewcard.co.
Some jobs need additional instruction to be able to finish the job properly. Instructions are not only limited to text but may also include photos, images, or files. To view an instruction placed by the client please check the instructions below:
On the Shifts page, please select a Shift.
On the Job Details page, you may view if an instruction is added by navigating at the lower part of the page.

To finish a task inside an instruction.
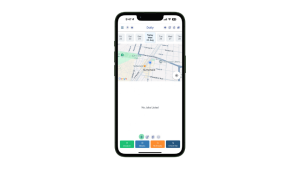
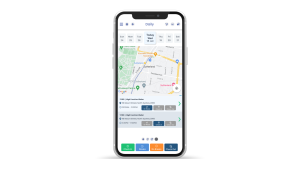
Daily page allows you to en route, check in and check out of the shift. If right arrow button is tapped then this will direct you the job details page wherein you can see more details about the job.

En Route will be activated 1 hour prior to the Shift start time while the check in will be activated by default by 1 hour prior to the Shift start time. When en route is tapped a pop up will appear and ask “Would you like direction to job?”
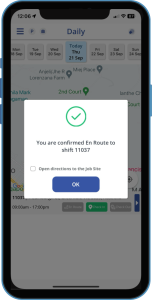
Tap yes and it will navigate via GPS to the Shift meeting point.
From the Daily page, crew can check in and out of their shift.
If you would like to alter the settings for the crew check in and out, please contact support@personnelmanager.com.
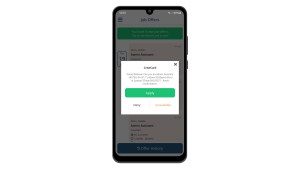
How the APP handles the Check-In:
Check-In Enable/Disable Logic
Check-In Logic (When Check In button is Enabled)
Start Time Lock
The job’s official start time is always used as the check-in time, no matter when the crew taps the button.
Edit Time
A time picker appears, and the crew can set their own check-in time. If early check-in is enabled, the app allows check-in up to N minutes before the shift start time.
No Edit Time
Works like Edit Time, but instead of selecting a time, the app automatically uses the current time as the check-in time.
Crew Add Shift – User Guide
With the latest update, crew members can now access the Crew Add Shift feature, which was previously only available to Admin and Supervisor roles. This new development makes it easier for crew members to manage their shifts and schedules, without having to rely on their superiors. By having access to this feature, crew members can now add or update their shifts in a more efficient manner, without the need for a manual request to their supervisors. This not only saves time for the crew members, but also eases the workload of the Admin and Supervisor roles, allowing them to focus on other important tasks.
Below are the steps to open it and a guide to help you understand some of the app’s symbols and their functions.
Access the Add Shift Feature (Crew)
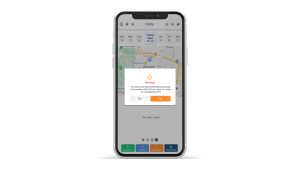
Initially, sign in as a crew member. This action will guide you to the main menu of the application. On the header of the Shifts page, if this setting is enabled by your administrator, you will see a ‘+’ icon to the left of the filter icon. 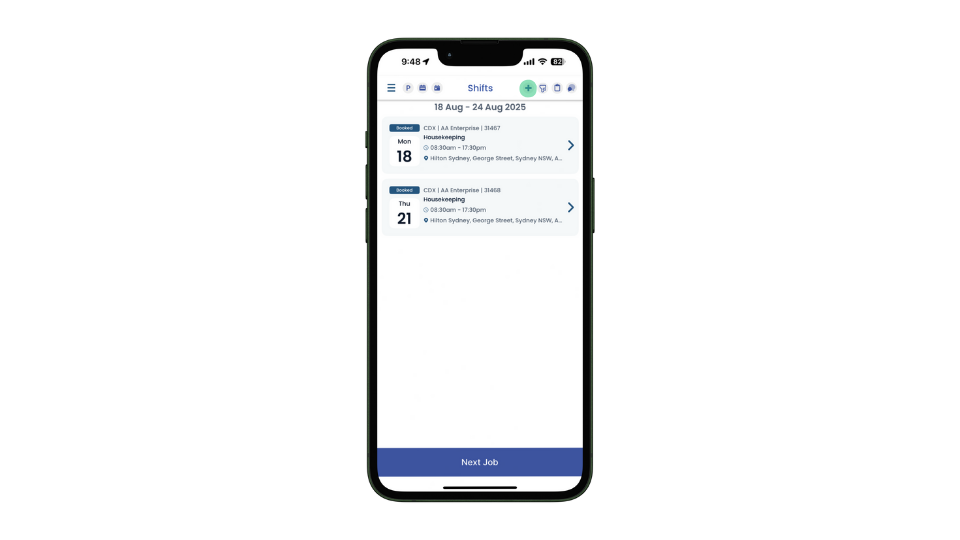
Alternatively, you can also add shifts via the Daily page.
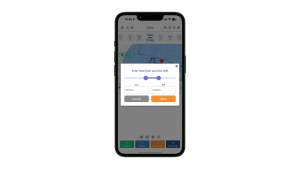
This feature allows you to complete a form to create a new shift, including details such as Partner, Client, Business, Date, Activity, and Venue. Once filled, select ‘Check-in’ to confirm, or click Cancel to exit without saving. A time picker will appear, allowing you to adjust the check-in time.
By default, any shifts added using this feature will have the check-out time set to 11:59 PM. You can edit this later on the Daily page, which provides more control over shift details.
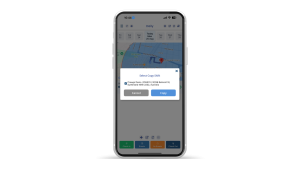
Overlapping Shift Warning : This warning message will appear if you enter start and end times that overlap with another existing shift. It will ask if you wish to proceed with creating an overlapping shift. Press ‘Yes’ to continue creating the overlapping shift or ‘No’ to abort the process.
Icons above the Time Log Management (for shift edits):
![]() Add Shift: Click this button to add a new shift. (Refer to the Add Shift section above for full details on completing the form.)
Add Shift: Click this button to add a new shift. (Refer to the Add Shift section above for full details on completing the form.)
![]() Copy Existing Shift: Click on this button to replicate or duplicate a shift. Please note that you can only copy one shift at a time.
Copy Existing Shift: Click on this button to replicate or duplicate a shift. Please note that you can only copy one shift at a time.
Click ‘Cancel’ or ‘X’ to abort. Click ‘Copy’ to duplicate.
![]() Edit Existing Shift/Daily: It provides the option to select whether you want to edit the shift daily or edit a specific shift.
Edit Existing Shift/Daily: It provides the option to select whether you want to edit the shift daily or edit a specific shift.
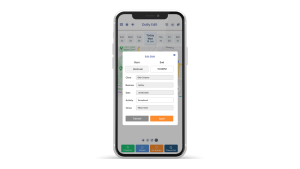
Edit Shift: Choosing this option will open a popup where you can edit the shift details.
Note: If the crew is already checked in, the Date, Start Time, Venue, Client, and Business fields become uneditable. Only the Time and Activity fields can be updated.
If the shift is locked, no fields can be edited.
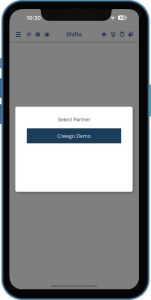
![]() Portal Icon: Clicking this icon allows you to select one or more partners and then access the Portal.
Portal Icon: Clicking this icon allows you to select one or more partners and then access the Portal.
Check In: This button allows the crew to check in for multiple shifts at once.
Breaks: Users are allowed to enter Start Break and End Break.
No Breaks: This option can only be selected if the crew member doesn’t take any breaks.
Check Out: This button allows the crew to check out for multiple shifts simultaneously.
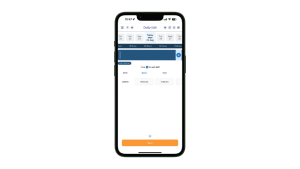
Shift Combos – User Guide
Shift Combos, a new feature meticulously designed to streamline your work experience, is here to save you valuable time during check-in and check-out shifts. Imagine, if two or more shifts fall within a specific time frame (currently set at 120 minutes), you will be automatically combined into a shift combo. This ingenious feature allows you to check in only once at the start of the first shift and check out only once at the end of the last shift, completely eliminating the need for multiple check-ins and check-outs. To enable this time-saving feature or modify the break length, please contact support@crewcard.co.
How to Enable
Go to the Profile page and under the Daily Page Jobs section, select the company name you need to activate
To access the Daily Page, navigate to the left-side menu and select the corresponding option.
Once on the page, you will find four small buttons at the bottom. The button on the right-hand side is called “Shift Combo”.
Once you click on Shift Combo, you will be directed to its page.
The i icon on the bottom allows you to see the text information. While if you click the arrow button below the i button, you will be directed back to the Daily Page.
As mentioned above, to have the shifts shown on Shift Combos, we must have at least two shifts with breaks of less than 120 minutes.
(Please note that shifts inside a shift combo cannot be checked in individually).
Five shifts are listed on the Daily Page, while only four are displayed on the Shift Combo page. This inconsistency arises because a new Shift Combo will not be created if there is only one shift with a gap of at least 120 minutes between its end time and the start time of the subsequent shift. There must be a minimum of two shifts with a gap of less than 120 minutes between the first shift’s end time and the second shift’s start time to generate a Shift Combo.


On the Shift Combos page, you will find three primary buttons: Check-In, Breaks, and Check Out. These buttons are your tools for managing your shifts within a Shift Combo.
Upon selecting ‘Check In,’ input the earliest start time of the shifts in the designated Shift Combo section (e.g. Shift Combo 1).
By clicking ‘Breaks,’ users can input their breaks’ start and end times.
To use ‘Check Out,’ click and input the latest end time of the shifts in the specified Shift Combo section (e.g., Shift Combo 1).
When you tap On Call / Off Call menu, you will be redirected to the Crew Portal where you can set your status.
The On/Off Call Status page allows crew members to receive job offers based on their current location, temporarily overriding any set unavailability or preferred work areas.

How to Use the On Call Status:


When the on-call status is active, you will receive job offers in your vicinity until you turn it off, making it easy to pick up work based on your real-time location.

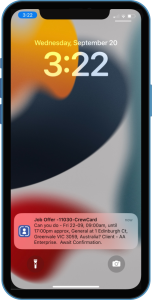
Job Offers page, shows all job offers sent to you.
A push notification will also pop up, tap the notification on the app.
A pop up will be asking you if you want to accept a new job.

In the Job offer page, the Offer History button is also available. When the button is tapped you will be directed to the Offer History Page. Note that Job offer dates are sorted by the date the offer was created.


Available Jobs/ Shifts
In order to view Available Jobs/ Shifts, login to the CrewCard app and select the hamburger icon in the top left corner. Once the pop out menu appears, select ‘Job Offers’. This will present the available shifts.
Crew will be able to easily determine whether the shift was a shift offer or an available shift. It will say Available Job at (Date Shift Created) at the bottom right corner of the Job Card.
The job offer, job details and history of acceptance will then appear in ‘Offer History’, located beneath ‘Job Offers’ in the pop out menu.
The shift will reflect in the ‘Shifts’ page if accepted.
Clients can Select their own Crew
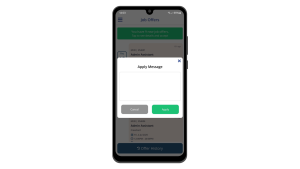
When the crew receives the job offer through the Crewcard app, they will see an APPLY button instead of an Accept Job button. By tapping the APPLY button, they will be directed to the Apply Message window where they can enter a message to express their interest in the job and submit their application.
Open the Crewcard app and navigate to the Job Offer page. Look through the job offers listed on the page and select the one you want to apply for.
Tap on the offer to open it and read through the job details carefully to make sure you meet all the requirements. If you’re interested in the job and meet the requirements, tap the APPLY button to be directed to the Apply Message window.
Write a message expressing your interest in the job and highlighting your relevant skills and experience. Submit your application by tapping the submit button or sending the message.
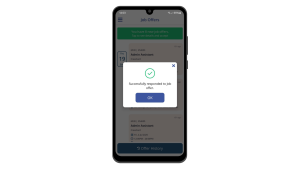
Tap ok button to confirm that you have successfully responded to the job offer.
In this page, Crew will be permitted to view their offer history. Crew can view the following details:
The existing logic for the Offer History page functions as described below:
Accepted Job offer
Another crew is Accepted the shift

In the Job offer page, the Offer History button is also available. When the button is tapped you will be directed to the Offer History Page.
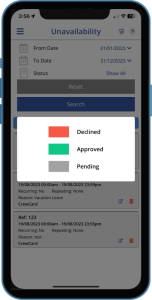
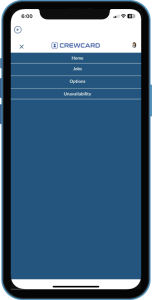
In the Unavailability Page it allows you to enter and update the Unavailability as a Crew Member for certain time slots, so that they appear with a hash symbol (#) next to their name in the Crew List for jobs that are due to occur in that time slot.
To access the unavailability, Login to CrewCard App.
Tap the menu and select Unavailability.
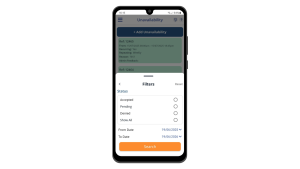
In the Unavailability page, tap the filter icon to filter your searches.

Tap the info icon to check the color information in the unavailability page.
To add unavailability, tap + Add Unavailability button.


Company: Select the company you’re working with on the company drop down list.
Select Start Date and Start Time. Select End date and End time.
If you require or you will be unavailable for the whole day, simply tick the checkbox for Unavailable All Day.
In the repeat section, select if your unavailability is repetitive or not. You may select none, daily or weekly.
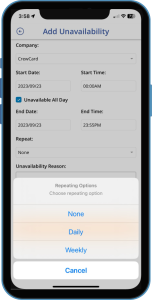
Lastly is the reason section, enter the reason for your unavailability.
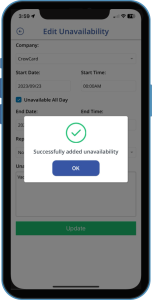
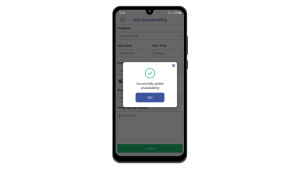
Once done, tap save button and click Ok.
To edit the unavailability simply tap the edit icon alternatively you can tap delete to delete the unavailability.
You may edit the date, time, repeat and reason for unavailability.
Once done click update and click ok button.
In the Unavailability Page it allows you to enter and update the Unavailability as a Crew Member for certain time slots, so that they appear with a hash symbol (#) next to their name in the Crew List for jobs that are due to occur in that time slot.
To access the unavailability, Login to CrewCard App.
Tap the menu and select Unavailability.
In the Unavailability page, tap the filter icon to filter your searches.
To add unavailability, tap + Add Unavailability button.
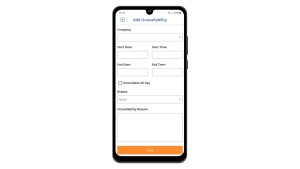
Select the company you’re working with on the company drop down list.
Select Start Date and Start Time. Select End date and End time
If you require or you will be unavailable for the whole day, simply tick the checkbox for Unavailable All Day.
In the repeat section, select if your unavailability is repetitive or not. You may select none, daily or weekly.
Lastly is the reason section, enter the reason for your unavailability.
Once done, tap save button and tap Ok.
To edit the unavailability simply tap the edit icon.
You may edit the date, time, repeat and reason for unavailability.
Once done tap update and tap ok button.
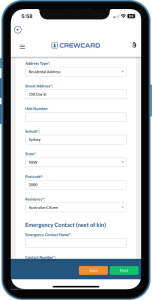
Tap Profile in the side menu to direct you to Profile page.
Once on your Profile Page, you may access the following Information:
ICAL Feature
The ICAL Features allows you to download and add their scheduled shift directly to their calendar app on their phone.
How to Use: Simply tap on the ICAL option, and it will generate a file containing the shift events, which can then be imported into your calendar app.

*Supported Apps: This feature is compatible with most calendar applications, including Google Calendar, Apple Calendar, and Outlook, allowing for seamless integration with your existing scheduling tools.
Please refer 2.2 for information about Editing your CrewCard profile.
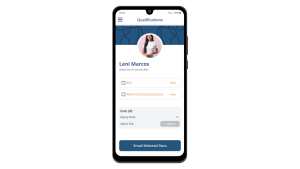
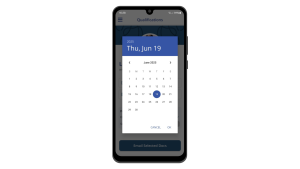
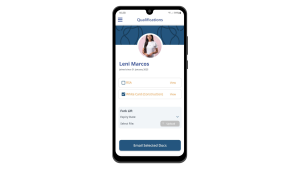
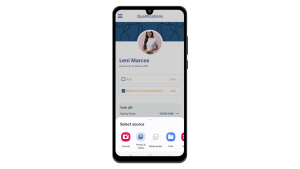
On the Main Menu please tap Qualifications.

Once on the Qualifications page, it will show the status of the different documents required.

For uploaded and approved documents you may do the following:


For documents that aren’t uploaded yet, you can upload those through the app please follow the instructions below:


On the Main Menu please tap Qualifications.
Once on the Qualifications page, it will show the status of the different documents required.
For uploaded and approved documents you may do the following:
For documents that aren’t uploaded yet, you can upload those through the app please follow the instructions below:
The Resource feature allows crew members to view company policies directly within the Crew App, in addition to the existing access through the Crew Portal.
When enabled:
A Resources menu will appear in the app navigation.
Crew members can access company policies and other resources, just like in the Crew Portal.
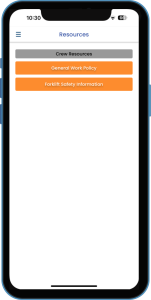
To enable this feature, please contact support@crewcard.co.
Note: This setting ensures company resources are easily accessible from both the Crew Portal and the Crew App.
Click on Portal on the Menu.
It will take you to the calendar, click a job.
A push notification is a brief, instant message sent from a server, application, or website to a user’s mobile device or other digital device. These notifications are “pushed” to the user’s device in real-time, regardless of whether they are actively using the associated app. Push notifications are commonly used to deliver timely information, alerts, updates, or messages to users, keeping them informed and engaged with digital platforms and services. Users can typically customise their notification settings to control which types of notifications they receive and how they are displayed or delivered.
In your phone’s settings, activate notifications for the app so that you stay informed about job offers and receive job reminders without missing any.
See below samples of the Push Notifications:


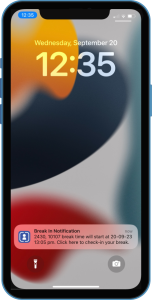


To enable or customise your Push Notifications in CrewCard App, Please contact us at support@personnelmanager.com.au.
To access support via the CrewCard App, tap Support in the side menu. This will take you to the dedicated support page where you can find help and request assistance.
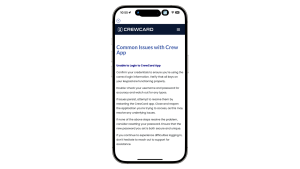
At the top of the support page, you’ll see a hyperlink named “information” Tapping on this will lead you to a collection of commonly asked questions and help articles, allowing you to troubleshoot and resolve common issues on your own.
If you need further assistance, you can submit a support request directly from the app. Simply fill out the short form with details about the issue you’re experiencing.
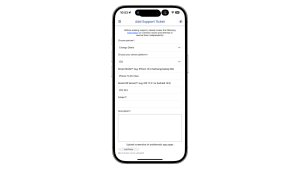
When submitting the request, you’ll be prompted to choose your partner from a dropdown menu. After that, select your device, which will also display a dropdown. Your device model and OS version will automatically be pre-filled; however, these fields remain editable in case any adjustments are needed.
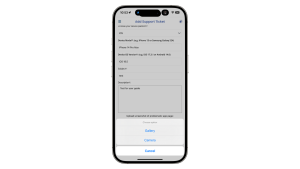
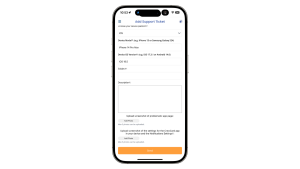
You’ll also be asked to upload a screenshot of your CrewCard app settings from your device’s system settings. This step is essential, as it allows us to determine whether the issue is caused by device settings or if it’s something we need to resolve on our end.

Once you’ve completed all the fields and uploaded the required screenshots, press Send. A confirmation popup will appear containing our contact details and a message confirming that your request has been submitted.
If you have any urgent questions or cannot access the app, you can always reach us at support@crewcard.co or visit www.crewcard.co. We’re here to help.