In any organisation, effective delegation and access control are essential for streamlined operations and efficient management. For many businesses, assigning a crew as a Superuser in admin settings is a powerful way to empower trusted individuals or teams with additional responsibilities and privileges within a system or platform. In this blog, we’ll walk you through the process of assigning a crew as a Superuser in admin settings, highlighting the benefits and best practices for doing so.
What is a Superuser?
Before we delve into the “how,” let’s clarify what a Superuser is and why it’s important:
A Superuser is a term often used in the context of software or systems administration. It refers to a user with elevated privileges and access rights that enable them to perform critical tasks, make system-wide changes, and assist in troubleshooting. Superusers are trusted individuals who play a key role in ensuring the smooth operation of a system.
Benefits of Assigning a Crew as Superuser
Assigning a crew as Superuser in your admin settings can bring several advantages to your organisation:
Enhanced Efficiency: Superusers can perform tasks and resolve issues quickly, reducing downtime and improving operational efficiency.
Delegated Responsibility: Distributing administrative tasks among a crew frees up time for other team members and allows for a more balanced workload.
Expertise Utilization: Superusers often possess in-depth knowledge of your systems or processes, enabling them to provide valuable insights and solutions.
Adaptability: Superusers can adapt to changing circumstances, such as handling unexpected issues or training new team members.
How to Assign a Crew as Superuser in Admin Settings
Step 1: Access Admin Settings
Navigate to Admin Settings: Once you’re logged in, navigate to the admin settings section. This is usually found in the main menu or sidebar of your admin dashboard.
Step 2: Select the Superuser Option
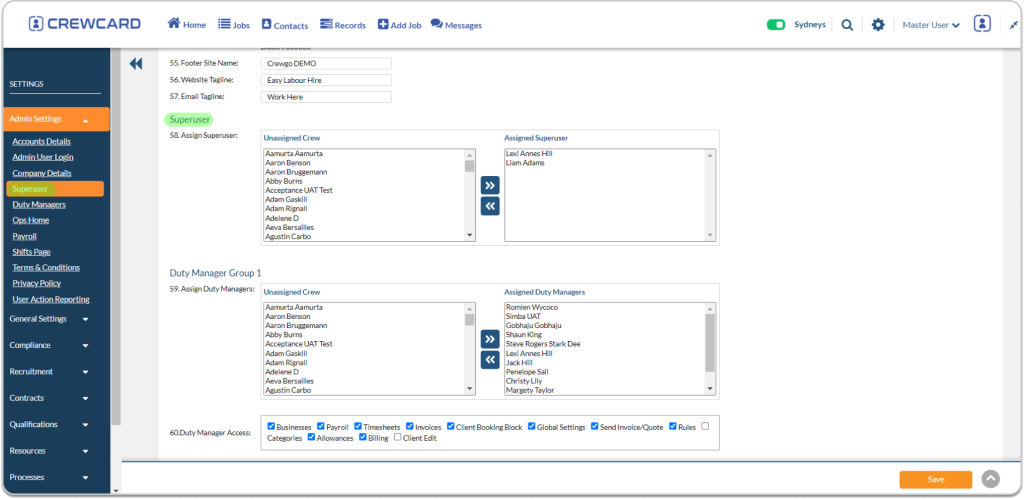
Find “Superuser” in the Menu: Within the admin settings, look for the “Superuser” option
Step 3: Assign Crew as Superuser
In the Superuser settings, you’ll typically see a list of crew members who can be assigned Superuser status. Locate the crew or individual(s) you wish to grant Superuser access.
Move Crew to “Assigned Super”: To assign Superuser status to a crew, click on the crew’s name and then use the right arrow (>) or a similar symbol to move the crew name from the unassigned list to the “Assigned Super” list. This action designates them as Superusers.
Step 4: Save Changes
Once you’ve assigned the crew as Superusers, don’t forget to save your changes. Look for a “Save” button on the lower right of the settings page, and click it to confirm your selections.
Step 5: Verify and Test
Verify Superuser Access: After saving, it’s essential to verify that the crew members you assigned as Superusers now have the appropriate access and privileges. Test their access to ensure everything is working as intended.